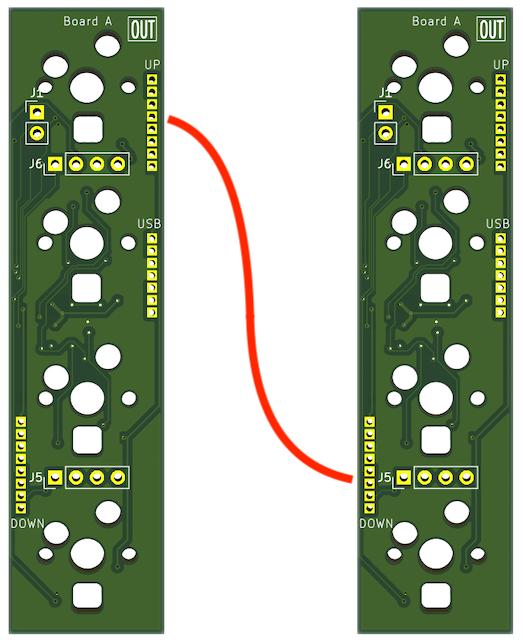
What is with all the wasted space on keyboards? There’s a whole back side just sitting there doing nothing. But how can you use the back at the same time as the front?
All the board sandwiches must be wired together like this, natch.
Just when we think Google Japan can’t possibly produce another weird, amazing keyboard that actually works and comes with full documentation, they go and outdo themselves with this ortholinear Mobius thing that wastes (almost) no space. (Japanese, translated) Be sure to check out the video after the break where hilarity ensues.
This crazy thing is made up of 26 modules, each with 8 key switches, four on a side. Do the math — that’s a total of 208 keys! More than enough to stretch out around the table and do some group programming without rubbing elbows. All the switches are hot-swappable, and there’s even RGB backlighting. The controller here is the STM32F042F4P6.
So what are all the extra keys for? Well, the keyboard is half in Japanese and half QWERTY, and has a set of emoji keys as well for the full programming experience. You can also make a paper version if you want to test out the topology.
Be sure to check out the documentation, because it’s pretty interesting how this keyboard is put together. And no, we’re not sure how to set it down and use it without accidental key presses. Suppose that’s part of the charm?
Today, you likely often authenticate or pay for things with a tap, either using a chip in your card, or with your phone, or maybe even with your watch or a Yubikey. Now, imagine doing all these things way back in 1998 with a single wearable device that you could shower or swim with. Sound crazy?
These types of transactions and authentications were more than possible then. In fact, the Java ring and its iButton brethren were poised to take over all kinds of informational handshakes, from unlocking doors and computers to paying for things, sharing medical records, making coffee according to preference, and much more. So, what happened?
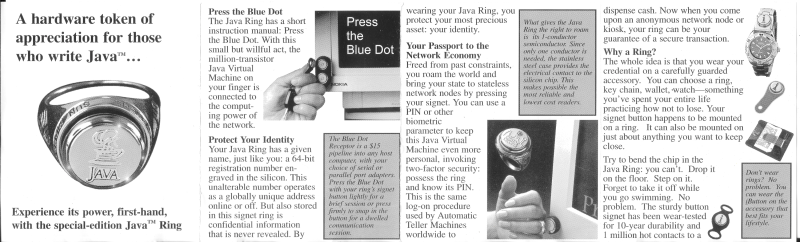
Just Press the Blue Dot
Perhaps the most late-nineties piece of tech jewelry ever produced, the Java Ring is a wearable computer. It contains a tiny microprocessor with a million transistors that has a built-in Java Virtual Machine (JVM), non-volatile storage, and an serial interface for data transfer.
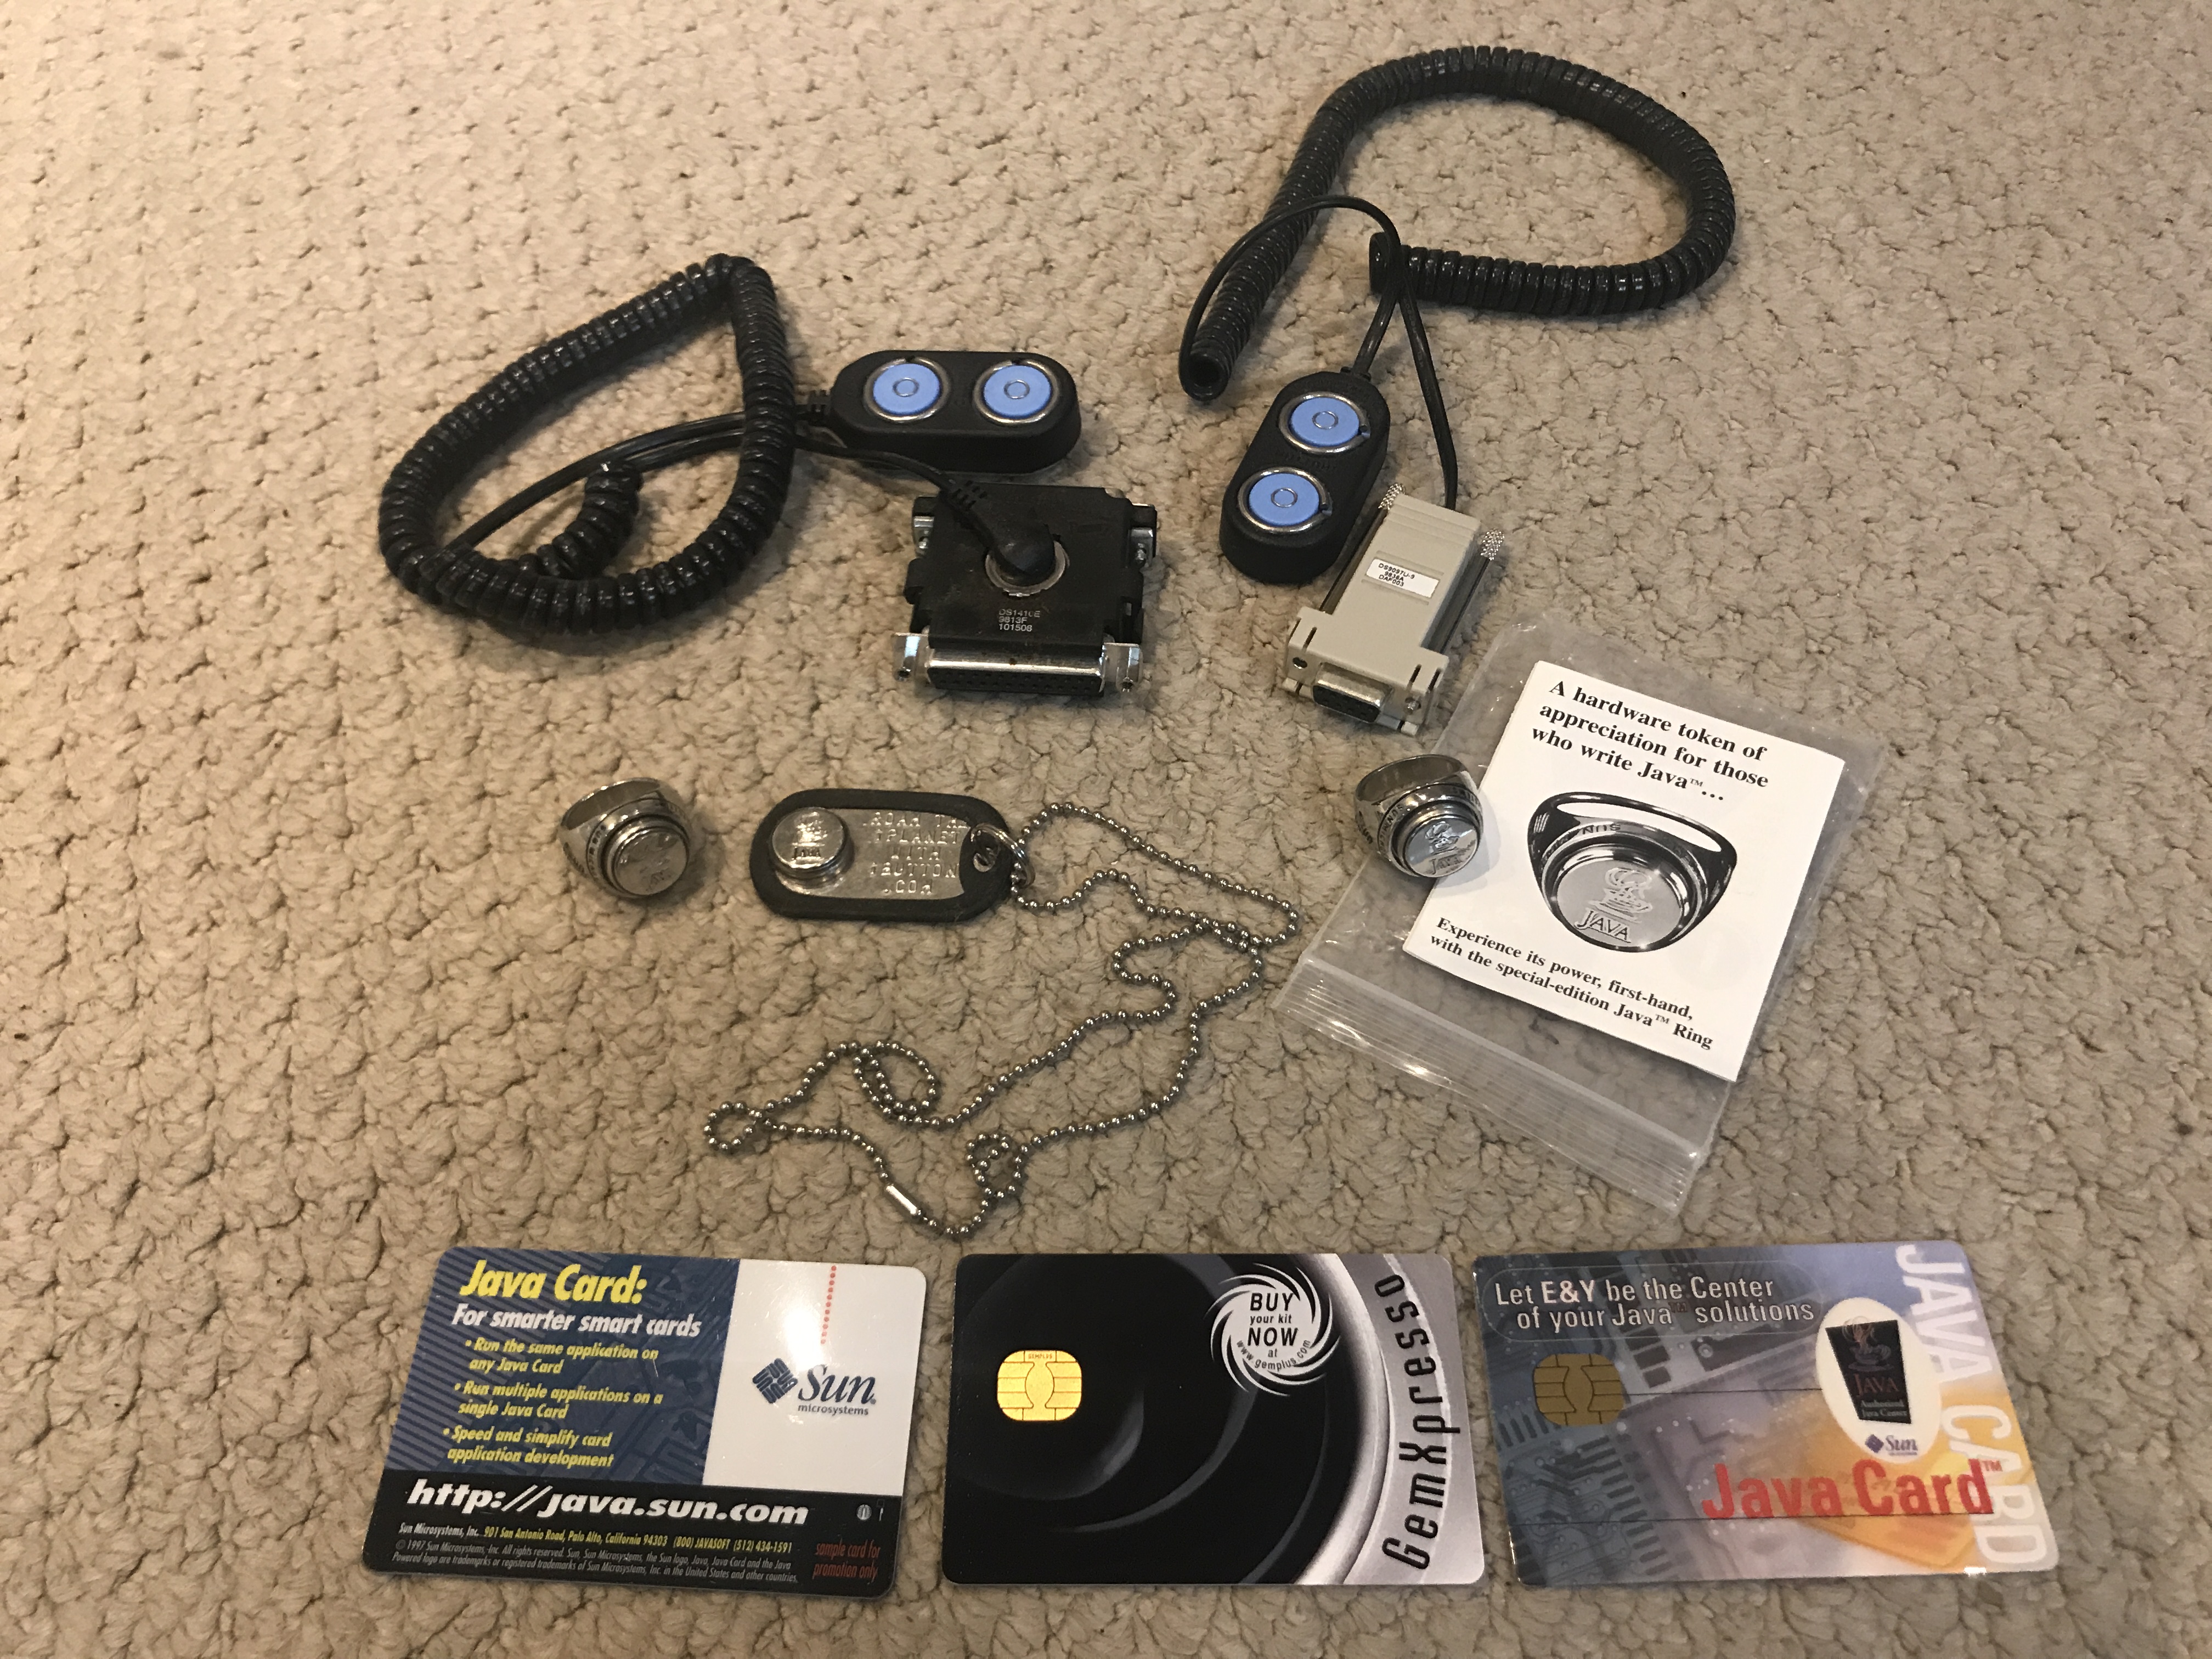
A family of Java iButton devices and smart cards, including the Java Ring, a Java dog tag, and two Blue Dot readers. Image by [youbitbrain] via redditTechnically speaking, this thing has 6 Kb of NVRAM expandable to 128 Kb, and up to 64 Kb of ROM (PDF). It runs the Java Card 2.0 standard, which is discussed in the article linked above.
While it might be the coolest piece in the catalog, the Java ring was just one of many ways to get your iButton. But wait, what is this iButton I keep talking about?
For $15 in 1998 money, you could get a Blue Dot receptor to go with it for sexy hardware two-factor authentication into your computer via serial or parallel port. Using an iButton was as easy as pressing the ring (or what have you) up against the Blue Dot.
Indestructible Inside and Out, Except for When You Need It
It’s a hefty secret decoder ring, that’s for sure.
Made of of stainless steel and waterproof grommets, this thing is built to be indestructible. The batteries were rated for a ten-year life, and the ring itself for one million hot contacts with Blue Dot receptors.
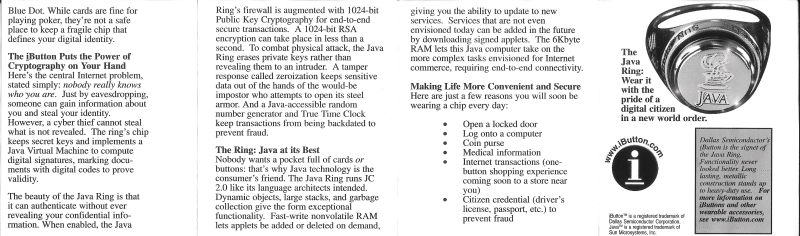
This thing has several types of encryption going for it, including 1024-bit RSA public-key encryption, which acts like a PGP key. There’s a random number generator and a real-time clock to disallow backdating transactions. And the processor is driven by an unstabilized ring oscillator, so it constantly varies its clock speed between 10 and 20 MHz. This way, the speed can’t be detected externally.
But probably the coolest part is that the embedded RAM is tamper-proof. If tampered with, the RAM undergoes a process called rapid zeroization that erases everything. Of course, while Java Rings and other iButton devices maybe be internally and externally tamper-proof, they can be lost or stolen quite easily. This is part of why the iButton came in many form factors, from key chains and necklaces to rings and watch add-ons. You can see some in the brochure below that came with the ring:
The Part You’ve Been Waiting For
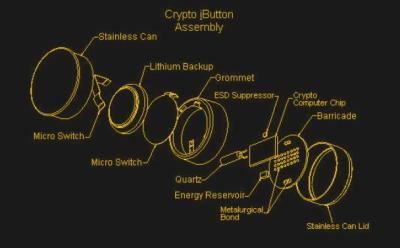
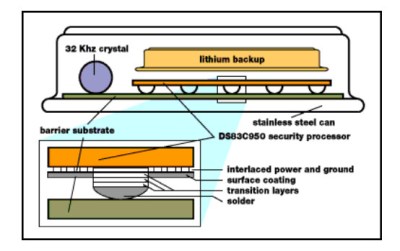
I seriously doubt I can get into this thing without totally destroying it, so these exploded views will have to do. Note the ESD suppressor.
So, What Happened?
I surmise that the demise of the Java Ring and other iButton devices has to do with barriers to entry for businesses — even though receptors may have been $15 each, it simply cost too much to adopt the technology. And although it was stylish to Java all the things at the time, well, you can see how that turned out.
For this contest, we’re asking you to come up with the best SAO you can think of that does something cool. What could be cooler than sharing your contact information all over Supercon and beyond with a tap of a Jolly Wrencher? It’s way better than just some sticker, and with the extra solder pad on the back, you can turn it into a pin once the con is over. Contact data can be uploaded over I²C.
The KiCad-generated coil.
Here, [Phil Weasel] seeks to answer the question of whether one can make a working NFC tag with the M24LR04E IC, using a PCB trace as a coil. If there is an issue, it’s probably going to be that copper plane inside the antenna.
Designing the antenna itself proved fairly easy after checking the datasheet for the internal tuning capacitance (~27.5 pF), verifying the frequency of NFC (~13.56 MHz), and doing the math to find the inductance needed. After confirming everything in LTSpice, [Phil] used a PCB coil calculator and let the KiCad coil generator draw it out.
Did we mention the Jolly Wrencher is backlit by four side-mounted LEDs? Because what’s an SAO without a few blinkenlights?
They say you can buy anything on the Internet if you know the right places to go, and apparently if you’re in the mood to make diamonds, then Alibaba is the spot. You even have your choice of high-pressure, high-temperature (HPHT) machine for $200,000, or a chemical vapor deposition (CVD) version, which costs more than twice as much. Here’s a bit more about how each process works.
Of course, you’ll need way more than just the machine and a power outlet. Additional resources are a must, and some expertise would go a long way. Even so, you end up with raw diamonds that need to be processed in order to become gems or industrial components.
For HPHT, you’d also need a bunch of good graphite, catalysts such as iron and cobalt, and precise control systems for temperature and pressure, none of which are included as a kit with the machine.
For CVD, you’d need methane and hydrogen gases, and precise control of microwaves or hot filaments. In either case, you’re not getting anywhere without diamond seed crystals.
Right now, the idea of Joe Hacker making diamonds in his garage seems about as far off as home 3D printing did in about 1985. But we got there, didn’t we? Hey, it’s a thought.
It takes but an ill-fated second to break a bone, and several long weeks for it to heal in a cast. And even if you have one of those newfangled fiberglass casts, you still can’t get the thing wet, and it’s gonna be itchy under there because your skin can’t breathe. Isn’t it high time for something better?
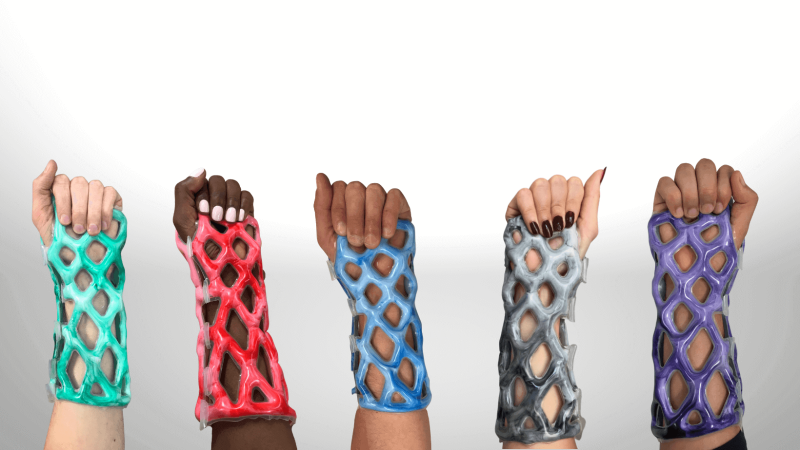
Enter Cast21, co-founded by Chief Technical Officer [Jason Troutner], who has been in casts more than 50 times due to sports injuries and surgeries. He teamed up with a biomedical design engineer and an electrical engineer to break the norms associated with traditional casts and design a new solution that addresses their drawbacks.
So, how does it work already? The latticework cast is made from a network of silicone tubes that harden once injected with resin and a catalyst mixture. It takes ten seconds to fill the latticework with resin and three minutes for it to cure, and the whole process is much faster than plaster or fiberglass.
This new cast can be used along with electrical stimulation therapy, which can reduce healing time and prevent muscle atrophy.
Cast21 is not only breathable, it’s also waterproof, meaning no more trash bags on your arm to take a shower. The doctor doesn’t even need a saw to remove it, just cut in two places along the seam. It can even be used as a splint afterward.
When you work with tiny things on the regular, they start to seem normal-sized to your hands and eyes. Then, if you work with even smaller packages, stuff like 0603 might as well be through-hole components.
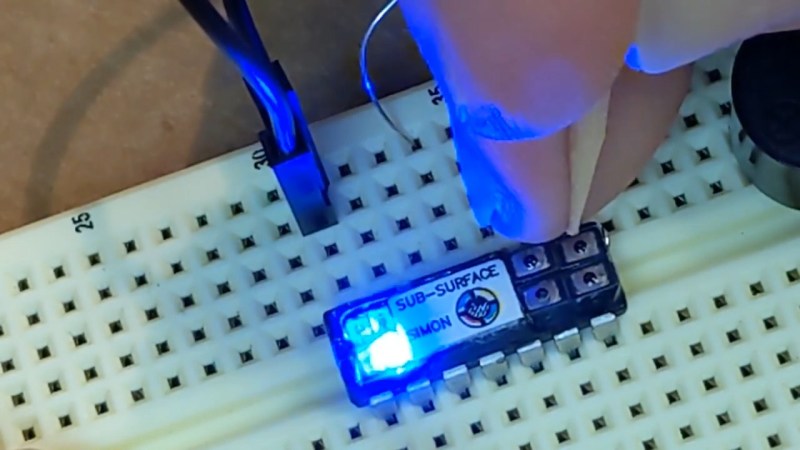
[alnwlsn] is no stranger to the small, having worked almost exclusively with surface mount components for a few years now. Even so, they’ve built up an admirable stock of DIP chips, including the ATtiny84 DIP-14 that their incredible Simon game is built into.
How in the world did [alnwlsn] accomplish this? As you’ll see in the video after the break, the answer lies in milling, but with the motors disconnected and manually turning the knobs.
Soldering didn’t require anything special, just the usual suspects like a fine-tipped iron, an X-acto knife, some tweezers, and a few other things like a hot air gun for soldering fine wires to the leadframe. Oh, and of course, really steady hands, and lots of patience.
The 2024 Tiny Games Contest officially closed on Tuesday, September 10th. We’ll have the results out as soon as possible. Best of luck to all who entered!
They don’t call slot machines one-armed bandits for nothing. And although it’s getting harder and harder to find slot machines with actual pull-able handles instead of just big buttons, you can easily simulate the handle at home with the right kind of limit switch, as [Andrew Smith] did with this micro slot machine.
This baby slot machine is built around the Adafruit 5×5 NeoPixel grid, which is an add-on for the QT Py. As you’ll see in the brief demo video after the break, the switch actuates on release, which starts the lights a-spinning. [Andrew] says the constraints of the SAMD21-powered QT Py made this a particularly fun challenge.
Whereas most physical slot machines have different reel sequences, this build uses just one. [Andrew] declared hex values to ID each color, and then created the reel manually with different color frequencies. When the lever is released, the columns are animated and slowly to come to rest at a random offset. You can check out the code on GitHub.
One way to keep things tiny is to make a system with cartridges where the brain lives on each cartridge instead of the platform itself. [Michael]’s Epic Minimalist Entertainment System (EMES) is one of those, and boy, is it tiny. EMES makes use of the ATtiny10, and they don’t get much AT-tinier than that.
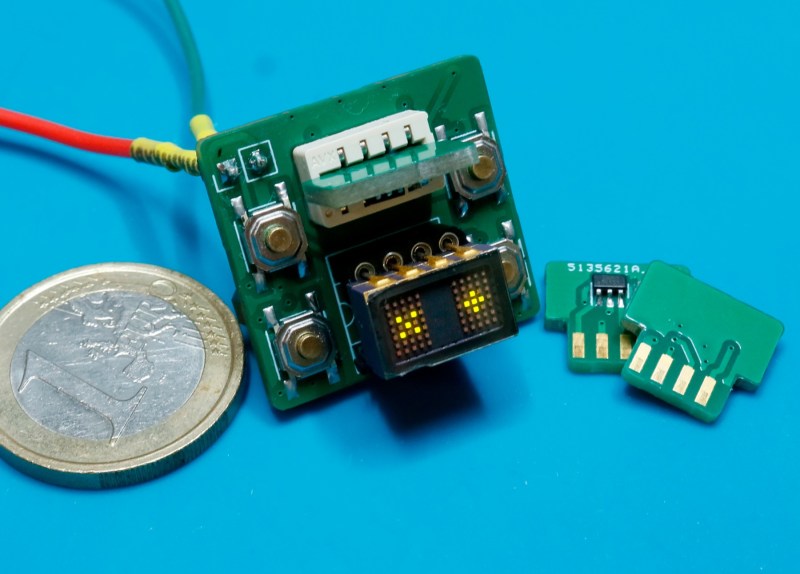
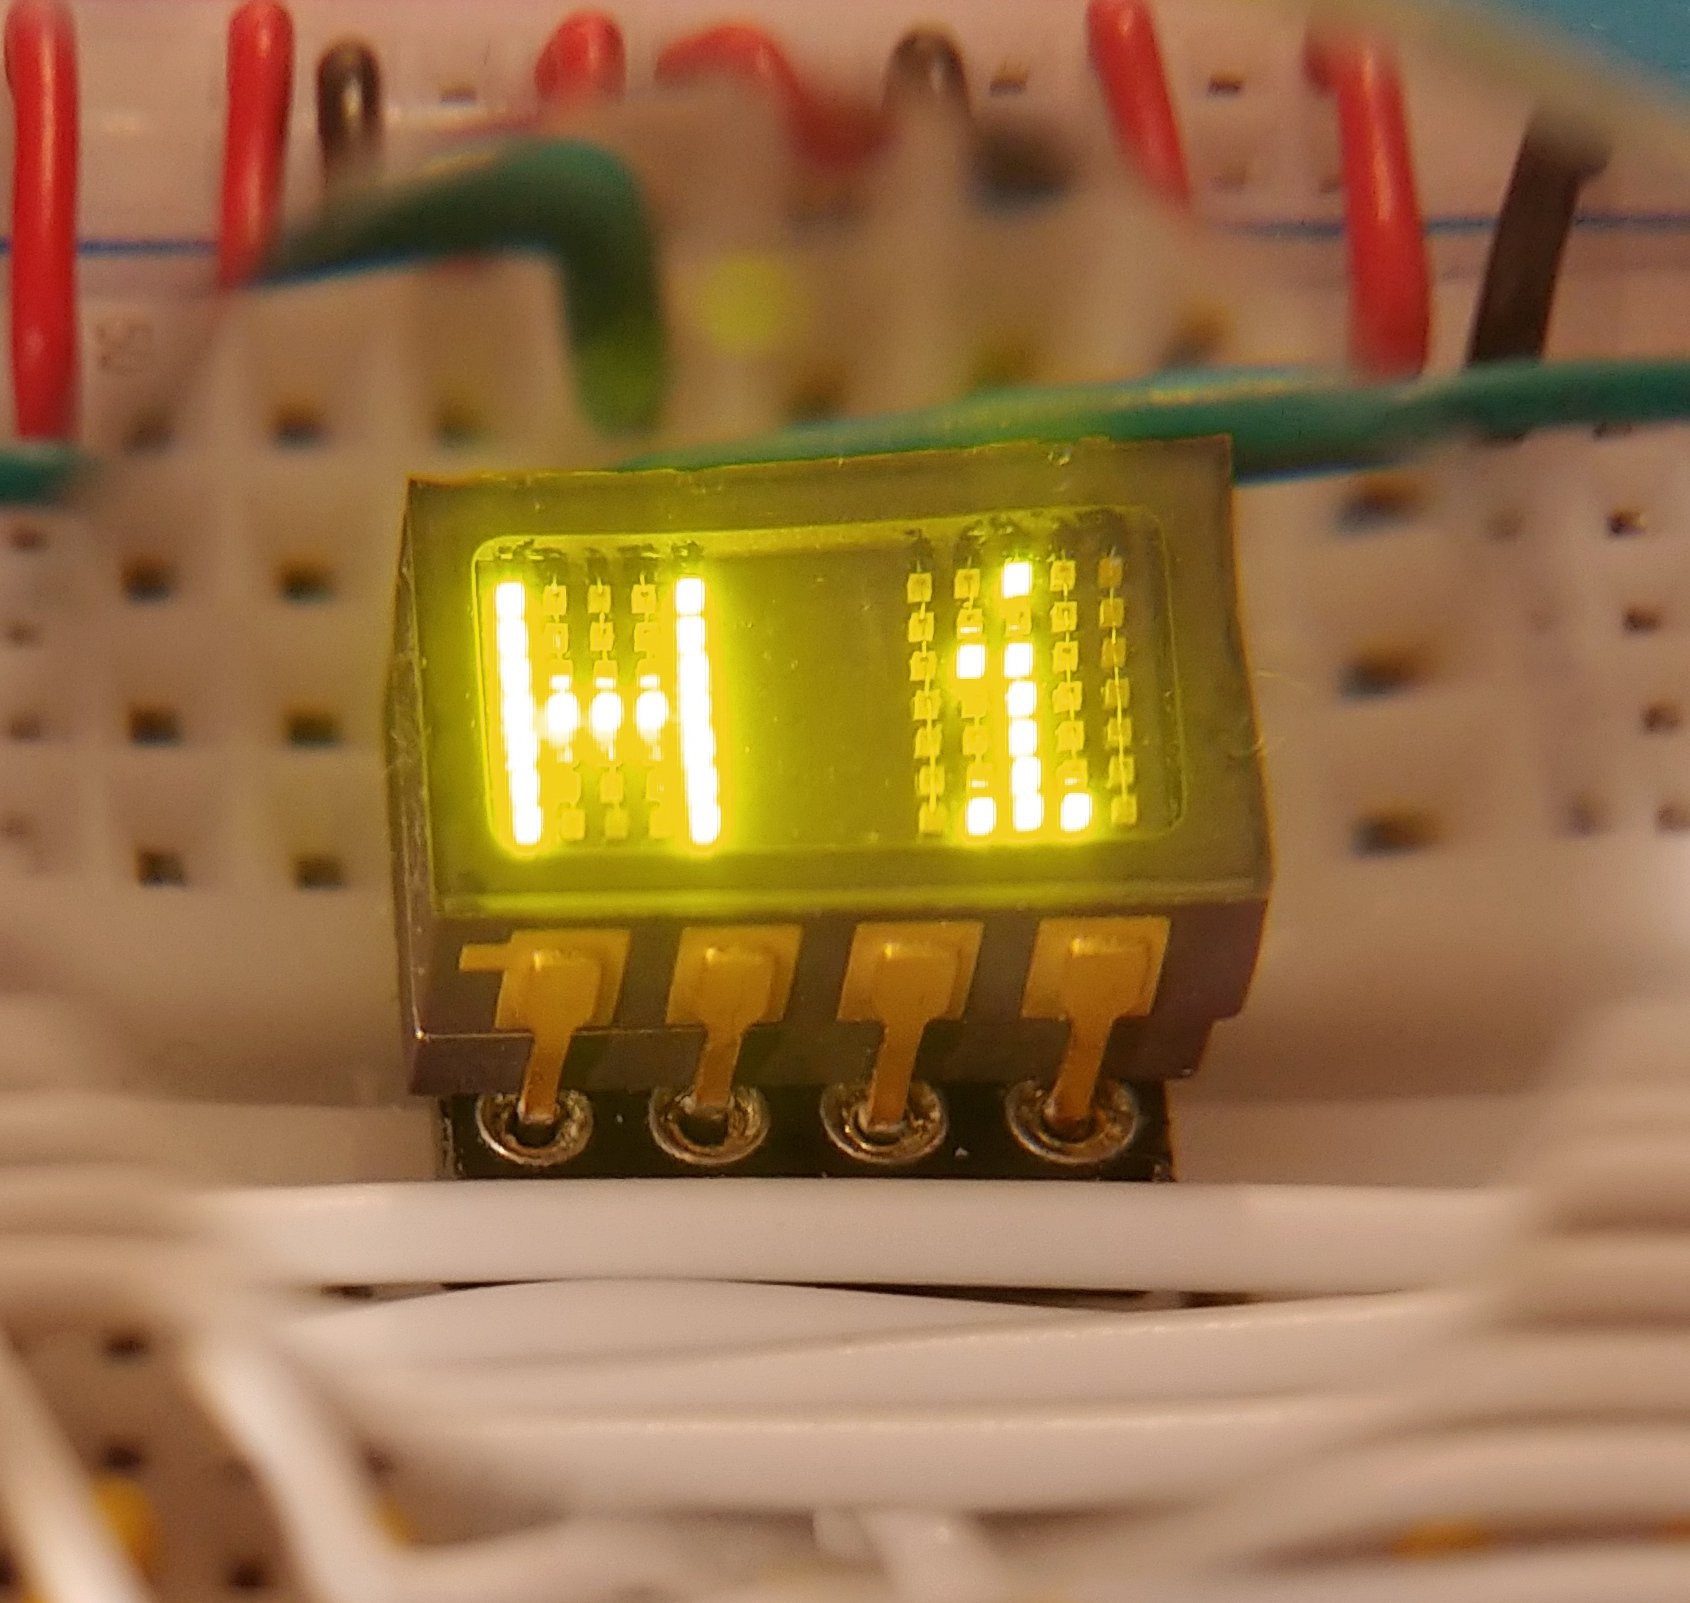
This nearly microscopic console uses an equally Lilliputian display — a Plessey GPD340 vintage LED display, in fact. (Check out [Michael]’s reverse engineering project if you want to play around with these.) There are four ultra-small buttons for control and a buzzer for sound.
Now, the ATtiny10 is an 8Mhz microcontroller with 1KB of flash and 32 bytes of RAM. It has an 8-bit ADC and a somewhat surprisingly high four GPIO pins. But of course, that’s not enough. Not with the display, the four buttons, and the buzzer, so [Michael] had to come up with a way to multiplex everything to four GPIOs.
PB0 is shared between the buttons and the display’s serial data input. PB1 cleverly outputs the same PWM for both the brightness control and the buzzer. When the buzzer is needed, [Michael]’s code switches to a lower frequency and adjusts the duty cycle of the display to keep it readable. PB2 and 3 are serial clock inputs for the two display halves. Be sure to check it out the heated PONG action in the video after the break!
Look, if something happened to you every three weeks or so to basically turn you into a different person and factored heavily into whether any new humans were created, you’d probably want to keep abreast of the schedule, yeah? Yeah. So, while there are, of course, a ton of ways to do this with your phone, most of those apps do gross things with your data. Are you angry yet?
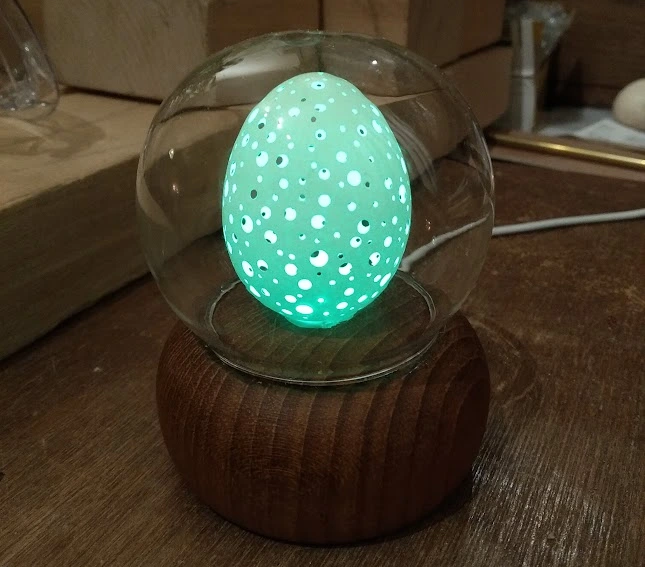
The coolest part is that this is an actual egg from one of [Jakoba]’s backyard chickens. No. The coolest part is how she was able to make so many holes without breaking it. (It took four tries.)
After bleaching the insides, the egg was ready to glow. As [Jakoba] says, the guts are simple — just a Wemos D1 Mini ESP8266, a WS2812 LED, and a heatsink. The enclosure consists of an inverted peanut bowl with a glass ornament hot-glued in place.
Once it was put together, all she had to do was add it in Home Assistant and use the current calendar state to trigger services from the YAML configuration.
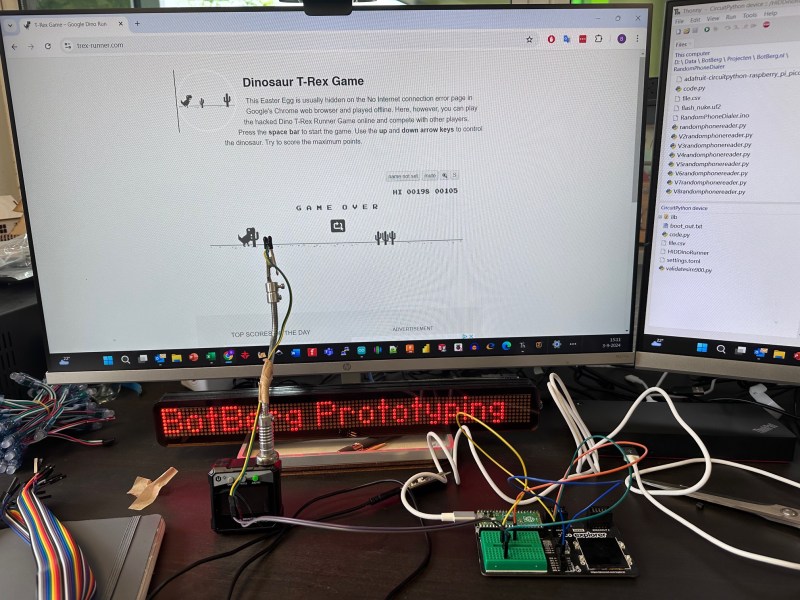
By now, probably everyone is familiar with the “You’re Offline” dinosaur that stars in Google’s T. Rex game. You know — jump cacti, avoid pterodactyls. Repeat until you lose, or, we suppose, make the leaderboard. Well, what if you theoretically couldn’t lose? That’s kind of the idea behind [Bas BotBerg]’s cactus detection-and-avoidance scheme (translated from Dutch).
Like many of us, [Bas] firmly believes that repetitive tasks should be automated, and that includes the controls of the famous T. Rex. Since the cacti are always dark gray and appear along the same plane, it’s easy to register the difference between cacti and screen electronically. In order to accomplish this, [Bas] is using a light-dependent resistor and a pull-up resistor to create a resistance bridge, which is then connected to an analog input pin on a Raspberry Pi Pico.
But [Bas] didn’t do this just to cheat at Offline Dinosaur. Really! It’s for educational purposes, to get people comfortable with embedded processing, sensors, and interfaces between different devices. Check it out in brief action after the break.
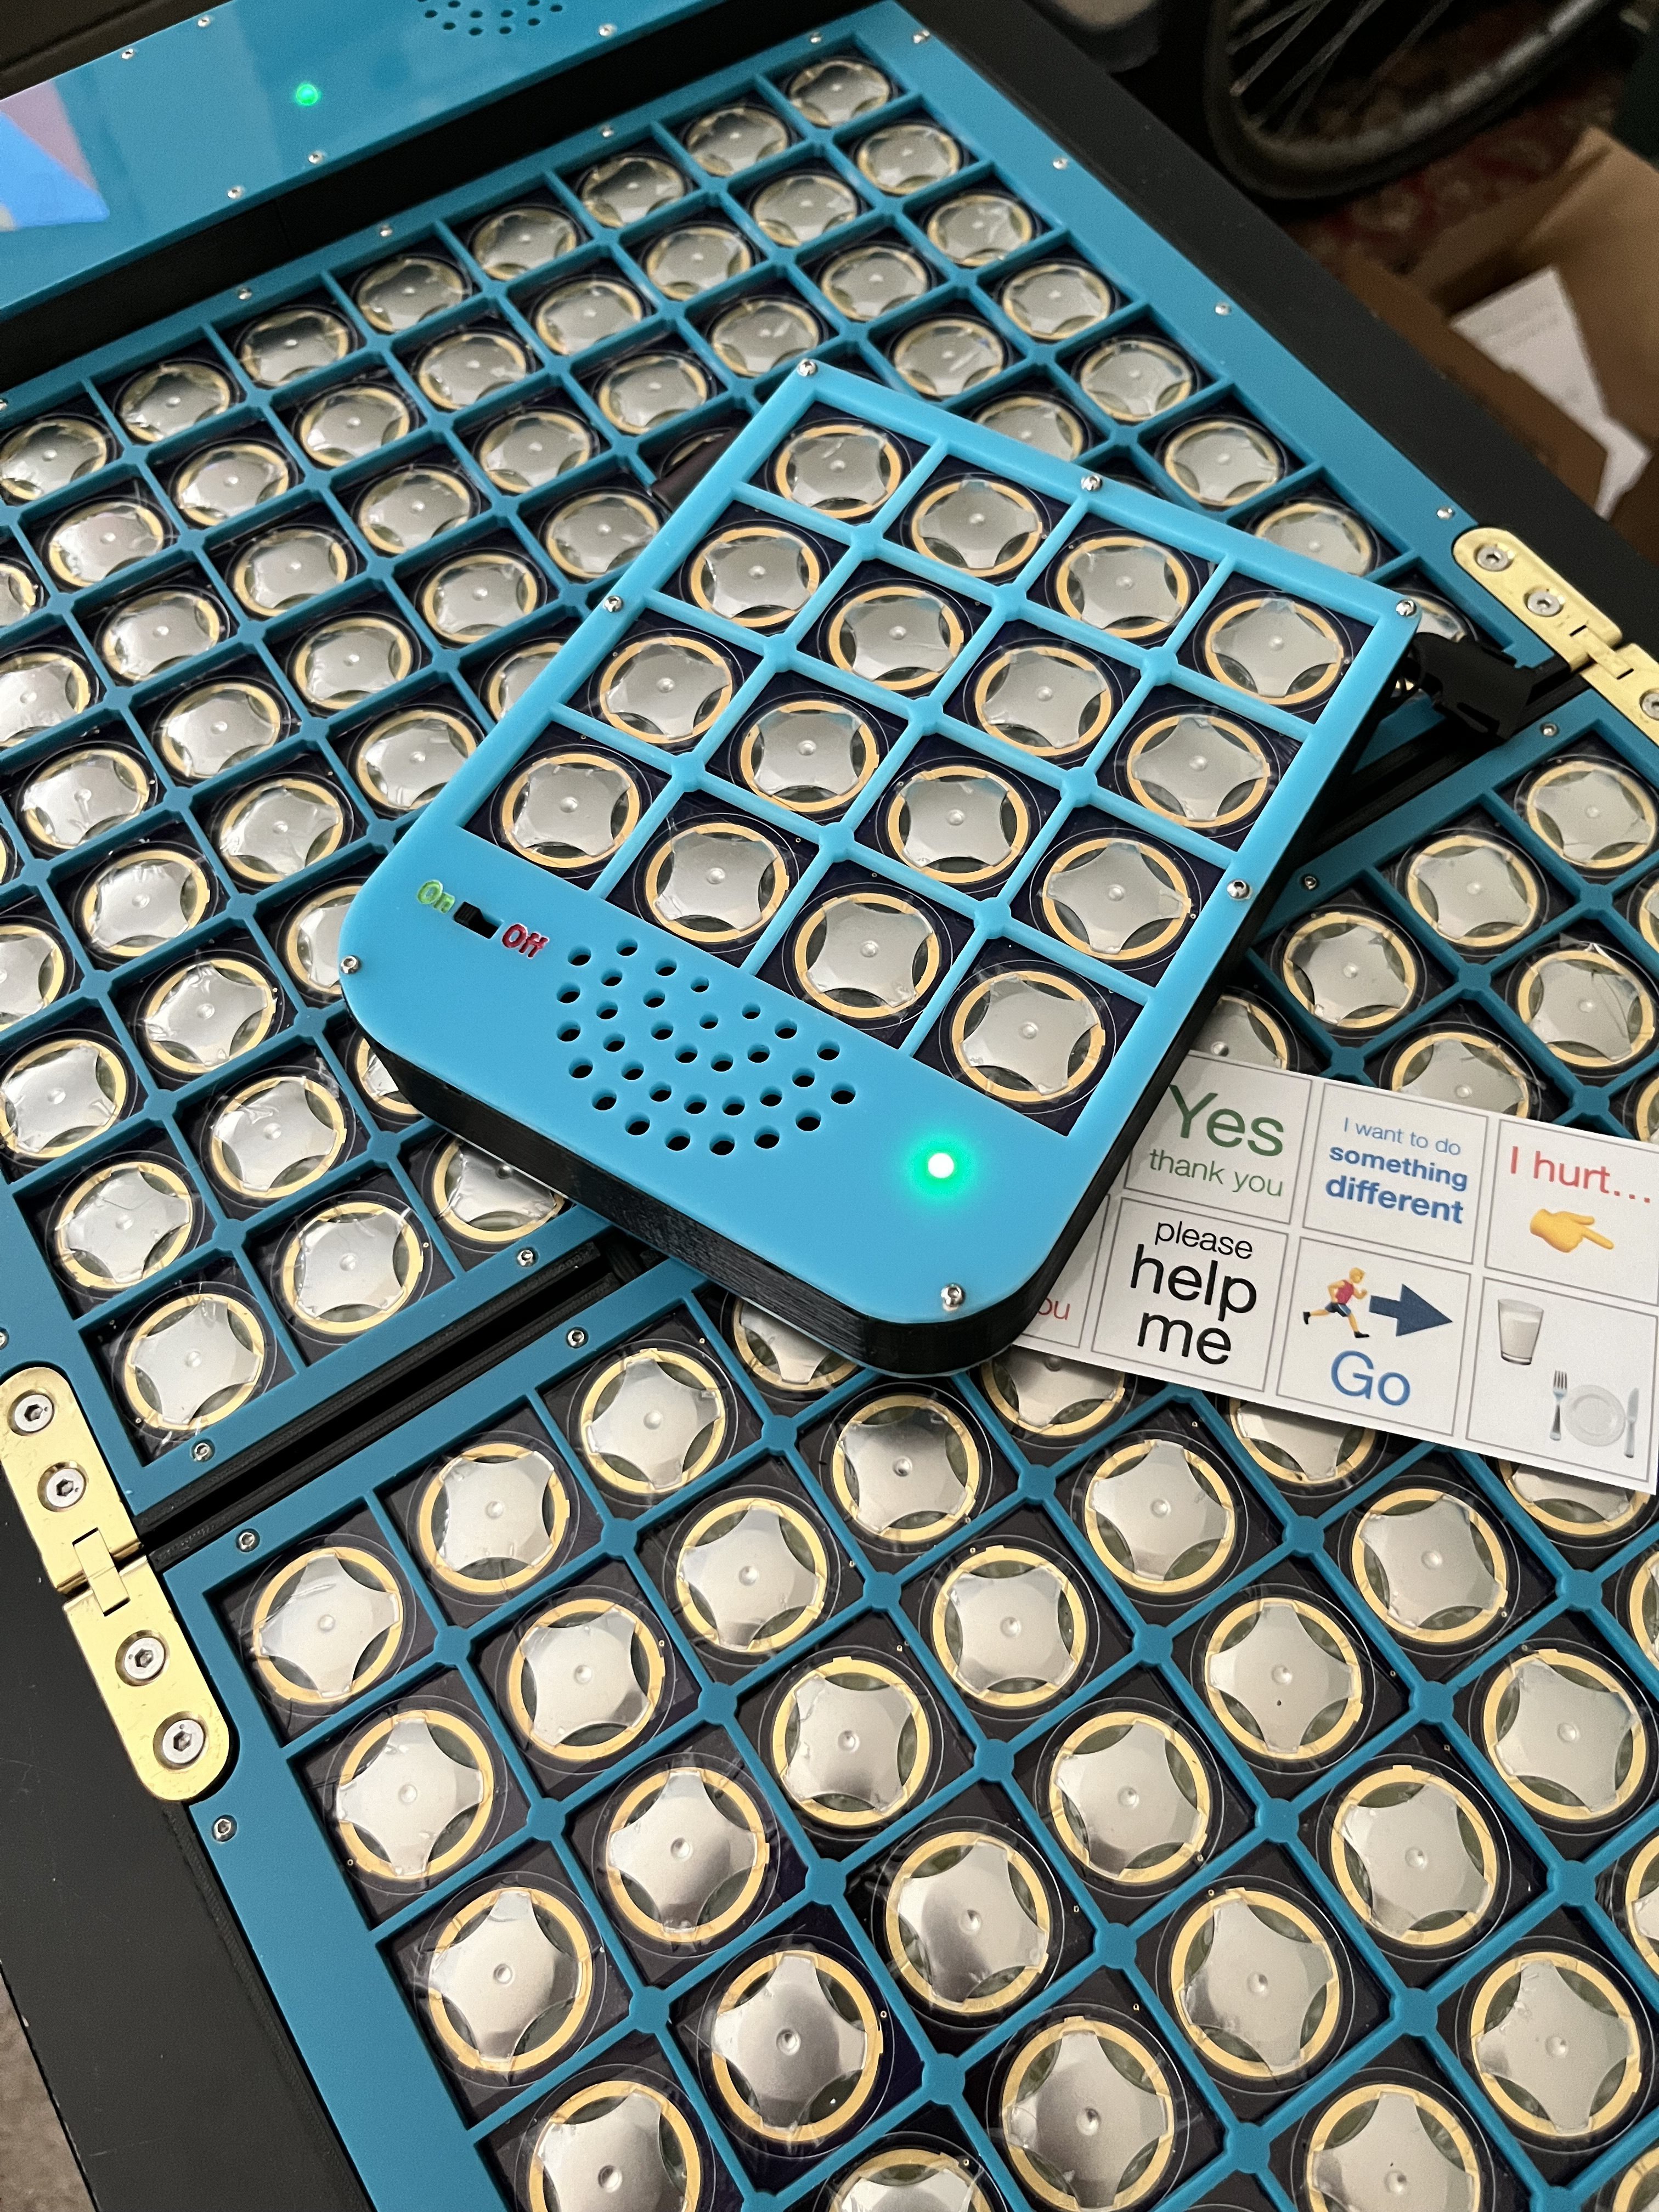
Sometimes, simple things can make a world of difference. Take for example a non-verbal person who can’t necessarily control a touch screen in order to tell someone else what they need or want or think.
This is where Augmentative and Alternative Communication (AAC) devices come in. Recently tasked with building such a device, [Thornhill!] came up with a great design that houses 160 different phrases in a fairly small package and runs on CircuitPython.
Basically, the client presses the appropriate snap-dome button button and the corresponding phrase is spoken through the speaker. The 10×16 grid of buttons is covered with a membrane that both feels nice and gives a bit of protection from spills.
The buttons can achieve high actuation forces and have a crisp tactile response, which means they’re probably gonna go a long way to keep the user from getting frustrated.
This handy AAC board is built on the Adafruit RP2040 Prop-Maker Feather and two keypad matrices. If this weren’t useful enough as it is, [Thornhill!] also built an even smaller version with 16 buttons for the client to wear around their neck.
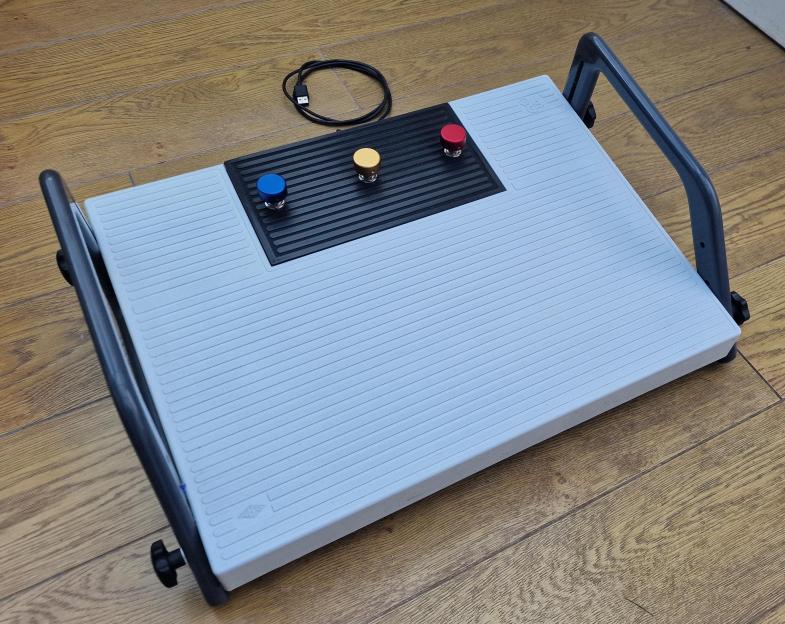
Whether you have full use of your hands or not, a foot-operated keyboard is a great addition to any setup. Of course, it has to be a lot more robust than your average finger-operated keyboard, so building a keyboard into an existing footstool is a great idea.
When [Wingletang]’s regular plastic footrest finally gave up the ghost and split in twain, they ordered a stronger replacement with a little rear compartment meant to hold the foot switches used by those typing from dictation. Settling upon modifiers like Ctrl, Alt, and Shift, they went about designing a keyboard based on the ATmega32U4, which does HID communication natively.
For the switches, [Wingletang] used the stomp switches typically found in guitar pedals, along with toppers to make them more comfortable and increase the surface area. Rather than drilling through the top of the compartment to accommodate the switches, [Wingletang] decided to 3D print a new one so they could include circuit board mounting pillars and a bit of wire management. Honestly, it looks great with the black side rails.
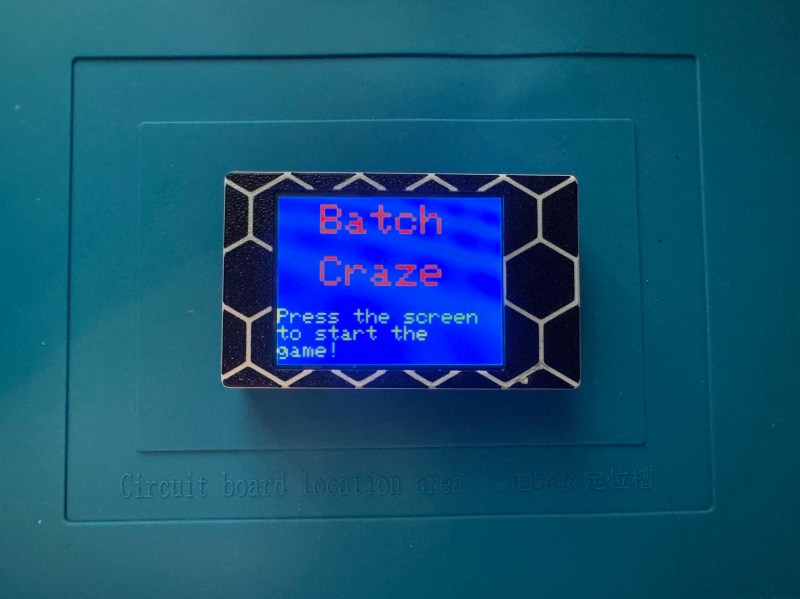
So there’s this commercial electronic game out there called Catch Phrase, which, as the game’s own catch phrase explains, is the game that’s played one word at a time. See, a word comes up on the screen, and you have to get the other person or team to guess what it is using gestures and such before the timer goes off. There are a bunch of rules, like you can’t say a word that rhymes, give the first letter, or the number of syllables.
Well, [ahixson1230] and company got their hands on the After Dark NSFW version but found it lacking in the edginess department. So naturally, [ahixson1230] was inspired to build a better one, with a touch screen in lieu of buttons, and a way for players to suggest words to be added to the list. In this version, a player presses anywhere on the screen to start the game, and a random word or phrase comes up. They act it out, get the other person to guess, and then pass the unit over to continue the fun.
Batch Craze is based on the Cheap Yellow Display, aka the ESP32-2432S028R, and [ahixson1230] highly recommends [witnessmenow]’s excellent resource on the subject. As of this writing, [ahixson1230] is still trying to get the speaker to work, and welcomes any help. Can you assist?
There’s still time to enter the 2024 Tiny Games Contest! You have until Tuesday, September 10th, so head on over to Hackaday.IO and get started!
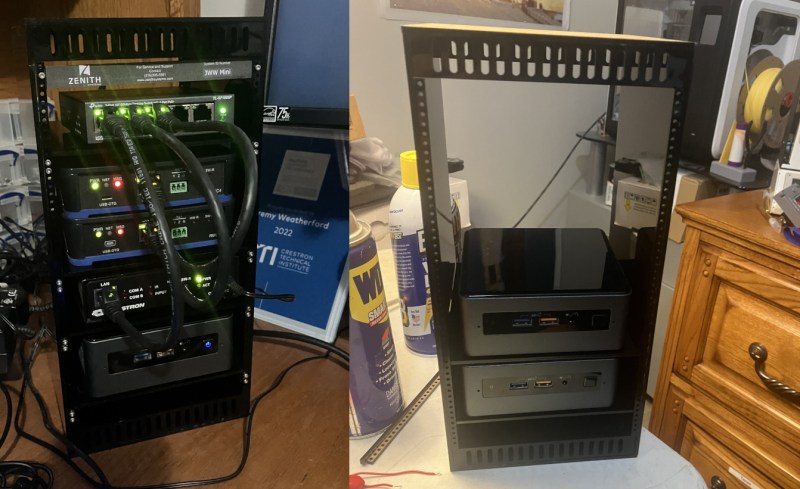
We (well, some of us) are complete suckers for things that are both much smaller and much larger than life. And if that thing actually does what its supposed to? Squee! So naturally, we rushed to bring you news of this mini NUC rack designed by [Jeremy Weatherford].
Inspiration comes from a lot of places, often times from stuff that lives on your desk. [Jeremy] had a pile of NUCs and thought they resembled a mini rack already, so why not build them one to live in? It was the perfect excuse to learn CAD, so off [Jeremy] went. Although this is a mini rack, the parts were too big to print. Another opportunity presented itself, and [Jeremy] tried out an online service to get the acrylic cut.
Assembly may have been fiddly with super glue all over the nice black acrylic, but [Jeremy] learned an important tip: excess glue can be removed with vegetable oil. Once it was built, he decided to make it into a control system lab and even found a perfect little five-port switch to top it off. The logo plate, of course, is the icing on this cake.
Magnets are pretty nice little tools. [EmGi] has used them in many a cool 3D printed build with great success. But getting them where you want can be really tricky. More often than not, you end up with glue all over your fingers, or the magnets fly out of place, or they stick together when you don’t want them to.
Well, [EmGi] created a mighty fine magnet insertion tool that you can print for yourself. It’s finger-operated and uses a single embedded magnet to place magnets wherever they’re needed.
This thing went through several designs before [EmGi] ever printed it out. Originally, there were two magnets, but there was an issue where if the tool wasn’t lifted off perfectly, it would send the magnet flying.
But now it works great, and [EmGi] even deposited an array of 64 magnets without using glue to test it out before printing a second one to handle the other polarity. Check out the build/demo video after the break.
What is it about tangible media? There’s just something neat about having an individual thing that represents each game, each album, each whatever. Sure, you can have a little console with a thousand games loaded on it, but what’s the fun in that?
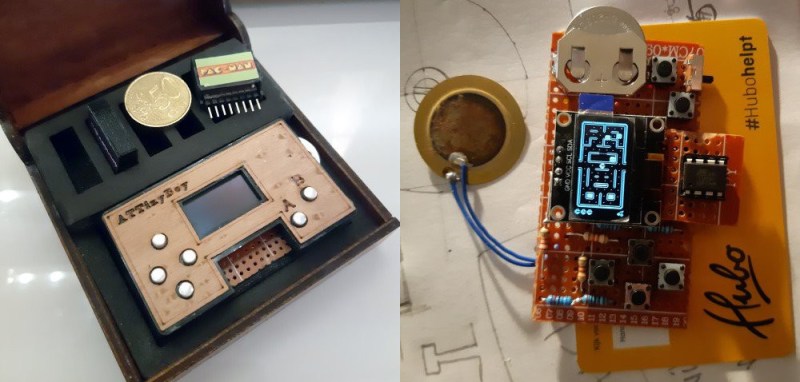
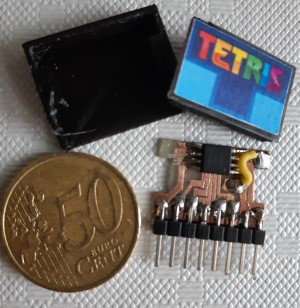
Enter the ATtinyBoy. [Bram]’s entry into the Tiny Games Contest is based on the ATtiny85, and the whole thing is smaller than a credit card. In fact, each little game cartridge contains its own ATtiny85, with the pins broken out into headers.
That is, although the schematic is based on [Billy Cheung]’s gametiny, which uses an ATtiny85 as the brain, ATtinyBoy’s brain is divided among each of the games.
This certainly checks a lot of boxes when it comes to contest rules and requirements, and it’s just awesome besides. We particularly like the custom box that holds ATtinyBoy and all his distributed knowledge. If you want to make one of your own, the schematic, code, and STLs are all available over on IO.
It may be the last gasp of summer here in the Northern Hemisphere, but it’s always cold somewhere, whether it’s outdoors or inside. If you suffer from cold, stiff hands, you know how difficult it can be to work comfortably on a computer all day. Somehow, all that typing and mousing does little to warm things up. What you need are hand warmers, obviously, and they might as well be smart and made to fit your hands.
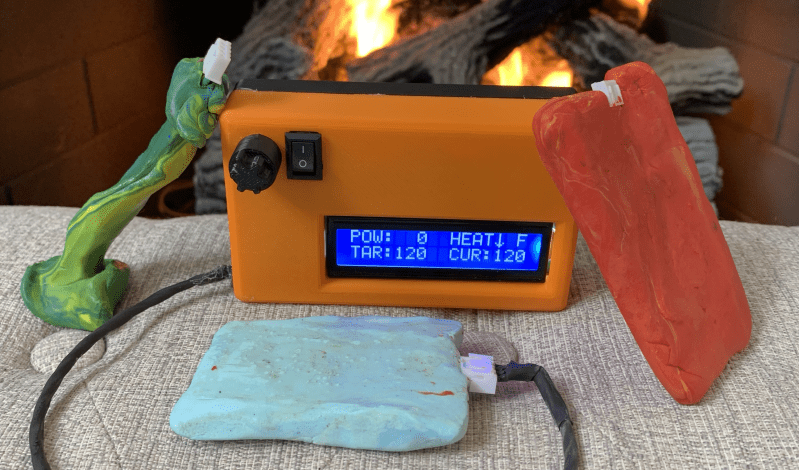
Fifteen-year-old [Printerforge] created these bad boys in an effort to learn how to code LCDs and control heat like Magneto controls ferrous metals. Thanks to digital control, they can heat up to specific temperatures, and they happen to run for a long time.
Power-wise, these warmers use a 18650 cell and a TP4056 charging module. Everything is controlled by an Arduino Nano, which reads from both a thermistor and a potentiometer to control the output.
[Printerforge] really thought this project through, as you’ll see in the Instructable. There’s everything from a table of design requirements to quick but thorough explanations of nichrome wire and basic electronic theory.
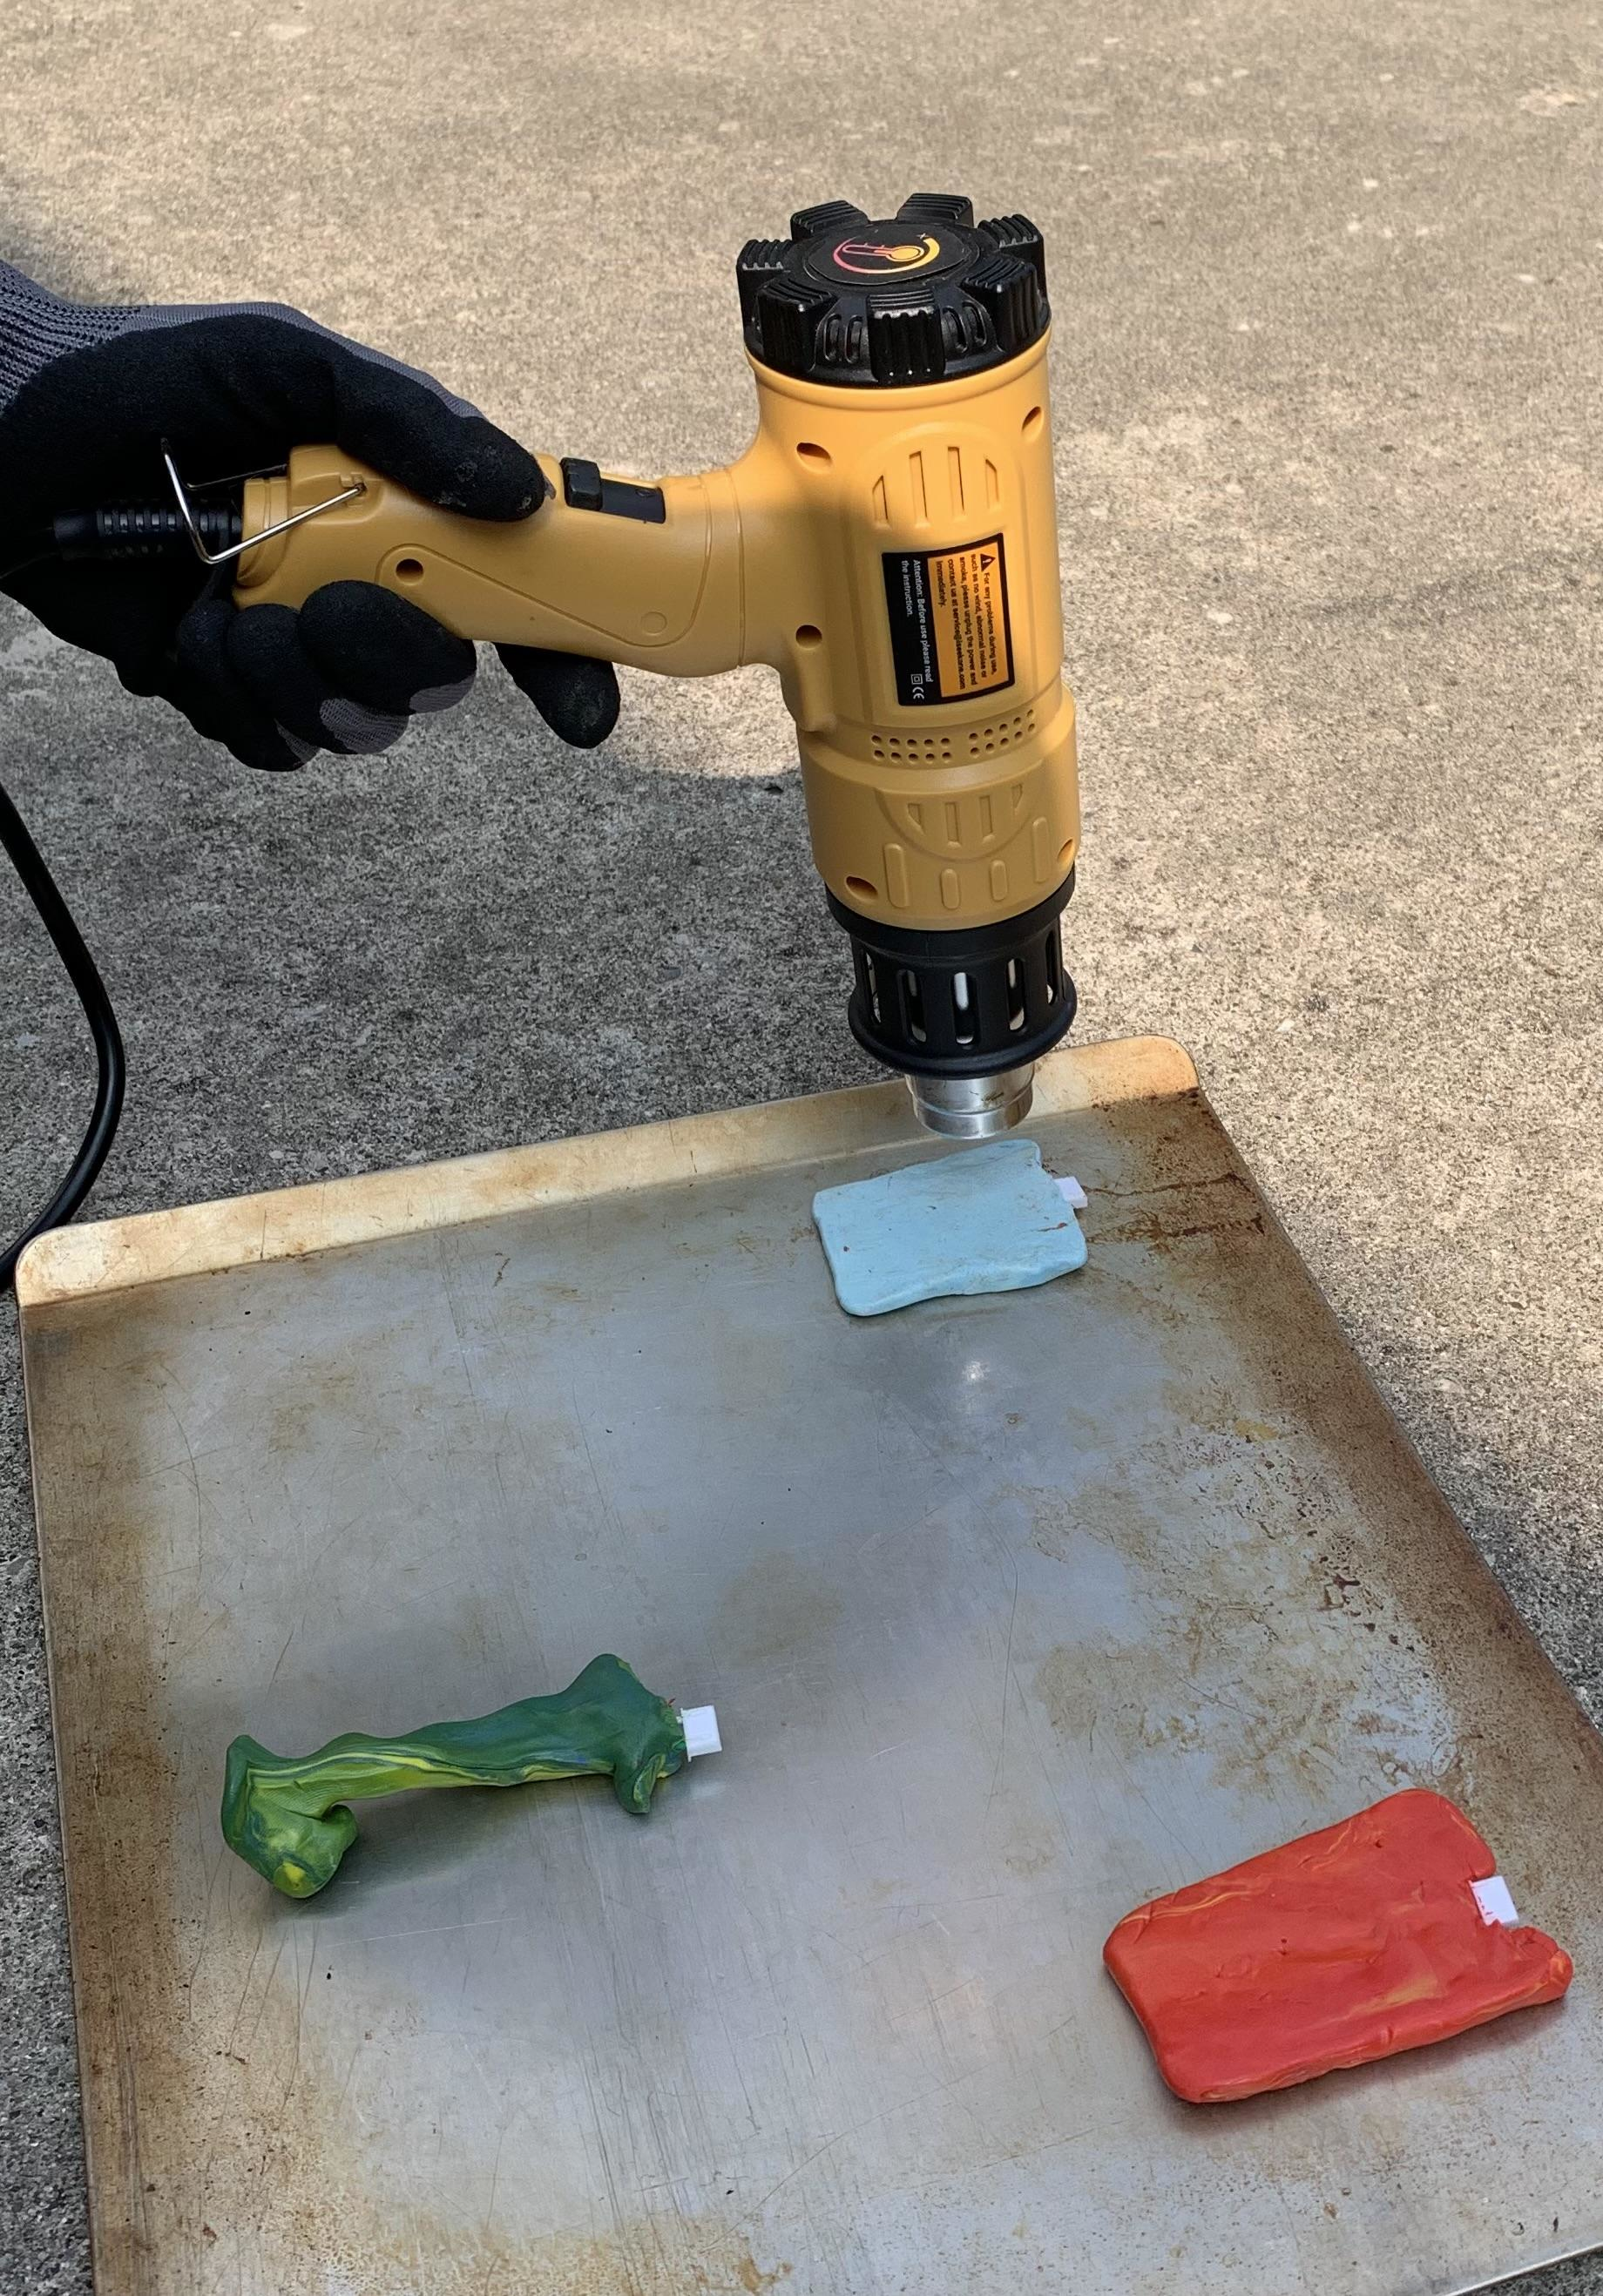
And then there’s the material consideration. [Printerforge] decided that polymer clay offers the best balance of heat conductivity and durability. They ended up with two styles — flat, and joystick grip. The best part is, everything can fit in a generous pocket.
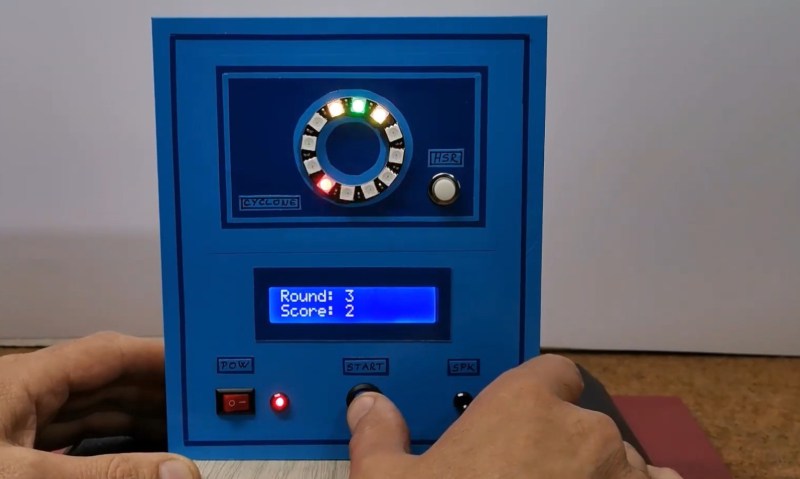
Round and round goes the red LED, and if you can push the button when it overlaps the green LED, then you win. Cyclone is almost too simple of a game, and that’s probably part of why it’s so addictive.
Want to make one for your desk? All it takes is an Arduino Nano R3 or comparable microcontroller, an RGB LED ring with 12 LEDs, a 16×2 LCD, a buzzer, and a momentary push button switch.
Interestingly, there aren’t successive levels with increasing speed, but each round begins with a randomized speed value. Of course, this can all be easily changed in the code, which is modified from [Joern Weise]’s original.
This is a tinier version of [mircemk]’s original project, which uses a 60-LED ring and does contain levels. As usual with [mircemk]’s builds, this project is mounted on their trademark 3 mm PVC board and covered with peel-and-stick wallpaper. Be sure to check out the demo and build video after the break.
You know, it feels as though it’s getting more and more difficult to compete for Father of the Year around here. And [Jon Petter Skagmo] just laid down a new gauntlet — the incredibly overly-engineered kids car.
While the original plan was to build the entire car from scratch, [Jon] eventually opted to use an off-the-shelf car that had a dead battery.
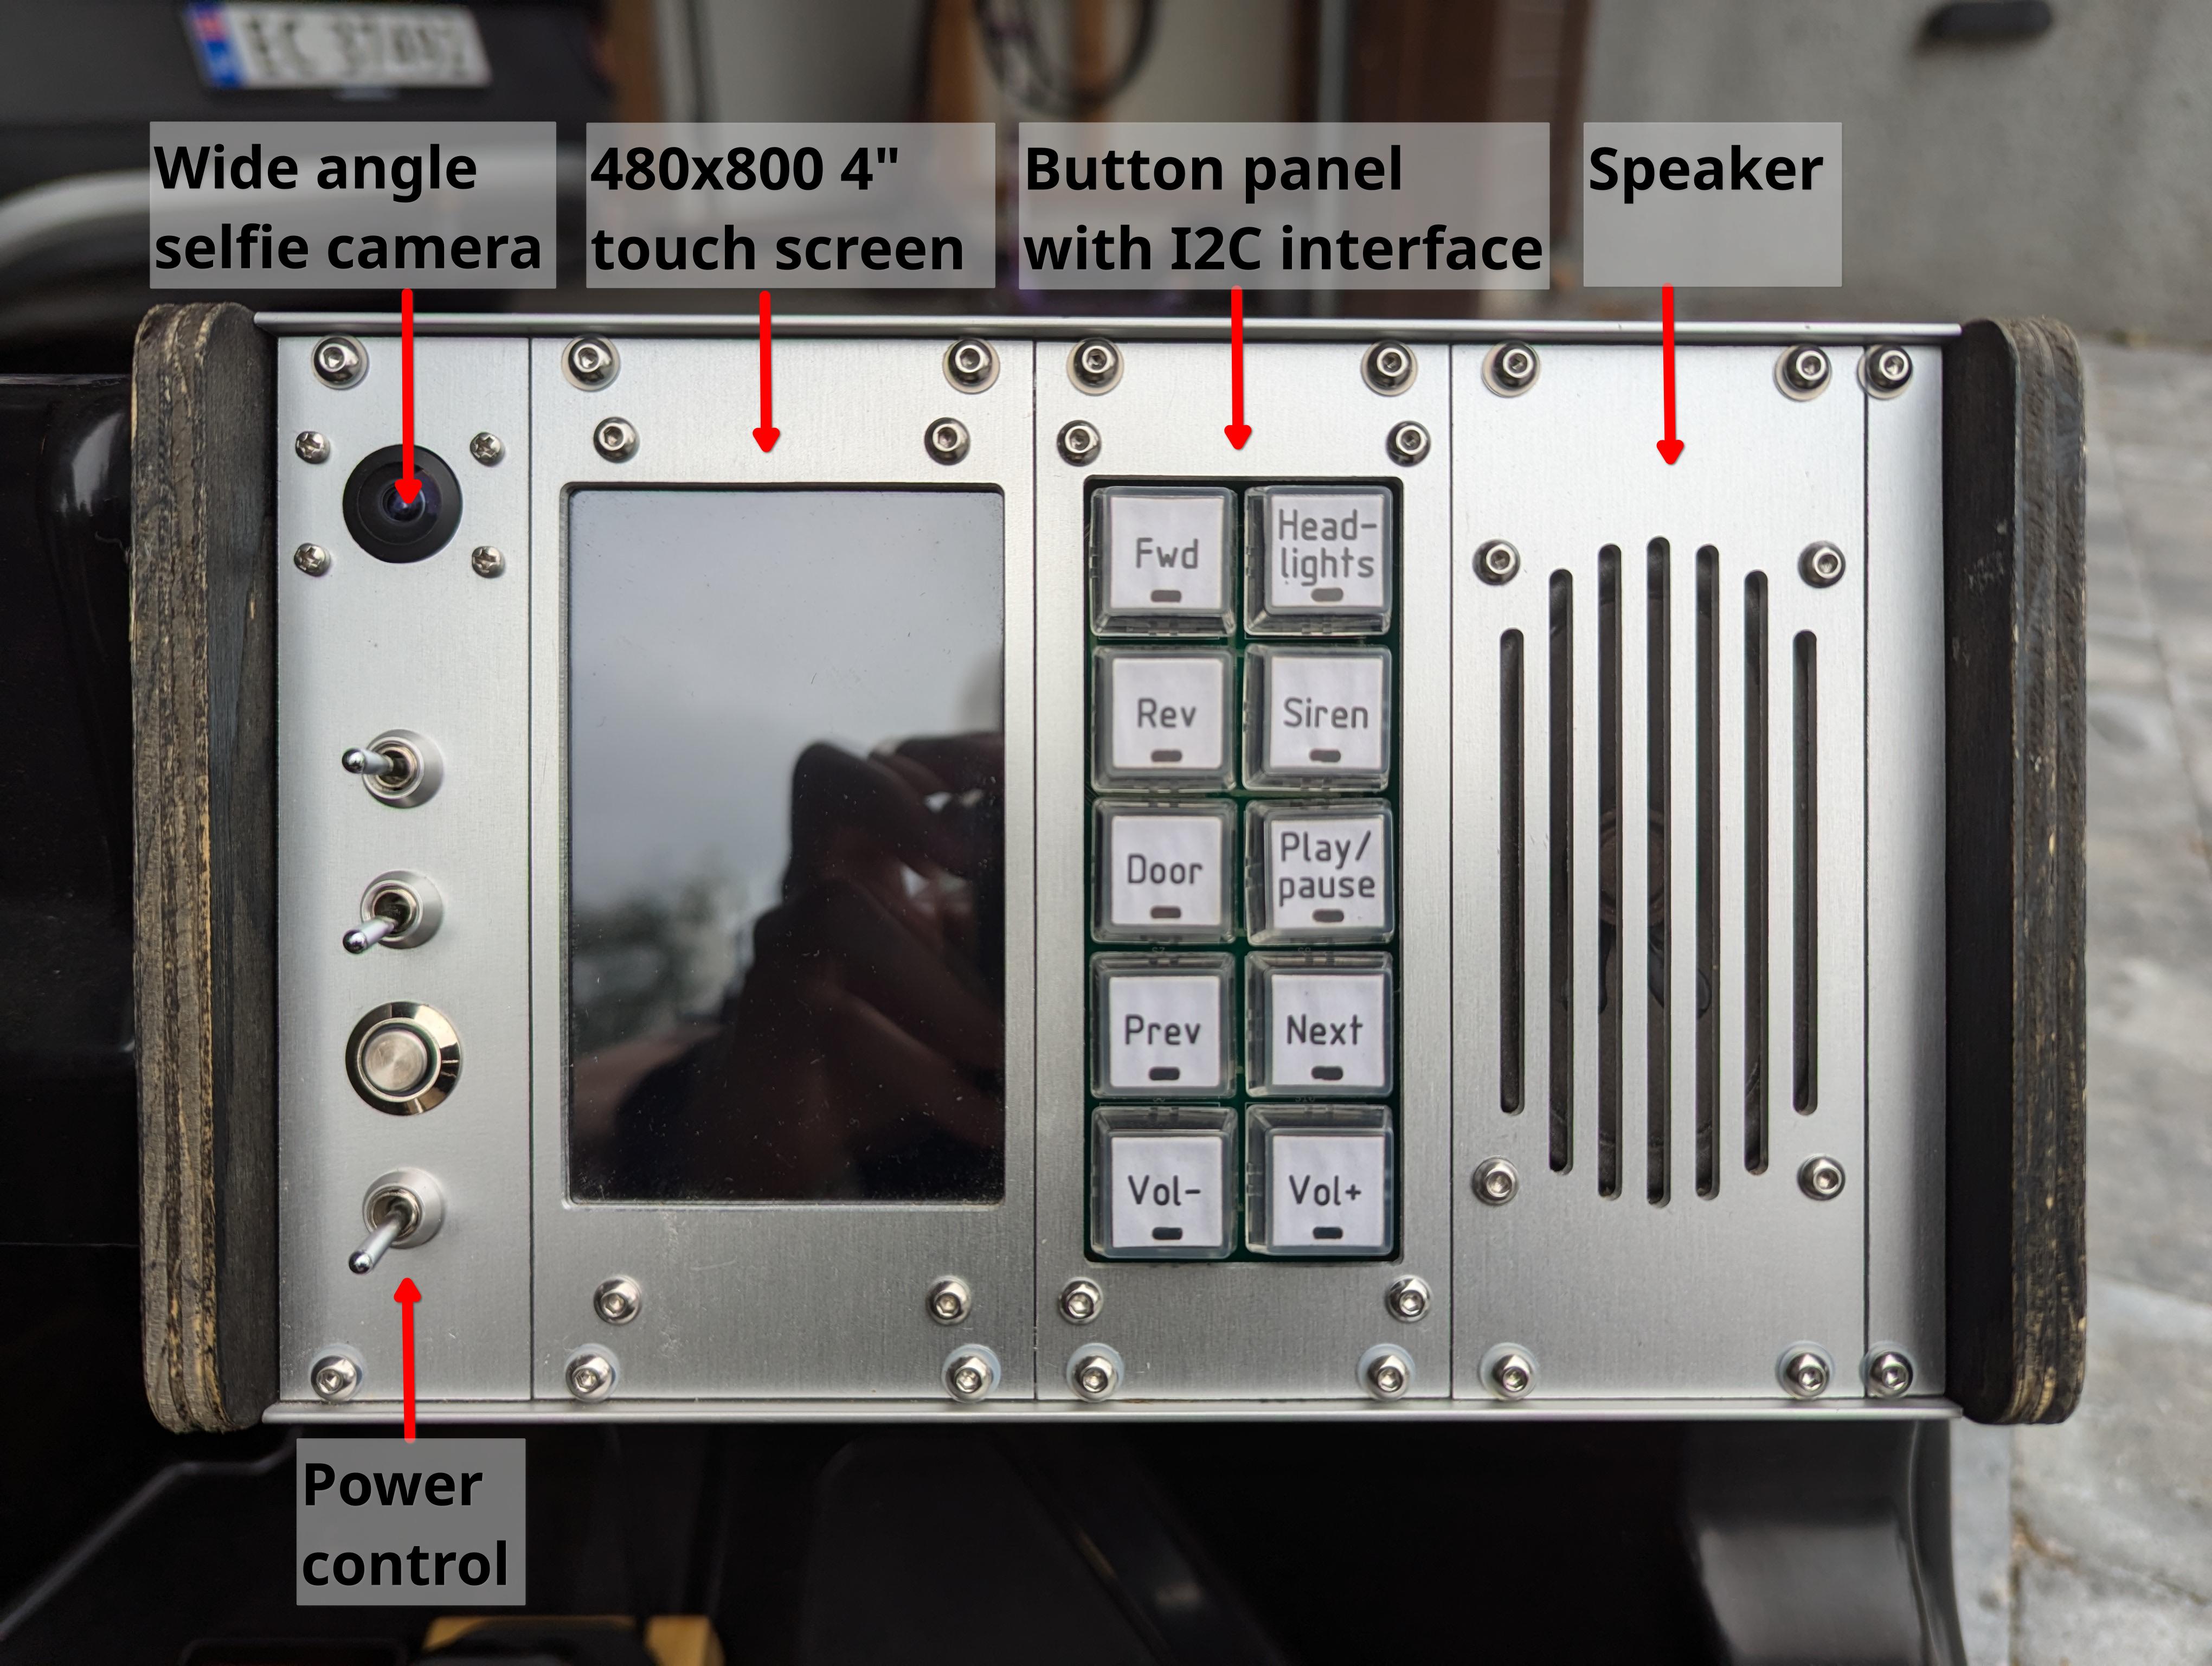
While the original architecture was quite simple, the new hardware has just about everything a kid could want in a tricked-out ride, most of which is accessible through the really cool dashboard.
We’re talking headlights, a music player, a siren, a selfie video cam that doubles as two-way communication with the driver, and even a garage door opener that uses an MQTT connection.
Under the cute little hood is where you’ll find most of the electronics. The car’s brain is a Raspberry Pi 3B, and there’s a custom daughter board that includes GPS/GNSS. This was originally meant to geofence [Baby Girl Skagmo] in, but Dad quickly realized that kids are gonna kid and disabled it pretty soon after.