Vista de Lectura

Hay nuevos artículos disponibles. Pincha para refrescar la página.

Little Pharma on the Prairie

MicroLab reactor setup

Let’s get the obvious out of the way first — in his DEFCON 32 presentation, [Dr. Mixæl Laufer] shared quite a bit of information on how individuals can make and distribute various controlled substances. This cuts out pharmaceutical makers, who have a history of price-gouging and discontinuing recipes that hurt their bottom line. We predict that the comment section will be incendiary, so if your best argument is, “People are going to make bad drugs, so no one should get to have this,” please disconnect your keyboard now. You would not like the responses anyway.

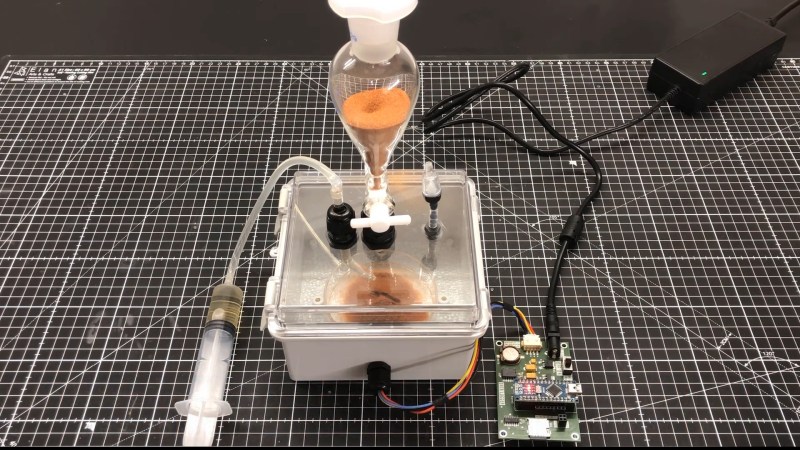
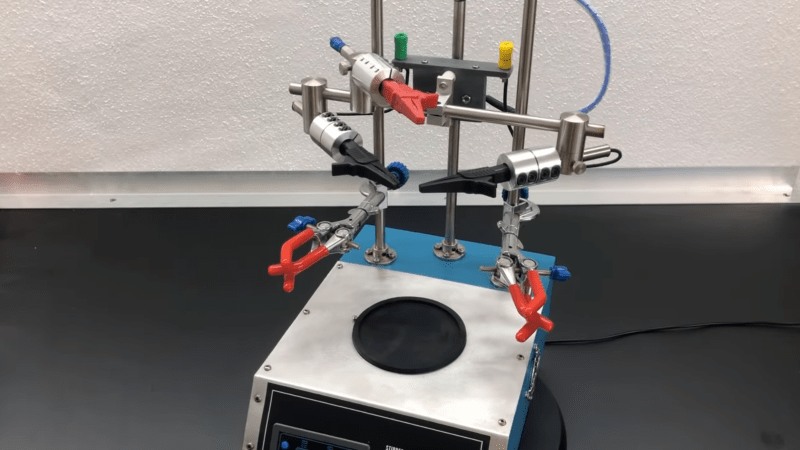
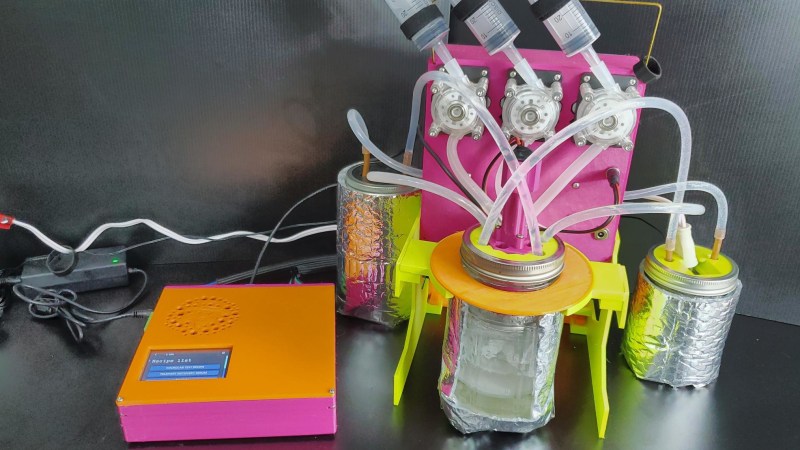
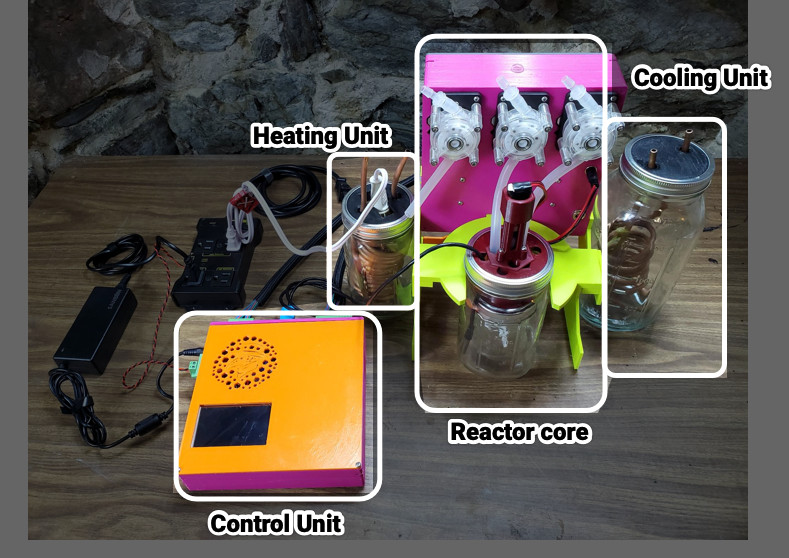
Let’s talk about the device instead of policy because this is an article about an incredible machine that a team of hackers made on their own time and dime. The reactor is a motorized mixing vessel made from a couple of nested Mason jars, surrounded by a water layer fed by hot and cold reservoirs and cycled with water pumps. Your ingredients come from three syringes and three stepper-motor pumps for accurate control. The brains reside inside a printable case with a touchscreen for programming, interaction, and alerts.

It costs around $300 USD to build a MicroLab, and to keep it as accessible as possible, it can be assembled without soldering. Most of the cost goes to a Raspberry Pi and three peristaltic pumps, but if you shop around for the rest of the parts, you can deflate that price tag significantly. The steps are logical, broken up like book chapters, and have many clear pictures and diagrams. If you want to get fancy, there is room to improvise and personalize. We saw many opportunities where someone could swap out components, like power supplies, for something they had lying in a bin or forego the 3D printing for laser-cut boards. The printed pump holders spell “HACK” when you disassemble them, but we would have gone with extruded aluminum to save on filament.

Several times [⁨Mixæl] brings up the point that you do not have to be a chemist to operate this any more than you have to be a mechanic to drive a car. Some of us learned about SMILES (Simplified Molecular Input Line Entry System) from this video, and with that elementary level of chemistry, we feel confident that we could follow a recipe, but maybe for something simple first. We would love to see a starter recipe that combines three sodas at precise ratios to form a color that matches a color swatch, so we know the machine is working correctly; a “calibration cocktail,” if you will.

If you want something else to tickle your chemistry itch, check out our Big Chemistry series or learn how big labs do automated chemistry.

We’ll Take DIY Diamond Making for $200,000

A person examines a diamond with a loupe.

They say you can buy anything on the Internet if you know the right places to go, and apparently if you’re in the mood to make diamonds, then Alibaba is the spot. You even have your choice of high-pressure, high-temperature (HPHT) machine for $200,000, or a chemical vapor deposition (CVD) version, which costs more than twice as much. Here’s a bit more about how each process works.

A sea of HPHT diamond-making machines.
A sea of HPHT machines. Image via Alibaba

Of course, you’ll need way more than just the machine and a power outlet. Additional resources are a must, and some expertise would go a long way. Even so, you end up with raw diamonds that need to be processed in order to become gems or industrial components.

For HPHT, you’d also need a bunch of good graphite, catalysts such as iron and cobalt, and precise control systems for temperature and pressure, none of which are included as a kit with the machine.

For CVD, you’d need methane and hydrogen gases, and precise control of microwaves or hot filaments. In either case, you’re not getting anywhere without diamond seed crystals.

Right now, the idea of Joe Hacker making diamonds in his garage seems about as far off as home 3D printing did in about 1985. But we got there, didn’t we? Hey, it’s a thought.

Main and thumbnail images via Unsplash

An Earth-Bound Homage to a Martian Biochemistry Experiment

With all the recent attention on Mars and the search for evidence of ancient life there, it’s easy to forget that not only has the Red Planet been under the figurative microscope since the early days of the Space Race, but we went to tremendous effort to send a pair of miniaturized biochemical laboratories there back in 1976. While the results were equivocal, it was still an amazing piece of engineering and spacefaring, one that [Marb] has recreated with this Earth-based version of the famed Viking “Labeled Release” experiment.

The Labeled Release experimental design was based on the fact that many metabolic processes result in the evolution of carbon dioxide gas, which should be detectable by inoculating a soil sample with a nutrient broth laced with radioactive carbon-14. For this homage to the LR experiment, [Marb] eschewed the radioactive tracer, instead looking for a relative increase in the much lower CO2 concentration here on Earth. The test chamber is an electrical enclosure with a gasketed lid that holds a petri dish and a simple CO2 sensor module. Glands in the lid allow an analog for Martian regolith — red terrarium sand — and a nutrient broth to be added to the petri dish. Once the chamber was sterilized, or at least sanitized, [Marb] established a baseline CO2 level with a homebrew data logger and added his sample. Adding the nutrient broth — a solution of trypsinized milk protein, yeast extract, sugar, and salt — gives the bacteria in the “regolith” all the food they need, which increases the CO2 level in the chamber.

More after the break…

[Marb]’s results are not surprising by any means, but that’s hardly the point. This is just a demonstration of the concept of the LR experiment, one that underscores the difficulties of doing biochemistry on another planet and the engineering it took to make it happen. Compared to some of the instruments rolling around Mars today, the Viking experiments seem downright primitive, and the fact that they delivered even the questionable data they did is pretty impressive.

Building A Multi-Purpose Electrochemistry Device

We don’t get enough electrochemistry hacks on these pages, so here’s [Markus Bindhammer] of YouTube/Marb’s lab fame to give us a fix with their hand-built general-purpose electrochemistry device.

The basic structure is made from plyboard cut to size on a table saw and glued’n’screwed together. The top and front are constructed from an aluminium sheet bent to shape with a hand-bender. A laser-printed front panel finishes the aesthetic nicely, contrasting with the shiny aluminium. The electrode holders are part of off-the-shelf chemistry components, with the electrical contacts hand-made from components usually used for constructing stair handrails. Inside, a 500 RPM 12 V DC geared motor is mounted, driving a couple of small magnets. A PWM motor speed controller provides power. This allows a magnetic stirrer to be added for relevant applications. Power for the electrochemical cell is courtesy of a Zk-5KX buck-boost power supply with a range of 0 – 36 V at up to 5 A  with both CV and CC modes. A third electrode holder is also provided as a reference electrode for voltammetry applications. A simple and effective build, we reckon!

Over the years, we’ve seen a few electrochemical hacks, like this DIY electroplating pen, a DIY electrochemical machining rig, and finally, a little something about 3D printing metal electrochemically.

Machining Copper from Algaecide

We love it when we find someone on the Internet who has the exact same problem we do and then solves it. [Hyperspace Pirate] starts a recent video by saying, “Oh no! I need to get rid of the algae in my pond, but I bought too much algaecide. If only there were a way to turn all this excess into CNC machined parts.” OK, we’ll admit that we don’t actually have this problem, but maybe you do?

Algaecide is typically made with copper sulfate. There are several ways to extract the copper, and while it is a little more expensive than buying copper, it is cost-competitive. Electrolysis works, but it takes a lot of power and time. Instead, he puts a more reactive metal in the liquid to generate a different sulfate, and the copper should precipitate out.

As you might expect, the details are the problem here. He first tried scrap steel. It worked, but it took a long time. He switched to aluminum, which was faster but required some salt to strip off the oxide. Once he had 1 kg of copper, it was time to heat it up.

Melting it was another set of issues and solutions. He eventually gets a reasonable cube of copper. Then it was off to the CNC mill, which had its own set of issues. But in the end, it looked OK. Some chemical aging made it look interesting.

Honestly, maybe just buy copper, but it sure was interesting and educational watching it all work. As a bonus, he took the copper dust from machining and converted it back into copper sulfate, completing the circle.

Usually, our chemical interest in copper is making it go away. Or plating it onto something.

❌