Vista de Lectura

Hay nuevos artículos disponibles. Pincha para refrescar la página.

Building AI Models To Diagnose HVAC Issues

HVAC – heating, ventilation, and air conditioning – can account for a huge amount of energy usage of a building, whether it’s residential or industrial. Often it’s the majority energy consumer, especially in places with extreme climates or for things like data centers where cooling is a large design consideration. When problems arise with these complex systems, they can go undiagnosed for a time and additionally be difficult to fix, leading to even more energy losses until repairs are complete. With the growing availability of platforms that can run capable artificial intelligences, [kutluhan_aktar] is working towards a system that can automatically diagnose potential issues and help humans get a handle on repairs faster.

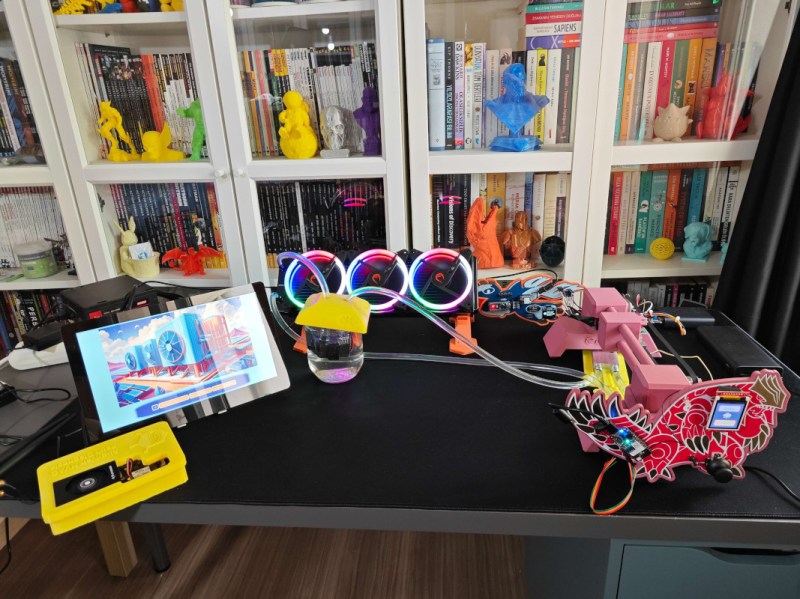
The prototype system is designed for hydronic (water-based) systems and uses two separate artificial intelligences, one to analyze thermal imagery of the system and look for problems like leaks, hot spots, or blockages, and the other to listen for anomalous sounds especially relating to the behavior of cooling fans. For the first, a CNC-like machine was built to move a thermal camera around a custom-built model HVAC system and report its images back to a central system where they can be analyzed for anomalies. The second system which analyses audio runs its artificial intelligence on a XIAO ESP32C6 and listens to the cooling fans running in the model.

One problem that had to be tackled before any of this could be completed was actually building an open-source dataset to train the AI on. That’s part of the reason for the HVAC model in this project; being able to create problems to train the computer to detect before rolling it out to a larger system. The project’s code and training models can be found on its GitHub page. It seems to be a fairly robust solution to this problem, though, and we’ll be looking forward to future versions running on larger systems. Not everyone has a hydronic HVAC system, though. As heat pumps become more and more popular and capable, you’ll need systems to control those as well.

Tiny Trackpad Fits On Ergonomic Keyboard

Cats are notorious for interrupting workflow. Whether it’s in the kitchen, the garden, or the computer, any feline companion around has a way of getting into mischief in an oftentimes disruptive way. [Robin] has two cats, and while they like to sit on his desk, they have a tendency to interrupt his mouse movements while he’s using his Apple trackpad. Rather than solve the impossible problem of preventing cats from accessing areas they shouldn’t, he set about building a customized tiny trackpad that integrates with his keyboard and minimizes the chance of cat interaction.

The keyboard [Robin] uses is a split ergonomic keyboard. While some keyboards like this might use a standard USB connection to join the two halves, the ZSA Voyager uses I2C instead and even breaks the I2C bus out with a pogo pin-compatible connector. [Robin] originally designed a 3D-printed integrated prototype based on a Cirque trackpad that would clip onto the right side of the keyboard and connect at this point using pogo pins, but after realizing that the pogo pin design would be too difficult for other DIYers to recreate eventually settled on tapping into the I2C bus on the keyboard’s connecting cable. This particular keyboard uses a TRRS connector to join the two halves, so getting access to I2C at this point was as simple as adding a splitter and plugging in the trackpad.

With this prototype finished, [Robin] has a small trackpad that seamlessly attaches to his ergonomic keyboard, communicates over a standard protocol, and avoids any unwanted cat-mouse action. There’s also a build guide if you have the same keyboard and want to try out this build. He does note that using a trackpad this small involves a bit of a learning curve and a larger-than-average amount of configuration, but after he got over those two speed bumps he hasn’t had any problems. If trackpads aren’t your style, though, with some effort you can put a TrackPoint style mouse in your custom mechanical keyboard instead.

RC Car Gets Force Feedback Steering

Remote-controlled cars can get incredibly fast and complex (and expensive) the farther into the hobby you get. So much so that a lot of things that are missing from the experience of driving a real car start to make a meaningful impact. [Indeterminate Design] has a few cars like this which are so fast that it becomes difficult to react to their behavior fast enough through sight alone. To help solve this problem and bridge the gap between the experience of driving a real car and an RC one, he’s added force feedback steering to the car’s remote control.

The first thing to tackle is the data throughput required to get a system like this working wirelessly. Relying heavily on the two cores in each of a pair of ESP32s, along with a long-range, high-speed wireless communications protocol called ESP-NOW, enough data from the car can be sent to make this possible but it does rely on precise timing to avoid jitter in the steering wheel. Some filtering is required as well, but with the small size of everything in this build it’s also a challenge not to filter out all of the important high-frequency forces. With the code written, [Indeterminate Design] turned to the 3D printer to build the prototype controller with built-in motors to provide the haptic feedback.

The other half of the project involves sensing the forces in the RC car which will then get sent back to the remote. After experimenting with a mathematical model to avoid having to source expensive parts and finding himself at a deadend with that method, eventually a bi-directional load cell was placed inside the steering mechanism which solved this problem. With all of these pieces working together, [Indeterminate Design] has a working force feedback steering mechanism which allows him to feel bumps, understeer, and other sensations, especially while doing things like drifting or driving through grass, that would be otherwise unavailable to drivers of RC cars. The only thing we could think of to bring this even more into realistic simulation territory would be to add something like a first-person view like high-speed drones often have.

Asteroids: Kessler Syndrome Edition

Asteroids, the late-70s arcade hit, was an immensely popular game. Often those with the simplest premise, while maintaining a fun, lighthearted gameplay have the most cultural impact and longest legacy. But, although it was popular, it doesn’t really meet the high bar of scientific fidelity that some gamers are looking for. That’s why [Attoparsec] built the Kessler Syndrome Edition of this classic arcade game.

The Kessler Syndrome is a condition where so much man-made debris piles up in low-Earth orbit that nothing can occupy this orbit without getting damaged or destroyed by the debris, and thus turning into more debris itself in a terrible positive feedback loop. [Attoparsec] brings this idea to Asteroids by reprogramming the game so that asteroids can be shot into smaller and smaller pieces but which never disappear, quickly turning the game into a runaway Kessler Syndrome where the chance of survival is extremely limited, and even a destroyed player’s ship turns into space junk as well.

To further the scientific accuracy and improve playability, though, he’s added a repulsor beam mechanism which can push the debris a bit and prolong the player’s life, and also added mass effect reactions so that even shooting bullets repels the player’s ship a bit. The build doesn’t stop with software, either. He also built a custom 70s-style arcade cabinet from the ground to host the game.

Asteroids is still a popular platform for unique builds like this. Take a look at a light-vector game using lasers to create the graphics, or this tiny version of the game that uses a real CRT.

Thanks to [smellsofbikes] for the tip!

Better Battery Design Through Science

Before the age of lithium batteries, any project needing to carry its own power had to rely on batteries that were much less energy-dense and affordable. In many ways, we take modern lithium technology for granted, and can easily put massive batteries in our projects by the standards of just a few decades ago. While the affordability of lithium batteries has certainly decreased the amount of energy we need to put in to our projects to properly size batteries, there’s still a lot of work to be done if you’re working on a bigger project or just want to get the maximize the efficiency and effectiveness of your DIY battery pack.

The main problem with choosing a battery, as [ionworks] explains, is that batteries can’t be built for both high energy and high power, at least not without making major concessions for weight or cost. After diving in to all of the possible ways of customizing a battery, the battery guide jumps in to using PyBaMM to perform computational modeling of potential battery designs to hopefully avoid the cumbersome task of testing all of the possible ways of building a battery. With this tool virtually all of a battery’s characteristics can be simulated and potential problems with your setup can be uncovered before you chose (or start production of) a specific battery system.

While customizing a battery pack to this extent might not be a consideration for most of us unless the project is going to be big enough to run something like an electric car or a whole-house generator, it’s a worthwhile tool to know about as even smaller projects like ebikes can benefit from choosing the right cell for the application. Some of the nuances of battery pack design can be found in this guide to building packs from the standard 18650 cells.

Header: Lead holder, CC BY-SA 3.0 .

Getting an Old HVAC System Online

Standardization might sound boring, but it’s really a great underlying strength of modern society. Everyone agreeing on a way that a certain task should be done saves a lot of time, energy, and money. But it does take a certain amount of consensus-building, and at the time [JC]’s HVAC system was built the manufacturers still hadn’t agreed on a standard control scheme for these machines yet. But with a little ingenuity and an Arduino, the old HVAC system can be given a bit of automatic control.

The original plan for this antiquated system, once off-the-shelf solutions were found to be incompatible, was to build an interface for the remote control. But this was going to be overly invasive and complex. Although the unit doesn’t have a standard remote control system, it does have extensive documentation so [JC] was able to build a relay module for it fairly easily with an Arduino Nano Matter to control everything and provide WiFi functionality. It also reports the current status of the unit and interfaces with the home automation system.

While some sleuthing was still needed to trace down some of the circuitry of the board to make sure everything was wired up properly, this was a much more effective and straightforward (not to mention inexpensive) way of bringing his aging HVAC system into the modern connected world even through its non-standardized protocols. And, although agreeing on standards can sometimes be difficult, they can also be powerful tools once we all agree on them.

The Last Instrument to get Auto-Tuned

Various decades have their musical signature, like the excessive use of synthesizers and hairspray in the 1980s pop music scene. Likewise, the early 2010s was marked by a fairly extreme use of autotune, a technology that allows sounds, especially vocals, to be shifted to precise pitches regardless of the pitch of the original source. In this dark era, a wide swath of instruments and voices on the charts were auto-tuned at some point, although we don’t remember this iconic instrument ever being featured among the annals of pitch-shifted pop music.

The auto-tuned kazoo created by [Guy Dupont] does its pitch corrections on-the-fly thanks to a built-in ESP-32-S3 microcontroller which, through a microphone inside the kazoo, listens for note of the musician’s hum and corrects it to the closest correctly pitched note. Once it identifies the note it outputs a kazoo-like pitch-corrected note from a small speaker, also hidden inside the instrument. It does this fast enough for live performances using the YIN fundamental frequency estimation algorithm. Not only can the kazoo be played directly, but thanks to the implementation of MIDI it can be used to control other synthesizers or be played through other means as a stand-alone synthesizer.

Much like the 80s, where the use of synthesizers relaxed from excessive use on nearly every instrument on every track throughout the decade to a more restrained use as the decade faded, so has autotune been toned down in most music to be more subtly applied. But like our enjoyment of heavily synthesized tunes outside the 80s like those by Daft Punk or The Weeknd, we can also appreciate something heavily auto-tuned outside of the 2010s like a stylized kazoo or a T-Pain-style guitar effects pedal.

MIDI Controller in a Cubic Inch

MIDI as a standard has opened up a huge world to any musician willing to use a computer to generate or enhance their playing and recording. Since the 80s, it has it has revolutionized the way music is produced and performed, allowing for seamless integration of digital instruments, automation of complex sequences, and unprecedented control over everything from production to editing. It has also resulted in a number of musical instruments that probably wouldn’t be possible without electronic help, like this MIDI instrument which might be the world’s smallest.

Fitting into a cubic inch of space, the tiny instrument’s volume is mostly taken up by the MIDI connector itself which was perhaps an acceptable size by 1980s standards but seems rather bulky today. A two-layer PCB split into three sections sandwiches the connector in place and boasts an ATtiny85 microcontroller and all the associated electronics needed to implement MIDI. Small threaded screws hold the platform together and provide each layer with a common ground. Four small pushbuttons at the top of the device act as the instrument’s keys.

The project’s creator (and Hackaday alum!) [Jeremy Cook] has it set up to play notes from a piano right now, but has also made the source code available so that any musical action can be programmed onto these buttons. Flexibility is perhaps MIDI’s greatest strength and why the standard has lasted for decades now, as it makes it fairly straightforward to build more comprehensive, easy-to-learn musical instruments or even musical instruments out of retro video game systems.

Automatic Garbage Can Keeps Cooking Cleaner

Over the last decade or so, we’ve been inundated with appliances with wireless or “smart” technology that is often of dubious utility. No one really needs a tablet in their refrigerator or Wi-Fi on their coffee maker. A less glamorous kitchen appliance that actually might benefit from some automation and connectivity is the garbage can, or “bin” for those speaking the Queen’s English, and [Mellow_Labs] is here to show off just how to get that done with this automatic garbage can lid.

As he explains, the real impetus behind this build is to not have to touch a dirty lid while cooking to avoid having to take time to wash one’s hands again afterwards. There are a few other design criteria as well; it has to be roommate-approved so nothing permanently attached to the lid, overly complicated, or with an unnecessary amount of wires or other fixtures. A servo with an extension sits on the lid itself, and when activated forces the lid open. A distance sensor provides basic gesture recognition and a microcontroller with wireless connectivity controls both and provides home automation integration as well. With a 3D printed case that includes a quick disconnect function for easy cleaning of the lid, the build was ready to be put into service.

The first iteration used an infrared distance sensor, but placing it by an open window caused it to continuously open and close since sunlight has the same wavelengths of light the sensor is tuned for. A quick swap with an ultrasonic sensor solved the problem, and the garbage can is working flawlessly in the kitchen now. Another appliance that is generally not targeted by off-the-shelf automation solutions is the range fume hood, but another build tackled that problem a while back.

CW Not Hard Enough? Try This Tiny Paddle

For a long time, a Morse code proficiency was required to obtain an amateur radio license in many jurisdictions around the world, which was a much higher bar of entry than most new hams have to pass. Morse, or continuous wave (CW) is a difficult skill to master, and since the requirement has been dropped from most licensing requirements few radio operators pick up this skill anymore. But if you like a challenge, and Morse itself isn’t hard enough for you, you might want to try out this extremely small Morse paddle.

Originally meant for portable operation, where hiking to something like a mountain top with radio gear demands small, lightweight, and low-power options, this paddle is actually not too complex. It attaches to most radios with a 3.5 mm stereo cable and only has two paddles on flexible metal arms which, when pressed against the center of the device, tell the radio to either produce continuous “dits” or “dahs”. For portable use the key sits inside a tiny plastic case and only needs to be pulled out and flipped around to get started. And, while not waterproof, [N6ARA] reports that it’s so small you likely could just shield it from the rain with your other hand if you needed to.

Presumably, this paddle actually wouldn’t be that much different than using any other paddle except for the fact that it’s not heavy enough to resist the force of use, so you’d have to hold it with your other hand anyway. And, while this is a product available for purchase it’s simple enough that, presumably, the design could easily be duplicated with just a few parts. Paddles like this were made as an improvement to older technology like straight keys which require the operator to produce the correct lengths of tones for each character manually. While you can get higher speeds with a paddle, there are still some dedicated CW operators using a straight key.

Single-Stepping the 6502 Processor

Although marketing folk and laypeople may credit [Steve Jobs] as the man behind the success of Apple, those in the tech world know the real truth that without [Steve Wozniak] nothing would have ever gotten off the ground during the early days of the computer company. As an exhibit of his deep knowledge of the machines he was building, take a look at this recreation of a circuit by [Anders] which allows the 6502 processor to step through instructions one at a time, originally designed by [Woz] himself, even though there are still myths floating around the Internet that this type of circuit can’t work.

Like a lot of Internet myths, though, there’s a kernel of truth at the middle. The original 6502 from the mid-70s had dynamic registers, meaning they would lose their values if the chip was run below a critical clock speed. Since single-stepping the processor is much lower than this speed, it seems logical that this might corrupt the data in the registers. But if the clock is maintained to the registers the processor can be halted after each instruction, allowing even the original 6502 to go through its instructions one at a time.

[Anders]’s project sets up this circuit originally laid out by [Steve Wozniak] but updates it a bit for the modern times. Since the technology of the era would have been TTL, modern CMOS logic requires pull-up resistors to keep any inputs from floating. The key design of the original circuit is a set of flip-flops which latch the information on the data bus, and a switch that can be pressed to let the processor grab its next instruction, as well as a set of LEDs that allow the user to see the value on the data bus directly.

Of course, a computer processor of this era would be at a major handicap without a way to debug code that it was running, so there are even dedicated pins that allow this functionality to occur. Perhaps the Internet myth is a bit overblown for that reason alone, but [Anders] is no stranger to the 6502 and has developed many other projects that demonstrate his mastery of the platform.

Free and Open E-Reader from the Ground Up

Although ebooks and e-readers have a number of benefits over reading an analog paper book as well as on more common electronic devices like tablets, most of them are locked behind proprietary systems like Kindle which make it difficult to take control over your electronic library. While there are a few off-brand e-readers that allow users to take a bit of control back and manually manage their files and libraries, there are few options for open-source solutions. This project aims to provide not only a free and open e-reader from the hardware to the software, but also a server to host a library as well.

The goal of most of the build is to keep everything as FLOSS as possible including the hardware, which is based on a Raspberry Pi compute module. The display comes from Good Display, which includes a built-in light and a touchscreen. There’s a lithium battery to power the tablet-like device with a number of support chips to charge it, handle the display, and interface with the Pi. On the software side, the system uses MuPDF which has support for most ebook file types while the server side is based on Calibre and the Open Publication Distribution System.

A subsection of the build log discusses a lot of how the code works for those looking to build their own similar system based on this project. The project code is even hosted on GitLab, a more FLOSS-y version of GitHub. Free and open ebook readers have been a goal of a number of builders for some time now, as we’ve seen projects going back at least a few years now and others that hope to make the Kindle hardware a little more open instead.

Turning Horrible Browser Controls Into A Game

With all of the various keyboards, mouses (mice?), and other human interface devices (HID) available for our computers, there’s no possible way for developers to anticipate every type of input for every piece of software they build. Most of the time everything will work fine as long as some basic standards are kept, both from the hardware and software sides, but that’s not always the case. [Losso] noticed a truly terrible volume control method when visiting certain websites while also using a USB volume knob, and used this quirk to build a Breakout game with it.

It turns out his volume control knob would interact simultaneously with certain video players’ built-in volume control and the system volume for the operating system, leading to a number of undesirable conditions. However, the fact that this control is built in to certain browsers in the first place led to this being the foundation for the Breakout clone [Losso] is calling KNOB-OUT. Unlike volume buttons on something like a multimedia keyboard, the USB volume control knob can be configured much more easily to account for acceleration, making it more faithful to the original arcade version of the game. The game itself is coded in JavaScript with the source code available right in the browser.

If you’d like to play [Losso]’s game here’s a direct link to it although sometimes small web-based projects like these tend to experience some slowdown when they first get posted here. And, if you’re looking for some other games to play in a browser like it’s the mid-00s again, we’re fans of this project which brings the unofficial Zelda game Zelda Classic to our screens.

Docker-Powered Remote Gaming with Games on Whales

Cloud gaming services allow even relatively meager devices like set top boxes and cheap Chromebooks play the latest and greatest titles. It’s not perfect of course — latency is the number one issue as the player’s controller inputs need to be sent out to the server —  but if you’ve got a fast enough connection it’s better than nothing. Interested in experimenting with the tech on your own terms? The open source Games on Whales project is here to make that a reality.

As you might have guessed from the name, Games on Whales uses Linux and Docker as core components in its remote gaming system. With the software installed on a headless server, multiple users can create virtual desktop environments on the same machine, with each spawning as a separate process on the host computer. This means that all of the hardware of the host can be shared without needing to do anything complicated like setting up GPU pass-through. The main Docker container can spin up more containers as needed.

Of course there will obviously be limits to what any given hardware configuration will be able to support in terms of number of concurrent users and the demands of each stream. But for someone who wants to host a server for their friends or something even simpler like not having to put a powerful gaming PC in the living room, this is a real game-changer. For those not up to speed on Docker yet, we recently featured a guide on getting started with this powerful tool since it does take some practice to wrap one’s mind around at first.

Particle Physics on a Small, Affordable PCB

Experimenting in the world of particle physics probably brings to mind large, expensive pieces of equipment like particle accelerators, or at least exotic elements or isotopes that most of us can’t easily find. But plenty of common objects emit various particles, and it turns out that detecting these particles does not require government backing or acres of test equipment. In fact, you can get this job done with a few readily-available parts and [Tim] shows us how it’s done with his latest project.

The goal of his build is to have a working particle detector for less than $10 per board, although he’s making them in bulk to be used in an educational setting. The board uses a set of photodiodes enclosed in a protective PCB sandwich to detect beta particles from a Potassium-40 source. The high-energy electron interacts with the semiconductor in the photodiode and creates a measurable voltage pulse, which can be detected and recorded by the microcontroller on the board. For this build an RP2040 chip is being used, with a number of layers of amplification between it and the photodetector array used to get signals that the microcontroller can read.

Getting particle physics equipment into the hands of citizen scientists is becoming a lot more common thanks to builds like this which leverage the quirks of semiconductors to do something slightly outside their normal use case, and of course the people building them releasing their projects’ documentation on GitHub. We’ve also seen an interesting muon detector with a price tag of around $100 and an alpha particle detector which uses a copper wire with a high voltage to do its work.

Google Drive Now Bootable

USB drives are incredibly useful, both storing files for transport between different computers and for creating bootable drives that let us use or install other operating systems on our computers. While online file storage systems like Dropbox and Google Drive have taken over a large percentage of the former task from USB drives, they have not been able to act as bootable media, ensuring that each of us have a few jump drives lying around. That might not be the case anymore, though, as this guide is the first we know of to be able to use Google Drive to boot to a Linux system.

Unlike the tried-and-true jump drive methods, however, this process is not straightforward at all. It relies on two keys, the first of which is FUSE which allows a filesystem to be created in userspace. The second is exploiting a step in boot process of Linux systems where the kernel unpacks a temporary filesystem, called initramfs, in order to load the real filesystem. Normally a user doesn’t interact much with this step, but that doesn’t mean it’s impossible. A tool called dracut allows using an existing Linux installation to build a custom initramfs and in this case, the custom initramfs is built to include the proper support for both networking and FUSE.

The proof of concept in this demonstration originally ran in a container, using an existing project called google-drive-ocamlfuse to interact with Google Drive itself. From there, after sorting out some issues with root access, networking, malfunctioning symlinks, and various timeouts on the (perhaps predictably) slow system, the whole contraption was moved over to a laptop so it could be tested on real hardware. Everything runs, and although the original creator of this behemoth admits it is a bit “silly” they note that there may be some real-world use cases for something like this. We still won’t expect everyone to throw out their jump drives anytime soon, though. If you’re not feeling like your Linux skills are up to the challenge of something like this, we’d recommend you start with our own [Al Williams]’s Linux Fu series.

Swapping Vinyl for Cardboard with this ESP32 Turntable

Cardboard is a surprisingly durable material, especially in its corrugated form. It’s extremely lightweight for its strength, is easy to work, can be folded and formed into almost any shape, is incredibly inexpensive, and when it has done its duty it can be recycled back into more paper. For these reasons, it’s often used in packaging material but it can be used to build all kinds of things outside of ensuring that products arrive at their locations safely. This working cardboard record player is one example.

While the turntable doesn’t have working records in the sense that the music is etched into them like vinyl, each has its own RFID chip embedded that allows the ESP32 in the turntable’s body to identify them. Each record corresponds to a song stored on an SD card that instructs the ESP32 to play the appropriate song. It also takes care of spinning the record itself with a small stepper motor. There are a few other details on this build that tie it together too, including a movable needle arm held on with a magnet and a volume slider.

As far as a building material goes, cardboard is fairly underrated in our opinion. Besides small projects like this turntable, we’ve also seen it work as the foundation for a computer, and it even has the strength and durability to be built into a wall or even used as shelving material. And, of course, it’s a great material to use when prototyping new designs.

Go Forth With This Portable Programmer

When choosing a low-level language, it’s hard to beat the efficiency of Forth while also maintaining some amount of readability. There are open source options for the language which makes it accessible, and it maintains its prevalence in astronomical and other embedded systems for its direct hardware control and streamlined use of limited resources even though the language started over 50 years ago. Unlike 50 years ago, though, you can now take your own self-contained Forth programmer on the go with you.

The small computer is built on a design that [Dennis] built a while back called my4TH which has its own dedicated 8-bit CPU and can store data in a 256 kB EEPROM chip. Everything else needed for the computer is built in as well but that original design didn’t include a few features that this one adds, most notably a small 40×4 character LCD and a keyboard. The build also adds a case to tie everything together, with ports on the back for I2C and power plus an RS232 port. An optional battery circuit lets the computer power up without an external power supply as well.

Part of the appeal of Forth for systems like this is that it includes an interpreter and compiler in addition to the programming language itself, meaning that it has everything needed for a usable computer system built right in. For some more details on this unique language, or if you’d like to explore below the world of Python or C, check out [Elliot]’s discussion on the “hacker’s language.”. While Forth can tackle big problems, it can fit on tiny machines, too.

❌