Did you know you can get a “smart bed” that tracks your sleep, breathing, heart rate, and even regulates the temperature of the mattress? No? Well, you can get root access to one, too, as [Dillan] shows, and if you’re lucky, find a phone-home backdoor-like connection. The backstory to this hack is pretty interesting, too!
You see, a Sleep Number bed requires a network connection for its smart features, with no local option offered. Not to worry — [Dillan] wrote a Homebridge plugin that’d talk the cloud API, so you could at least meaningfully work with the bed data. However, the plugin got popular, Sleep Number didn’t expect the API to be that popular. When they discovered the plugin, they asked that it be shut down. Tech-inclined customers are not to be discouraged, of course.
Taking a closer look at the hardware, [Dillan] found a UART connection and dumped the flash, then wrote an extensive tutorial on how to tap into your bed’s controller, which runs Linux, and add a service you can use locally to query bed data and control the bed – just like it should have been from the beginning. Aside from that, he’s found a way to connect this hub to a network without using Sleep Number’s tools, enabling fully featured third-party use – something that the company doesn’t seem to like. Another thing he’s found is a reverse SSH tunnel back into the Sleep Number network.
Now, it can be reasonable to have a phone-home tunnel, but that doesn’t mean you want it in your personal network, and it does expose a threat surface that might be exploited in the future, which is why you might want to know about it. Perhaps you’d like to use Bluetooth instead of WiFi. Having this local option is good for several reasons. For example, having your smart devices rely on the manufacturer’s server is a practicethatregularlyresultsinperma-brickedsmartdevices, though we’ve been seeing someexamples of dedicated hackers bringing devices back to life. Thanks to this hack, once Sleep Number shutters, is bought out, or just wants to move on, their customers won’t be left with a suddenly dumbed-down bed they can no longer control.
When we think about sending an STL off on the Internet for processing, we usually want someone to print it for us or we want mesh repair. But [Chuck] found an interesting project on GitHub from [Andrew Sink] that will let you add a variable amount of twist to any STL and then return it to you for printing or whatever else you use STLs for. If you don’t get what we mean, check out the video below.
The site that does the work initially loads a little gnome figure if you are too lazy to upload your own model. That’s perfect, though, because the little guy is a good example of why you might want to twist a model. With just a little work, you can make the gnome look in one direction or even look behind him.
[Chuck] shows how to use the tool for artistic effect by twisting his standard cube logo. The result is something that looks like it would be difficult to create, but could hardly be easier. The tool lets you rotate the object, too, so you can get the twist effect in the right orientation for what you want to accomplish. A great little tool for making more artistic 3D prints without learning new software. If you want some fun, you can try the version that uses sound from your microphone to control the twist.
If you’d rather twist in CAD, we can help. If you really want artsy 3D printing, you probably need to learn Blender.
Cardboard is a surprisingly durable material, especially in its corrugated form. It’s extremely lightweight for its strength, is easy to work, can be folded and formed into almost any shape, is incredibly inexpensive, and when it has done its duty it can be recycled back into more paper. For these reasons, it’s often used in packaging material but it can be used to build all kinds of things outside of ensuring that products arrive at their locations safely. This working cardboard record player is one example.
While the turntable doesn’t have working records in the sense that the music is etched into them like vinyl, each has its own RFID chip embedded that allows the ESP32 in the turntable’s body to identify them. Each record corresponds to a song stored on an SD card that instructs the ESP32 to play the appropriate song. It also takes care of spinning the record itself with a small stepper motor. There are a few other details on this build that tie it together too, including a movable needle arm held on with a magnet and a volume slider.
There are so many new cool MCUs coming out, and you want to play with all of them, but, initially, they tend to be accessible as bare chips. Devboards might be hard to get, not expose everything, or carry a premium price. [Willmore] has faced this problem with an assortment of new WCH-made MCUs, and brings us all a solution – a universal board for TSSOP20-packaged MCUs, breadboard-friendly and adaptable to any pinout with only a few jumpers on the underside.
The board brings you everything you might want from a typical MCU breakout – an onboard 3.3V regulator, USB series resistors, a 1.5K pullup, decoupling capacitors, and a USB-C port. All GPIOs are broken out, and there’s a separate header you can wire up for all your SWD/UART/USB/whatever needs – just use the “patch panel” on the bottom of the board and pick the test points you want to join. [Willmore] has used these boards for the CH32Vxxx family, and they could, no doubt, be used for more – solder your MCU on, go through the pin table in the datasheet, do a little point-to-point wiring, and you get a pretty functional development board.
As a result of the European Union’s push for greater repairability of consumer devices like smartphones, Apple sees itself forced to make the batteries in the iPhone user-replaceable by 2027. Reportedly, this has led Apple to look at using electroadhesion rather than conventional adhesives which require either heat, isopropyl alcohol, violence, or all of the above to release. Although details are scarce, it seems that the general idea would be that the battery is wrapped in metal, which, together with the inside of the metal case, would allow for the creation of a cationic/anionic pair capable of permanent adhesion with the application of a low-voltage DC current.
This is not an entirely wild idea. Tesa has already commercialized it in the electrical debonding form of its Debonding on Demand product. This uses a tape that’s applied to one side of the (metal) surfaces, with a 5 bar pressure being applied for 5 seconds. Afterwards, the two parts can be released again without residue as shown in the above image. This involves applying a 12V DC voltage for 60 seconds, with the two parts afterward removable without force.
Tesa markets this right alongside the pull tab adhesive strips which are currently all the rage in smartphones, with the opinions on pull strips during battery replacement strongly divided. A bottle of IPA is always good to have nearby when a pull tab inevitably snaps off and you have to pry the battery loose. In that regard electroadhesion for debonding would make life significantly easier since the times when batteries were not a structural part of smartphones are unlikely to return no matter how much we might miss them.
We covered electroadhesion previously, as you can make just about anything stick to anything, including biological tissues to graphite and metal, with potentially interesting applications in robotics and medicine.
When choosing a low-level language, it’s hard to beat the efficiency of Forth while also maintaining some amount of readability. There are open source options for the language which makes it accessible, and it maintains its prevalence in astronomical and other embedded systems for its direct hardware control and streamlined use of limited resources even though the language started over 50 years ago. Unlike 50 years ago, though, you can now take your own self-contained Forth programmer on the go with you.
The small computer is built on a design that [Dennis] built a while back called my4TH which has its own dedicated 8-bit CPU and can store data in a 256 kB EEPROM chip. Everything else needed for the computer is built in as well but that original design didn’t include a few features that this one adds, most notably a small 40×4 character LCD and a keyboard. The build also adds a case to tie everything together, with ports on the back for I2C and power plus an RS232 port. An optional battery circuit lets the computer power up without an external power supply as well.
Part of the appeal of Forth for systems like this is that it includes an interpreter and compiler in addition to the programming language itself, meaning that it has everything needed for a usable computer system built right in. For some more details on this unique language, or if you’d like to explore below the world of Python or C, check out [Elliot]’s discussion on the “hacker’s language.”. While Forth can tackle big problems, it can fit on tiny machines, too.
Showing off the 3D-printed hydraulics system. (Credit: Indeterminate Design, YouTube)
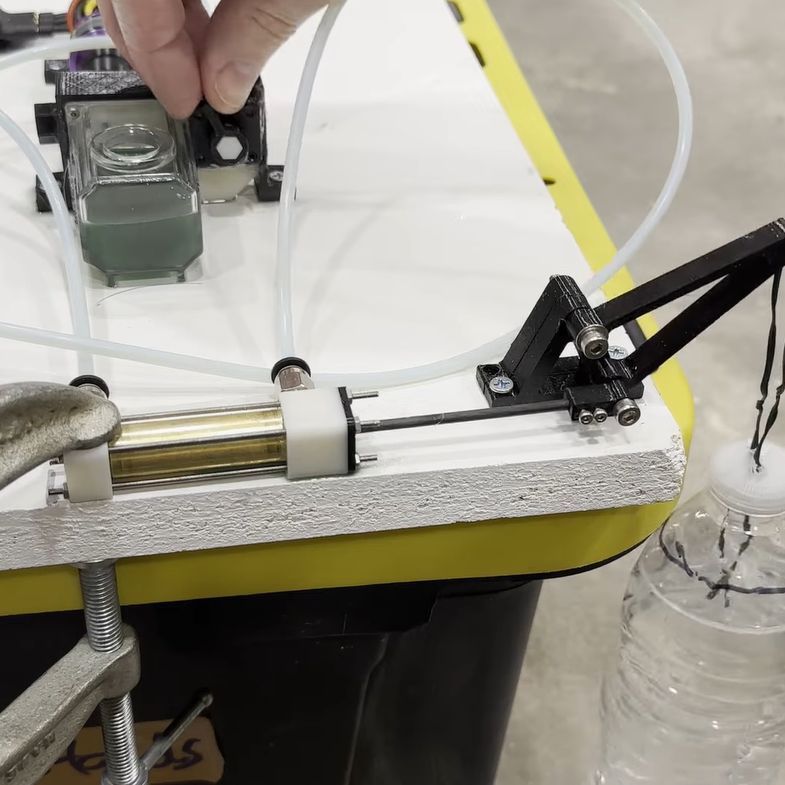
Hydraulics are incredibly versatile, but due to the pressures at which they operate, they are also rather expensive and not very DIY-friendly. This isn’t to say that you cannot take a fair shot at a halfway usable 3D-printed set of hydraulics, as [Indeterminate Design] demonstrates in a recent video. Although not 100% 3D-printed, it does give a good idea of how far you can push plastic-based additive manufacturing in this field.
Most interesting is the integration of the gear pump, 4-way selector valve, and relief valve into a single structure, which was printed with a resin printer (via the JLC3DP 3D print service). After bolting on the (also 3D printed) clear reservoir and assembling the rest of the structure including the MR63 ball bearings, relief spring valve, and pneumatic fittings it was ready to be tested. The (unloaded) gear pump could pump about 0.32 L/minute, demonstrating its basic functionality.
For the hydraulic cylinder, mostly non-3D printed parts were used, with a brass cylinder forming the main body. During these initial tests, plain water was used, followed by CHF11 hydraulic oil, with a pressure of about 1.3 bar (19 PSI) calculated afterward. This fairly low pressure is suspected to be caused by leaky seals (including the busted shaft seal), but as a basic proof of concept, it provides an interesting foundation for improvements.
Last week, [Al Williams] wrote up a his experience with a book that provided almost too much detailed information on how to build a DIY x-ray machine for his (then) young soul to bear. He almost had to build it! Where the “almost” is probably both a bummer because he didn’t have an x-ray machine as a kid, but also a great good because it was a super dangerous build, of a typical sort for the 1950s in which it was published.
Part of me really loves the matter-of-factness with which “A Boy’s First Book of Linear Accelerators” tells you how you (yes you!) can build a 500 kV van der Graff generator. But at the same time, modern me does find the lack of safety precautions in many of these mid-century books to be a little bit spooky. Contrast this with modern books where sometimes I get the feeling that the publisher’s legal team won’t let us read about folding paper airplanes for fear of getting cut.
A number of us have built dangerous projects in our lives, and many of us have gotten away with it. Part of the reason that many of us are still here is that we understood the dangers, but I would be lying if I said that I always fully understood them. But thinking about the dangers is still our first and best line of defense. Humility about how well you understand all of the dangers of a certain project is also very healthy – if you go into it keeping an eye out for the unknown unknowns, you’re in better shape.
Safety isn’t avoiding danger, but rather minimizing it. When we publish dangerous hacks, we really try to at least highlight the most important hazards so that you know what to look out for. And over the years, I’ve learned a ton of interesting safety tricks from the comments and fellow hackers alike. My ideal, then, is the spirit of the 1950s x-ray book, which encourages you to get the hack built, but modernized so that it tells you where the dangers lie and how to handle them. If you’re shooting electrons, shouldn’t the book also tell you how to stay out of the way?
This article is part of the Hackaday.com newsletter, delivered every seven days for each of the last 200+ weeks. It also includes our favorite articles from the last seven days that you can see on the web version of the newsletter.
Want this type of article to hit your inbox every Friday morning? You should sign up!
Developing free and open source software can be a thankless experience. Most folks do it because it’s something they’re passionate about, with the only personal benefit being the knowledge that there are individuals out there who found your work useful enough to download and install. So imagine how you’d feel if it turns out somebody was playing around with the figures, and the steady growth in the number of installs you thought your software had turned out to be fake.
[Gina] discovered this manipulation on June 26th after taking a look at the publicly available usage stats on data.octoprint.org. She noticed that an unusually high number of instances appeared to be running an old OctoPrint release, and upon closer inspection, realized what she was actually seeing was a stream of bogus data that was designed to trick the stat counter. Rolling back the data, she was able to find out this spam campaign has been going on since late 2022. Tens of thousands of the users she thought she’d gained over the last two years were in fact nothing more than garbage spit out by some bot. But why?
Here’s where it gets interesting. Looking at the data being reported by these fake OctoPrint instances, [Gina] could tell the vast majority of them claimed to be running a specific plugin: OctoEverywhere. The perpetrators were clever enough to sprinkle in a random collection of other popular plugins along with it, but this specific plugin was the one most of them had in common. Sure enough this pushed OctoEverywhere to the top of the charts, making it seem like it was the most popular plugin in the community repository.
So what do the developers of OctoEverywhere have to say for themselves? In a statement that [Gina] posted on the OctoPrint blog, they claim they were able to determine a member of the community had performed the stat manipulation of their own accord, but as of this writing are unwilling to release this individual’s identity. A similar statement now appears on the OctoEverywhere website.
On June 27th, Gina Häußge, the developer behind OctoPrint, informed us of an incident involving the OctoPrint usage stats. Gina had observed that the stats were being manipulated to boost OctoEverywhere’s rankings.
We took the report very seriously and quickly started an investigation. Using private community channels, we determineda community member was responsible for manipulating the OctoPrint stats. We had a private conversation with the individual, who didn’t realize the impact they were having but apologized and promised never to do it again.
From a journalistic perspective, it would be inappropriate for us to leap to any conclusions based on the currently available information. But we will say this…we’ve heard more convincing stories on a kindergarten playground. Even if we take the statement at face value, the fact that they were able to figure out who was doing this within 48 hours of being notified would seem to indicate this person wasn’t exactly a stranger to the team.
In any event, the bogus data has now been purged from the system, and the plugin popularity charts are once again showing accurate numbers. [Gina] also says some safeguards have been put into place to help prevent this sort of tampering from happening again. As for OctoEverywhere, it slid back to its rightful place as the 6th most popular plugin, a fact that frankly makes the whole thing even more infuriating — you’d think legitimately being in the top 10 would have been enough.
On Mastodon, [Gina] expressed her disappointment in being fooled into thinking OctoPrint was growing faster than it really was, which we certainly get. But even so, OctoPrint is a wildly popular piece of software that has become the cornerstone of a vibrant community. There’s no question that her work has had a incredible impact on the world of desktop 3D printing, and while this turn of events is frustrating, it will ultimately be little more than a footnote in what is sure to be a lasting legacy.
Fusion power has long held the promise of delivering near-endless energy without as many unfortunate side effects as nuclear fission. But despite huge investment and some fascinating science, the old adage about practical power generation being 20 years away seems just as true as ever. But is that really the case? [Brian Potter] has written a review article for Construction Physics, which takes us through the decades of fusion research.
For a start, it’s fascinating to learn about the many historical fusion process, the magnetic pinch, the stelarator, and finally the basis of many modern reactors, the tokamak. He demonstrates that we’ve made an impressive amount of progress, but at the same time warns against misleading comparisons. There’s a graph comparing fusion progress with Moore’s Law that he debunks, but he ends on a positive note. Who knows, we might not need a Mr. Fusion to arrive from the future after all!
Fusion reactors are surprisingly easy to make, assuming you don’t mind putting far more energy in than you’d ever receive in return. We’ve featured more than one Farnsworth fusor over the years.
Over the last few years, it’s been increasingly common for concertgoers to be handed a light-up bracelet from PixMob that synchronizes with the others in the crowd to turn the entire audience into a music visualizer. They’re a clever way of enhancing the concert experience, but unfortunately, they don’t do anything once you leave the show. Or at least, that used to be the case.
We’ve seen efforts to reverse engineer the IR (and occasionally radio) signals that drive these PixMob devices, but since we checked in last it seems like things have gotten a lot easier for the home gamer. [David Pride] has recently posted a brief write-up that shows how quickly and easily it is to get these devices fired up using nothing more exotic than an Arduino, an IR LED, and an audio sensor module.
With the audio sensor module connected to the Arduino’s digital input and the IR LED wired to digital out, all you need to do is flash firmware to the board and start playing some beats. The source code [David] has provided is a a remixed version of what’s previously been published by [Carlos Ganoza], which, in this case, has been tweaked to make the lighting patterns less random.
Presumably, this is to make the devices behave more like they do during an actual concert, but since nobody at Hackaday is cool enough to have seen a live musical performance in the last decade, we’re not really sure. All we can say is that the effect looks pretty sweet in the demo video.
Back in 2019, we saw a teardown of an early PixMob device, and by 2022, the efforts to reverse engineer their IR control protocol were well underway. We’re glad to see things have progressed to the point that you can piece together a transmitter from what’s in the parts bin, as it means at least some of these devices will have a lifespan longer than a single concert.
There’s a pleasing retro analogue experience to shooting Super 8 film, giving as it does the feel of a 1970s home movie to your work. But once you’ve had the film developed, there’s a need for a projector to enjoy the result. Far better to digitize it for a more modern viewing and editing experience. [Elbert] has made a digitizer for 8mm film which takes the best approach, snapping each frame individually to be joined together in a video file as a whole.
The frame of the device is 3D printed, but some parts of a film transport must be higher quality than a printed part can deliver. These, in particular the sprockets, are salvaged from a film viewer, and the movement is powered by a set of stepper motors. The steppers are controlled by an ESP32, and the optics are provided by a USB microscope. All this is hooked up to a PC which grabs each image, and finally stitches them all together using ffmpeg.
As anyone who has dabbled in 8mm film will tell you, there is a lot in the quality of a film digitizer, and it’s often worth paying for a professional job from someone aimed at the film-making world rather than you local photographic print booth. It would be interesting to take a look at this device, and see whether its quality is worth pursuing. After all, some of us have been known to dabble in 8mm film.
[Teaching Tech] got an interesting e-mail from [Johan] showing pictures of 3D prints with a dye-sublimated color image on the surface. Normally, we think of dye sublimation, we think of pressing color pictures onto fabric, especially T-shirts. But [Johan] uses a modified Epson inkjet printer and has amazing results, as you can see in the video below.
The printers use separate tanks for ink, which seems to be the key. If you already have an Espon “tank” printer, you are halfway there, but if you don’t have one, a cheap one will set you back less than $200 and maybe even less if you pick one up used.
You have to fill bottles with special dye, of course. You can also use the printer to make things like T-shirts. The idea is to print a dye transfer page and place it on the bed before you start printing. The sublimation dye is activated with heat, and, of course, you are shooting out hot plastic, so the image will transfer to the plastic.
[Teaching Tech] explains the best settings to make it all work. The results look great and we’re interested to try this ourselves. Transferring bed images is old hat, but this is something else. Beats liar’s color printing.
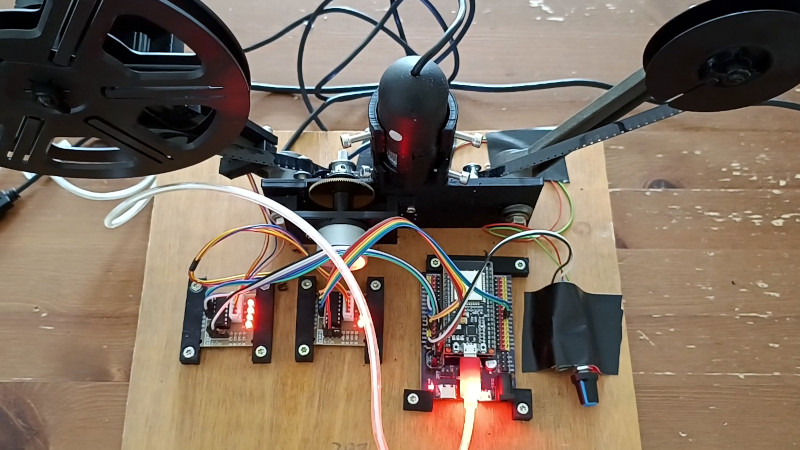
Not only will this spin nicely, the spinning action will use magnets to energize PCB coils and light up LEDs for some persistence of vision action. Designing the PCB was easier than you might imagine thanks to KiMotor, a KiCad plugin to automate the design of parametric PCB motors.
Mechanical testing went pretty well with the bearings and magnets that [mulcmu] had on hand, along with a scrap PCB as the sacrifice. Although a bit difficult to hold, it spins okay with just the bearing and the shaft. Once the boards arrived, it was time to test the electrical side. So far, things are not looking good — [mulcmu] is only getting a few tens of mV out of the rectifier — but they aren’t giving up hope yet. We can’t wait to see this one in action!
Hurry! This is the last weekend to enter the 2024 Business Card Challenge! Technically you have until Tuesday, July 2nd, but you know what we mean. Show us what you’ve got!
The hot news this week is that Kaspersky is banned in the USA. More specifically, Kaspersky products will be banned from sale in the US starting on September 29. This ban will extend to blocking software updates, though it’s unclear how that will actually be accomplished. It’s reasonable to assume that payment processors will block payments to Kaspersky, but will ISPs be required to block traffic that could contain antivirus updates?
WordPress Plugin Backdoor
A Quartet of WordPress plugins have been found to have recently included backdoor code. It’s a collection of five Open Source plugins, seemingly developed by unrelated people. Malicious updates first showed up on June 21st, and it appears that all five plugins are shipping the same malicious code.
The research seems to be done by the rabbitude group, who found the keys back in May. Of the things allowed by access to the API keys, the most worrying for user privacy was access to every text-to-speech call. Rabbitude states in their June 25 post, that “rabbit inc has known that we have had their elevenlabs (tts) api key for a month, but they have taken no action to rotate the api keys.” On the other hand, rabbit pushed a statement on the 26th, claiming they were just then made aware of the issue, and made the needed key rotations right away.
MOVEit is Back
Last year a severe vulnerability in MOVEit file transfer server led to some big-deal compromises in 2023 and 2024. MOVEit is back, this time disclosing an authentication bypass. The journey to finding this vulnerability starts with an exception, thrown whenever an SSH connection is attempted with a public key.
…the server is attempting to open the binary data representing our auth material, as a file path, on the server.
Uh-oh. There’s no way that’s good. What’s worse, that path can be an external SMB path. That’s even worse. This behavior does depend on the incoming connection referencing a valid username, but this has the potential to enable password stealing, pass-the-hash attacks, and username mapping. So what’s actually going on here? The SSH server used here is IPWorks SSH, which has some useful additions to SSH. One of these additions seems to be an odd delegated authentication scheme that goes very wrong in this case.
The attack flow goes like this: Upload a public SSH key to any location on the MOVEit server, log in with any valid username signing the connection with the uploaded key, and send the file location of the uploaded key instead of an actual key. Server pulls the key, makes sure it matches, and lets you in. The only pesky bit is how to upload a key without an account. It turns out that the server supports PPK keys, and those survive getting written to and read from the system logs. Ouch.
The flaws got fixed months ago, and a serious effort has been carried out to warn MOVEit customers and get them patched. On the other hand, a full Proof of Concept (PoC) is now available, and Internet monitoring groups are starting to see the attack being attempted in the wild.
Cat File: Pop Calc
We all know not to trust files from the Internet. Don’t execute the script, don’t load the spreadsheet, and definitely don’t install the package. But what about running cat or strings on an untrusted file? Apparently the magic of escape strings makes those dangerous too. The iTerm2 terminal was accidentally set to allow “window title reporting”, or copying the window title to the command line. Another escape code can set that value, making for an easy way to put an arbitrary command on the command line. One more quirk in the form of tmux integration allowed the injection of a newline — running the arbitrary command. Whoops. Versions 3.5.0 and 3.5.1 are the only iterm2 versions that are vulnerable, with version 3.5.2 containing the fix.
Putting LLM to Work During Naptime
There’s been a scourge of fake vulnerability reports, where someone has asked ChatGPT to find a vulnerability in a project with a bug bounty. First off, don’t do this. But second, it would be genuinely useful if a LLM could actually find vulnerabilities. This idea intrigued researchers at Google’s Project Zero, so they did some research, calling it “Project Naptime”, in a playful reference to napping while the LLM works.
The secret sauce seems to be in extending an LLM to look at real code, to run Python scripts in a sandbox, and have access to a debugger. The results were actually encouraging, that LLM could eventually be a useful tool. It’s not gonna replace the researcher, but it won’t surprise me to cover vulnerabilities found by a LLM instead of a fuzzing tool. Or maybe that’s an LLM guided fuzzer?
Github Dishes on Chrome RCE
Github’s [Man Yue Mo] discovered and reported CVE-2024-3833 in Chrome back in March, a fix was released in April, and it’s now time to get the details. This one is all about how object cloning and code caching interacts. Cloning an object in a particular circumstance ends up with an object that exists in a superposition between having unused property fields, and yet a full property array. Or put simply, the internal object state incorrectly indicates there is unused allocated memory. Try to write a new property, and it’s an out of bounds write.
The full exploit is involved, but the whole thing includes a sandbox escape as well, using overwritten WebAssembly functions. Impressive stuff.
Bits and Bytes
[Works By Design] is taking a second crack at building an unpickable lock. This one has some interesting features, like a ball-bearing spring system that should mean that levering one pin into place encourages the rest to drop out of position. A local locksmith wasn’t able to pick it, given just over half-an-hour. The real test will be what happens when [LockPickingLawyer] gets his hands on it, which is still to come.
People go missing without a trace far more commonly than any of us would like to think about. Of course the authorities will conduct a search, but even assuming they have the equipment and personnel necessary, the odds are often stacked against them. A few weeks go by, then months, and eventually there’s yet another “cold case” on the books and a family is left desperate for closure.
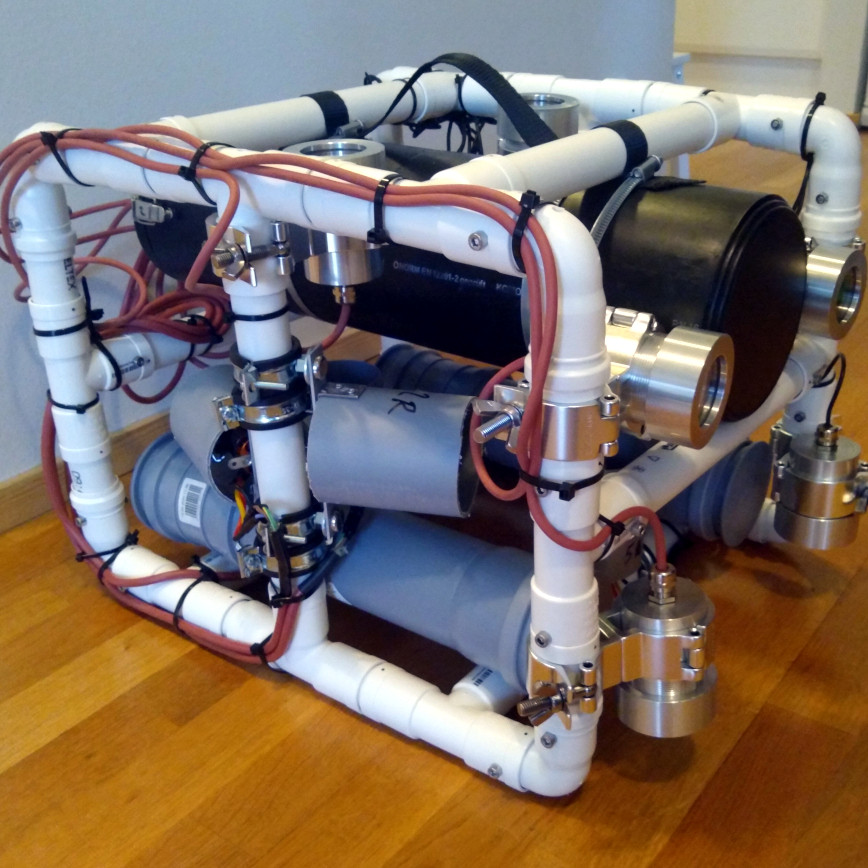
But occasionally a small team or an individual, if determined enough, can solve such a case even when the authorities have failed. Some of these people, such as [Antti Suanto] and his brother, have even managed to close the books on multiple missing person cases. In an incredibly engrossing series of blog posts, [Antti] describes how he hacked together a pair of remotely operated vehicles to help search for and ultimately identify sunken cars.
The first he built was intended to perform reconnaissance using a consumer side-scan sonar unit. While these devices are designed to be mounted to a “real” boat, [Antti] didn’t have the room at home for one. So he did some research and eventually settled on an affordable solution that combined a watertight plastic box with pontoons made out of PVC pipes. We’ve seen similar designs before, and have always been impressed with the stability and payload capacity offered by such an arrangement given its low cost and ease of assembly.
In an interesting twist [Antti] decided to outfit his craft with quadcopter motors and propellers to create a sort of airboat, which would keep it from getting tangled up in weeds. We also appreciate the no-nonsense method of viewing the sonar’s output remotely — all they had to do was take an old smartphone, point its camera at the unit, and open up a video calling application.
While having the sonar data would help the brothers identify potential targets on the bottom, it wasn’t enough to make a positive identification. For that, they’d have to go down there and directly image the object being investigated. So the second project was a remotely operated vehicle (ROV). Its PVC frame might look a bit low-tech, but [Antiii] designed the central “dry hull” to survive at depths of up to 100 meters (328 feet). With cameras, lights, a Raspberry Pi, and an Arduino Mega pulling it all together, the finished product is a formidable underwater explorer.
Combined with diligent research on the individuals who went missing and the areas in which they were last seen, the brothers were able to use these vehicles to solve a pair of missing persons cases that had been open for more than a decade. Their work earned them the personal thanks of the President of Finland, and a medal that’s generally only given to police officers.
Our hats off to this intrepid duo — surely there’s no more noble a pursuit than dedicating your skills and free time to help others.
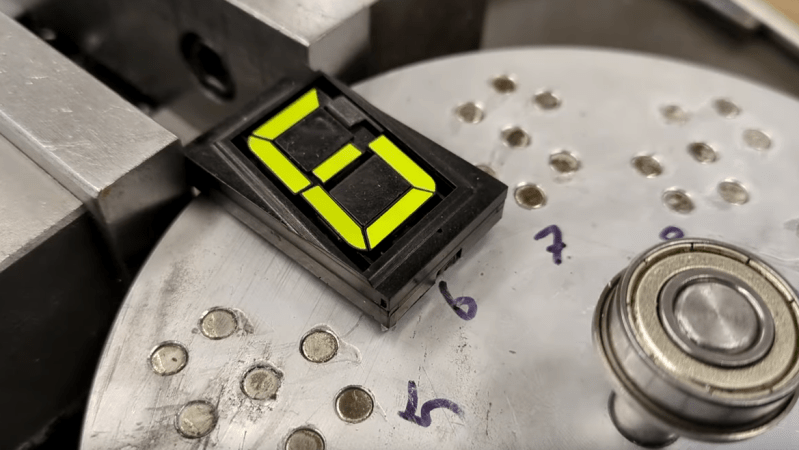
Dice are about the simplest machines possible, and they’ve been used since before recorded history to generate random numbers. But no machine is so simple that a little needless complexity can’t make it better, as is the case with this mechanical spinning dice. Or die. Whatever.
Inspiration for the project came from [Attoparsec]’s long history with RPG and tabletop games, which depend on different kinds of dice to generate the randomness that keeps them going — that and the fortuitous find of a seven-segment flip-dot display, plus the need for something cool to show off at OpenSauce. The flip-dot is controlled by an array of neodymium magnets with the proper polarity to flip the segments to the desired number. The magnets are attached to an aluminum disk, with each array spread out far enough to prevent interference. [Attoparsec] also added a ring of magnets to act as detents that lock the disk into a specific digit after a spin.
The finished product ended up being satisfyingly clicky and suitably random, and made a good impression at OpenSauce. The video below documents the whole design and build process, and includes some design dead-ends that [Attoparsec] went down in pursuit of a multiple-digit display. We’d love to see him revisit some of these ideas, mechanically difficult though they may be. And while he’s at it, maybe he could spice up the rolls with a little radioactivity.
It’s a constant battle for musicians — how to practice your instrument without bothering those around you? Many of us live in apartments or shared accommodation, and having to wait until the apartment is empty or only being able to practice at certain times of day can be restrictive, especially if you need to practice for an upcoming gig or if the creative juices start flowing and it’s 3 AM! [Gavin] was having this issue and started developing Porter, a guitar/bass practice device which works with all effects pedals and is portable and rechargeable. So you can grind away your epic heavy metal solo no matter the time of day!
While there have been similar solutions, many musicians weren’t satisfied with the sound and often couldn’t support inputs from distortion pedals. They usually chewed through batteries and were just not a great solution to the problem. [Gavin] has spent the last two years fine-tuning the design. It’s a fully analog design, with built-in rechargeable batteries to boot. So it not only sounds great, but it can last as long as your practice session does with a 15-hour runtime when fully charged!
Initially, the project began as a headphone amplifier but morphed into a design specifically for guitar and bass, with preamp and power amp stages and adjustable input impedance – 500kΩ for guitars and 1MΩ for bass. The latest revision also changed to a different power amp that further reduced THD and led to an even better sound. The schematics are up on the Hackaday.io project page, but [Gavin] is also hoping to do a crowdfunding campaign to get these devices out into the hands of guitarists everywhere!
While it’s currently the start of summer in the Northern Hemisphere, it will inevitably get cold again. If you’re looking for a unique way of heating your workshop this year, you could do worse than build an 8-bit computer with a bunch of 6N3P vacuum tubes. While there are some technical details, you might find it a challenging build. But it is still an impressive sight, and it took 18 months to build a prototype and the final version. You can find the technical details if you want to try your hand. Oh, did we mention it takes about 200 amps? One of the prototype computers plays Pong on a decidedly low-tech display, which you can see below.
The architecture has 8 data bits and 12 address bits. It only provides six instructions, but that keeps the tube count manageable. Each tube has two triodes in one envelope and form a NOR gate which is sufficient to build everything else you need. In addition to tubes, there are reed relays and some NVRAM, a modern conceit.
Operating instructions are to turn it on and wait for the 560 tubes to warm up. Then, to quote the designer, “… I check the fire extinguisher is full, and run the code.” We wonder if one of the six instructions is halt and catch fire. Another quote from the builder is: “It has been a ridiculous amount of soldering and a fantastic amount of fun.” We can imagine.
If the computer seems familiar, we covered the first and second prototypes named ENA and Fred. We’ve also seen tube-base single-board computers.