Vista de Lectura

Hay nuevos artículos disponibles. Pincha para refrescar la página.

Custom Microcode Compiler, Made in Google Sheets

When homebrewing a CPU, one has to deal with microcode. Microcode is the low-level nuts and bolts of how, precisely, a CPU executes instructions (like opcodes) and performs functions such as updating the cycle counter or handling interrupt requests. To make this task easier, [Bob Alexander] created a microcode compiler built in Google Sheets to help with his own homebrew work, but it’s flexible and configurable enough to be useful to others, as well.

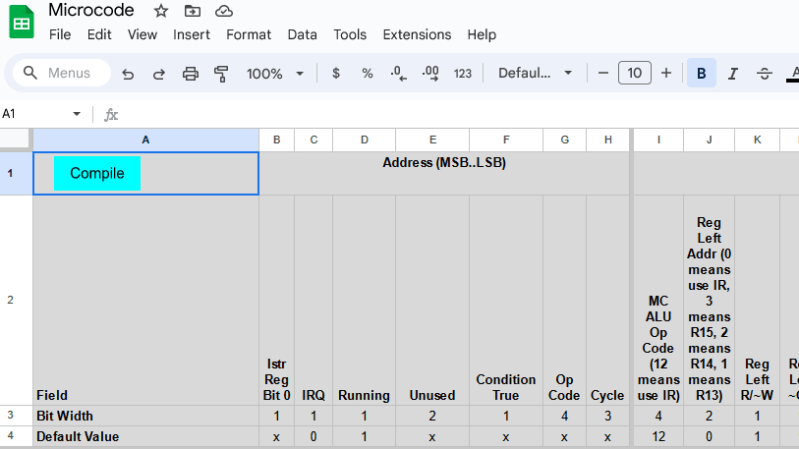
A CPU’s microcode usually lives in read-only memory, and writing the microcode is only one step in the journey. [Bob]’s tool compiles his microcode into files that can be burned into memory (multiple EEPROM chips, in [Bob]’s case) or used as a Verilog program in the case of implementing the CPU in an FPGA. It’s configurable enough to be adapted for other homebrew CPU projects, though one would of course have to re-write the microcode portion.

A read-only version of the spreadsheet makes for some fun browsing, and if it piques your interest enough to get a copy of your own complete with the compiler script, you can do that here. It uses Google Sheets, and writes the output files into one’s Google Drive.

This kind of low-level project really highlights the finer points of just how the hard work of digital computing gets done. A good example is the Gigatron which implemented a RISC CPU using only microcode, memory, and logic gates in the late 70s. We’ve even seen custom microcode used to aid complex debugging.

2024 Business Card Challenge: Magnetic Fidget Card

A 3D-printed magnetic fidget business card with ID storage.

If you want someone to keep your business card around, you should probably make it really cool-looking, or have it do something useful. It’s kind of the whole point of the 2024 Business Card Challenge. And while we’d normally expect electronics of some persuasion to be involved, we must admit that this magnetic fidget card definitely does something, at least when manipulated. And even when it’s just sitting there, the card has a storage slot for IDs, or whatever you want.

Have you ever played with a magnetic fidget? They are quite satisfying, and making one yourself is likely to be even cheaper than making one of the spinning variety. This one uses a whopping 16 neodymium magnets, which means that it’s probably quite aurally satisfying as well as fun to handle.

And of course, since it’s 3D-printed, you can put whatever you want on the faces and update them easily if something changes. Bonus points to [Bhuvan Bagwe] for designing some for the Hackaday crew!

2024 Business Card Challenge

Hacking a Brother Label Maker: Is your CUPS half empty or half full?

On the one hand, we were impressed that a tiny Brother label maker actually uses CUPS to support printing. Like [Sdomi], we were less than impressed at how old a copy it was using – – 1.6.1. Of course, [Sdomi] managed to gain access to the OS and set things up the right way, and we get an over-the-shoulder view.

It wasn’t just the old copy of CUPS, either. The setup page was very dated and while that’s just cosmetic, it still strikes a nerve. The Linux kernel in use was also super old. Luckily, the URLs looked like good candidates for command injection.

Worst of all, the old version of CUPS had some known vulnerabilities, so there were several avenues of attack. The interface had some filtering, so slashes and spaces were not passed, but several other characters could get around the limitations. Very clever.

The post contains a few good tricks to file away for future use. It also turned out that despite the Brother branding, the printer is really from another company, which was useful to know, too. In the end, does the printer work any better? Probably not. But we get the urge to check some of the other devices we own.

The last time we saw CUPS save an old printer, it had to be bolted on. CUPS was meant to support 3D printers, but we never see anyone using it like that.

Repeatable “One-Click” Fusion, From Your Cellphone

Sometimes you spend so much time building and operating your nuclear fusor that you neglect the creature comforts, like a simple fusion control profile or a cellphone app to remote control the whole setup. No worries, [Nate Sales] has your back with his openreactor project, your one-click fusion solution!

An inertial electrostatic confinement (IEC) fusor is perhaps the easiest type of fusion for the home gamer, but that’s not the same thing as saying that building and running one is easy. It requires high vacuum, high voltage, and the controlled introduction of deuterium into the chamber. And because it’s real-deal fusion, it’s giving off neutrons, which means that you don’t want to be standing on the wrong side of the lead shielding. This is where remote control is paramount.

While this isn’t an automation problem that many people will be having, to put it lightly, it’s awesome that [Nate] shared his solution with us all. Sure, if you’re running a different turbo pump or flow controller, you might have some hacking to do, but at least you’ve got a start. And if you’re simply curious about fusion on a hobby scale, his repo is full of interesting details, from the inside.

And while this sounds far out, fusion at home is surprisingly attainable. Heck, if a 12-year old or even a YouTuber can do it, so can you! And now the software shouldn’t stand in your way.

Thanks [Anon] for the tip!

British Trains To (Maybe) Make Way For Steam Once More

There’s nothing more guaranteed to excite a grizzled old railway enthusiast than the sight of a steam locomotive. The original main-line rail propulsion technology still clings on in a few places, but for practical purposes, it disappeared a lifetime ago. It’s interesting then to hear of a brand new steam locomotive prototype being considered for revenue freight use on British metals. Is it yet another rebuild of a heritage design to be used for enthusiasts only? No, it’s an entirely new design with nothing in common with the locomotives of the past, as [Terrier55Stepney] tells us in the video below the break.

Gone is the huge boiler and reciprocating pistons of old, as indeed is the notion of boiling anything. Instead, this is a steam turbine, nothing like the 1920s and 30s experiments with conventional locomotives, nor even the Union Pacific’s oil-fired condensing turbo-electrics. The new idea here from the British company Steamology is to create steam directly from the combustion of hydrogen in a series of small modular steam generators, and the resulting prototype turbo-generator will replace the diesel engine in a redundant British Rail class 60 freight locomotive. It’s unclear whether it will incorporate a condenser, but since it has no need to retain the water for a boiler we’re not sure it would need one.

Prototype locomotives featuring new technologies have a long and inglorious history of not making the grade, so while this is definitely an exciting and interesting development we’re not guaranteed to see it in widespread use. But it could offer a way to ensure a low-carbon replacement for diesel heavy freight locomotives, and unexpectedly provide engine upgrades for existing classes. The fact it’s technically a steam locomotive is incidental.

BR Class 60: Tutenkhamun Sleeping, CC BY 2.0.

Full-Scale Flying DeLorean Gets Closer to Liftoff

These days, even hobbyist multi-rotor aircraft are capable of carrying considerable payloads. For example, the test rig that [Brian Brocken] recently put together should be able to loft more than 80 pounds (36 kilograms) without breaking a sweat. That would be a whole lot of camera gear or other equipment, but in this case, he’s planning on carrying something a bit more interesting: a full-scale foam DeLorean.

We first covered this project in December of last year, when [Brian] started using a massive robotic arm to carefully cut the body and individual parts of the car out of expanded polystyrene foam. He estimated at the time the body should weigh in at less than 30 lbs (14 kg), so he’d need to build a quadcopter with a maximum lift of roughly twice that much to keep the performance where he wanted it.

In the latest update to the Hackaday.io project page, [Brian] goes over the work that’s been done since we first got a glimpse of this incredible build. Improvements have been made to the motorized flaps and slats that cover up the front and rear motors when not in operation. The DeLorean’s iconic gull-wing doors have also been recreated, although in this case they’re motorized.

But the real news is the prototype airframe. Made of aluminum and 3D printed components, [Brian] is using it to get a feel for how much thrust can be expected from the motors, as well as provide some early numbers for the eventual PID tuning that’ll be needed to get the car flying smoothly. Unfortunately, there’s a bit too much flex in this version of the frame — [Brian] says that a later carbon fiber version will not only be more rigid, but also shave off a few more precious pounds.

We’re just as eager as the rest of you to see the first flight of this ambitious build, so stay tuned for the next update.

2024 Business Card Challenge: a Battery Tester with Blinkenlights

A battery-testing business card.

Readers of a certain vintage will no doubt remember that for a brief time, some alkaline batteries came with a built-in battery tester. Basically, you just pushed really hard with your fingernails on the two ends of the strip, and it either lit up the little strip (or didn’t if it was dead), or made the word ‘good’ appear if energized.

But those days are long gone. What you need now is to either grab the voltmeter, stick out your tongue, or build yourself a battery-testing business card. Even the normies will enjoy this one, mostly because LEDs. Forty-seven of them to be exact, which will come to life and demonstrate that [Greg] is capable of making working electronic gadgets. No way does this card end up at the bottom of a desk drawer.

As far as grasping the batteries goes, [Greg] had several ideas, but ultimately landed on pogo pins, which we think is a fabulous solution. Be sure to check out the neat interactive BOM, somewhere in the middle of which is the CH32v003 RISC-V microcontroller. In the video after the break, you can see [Greg] using a Flipper Zero to program it.

2024 Business Card Challenge

Halfway Between Inspiration and Engineering

We see a lot of hacks where the path to success is pretty obvious, if maybe strewn with all sorts of complications, land-mines, and time-sinks. Then we get other hacks that are just totally out-of-the-box. Maybe the work itself isn’t so impressive, or even “correct” by engineering standards, but the inner idea that’s so crazy it just might work shines through.

This week, for instance, we saw an adaptive backlight LED TV modification that no engineer would ever design. Whether it was just the easiest way out, or used up parts on hand, [Mousa] cracked the problem of assigning brightnesses to the LED backlights by taking a tiny screen, playing the same movie on it, pointing it at an array of light sensors, and driving the LEDs inside his big TV off of that. No image processing, no computation, just light hitting LDRs. It’s mad, and it involves many, many wires, but it gets the job done.

Similarly, we saw an answer to the wet-3D-filament problem that’s as simple as it could possibly be: basically a tube with heated, dry air running through it that the filament must pass through on it’s way to the hot end. We’ve seen plenty of engineered solutions to damp filament, ranging from an ounce of prevention in the form of various desiccant storage options, to a pound of cure – putting the spools in the oven to bake out. We’re sure that drying filament inline isn’t the right way to do it, but we’re glad to see it work. The idea is there when you need it.

Not that there’s anything wrong with the engineering mindset. Quite the contrary: most often taking things one reasonable step at a time, quantifying up all the unknowns, and thinking through the path of least resistance gets you to the finish line of your project faster. But we still have to admire the off-the-wall hacks, where the way that makes the most sense isn’t always the most beautiful way to go. It’s a good week on Hackaday when we get both types of projects in even doses.

This article is part of the Hackaday.com newsletter, delivered every seven days for each of the last 200+ weeks. It also includes our favorite articles from the last seven days that you can see on the web version of the newsletter. Want this type of article to hit your inbox every Friday morning? You should sign up!

Candle Powered Lantern Isn’t as Silly as You Think

[Gilles Messier] at the Our Own Devices YouTube channel recently took a look at an interesting device — an electric lantern powered by a candle. At first glance, this sounds completely absurd. Why use a candle to power LEDs when you can use the light from the candle itself? This gadget has a trick up its sleeve, though. It lets candle light out and uses the heat from the candle flame to generate power for the LEDs.

The small Peltier “solid-state heat pump” module in the lantern acts as a thermoelectric generator, converting heat from the candle into electricity for the LEDs. The genius of the device is how it handles the candle “exhaust”.  A bimetallic disk in the chimney of the lantern closes when the air inside the device is hot. The Peltier device converts the heat differential to electricity, causing the air inside the lantern to cool. Meanwhile, the candle is beginning to starve for oxygen.  Once the air cools down a bit, the disk bends, allowing stale smoke out, and fresh air in, allowing the candle to burn brightly again. Then the cycle repeats.

[Gilles] does a deep dive into the efficiency of the lantern, which is worth the price of admission alone. These lanterns are pretty expensive — but Peltier modules are well-known by hackers. We’re sure it won’t be too hard to knock together a cheap version at home.

New Solar Spheres Claim to be Better than Solar Panels

When you think of solar energy, you probably think of flat plates on rooftops. A company called WAVJA wants you to think of spheres. The little spheres, ranging from one to four inches across, can convert light into electricity, and the company claims they have 7.5 times the output of traditional solar panels and could later produce even more. Unfortunately, the video below doesn’t have a great deal of detail to back up the claims.

Some scenes in the video are clearly forward-looking. However, the so-called photon energy system appears to be powering a variety of real devices. It’s difficult to assess some of the claims. For example, the video claims 60 times the output of a similar-sized panel. But you’d hardly expect much from a tiny 4-inch solar panel.

What do you think? Do they really have layers of exotic material? If we were going to bet, we’d bet these claims are a bit of hyperbole. Then again, who knows? We’ll be watching to see what technical details emerge. We have to admit that quotes like this from their website don’t make us especially hopeful:

…relies on the use of multiple layers of materials and special spheres to introduce sunlight and generate a significant amount of luminosity, which is then transformed into electricity using a silicon conductor module…

There are ways to make solar technology more efficient. But we do see a lot of solar energy claims that are — well — inflated.

Building an IR Thermometer That Fits on Your Keychain

Non-contact infrared (IR) thermometers used to be something of an exotic tool, but thanks at least in part due to the COVID-19 pandemic, they’re now the sort of thing you see hanging up near the grocery store checkout as a cheap impulse buy. Demand pushed up production, and the economies of scale did the test. Now the devices, and the sensors within them, are cheap enough for us hackers to play with.

The end result is that we now have projects like this ultra compact IR thermometer from [gokux]. With just a handful of components, some code to glue it all together, and a 3D printed enclosure to wrap it all up, you’ve got a legitimately useful tool that’s small enough to replace that lucky rabbit’s foot you’ve got on your keys.

If this project looks familiar, it’s because the whole thing is closely related to the LiDAR rangefinder [gokux] put together last month. It shares the same Seeed Studio XIAO  ESP32-C3 microcontroller, 0.49 inch OLED display, and tiny 40 mAh LiPo battery. The only thing that’s really changed, aside from the adjustments necessary to the 3D printed enclosure, is that the LiDAR sensor was replaced with a MLX90614 IR temperature sensor.

[gokux] has put together some great documentation for this build, making it easy for others to recreate and remix on their own. Assembly is particularly straightforward thanks to the fact that both the display and temperature sensor communicate with the ESP32 over I2C, allowing them to be wired daisy chain style — there’s no need for even a scrap of perfboard inside the case, let alone a custom board.

Dad? Where Did Printed Circuit Boards Come From?

These days, it is hard to imagine electronics without printed circuit boards. They are literally in everything. While making PCBs at home used to be a chore, these days, you design on a computer, click a button, and they show up in the mail. But if you go back far enough, there were no PC boards. Where did they come from? That’s the question posed by [Steven Leibson] who did some investigating into the topic.

There were many false starts at building things like PCBs using wires glued to substrates or conductive inks.  However, it wasn’t until World War II that mass production of PC boards became common. In particular, they were the perfect solution for proximity fuzes in artillery shells.

The environment for these fuzes is harsh. You literally fire them out of a cannon, and they can feel up to 20,000 Gs of acceleration. That will turn most electronic circuits into mush.

The answer was to print silver-bearing ink on a ceramic substrate. These boards contained tubes, which also needed special care. Two PCBs would often have components mounted vertically in a “cordwood” configuration.

From there, of course, things progressed rapidly. We’ve actually looked at the proximity fuze before. Not to mention cordwood.

The Thermite Process Iron Foundry

The thermite process is a handy way to generate molten iron in the field. It’s the reaction between aluminium metal and iron oxide, which results in aluminium oxide and metallic iron. It’s hot enough that the iron is produced as a liquid, which means it’s most notably used for in-field welding of things such as railway tracks. All this is grist to [Cody’s Lab]’s mill of course, so in the video below the break he attempts to use a thermite reaction in a rough-and-ready foundry, to make a cast-iron frying pan.

Most of the video deals with the construction of the reaction vessel and the mold, for which he makes his own sodium silicate and cures it with carbon dioxide. The thermite mix itself comes from aluminium foil and black iron oxide sand, plus some crushed up drinks cans for good measure.

The result is pretty successful at making a respectable quantity of iron, and his pour goes well enough to make a recognizable frying pan. It has a few bubbles and a slight leak, but it’s good enough to cook an egg. We’re sure his next try will be better. Meanwhile this may produce a purer result, but it’s by no means the only way to produce molten iron on a small scale.

A Look Back at the USSR’s Mi-6 Helicopter Airliner

Most of us would equate commercial airline travel with fixed-wing aircraft, but civilian transport by helicopter, especially in large and sparsely populated regions, is common enough. It was once even big business in the Soviet Union, where the Aeroflot airline operated passenger helicopters in regular service for many decades. In the mid-1960s they even started work on converting the Mil Mi-6 — the USSR’s largest and fastest helicopter — to carry paying passengers. Unfortunately this never got past a single prototype, with the circumstances described by [Oliver Parken] in a recent article.

This passenger version of the Mi-6 got the designation Mi-6P (for passazhirskyi, meaning passenger) and would have seated up to 80 (3 + 2 row configuration), compared to the Mi-8 passenger variant that carried 28 – 31 passengers. Why exactly the Mi-6P never got past the prototype stage is unknown, but its successor in the form of the Mi-26P has a listed passenger variant and features. Both have a cruising speed of around 250 km/h, with a top of 300 km/h. The auxiliary winglets of the Mi-6 provided additional lift during flight, and the weight lifting record set by the Mi-6 was only broken by the Mi-26 in 1982.

An obvious disadvantage of passenger helicopters is that they are more complicated to operate and maintain, while small fixed wing airliners like the ATR 72 (introduced in 1988) can carry about as many passengers, requires just a strip of tarmac to land and take off from, travel about twice as fast as an Mi-6P would, and do not require two helicopter pilots to fly them. Unless the ability to hover and land or take-off vertically are required, this pretty much explains why passenger helicopters are such a niche application. Not that the Mi-6P doesn’t have that certain je ne sais quoi to it, mind.

This Week in Security: Hide Yo SSH, Polyfill, and Packing It Up

The big news this week was that OpenSSH has an unauthorized Remote Code Execution exploit. Or more precisely, it had one that was fixed in 2006, that was unintentionally re-introduced in version 8.5p1 from 2021. The flaw is a signal handler race condition, where async-unsafe code gets called from within the SIGALARM handler. What does that mean?

To understand, we have to dive into the world of Linux signal handling. Signals are sent by the operating system, to individual processes, to notify the process of a state change. For example SIGHUP, or SIGnal HangUP, originally indicated the disconnect of the terminal’s serial line where a program was running. SIGALRM is the SIGnal ALaRM, which indicates that a timer has expired.

What’s interesting about signal handling in Unix is how it interrupts program execution. The OS has complete control over execution scheduling, so in response to a signal, the scheduler pauses execution and immediately handles the signal. If no signal handler function is defined, that means a default handler provided by the OS. But if the handler is set, that function is immediately run. And here’s the dangerous part. Program execution can be anywhere in the program, when it gets paused, the signal handler run, and then execution continues. From Andries Brouwer in The Linux Kernel:

It is difficult to do interesting things in a signal handler, because the process can be interrupted in an arbitrary place, data structures can be in arbitrary state, etc. The three most common things to do in a signal handler are (i) set a flag variable and return immediately, and (ii) (messy) throw away all the program was doing, and restart at some convenient point, perhaps the main command loop or so, and (iii) clean up and exit.

The term async-signal-safe describes functions that have predictable behavior even when called from a signal handler, with execution paused at an arbitrary state. How can such a function be unsafe? Let’s consider the async-signal-unsafe free(). Here, sections of memory are marked free, and then pointers to that memory are added to the table of free memory. If program execution is interrupted between these points, we have an undefined state where memory is both free, and still allocated. A second call to free() during execution pause will corrupt the free memory data structure, as the code is not intended to be called in this reentrant manner.

So back to the OpenSSH flaw. The SSH daemon sets a timer when a new connection comes in, and if the authentication hasn’t completed, the SIGALRM signal is generated when the timer expires. The problem is that this signal handler uses the syslog() system call, which is not an async-safe function, due to inclusion of malloc() and free() system calls. The trick is start an SSH connection, wait for the timeout, and send the last bytes of a public-key packet just before the timeout signal fires. If the public-key handling function just happens to be at the correct point in a malloc() call, when the SIGALRM handler reenters malloc(), the heap is corrupted. This corruption overwrites a function pointer. Replace the pointer with an address where the incoming key material was stored, and suddenly we have shellcode execution.

There are several problems with turing this into a functional exploit. The first is that it’s a race condition, requiring very tight timing to split program execution in just the right spot. The randomness of network timing makes this a high hurdle. Next, all major distros use Address Space Layout Randomization (ASLR), which should make that pointer overwrite very difficult. It turns out, also on all the major distros, ASLR is somewhat broken. OK, on 32-bit installs, it’s completely broken. On the Debian system tested, there’s literally a single bit of ASLR in play for the glibc library. It can be located at one of two possible memory locations.

Assuming the default settings for max SSH connections and LoginGraceTime, it takes an average of 3-4 hours to win the race condition to trigger the bug, and then there’s a 50% chance of guessing the correct address on the first try. That seems to put the average time at five and a quarter hours to crack a 32-bit Debian machine. A 64-bit machine does have ASLR that works a bit better. A working exploit had not been demonstrated as of when the vulnerability write-up was published, but the authors suggest it could be achieved in the ballpark of a week of attacking.

So what systems should we really worry about? The regression was introduced in 8.5p1, and fixed in 9.8p1. That means Debian 11, RHEL 8, and their derivatives are in the clear, as they ship older OpenSSH versions. Debian 12 and RHEL 9 are in trouble, though both of those distros now have updates available that fix the issue. If you’re on one of those distros, particularly the 32-bit version, it’s time to update OpenSSH and restart the service. You can check the OpenSSH version by running nc -w1 localhost 22 -i 1, to see if you’re possibly vulnerable.

Polyfill

The Polyfill service was once a useful tool, to pull JavaScript functions in to emulate newer browser features in browsers that weren’t quite up to the task. This worked by including the polyfill JS script from polyfill.io. The problem is that the Funnull company acquired the polyfill domain and Github account, and began serving malicious scripts instead of the legitimate polyfill function.

The list of domains and companies caught in this supply chain attack is pretty extensive, with nearly 400,000 still trying to link to the domain as of July 3rd. We say “trying”, as providers have taken note of Sansec’s report, breaking the story. Google has blocked associated domains out of advertising, Cloudflare is rewriting calls to polyfill to a clean cache, and Namecheap has blackholed the domain, putting an end to the attack. It’s a reminder that just because a domain is trustworthy now, it may not be in the future. Be careful where you link to.

Pack It Up

We’re no strangers to disagreement over CVE severity drama. There can be a desire to make a found vulnerability seem severe, and occasionally this results in a wild exaggeration of the impact of an issue. Case in point, the node-ip project has an issue, CVE-2023-42282, that originally scored a CVSS of 9.8. The node-IP author has taken the stance that it’s not a vulnerability at all, since it requires an untrusted input to be passed into node-ip, and then used for an authorization check. It seems to be a reasonable objection — if an attacker can manipulate the source IP address in this way, the source IP is untrustworthy, regardless of this issue in node-ip.

The maintainer, [Fedor] made the call to simply archive the node-ip project in response to the seemingly bogus CVE, and unending stream of unintentional harassment over the issue. Auditing tools starting alerting developers about the issue, and they started pinging the project. With seemingly no way to fight back against the report, archiving the project seemed like the best solution. However, the bug has been fixed, and Github has reduced the severity to “low” in their advisory. As a result, [Fedora] did announce that the project is coming back, and indeed it is again an active project on Github.

Bits and Bytes

[sam4k] found a remote Use After Free (UAF) in the Linux Transparent Inter Process Communication (TIPC) service, that may be exploitable to achieve RCE. This one is sort of a toy vulnerability, found while preparing a talk on bug hunting in the Linux kernel. It’s also not a protocol that’s even built in to the kernel by default, so the potential fallout here is quite low. The problem is fragmentation handling, as the error handling misses a check for the last fragment buffer, and tries to free it twice. It was fixed this May, in Kernel version 6.8.

CocaoPods is a dependency manager for Swift/Objective-C projects, and it had a trio of severe problems. The most interesting was the result of a migration, where many packages lost their connection to the correct maintainer account. Using the CocaoPods API and a maintainer email address, it was possible for arbitrary users to claim those packages and make changes. This and a couple other issues were fixed late last year.

Toyota Heater Switches Learn New Tricks

The look, the feel, the sound — there are few things more satisfying in this world than a nice switch. If you’re putting together a device that you plan on using frequently, outfitting it with high-quality switches is one of those things that’s worth the extra cost and effort.

So we understand completely why [STR-Alorman] went to such great lengths to get the aftermarket seat heaters he purchased working with the gorgeous switches Toyota used in the 2006 4Runner. That might not sound like the kind of thing that would involve reverse engineering hardware, creating a custom PCB, or writing a bit of code to tie it all together. But of course, when working on even a halfway modern automobile, it seems nothing is ever easy.

The process started with opening up the original Toyota switches and figuring out how they work. The six-pin units have a lot going on internally, with a toggle, a rheostat, and multiple lights packed into each one. Toyota has some pretty good documentation, but it still took some practical testing to distill it down into something a bit more manageable. The resulting KiCad symbol for the switch helps explain what’s happening inside, and [STR-Alorman] has provided a chart that attributes each detent on the knob with the measured resistance.

But understanding how the switches worked was only half the battle. The aftermarket seat heaters were only designed to work with simple toggles, so [STR-Alorman] had to develop a controller that could interface with the Toyota switches and convince the heaters to produce the desired result. The custom PCB hosts a Teensy 3.2 that reads the information from both the left and right seat switches, and uses that to control a pair of beefy MOSFETs. An interesting note here is the use of very slow pulse-width modulation (PWM) used to flip the state of the MOSFET due to the thermal inertia of the heater modules.

We love the effort [STR-Alorman] put into documenting this project, going as far as providing the Toyota part numbers for the switches and the appropriate center-console panel with the appropriate openings to accept them. It’s an excellent resource if you happen to own a 4Runner from this era, and a fascinating read for the rest of us.

How To Turn Cheap Speakers Into Something A Little Better

[Adam Francis] bought some cheap speaker drivers from AliExpress. Are they any good? Difficult to tell without a set of enclosures for them, so he made a set of transmission line cabinets. The resulting video proves that a decent sounding set of speakers shouldn’t have to cost the earth, and is quite entertaining to watch.

The design he’s going for is a transmission line, in effect a folded half-wave resonant tube terminated at one end and open at the other, with the speaker close to half way along. There is a lot of nuance to perfecting a speaker cabinet, but this basic recipe doesn’t have to be optimum to give a good result.

So after having some MDF cut to shape and glueing it all together, he ends up with some semi decent speakers for not a lot of money. The video is entertaining, with plenty of Britishisms, but the underlying project is sound. We’d have a pair on our bench.

Useless Robot Gets Cute, Has Personality

Useless robots (or useless machines) are devices that, when switched on, exist only to turn themselves back off. They are fun and fairly simple builds that are easy to personify, and really invite customization by their creators. Even so, [tobychui]’s Kawaii Useless Robot goes above and beyond in that regard. Not only will his creation dutifully turn itself off, but if the user persists in engaging it, Kawaii Useless Robot grows progressively (and adorably) upset which ultimately culminates in scooting about and trying to run away.

If anything, it gets cuter when upset.

This is actually a ground-up re-imagining of an original work [tobychui] saw from a Japanese maker twelve years ago. That original Kawaii Useless Robot did not have any design details, so [tobychui] decided to re-create his own.

Behind the laser-cut front panel is a dot matrix LED display made up of eight smaller units, and inside are a total of four motors, an ESP32 development board, and supporting electronics. A neat touch is the ability to allow connections over Wi-Fi for debugging or remote control. The project page has some nice photos of the interior that are worth checking out. It’s a very compact and efficient build!

Watch it in action in the video (embedded below) which also includes a tour of the internals and a thorough description of the functions.

Inspired to make your own useless machine? Don’t be afraid to re-invent the whole concept. For example, we loved the one that physically spins the switch and the clock that falls to the floor when it detects someone looking at it. That last one is a close relative of the clock that displays the wrong time if and only if someone is looking.

Cavity Filters, The Black Art You Have A Chance Of Pursuing

A tuned circuit formed by a capacitor and an inductor is a familiar enough circuit, and it’s understood that it will resonate at a particular frequency. As that frequency increases, so the size of the capacitor and inductor decrease, and there comes a point at which they can become the characteristic capacitance and inductance of a transmission line. These tuned circuits can be placed in an enclosure, at which they can be designed for an extremely high Q factor, a measure of quality, and thus a very narrow resonant point. They are frequently used as filters for that reason, and [Fesz] is here with a video explaining some of their operation and configurations.

Some of the mathematics behind RF design can be enough to faze any engineer, but he manages to steer a path away from that rabbit hole and explain cavity filters in a way that’s very accessible. We learn how to look at tuned circuits as transmission lines, and the properties of the various different coupling methods. Above all it reveals that making tuned cavities is within reach.

They’re a little rare these days, but there was a time when almost every TV set contained a set of these cavities which were ready-made for experimentation.

❌