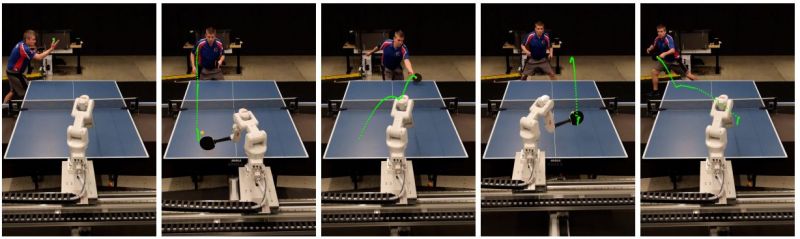
A team at Google has spent a lot of time recently playing table tennis, purportedly only for science. Their goal was to see whether they could construct a robot which would not only play table tennis, but even keep up with practiced human players. In the paper available on ArXiv, they detail what it took to make it happen. The team also set up a site with a simplified explanation and some videos of the robot in action.
Table tennis robot vs human match outcomes. B is beginner, I is intermediate, A is advanced. (Credit: Google)
In the end, it took twenty motion-capture cameras, a pair of 125 FPS cameras, a 6 DOF robot on two linear rails, a special table tennis paddle, and a very large annotated dataset to train multiple convolutional network networks (CNN) on to analyze the incoming visual data. This visual data was then combined with details like knowledge of the paddle’s position to churn out a value for use in the look-up table that forms the core of the high-level controller (HLC). This look-up table then decides which low-level controller (LLC) is picked to perform a certain action. In order to prevent the CNNs of the LLCs from ‘forgetting’ the training data, a total of 17 different CNNs were used, one per LLC.
The robot was tested with a range of players from a local table tennis club which made clear that while it could easily defeat beginners, intermediate players pose a serious threat. Advanced players completely demolished the table tennis robot. Clearly we do not have to fear our robotic table tennis playing overlords just yet, but the robot did receive praise for being an interesting practice partner.
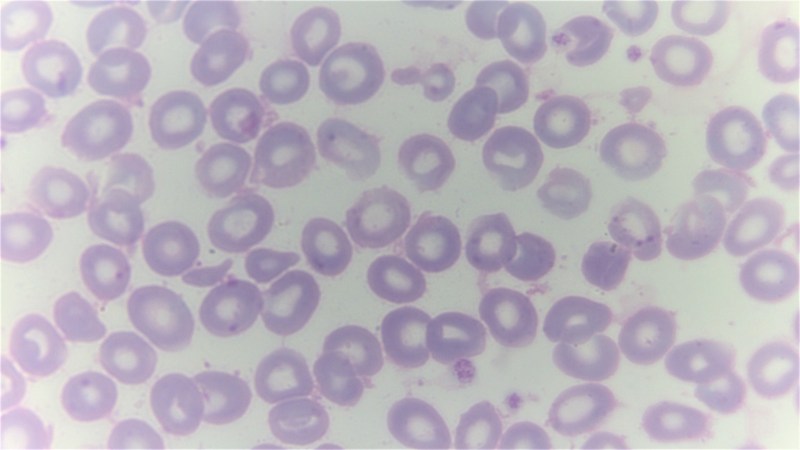
Beta thalassemia and sickle cell are two red blood cell disorders which both come with massive health implications and shortened lifespans, but at least for UK-based patients the former may soon be curable with a fairly new CRISPR-Cas9 gene therapy (Casgevy) via the UK’s National Health Service (NHS). Starting with the NHS in England, the therapy will be offered to the approximately 460 β thalassemia patients in that part of the UK at seven different NHS centers within the coming weeks.
We previously covered this therapy and the way that it might offer a one-time treatment to patients to definitely cure their blood disorder. In the case of β thalassemia this is done by turning off the defective adult hemoglobin (HbA) production and instead turning the fetal hemoglobin (HbF) production back on. After eradicating the bone marrow cells with the defective genes, the (externally CRISPR-Cas9 modified) stem cells are reintroduced as with a bone marrow transplant. Since this involves the patient’s own cells, no immune-system suppressing medication is necessary, and eventually the new cells should produce enough HbF to allow the patient to be considered cured.
So far in international trials over 90% of those treated in this manner were still symptom-free, raising the hope that this β thalassemia treatment is indeed a life-long cure.
Top image: A giemsa stained blood smear from a person with beta thalassemia. Note the lack of coloring. (Credit: Dr Graham Beards, Wikimedia Commons)
It could happen to anyone of us: suddenly you got this inkling of an idea for a product that you think might just be pretty useful or even cool. Some of us then go on to develop a prototype and manage to get enough seed funding to begin the long and arduous journey to turn a sloppy prototype into a sleek, mass-produced product. This is basically the story of how the Fitbit came to be, with a pretty in-depth article by [Tekla S. Perry] in IEEE Spectrum covering the development process and the countless lessons learned along the way.
Of note was that this idea for an accelerometer-based activity tracker was not new in 2006, as a range of products already existed, from 1960s mechanical pedometers to 1990s medical sensors and the shoe-based Nike+ step tracker that used Apple’s iPod with a receiver. Where this idea for the Fitbit was new was that it’d target a wide audience with a small, convenient (and affordable) device. That also set them up for a major nightmare as the two inventors were plunged into the wonderfully terrifying world of industrial design and hardware development.
One thing that helped a lot was outsourcing what they could to skilled people and having solid seed funding. This left just many hardware decisions to make it as small as possible, as well as waterproof and low-power. The use of the ANT protocol instead of Bluetooth saved a lot of battery, but meant a base station was needed to connect to a PC. Making things waterproof required ultrasonic welding, but lack of antenna testing meant that a closed case had a massively reduced signal strength until a foam shim added some space. The external reset pin on the Fitbit for the base station had a low voltage on it all the time, which led to corrosion issues, and so on.
While much of this was standard development and testing fun, the real challenge was in interpreting the data from the accelerometer. After all, what does a footstep look like to an accelerometer, and when is it just a pothole while travelling by car? Developing a good algorithm here took gathering a lot of real-world data using prototype hardware, which needed tweaking when later Fitbits moved from being clipped-on to being worn on the wrist. These days Fitbit is hardly the only game in town for fitness trackers, but you can definitely blame them for laying much of the groundwork for the countless options today.
A working DIY two-stroke in all of its glory, with the flywheel removed. (Credit: Camden Bowen)
How hard could it to be to build a two-stroke internal combustion engine (ICE) from scratch? This is a challenge that [Camden Bowen] gladly set for himself, while foregoing such obvious wastes of time like first doing an in-depth literature study on the topic. That said, he did do some research and made the design in OnShape CAD before making his way over to the hardware store to make some purchases.
As it turns out, you can indeed build a two-stroke engine from scratch, using little more than some metal piping and other parts from the hardware store. You also need a welder and a lathe, with [Camden] using a Vevor mini-lathe that totally puts the ‘precision’ in ‘chatter’. As building an ICE requires a number of relatively basic parts that have to move with very little friction and with tight tolerances, this posed some challenges, but nothing that some DIY spirit can’t fix.
In the case of the very flexible boring bar on the lathe, improvising with some sturdy metal stock welded to a short boring bar resolved that, and precision was achieved. Together with an angle grinder, [Camden] was then able to manufacture the crank case, the cylinder and crank shaft and all the other pieces that make up an ICE. For the carburetor he used a unit off Amazon, which turned out to have the wrong throat size at 19 mm, but a 13 mm version worked. Ultimately, the first ICE constructed this way got destroyed mostly by running it dry and having the starter fluid acting as a solvent, but a full rebuild fixed all the issues.
This second attempt actually ran just fine the first time around, with oil in the crank case so that the poor engine wasn’t running dry any more. With a 40:1 fuel/oil mixture the little engine idles and runs as well as a two-stroke can, belching blue smoke and making a ruckus. This answers the question of whether you can build a two-stroke ICE with basic machining skills and tools, but of course the question that’s now on everyone’s lips is whether a four-stroke one would be nearly as ‘easy’. We wait with bated breath.
The idea of traveling faster than the speed of light (FTL) has been a popular idea long before [Alcubierre] came up with the first plausible theoretical underpinnings for such a technology. Yet even if such an FTL drive is possible, it may be hundreds of years before humanity manages to develop its first prototype. This does however not prevent us from for looking for possible FTL drive signatures in the spacetime around us. Such a concept was recently proposed by [Katy Clough] and colleagues in a recent article (Arxiv preprint).
For a friendly but detailed explanation the PBS Space Time video (embedded below) on the paper comes highly recommended. The gotcha with detecting an FTL warp drive is that it is undetectable until it collapses in some fashion. By simulating what this collapse might look like, the researchers were able to speculate about the properties to look for. These include gravitational waves, which would not be detectable by an existing gravitational wave detector like LIGO, but we might be able to build one that can.
Ultimately we’d be acting on conjecture on what a warp bubble would look like and how it would behave when it collapses so we might just as well mistake something far less intelligent for Vulcans passing through our solar system. It might also be our first sign of extraterrestrial life, possibly ogling some primitive civilization on a Class M planet until it’s ready for First Contact.
The ‘CRT Effect’ myth says that the reason why pixel art of old games looked so much better is due to the smoothing and blending effects of cathode-ray tube (CRT) displays, which were everywhere until the early 2000s. In fits of mistaken nostalgia this has led both to modern-day extreme cubism pixel art and video game ‘CRT’ filters that respectively fail to approach what pixel art was about, or why old games looked the way they did back with our NES and SNES game consoles. This is a point which [Carl Svensson] vehemently argues from a position of experience, and one which is likely shared by quite a few of our readers.
Although there is some possible color bleed and other artefacts with CRTs due to the shadow mask (or Sony’s Trinitron aperture grille), there was no extreme separation between pixels or massive bleed-over into nearby pixels to create some built-in anti-aliasing as is often claimed unless you were using a very old/cheap or dying CRT TV. Where such effects did happen was mostly in the signal being fed into the CRT, which ranged from the horrid (RF, composite) to the not-so-terrible (S-Video, component) to the sublime (SCART RGB), with RGB video (SCART or VGA) especially busting the CRT effect myth.
Where the pixel art of yester-year shines is in its careful use of dithering and anti-aliasing to work around limited color palettes and other hardware limitations. Although back in the Atari 2600 days this led to the extreme cubism which we’re seeing again in modern ‘retro pixel art’ games, yesterday’s artists worked with the hardware limitations to create stunning works of arts, which looked great on high-end CRTs connected via RGB and decent via composite on the kids’ second-hand 14″ color set with misaligned electron guns.
Drive-throughs are a popular feature at fast-food places, where you can get some fast grub without even leaving your car. For the fast-food companies running them they are also a big focus of automation, with the ideal being a voice assistant that can take orders and pass them on to the (still human) staff. This probably in lieu of being able to make customers use the touch screens-equipped order kiosks that are common these days. Pushing for this drive-through automation change is now Taco Bell, or specifically the Yum Brands parent company.
This comes interestingly enough shortly after McDonalds deemed its own drive-through voice assistant to be a failure and removing it. Meanwhile multiple Taco Bell in the US in 13 states and five KFC restaurants in Australia are trialing the system, with results apparently encouraging enough to start expanding it. Company officials are cited as it having ‘improved order accuracy’, ‘decreased wait times’ and ‘increased profits’. Considering the McDonalds experience which was pretty much the exact opposite in all of these categories we will remain with bated breath. Feel free to share your Taco Bell or other Voice AI-enabled drive-through experiences in the comments. Maybe whoever Yum Brands contracted for their voice assistant did a surprisingly decent job, which would be a pleasant change.
Top image: Taco Bell – Vadnais Heights, MN (Credit: Gabriel Vanslette, Wikimedia)
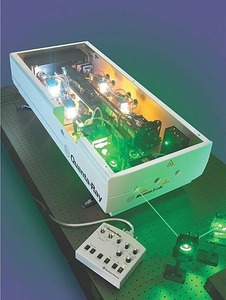
Most people love lasers, because they can make cats chase, read music from a shiny disc, etch and cut materials, and be very shiny in Hollywood blockbusters, even when their presence makes zero sense. That said, lasers are also extremely dangerous, as their highly focused nature and wide range of power levels can leave a person dazzled, blinded or dead from direct and indirect exposure. A lapse in laser safety was how [Phil Broughton] ended up with part of his retina forever marked, as he describes his adventures with an overly enthusiastic laser company sales person.
Quanta Ray PRO350 with frequency doubling, emitting a 532 nm beam – Sales brochure image from Quanta Ray, unknown date
It didn’t take much, just this sales person who made a really poor decision while trying to please some customers and nearly ended with multiple adults, a local school, pilots at a nearby airfield getting their retinas blasted out due to an absolutely harebrained idea to use a fairly high-powered Quanta-Ray Nd:YAG laser on reflective surfaces in the open.
This was in 1999, and fortunately [Phil] only suffered some fairly minor damage to his retina from the laser beam reflection. What happened to the customers (who wore argon laser safety glasses) or the sales critter (who left soon after) is not described, but both may have received some bad news when they had their eyes checked shortly after after at the ophthalmologist.
These kind of stories are a stark reminder that laser safety is not optional. Lasers producing a visible (400 – 700 nm) wavelength above Class 2 should only be operated in a fully secured environment, with safety glasses for the appropriate laser wavelength. Class 2 lasers producing a non-visible wavelength can cause permanent damage because the blink reflex of the eye does not offer any protection here.
As even some dodgy laser pointers are being (illegally) sold online are actually Class 2, this should make it clear that laser eye injury can happen to anyone, and it only takes a second to change someone’s life forever.
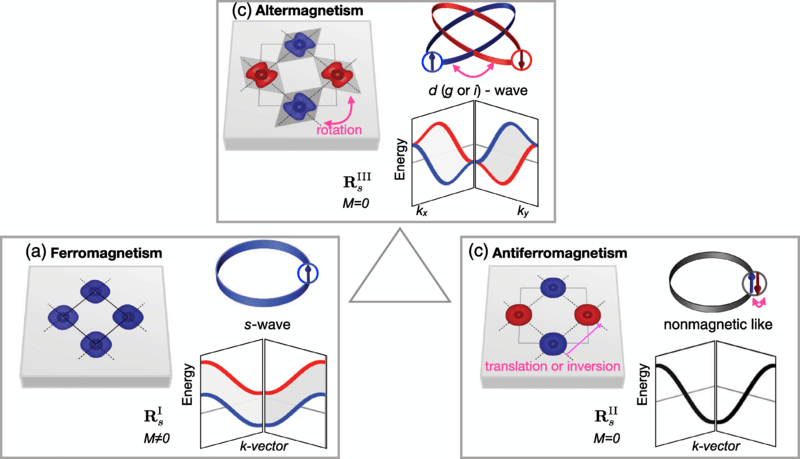
Magnetic materials are typically divided into ferromagnetic and antiferromagnetic types, depending on their magnetic moments (electron spins), resulting in either macroscopic (net) magnetism or not. Altermagnetism is however a recently experimentally confirmed third type that as the name suggests alternates effectively between these two states, demonstrating a splitting of the spin energy levels (spin-split band structure). Like antiferromagnets, altermagnets possess a net zero magnetic state due to alternating electron spin, but they differ in that the electronic band structure are not Kramers degenerate, which is the feature that can be tested to confirm altermagnetism. This is the crux of the February 2024 research paper in Nature by [J. Krempaský] and colleagues.
Specifically they were looking for the antiferromagnetic-like vanishing magnetization and ferromagnetic-like strong lifted Kramers spin degeneracy (LKSD) in manganese telluride (MnTe) samples, using photoemission spectroscopy in the UV and soft X-ray spectra. A similar confirmation in RuO2 samples was published in Science Advances by [Olena Fedchenko] and colleagues.
What this discovery and confirmation of altermagnetism means has been covered previously in a range of papers ever since altermagnetism was first proposed in 2019 by [Tomas Jungwirth] et al.. A 2022 paper published in Physical Review X by [Libor Šmejkal] and colleagues details a range of potential applications (section IV), which includes spintronics. Specific applications here include things like memory storage (e.g. GMR), where both ferromagnetic and antiferromagnetics have limitations that altermagnetism could overcome.
Naturally, as a fairly new discovery there is a lot of fundamental research and development left to be done, but there is a good chance that within the near future we will see altermagnetism begin to make a difference in daily life, simply due to how much of a fundamental shift this entails within our fundamental understanding of magnetics.
Heading image: Illustrative models of collinear ferromagnetism, antiferromagnetism, and altermagnetism in crystal-structure real space and nonrelativistic electronic-structure momentum space. (Credit: Libor Šmejkal et al., Phys. Rev. X, 2022)
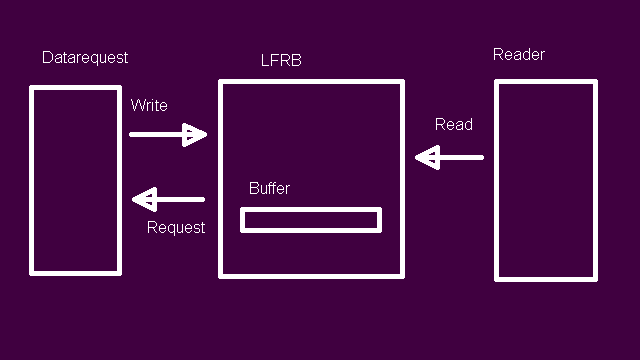
In the previous article we looked at designing a lock-free ring buffer (LFRB) in Ada, contrasting and comparing it with the C++-based version which it is based on, and highlighting the Ada way of doing things. In this article we’ll cover implementing the LFRB, including the data request task that the LFRB will be using to fill the buffer with. Accompanying the LFRB is a test driver, which will allow us to not only demonstrate the usage of the LFRB, but also to verify the correctness of the code.
This test driver is uncomplicated: in the main task it sets up the LFRB with a 20 byte buffer, after which it begins to read 8 byte sections. This will trigger the LFRB to begin requesting data from the data request task, with this data request task setting an end-of-file (EoF) state after writing 100 bytes. The main task will keep reading 8-byte chunks until the LFRB is empty. It will also compare the read byte values with the expected value, being the value range of 0 to 99.
Test Driver
The Ada version of the test driver for the LFRB can be found in the same GitHub project as the C++ version. The file is called test_databuffer.adb and can be found in the ada/reference/ folder. The Makefile to build the reference project is found in the /ada folder, which requires an Ada toolchain to be installed as well as Make. For details on this aspect, see the first article in this series. When running make in the folder, the build files are placed under obj/ and the resulting binary under bin/.
The LFRB package is called LFRingDataBuffer, which we include along with the dataRequest package that contains the data request task. Obviously, since typing out LFRingDataBuffer over and over would be tiresome, we rename the package:
with LFRingDataBuffer;
with dataRequest; use dataRequest;

procedure test_databuffer is
    package DB renames LFRingDataBuffer;
    [..]
After this we can initialize the LFRB:
initret : Boolean;
[..]
initret := DB.init(20);
if initret = False then
    put_line("DB Init failed.");
    return;
end if;
Before we start reading from the LFRB, we create the data request task:
drq : DB.drq_access;
[..]
drq := new dataRequestTask;
DB.setDataRequestTask(drq);
This creates a reference to a dataRequestTask instance, which is found in the dataRequest package. We pass this reference to the LFRB so that it can call entries on it, as we will see in a moment.
After this we can start reading data from the LFRB in a while loop:
bytes : DB.buff_array (0..7);
read : Unsigned_32;
emptied : Boolean;
[..]
emptied := False;
while emptied = False loop
    read := DB.read(8, bytes);
    [..]
    if DB.isEoF then
       emptied := DB.isEmpty;
   end if;
end loop;
As we know what the value of each byte we read has to be, we can validate it and also print it out to give the user something to look at:
idx : Unsigned_32 := 0;
[..]
idx := 0;
for i in 0 .. Integer(read - 1) loop
    put(Unsigned_8'Image(bytes(idx)) & " ");
    if expected /= bytes(idx) then
        aborted := True;
    end if;

    idx:= idx + 1;
    expected := expected + 1;
end loop;
Of note here is that put() from the Ada.Text_IO package is similar to the put_line() procedure except that it doesn’t add a newline. We also see here how to get the string representation of an integer variable, using the 'Image attribute. For Ada 2012 we can use it in this fashion, though since 2016 and in Ada 2022 we can also use it directly on a variable, e.g.:
put(bytes(idx)'Image & " ");
Finally, we end the loop by checking both whether EoF is set and whether the buffer is empty:
if DB.isEoF then
    emptied := DB.isEmpty;
end if;
With the test driver in place, we can finally look at the LFRB implementation.
Initialization
Moving on to the LFRB’s implementation file (lfringdatabuffer.adb), we can in the init procedure see a number of items which we covered in the previous article already, specifically the buffer type and its allocation, as well as the unchecked deallocation procedure. All of the relevant variables are set to their appropriate value, which is zero except for the number of free bytes (since the buffer is empty) and the last index (capacity – 1).
Flags like EoF (False) are also set to their starting value. If we call init with an existing buffer we first delete it before creating a new one with the requested capacity.
Reading
Simplified layout of a ring buffer.
Moving our attention to the read function, we know that the buffer is still empty, so nothing can be read from the buffer. This means that the first thing we have to do is request more data to fill the buffer with. This is the first check in the read function:
if eof = false and len > unread then
    put_line("Requesting data...");
    requestData;
end if;
Here len is the requested number of bytes that we intend to read, with unread being the number of unread bytes in the buffer. Since len will always be more than zero (unless you are trying to read zero bytes, of course…), this means that we will call the requestData procedure. Since it has no parameters we omit the parentheses.
This procedure calls an entry on the data request task before waiting for data to arrive:
dataRequestPending := True;
readT.fetch;

while dataRequestPending = True loop
    delay 0.1; -- delay 100 ms.
end loop;
We set the atomic variable dataRequestPending which will be toggled upon a write action, before calling the fetch entry on the data request task reference which got passed in from the test driver earlier. After this we loop with a 100 ms wait until the data has arrived. Depending on the context, having a time-out here might be desirable.
We can now finally look at the data request task. This is found in the reference folder, with the specification (dataRequest.ads) giving a good idea of what the Ada rendezvous synchronization mechanism looks like:
package dataRequest is
    task type dataRequestTask is
        entry fetch;
    end dataRequestTask;
end dataRequest;
Unlike an Ada task, which is auto-started with the master task to which the subtask belongs, a task type can be instantiated and started at will. To communicate with the task we use the rendezvous mechanism, which presents an interface (entries) to other tasks that are effectively like procedures, including the passing of parameters. Here we have defined just one entry called fetch, for hopefully obvious reasons.
The task body is found in dataRequest.adb, which demonstrates the rendezvous select loop:
task body dataRequestTask is
[..]
begin
    loop
        select
            accept fetch do
            [..]
            end fetch;
        or
            terminate;
        end select;
    end loop;
end dataRequestTask;
To make sure that the task doesn’t just exit after handling one call, we use a loop around the select block. By using or we can handle more than one call, with each entry handler (accept) getting its own section so that we can theoretically handle an infinite number of entries with one task. Since we only have one entry this may seem redundant, but to make sure that the task does exit when the application terminates we add an or block with the terminate keyword.
With this structure in place we got a basic rendezvous-enabled task that can handle fetch calls from the LFRB and write into the buffer. Summarized this looks like the following:
data : DB.buff_array (0..9);
wrote : Unsigned_32;
[..]
wrote := DB.write(data);
put_line("Wrote " & Unsigned_32'Image(wrote) & HT & "- ");
Here we can also see the way that special ASCII characters are handled in Ada’s Text_IO procedures, using the Ada.Characters.Latin_1 package. In this case we concatenate the horizontal tab (HT) character.
Skipping ahead a bit to where the data is now written into the LFRB’s buffer, we can read it by first checking how many bytes can be read until the end of the buffer (comparing the read index with the buffer end index). This can result in a number of of outcomes: either we can read everything in one go, or we may need to read part from the front of the buffer, or we have fewer bytes left unread than requested. These states should be fairly obvious so I won’t cover them here in detail, but feel free to put in a request.
To take the basic example of reading all of the requested bytes in a single chunk, we have to read the relevant indices of the buffer into the bytes array that was passed as a bidirectional parameter to the read function:
function read(len: Unsigned_32; bytes: in out buff_array) return Unsigned_32 is
This is done with a single copy action and an array slice on the (dereferenced) buffer array:
We’re copying into the entire range of the target array, so no slice is necessary here. On the buffer array, we start at the first unread byte (read_index), with that index plus the number of bytes we intend to read as the last byte. Minus one due to us starting the array with zero instead of 1. This would be a handy optimization, but since we’re a stickler for tradition, this is what we have to live with.
Writing
Writing into the buffer is easier than reading, as we only have to concern ourselves with the data that is in the buffer. Even so it is quite similar, just with a focus on free bytes rather than unread ones. Hence we start with looking at how many bytes we can write:
locfree : Unsigned_32;
bytesSingleWrite: Unsigned_32;
[..]
locfree := free;
bytesSingleWrite := free;
if (buff_last - data_back) < bytesSingleWrite then
    bytesSingleWrite := buff_last - data_back + 1;
end if;
We then have to test for the different scenarios, same as with reading. For example with a straight write:
if data'Length <= bytesSingleWrite then
    writeback := (data_back + data'Length) - 1;
    buffer.all(data_back .. writeback) := data;
elsif
    [..]
end if;
Of note here is that we can obtain the size of a regular array with the 'Length attribute. Since we can write the whole chunk in one go, we set the slice on the target (the dereferenced buffer) from the write index (data_back) to (and including) the size of the data we’re writing (minus one, because tradition). If we have to do partial copying of the data we need to use array slices here as well, but here it is only needed on the buffer.
Finally, we have two more items to take care of in the write function. The first is letting the data request procedure know that data has arrived by setting dataRequestPending to false. The other is to check whether we can request more data if there is space in the buffer:
if eof = true then
    null;
elsif free > 204799 then
    readT.fetch;
end if;
There are a few notable things in this code. The first is that Ada does not allow you to have empty blocks, but requires you to mark those with null. The other is that magic numbers can be problematic. Originally the fixed data request block size in NymphCast was 200 kB before it became configurable. If we were to change the magic number here to e.g. 10 (bytes), we’d call the fetch entry on the data request task again on the first read request, getting us a full buffer.
EoF
With all of the preceding, we now have a functioning, lock-free ring buffer in Ada. Obviously we have only touched on the core parts of what makes it tick, and skimmed over the variables involved in keeping track of where what is going and where it should not be, not to mention how much. Much of this should be easily pieced together from the linked source files, but can be expanded upon, if desired.
Although we have a basic LFRB now, the observing among us may have noticed that most of the functions and procedures in the Ada version of the LFRB as located on GitHub are currently stubs, and that the C++ version does a lot more. Much of this functionality involves seeking in the buffer and a number of other tasks that make a lot of sense when combined with a media player like in NymphCast. These features will continue to be added over time as the LFRB project finds more use, but probably aren’t very interesting to cover.
Feel free to sound off in the comments on what more you may want to see involving the LFRB.
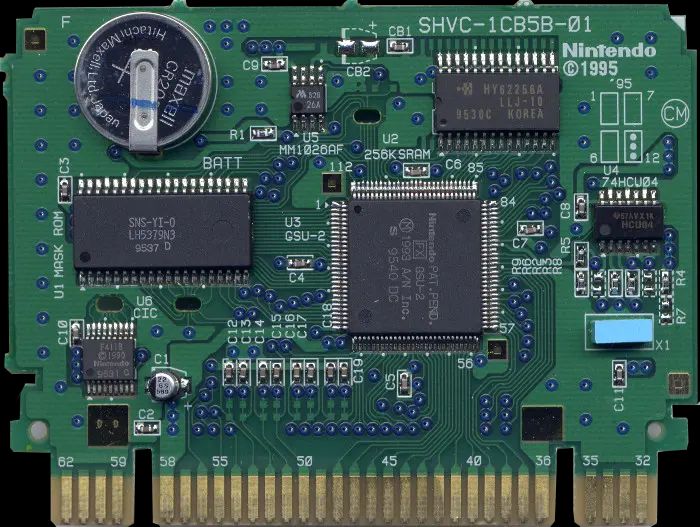
Despite being effectively sold as a toy in the 1990s, the Super Nintendo Entertainment System (SNES) was pretty bleeding-edge as far its computing chops were concerned. This was especially apparent with its cartridges, such as in this excellent summary article by [Fabien Sanglard]. In addition to the mask ROM that stored the game data and (optionally) battery-backed SRAM to store save data, a wide range of enhancement processors existed that upgraded the base SNES system with additional processors for more CPU performance, enhanced graphics and so on. Imagine sticking a game cartridge in a Playstation 4 today that boosted CPU speed by 5x and gave it a much better GPU, this was the world of SNES games.
On the other side of the video game cartridges was the video output system, which seems easy enough in today’s world of digital HDMI and DisplayPort output. In the 90s video output did however mean NTSC and SECAM/PAL, which means playing nice with frequencies, different resolutions (lines) and squeezing as much as possible into a single frame in a way that works with the game console’s rendering pipeline. As a result of this the PAL version of Super Mario World has a larger vertical resolution than the NTSC version (240 vs 224 lines), even if it’s still squashed into the same 4:3 format. For the physical video output side, European gamers were spoiled with an AV connector to (RGB) SCART output, while the rest of the world dealt with some variety of RF composite or S-video.
Although the SNES’s successor in the form of the N64 would not take cartridges to the same extremes, it was this flexible architecture that gave the SNES such an amazing game library.
Hydroforming is a very effective way to turn a ductile metal like aluminium or stainless steel into a specific shape, either using a die or by creating a closed envelope in which the hydraulic fluid is injected. While trying to think of ways to create a hydroformed airplane without spending big bucks on having it done professionally – or learning to weld sheet metal together with waterproof welds along the seams – [Adrian Perez] decided that using plain aluminium foil as found in the average kitchen might be a good way to get his feet wet here. When stuck together with double-sided tape, the foil is both strong and light enough to be inflated like a party balloon and still fly better than a lead balloon (which do fly, albeit poorly).
The basic design for the initial Luma glider that he assembled is based around a Kline-Fogleman (KA) airfoil. This type of airfoil is mostly characterized by the simplicity of construction, having been devised in the 1960s for paper airplanes. It uses a stepped approach rather than a continuous airfoil and has seen mostly attention in hobby circles. Even if this Luma glider brings to mind the ill-fated Goodyear Inflatoplane, a hydroformed version of these foil prototype gliders would not have to rely on being inflated to function.
For small-scale prototypes, using low-cost aluminium foil or similar to test out shapes before committing to a design to be welded and hydroformed does seem like a useful approach.
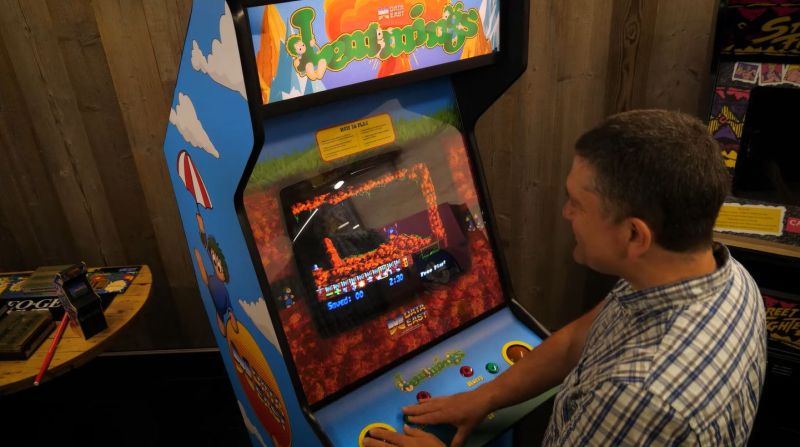
Back in the early 90s the world was almost graced with an arcade version of Lemmings, but after a few board revisions it was abandoned in 1991. Now the folk over at UK-based [RMC – The Cave] on YouTube have managed to not only get their mitts on a nearly finished prototype board, but have also designed and built a period-appropriate cabinet to go with it. This involved looking at a range of arcade cabinets created by Data East and picking a design that would allow both for the two-player mode of the game, and fit the overall style.
The finished Lemmings arcade cabinet. (Credit: RMC – The Cave, YouTube)
Arcade cabinets came in a wide range of cabinet styles and control layouts, largely defined by the game’s requirements, but sometimes with flourishes to distinguish the cabinet from the hundred others in the same arcade.
In this particular case the typical zig-zag (Z-back) style was found to be a good fit as on the Data East Night Slashers 1993-era cabinet, which then mostly left the controls (with two trackballs) and cabinet art to figure out. Fortunately there is plenty of inspiration when it comes to Lemmings art, leading to the finished cabinet with the original mainboard, the JAMMA wiring harness with MultiPi JAMMA controller, a 19″ CRT monitor and other components including the 3D printed controls panel.
With more and more new arcades popping up in the US and elsewhere, perhaps we’ll see these Lemmings arcade cabinets appear there too, especially since the ROMs on the prototype board were dumped for convenient MAME-ing.
The ps command is extremely useful when you want to get some quick information on active system processes (hence the name), especially followed by piping it into grep and kin for some filtering. One gotcha is of course that ps doesn’t run in the current shell process, but is forked off into its own process, so what if everything goes wrong and you absolutely need to run ps aux on a system that is completely and utterly out of fresh process IDs to hand out? In that scenario, you fortunately can write a shell script that does the same, but all within the same shell, as [Isabella Bosia] did, with a Bash shell script.
The how and why is mostly covered in the shell script itself, using detailed comments. Initially the hope was to just read out and parse the contents of /proc/<pid>/status, but that doesn’t have details like CPU%. The result is a bit more parsing to get the desired result, as well as a significant amount of cussing in the comments. Even if it’s not entirely practical, as the odds of ending up on a system with zero free PIDs are probably between zero and NaN, but as an ‘entertaining’ job interview question and example of all the fun things one can do with shell scripting it’s definitely highly recommended.
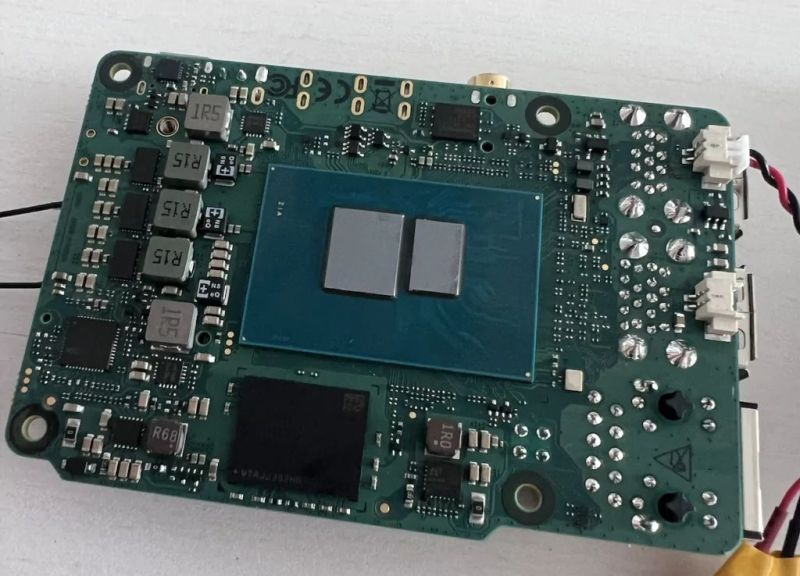
Recently Radxa released the X4, which is an SBC containing not only an N100 x86_64 SoC but also an RP2040 MCU connected to a Raspberry Pi-style double pin header. The Intel N100 is one of a range of Alder Lake-N SoCs which are based on a highly optimized version of the Skylake core, first released in 2015. These cores are also used as ‘efficiency’ cores in Intel’s desktop CPUs. Being x86-based, this means that the Radxa X4 can run any Linux, Windows and other OS from either NVMe (PCIe 3.0 x4) or eMMC storage. After getting his hands on one of these SBCs, [Bret] couldn’t wait to take a gander at what it can do.
Installing Windows 11 and Debian 12 on a 500 GB NVMe (2230) SSD installed on the X4 board worked pretty much as expected on an x86 system, with just some missing drivers for the onboard Intel 2.5 Gbit Ethernet and WiFi, depending on the OS, but these were easily obtained via the Intel site and installed. The board comes with an installed RTC battery and a full-featured AMI BIOS, as well as up to 16 GB of LPPDR5 RAM.
Using the system with the Radxa PoE+ HAT via the 2.5 Gbit Ethernet port also worked a treat once using a quality PoE switch, even with the N100’s power level set to 15 Watt from the default 6. The RP2040 MCU on the mainboard is connected to the SoC using both USB 2.0 and UART, according to the board schematic. This means that from the N100 all of the Raspberry Pi-style pins can be accessed, making it in many ways a more functional SBC than the Raspberry Pi 5, with a similar power envelope and cost picture.
At $80 USD before shipping for the 8 GB (no eMMC) version that [Bret] looked at one might ask whether an N100-based MiniPC could be competitive, albeit that features like PoE+ and integrated RPi-compatible header are definite selling points.
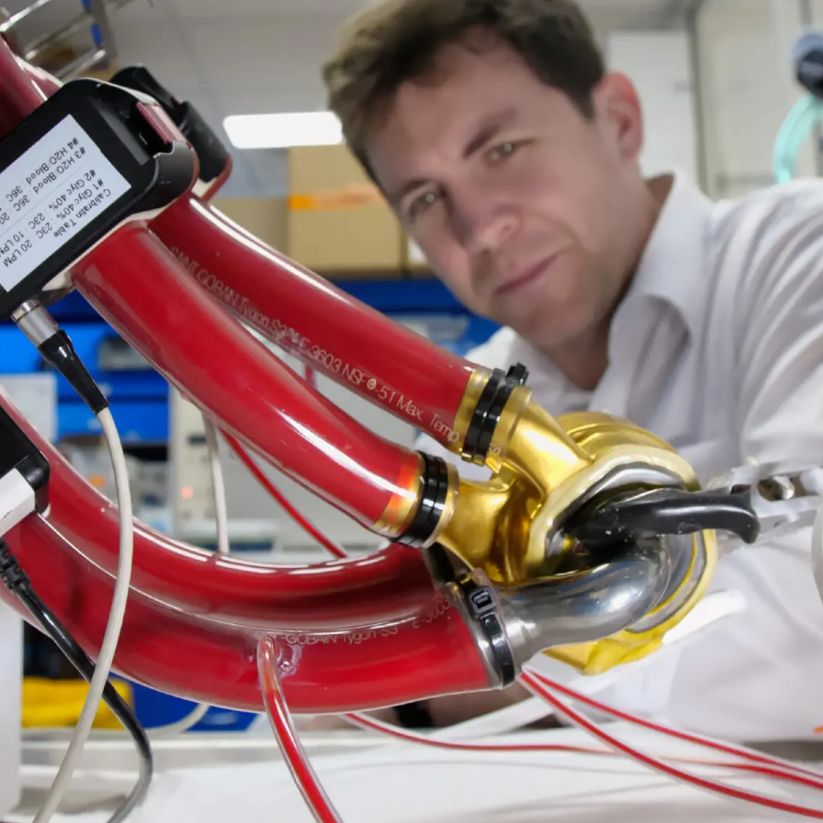
The BiVACOR THA hooked up with the CTO Dianiel Timms in the background. (Credit: BiVACOR)
Outside of the brain, the heart is probably the organ that you miss the most when it ceases to function correctly. Unfortunately, as we cannot grow custom replacement hearts yet, we have to keep heart patients alive long enough for them to receive a donor heart. Yet despite the heart being essentially a blood pump, engineering even a short-term artificial replacement has been a struggle for many decades. A new contender has now arrived in the BiVACOR TAH (total artificial heart), which just had the first prototype implanted in a human patient.
Unlike the typical membrane-based pumps, the BiVACOR TAH is a rotary pump that uses an impeller-based design with magnetic levitation replacing bearings and theoretically minimizing damage to the blood. This design should also mean a significant flowrate, enough even for an exercising adult. Naturally, this TAH is only being tested as a bridge-to-transplant solution, for patients with a failing heart who do not qualify for a ventricular assist device. This may give more heart patients a chance to that donor heart transplant, even if a TAH as a destination therapy could save so many more lives.
The harsh reality is that the number of donor hearts decreases each year while demand increases, leading to unconventional approaches like xenotransplantation using specially bred pigs as donor, as well as therapeutic cloning to grow a new heart from the patient’s own cells. Having a universal TAH that could be left in-place (destination therapy) for decades would offer a solid option next to the latter, but remains elusive. As shown by e.g. the lack of progress with a TAH like the ReinHeart despite a promising 2014 paper in a bovine model.
Hopefully before long we’ll figure out a reliable way to fix this ‘just a blood pump’ in our bodies, regardless of whether it’s a biological or mechanical solution.
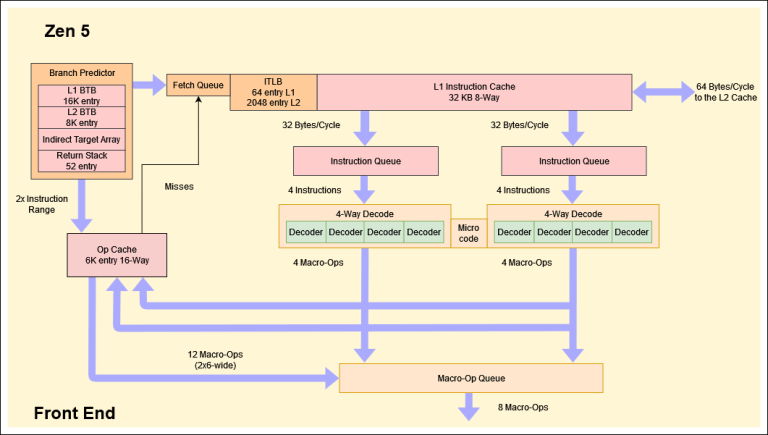
An interesting finding in fields like computer science is that much of what is advertised as new and innovative was actually pilfered from old research papers submitted to ACM and others. Which is not to say that this is necessarily a bad thing, as many of such ideas were not practical at the time. Case in point the new branch predictor in AMD’s Zen 5 CPU architecture, whose two-block ahead design is based on an idea coined a few decades ago. The details are laid out by [George Cozma] and [Camacho] in a recent article, which follows on a recent interview that [George] did with AMD’s [Mike Clark].
The 1996 ACM paper by [André Seznec] and colleagues titled “Multiple-block ahead branch predictors” is a good start before diving into [George]’s article, as it will help to make sense of many of the details. The reason for improving the branch prediction in CPUs is fairly self-evident, as today’s heavily pipelined, superscalar CPUs rely heavily on branch prediction and speculative execution to get around the glacial speeds of system memory once past the CPU’s speediest caches. While predicting the next instruction block after a branch is commonly done already, this two-block ahead approach as suggested also predicts the next instruction block after the first predicted one.
Perhaps unsurprisingly, this multi-block ahead branch predictor by itself isn’t the hard part, but making it all fit in the hardware is. As described in the paper by [Seznec] et al., the relevant components are now dual-ported, allowing for three prediction windows. Theoretically this should result in a significant boost in IPC and could mean that more CPU manufacturers will be looking at adding such multi-block branch prediction to their designs. We will just have to see how Zen 5 works once released into the wild.
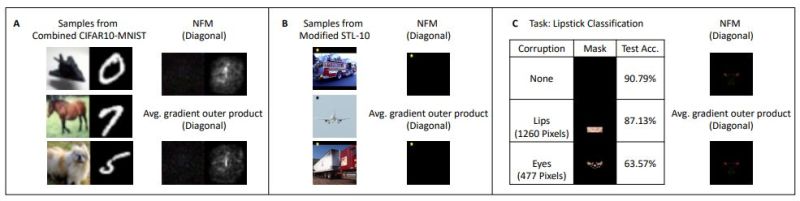
Artificial Neural Networks (ANNs) are commonly used for machine vision purposes, where they are tasked with object recognition. This is accomplished by taking a multi-layer network and using a training data set to configure the weights associated with each ‘neuron’. Due to the complexity of these ANNs for non-trivial data sets, it’s often hard to make head or tails of what the network is actually matching in a given (non-training data) input. In a March 2024 study (preprint) by [A. Radhakrishnan] and colleagues in Science an approach is provided to elucidate and diagnose this mystery somewhat, by using what they call the average gradient outer product (AGOP).
Defined as the uncentered covariance matrix of the ANN’s input-output gradients averaged over the training dataset, this property can provide information on the data set’s features used for predictions. This turns out to be strongly correlated with repetitive information, such as the presence of eyes in recognizing whether lipstick is being worn and star patterns in a car and truck data set rather than anything to do with the (highly variable) vehicles. None of this was perhaps too surprising, but a number of the same researchers used the same AGOP for elucidating the mechanism behind neural collapse (NC) in ANNs.
NC occurs when an ANN gets overtrained (overparametrized). In the preprint paper by [D. Beaglehole] et al. the AGOP is used to provide evidence for the mechanism behind NC during feature learning. Perhaps the biggest take-away from these papers is that while ANNs can be useful, they’re also incredibly complex and poorly understood. The more we learn about their properties, the more appropriately we can use them.
Shell scripting is one of those skills that are absolutely invaluable on especially UNIX and BSD-based systems like the BSDs, the two zillion Linux distributions as well as MacOS. Yet not every shell is the same, and not everybody can be bothered to learn the differences between the sh, bash, ksh, zsh, dash, fish and other shells, which can make a project like Pnut seem rather tempting. Rather than dealing with shell scripting directly, the user writes their code in the Lingua Franca of computing, AKA C, which is then transpiled into a shell script that should run in any POSIX-compliant shell.
The transpiler can be used both online via the main Pnut website, as well as locally using the (BSD 2-clause) open source code on GitHub. Here the main limitations are also listed, which mostly concern the C constructs that do not map nicely to a POSIX shell. These are: no support for floating point numbers and unsigned integers, no goto and switch nor taking the address of a variable with &. These and preprocessor-related limitations and issues are largely to be expected, as especially POSIX shells are hardly direct replacements for full-blown C code.
As a self-professed research project, Pnut seems like an interesting project, although if you are writing shell scripts for anything important, you probably just want to buckle down and learn the ins and outs of POSIX shell scripting and beyond. Although it’s a bit of a learning curve, we’d be remiss if we said that it’s not totally worth it, if only because it makes overall shell usage even beyond scripting so much better.