Vista de Lectura

Hay nuevos artículos disponibles. Pincha para refrescar la página.

A Tiny Knob Keeps You In Control

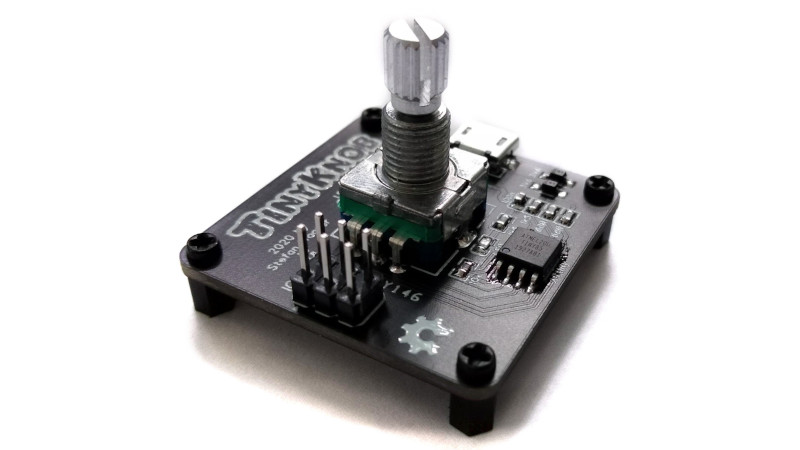
There are many forms of human interface device beyond the ubiquitous keyboard and mouse, but when it comes to fine-tuning a linear setting such as a volume control there’s nothing quite like a knob. When it comes to peripherals it’s not the size that matters, as proven by  [Stefan Wagner] with the Tiny Knob. It’s a very small PCB with a rotary encoder and knob, an ATtiny85, a USB port, and not much else.

It uses the V-USB software implementation of USB HID, and should you have a need for a Tiny Knob of your own you can find all the files for it in a GitHub repository. There’s even a very professional-looking 3D-printed enclosure for the finishing touch. We like this project for its simplicity, and we think you might too.

Over the years we’ve brought you more than one knob, they appear to be a popular subject for experimentation. If you’re up for more, have a look at this one.

The Waveguide Explanation You Wish You’d Had At School

Anyone who has done an electronic engineering qualification will at some point have had to get to grips with transmission lines, and then if they are really lucky, waveguides. Perhaps there should be one of those immutable Laws stating that for each step in learning about these essential parts, the level of the maths you are expected to learn goes up in an exponential curve, for it’s certainly true that most of us breathe a hefty sigh of relief when that particular course ends. It’s not impossible to understand waveguides though, and [Old Hack EE] is here to slice through the formulae with some straightforward explanations.

First of all we learn about the basics of propagation in a waveguide, then we look at the effects of dimension on frequency. Again, there’s little in the way of head-hurting maths, just real-world explanations of cutt-off frequencies, and of coupling techniques. For the first time we’ve seen, here are simple and understandable explanations of the different types of splitter, followed up by the famous Magic T. It’s all in the phase, this is exactly the stuff we wish we’d had at university.

The world needs more of this type of explanation, after all it’s rare to watch a YouTube video and gain an understanding of something once badly taught. Take a look, the video is below the break.

The 555 As A MOSFET Driver

To drive a MOSFET requires more than merely a logic level output, there’s a requirement to charge the device’s gate which necessitates a suitable buffer amplifier. A variety of different approaches can be taken, from a bunch of logic buffers in parallel to a specialised MOSFET driver, but [Mr. T’s Design Graveyard] is here with a surprising alternative. As it turns out, the ever-useful 555 timer chip does the job admirably.

It’s a simple enough circuit, the threshold pin is pulled high so the output goes high, and the PWM drive from an Arduino is hooked up to the reset pin. A bipolar 555 can dump a surprising amount of current, so it’s perfectly happy with a MOSFET. We’re warned that the CMOS variants don’t have this current feature, and he admits that the 555 takes a bit of current itself, but if you have the need and a 555 is in your parts bin, why not!

This will of course come as little surprise to anyone who played with robots back in the day, as a 555 or particularly the 556 dual version made a pretty good and very cheap driver for small motors. If you’ve ever wondered how these classic hips work, we recently featured an in-depth look.

Your ESP32 As A USB Bluetooth Dongle

Using Bluetooth on a desktop computer is now such a seamless process; it’s something built-in and just works. Behind that ubiquity is a protocol layer called HCI, or Host Controller Interface, a set of commands allowing a host computer to talk to a Bluetooth interface.  That interface doesn’t have to be special, and [Dakhnod] is here to show us that it can be done with an ESP32 microcontroller through its USB interface.

The linked repository doesn’t tell us which of the ESP32 variants it works with, but since not all of them have a USB peripheral we’re guessing one of the newer variety. It works with Linux computers, and we’re told it should work with Windows too if a HCI driver is present. We might ask ourselves why such a project is necessary given the ubiquity of Bluetooth interfaces, but for us it’s provided the impetus to read up on how it all works.

We can’t find anyone else in our archive who’s made a Bluetooth dongle in this way, but we’ve certainly seen sniffing of HCI commands to reverse engineer a speaker’s communications.

All The Air Ducting Parts You Could Ever Need

If you have ever planned an air duct or dust extraction system for your shop, you’ll know just how difficult it can be to accommodate all but the simplest of arrangements. Off the shelf systems are intended for use in home heating or other domestic systems, and offer little flexibility of choice. Of course you could 3D print an adapter or two, but [Fabian] has taken it to the next level with a comprehensive library of 3D-printable pipe system adapters and accessories. We’re not sure we’ve seen such a complete collection.

The pipes are mostly at 125 mm diameter, with the full array of elbows and joints, alongside adapters for fans and smaller pipes, and different splitter options. It becomes particularly interesting in the accessories department though, because he’s also made a set of smart addons, packing ESP32s for sensors, and even valves.

It sometimes shocks us to go into hackerspaces and see nothing in the way of extraction around tools that really need it. Airborne smoke and particulates are a proven hazard, and thus we like this project a lot. If you don’t have adequate ventilation or extraction on your bench, consider printing yourself a solution. Take a look at how one hackerspace did it.

Spin Your Own Passive Cooling Fibres

When the temperature climbs, it’s an eternal problem: how to stay cool. An exciting field of materials science lies in radiative cooling materials, things which reflect so much incoming heat that they can cool down from their own radiation rather than heating up in the sun. It’s something [NightHawkInLight] has been working on over a series, and he’s dropped a very long video we’ve placed below. It’s ostensibly about spinning radiative cooling fibers, but in fact provides a huge quantity of background as well as a bonus explanation of cotton candy machines.

These materials achieve their reflectivity by creating a surface full of microscopic bubbles. It’s the same process that makes snow so white and reflective, and in this case it’s achieved by dissolving a polymer in a mixture of two solvents. The lower boiling point solvent evaporates first leaving the polymer full of microscopic bubbles of the higher boiling point solvent, and once these evaporate they leave behind the tiny voids. In the video he’s using PLA, and we see him experimenting with different solvents and lubricants to achieve the desired result. The cotton candy machine comes in trying to create fibers by melting solid samples, something which doesn’t work as well as it could so instead he draws them by hand with a small rake.

When he tests his mat of fibers in bright sunlight the effect is almost magical if we didn’t already know the mechanism, they cool down by a few degrees compared to ambient temperature and the surrounding control materials. This is a fascinating material, and we hope we’ll see more experimenters working with it. You won’t be surprised to hear we’ve featured his work before.

You’ve Got The Portable Radio, Now What About The Antenna?

There’s an old saying in the amateur radio community that when it comes to antennas all you need is a piece of wet string. This may be a little fanciful, but it’s certainly true that an effective antenna can be made with surprisingly little in the way of conductor. It’s something [Evan Pratten VZ3ZZA] demonstrates amply with a description of the antenna he took camping in a Canadian provincial park.

Most of us would try some form of dipole on our adventures, but the antenna he’s using caught our eye as it’s described as an end-fed half-wave, but it has both a half-wave and quarter-wave element. Made from speaker cable or in this case thin mains cable for lamps, it’s obviously far from a perfect match and requires an ATU, but it generates an impressive array of FT4 contacts on a pretty meagre power level. We particularly like his in-plain-sight test run in the parking lot of a supermarket.

We frequently talk about the diversity of pursuits in amateur radio aside from that of the chequebook ham, and this project shows one of those. The world of QRP, operating at extreme low power, is not expensive to enter and can be extremely rewarding.

An RC Tracked Robot, Without The Pain

Small robots can be found at all levels from STEM toys for kids all the way through to complex hacker projects. Somewhere along that line between easy enough for anyone to build and interesting enough for hackers lies the PlayCar, from [ComfySpace]. It’s a small build-it-yourself tracked robot that’s controlled from your smartphone via an app.

At the PlayCar’s heart is a Raspberry Pi Zero 2W, and surrounding it are a set of inexpensive off the shelf modules for power and motor control. The juice meanwhile comes from a set of AA batteries, and the motors are geared DC units. Having acquired all the components, the 3D printable parts can then be downloaded from Printables, and the ComfySpace app can be downloaded for either Apple or Android platforms.

It’s clear that ComfySpace is a start-up targeting the education sector, and we wish them every success. The approach of making an open platform is one we like, as it has the potential to create a community feeding back designs and add-ons rather than remaining proprietary. You can take a  look at the video below the break for more information.

Vintage Ribbon Cable Repair Saves Poqet PC

It sometimes seems as though computing power in your pocket is a relatively new phenomenon, but in fact there have been ultraportable computers since the 8-bit era. They started to become useful around the end of the 1980s though as enterprising manufacturers started cramming full-fat PC XTs into pocket form factors. Of these the one to own was the Poqet PC, a slim clamshell design that would run for ages on a pair of AA cells . If you have one today you’d be lucky if its display ribbon cable is without faults though, and [Robert’s Retro] is here with a fix previously thought impossible.

A large proportion of the video below the break is devoted to dismantling the unit, no easy task. The cable once exposed is found to have delaminated completely, and he takes us through the delicate task of attaching a modern equivalent. We particularly like the way in which the cable’s own springiness is used to retract it. The result has a white cable rather than the original black, but that’s a small price to pay for a machine that works rather than a broken paperweight.

If early pocket computing is your thing, it’s a subject we’ve covered before.

Your QuickTake Camera And Your Modern PC

An object of desire back in the mid-1990s might have been Apple’s QuickTake camera. In a form factor not unlike a monocular it packed a 640×480 digital camera, the images from which could be downloaded to a computer via a serial cable. A quarter century later it’s a great retro camera for the enthusiast, but both the serial ports and the operating systems needed to run its software have passed into history. Time for the junk pile? Not at all, for [Crazylegstoo] has produced a new piece of software for 2024 that works for both QuickTake 100 and 150 cameras with USB serial ports on modern operating systems.

Called JQuickTake, it’s a Java app which has the advantage of building on that early Java promise of running cross platform so can be had for Mac or Windows. It allows retrieval of both metadata and images from the camera, but sadly it doesn’t display any of the images. It also doesn’t work with the QuickTake 200. Happily though, there are instructions for building a serial cable, and suggestions for how to deal with the proprietary QTK image format.

Meanwhile if you lack a PC or Mac all is not lost. You can also use these cameras with an Apple II.

Header image: Hannes Grobe, CC BY-SA 4.0.

Can Cats Solve Puzzles?

Cats, to those of us who appreciate their company, are fascinating creatures, with their infinite curiosity and playfulness. [Makers Muse] has a pair of half-grown-up kittens, and set out to provide them with a plaything far better than those the market could offer. The result is the Snak Attak, a gravity puzzle maze that delivers kibble for the cat prepared to puzzle it out.

The point of this exercise isn’t to give kibble but to provide the optimum play experience for a pair of younger cats. The premise is that kibble is held back by a set of wooden pegs each with a temptingly dangly string, and they should after some investigation be able to pull the pegs out and release it. What’s interesting is how the two different cats approach the problem, while one pulls the out as expected, the other pushes them from the back of the device.

The conclusion is that the two cats can indeed solve puzzles, and gain hours of play from the device. An updated version was produced with a few more challenges, and as you can see in the video below the break, it’s captivated their attention. It’s not the first cat toy we’ve brought you by any means, this robotic mouse springs to mind, but it’s certainly upped the ante on feline entertainment.

A Lenticular Clock Spells Out The Hours

So many are the clock projects which cross the Hackaday threshold, that it’s very rare indeed to see something that hasn’t already been done. We think we’ve not seen a lenticular clock before though, and we’re thus impressed by this one produced by [Moritz Sivers].

You may well be familiar with lenticular images from toys and novelties, an animation is sliced into lines and placed behind an array of multi-faceted linear lenses. It gives the effect of movement as from different viewing angles a different frame of the animation is perceived. In this clock the animation is replaced by the clock digits, and by rotating the whole with a servo driven by an ESP8266 microcontroller it can display different digits to the viewer. The write-up and the video below are of value both for the clock itself and the description of how these animations are produced. The clock itself doesn’t sacrifice usability for all its novelty, and we can see this technique might find a place in other projects requiring custom displays.

The lenticular lenses used here are off the shelf, but if you are of an adventurous mind, you could try printing some of your own.

Colour Film Processing For The 2020s Hacker

We’re now somewhere over two decades since the mass adoption of digital photography made chemical film obsolete in a very short time, but the older technology remains in use by artists and enthusiasts. There’s no longer a speedy developing service at you local mall though, so unless you don’t mind waiting for one of the few remaining professional labs you’ll be doing it yourself. Black-and-white is relatively straightforward, but colour is another matter. [Jason Koebler] has set up his own colour processing lab, and takes us through the difficult and sometimes frustrating process.

From an exhaustive list of everything required, to a description of the ups and downs of loading a Patterson tank and the vagiuaries of developer chemicals, we certainly recognise quite a bit of his efforts from the Hackaday black-and-white lab. But this is 2024 so there’s a step from days past that’s missing. We no longer print our photos, instead we scan the negatives and process then digitally, and it’s here that some of the good advice lies.

What this piece shows us is that colour developing is certainly achievable even if the results in a home lab can be variable. If you’re up for trying it, you can always automate some of the process.

FauxTRS Is Definitely Not A Trash 80

Among the 8-bit home micro boom from the late 1970s through early 1980s, the introduction to computing for many wasn’t a pricey Apple or Commodore, instead it was the slightly lower budget machine from Radio Shack. The TRS-80 series of computers live on and have a loyal following among retro computing enthusiasts. But like all such machines the original hardware is harder to find in 2024, so how about the TRS-80 experience without the failing vintage parts? The FauxTRS from [Jpasqua] is just that, the feel of a Model 3 or Model 4, powered by a Raspberry Pi.

In a sense then, this is a very well-designed case for a Raspberry Pi that looks a lot like the Tandy of old. With a modern LCD and keyboard it could just as easily be a normal desktop machine, but when the emulator fires up it does indeed look very much like a small version of the real thing. You can download the STL files from Printables, and for the cost of a few extra parts you can have one too.

Alternatively, if a faux TRS doesn’t do it for you, there’s always the chance of making a more real one.

A Modchip for a Fridge

An annoying fridge that beeps incessantly when the door is open too long should be an easy enough thing to fix by disconnecting the speaker, but when as with [kennedn]’s model it’s plumbed in and the speaker is inaccessible, what’s to be done? The answer: create a mod chip for a fridge.

While the fridge electronics themselves couldn’t be reached, there was full access to a daughterboard with the fridge controls. It should be easy enough to use them to turn off the alarm, but first a little reverse engineering was required. It used a serial communication with an old-school set of shift registers rather than a microcontroller, but it soon became apparent that the job could be done by simply pulling the buttons down. In a move that should gladden the heart of all Hackaday readers then, the modchip in question didn’t even have to be a processor, instead it could be the venerable 555 timer. Our lives are complete, and the fridge is no longer annoying.

The 555 is unashamedly a Hackaday cliche, but even after five decades it still bears some understanding.

Desiccants, Tested Side By Side

We’re so used to seeing a little sachet of desiccant drop out of a package when we open it, that we seldom consider these essential substances. But anyone who spends a while around 3D printing soon finds the need for drying their filament, and knowing a bit about the subject becomes of interest. It’s refreshing then to see [Big Clive] do a side-by-side test of a range of commonly available desiccants. Of silica gel, bentonite, easy-cook rice, zeolite, or felight, which is the best? He subjects them to exactly the same conditions over a couple of months, and weighs them to measure their efficiency in absorbing water.

The results are hardly surprising, in that silica gel wins by a country mile. Perhaps the interesting part comes in exploding the rice myth; while the rice does have some desiccant properties, it’s in fact not the best of the bunch despite being the folk remedy for an immersed mobile phone.

Meanwhile, this isn’t the first time we’ve looked at desiccants, in the past we’ve featured activated alumina.

Are Hackers The Future of Amateur Radio?

If amateur radio has a problem, it’s that shaking off an image of being the exclusive preserve of old men with shiny radios talking about old times remains a challenge. Especially, considering that so many amateurs are old men who like to talk a lot about old times. It’s difficult to attract new radio amateurs in the age of the Internet, so some in the hobby are trying new avenues. [Dan, KB6NU] went to the recent HOPE conference to evangelise amateur radio, and came away having had some success. We agree with him, hackers can be the future of amateur radio.

He’s put up the slides from his talk, and in them he goes through all the crossovers between the two communities from Arduinos to GNU Radio. We don’t need persuading, in fact we’d have added UHF and microwave RF circuitry and pushing the limits of the atmosphere with digital modes such as WSPR to the list as our personal favourites. It seems he found willing converts, and it’s certainly a theme we’ve featured before here at Hackaday. After all, unless it retains its interest, amateur radio could just die away.

Time’s Up For Mbed

In a forum post has come the announcement that mBed, ARM’s accessible microcontroller development platform, is to reach end-of-life in July 2026. This means that the online platform and OS will no longer be supported by ARM, though the latter will remain an open source project. The website will be shuttered, and no new projects can be created after that date using ARM infrastructure.

mBed was originally launched back in 2009, as a competitor to the Arduino IDE for ARM’s chips. Its easy development made it attractive and there were soon an array of boards from different manufacturers supporting it, but perhaps due to its support for only the one architecture, it failed to find success. It’s certainly not the first time a single-architecture microcontroller development platform has been discontinued, we need only look to the Intel Edison for that, but given the success of ARM platforms in general it’s still something of a surprise. Perhaps it’s time to take the press release explanation that other platforms such as Arduino have simply been much more popular.

Will a community form around an open source mBed? Given that it’s been a definite minority among Hackaday projects over the years, while we hope it does, we’re not so sure.

mBed board image: Viswesr, CC BY-SA 3.0.

Wrap Your Keyboard With A Vacuum Former

Coloured keycaps are a common customisation when it comes to making your input device special. If you are working with modern tech it’s easy, there are plenty of vendors who can sell you keycaps for any purpose. With retro tech it’s never so simple, if a keycap hasn’t been made for decades you’re out of luck. This doesn’t faze [Drygol] though, who has solved the coloured retro keycap in a unique and non-destructive way. Wrap them in vinyl film using a vacuum former.

Vacuum formers are an often-underrated tool in the hardware arsenal, but as this project shows, they can produce startlingly good results. Original keycaps are placed on a 3D-printed scaffold before the vinyl is formed over them, then they are carefully cut out and a triangular edge on both sides is folded underneath, The result is an Amiga with a striking orange keyboard, and for us the best bit is that the original key is safely preserved under the vinyl.

[Drygol]’s exceptional work in the retrocomputing sphere has delighted us many times on these pages. There are too many examples to link here, but one we particularly liked was this nearly-all-new Amiga 2000.

❌