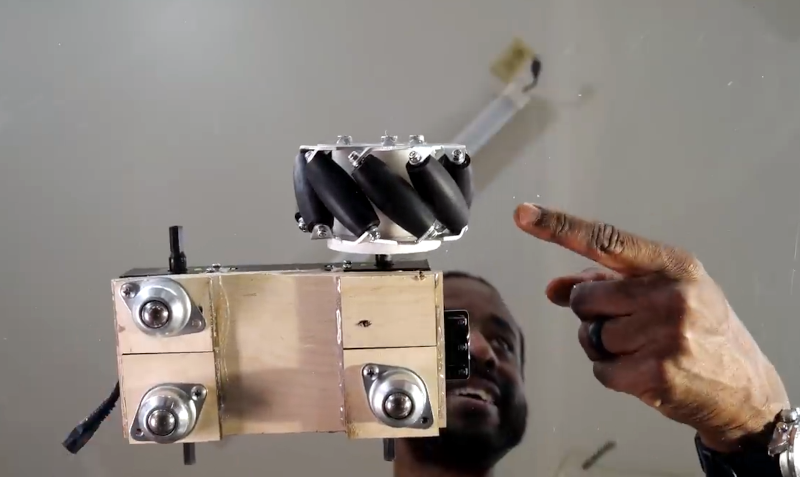
If you make anything that moves, like a robot, you quickly realize that turning can be a pain. That’s why there are a number of designs for wheels that can go in different directions. One of the most common is the mechanum wheel. [Jeremy] explains how they work by filming them from below on a transparent table. You can see the enlightening video below.
If you haven’t done anything with omni wheels before, it is disconcerting to see wheels rotating one way causing the vehicle to move at a right angle to the rotation. But this is very useful when you build robots or — as he shows at the start of the video — a forklift.
Mechanum wheels are similar to omni wheels, but with some differences. In particular, omni wheels have rollers at a 90-degree angle so they drag in the “wrong” direction. The mecanum rollers are at 45-degree angle. That might seem like a small difference, but it means that all rotation translates and requires some vector math, as the video points out.
Many years ago, we were surprised to learn you could build strange wheels from wood. We like using omni wheels in a three-wheel configuration often called a Kiwi drive.
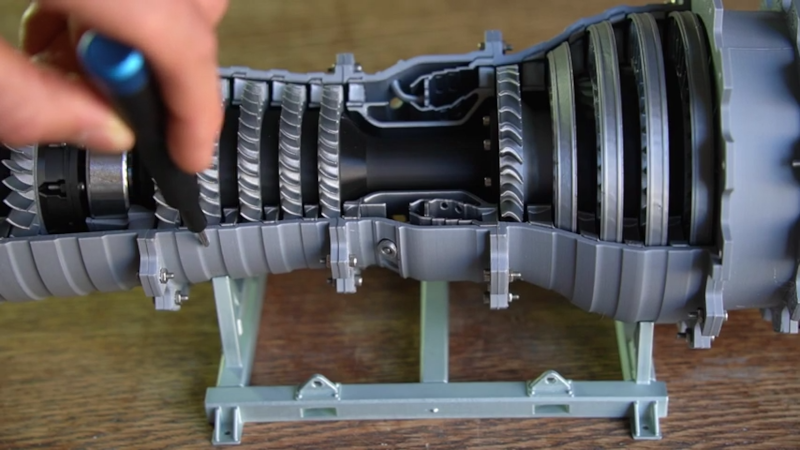
Printing a model jet engine is quite an accomplishment. But it wasn’t enough for [linus3d]. He wanted to redesign it to have a turbojet, an afterburner, and a variable exhaust nozzle. You can see how it all goes together in the video below.
This took months of work and it shows. This probably won’t make a good rainy-day weekend project. You do need a few ball bearings and some M2 hardware, but it is mostly 3D printed.
True turbojets are most often found on military planes. They are loud, don’t perform well at low speeds, and are generally not very efficient. A variation, the turbofan, is what you usually find on passenger jets. They are quieter and work better at low speeds, but have more parts and, thus, more maintenance.
Unlike a true turbojet, turbofan engines have a cold section and a hot section. The bypass ratio refers to how much air flows through the cold path relative to the amount flowing through the hot path. This cold air provides additional thrust, making the turbofan engine more efficient, especially at lower speeds. The reduced demand on the hot air thrust also reduces the amount of noise.
[Mark] starts a post from a bit ago with: “… maybe you have also heard that SystemVerilog is simply an extension of Verilog, focused on testing and verification.” This is both true and false, depending on how you look at it. [Mark] then explains what the differences are. It’s a good read if you are Verilog fluent, but just dip your toe into SystemVerilog.
Part of the confusion is that until 2009, there were two different things: Verilog and SystemVerilog. However, the SystemVerilog 2009 specification incorporates both languages, so modern Verilog is SystemVerilog and vice versa.
While many new features are aimed at verification, there is something for everyone. For example, [Mark] explains how you can replace instances of reg and wire with the logic data type. SystemVerilog will figure out if you need a reg or a wire on its own.
In addition, some common idioms are now part of the standard, which can make defining always blocks easier. So if you are using FPGAs and Verilog, are you using SystemVerilog? We don’t see much of it in incoming projects, but we do see it occasionally. Of course, pundits tell us that soon we won’t even have to write Verilog thanks to — what else? — AI. We remain skeptical.
[Extreme Kits] asks the question: “What the hell is a luminiferous theremin?” We have to admit, we know what a thermin is, but that’s as far as we got. You’ve surely seen and heard a theremin, the musical instrument developed by Leon Theremin that makes swoopy music often associated with science fiction movies. The luminiferous variation is a similar instrument that uses modern time of flight sensors to pick up your hand positions.
The traditional instrument uses coils, and your hands alter the frequency of oscillators. Some versions use light sensors to avoid the problems associated with coils. While the time of flight sensors also use light, they are immune to many false readings caused by stray light.
While there is a kit for sale, you can find the schematic and source code on GitHub with a BSD-3-Clause license. We had hoped for a video of the device, but we didn’t see one.
One nice thing about the device is you can easily swap the “handedness.” That is, you can switch the function of the virtual coils easily if you prefer to use your dominant hand for pitch.
We talk about theremins around here more than you’d think. You can build a classic one quite easily, and we’ve seen plenty of more complex designs, too.
From the “why didn’t we think of that” department comes [dupontgu’s] pong mouse project. The mouse appears and acts like a normal computer mouse until you click the scroll wheel. When you do, the mouse rapidly moves the cursor on the connected computer to play pong. Obviously, though, the paddles and the ball all look like your cursor, whatever that happens to be. So, how do you tell the score? Well, when a score happens, the cursor shows between the two paddles. In the middle means the game is tied. Otherwise, the player closest to the score indicator is winning. The mouse is an off-the-shelf unit, but inside is a tiny XIAO RP2040 board that can act as both a USB host and a USB device. The RP2040 intercepts the USB traffic and can modify it as it sees fit or just pass it unchanged. Part of the secret sauce is to make the mouse use absolute mode so that it can teleport the cursor between two spots. This is common with, for example, touchscreen drivers. However, it is unusual for a mouse to use this mode. Of course, the cursor is actually only in one place at a time, but your eye thinks it is in multiple places at the same time.
The code itself isn’t very long. A few hundred lines of C++ and, of course, plenty of libraries to handle the USB. We can think of lots of reasons we might want to filter a USB device.
Americans certainly remember Sputnik. At a time when the world was larger and scarier, the Soviets had a metal basketball flying over the United States and the rest of the world. It made people nervous, but it was also a tremendous scientific achievement. However, it wasn’t the plan to use it as the first orbiter, as [Scott Manley] explains in a recent video that you can see below.
The original design would become Sputnik 3, which, as [Scott] puts it, was the first Soviet satellite that “didn’t suck.” The first one was essentially a stunt, and the second one had an animal payload and thermal problems that killed the canine occupant, [Laika].
Most people don’t remember the later Sputnik missions. However, they did some of the first science in Earth’s orbit. [Scott] has a lot of history related to the early days of space science.
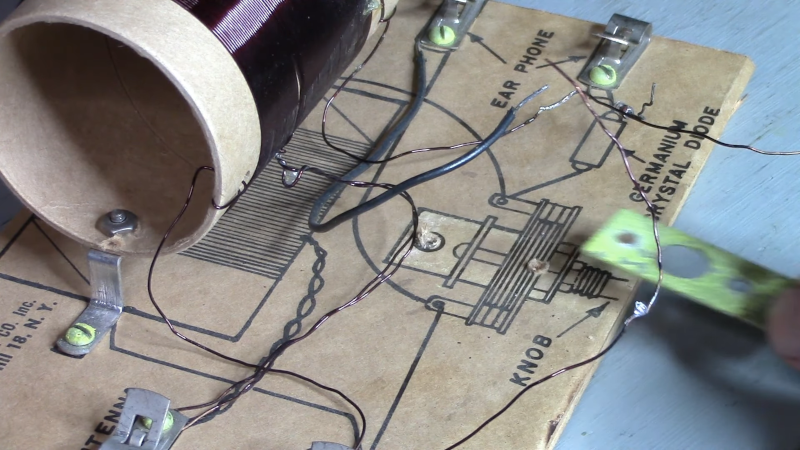
The classic crystal radio was an oatmeal box with some wire and a few parts. [Michael Simpson] has something very different. He found an assembled Philmore “selective” radio kit. The simple kit had a coil, a germanium diode, and a crystal earphone.
We were sad when [Michael] accidentally burned a part of the radio’s coil. But–well–in the end, it all worked out. We’ll just say that and let you watch for yourself. The radio is simplicity itself, built on a wooden substrate with a very basic coil and capacitor tuned circuit.
The model VC-1000 appears to be about 60 years old, and back then, it cost $5. That doesn’t sound like much, but that’s about $50 in today’s money. Of course, a nice one in mint condition today would probably be worth a good bit more than $50.
[Michael] uses an amplifier to let us listen in, but the original crystal earphone has to have a high impedance to prevent loading the detector. At first, there was an intermittent connection to the radio, perhaps not surprising after 60 years for a $5 radio.
The variable capacitor had metal plates with what looked like mylar spacers. The capacitor plates intermittently shorted, probably due to damage to the spacers. He did take the cap apart and found the root cause of the issue. Watching him reassemble it was oddly calming.
A “new” capacitor finally arrived. After a little surgery, the radio was back to its original condition. It always seems like magic that just some wire, metal plates, and a little glass-like cylinder is all you need to hear signals that fly through the air.
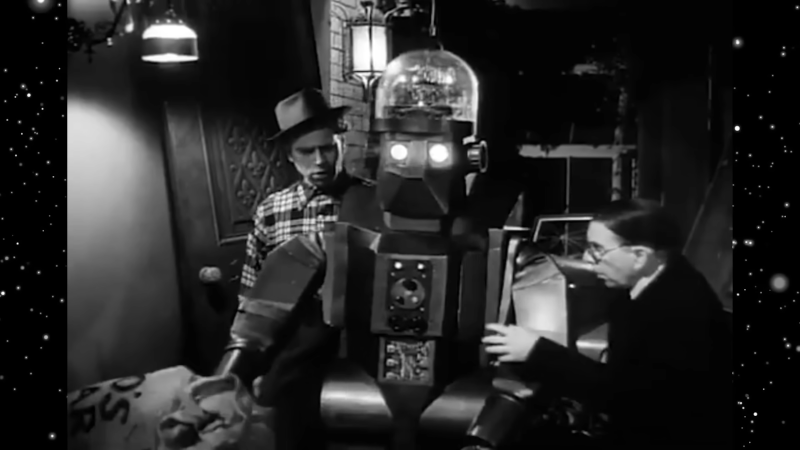
Even if you don’t like to build replicas of movie robots, you can often draw inspiration from cinema. Everyone knows Robby the Robot, Gort, and R2D2. But [Atomic Snack Bar] treats us to some lesser-known robots from movies in the 1930s, 40s, and 50s. While we are pretty up on movies, we have to admit that the video, which you can see below, has a few we didn’t know about.
The robots are mostly humanoid. The comedy vampire flick from the 1950s could have inspired Robby, who appeared four years later. The exception that proves the rule is the Twonky which was a TV set turned robot turned mind controller.
Kronos wasn’t exactly humanoid but still had a human-like figure. It turns out Kronos has a direct connection to Robby, even though he wasn’t nearly as famous.
A 1939 movie featured a mad scientist with “the robot,” which was sort of a cross between Robby and a Halloween mask. Then there was the water heater robot that appeared in many Republic movies, including Commander Cody, where we remember him.
We’d love to see some replicas of these fine old robots, especially since the originals go for a fortune. Or maybe try a replica movie computer.
In the late 1800s, the stereograph — sometimes incorrectly called a stereopticon — was a big craze. You’d view two side-by-side images through some lenses and see a three-dimensional image. This, of course, later would morph into View-Masters and, eventually, virtual reality headsets. But if you have an old stereograph, where do you get new images for it? If you are [Engineers Need Art], you write a program to convert MPO files (a common 3D image format) to printable stereograms. Interestingly, he used AI to assist in the project and has observations about where it helped and where it didn’t.
The post goes into a lot of detail about how the author experimented with 3D imaging for many years. However, it eventually discusses a MacOS application built with the help of an AI chatbot.
There are a number of subtle issues involved with creating a viewer, and those are — unsurprisingly — the parts where AI needs the most help. You can find the source code for the application on GitHub.
Honestly, this made us think of building some 3D camera gear or even adapting the program to a VR headset. On the other hand, reading glasses can make a cheap stereoscope. While not pretty, they are more comfortable than cross-eyed viewing.
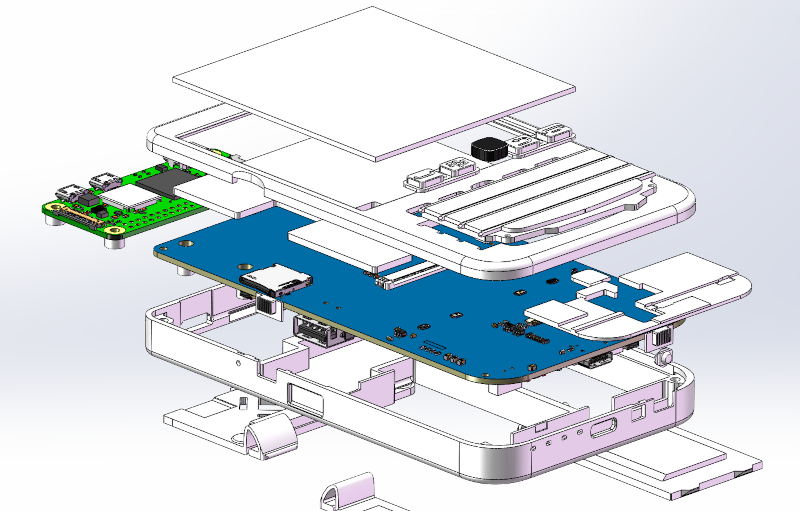
There was a time — not so long ago — when a handheld terminal would have been an expensive and exotic piece of kit. Now, all it takes is a Raspberry Pi and an off-the-shelf TFT display, as [ZitaoTech] shows us.
The resemblance to a Blackberry isn’t a coincidence
Admittedly, we are now seeing these all over the place, but this build looks well thought out. It looks suspiciously like a Blackberry, which isn’t a bad thing. It also has an interesting dual-battery system that lets you swap between two identical Nokia BL-5C batteries without missing a beat.
The device looks like a Blackberry because it uses the Q10 or Q20 Blackberry keyboard. There is a pass-through switch that lets you use the keyboard and pointer as a USB device on a different host computer.
Rounding out the design are three USB ports, an I2C port, and a TF card slot. Size-wise, the device is about 140 mm tall and 82 mm wide. The thickness is less than 16 mm. Even with the batteries, it weighs a lot less than 200 grams.
In the “Something-you-can-try” directory, there are images for Windows 3.1, mini VMAC, and — of course — DOOM. As you might expect, most of the project is 3D printing the intricate case.
Edwin Land, were he alive, would hate this post. He wanted to be known for this scientific work and not for his personal life. In fact, upon his death, he ordered the destruction of all his personal papers. However, Land was, by our definition, a hacker, and while you probably correctly associate him with the Polaroid camera, that turns out to be only part of the story.
Land in 1977
It was obvious that Land was intelligent and inquisitive from an early age. At six, he blew all the fuses in the house. He was known for taking apart clocks and appliances. When his father forbade him from tearing apart a phonograph, he reportedly replied that nothing would deter him from conducting an experiment. We imagine many Hackaday readers have similar childhood stories.
Optics
He was interested in optics, and at around age 13, he became interested in using polarized light to reduce headlight glare. The problem was that one of the best polarizing crystals known — herapathite — was difficult to create in a large size. Herapathite is a crystalline form of iodoquinine sulfate studied in the 1800s by William Herapath, who was unable to grow large sizes of the crystal. Interestingly, one of Herapath’s students noticed the crystals formed when adding iodine to urine from dogs that were given quinine.
Land spent a year at Harvard studying physics, but he left and moved to New York. He continued trying to develop a way to make large, practical, light-polarizing crystals. At night, he would sneak into labs at Columbia University to conduct experiments.
His breakthrough was the realization that he could develop tiny polarizing crystals and put millions of them in a film to form a large polarizer without the problem of growing giant crystals. At first, he created tiny crystals, suspended them in liquid, and aligned them with an electromagnet. A sheet of celluloid would pass through the liquid, picking up precisely aligned microcrystals. When the liquid dried, the crystals remained, and you had a sheet of polarizing film.
A Polarizing Patent
Two misaligned filters will pass less light until reaching 90 degrees of misalignment, which will block most light
That was the basis of the 1929 patent for polarizing films. Later, the process changed to using a polymer sheet with crystals that aligned by stretching the plastic without an electromagnet. Eventually, the crystals would be made of iodine. Not only did polarizing filters reduce glare, but using two of them allowed you to control the flow of light. If the two filters have the same alignment, light with the correct polarization will pass. As you rotate one filter, less light will pass until the polarizers are at right angles to each other. At that point, virtually no light will flow. Polariscopes can even detect stress in glass objects.
In 1932, a Havard professor who had family money joined with Land to form Land-Wheelwright Laboratories to manufacture polarizing films. You’d think that wouldn’t be a big business, but it turns out there were many uses for a large polarizer, although auto headlights didn’t work out. Kodak bought polarizing film for movie cameras. American Optical made polarized sunglasses. It even made 3D movies and photographs more practical.
In 1937, the company changed its name to Polaroid. But it would be 1943 before the Polaroid camera was even an idea. Of course, between those years, there was a World War to contend with.
The company sold many 3D movie cameras. They produced a 3D film for the 1939 World’s Fair. Unfortunately, the right eye film has been lost, but the left eye one is still around, and you can see it below.
War Years
Turns out polarizing films have more military uses than you might guess. Pilots and soldiers benefit from polarized goggles. A 1944 magazine article noted that all fire control teams had polarizing goggles that could adjust their darkness by turning a knob. Polaroid even produced goggles for war dogs and mules. Even General George Patton was seen sporting a pair of Polaroid goggles.
While most of the company’s war effort was optical in nature, it wasn’t all polarized light technology. For example, the company also developed synthetic quinine after the war shut off the supply of tree bark normally used to produce the medicine. While that might seem odd, at the time, quinine crystals were used in the polarizing films produced by the company. The work ultimately didn’t pan out for practical purposes, but it did win the Polaroid researcher responsible a Nobel Prize in 1965, as it was a landmark achievement in organic chemistry.
Before the war, a Polaroid employee made the Vectograph, a stereo viewer that encoded depth information in the form of polarization. During the war, the technique was used to enhance reconnaissance photos. Land and his company also played important roles in future photo intelligence development. He contributed to the U2’s camera and several satellite- and balloon-borne cameras.
The Camera
Of course, what Land is really known for is instant photography. Inspiration struck in 1943 while on vacation in Santa Fe, New Mexico. He took a picture of his three-year-old daughter. She wanted to see the resulting picture right away.
That wasn’t possible, of course, but it got Land thinking. Reportedly, in an hour, he had the basic ideas in place to make the system work. Within three years, he had a prototype. Two years after that, the camera was on sale to the public.
The camera used a technique known as diffusion transfer that was known before Land used it and made it practical for cameras. Prior to this, it was used to copy documents and produce lithography plates before being replaced with more modern techniques. The company made 60 cameras and put 57 of them on a shelf in a department store, thinking they would have some time to make more. The cameras were all sold in a single day, as you can see in the video below. Later, a demonstration by Steve Allen on national television undoubtedly sold many cameras.
The secret isn’t so much in the camera as in the film. In the original process, silver halide — just like regular film — turns black where the light hits it and doesn’t blacken where the image was dark. A dye transfer process migrates dye to the surface of the picture, being blocked where the image is black. This produces a positive image. This requires a series of chemical reactions.
To start the reactions, the reagents are lumped together at the edge of the picture. Rollers in the camera crush capsules containing the reagents and spread them across the picture. For color photos, there are multiple light-sensitive layers and complementary dyes.
In early cameras, the development occurred in the middle of a pack, and after a delay, the user had to separate the image from the rest of the pack. However, in 1972, integral film appeared, which used more chemical magic to develop the image right in front of your eyes.
Genius
Now, when you hear of Edwin Land, you know he did more than invent the instant camera. Not bad for someone who dropped out of school twice. He did, eventually, get an honorary PhD from Harvard. In fact, Harvard’s Baker Library has a great exhibit about Land and his work if you want a lot more detail.
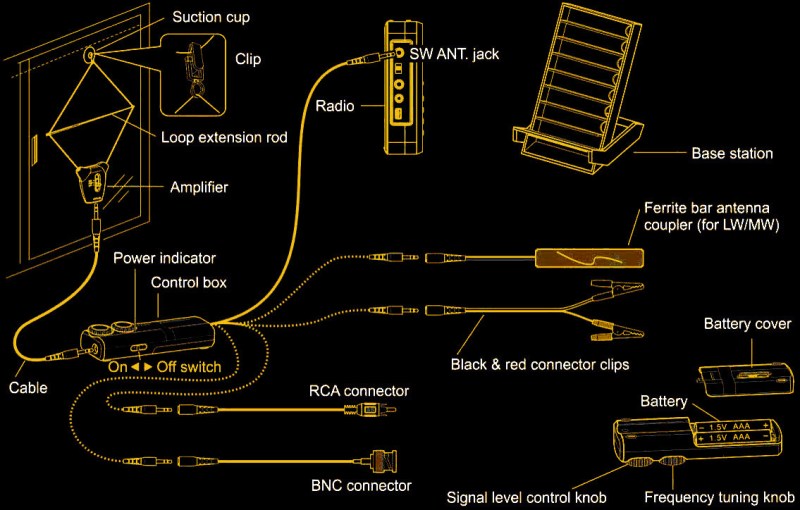
It is one of Murphy’s laws, we think, that you can’t get great things when you need them. Back in the heyday of shortwave broadcasting, any of us would have given a week’s pay for even a low-end receiver today. Digital display? Memory? Digital filtering? These days, you have radios, and they aren’t terribly expensive, but there isn’t much to listen to. Making matters worse, it isn’t easy these days to string wires around in your neighborhood for a variety of reasons. Maybe you don’t have a yard, or you have deed restrictions, or your yard lacks suitable space or locations. This problem is so common that there are a crop of indoor antennas that seem attractive. Since I don’t often tune in shortwave and I don’t want to have to reset my antenna after every storm, I decided to look at the Tecsun AN-48X along with a YouLoop clone from China. Let’s start with the Tecsun.
In the Box
The Tecsun in a more or less diamond shape
The antenna is not terribly cheap at about $50 or so, but there’s a lot in the box. The business end looks like something you’d wear around your neck. A small box has a switch for three bands — LW, AM, and SW. the two wires coming out of that box form a loop. You can stick the loop to something using a suction cup or a hook. There’s also a little bar that looks like a standard telescoping antenna but it has two plastic clips on the end. You use this to form the loop into a diamond shape with the telescoping rod about halfway.
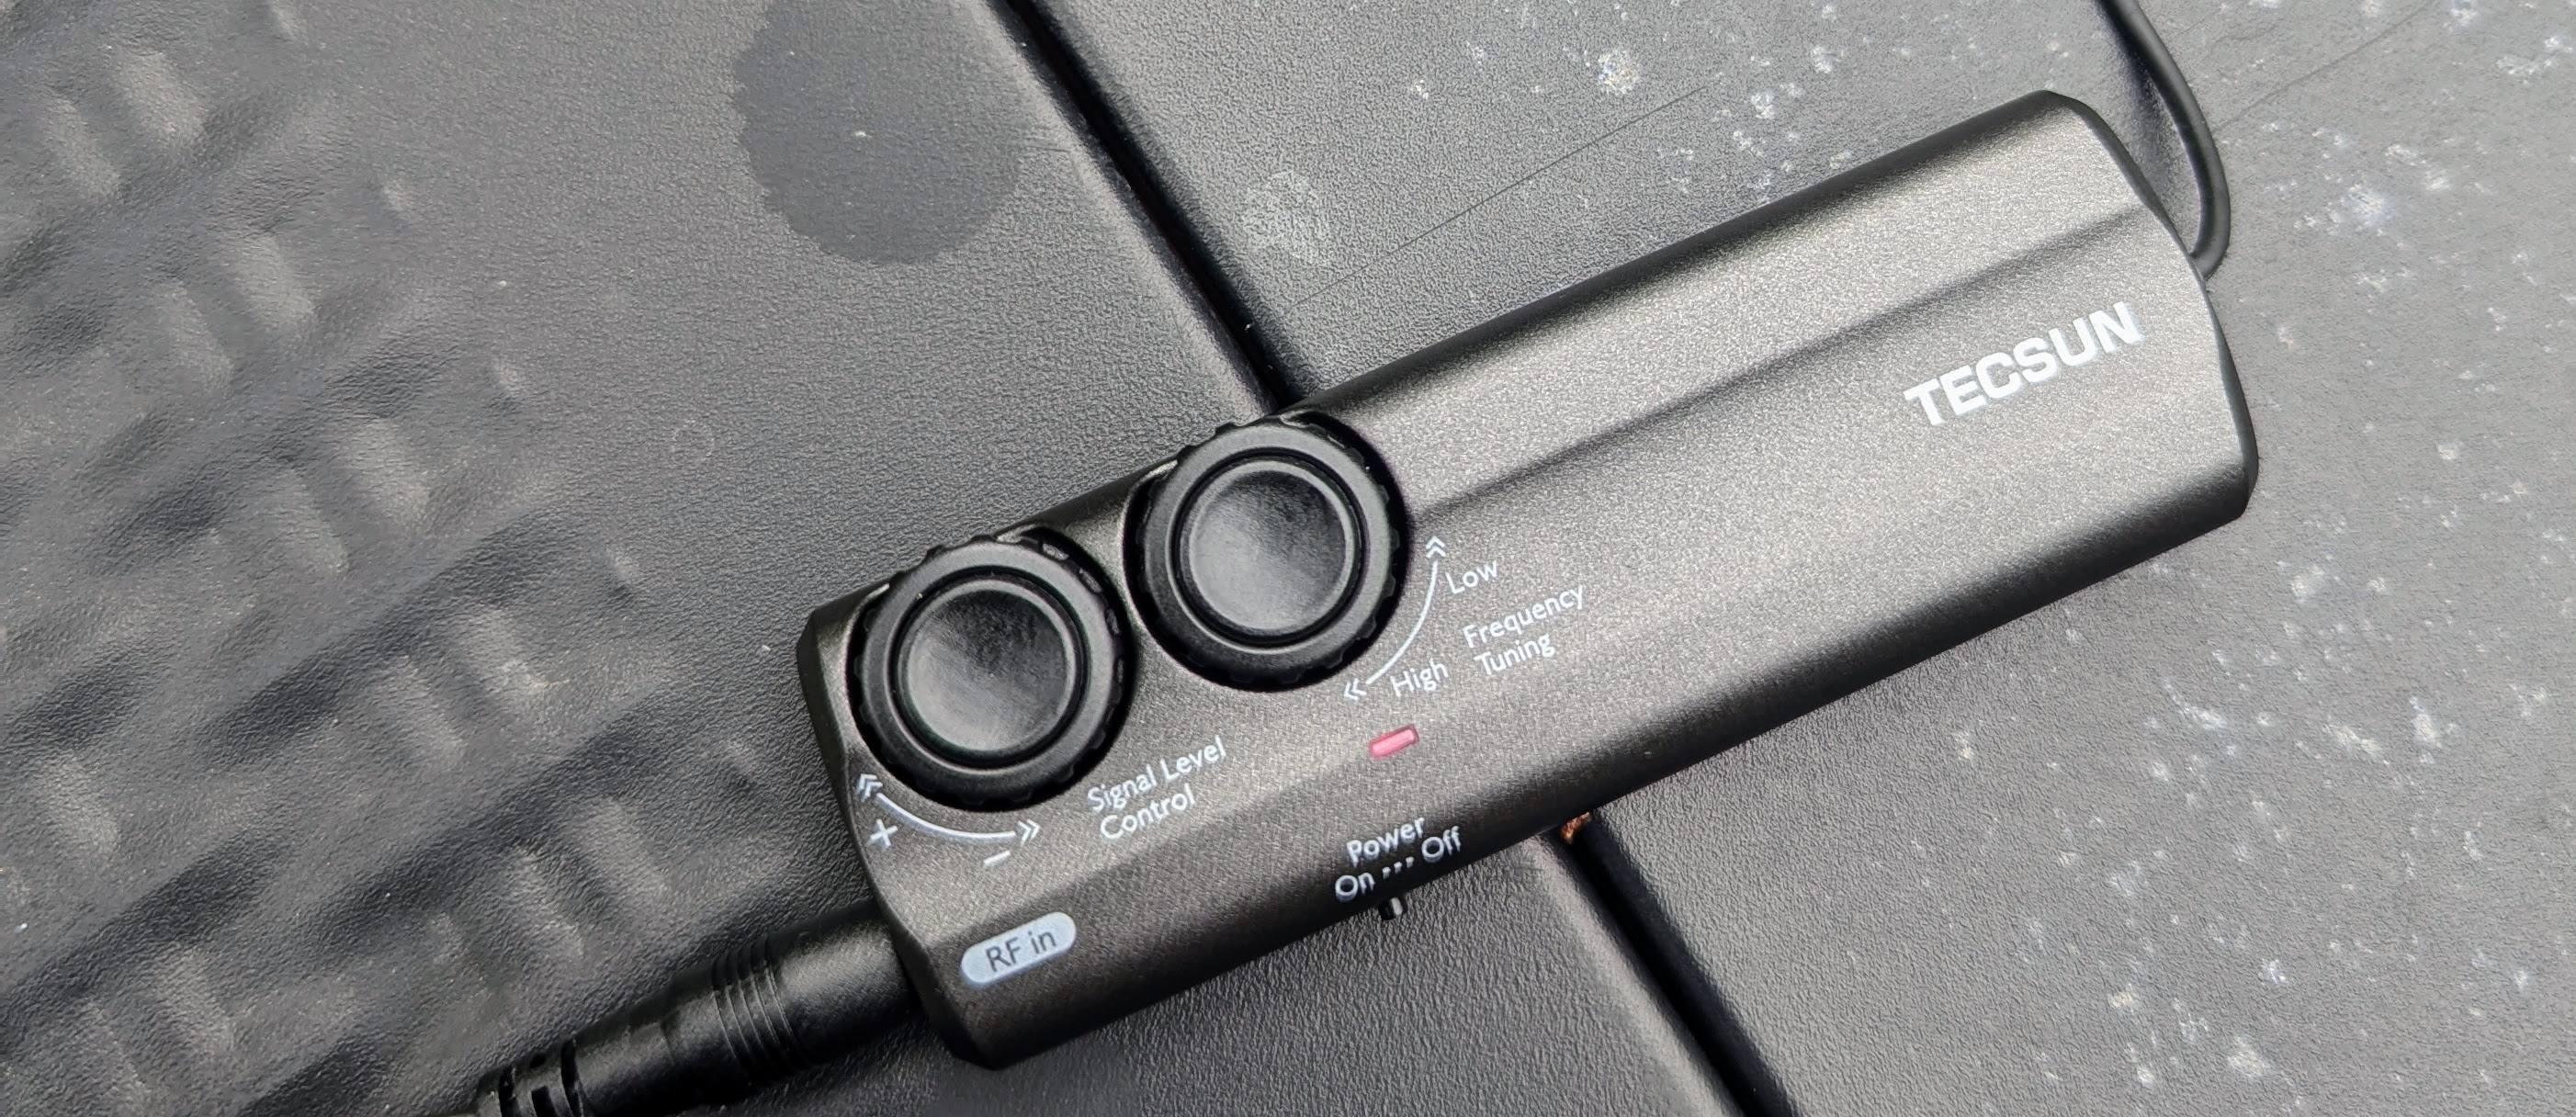
At the bottom of the box with the switch is a standard 1/8″ jack. A cable connects that jack to a similar jack on the control unit which is about the size of a large pack of gum and has two AAA batteries inside. That box has a switch, two knobs, and a pigtail with another 1/8″ jack.
If your radio takes a 1/8″ plug for an antenna, that’s where you connect it. If it doesn’t, you have a few options. The box contains pigtails that convert the plug to BNC, RCA, alligator clips, or a ferrite bar that can couple to a radio’s internal antenna. You probably need SMA for a modern radio, so you’ll need an adapter. There’s also a plastic stand that can hold your radio and the ferrite bar if you are using it.
The knobs on the control box control the gain and tune the frequency of the antenna. Other than the switch close to the loop, all the other controls are on the control box, which stays close to your radio. So, as long as you don’t care about jumping between LW, AM, and SW, you don’t need to access the loop part during operation.
A Few Tests
I decided to try the antenna at a few different times a day in a few different locations. I used an old portable DAK shortwave receiver and also a more modern SDR receiver.
The Tecsun control box.
For the first test, I hung the loop on my upstairs stair rail and let the cable drop down to the first floor. During the day, WWV was barely audible, and there was little else to hear outside of noise. Granted, this was indoors. The signal level control didn’t seem to do much. The tuning frequency knob reminded me of a regenerative receiver control. You could hear the device oscillate, and just past the oscillation, you’d get the best signal. It made me wonder if the inner circuit was, in fact, a regenerative amplifier.
The portable shortwave uses a regular jack, but for the Malachite, I had to use a BNC to SMA adapter. Neither radio could pull much out. Nighttime reception was a little better, but not much.
The Great Outdoors
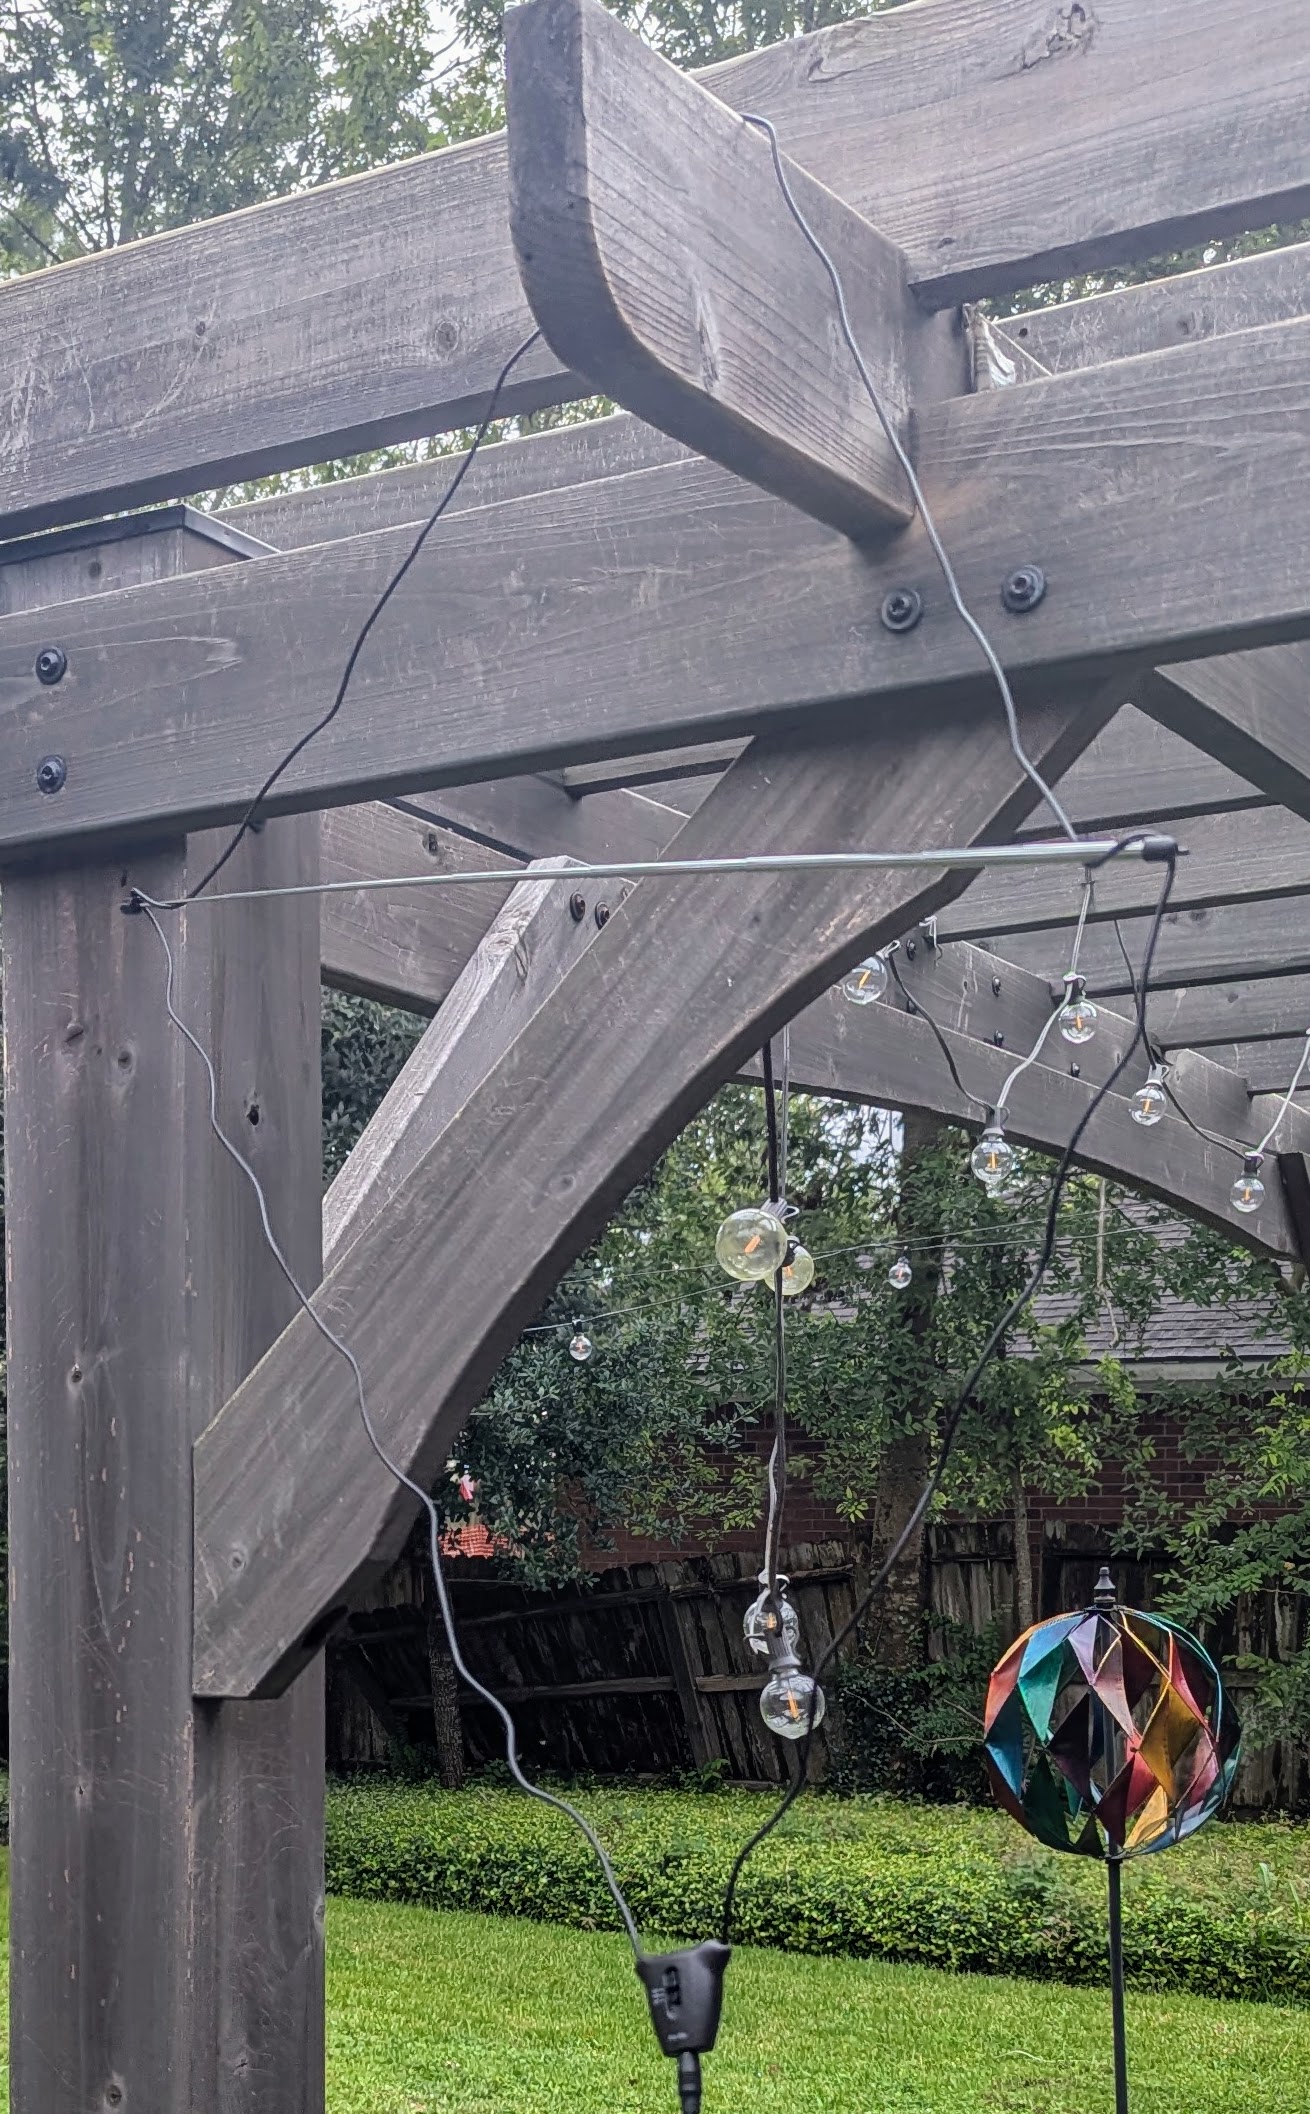
Unsurprisingly, the device worked a little better outdoors. I hung it from an exposed beam on a pergola, and at night, there were a few fairly clear signals. During the daylight hours, WWV was elusive, but the Voice of America and Radio Havana — not too far from Houston — were easy to copy, especially if you understand French. I even managed to catch a few faint snags of WWVH.
The video below shows a few audio clips of the results. Forgive the outdoor glare on the screen in the first clip. I omitted the clips with music that YouTube might flag, but you get the idea.
I also tested a YouLoop clone. This worked almost as well as the Techsun, but not quite as well. However, there was nothing to fidget with on the frequency.
The YouLoop
The YouLoop has an interesting idea. It uses coax for the loop and configures it like a Mobius strip so that it is kind of, an infinite loop. At the bottom is a balun with three connectors, and at the top is a phase inverter. That sounds fancy, but it really is just a box that connects the inside of one cable to the outside of the other. The antenna came with a powered preamp, although if your radio has a preamp, you probably don’t need it.
It is handy that it just works, and the coax sections are stiff enough to be easy to handle when you want to hang it from a branch, for example. However, it also doesn’t pack down as tightly, and the boxes are metal, which adds to the weight but is probably better for shielding.
Signals on this loop were almost always lower in volume than the same signal from the Tecsun, even with the preamp. On the other hand, if you don’t need the preamp, this antenna takes no batteries. It is simple enough that you can try it and see if you like it without a major investment.
Observations
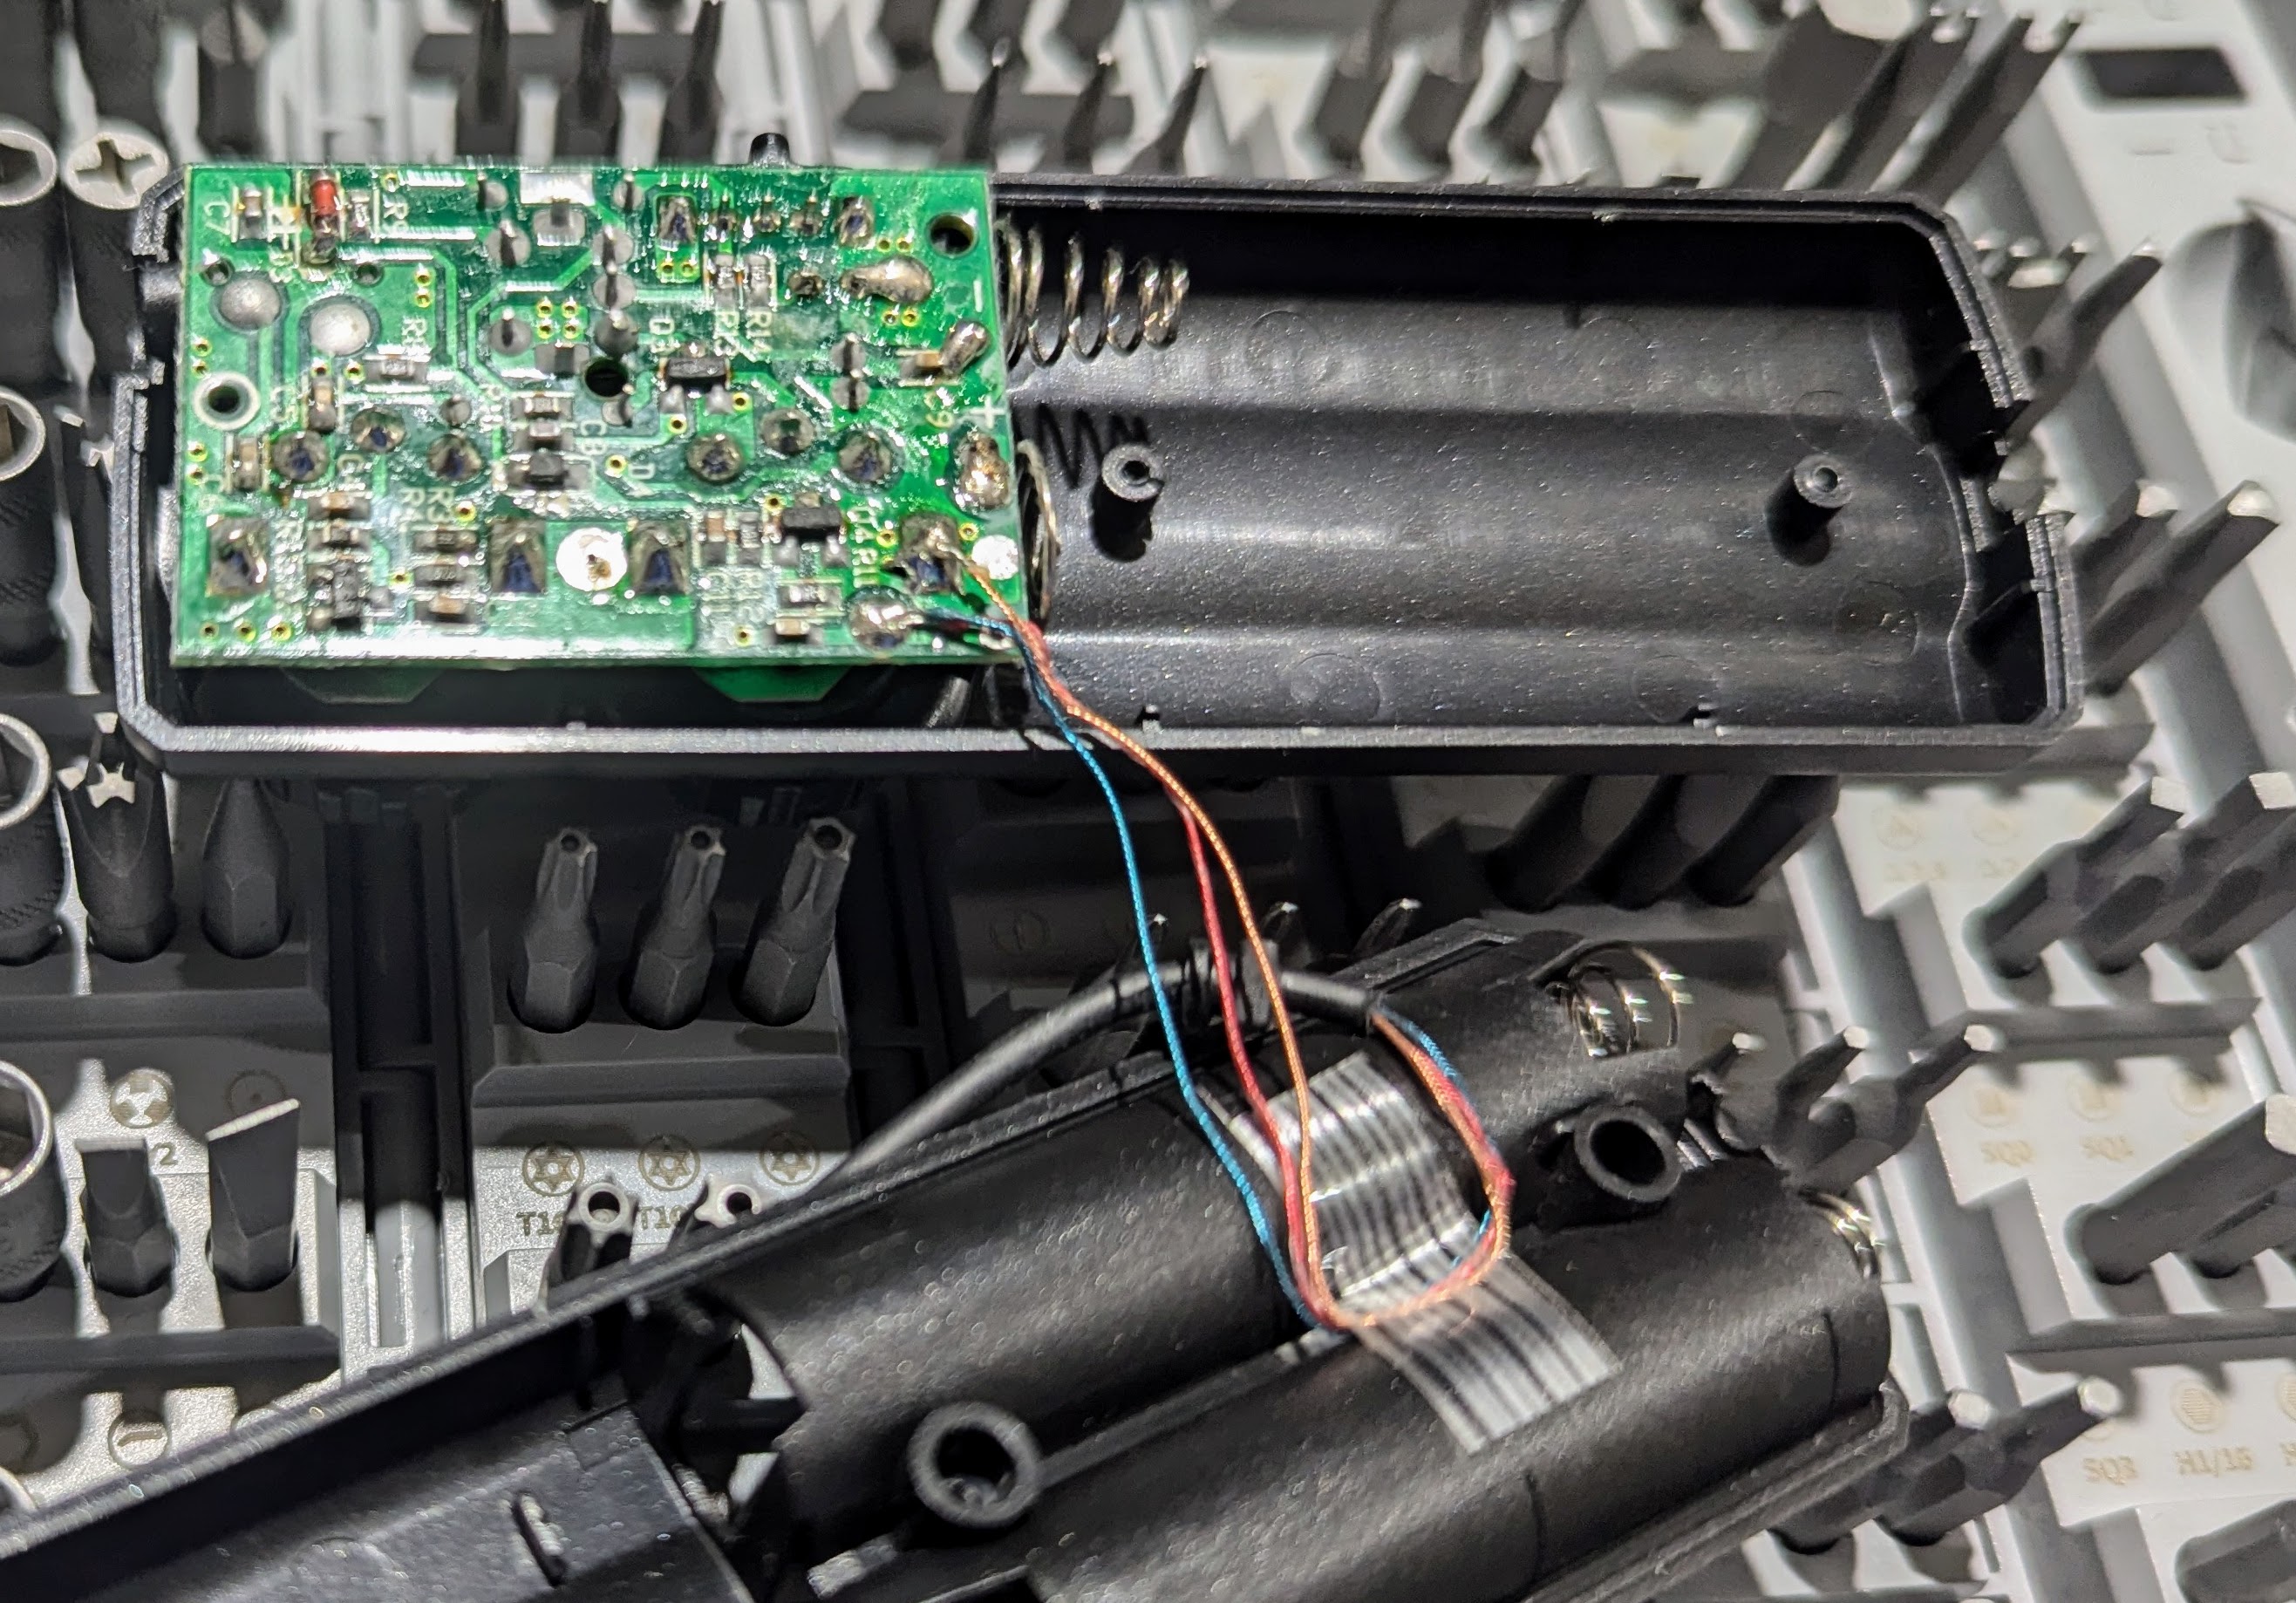
The Tecsun control board revealed
While the Tecsun is light, I can’t help but wonder if the shielded feedline might not have helped it. For both antennas, having the preamp close up to the feed point might pay off, although maybe some of the wire between the antenna and the control boxes or preamp becomes part of the antenna. It isn’t, after all, a tuned antenna.
The Tecsun’s control box frequency knob is maddeningly sensitive, but it does seem to help things. Inside the box is a tiny PCB, and I didn’t find any online schematics.
Should you run out and get either of these antennas? If you have other options, probably not. But if you need something, both of them are better than nothing.
The last time we checked in with [Downtown Doug Brown], he had some cheap Altera USB Blaster clones that didn’t want to work under Linux. The trick at that time was to change the device’s 24 MHz clock to 12 MHz. This month, he’s found some different ones that don’t work, but now the clock change doesn’t work. What’s the problem?
He also picked up a Terasic clone, which does work on Linux and is considered, according to [Doug], the best of the clones. The units were superficially similar. So what follows is a lot of USB tracing and dumping of the CPLD chip’s configuration.
The problem is that even though CPLDs are relatively simple, relative is a — well — relative word. It is still a lot of work to reverse engineer a CPLD bitstream. However, he did find some public VHDL source code that acted the same so he presumed it shared a common problem with the original configuration.
Inspecting the code, he realized that there was no delay between a critical part of the protocol. For some reason, Windows didn’t seem to care, but it was enough to upset the Linux driver. At least, that was the theory.
Theory, in this case, translated to practice. As a bonus, the new code even made the original units work at full speed. Although it isn’t technically accurate, you can think of CPLDs as little FPGAs, and sometimes, they are more approachable for beginners. They are also great when you don’t need a full-blown FPGA.
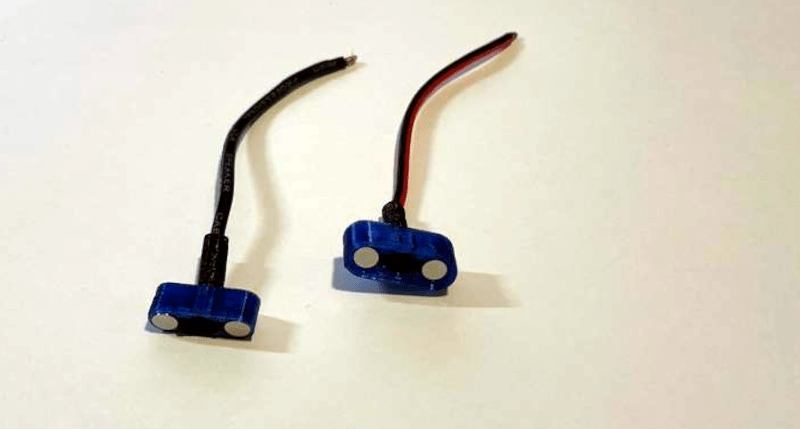
If you have a late-model laptop, you’ve probably seen how the chargers magnetically snap into place. In theory, this should be easy to recreate for your own purposes. But why reinvent the wheel when [DarthKaker] has already done the work for you — assuming you only need two conductors.
The 3D-printed shells take the usual round magnets. Obviously, the north pole on one part should point to the south pole on the other part. In addition, if polarity matters, you should also have each housing contain one north-facing and one south-facing magnet so that the connectors will only mate one way.
It appears the project uses wires soldered or spot welded to the magnets. Heating magnets sometimes has bad effects, so we might try something different. For example, you could solder the wires to thin washers affixed to the magnets with epoxy, perhaps. Or use the magnets for alignment and make a different arrangement for the contacts, although that would take a different shell design.
We have talked about magnet soldering for connectors before. Don’t forget that you can build magnets into your prints, too.
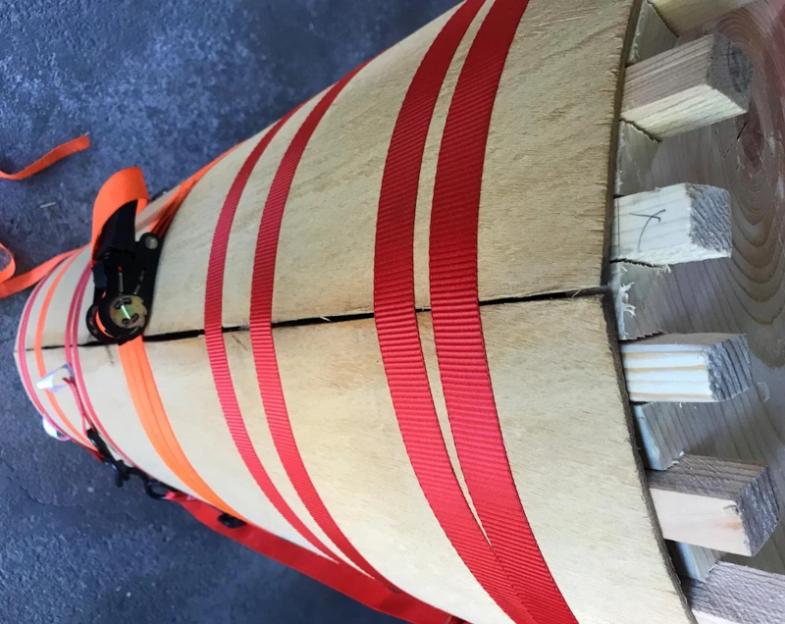
To be clear, when we are talking about tubes, we mean ordinary cylinders, not vacuum-amplifying elements. With that out of the way, when we need a tube like that, we usually think of PVC or some other kind of pipe product. Or maybe we’ll 3D print what we need. But not [GregO29]. He made his tubes from plywood.
You can make tubes as small as 12 inches in diameter, and [GregO29] made some that were 16 inches. The first step was to make a mold or form. In this case, he elected to make a form that the tube-to-be wraps around. The plywood is thin 2-ply white birch. This makes it easy to shape.
The basic idea is to wrap the wood around the form and glue it. You hold it together with a strap until it dries. Then, you can add more layers until it is the thickness you need.
The real problem turned out to be removing the form once it was done. Why make a tube like this? In [Greg]’s case, he’s building a telescope, which is as good a reason as any to have a tube, we suppose.
AVO meters — literally amp, volt, ohm meters — are not very common in North America but were staples in the UK. [TheHWcave] found an AVO 8 that is probably from the 1950s or 1960s and wanted to get it working. You can see the project in the video below.
These are very different from the standard analog meters many of us grew up with. [TheHWcave] shows how the dual range knobs work together to set the measurement. There are three separate ohm settings, and each one has its own zero pot. We were surprised that the meter didn’t have a parallax-correcting mirror.
Other than dirty switch contacts, the voltage measurements still worked. After cleaning the contacts, most of the ranges worked well, although there were still some issues. Some of the resistor ranges were not working, either. Inside the case were an old D cell and a square battery, a B121 15 V battery. Replacing the 15 V battery with a bench supply made things better.
Some plugins are available to allow the meter to read low resistance or high currents. We thought using the soldering gun as a current source was clever. Once he gets it working, he opens the box around the 14:30 mark.
The inside was all hand-wiring and power resistors. Of course, there are also a ton of contacts for the switches. So it isn’t just an electrical design, but a mechanical one, too. The electrical design is also interesting, and an analysis of it winds the video down.
Suppose you decide you want to become a novelist. You enroll in the Hackaday Famous Novelists School where your instructor announces that since all truly great novels are written in Russian, our first task will be to learn Russian. You’d probably get up and leave. The truth is, what makes a great (or bad) novel transcends any particular language, and you could make the same argument for programming languages.
Despite the pundits, understanding the basics of how computers work is more important than knowing C, Java, or the language of the week. A recent post by [lackofimagination] proposes that we should teach programming using BASIC. And not a modern whizz-pow BASIC, but old-fashioned regular BASIC as we might have used it in the 1980s.
Certainly, a whole generation of programmers cut their teeth on BASIC. On the other hand, the programming world has changed a lot since then. While you can sort of apply functional and object-oriented techniques to any programming language, it isn’t simple and the details often get in the way of the core ideas.
Still, some things don’t change. The idea of variables, program flow, loops, and arrays all have some parallel in just about anything, so we can see some advantages to starting out simply. After all, you don’t learn to drive by trying it out in the Indy 500, right?
What do you think? If you were teaching programming today, would you start with BASIC? Or with something else? You can modernize a little bit with QB64. Or try EndBasic which just recently had a new release.
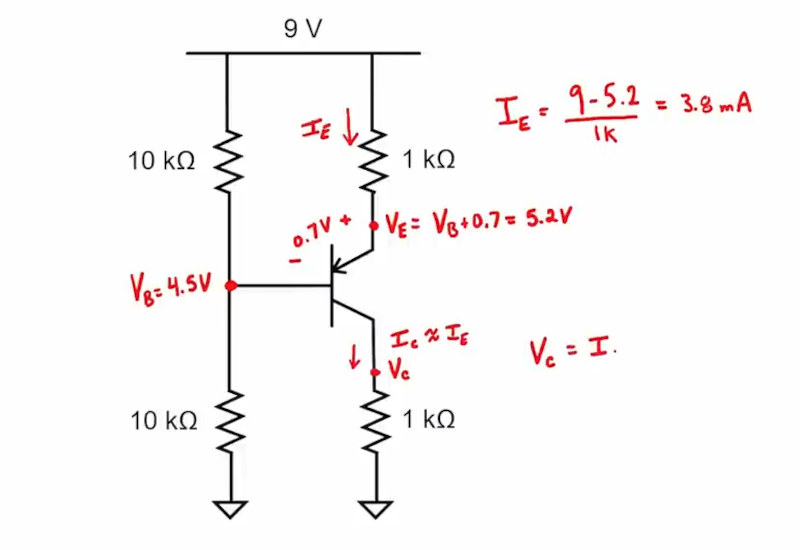
In the early days, PNP bipolar transistors were common, but the bulk of circuits you see today use NPN transistors. As [Aaron Danner] points out, many people think PNP transistors are “backward” but they have an important role to play in many circuits. He explains it all in a recent video you can see below.
He does explain why PNP transistors don’t perform as well as corresponding NPN transistors, but they are still necessary sometimes. Once you get used to it, they are no problem to handle at all. Common cases where you want a PNP are, for example, when you want to switch a voltage instead of a ground. There are also certain amplifier configurations that need PNP units.
Like an NPN transistor, a PNP can operate in saturation, linear operation, reverse active, or it can be cut off. [Aaron] shows you how to bias a transistor and you’ll see it isn’t much different from an NPN except the base-emitter diode junction is reversed.
As you might expect, current has to flow through that diode junction to turn the transistor on. The arrow points in the direction of the diode junction. If you want a refresher on transistor biasing, we got you. Sure, you don’t need to do it every day now, but it still is a useful skill to have.
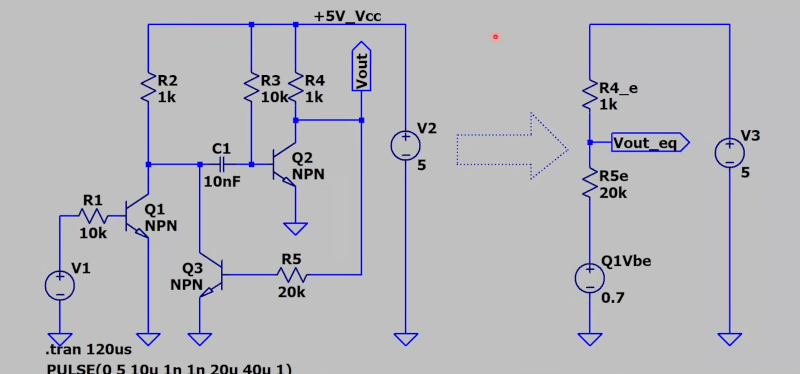
[The Engineering Experience] has an ambitious series of videos. He’s working through circuit examples from the awesome book “The Art of Electronics.” In the latest installment, he’s looking at a pulse generator that uses bipolar transistors. So far, there are 43 videos covering different exercises.
If you’ve read the book — and you should — you know the examples and exercises sometimes have little explanation. Honestly, that’s good. You should try to work through them yourself first. But once you have an idea of how it works, hearing someone give their take on it may help you out. In fact, even if you don’t have the book, we’d suggest pausing the video and looking at the circuit to see what you can figure out before playing the explanation. You’ll learn more that way.
Admittedly, some of the early videos will be cakewalks for Hackaday readers. The first few, for example, walk through parallel and series resistors. However, if you are starting out or just want a refresher, you can probably enjoy all of them. The later ones get a bit more challenging.
If you want to double-check your work, you can simulate the circuit, too. Our simulation got 4.79 V and he computed 4.8, which is certainly close enough.