Vista de Lectura

Hay nuevos artículos disponibles. Pincha para refrescar la página.

A History of Copper Pours

If you compare a modern PCB with a typical 1980s PCB, you might notice — like [lcamtuf] did — that newer boards tend to have large areas of copper known as pours instead of empty space between traces. If you’ve ever wondered why this is, [lcamtuf] explains.

The answer isn’t as simple as you might think. In some cases, it is just because the designer is either copying the style of a different board or the design software makes it easy to do. However, the reason it caught on in the first place is a combination of high-speed circuitry and FCC RF emissions standards. But why do pours help with unintentional emissions and high-speed signals?

The answer lies in the inductance the pours add to the boards. Of course, there’s no free lunch. Adding inductance in this way also increases capacitance, which can be a bad thing.

The truth is, most of the boards we deal with would be fine with or without the pours. That’s a good thing, too, because the post illustrates how some common things can significantly reduce the effectiveness of the copper pours.

When we don’t send our boards out, we are usually more interested in removing copper. You also have to be careful when you want your PCB to radiate.
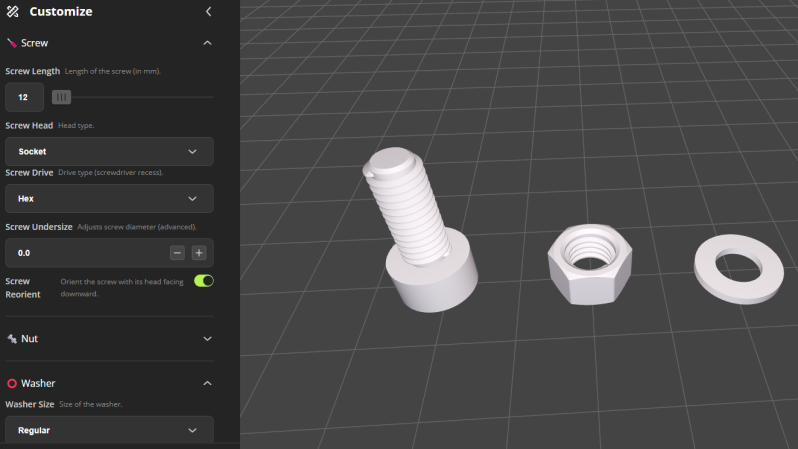
Handy Online Metric Screw, Nut, and Washer Generator

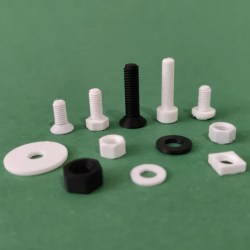
For those times when you could really use a quick 3D model, this metric screw generator will do the trick for screws between M2 and M16 with matching nuts and washers. Fastener hardware is pretty accessible, but one never knows when a 3D printed piece will hit the spot. One might even be surprised what can be usefully printed on a decent 3D printer at something like 0.08 mm layer height.

Behind the scenes, [Jason]’s tool is an OpenSCAD script with a very slick web-based interface that allows easy customization of just about any element one might need to adjust, including fine-tuning the thread sizing. We’re fans of OpenSCAD here and appreciate what’s going on behind the scenes, but one doesn’t need to know anything about it to use the online tool.

Generated models can be downloaded as .3mf or .stl, but if you really need a CAD model you’re probably best off looking up a part and downloading the matching 3D model from a supplier like McMaster-Carr.

Prefer to just use the OpenSCAD script yourself, instead of the web interface? Select “Download STL/CAD Files” from the dropdown of the project page to download ScrewGenerator.scad for local use, and you’re off to the races.

The Jell-O Glow Tensegrity Toy You Didn’t Know You Needed

Tensegrity construction with Adafruit led strands

If you’re looking to add a pop of glowing whimsy to your workspace, check out this vibrant jiggly desk toy by [thzinc], who couldn’t resist the allure of Adafruit’s NOODS LED strands. [thzinc]’s fascination with both glowing LEDs and levitating tensegrity designs led to an innovative attempt to defy gravity once again.

The construction’s genius is all about the balance of tension across the flexible LED strands, with three red ‘arms’ and a blue ‘hanger’ arm supporting the central hub. [thzinc]’s early designs faced print failures, but by cleverly reorienting print angles and refining channel designs, he achieved a modular, sturdy structure. Assembly involved careful soldering, tension adjustments, and even a bit of temporary tape magic to perfect the wobbling equilibrium.

But, the result is one to applaud. A delightful, wobbly desk toy with a kind of a Jell-O vibe that dances to your desk’s vibrations while glowing like a mini neon sign. We’ve covered tensegrity constructions in the past, so with a little digging through our archives you’ll be able to find some unique variations to build your own. Be sure to read [thzinc]’s build story before you start. Feel free to combine the best out there, and see what you can bring to the table!


Patching Up Failing Hearts With Engineered Muscle Tissue

As the most important muscle in our body, any issues with our heart are considered critical and reason for replacement with a donor heart. Unfortunately donor hearts are rather rare, making alternatives absolutely necessary, or at the very least a way to coax the old heart along for longer. A new method here seems to be literally patching up a patient’s heart with healthy heart tissue, per the first human study results by [Ahmad-Fawad Jebran] et al. as published in Nature (as well as a partially paywalled accompanying article).

Currently, simple artificial hearts are a popular bridging method, which provide a patient with effectively a supporting pump. This new method is more refined, in that it uses induced pluripotent stem cells (iPS) from an existing hiPSC cell line (TC1133) which are then coaxed into forming cardiomyocytes and stromal cells, effectively engineered heart muscle (EHM). After first testing this procedure on rhesus macaque monkeys, a human trial was started involving a 46-year old woman with heart failure after a heart attack a few years prior.

During an operation in 2021, 10 patches of EHMs containing about 400 million cells each were grafted onto the failing heart. When this patient received a donor heart three months later, the removed old heart was examined and the newly grafted sections found to be healthy, including the development of blood vessels.

Although currently purely intended to be a way to keep people alive until they can get a donor heart, this research opens the tantalizing possibility of repairing a patient’s heart using their own cells, which would be significantly easier than growing (or bioprinting) an entire heart from scratch, while providing the benefit of such tissue patches grown from one’s own iPS cells not evoking an immune response and thus mitigating the need for life-long immune system suppressant drugs.

Featured image: Explanted heart obtained 3 months after EHM implantation, showing the healthy grafts. (Credit: Jebran et al., 2025, Nature)

Copper Candle Burns Forever… Just add Fuel

[Zen Garden Oasis] wanted to heat and light a space using a candle. But candles aren’t always convenient since they burn down and, eventually, you must replace them. So he built copper candles using a common copper pipe and an old glass jar. Of course, the candle still takes fuel that you have to replace, but the candle itself doesn’t burn down.

The basic idea is that the copper tube holds a high-temperature carbon wick that stays saturated with fuel. The fuel burns, but the wick material doesn’t. The copper part is actually concentric with a 3/4-inch pipe mostly enclosing a 1/2-inch pipe.

The inner pipe extends further, and there are several holes in each pipe for fuel and air flow. The extended part of the pipe will be the candle’s flame. The wick wraps the entire inner pipe, stopping when it emerges from the outer pipe.

The fuel is alcohol, just like the old burner in your childhood chemistry set. The flame isn’t very visible, but a little salt in the fuel can help make the burn more orange.

Of course, this is a flame, so you need ventilation. You’ll also want to take care to make sure the candle—or anything burning—doesn’t tip over or set something else on fire. These candles will store just fine, and they can even burn common rubbing alcohol, so they could be useful in an emergency to generate heat and light with no electricity. Even a small candle can generate heat around 300F. Bigger candles make more heat, and the video shows ways to capture the heat to make it more useful.

There are a number of useful comments about drilling a cleaner hole in the jar lid and better replacements for the JB Weld seal. We’d have suggested furnace cement, which is easy to find and cheap.

Comparing Adhesives for Gluing PETG Prints

Testing every kind of glue with PETG, including wood glue. (Credit: Cosel, YouTube)

PETG is a pretty great material to print 3D models with, but one issue with it is that gluing it can be a bit of a pain. In a recent video by [Cosel] (German language, with English auto-dub) he notes that he found that with many adhesives the adhesion between PETG parts would tend to fail over time, so he set out to do a large test with just about any adhesive he could get his hands on. This included everything from epoxy to wood glue and various adhesives for plastics

For the test, two flat surfaces were printed in PETG for each test, glued together and allowed to fully dry over multiple days. After about a week each sample was put into a rig that tried to pull the two surfaces apart while measuring the force required to do so.

With e.g. two-part epoxy and super glue the parts would break rather than the glue layer, while with others the glue layer would give way first. All of these results are noted in the above graphic that has the force listed in Newton. The special notes and symbols stand for strong smell (‘Geruch’), the PETG itself breaking (‘Substrat gebrochen’) and high variability (‘hohe Streuung’) between the multiple samples tested per adhesive.

Interesting is that multiple superglues (‘Sekundenkleber’) show different results, while MMA (Methyl Methacrylate) and similar score the highest. The Bostik P580 is a polyurethane construction adhesive, usually used for gluing just about anything to anything in interior and exterior applications, so perhaps its high score isn’t so surprising. Trailing at the end are the wood glue in last place, with the UHU general adhesive also scoring rather poorly.

Clearly there are many options for gluing PETG parts, but some are definitely more sturdy than others.

Thanks to [Risu no Kairu] for the tip.

Retrotechtacular: The Tyranny of Large Numbers

Although much diminished now, the public switched telephone network was one of the largest machines ever constructed. To make good on its promise of instant communication across town or around the world, the network had to reach into every home and business, snake along poles to thousands of central offices, and hum through the ether on microwave links. In its heyday it was almost unfathomably complex, with calls potentially passing through thousands of electronic components, any of which failing could present anything from a minor annoyance to a matter of life or death.

The brief but very interesting film below deals with “The Tyranny of Large Numbers.” Produced sometime in the 1960s by Western Electric, the manufacturing arm of the Bell System, it takes a detailed look at the problems caused by scaling up systems. As an example, it focuses on the humble carbon film resistor, a component used by the millions in various pieces of telco gear. Getting the manufacturing of these simple but critical components right apparently took a lot of effort. Initially made by hand, a tedious and error-prone process briefly covered in the film, Western Electric looked for ways to scale up production significantly while simultaneously increasing quality.

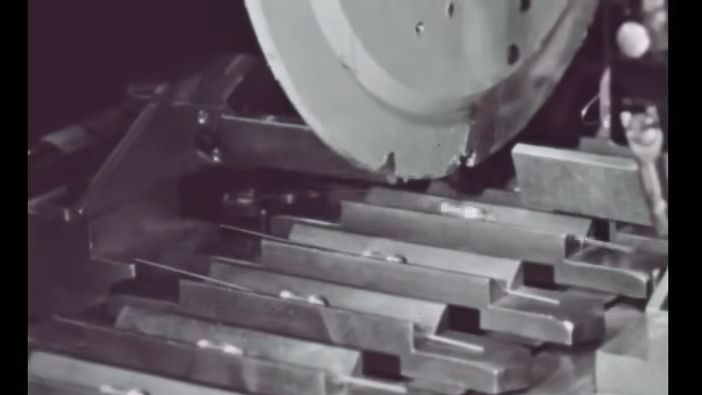
While the equipment used by the Western engineers to automate the production of resistors, especially the Librascope LGP-30 computer that’s running the show, may look quaint, there’s a lot about the process that’s still used to this day. Vibratory bowl feeders for the ceramic cores, carbon deposition by hot methane, and an early version of a SCARA arm to sputter gold terminals on the core could all be used to produce precision resistors today. Even cutting the helical groove to trim the resistance is similar, although today it’s done with a laser instead of a grinding wheel. There are differences, of course; we doubt current resistor manufacturers look for leaks in the outer coating by submerging them in water and watching for bubbles, but that’s how they did it in the 60s.

The productivity results were impressive. Just replacing the silver paint used for terminal cups with sputtered gold terminals cut 16 hours of curing time out of the process. The overall throughput increased to 1,200 pieces per hour, an impressive number for such high-reliability precision components, some of which we’d wager were still in service well into the early 2000s. Most of them are likely long gone, but the shadows cast by these automated manufacturing processes stretch into our time, and probably far beyond.

RGB LED Display Simply Solves The Ping-Pong Ball Problem

A few years ago [Brian McCafferty] created a nice big RGB LED panel in a poster frame that aimed to be easy to move, program, and display. We’d like to draw particular attention to one of his construction methods. On the software end of things there are multiple ways to get images onto a DIY RGB panel, but his assembly technique is worth keeping in mind.

The diameter of ping pong balls is a mismatch for the spacing of LEDs on a strip. The solution? A bit of force.

The technique we want to highlight is not the fact that he used table tennis balls as the diffusers, but rather the particular manner in which he used them. As diffusers, ping-pong balls are economical and they’re effective. But you know what else they are? An inconvenient size!

An LED strip with 30 LEDs per meter puts individual LEDs about 33 mm apart. A regulation ping-pong ball is 40 mm in diameter, making them just a wee bit too big to fit nicely. We’ve seen projects avoid this problem with modular frames that optimize spacing and layout. But [Brian]’s solution was simply to use force.

Observing that ping-pong balls don’t put up much of a fight and the size mismatch was relatively small, he just shoved those (slightly squashy) 40 mm globes into 33 mm spacing. It actually looks… perfectly fine!

We suspect that this method doesn’t scale indefinitely. Probably large displays like this 1200 pixel wall are not the right place to force a square peg into a round hole, but it sure seemed to hit the spot for his poster-sized display. Watch it in action in the video below, or see additional details on the project’s GitHub repository.

Lessons Learned, When Restoring An Amiga 1000

In the mid 1980s, there was a rash of 16-bit computers entering the market. One of them stood head and shoulders above the rest: Commodore’s Amiga 1000. It had everything that could reasonably be stuffed into a machine of the period, and multimedia capabilities the rest wouldn’t catch up on for years. [Celso Martinho] has managed to secure one of those first machines, and has shared his tale of bringing it back to life.

The post is as much a love letter to the Amiga and review of A1000 peripherals as it is a restoration, which makes it a good read for retrocomputing enthusiasts.  He recapped it and it wouldn’t boot, the solution of which turned out to be a reminder for the rest of us.

The machine had a RAM upgrade in the form of a daughterboard under the processor, its pins had weakened the leaves of the processor socket so it wouldn’t make contact. So don’t forget to replace sockets as well as capacitors.

The resulting machine is much faster thanks to a modern upgrade with a much quicker processor, memory, and an SD card for storage. He goes into some of the other upgrades available today, all of which would have had early-1990s-us salivating. It’s fair to say that in 2025 an A1000 is more 40-year-old curio than useful modern computer, but we can’t fail to admit to a bit of envy. The Amiga holds a special affection, here.

Inside Vacuum Fluorescent Displays

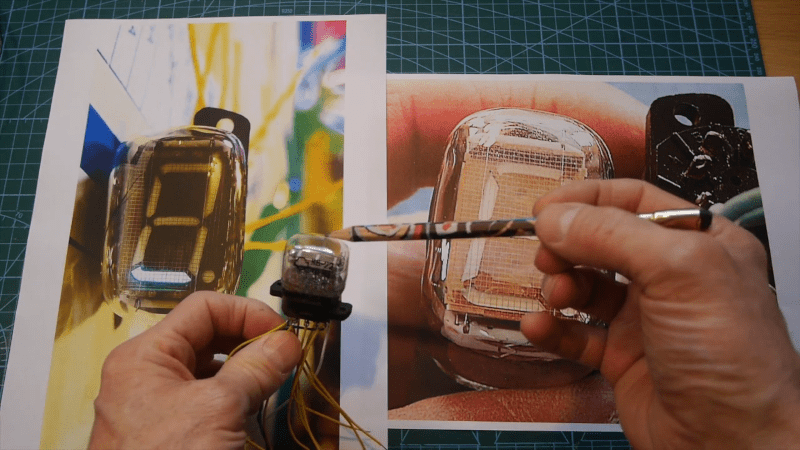
VFDs — vacuum fluorescent displays — have a distinctive look, and [Anthony Francis-Jones] is generally fascinated with retro displays. So, it makes sense that he’d build a VFD project as an excuse to explain how they work. You can see the video below.

VFDs are almost miniature CRTs. They are very flexible in what they display and can even use color in a limited way. The project [Anthony] uses as an example is an indicator to show the video number he’s currently making.

The glass display is evacuated and, like a tube, has a getter to consume the last of the gas. There’s a filament that emits electrons, a grid to control their flow, and anodes coated with a fluorescent material. Unlike a regular tube, the filaments have to operate cool so they don’t glow under operation.

When the grid is positive, and the anode is also positive, that anode will glow. The anodes can be arranged in any pattern, although these are made as seven-segment displays. The filament on the tubes in this project runs on 1.5V, and the anodes need about 25V.

The project itself is fairly simple. Of course, you need a way to control the 25V anode and grid voltages, but that’s easy enough to do. It is possible to make VFDs in unusual character shapes. They work well as light sources for projection displays, too.

Using Guanella Baluns As Impedance Transformers

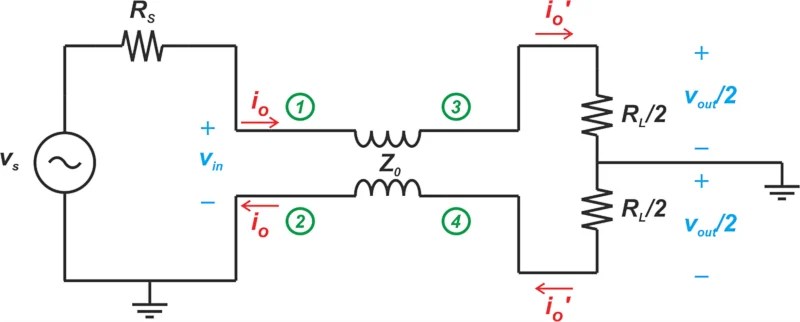
The Guanella 1:1 balun. (Credit: Steve Arar)
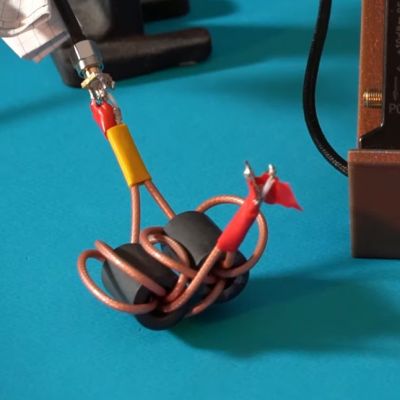
Guanella Impedance Transformer. (Credit: FesZ Electronics)

Even before entering the mystical realms of UHF design, radio frequency (RF) circuits come with a whole range of fun design aspects as well. A case in point can be found in transmission line transformers, which are commonly used in RF power amplifiers, with the Guanella transformer (balun) being one example. Allowing balanced and unbalanced  (hence ‘balun’) systems to interface without issues, they’re both very simple and very complex. This type of transformer and its various uses is explained in a video by [FesZ Electronics], and also the subject of an article by [Dr. Steve Arar] as part of a larger series, the latter of which is recommended to start with you’re not familiar with RF circuitry.

Transmission line transformers are similar to regular transformers, except that the former relies on transmission line action to transfer energy rather than magnetic flux and provides no DC isolation. The Guanella balun transformer was originally described by Gustav Guanella in 1944. Beyond the 1:1 balun other configurations are also possible, which [Dr. Arar] describes in a follow-up article, and which are also covered in the [FesZ] video, alongside the explanation of another use of Guanella transformers: as an impedance transformer. This shows just how flexible transformers are once you can wrap your mind around the theory.

We have previously covered RF amplifier builds as well as some rather interesting balun hacks.

Heading image:  The Guanella 1:1 balun. (Credit: Steve Arar)

Going Brushless: Salvaging A Dead Drill

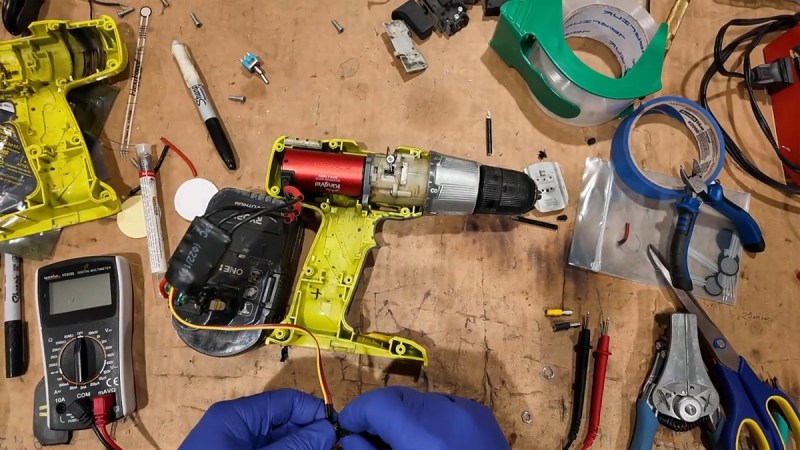
A dismantled drill on a cluttered workbench

Let’s face it—seeing a good tool go to waste is heartbreaking. So when his cordless drill’s motor gave up after some unfortunate exposure to the elements, [Chaz] wasn’t about to bin it. Instead, he embarked on a brave journey to breathe new life into the machine by swapping its dying brushed motor for a sleek brushless upgrade.

Things got real as [Chaz] dismantled the drill, comparing its guts to a salvaged portable bandsaw motor. What looked like an easy swap soon became a true hacker’s challenge: incompatible gear systems, dodgy windings, and warped laminations. Not discouraged by that, he dreamed up a hybrid solution: 3D-printing a custom adapter to make the brushless motor fit snugly into the existing housing.

The trickiest part was designing a speed control mechanism for the brushless motor—an impressively solved puzzle. After some serious elbow grease and ingenuity, the franken-drill emerged better than ever. We’ve seen some brushless hacks before, and this is worth adding to the list. A great tool hack and successful way to save an old beloved drill. Go ahead and check out the video below!

Taylorator Makes Mischief on the Airwaves

[Stephen] recently wrote in to share his experiments with using the LimeSDR mini to conduct a bit of piracy on the airwaves, and though we can’t immediately think of a legitimate application for spamming the full FM broadcast band simultaneously, we can’t help but be fascinated by the technique. Called the Taylorator, as it was originally intended to carpet bomb the dial with the collected works of Taylor Swift on every channel, the code makes for some interesting reading if you’re interested in the transmission-side of software defined radio (SDR).

The write-up talks about the logistics of FM modulation, and how quickly the computational demands stack up when you’re trying to push out 100 different audio streams at once. It takes a desktop-class CPU to pull it off in real-time, and eats up nearly 4 GB of RAM.

You could use this project to play a different episode of the Hackaday Podcast on every FM channel at once, but we wouldn’t recommend it. As [Stephen] touches on at the end of the post, this is almost certainly illegal no matter where you happen to live. That said, if you keep the power low enough so as not to broadcast anything beyond your home lab, it’s unlikely anyone will ever find out.

FLOSS Weekly Episode 818: I Don’t Care About the Roman Empire

This week, Jonathan Bennett, Doc Searls, and Jeff Massie talk about Deepseek, technical solutions to Terms of Service abuse, and more!

Did you know you can watch the live recording of the show right on our YouTube Channel? Have someone you’d like us to interview? Let us know, or contact the guest and have them contact us! Take a look at the schedule here.

Direct Download in DRM-free MP3.

If you’d rather read along, here’s the transcript for this week’s episode.

Places to follow the FLOSS Weekly Podcast:


Theme music: “Newer Wave” Kevin MacLeod (incompetech.com)

Licensed under Creative Commons: By Attribution 4.0 License

Cool Kinetic Sculpture Has Tooling Secrets to Share

Occasionally, we get a tip for a project that is so compelling that we just have to write it up despite lacking details on how and why it was built. Alternatively, there are other projects where the finished product is cool, but the tooling or methods used to get there are the real treat. “Homeokinesis,” a kinetic art installation by [Ricardo Weissenberg], ticks off both those boxes in a big way.

First, the project itself. Judging by the brief video clip in the reddit post below, Homeokinesis is a wall-mounted array of electromagnetically actuated cards. The cards are hinged so that solenoids behind them flip the card out a bit, making interesting patterns of shadow and light, along with a subtle and pleasing clicking sound. The mechanism appears to be largely custom-made, with ample use of 3D printed parts to make the frame and the armatures for each unit of the panel.

Now for the fun part. Rather than relying on commercial solenoids, [Ricardo] decided to roll his own, and built a really cool CNC machine to do it. The machine has a spindle that can hold at least eleven coil forms, which appear to be 3D printed. Blank coil forms have a pair of DuPont-style terminal pins pressed into them before mounting on the spindle, a job facilitated by another custom tool that we’d love more details on. Once the spindle is loaded up with forms, magnet wire feeds through a small mandrel mounted on a motorized carriage and wraps around one terminal pin by a combination of carriage and spindle movements. The spindle then neatly wraps the wire on the form before making the connection to the other terminal and moving on to the next form.

The coil winder is brilliant to watch in action — however briefly — in the video below. We’ve reached out to [Ricardo] for more information, which we’ll be sure to pass along. For now, there are a lot of great ideas here, both on the fabrication side and with the art piece itself, and we tip our hats to [Ricardo] for sharing this.

Development of my kinetic art installation
byu/musicatristedonaruto inEngineeringPorn

Parcae: A Trio of Spy Satellites

Did you ever hear of a satellite called Parcae (pronounced like park-eye)? If you haven’t, don’t feel bad—it was, after all, a top-secret project only revealed in July 2023. [Ivan Amato] not only heard about it, but also wrote a fascinating peek into the cloak-and-dagger world of cold-war spy satellites for this month’s IEEE Spectrum.

According to [Ivan], the satellite helped the United States to keep track of Russian submarines and was arguably the most capable orbiting spy platform ever. Or, at least, that we get to hear about.

Given that it was built in the 1970s, it was amazing that the satellite wasn’t very large. The craft itself seemed small compared to its solar panels. Even today, the satellite remains a bit of a mystery. While the NRO—the US spy satellite agency—did acknowledge its existence in 2023, there is very little official information about it, although, apparently, other curious people have unearthed data on Parcae over the years. According to the NRO, the satellites have not been in use since 2008.

The Parcae—named after the Romans’ three fates—worked in groups of three and launched in a “dispenser” that carried the trio of spaceships. They could listen to radio emissions from ships and use very accurate clocks to pinpoint their location based on the slight differences in the time each satellite heard the signal.

One of the system’s unique features was that thanks to a minicomputer, ship positions could be in users’ hands in minutes. That doesn’t sound so impressive today, but it was an amazing achievement for that time.

The article goes into more detail about how the individual satellites used a gravity boom for orientation and a lot of details about the designers. Of course, some of what Parcae could do is still secret for now, so there may be more to this story later.

Spy satellites can’t always hide from backyard telescopes. Spy satellites always have impressive technology and—presumably—big budgets.

Transition-Metal Dichalcogenides: Super-Conducting, Super-Capacitor Semiconductors

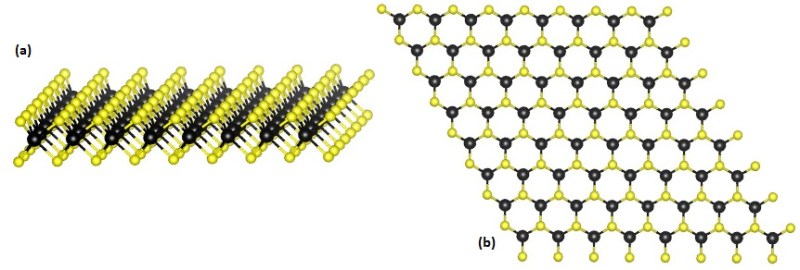
Crystal structure of a monolayer of transition metal dichalcogenide.(Credit: 3113Ian, Wikimedia)

Transition-metal dichalcogenides (TMDs) are the subject of an emerging field in semiconductor research, with these materials offering a range of useful properties that include not only semiconductor applications, but also in superconducting material research and in supercapacitors. A recent number of papers have been published on these latter two applications, with [Rui] et al. demonstrating superconductivity in (InSe2)xNbSe2. The superconducting transition occurred at 11.6 K with ambient pressure.

Two review papers on transition metal sulfide TMDs as supercapacitor electrodes were also recently published by [Mohammad Shariq] et al. and [Can Zhang] et al. showing it to be a highly promising material owing to strong redox properties. As usual there are plenty of challenges to bring something like TMDs from the laboratory to a production line, but TMDs (really TMD monolayers) have already seen structures like field effect transistors (FETs) made with them, and used in sensing applications.

TMDs consist of a transition-metal (M, e.g. molybdenum, tungsten) and a chalcogen atom (X, e.g. sulfur) in a monolayer with two X atoms (yellow in the above image) encapsulating a single M atom (black). Much like with other monolayers like graphene, molybdenene and goldene, it is this configuration that gives rise to unexpected properties. In the case of TMDs, some have a direct band gap, making them very suitable for transistors and perhaps most interestingly also for directly growing 3D semiconductor structures.

Heading image: Crystal structure of a monolayer of transition metal dichalcogenide.(Credit: 3113Ian, Wikimedia)

Testing at Scale

We’ve said it before: building one-offs is different from building at scale. Even on a small scale. There was a time when it was rare for a hobbyist to produce more than one of anything, but these days, access to cheap PC boards makes small production runs much more common. [VoltLog], for example, is selling some modules and found he was spening a lot of time testing the boards. The answer? A testing jig for his PC board.

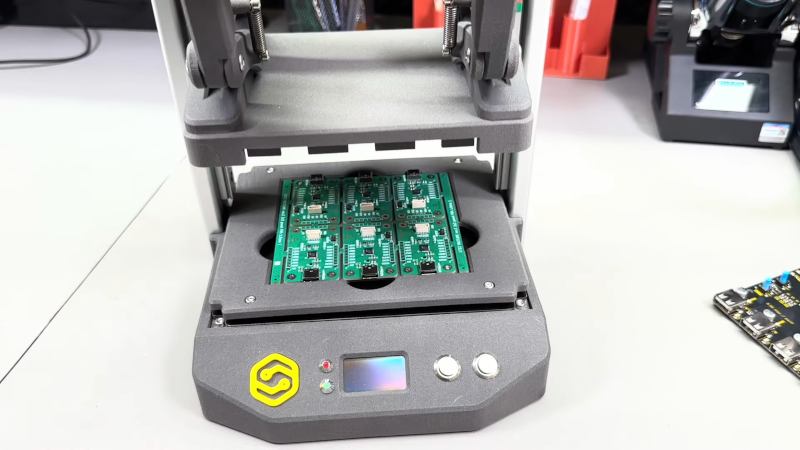
Big factories, of course, have special machines for bulk testing. These are usually expensive. [VoltLog] found a place specializing in creating custom test jigs using 3D printing.

They also have some standard machines. He did have to modify his PCB to accommodate special test points. He sent the design files to the company, and they produced a semi-custom testing jig for the boards in about a month.

A Raspberry Pi runs the test and can even sense LEDs turning on if you need it to. Although the device is 3D printed, it looks very professional.  The machine accepts an entire panel of PCBs and wedges pogo pins to the test points.

We were curious about the cost of this fixture. Of course, each one is unique, so the cost of his fixture will not be the same as yours, but it would still be nice to have an order-of-magnitude idea of the price. On the other hand, he claims his testing is now 15 times faster, so if you spend enough time testing, the cost is probably insignificant.

Replicating a design many times has plenty of challenges. While we do like the look of [VoltLog’s] machine, we also know you could roll your own pogo pin setup if you were on a budget.

Your VAX in a Cloud is Ready

For many people of a certain age, the DEC VAX was the first computer they ever used. They were everywhere, powerful for their day, and relatively affordable for schools and businesses. These minicomputers were smaller than the mainframes of their day, but bigger than what we think of as a computer today. So even if you could find an old one in working order, it would be a lot more trouble than refurbishing, say, an old Commodore 64. But if you want to play on a VAX, you might want to get a free membership on DECUServe, a service that will let you remotely access a VAX in all its glory.

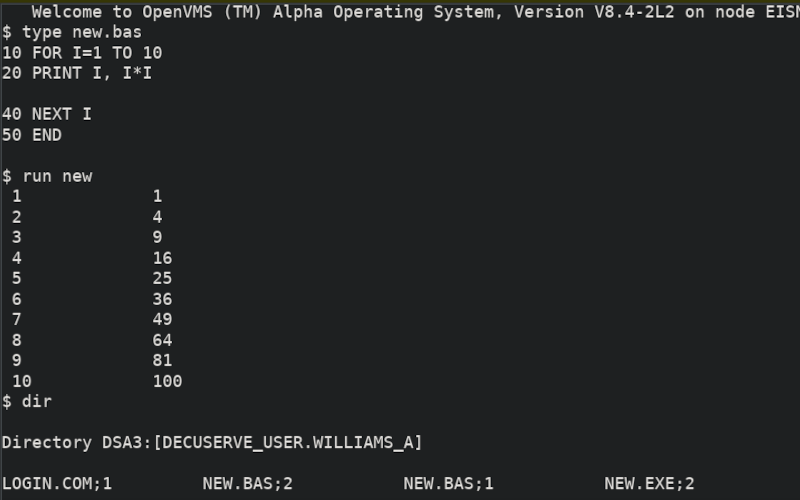
The machine is set up as a system of conferences organized in notebooks. However, you do wind up at a perfectly fine VAX prompt (OpenVMS).

What can you do? Well, if you want a quick demo project, try editing a file called NEW.BAS (EDIT NEW.BAS). You may have to struggle a bit with the commands, but if you (from the web interface) click VKB, you’ll get a virtual keyboard that has a help button. One tip: if you start clicking on the fake keyboard, you’ll need to click the main screen to continue typing with your real keyboard.

Once you have a simple BASIC program, you can compile it (BASIC NEW.BAS). That won’t seem to do anything, but when you do a DIR, you’ll see some object files. (LINK NEW) will give you an executable and, finally, RUN NEW will pay off.

Some quick searches will reveal a lot more you can do, and, of course, there are also the conferences (not all of them are about VAX, either). Great fun! We think this is really connected to an Alpha machine running OpenVMS, although it could be an emulator. There are tons of emulators available in your browser.

❌