Vista de Lectura

Hay nuevos artículos disponibles. Pincha para refrescar la página.

Modular Multi-Rotor Flies Up To Two Hours

Flight time remains the Achilles’ heel of electric multi-rotor drones, with even high-end commercial units struggling to stay airborne for an hour. Enter Modovolo, a startup that’s shattered this limitation with their modular drone system achieving flights exceeding two hours.

The secret? Lightweight modular “lift pods” inspired by bicycle wheels using tensioned lines similar to spokes. The lines suspend the hub and rotor within a duct. It’s all much lighter than of traditional rigid framing. The pods can be configured into quad-, hex-, or octocopter arrangements, featuring large 671 mm propellers. Despite their size, the quad configuration weighs a mere 3.5 kg with batteries installed. From the demo-day video, it appears the frame, hub, and propeller are all FDM 3D printed. The internal structure of the propeller looks very similar to other 3D-printed RC aircraft.

The propulsion system operates at just 1000 RPM – far slower than conventional drones. The custom propellers feature internal ring gears driven by small brushless motors through a ~20:1 reduction. This design allows each motor to hover at a mere 60 W, enabling the use of high-density lithium-ion cells typically unsuitable for drone applications. The rest of the electronics are off-the-shelf, with the flight controller running ArduPilot. Due to the unconventional powertrain and large size, the PID tuning was very challenging.

We like the fact this drone doesn’t require fancy materials or electronics, it just uses existing tech creatively. The combination of extended flight times, rapid charging, and modular construction opens new possibilities for applications like surveying, delivery, and emergency response where endurance is critical.

Hacking the Soil to Combat Desertification

While the Sahara Desert is an important ecosystem in its own right, its human neighbors in the Sahel would like it to stop encroaching on their environment. [Andrew Millison] took a look at how the people in the region are using “half moons” and zai pits to fight desertification.

With assistance from the World Food Program, people in Niger and all throughout the Sahel have been working on restoring damaged landscapes using traditional techniques that capture water during the rainy season to restore the local aquifer. The water goes to plants which provide forage during the 9 drier months of the year.

The main trick is using pits and contouring of the soil to catch rain as it falls. Give the ground time to absorb the water instead of letting it run off. Not only does this restore the aquifers, it also reduces flooding during during the intense rain events in the area. With the water constrained, plants have time to develop, and a virtuous cycle of growth and water retention allows people to have a more pleasant microclimate as well as enhanced food security. In the last five years, 500,000 people in Niger no longer need long-term food assistance as a result of these resiliency projects.

If this seems familiar, we previously covered the Great Green Wall at a more macro level. While we’re restoring the environment with green infrastructure, can we plant a trillion trees?

$40 Ham Antenna Works Six Bands

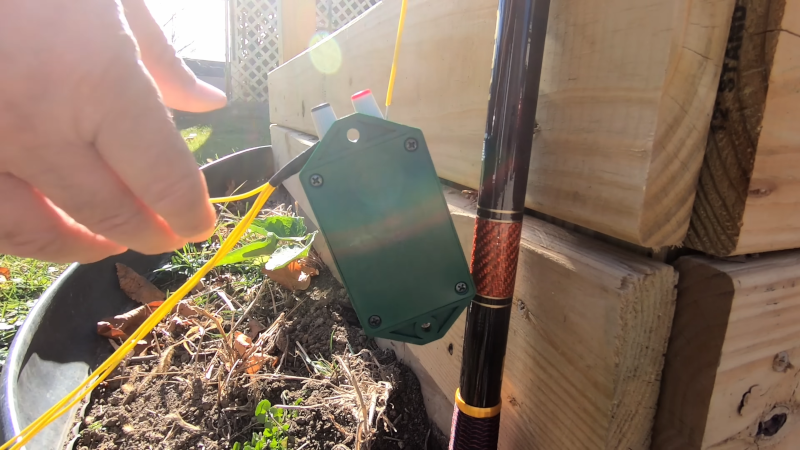
[My Ham Radio Journey] wanted to see if a “common person” (in his words) could build an effective vertical ham radio antenna. If you look at the video below, the answer is apparently yes.

He started with a 24-foot fishing rod and a roll of 22 gauge wire. The height of the antenna wire is just over 20 feet long and he has several ground radials, as you might expect for a vertical antenna.

You also need a toroid to make an unun for the feed point. The details of how he mounted everything will be useful if you want to experiment with making your own version.

Vertical antennas have plusses and minuses. One advantage is they have a low angle of radiation, which is good for long distance communication. It is possible to make arrays of vertical antennas, and we are surprised we haven’t seen any of those lately.

In the end, it looks like the antenna works well. With the 4:1 transformer, the SWR on all the ham bands is within range of the radio’s tuner.

We recently saw a fishing pole antenna that used no wire at all. If you want portable and fishing isn’t your thing, try a tape measure.


RFID From First Principles and Saving a Cat

[Dale Cook] has cats, and as he readily admits, cats are jerks. We’d use stronger language than that, but either way it became a significant impediment to making progress with an RFID-based sensor to allow his cats access to their litterbox. Luckily, though, he was able to salvage the project enough to give a great talk on RFID from first principles and learn about a potentially tragic mistake.

If you don’t have 20 minutes to spare for the video below, the quick summary is that [Dale]’s cats are each chipped with an RFID tag using the FDX-B protocol. He figured he’d be able to build a scanner to open the door to their playpen litterbox, but alas, the read range on the chip and the aforementioned attitude problems foiled that plan. He kept plugging away, though, to better understand RFID and the electronics that make it work.

To that end, [Dale] rolled his own RFID reader pretty much from scratch. He used an Arduino to generate the 134.2-kHz clock signal for the FDX-B chips and to parse the returned data. In between, he built a push-pull driver for the antenna coil and an envelope detector to pull the modulated data off the carrier. He also added a low-pass filter and a comparator to clean up the signal into a nice square wave, which was fed into the Arduino to parse the Differential Manchester-encoded data.

Although he was able to read his cats’ chips with this setup, [Dale] admits it was a long road compared to just buying a Flipper Zero or visiting the vet. But it provided him a look under the covers of RFID, which is worth a lot all by itself. But more importantly, he also discovered that one cat had a chip that returned a code different than what was recorded in the national database. That could have resulted in heartache, and avoiding that is certainly worth the effort too.

Thanks for the tip, [Gustavo].

Forget Pixel Art: Try Subpixels

[Japhy Riddle] was tired of creating pixel art. He went to subpixel art. The idea is that since each color pixel is composed of three subpixels, your display is actually three times as dense as you think it is. As long as you don’t care about the colors, of course.

Is it practical? No, although it is related to the Bayer filter algorithm and font antialiasing. You can also use subpixel manipulation to hide messages in plain sight.

[Japhy] shows how it all works using Photoshop, but you could do the same steps with anything that can do advanced image manipulation. Of course, you are assuming the subpixel mask is identical is for any given device, but apparently, they are mostly the same these days. You could modify the process to account for different masks.

Of course, since the subpixels are smaller, scaling has to change. In the end, you get a strange-looking image made up of tiny dots. Strange? Yes. Surreal? You bet. Useful? Well, tell us why you did it in the comments!

Pixel art isn’t just for CRTs. However, subpixel art assumes that the pixels can be divided up, which is not always the case.

Close Shave for an Old Oscilloscope Saved with a Sticky Note

When you tear into an old piece of test equipment, you’re probably going to come up against some surprises. That’s especially true of high-precision gear like oscilloscopes from the time before ASICs and ADCs, which had to accomplish so much with discrete components and a lot of engineering ingenuity.

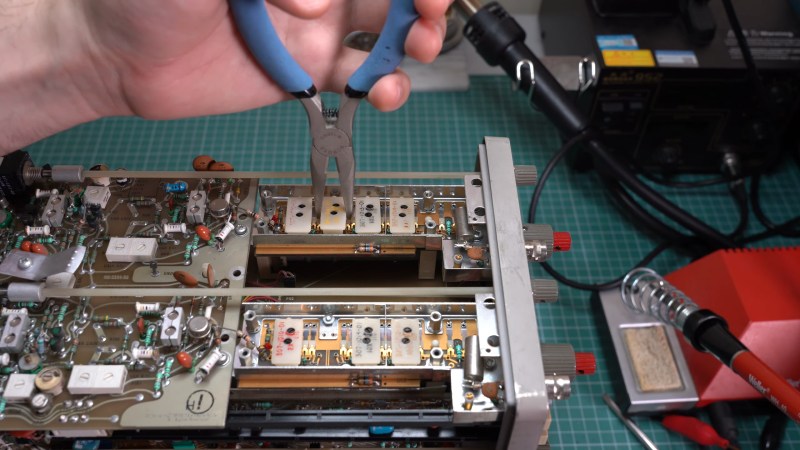
Unfortunately, though, those clever hacks that made everything work sometimes come back to bite you, as [Void Electronics] learned while bringing this classic Tektronix 466 scope back to life. A previous video revealed that the “Works fine, powers up” eBay listing for this scope wasn’t entirely accurate, as it was DOA. That ended up being a bad op-amp in the power supply, which was easily fixed. Once powered up, though, another, more insidious problem cropped up with the vertical attenuator, which failed with any setting divisible by two.

With this curious symptom in mind, [Void] got to work on the scope. Old analog Tek scopes like this use a bank of attenuator modules switched in and out of the signal path by a complex mechanical system of cams. It seemed like one of the modules, specifically the 4x attenuator, was the culprit. [Void] did the obvious first test and compared the module against the known good 4x module in the other channel of the dual-channel scope, but surprisingly, the module worked fine. That meant the problem had to be on the PCB that the module lives on. Close examination with the help of some magnification revealed the culprit — tin whiskers had formed, stretching out from a pad to chassis ground. The tiny metal threads were shorting the signal to ground whenever the 4x module was switched into the signal path. The solution? A quick flick with a sticky note to remove the whiskers!

This was a great fix and a fantastic lesson in looking past the obvious and being observant. It puts us in the mood for breaking out our old Tek scope and seeing what wonders — and challenges — it holds.

3D Printed Boat Uses Tank Tracks For Amphibious Propulsion

Boats normally get around with propellers or water jets for propulsion. Occasionally, they use paddles. [Engineering After Hours] claims he is “changing the boat game forever” with his new 3D printed boat design that uses a tank tread for propulsion instead. Forgive him for the hyperbole of the YouTuber. It’s basically a modified paddle design, but it’s also pretty cool.

It works on land, even if it doesn’t steer well!

The basic idea is simple enough—think “floating snowmobile” and you’re in the ballpark. In the water, the chunky tank track provides forward propulsion with its paddle-like treads. It’s not that much different from a paddle wheel steamer. However, where it diverges is that it’s more flexible than a traditional paddle wheel.

The tracked design is actually pretty good at propelling the boat in shallow water without getting stuck. In fact, it works pretty well on dirt, too! The video covers the basic concept, but it also goes into some detail regarding optimizing the design, too. Getting the float and track geometry right is key to performance, after all.

If you’re looking to build an oddball amphibious craft, maybe working with the snowmobile concept is worth your engineering time.

3D Space Can Be Tiled With Corner-free Shapes

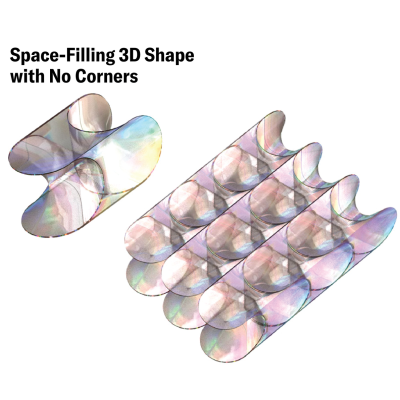
Tiling a space with a repeated pattern that has no gaps or overlaps (a structure known as a tessellation) is what led mathematician [Gábor Domokos] to ponder a question: how few corners can a shape have and still fully tile a space? In a 2D the answer is two, and a 3D space can be tiled in shapes that have no corners at all, called soft cells.

These shapes can be made in a few different ways, and some are shown here. While they may have sharp edges there are no corners, or points where two or more line segments meet. Shapes capable of tiling a 2D space need a minimum of two corners, but in 3D the rules are different.

A great example of a natural soft cell is found in the chambers of a nautilus shell, but this turned out to be far from obvious. A cross-section of a nautilus shell shows a cell structure with obvious corners, but it turns out that’s just an artifact of looking at a 2D slice. When viewed in full 3D — which the team could do thanks to a micro CT scan available online — there are no visible corners in the structure. Once they knew what to look for, it was clear that soft cells are present in a variety of natural forms in our world.

[Domokos] not only seeks a better mathematical understanding of these shapes that seem common in our natural world but also wonders how they might relate to aperiodicity, or the ability of a shape to tile a space without making a repeating pattern. Penrose Tiles are probably the most common example.

Drilling Rig Makes Accurate Holes In Seconds

Drilling holes can be quite time consuming work, particularly if you have to drill a lot of them. Think about all the hassle of grabbing a part, fixturing it in the drill press, lining it up, double checking, and then finally making the hole. That takes some time, and that’s no good if you’ve got lots of parts to drill. There’s an easy way around that, though. Build yourself a rad jig like [izzy swan] did.

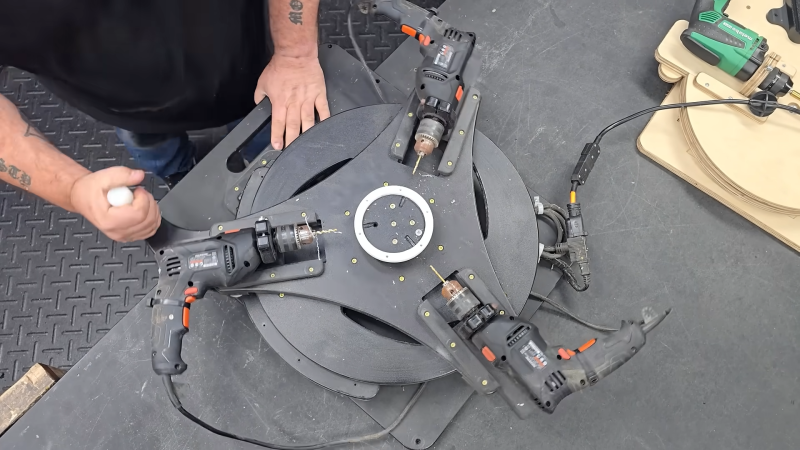
The first jig we get to see is simple. It has a wooden platter, which hosts a fixture for a plastic enclosure to slot perfectly into place. Also on the platter is a regular old power drill. The platter also has a crank handle which, when pulled, pivots the platter, runs the power drill, and forces it through the enclosure in the exact right spot. It’s makes drilling a hole in the enclosure a repeatable operation that takes just a couple of seconds. The jig gets it right every time.

The video gets better from there, though. We get to see even niftier jigs that feature multiple drills, all doing their thing in concert with just one pull of a lever. [izzy] then shows us how these jigs are built from the ground up. It’s compelling stuff.

If you’re doing any sort of DIY manufacturing in real numbers, you’ve probably had to drill a lot of holes before. Jig making skills could really help you if that’s the case. Video after the break.

Transforming Drone Drives and Flies

Vehicles that change their shape and form to adapt to their operating environment have long captured the imagination of tech enthusiasts, and building one remains a perennial project dream for many makers. Now, [Michael Rechtin] has made the dream a bit more accessible with a 3D printed quadcopter that seamlessly transforms into a tracked ground vehicle.

The design tackles a critical engineering challenge: most multi-mode vehicles struggle with the vastly different rotational speeds required for flying and driving. [Michael]’s solution involves using printed prop guards as wheels, paired with lightweight tracks. An extra pair of low-speed brushless motors are mounted between each wheel pair, driving the system via sprockets that engage directly with the same teeth that drive the tracks.

The transition magic happens through a four-bar linkage mounted in a parallelogram configuration, with a linear actuator serving as the bottom bar. To change from flying to driving configuration the linear actuator retracts, rotating the wheels/prop guards to a vertical position. A servo then rotates the top bar, lifting the body off the ground. While this approach adds some weight — an inevitable compromise in multi-purpose machines — it makes for a practical solution.

Powering this transformer is a Teensy 4.0 flight controller running dRehmFlight, a hackable flight stabilization package we’ve seen successfully adapted for everything from VTOLs to actively stabilized hydrofoils.

Mammalian Ancestors Shed Light on The Great Dying

An artist's depiction of a lystrosaurus munching on a prehistoric plant. It looks kind of like a hippo with a beak. The main body of the animal is grey-ish green and it's beak is ivory with two tusks jutting out from its top jaw.

As we move through the Sixth Extinction, it can be beneficial to examine what caused massive die-offs in the past. Lystrosaurus specimens from South Africa have been found that may help clarify what happened 250 million years ago. [via IFLScience]

The Permian-Triassic Extinction Event, or the Great Dying, takes the cake for the worst extinction we know about so far on our pale blue dot. The primary cause is thought to be intense volcanic activity which formed the Siberian Traps and sent global CO2 levels soaring. In Karoo Basin of South Africa, 170 tetrapod fossils were found that lend credence to the theory. Several of the Lystrosaurus skeletons were preserved in a spread eagle position that “are interpreted as drought-stricken carcasses that collapsed and died of starvation in and alongside dried-up water sources.”

As Pangea dried from increased global temperatures, drought struck many different terrestrial ecosystems and changed them from what they were before. The scientists say this “likely had a profound and lasting influence on the evolution of tetrapods.” As we come up on the Thanksgiving holiday here in the United States, perhaps you should give thanks for the prehistoric volcanism that led to your birth?

If you want to explore more about how CO2 can lead to life forms having a bad day, have a look at paleoclimatology and what it tells us about today. In more recent history, have a look at how we can detect volcanic eruptions from all around the world and how you can learn more about the Earth by dangling an antenna from a helicopter.


Lasers, Galvos, Action: A Quest for Laser Mastery

Custom built RGB laser firing beam

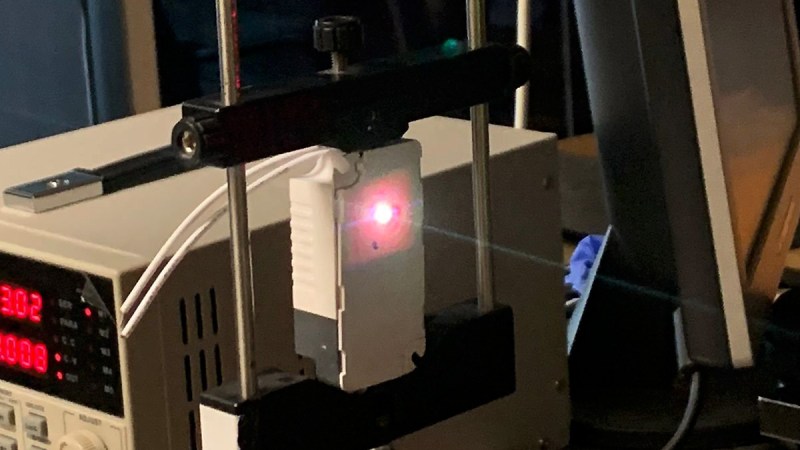
If you’re into hacking hardware and bending light to your will, [Shoaib Mustafa]’s latest project is bound to spike your curiosity. Combining lasers to project multi-colored beams onto a screen is ambitious enough, but doing it with a galvanomirror, STM32 microcontroller, and mostly scratch-built components? That’s next-level tinkering. This project isn’t just a feast for the eyes—it’s a adventure of control algorithms, hardware hacks, and the occasional ‘oops, that didn’t work.’ You can follow [Shoaib]’s build log and join the journey here.

The nitty-gritty is where it gets fascinating. Shoaib digs into STM32 Timers, explaining how modes like Timer, Counter, and PWM are leveraged for precise control. From adjusting laser intensity to syncing galvos for projection, every component is tuned for maximum flexibility. Need lasers aligned? Enter spectrometry and optical diffusers for precision wavelength management. Want real-time tweaks? A Python-controlled GUI handles the instruments while keeping the setup minimalist. This isn’t just a DIY build—it’s a work of art in problem-solving, with successes like a working simulation and implemented algorithms along the way.

If laser projection or STM32 wizardry excites you, this build will inspire. We featured a similar project by [Ben] back in September, and if you dig deep into our archives, you can eat your heart out on decades of laser projector projects. Explore Shoaib’s complete log on Hackaday.io. It is—literally—hacking at its most brilliant.

Build Yourself A Useful Resistor Decade Box

If you’ve ever worked with guitar pedals or analog audio gear, you’ve probably realized the value of a resistor decade box. They substitute for a resistor in a circuit and let you quickly flick through a few different values at the twist of a knob. You can still buy them if you know where to look, but [M Caldeira] decided to build his own.

At its core, the decade box relies on a number of 11-position rotary switches. Seven are used in this case—covering each “decade” of resistances, from 1 ohm to 10 ohm and all the way up to 1 megaohm. The 11 positions on each switch allows the selection of a given resistance. For example, position 7 on the 100 ohm switch selects 700 ohms, and adds it to the total resistance of the box.

[M Caldeira] did a good job of building the basic circuit, as well as assembling it in an attractive, easy-to-use way. It should serve him well on his future audio projects and many others besides. It’s a simple thing, but sometimes there’s nothing more satisfying than building your own tools.

We’ve seen other neat designs like this in the past, including an SMD version and this neat digital decade box. Video after the break.

OLED Screen Mounting, Without The Pain

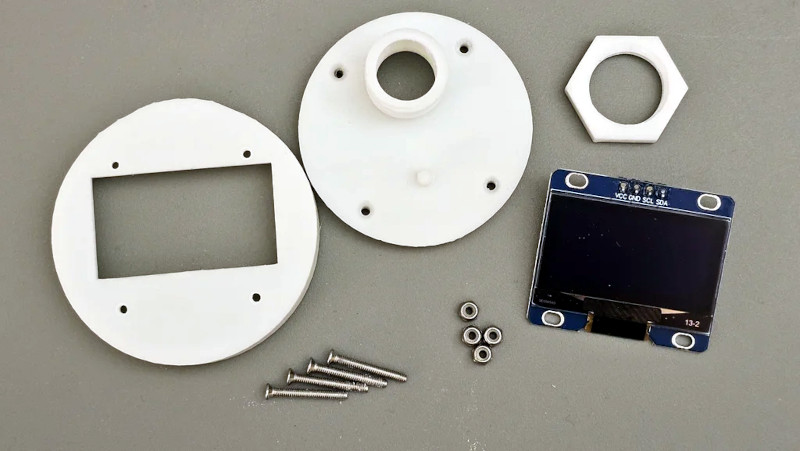
There was a time when no self-respecting electronics engineer would build a big project without at least one panel meter. They may be a rare part here in 2024, but we find ourselves reminded of them by [24Eng]’s project. It’s a 3D printed housing for one of those common small OLED displays, designed to be mounted on a panel with just a single round hole. Having had exactly this problem in the past trying to create a rectangular hole, we can immediately see the value in this.

It solves the problem by encasing the display in a printed shell, and passing a coarsely threaded hollow cylinder behind it for attachment to the panel and routing wires. This is where we are reminded of panel meters, many of which would have a similar sized protrusion on their rear housing their mechanism.

The result is a neatly made OLED display mounting, with a hole that’s ease itself to create. Perhaps now you’ll not be afraid to make your own panels.

A Surprisingly Simple Omnidirectional Display

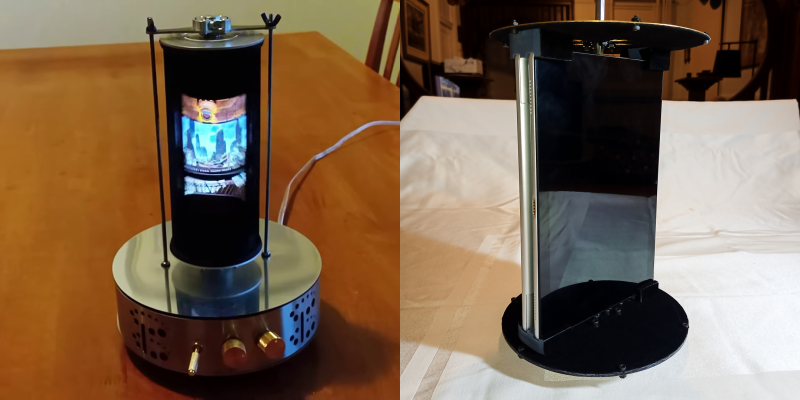
Old-school technology can spark surprising innovations. By combining the vintage zoetrope concept with digital displays, [Mike Ando] created the Andotrope, a surprisingly simple omnidirectional display.

Unlike other 3D displays, the Andotrope lets you view a normal 2D video or images that appear identical irrespective of your viewing angle. The prototype demonstrated in the video below consists of a single smart phone and a black cylinder spinning at 1,800 RPM. A narrow slit in front of each display creates a “scanning” view that our brain interprets as a complete image, thanks to persistence of vision. [Mike] has also created larger version with a higher frame rate, by mounting two tablets back-to-back.

Surprisingly, the Andotrope appears to be an original implementation, and neither [Mike] nor we can find any similar devices with a digital display. We did cover one that used a paper printout in a a similar fashion. [Mike] is currently patenting his design, seeing the potential for smaller displays that need multi-angle visibility. The high rotational speed creates significant centrifugal force, which might limit the size of installations. Critically, display selection matters — any screen flicker becomes glaringly obvious at speed.

This device might be the first of its kind, but we’ve seen plenty of zoetropes over the years, including ones with digital displays or ingenious time-stretching tricks.

Learn About Robot Arms By Building Pedro 2.0

Whether you’re a kid or a kid at heart, learning about science and engineering can be a lot more fun if it’s practical. You could sit around learning about motors and control theory, or you could build a robot arm and play with it. If the latter sounds like your bag of hammers, you might like Pedro 2.0.

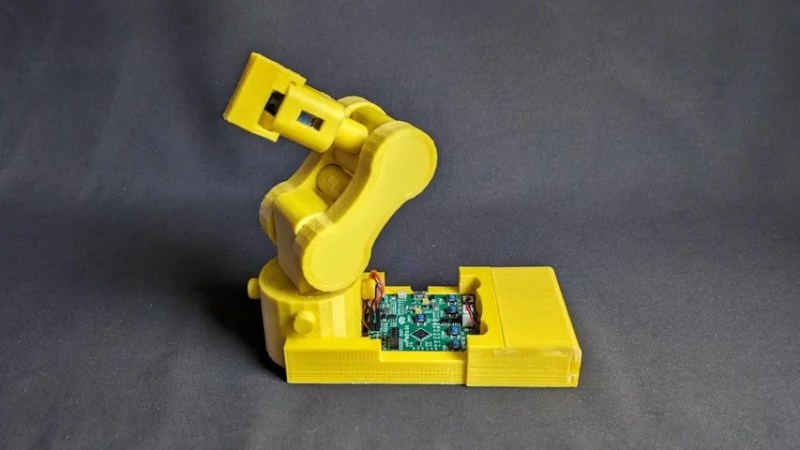
Pedro 2.0 is a simple 3D-printable robot arm intended for STEAM education. If you’re new to that acronym, it basically refers to the combination of artistic skills with education around science, technology, engineering and mathematics.

The build relies on components that are readily available pretty much around the world—SG90 servo motors, ball bearings, and an Arduino running the show. There’s also an NRF24L01 module for wireless remote control. All the rest of the major mechanical parts can be whipped up on a 3D printer, and you don’t need a particularly special one, either. Any old FDM machine should do the job just fine if it’s calibrated properly.

If you fancy dipping your toes in the world of robot arms, this is a really easy starting point that will teach you a lot along the way. From there, you can delve into more advanced designs, or even consider constructing your own tentacles. The world really is your octopus oyster.

Quick and Very Dirty Repair Gets Smoked PLC Back in the Game

When electronics release the Magic Smoke, more often than not it’s a fairly sedate event. Something overheats, the packaging gets hot enough to emit that characteristic and unmistakable odor, and wisps of smoke begin to waft up from the defunct component. Then again, sometimes the Magic Smoke is more like the Magic Plasma, as was the case in this absolutely smoked Omron programmable logic controller.

Normally, one tasked with repairing such a thing would just write the unit off and order a replacement. But [Defpom] needed to get the pump controlled by this PLC back online immediately, leading to the somewhat unorthodox repair in the video below. Whatever happened to this poor device happened rapidly and energetically, taking out two of the four relay-controlled outputs. [Defpom]’s initial inspection revealed that the screw terminals for one of the relays no longer existed, one relay enclosure was melted open, its neighbor was partially melted, and a large chunk of the PCB was missing. Cleaning up the damaged relays revealed what the “FR” in “FR4” stands for, as the fiberglass weave of the board was visible after the epoxy partly burned away before self-extinguishing.

With the damaged components removed and the dangerously conductive carbonized sections cut away, [Defpom] looked for ways to make a temporary repair. The PLC’s program was locked, making it impossible to reprogram it to use the unaffected outputs. Instead, he redirected the driver transistor for the missing relay two to the previously unused and still intact relay one, while adding an outboard DIN-mount relay to replace relay three. In theory, that should allow the system to work with its existing program and get the system back online.

Did it work? Sadly, we don’t know, as the video stops before we see the results. But we can’t see a reason for it not to work, at least temporarily while a new PLC is ordered. Of course, the other solution here could have been to replace the PLC with an Arduino, but this seems like the path of least resistance. Which, come to think of it, is probably what caused the damage in the first place.

Creating and Control of Magnetic Skyrmions in Ferromagnetic Film Demonstrated

Visualization of magnetic skyrmions. (Credit: KRISS)

Magnetic skyrmions are an interesting example of solitons that occurs in ferromagnetic materials with conceivable solutions in electronics, assuming they can be created and moved at will. The creation and moving of such skyrmions has now been demonstrated by [Yubin Ji] et al. with a research article in Advanced Materials. This first ever achievement by these researchers of the Korea Research Institute of Standards and Science (KRISS) was more power efficient than previously demonstrated manipulation of magnetic skyrmions in thicker (3D) materials.

Magnetic skyrmions are sometimes described as ‘magnetic vortices’, forming statically stable solitons. In a broader sense skyrmions are a topologically stable field configuration in particle physics where they form a crucial part of the emerging field of spintronics. For magnetic skyrmions their stability comes from the topological stability, as changing the atomic spin of the atoms inside the skyrmion would require overcoming a significant energy barrier.

In the case of the KRISS researchers, electrical pulses together with a  magnetic field were used to create magnetic skyrmions in the ferromagnetic  (Fe3GaTe2, or FGaT) film, after which a brief (50 µs) electric current pulse was applied. This demonstrated that the magnetic skyrmions can be moved this way, with the solitons moving parallel to the electron flow injection, making them quite steerable.

While practical applications of magnetic skyrmions are likely to be many years off, it is this kind of fundamental research that will enable future magnetic storage and spintronics-related devices.

Featured image: Direct imaging of the magnetic skyrmions. The scale bars represent 300 nm. (Credit:Yubin Ji et al., Adv. Mat. 2024)

Gear Up: A 15-Minute Intro on Involute Gears

Large gears on a bridge in Geneva, Switzerland

If you’re into CNC machining, mechanical tinkering, or just love a good engineering rabbit hole, you’re in for a treat. Substack’s [lcamtuf] has written a quick yet insightful 15-minute introduction to involute gears that’s as informative as it is accessible. You can find the full article here. Compared to Hackaday’s more in-depth exploration in their Mechanisms series over the years, this piece is a beginner-friendly gateway into the fascinating world of gear design.

Involute gears aren’t just pretty spirals. Their unique geometry minimizes friction and vibration, keeps rotational speeds steady, and ensures smooth torque transfer—no snags, no skips. As [lcamtuf] points out, the secret sauce lies in their design, which can’t be eyeballed. By simulating the meshing process between a gear and a rack (think infinite gear), you can create the smooth, rolling movement we take for granted in everything from cars to coffee grinders.

From pressure angles to undercutting woes, [lcamtuf] explores why small design tweaks matter. The pièce de résistance? Profile-shifted gears—a genius hack for stronger teeth in low-tooth-count designs.

Whether you’re into the theory behind gear ratios, or in need of a nifty tool to cut them at home, Hackaday has got you covered. Inspired?

❌