Vista de Lectura

Hay nuevos artículos disponibles. Pincha para refrescar la página.

Ore To Iron In A Few Seconds: New Chinese Process Will Revolutionise Smelting

The process of ironmaking has relied for centuries on iron ore, an impure form of iron oxide, slowly being reduced to iron by carbon monoxide in a furnace. Whether that furnace is the charcoal fire of an Iron Age craftsman or a modern blast furnace, the fundamental process remains the same, even if the technology around it has been refined. Now details are emerging of a new take on iron smelting from China, which turns what has always been a slow and intensive process into one that only takes a few seconds. So-called flash ironmaking relies on the injection of a fine iron ore powder into a superheated furnace, with the reduction happening explosively and delivering a constant stream of molten iron.

Frustratingly there is little detail on how it works, with the primary source for the news coverage being a paywalled South China Morning Post article. The journal article alluded to has proved frustratingly difficult to find online, leaving us with a few questions as to how it all works. Is the reducing agent still carbon monoxide, for example, or do they use another one such as hydrogen? The interesting part from an economic perspective is that it’s said to work on lower-grade ores, opening up the prospect for the Chinese steelmakers relying less on imports. There’s no work though on how the process would deal with the inevitable slag such ore would create.

If any readers have journal access we’d be interested in some insight in the comments, and we’re sure this story will deliver fresh information over time. Having been part of building a blast furnace of our own in the past, it’s something we find interesting

Pico Logic Analyzer Gets New Version

[Happy Little Diodes] built a Pi Pico logic analyzer designed by [El Dr. Gusman] using the original design. But he recently had a chance to test the newest version of the design, which is a big upgrade. You can see his take on the new design in the video below.

The original design could sample 24 channels at 100 MHz and required two different PCBs. The new version uses a single board and can operate up to 400 MHz. There’s also a provision for chaining multiple boards together to get more channels.

You can set the level shifters to use 5V, 3.3V, or an external voltage. Since [Happy] is working on a ZX Spectrum, the 5V conversion is a necessity.

One thing that a cheap logic analyzer lets you do is dedicate it to a particular purpose. In fact, by the end of the video, we see a dedicated connector to make it easier to attach the board to a ZX Spectrum.

The code is on GitHub, although it warns you there that you that version 6 — the one seen in the video — isn’t stable, so you might have to wait to make one on your own. The software looks impressive and there may be some effort to integrate with Sigrok.

If you missed our coverage of the earlier version, you can still catch up. Dead set on Sigrok support? [Pico-Coder] can help you out.


Tiny PONG, Big Ambitions: World’s Smallest Arcade

Tiny arcade machines on a tabletop

London, Ontario college student [Victoria Korhonen] has captured the attention of tech enthusiasts and miniaturization lovers with her creation of what might be the world’s smallest arcade machine. Standing just 64 mm tall, 26 mm wide, and 30 mm deep, this machine is a scaled-down marvel playing the classic Atari game PONG. While the record isn’t yet official—it takes about three months for Guinness to certify—it’s clear [Korhonen]’s creation embodies ingenuity and dedication.

[Korhonen], an electromechanical engineering student, took six months to design and build this micro arcade. Inspired by records within reach, she aimed to outdo the previous tiniest arcade machine by shaving off just a few millimeters During the project she faced repeated failures, but viewed each iteration as a step towards success. Her miniature machine isn’t just a gimmick; it’s fully functional, with every component—from paddle mechanics to coding—developed from scratch.

[Korhonen] is already eyeing new projects, including creating the smallest humanoid robot. She also plans to integrate her electromechanical expertise into her family’s escape room business. Her journey aligns with other hobbyist projects pushing the limits of miniaturization, such as this credit card-sized Tetris clone or [Aliaksei Zholner]’s paper micro engines.

Danger-Klipper Fork Renamed to Kalico

Hobbyist 3D printers have traditionally run the open source Marlin and later Klipper firmware, but as some hobbyists push their printers to the limits, more capable and less conservative firmware was needed. This is why the aptly named ‘Danger-Klipper’ fork of the Klipper firmware comes with the motto ‘I should be able to light my printer on fire’. Because the goal of Danger-Klipper wasn’t literally to light printers on fire (barring unfortunate accidents), the project has now been renamed to Kalico by the developers, after the pirate Calico Jack to maintain the nautical theming.

The Kalico project logo.

Not only does the project get a new name, but also a cute new pirate-themed calico cat logo. Beyond these changes not much else is different, though the documentation is obviously now also at a new domain. As a Klipper fork just about any printer that can run Klipper should be able to run Kalico, though the focus is on Raspberry Pi 2, 3 or 4. The FAQ has some more details on what Kalico can run on. Obviously, Kalico makes for a great option if you are building your own customized 3D printer (or similar), and will support the typical web UIs like Fluidd, OctoPrint, etc.

For some of the differences between Klipper and Kalico, the ‘Danger Features’ section of the documentation provides an impression. Suffice it to say that Kalico is not the kind of firmware to hold your hand or provide guiderails, making it an option for advanced users for whom breaking things while pushing boundaries is just part of the hobby.

Thanks to [Vinny] for the tip.

Chaotic System Cooks Meat Evenly

For better or worse, a lot of human technology is confined to fewer dimensions than the three we can theoretically move about in. Cars and trains only travel two dimensionally with limited exceptions, maps and books generally don’t take advantage of a third dimension, and most computer displays and even the chips that make them work are largely two-dimensional in nature. Most styles of cooking can only apply heat in a single dimension as well, but [Dane Kouttron] wanted to make sure the meat his cookouts took advantage of a truly three-dimensional cooking style by adding a gyroscopic mechanism to the spit.

The first thing that needed to be built were a series of concentric rings for each of the three axes of rotation. Metal tubes were shaped with a pipe bender and then welded into their final forms, with an annealing step to flatten the loops. From there, the rings are attached to each other with a series of offset bearings. The outer tube is mounted above the fire and a single motor spins this tube. Since no piece of meat is perfectly symmetrical (and could be offset on the interior ring a bit even if it were) enough chaos is introduced to the system that the meat is free to rotate in any direction, change direction at any time, and overall get cooked in a more uniform way than a traditional single-dimensional rotating spit.

As a proof of concept [Dane] hosted a cookout and made “gyro” sandwiches (even though the machine may technically be more akin to a gimbal), complete with small Greek flag decorative garnishes. It seems to have been a tremendous success as well. There are a few other novel ways we’ve seen of cooking food over the years, including projects that cook with plasma and much more widely available methods that cook food efficiently using magnets, of a sort.

Retrotechtacular: 1980s Restoration of San Francisco’s Cable Car System

The cable car system of San Francisco is the last manually operated cable car system in the world, with three of the original twenty-three lines still operating today. With these systems being installed between 1873 and 1890, they were due major maintenance and upgrades by the time the 1980s and with it their 100th year of operation rolled around. This rebuilding and upgrading process was recorded in a documentary by a local SF television station, which makes for some fascinating viewing.

San Francisco cable car making its way through traffic. Early 20th century.

While the cars themselves were fairly straight-forward to restore, and the original grips that’d latch onto the cable didn’t need any changes. But there were upgrades to the lubrication used (originally pine tar), and the powerhouse (the ‘barn’) was completely gutted and rebuilt.

As opposed to a funicular system where the cars are permanently attached to the cable, a cable car system features a constantly moving cable that the cars can grip onto at will, with most of the wear and tear on the grip dies. Despite researchers at San Francisco State University (SFSU) investigating alternatives, the original metal grip dies were left in place, despite their 4-day replacement schedule.

Ultimately, the rails and related guides were all ripped out and replaced with new ones, with the rails thermite-welded in place, and the cars largely rebuilt from scratch. Although new technologies were used where available, the goal was to keep the look as close as possible to what it looked at the dawn of the 20th century. While more expensive than demolishing and scrapping the original buildings and rolling stock, this helped to keep the look that has made it a historical symbol when the upgraded system rolled back into action on June 21, 1984.

Decades later, this rebuilt cable car system is still running as smoothly as ever, thanks to these efforts. Although SF’s cable car system is reportedly mostly used by tourists, the technology has seen somewhat of a resurgence. Amidst a number of funicular systems, a true new cable car system can be found in the form of e.g. the MiniMetro system which fills the automated people mover niche.

Thanks to [JRD] for the tip.

FLOSS Weekly Episode 813: Turn Off the Internet

This week, Jonathan Bennett, Simon Phipps, and Aaron Newcomb chat about retrocomputing, Open Source AI, and … politics? How did that combination of topics come about? Watch to find out!

Did you know you can watch the live recording of the show Right on our YouTube Channel? Have someone you’d like us to interview? Let us know, or contact the guest and have them contact us! Take a look at the schedule here.

Direct Download in DRM-free MP3.

If you’d rather read along, here’s the transcript for this week’s episode.

Places to follow the FLOSS Weekly Podcast:


Theme music: “Newer Wave” Kevin MacLeod (incompetech.com)

Licensed under Creative Commons: By Attribution 4.0 License

Unexpectedly Interesting Payphone Gives Up Its Secrets

Reverse engineering a payphone doesn’t sound like a very interesting project, at least in the United States, where payphones were little more than ruggedized versions of residential phones with a coin mechanism attached. Phones in other parts of the world were far more interesting, though, as this look at the mysteries of a payphone from Israel reveals (in Hebrew; English translation here.)

This is a project [Inbar Raz] worked on quite a while ago, but only got around to writing up recently. The payphone in question was sourced from the usual surplus market channels, and appears to have been removed from service by Israeli telecommunications company Bezeq only shortly before he found it. It was in pretty good shape, and was even still locked tight, making some amateur locksmithing the first order of the day. The internals of the phone are surprisingly complex, with a motherboard that looks more like something from a PC. Date codes on the chips and through-hole construction date the device to the early- to mid-1990s.

With physical access gained, [Inbar] turned to the firmware. An Atmel flash chip seemed a good place to look, and indeed he was able to pull code off the chip. That’s where things took a turn thanks to the CPU the code was written for — the CDP1806, a later version of the more popular but still fringe CDP1802. This required [Inbar] to fall down the rabbit hole of writing a new processor definition file for Ghidra so that the firmware could be reverse-engineered. This got him to the point of understanding 1806 assembly well enough that he was able to re-flash the phone to print debugging messages on the built-in 16×2 LCD screen, which allowed him to figure out which routines were being called under various error conditions.

It doesn’t appear that [Inbar] ever completed the reverse engineering project, but as he points out, what does that even mean? He got inside, took a look around, and made the phone do some cool things it couldn’t do before, and in the process made things easier for anyone working with 1806 processors in Ghidra. That’s a pretty complete win in our books.

The Math Behind the Music of the 80s

Although there might have been other music produced or recorded in the 1980s, we may never know of its existence due to the cacophony of all of the various keytars, drum machines, and other synthesized music playing nonstop throughout the decade. There was perhaps no more responsible synthesizer than the Yamaha DX7 either; it nearly single-handedly ushered in the synth pop era. There had been other ways of producing similar sounds before but none were as unique as this keyboard, and for ways beyond just its sound as [Kevin] describes in this write-up.

Part of the reason the DX7 was so revolutionary was that it was among the first accessible synthesizers that was fully digital, meaning could play more than one note at a time since expensive analog circuitry didn’t need to be replicated for multiple keys. But it also generated its tones by using frequency modulation of sine waves in a way that allowed many signals to be combined to form different sounds. While most popular musicians of the 80s used one of the preset sounds of the synthesizer, it could produce an incredible range of diverse sounds if the musician was willing to dig a bit into the programming of this unique instrument.

There were of course other reasons this synthesizer took off. It was incredibly robust, allowing a musician to reliably carry it from show to show without much worry, and it also stood on the shoulders of giants since musicians had been experimenting with various other types of synthesizers for the previous few decades. And perhaps it was at the right place and time for the culture as well. For a look at the goings on inside the chip that powered the device, [Ken Shirriff] did a deep dive into one a few years ago.

From Felt to Fate: Building Your Own Sorting Hat

[Wills] and his purple DIY sorting hat

Ever wondered how it feels to have the Sorting Hat decide your fate? [Will Dana] wanted to find out, so he conjured a bit of Hogwarts magic, and crafted a fully animatronic Sorting Hat from scratch. In the video below, he covers every step of bringing this magical purple marvel to life—from rapid joystick movements to the electronics behind it all.

The heart of the project is two 9g servos—one actuates the mouth, and the other controls the eyebrows—powered by an ESP32 microcontroller. Communication between two ESP32 boards ensures smooth operation via the ESP-NOW protocol, making this a wireless wonder. The design process involved using mechanical advantage to solve jittery servo movements, a trick that will resonate with anyone who’s fought with uncooperative motors.

If animatronics or themed projects excite you, Hackaday has covered similar builds, from a DIY BB-8 droid to a robot fox.

A Potential Exploit with the Ext Filesystem

The extended filesystem, otherwise known as ext, has been a fundamental part of Linux since before the 1.0 release in 1994. Currently the filesystem is on its fourth major revision, in use since its release in 2008 thanks to its stability, reliability, and backwards compatibility with the other ext filesystem versions. But with that much history there are bound to be a few issues cropping up here and there. [Will] recently found an exploit with this filesystem that can cause a Linux kernel to immediately panic when a manipulated USB drive is inserted into a computer.

[Will] discovered this quirk when investigating the intricacies of the filesystem for problems and other vulnerabilities. A tool called tune2fs, used for administering and modifying ext filesystems, includes the ability to pass certain commands to the Linux kernel when certain situations arise with the filesystem itself, including that the kernel should panic. One situation is that the ext filesystem itself becomes corrupted, which can then cause the kernel panic. Armed with this knowledge, a USB drive can be purposefully given a corrupted ext filesystem which, when plugged into a Linux machine, can cause the computer to shut down.

The post linked above goes into some discussion about how this exploit could be used maliciously to gain access to a Linux system, including rebooting computers where no access to a power button is otherwise enabled or making other changes to the system before needing a reboot to apply the changes. In general, though, it’s good to assume an attacker could take any route to gain access to a machine. This exploit from a few years ago, for example, allowed another Linux tool to be used to gain root access.

Thanks to [Timothy] for the tip!

Flying Drones That Can Walk and Jump into the Air: An Idea With Legs?

When we look at how everyone’s favorite flying dinosaurs get around, we can see that although they use their wings a lot too, their legs are at least as important. Even waddling or hopping about somewhat ungainly on legs is more energy efficient than short flights, and taking off from the ground is helped by jumping into the air with a powerful leap from one’s legs. Based on this reasoning, a team of researchers set out to give flying drones their own bird-inspired legs, with their findings published in Nature (preprint on ArXiv).

The prototype RAVEN (Robotic Avian-inspired Vehicle for multiple ENvironments) drone is capable of hopping, walking, jumping onto an obstacle and jumping for take-off. This allows the drone to get into the optimal position for take-off and store energy in its legs to give it a boost when it takes to the skies. As it turned out, having passive & flexible toes here was essential for stability when waddling around, while jumping tests showed that the RAVEN’s legs provided well over 90% of the required take-off speed.

During take-off experiments the drone was able to jump to an altitude of about 0.4 meters, which allows it to clear ground-based obstacles and makes any kind of ‘runway’ unnecessary. Much like with our avian dinosaur friends the laws of physics dictate that there are strong scaling limits, which is why a raven can use this technique, but a swan or similar still requires a bit of runway instead of jumping elegantly into the air for near-vertical take-off. For smaller flying drones this approach would however absolutely seem to have legs.

3D Printer Eliminates the Printer Bed

Anyone who has operated a 3D printer before, especially those new to using these specialized tools, has likely had problems with the print bed. The bed might not always be the correct temperature leading to problems with adhesion of the print, it could be uncalibrated or dirty or cause any number of other issues that ultimately lead to a failed print. Most of us work these problems out through trial and error and eventually get settled in, but this novel 3D printer instead removes the bed itself and prints on whatever surface happens to be nearby.

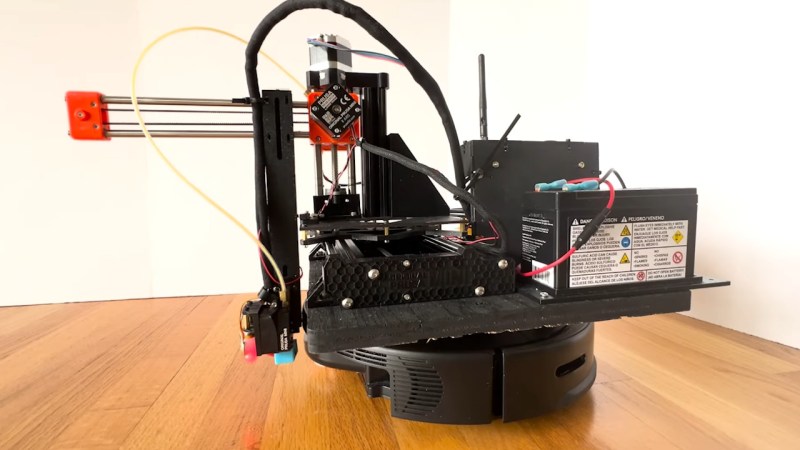
The printer is the product of [Daniel Campos Zamora] at the University of Washington and is called MobiPrint. It uses a fairly standard, commercially available 3D printer head but attaches it to the base of a modified robotic vacuum cleaner. The vacuum cleaner is modified with open-source software that allows it to map its environment without the need for the manufacturer’s cloud services, which in turn lets the 3D printer print on whichever surface the robot finds in its travels. The goal isn’t necessarily to eliminate printer bed problems; a robot with this capability could have many more applications in the realm of accessibility or even, in the future, printing while on the move.

There were a few surprising discoveries along the way which were mentioned in an IEEE Spectrum article, as [Campos Zamora] found while testing various household surfaces that carpet is surprisingly good at adhering to these prints and almost can’t be unstuck from the prints made on it. There are a few other 3D printers out there that we’ve seen that are incredibly mobile, but none that allow interacting with their environment in quite this way.

Trying to Shatter the World’s Fastest RC Car Record

The RC car is controlled via an FPV setup. (Credit: Luke Bell, YouTube)

Fresh off a world record for the fastest quadcopter, [Luke Bell] decided to try his luck with something more own to earth, namely trying to tackle the world record for the fastest RC car, with the current record set at 360 km/h. Starting off with a first attempt in what will be a video series, the obvious approach seems to be to get some really powerful electric motors, a streamlined body and a disused runway to send said RC car hurtling along towards that golden medal. Of course, if it was that easy, others would have done it already.

With the quadcopter record of nearly 500 km/h which we covered previously, the challenge was in a way easier, as other than air resistance and accidental lithobraking there are no worries about ground texture, tire wear or boundary layer aerodynamics. In comparison, the RC car has to contend with all of these, with the runway’s rough tarmac surface being just one of the issues, along with making sure that the wheels would hold up to the required rotation speed. For the wheels you got options like foam, hard rubber, etc., all with their own advantages and disadvantages, mostly in terms of grip and reliability.

So far speeds of over 200 km/h are easy enough to do, with foam wheels being the preferred option. To push the RC car to 300 km/h and beyond, a lot more experimentation and trial runs will have to be performed. Pending are changes to the aerodynamic design with features also commonly seen in F1 race cars such as downforce spoilers, diffusers and other tricks which should prevent the RC car from (briefly) becoming an RC airplane.

Updated Mouse Ring Does It With a Joystick

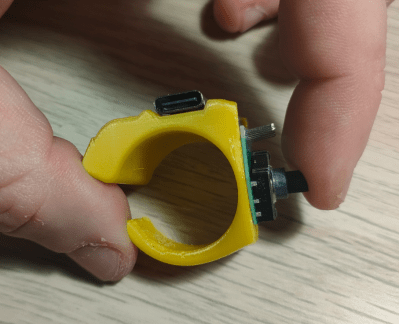
A Bluetooth mouse in ring form.

Have you ever wished for easy mouse controls to go along with your VR headset experience? Or maybe you just want a cooler way to mouse in general. In any case, look no further than [rafgaj78]’s Bluetooth Mouse Ring project.

Side view of a Bluetooth mouse in ring form.This is version two, which of course comes with several improvements over version one. The biggest change is from tactile buttons to a joystick input. [rafgaj78] also did away with the power switch, using deep-sleep mode instead. Version two is easier to assemble and offers improved ergonomics, as well as a range of ring sizes.

Like the first version, this ring runs on a Seeed Xiao nRF52840 and is programmed in CircuitPython. There are two modes to choose from. In one mode, the joystick does left and right mouse click and wheel up and down, while the push action recovers the micro from deep sleep. In the other mode, the joystick axis is a mouse pointer mover, and you push down to left click.

We really like this sleek design, and [rafgaj78] has great instructions if you want to build your own. This isn’t the first cool mouse ring we’ve seen, and it certainly won’t be the last.

An Engineer’s Perspective on Baking Gingerbread Houses

Optical illusion gingerbread house from an odd perspective

If you’ve ever wanted to merge the worlds of holiday cheer and clever geometry, [Kris Wilk]’s gingerbread house hack is your ultimate inspiration. Shared in a mesmerising video, [Wilk] showcases his 2024 entry for his neighborhood’s gingerbread house contest. Designed in FreeCAD and baked to perfection, this is no ordinary holiday treat. His pièce de résistance was a brilliant trompe l’oeil effect, visible only from one carefully calculated angle. Skip to the last twenty seconds of the video to wrap your head around how it actually looks.

[Wilk] used FreeCAD’s hidden true perspective projection function—a rarity in CAD software. This feature allowed him to calculate the perfect forced perspective, essential for crafting the optical illusion. The supporting structures were printed on a Prusa MK4, while the gingerbread itself was baked at home. Precision photography captured the final reveal, adding a professional touch to this homemade masterpiece. [Wilk]’s meticulous process highlights how accessible tools and a sprinkle of curiosity can push creative boundaries.

For those itching to experiment with optical illusions, this bakery battle is only the beginning. Why not build a similar one inside out? Or construct a gingerbread man in the same way? Fire up the oven, bend your mind, and challenge your CAD skills!

A Simple Robot For Learning About Robotics

Robots are super interesting, but you probably shouldn’t start learning about them with a full-sized industrial SCARA arm or anything. Better to learn with something smaller and simpler to understand. This simple Arduino-powered robot is called Bug, and it aims to be just that.

The design comes to us from [Joshua Stanley]. It’s based around the ubiquitous Arduino Uno, paired with a motor control and I/O shield for more connectivity. The robot uses treads for locomotion—each side has two wheels wrapped in a belt for grip. The robot has a small DC gearmotor driving each belt so it can be driven forwards, backwards, and steered differentially. To perceive the world, it uses an off-the-shelf ultrasonic transceiver module, and an NRF24L01 module for remote control. All this is wrapped up in a basic 3D-printed housing that positions the ultrasonic modules effectively as “eyes” which is kind of cute, all in all.

Despite its small size and simple construction, Bug gets around perfectly well in testing on an outdoor footpath. It even has enough torque to flip itself up at full throttle. For now, [Joshua] notes it’s a glorified remote control car, but he plans to expand it further with more functionality going forward.

We see lots of educational robots around these parts, like this nifty little robot arm. Video after the break.

[Thanks to Jan-Willem for the tip!]

Smartphone Runs Home Server

It’s one of the great tragedies of our technological era. Smartphones that feature an incredible amount of computational power compared to computers the past, are largely locked down by carriers or manufacturers, dooming them to performing trivial tasks far below their true capabilities.

But there is hope. In part one of this build, a OnePlus 6T is stripped of its Android operating system in favor of postmarketOS, a Linux distribution based on Alpine designed for a number of Android phones and tablets as well as some Linux-only handhelds. The guide also demonstrates how to remove the battery and use a modified USB-C cable to essentially trick the battery management system into powering up the phone anyway. The second part of the project dives into the software side, getting the Linux system up and running before installing Docker and whichever Docker containers the user needs.

There are a few downsides to running a server from a smartphone. Although there’s plenty of processing power available for a wide range of applications, most phones won’t have Ethernet support out-of-the-box which forces the use of WiFi. There’s also limited storage options available, so a large NAS system may be out of reach. But for something like a home automation system or a music streaming server this could put plenty of older devices to work again. And if you don’t want to hunt for an Android phone that isn’t completely hobbled out-of-the box you might want to try a phone that’s Linux-based from the get-go instead.

Thanks to [JohnU] for the tip!

PlayStation Motherboard Sanded and Scanned, But There’s More To Do

If you want to reverse engineer the boards in a modern console, you’d better have a lab, a lot of fancy gear, and a good few months to dedicate to the task. The humble PlayStation, on the other hand, is more accessible in this regard. [Lawrence Brode] pulled one apart and started documenting it as part of a grander quest for console understanding.

[Lawrence’s] ultimate goal is to create a portable PlayStation using original hardware. That is, rather than cannibalizing an existing console, he wants to build an original portable from scratch. He needed to understand the PlayStation to recreate it, so he started by analyzing the original hardware.

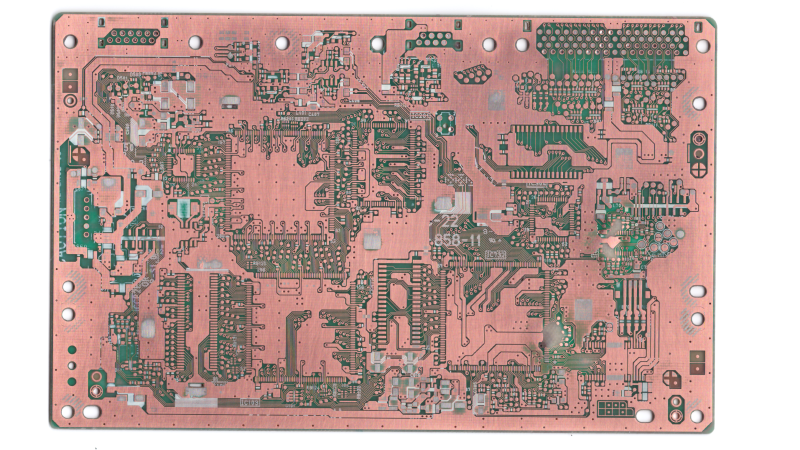
The first part of [Lawrence’s] quest was to try and reverse engineer the PlayStation motherboard itself. The 1990s console has the benefit of only using a two-layer PCB, meaning it’s far easier to trace out than more modern multi-layer designs. [Lawrence] started with a damaged console, pulled out the motherboard, and stripped off all the components. He then cleaned the board, scanned it, and then sandblasted it to remove the solder mask.

He’s begun the work of tracing out signals, and next on the agenda is to create a new custom PCB that’s compatible with the original PlayStation hardware. You can grab his work via GitHub if you’re interested. [Lawrence] is also excited about the possibilities of grabbing the 24-bit RGB signal heading into the GPU and using it for an HDMI output conversion in the future.

It’s always an exciting time in the PlayStation community; we see lots of great hacks on the regular. If you’re cooking up your own, don’t hesitate to drop us a line!

❌