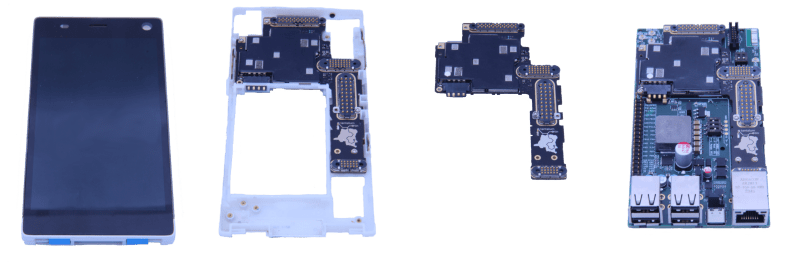
One of the things that’s stopping us from re-using old phones, of course, is the lack of easy access to the peripherals. On the average phone, you’ve got one USB port and that’s it. The Citronics dev provides all sorts of connectivity: 4x USB 2.0, 1x Ethernet 10/100M, and a Raspberry Pi Header (UART, SPI, I2C, GPIO). At the same time, for better or worse, they’ve done away with the screen and its touch interface, and the camera too, but they seem to be keeping all of the RF capabilities.
The whole thing runs Linux, which means that this won’t work with every phone out there, but projects like PostmarketOS and others will certainly broaden the range of usable devices. And stripping off the camera and screen has the secondary advantages of removing the parts that get most easily broken and have the least support from custom Linux distros.
We wish we had more details about the specifics of the break-out boards, but we like the idea. How long before we see an open-source implementation of something similar? There are so many cheap used and broken cellphones out there that it’s certainly a worthwhile project!
We know you’ve seen them: the time-lapses that show a 3D print coming together layer-by-layer without the extruder taking up half the frame. It takes a little extra work compared to just pointing a camera at the build plate, but it’s worth it to see your prints materialize like magic.
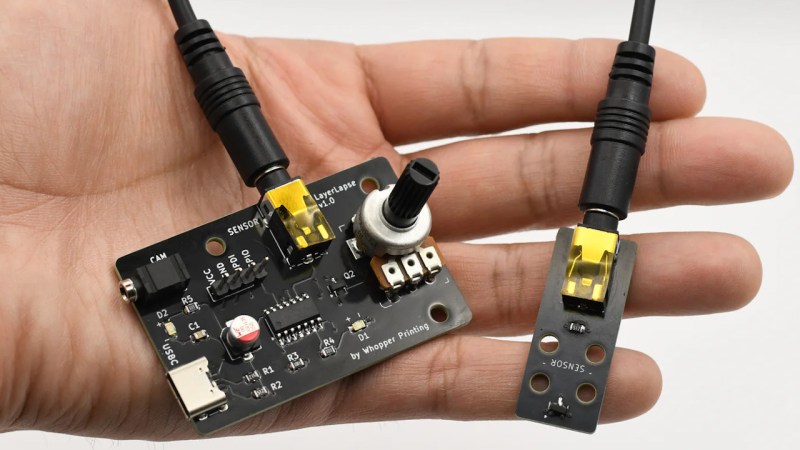
Usually these are done with a plugin for OctoPrint, but with all due respect to that phenomenal project, it’s a lot to get set up if you just want to take some pretty pictures. Which is why [Whopper Printing] put together the LayerLapse. This small PCB is designed to trigger your DSLR or mirrorless camera once its remotely-mounted hall effect sensor detects the presence of a magnet.
The remote hall effect sensor.
The idea is that you just need to stick a small magnet to your extruder, add a bit of extra G-code that will park it over the sensor at the end of each layer, and you’re good to go. There’s even a spare GPIO pin broken out should you want to trigger something else on each layer of your print. Admittedly we can’t think of anything else right now that would make sense, other than some other type of camera, but we’re sure some creative folks out there could put this feature to use.
Currently, [Whopper Printing] is selling the LayerLapse as a finished product, though it does sound like a kit version is in the works. There’s also instructions for building a DIY version of the hardware using your microcontroller of choice. Whether you buy or build the hardware, the firmware is available under the MIT license for your tinkering pleasure.
Being hardware hackers, we appreciate the stand-alone nature of this solution. But if you’re already controlling your printer through OctoPrint, you’re probably better off just setting up one of the available time-lapse plugins.
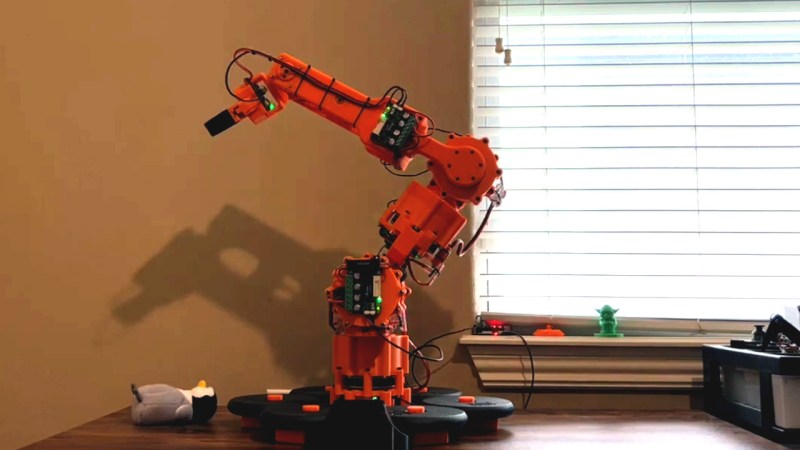
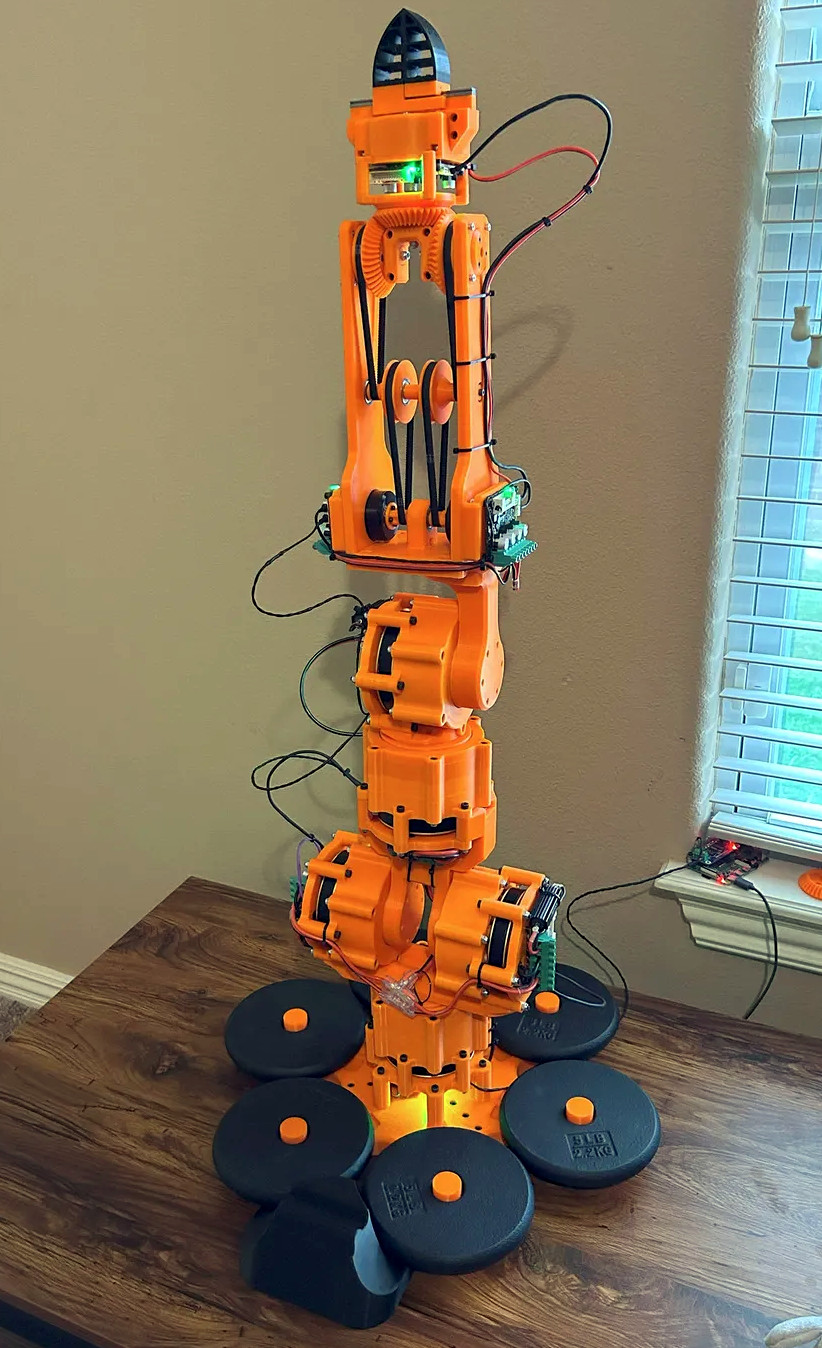
[JesseDarr] recently wrote in to tell us about their dynamic Arm for Robitc Mischief (dARM), a mostly 3D printed six degrees of freedom (6DOF) robotic arm that’s designed to be stronger and more capable than what we’ve seen so far from the DIY community.
The secret? Rather than using servos, dARM uses brushless DC (BLDC) motors paired with ODrive S1 controllers. He credits [James Bruton] and [Skyentific] (two names which regular Hackaday readers are likely familiar with) for introducing him to not only the ODrive controllers, but the robotics applications for BLDCs in the first place.
dARM uses eight ODrive controllers on a CAN bus, which ultimately connect up to a Raspberry Pi 4B with a RS485 CAN Hat. The controllers are connected to each other in a daisy chain using basic twisted pair wire, which simplifies the construction and maintenance of the modular arm.
As for the motors themselves, the arm uses three different types depending on where they are located, with three Eaglepower 8308 units for primary actuators, a pair of GB36-2 motors in the forearm, and finally a GM5208-24 for the gripper. Together, [JesseDarr] says the motors and gearboxes are strong enough to lift a 5 pound (2.2 kilogram) payload when extended in a horizontal position.
The project’s documentation includes assembly instructions for the printed parts, a complete Bill of Materials, and guidance on how to get the software environment setup on the Raspberry Pi. It’s not exactly a step-by-step manual, but it looks like there’s more than enough information here for anyone who’s serious about building a dARM for themselves.
Should you travel around Europe, you may notice that things in France are ever so slightly different. Not necessarily better or worse, simply that the French prefer to plough their own furrow rather than importing cultural tends from their neighbors.
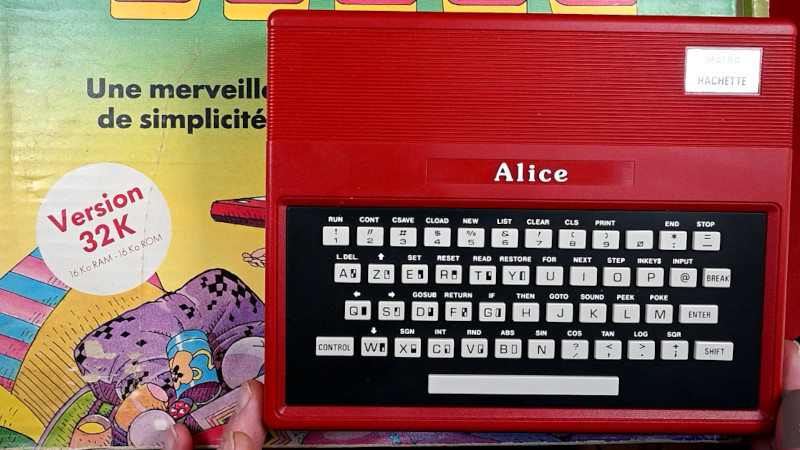
In the 1980s this was evident in their home computers, because as well as a Minitel terminal in your house, you could have an all-French machine plugged into your TV. [Retro Krazy] has just such a machine — it’s a Matra Hachette Alice 32, and its red plastic case hides hardware any of us would have been proud to own back in the day.
At first sight it appears superficially similar to a Sinclair Spectrum, with its BASIC keywords next to the keys. But under that slightly calculator style AZERTY keyboard is an entirely different architecture, a Motorola 6803. The first Alice computer was a clone of a Radio Shack model, and while this one has no compatibility with its predecessor it retains some silicon choices. On the back are a series of DIN sockets, one for a SCART adapter, and more for serial connectivity and a cassette deck. The overall impression is of a well-engineered machine, even if that red color is a little garish.
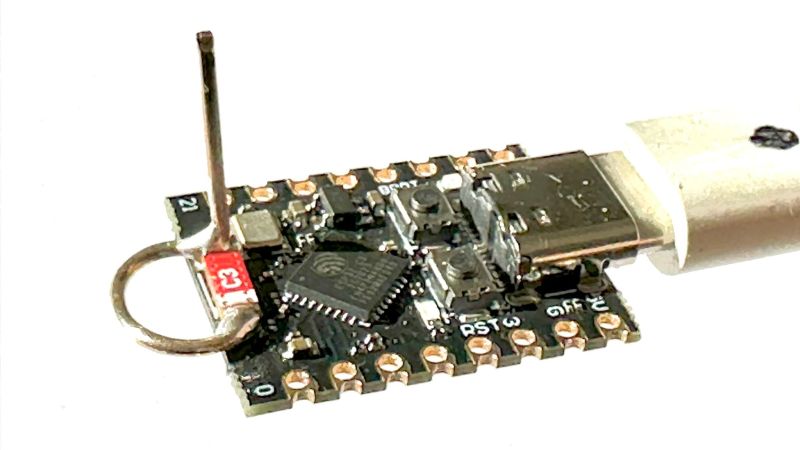
We’ve seen tons of projects lately using the ESP32-C3, and for good reason. The microcontroller has a lot to offer, and the current crop of tiny dev boards sporting it make adding a lot of compute power to even the smallest projects dead easy. Not so nice, though, is the poor WiFi performance of some of these boards, which [Peter Neufeld] addresses with this quick and easy antenna.
There are currently a lot of variations of the ESP32-C3 out there, sometimes available for a buck a piece from the usual suspects. Designs vary, but a lot of them seem to sport a CA-C03 ceramic chip antenna at one end of the board to save space. Unfortunately, the lack of free space around the antenna makes for poor RF performance. [Peter]’s solution is a simple antenna made from a 31-mm length of silver wire. One end of the wire is formed into a loop by wrapping it around a 5-mm drill bit and bending it perpendicular to the remaining tail. The loop is then opened up a bit so it can bridge the length of the ceramic chip antenna and then soldered across it. That’s all it takes to vastly improve performance as measured by [Peter]’s custom RSSI logger — anywhere from 6 to 10 dBm better. You don’t even need to remove the OEM antenna.
The video below, by [Circuit Helper], picks up on [Peter]’s work and puts several antenna variants to further testing. He gets similarly dramatic results, with 20 dBm improvement in some cases. He does note that the size of the antenna can be a detriment to a project that needs a really compact MCU and tries coiling up the antenna, with limited success. He also did a little testing to come up with an optimal length of 34 mm for the main element of the antenna.
There seems to be a lot of room for experimentation here. We wonder how mounting the antenna with the loop perpendicular to the board and the main element sticking out lengthwise would work. We’d love to hear about your experiments, so make sure to ping us with your findings.
The advantage of a radio-controlled clock that receives the time signal from WWVB is that you never have to set it again. Whether it’s a little digital job on your desk, or some big analog wall clock that’s hard to access, they’ll all adjust themselves as necessary to keep perfect time. But what if the receiver conks out on you?
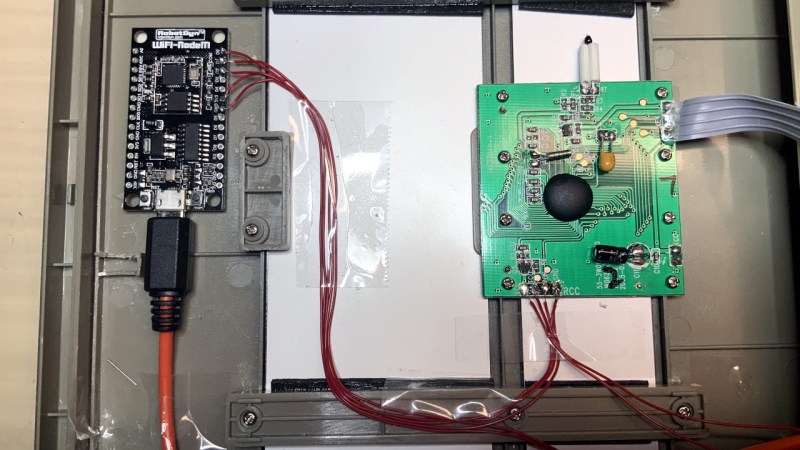
Well, you’d still have a clock. But you’d have to set it manually like some kind of Neanderthal. That wasn’t acceptable to [jim11662418], so after he yanked the misbehaving WWVB receiver from his clock, he decided to replace it with an ESP8266 that could connect to the Internet and get the current time via Network Time Protocol (NTP).
This modification was made all the easier by the fact that the WWVB receiver was its own PCB, connected to the clock’s main board by three wires: one for the clock signal, another that gets pulled low when the clock wants to turn on the receiver (usually these clocks only update themselves once a day), and of course, ground. It was simply a matter of connecting the ESP8266 dev board up to the two digital lines and writing some code that would mimic the responses from the original receiver.
If you take a look through the provided source code, a comment explains that the WWVB signal is recreated based on the official documentation from the National Institute of Standards and Technology (NIST) website. There are functions in the code to bang out the 500 ms “one” and 200 ms “zero” bits, and once the microcontroller has picked up the correct time from the Internet, they’re called in quick succession to build the appropriate time signal. As such, this code should work on any clock that has an external WWVB receiver like this, but as always, your mileage may vary.
We’ve got a love-hate relationship with discount tool outlet Harbor Freight: we hate that we love it so much. Apparently, [James Clough] is of much the same opinion, at least now that he’s looked into the quality of their outlet strips and found it somewhat wanting.
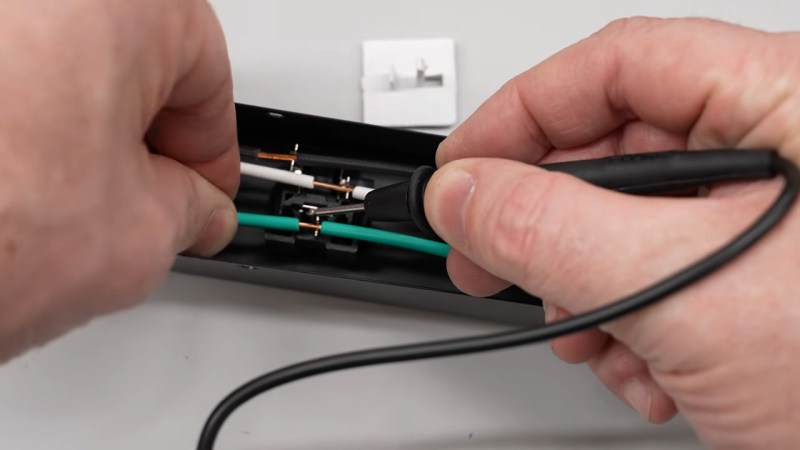
The outlet strips in question are Harbor Freight’s four-foot-long, twelve-outlet strips, three of which are visible from where this is being written. [James] has a bunch of them too, but when he noticed an intermittent ground connection while using an outlet tester, he channeled his inner [Big Clive] and tore one of the $20 strips to bits. The problem appears to be poor quality of the contacts within each outlet, which don’t have enough spring pre-load to maintain connection with the ground pin on the plug when it’s wiggled around. Actually, the contacts for the hot and neutral don’t look all that trustworthy either, and the wiring between the outlets is pretty sketchy too. The video below shows the horrors within.
What’s to be done about this state of affairs? That’s up to you, of course. We performed the same test on all our outlets and the ground connections all seemed solid. So maybe [James] just got a bad batch, but he’s still in the market for better-quality strips. That’s going to cost him, though, since similar strips with better outlets are about four times the price of the Harbor Freight units. We did find a similar strip at Home Depot for about twice the price of the HF units, but we can’t vouch for the quality. As always, caveat emptor.
Over the history of the Web, we have seen several major shifts in browsing software. If you’re old enough to have used NCSA Mosaic or any of the other early browsers, you probably welcomed the arrival of Netscape Navigator, and rued its decline in the face of Internet Explorer. As Mozilla and then Firefox rose from Netscape’s corpse the domination by Microsoft seemed inevitable, but then along came Safari and then Chrome. For a glorious while there was genuine competition between browser heavyweights, but over the last decade we’ve arrived at a point where Chrome and its associated Google domination is the only game in town. Other players are small, and the people behind Firefox seem hell-bent on fleeing to the Dark Side, so where should we turn? Is there a privacy-centric open source browser that follows web standards and doesn’t come with any unfortunate baggage in the room? It’s time to find out.
It’s All In The Engine
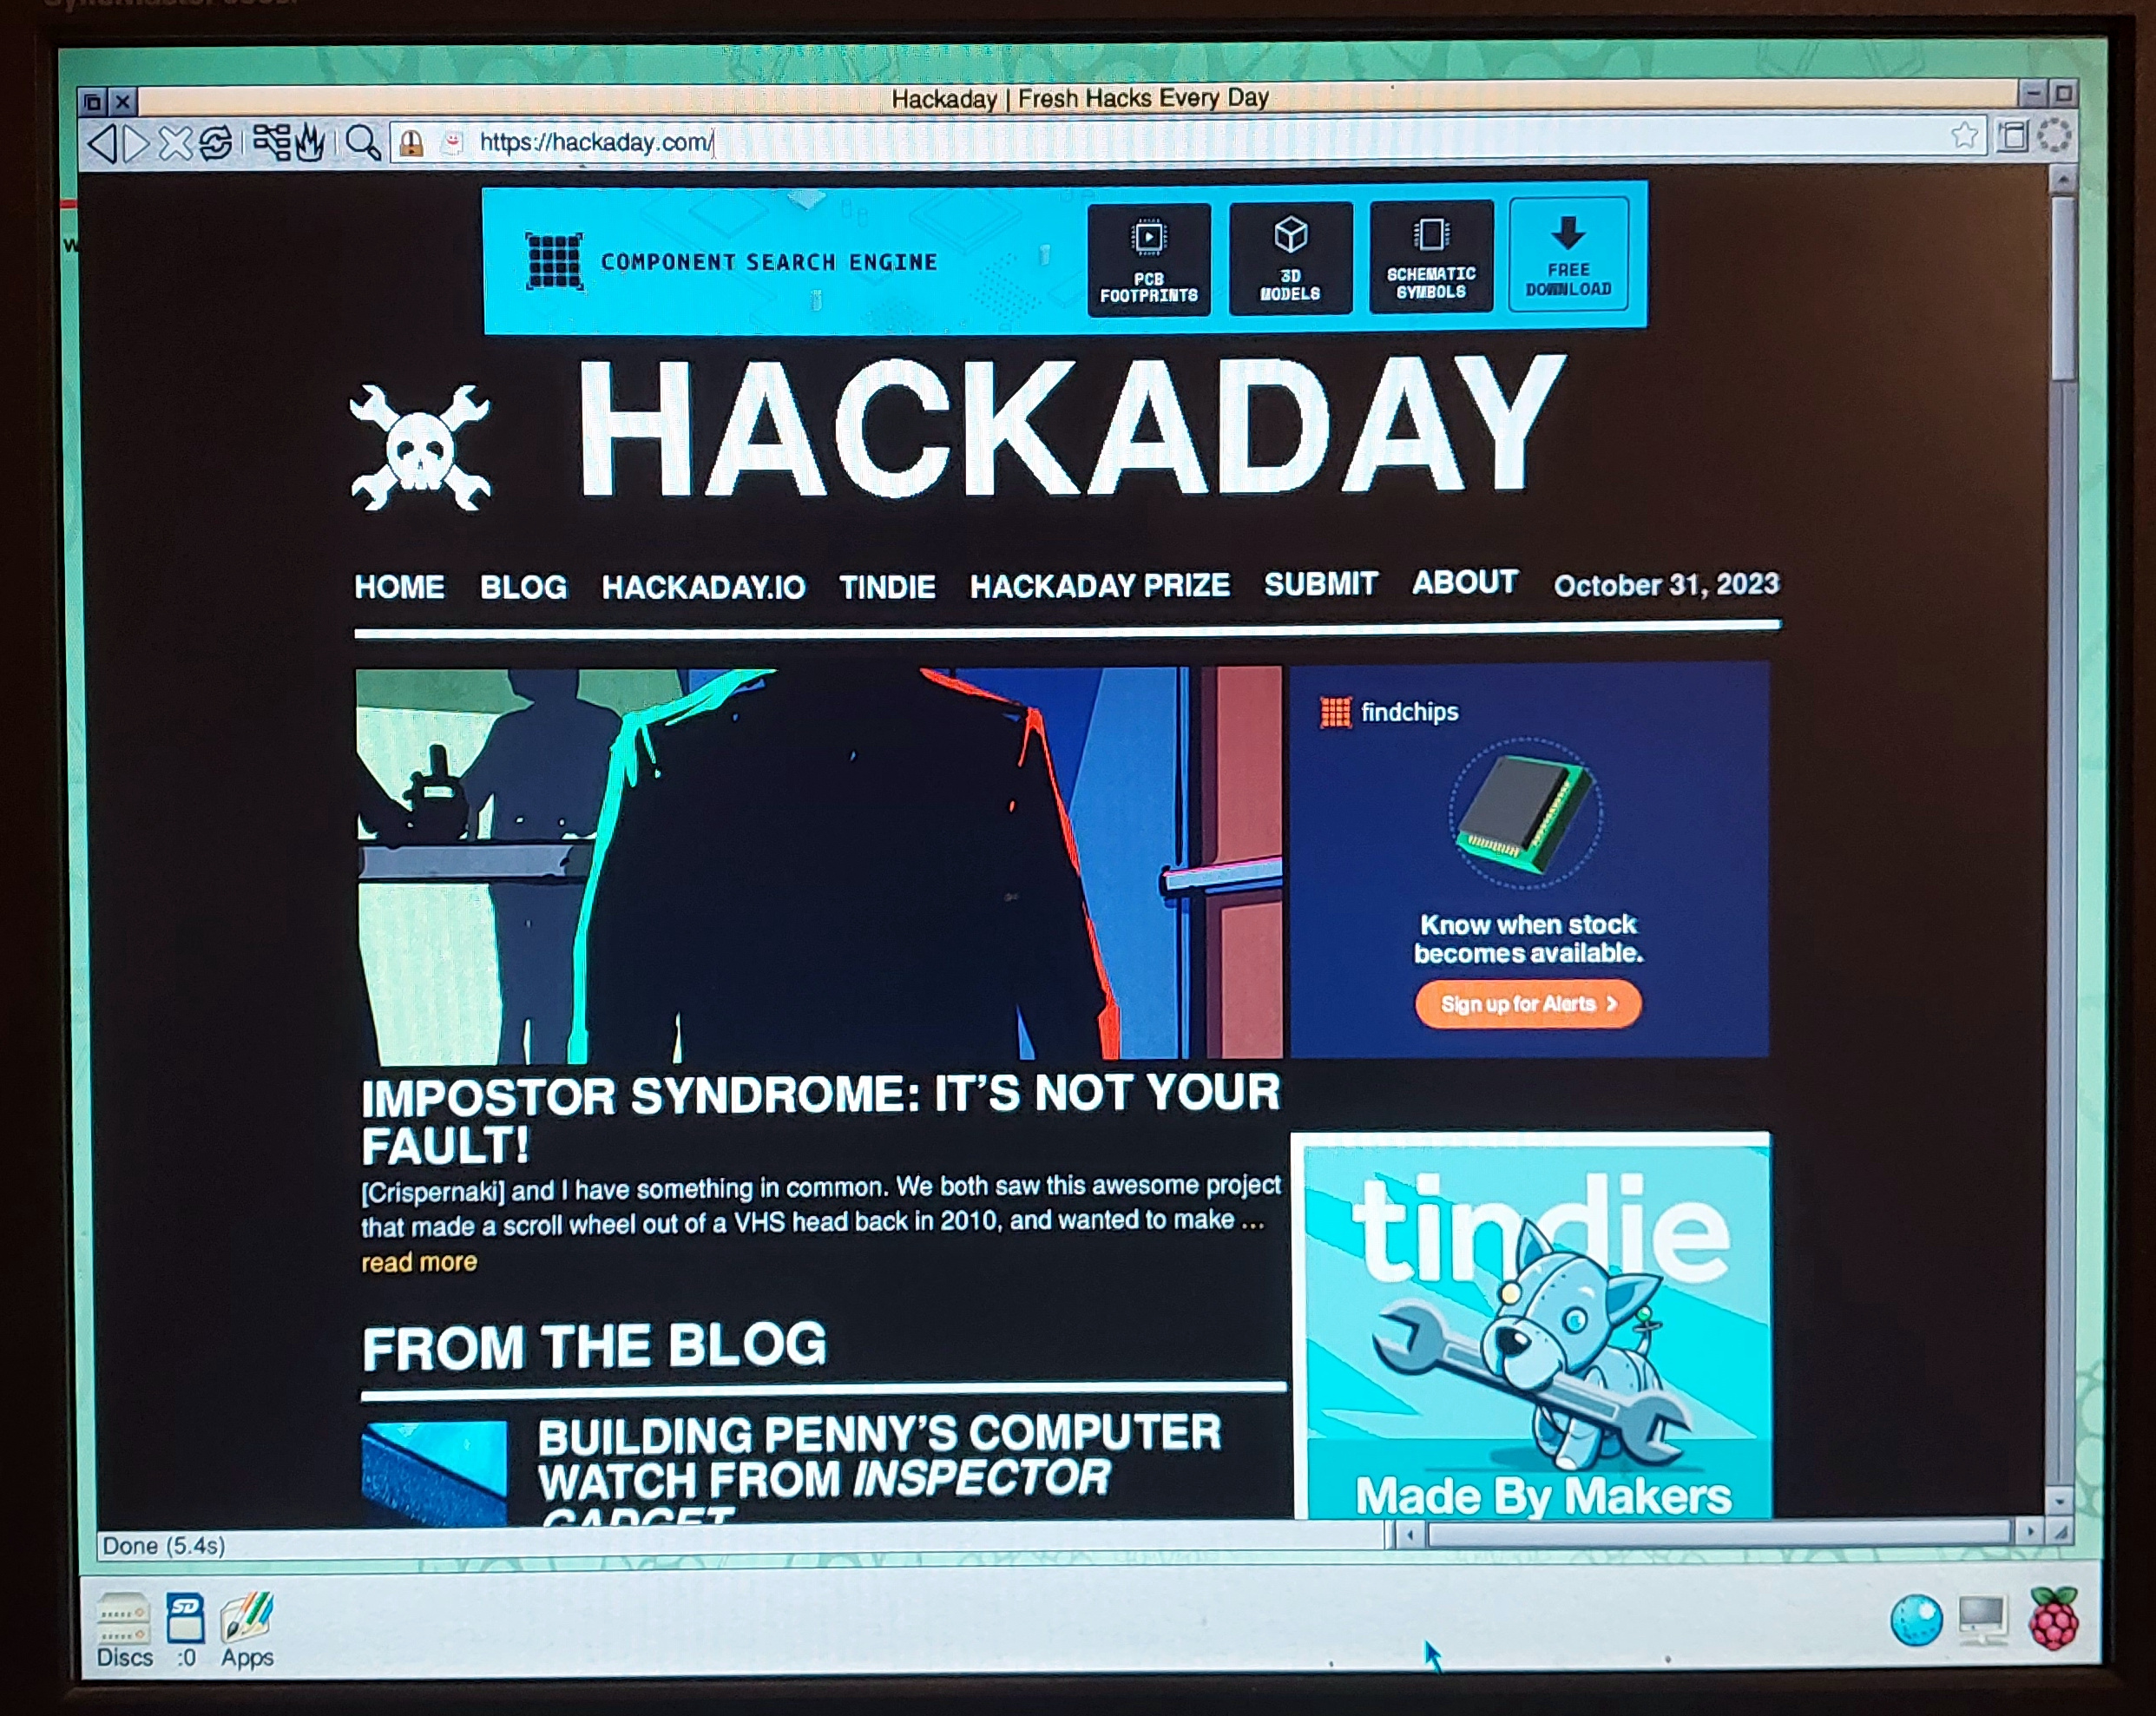
It’s Hackaday, in NetSurf!
If you look at the breadth of standards which a modern web browser has to support, it’s clear that writing a web browser is a Herculean task. Many browsers take the route of not trying to implement everything, for example minimalist browsers such as Dillo or NetSurf concentrate only on rendering web pages. For the purposes of this piece we’re looking at full-fat browsers capable of being a daily driver though, and for that a browser needs some very capable software. Many development teams are not capable of writing such a browser engine, and thus use one developed for another browser. Despite there being many names on the table then, peering under the hood there are surprisingly few options. The Apple Webkit and Google Blink family of browsers dominate, followed by Mozilla Gecko and its Goanna fork, and then by promising bit-part players such as Servo, or the Ladybird browser’s LibWeb. Having so much of the web’s browser software dominated by Apple and Google is not an ideal situation, but it’s where we find ourselves.
It’s Hackaday, in Ladybird!
So when choosing a browser, the first thing we look at is its engine. Whose ecosystem are we becoming part of, and does that have any effect on us? Within reason all modern full-featured browser engines render websites the same, so there should be little to choose from in terms of the websites themselves.
Having considered the browser engine, next up are whatever the developer uses to differentiate themselves. It’s suprisingly straightforward to construct a bare-bones web browser on top of WebKit, so to stand out each browser has a unique selling point. Is it privacy you’re after, ad blocking, or just following a UI path abandoned by a previous browser? And perhaps most importantly, are you simply departing a problematic developer for one even shadier? It’s worth doing your homework, and not being afraid to try multiple browsers before you find your home.
So Where Did Hackaday Land?
It’s Hackaday, in Vivaldi! (We are sure you are getting the idea by now)
Over the course of writing for Hackaday it’s inevitable that a bunch of different browsers will find their way on to my bench. Some of them like Ladybird or Servo I would love the chance to use as my daily driver, but they simply aren’t mature enough for my needs. Others such as Brave have too much of a whiff of controversy around them for someone seeking a quiet life of open-source obscurity. As I write this I have a preposterous number of browsers installed on my machine, and if there’s one thing which the experience has taught me it’s that they are much more the same than I expected. In three decades our expectation of a browser has homogenised to the extent that I’m hard pressed to tell between them. How do I pick one, without blindly throwing a dart at a corkboard covered in browser logos?
In the end, I looked for two candidates, one each from the Firefox and Apple/Google orbits. I tried them all, and settled on LibreWolf from the former, and Vivaldi from the latter. LibreWolf because it’s done a fine job of making Firefox without it being Firefox, and Vivaldi because its influence from the early Opera versions gave it a tiny bit of individuality missing in the others. I set up both with my usual Hackaday bookmarks, tabs, and shortcuts, changed the search engine to the EU-based Qwant. I’m ready to go, with a bit more control over how my data is shared with the world once more.
A refugee from the early Web writes…
It’s a fairly regular occurrence, that I will Do a Linux Thing in my hackerspace, only to have one of my younger friends point out a much newer and better tool than the one I know, which I probably learned to use some time in the mid-1990s. I’ve fond looking at web browsers to be in some respects a similar experience even if the browsers are much closer to each other than I expected, because for a couple of decades now I’ve been a Firefox user simply because Firefox was the plucky upstart open-source browser. Mozilla’s previous attempts to take Netscape 6 and make it the only piece of Internet software you needed were horribly bloated, and Firefox, or “Phoenix” as it launched, was an easy choice. Just as my operating system journey taught me about software complacency a couple of years ago, so I’ve now had the same awakening in the browser. The Web will never look the same again.
Using USB for powering devices is wonderful, as it frees us from a tangle of incompatible barrel & TRS connectors, not to mention a veritable gaggle of proprietary power connectors. The unfortunate side-effect of this is that the obvious thing to do with power connectors is to introduce splitters, which can backfire horribly, especially since USB-C and USB Power Delivery (USB-PD) were introduced. The [Quiescent Current] channel on YouTube recently went over the ways in which these handy gadgets can literally turn your USB-powered devices into a smoldering pile of ashes.
Much like Qualcomm’s Quick Charge protocols, USB-PD negotiates higher voltages with the power supply, after which this same voltage will be provided to any device that’s tapped into the power supply lines of the USB connector. Since USB-C has now also taken over duties like analog audio jacks, this has increased the demand for splitters, but these introduce many risks. Unless you know how these splitters are wired inside, your spiffy smartphone may happily negotiate 20V that will subsequently fry a USB-powered speaker that was charging off the same splitter.
In the video only a resistor and LED were sacrificed to make the point, but in a real life scenario the damage probably would be significantly more expensive.
And there’s a little bit of everything here, from orbital mechanics and fetching the two-line elements (TLE) from the web, to writing the code to translate that into the tabletop machine’s coordinate system. It looks like [Farid] hadn’t done much 3D CAD before, so he got a chance to stretch those muscles too. Finally, it served as an introduction to resource-constrained programming: “This was the first time I’ve had to think about the size of a compiled binary – the most frustrating part was figuring out that using a C++ stringstream was adding too much code to my binary.”
[Farid] is learning a lot here, and you might too. For instance, using pencil lead (graphite) as a lubricant on sliding 3D-printed parts is new to us, but makes sense. We’ll have to try that out.
And while this is a simple desktop tracker, with a lot more mechanical design, the same basics could be put to real use for pointing a receiver dish. Of course, who says you need fancy motors and computers to point a satellite dish anyway? If you work on your arm muscles a bit, you could become the satellite pointer.
It’s likely that among the readers of this article there will be many who collect something. Whether it’s rare early LEDs or first-year-of-manufacture microprocessors, you’ll scour the internet to find them, and eagerly await mystery packages from the other side of the world.
Emmanuel Lidden is an element collector, someone who tries to assemble an entire Periodic Table in their collection. He ordered a range of elements from an American element collectors’ supply website, including samples of plutonium and thorium. He seems to have been unaware he was committing any crime, with the microscopic samples available from legitimate websites with no warnings attached. The case becomes murkier as the Australian authorities flagged the thorium sample and instructed the courier not to deliver it, which they did anyway. Then a raid of the type you’d expect for the terrorists who stole the plutonium in Back To The Future was launched, along with that Gatwick-esque media frenzy.
We’re inclined to agree that the penalty likely to be meted out to him for buying a sliver of a Soviet smoke detector embedded in a Lucite cube seems overly steep, but at the same time his obvious naivety over dealing in radioactive materials marks him as perhaps more than a little foolhardy. It’s something over which to ponder though, have we managed to amass anything illegal disguised as outdated devices? Have you? Perhaps it’s something to discuss in the comments.
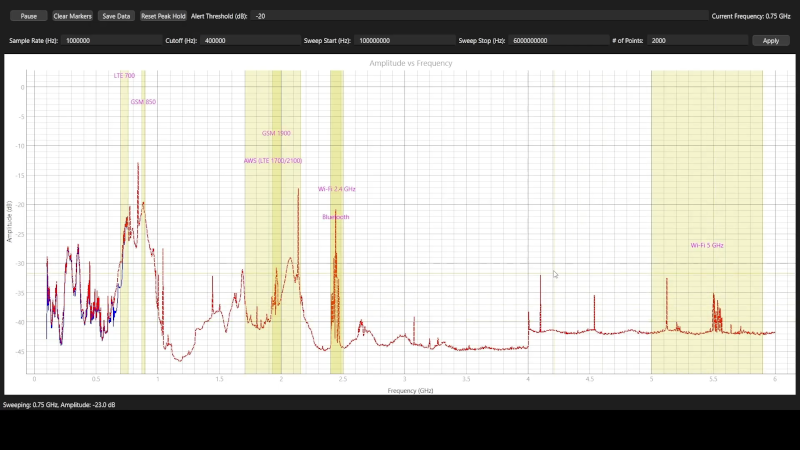
The RTL-SDR dongles get most of the love from people interested in software-defined radio, but the Pluto is also a great option, too. [FromConceptToCircuit] shares code to turn one of these radios into a spectrum analyzer that sweeps up to 6 GHz and down to 100 MHz. You can see a video of how it works below.
While it may seem that 100 MHz is a bit limiting, there’s plenty of activity in that range, including WiFi, Bluetooth, radio systems, both commercial and amateur, and even cell phones.
The system uses a lock-in amplifier technique for best performance. The Python code is straightforward. You simply scan all frequencies and determine the signal strength at each point. Of course, the devil is in the details.
We covered using Pluto with GNU Radio a while back. We like how it connects like a network adapter, among other things. Spectrum analysis is a common project for one of these SDRs.
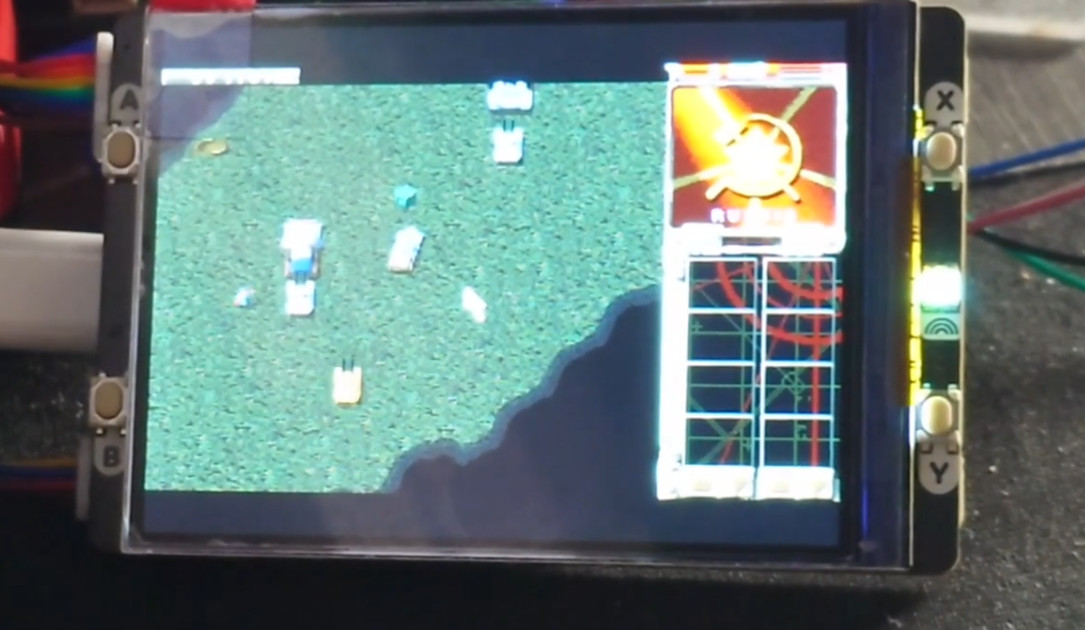
A couple of months back, Electronic Arts did something uncharacteristically benevolent and released several of the old Command and Conquer games under the GPLv3. Logically, we knew that opened the doors up to the games being ported to new operating systems and architectures, but we admit that it was still a little surprising to see Command and Conquer: Red Alert running on the Raspberry Pi Pico 2.
[Charlie Birks] documented the process of getting the 1996 game up and running on the microcontroller in a series of Mastodon posts spanning a few days in March. Seeing the incremental progress made each day makes for interesting reading, as he moves from the game just barely starting up to being able to complete missions and eventually even get multiplayer going between two Picos.
As [Charlie] clarifies, he’s technically using the Pimoroni Pico Plus 2 W, which takes the RP2350B from the official Pico 2, adds 8 MB of PSRAM, and bumps the onboard flash to 16 MB. The upgraded specs and an SD card are required to get the game running, as content that would have originally been held in RAM on the computer must instead be pulled from flash.
For an even more streamlined experience, he eventually slaps the Pico Plus 2 W into the Pimoroni Pico VGA Demo Base — which provided not only an integrated SD card slot, but (as the name implies) VGA output.
It’s still early days, but [Charlie] has been pushing all of his code changes into his fork of Red Alert on GitHub for anyone who wants to play along at home. If you get his fork compiled and running on your own Pico, we’d love to hear about it in the comments.
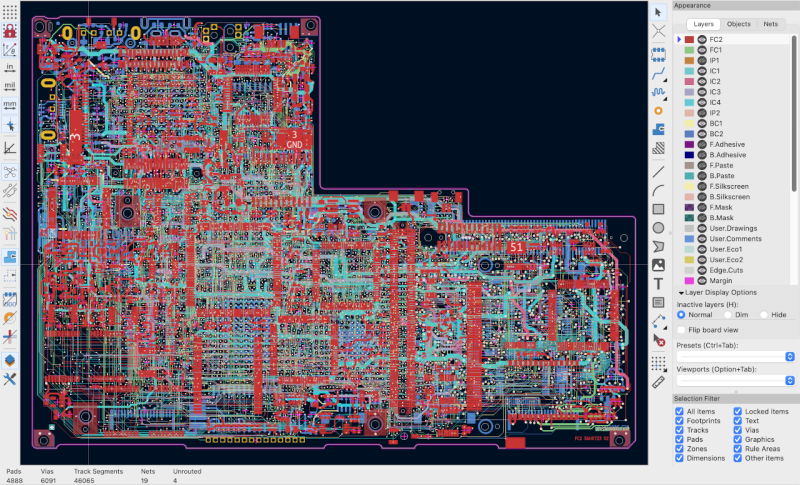
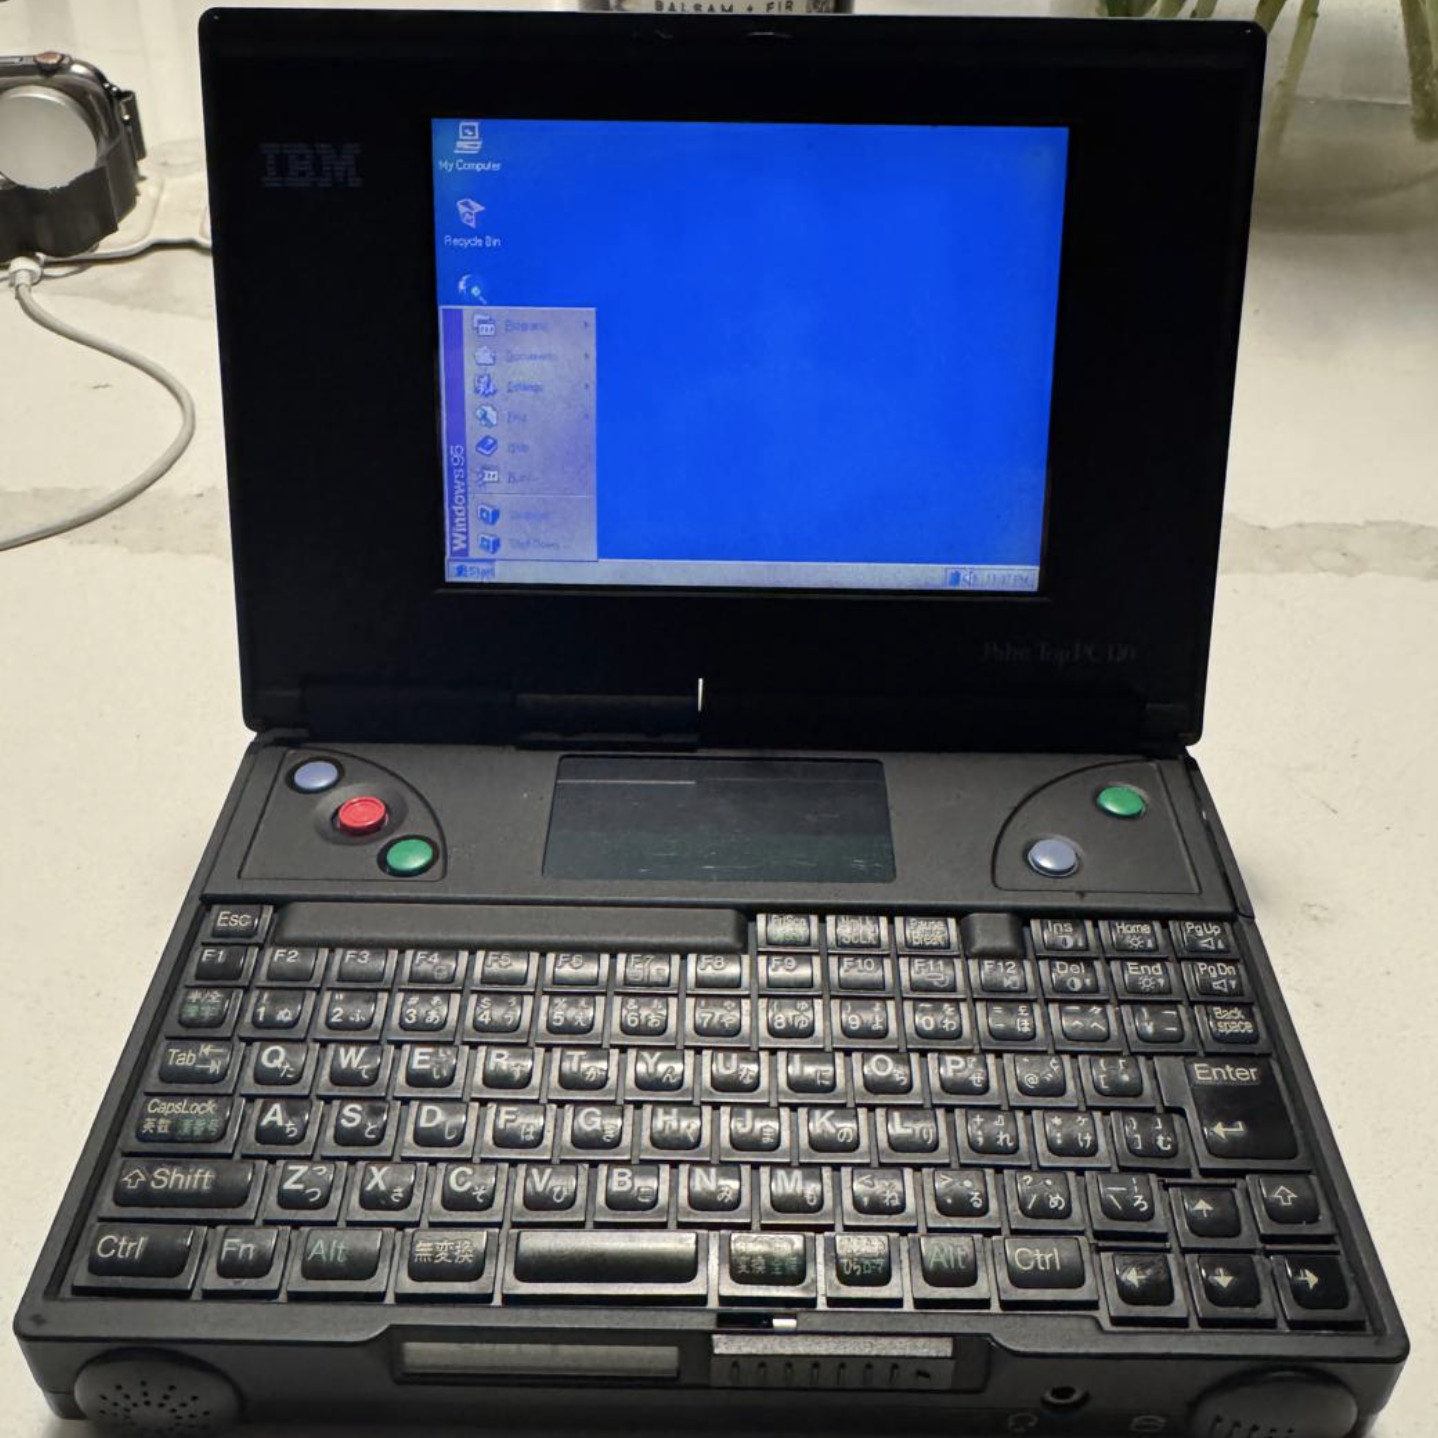
There’s a dedicated group of users out there that aren’t ready to let their beloved IBM PC110 go to that Great Big Data Center in the Sky. Unfortunately, between the limited available technical information and rarity of replacement parts, repairing the diminutive palmtops can be tricky.
Which is why [Ahmad Byagowi] has started a project that aims to not only collect all the available schematics and datasheets that pertain to the machine, but to reverse engineer all of the computer’s original circuit boards. Working from optical and x-ray scans, the project has already recreated the motherboard, power supply, modem, keyboard, and RAM module PCBs in KiCad.
Just last week the project released production-ready Gerbers for all the boards, but considering there have been 45+ commits to the repository since then, we’re going to assume they weren’t quite finalized. Of course, with a project of this magnitude, you’d expect it to take a few revisions to get everything right. (Hell, we’ve managed to screw up board layouts that had fewer than a dozen components on them.)
If you’d like to lend a hand, [Ahmad] says he could use the help. Beyond checking the boards for problems and reporting issues, he’s also on the hunt for any datasheets or other documentation that can be found for the PC110 or its components. It looks like there’s still schematic work that needs to be done as well, so if your idea of zen is figuring out how ~30 year old computers were wired up internally, this might be the perfect summer project for you.
Interestingly, our very own [Arya Voronova] has been working on creating a drop-in replacement motherboard for the Sony Vaio P using KiCad and imported board images. That hobbyists are now able to do this kind of work using free and open source tools is a reminder of just how far things have come in the last few years.
[Georges Gagnerot] has been trying to emulate iOS and run iPhone software in a virtual environment. There were a few choices, and qemu-t8030 had a number of interesting features that you can check out in his post.
The project requires a patched QEMU, and [Georges] did some basic jailbreaking techniques. The real problem, of course, was not having the Apple Silicon GPU. Older versions of iOS let you select software rendering, but that option is gone on newer versions. However, it was possible to patch the phone to still use software rendering. There are still apps that directly use Metal or OpenGL that won’t run, but that’s another problem.
There is a plan to explore forwarding GPU calls to a real device. However, that seems difficult so it will have to wait for now.
That wasn’t the last problem, of course. But the post gives you a great view into the detective work. There is still work to go, but it looks like a lot of progress.
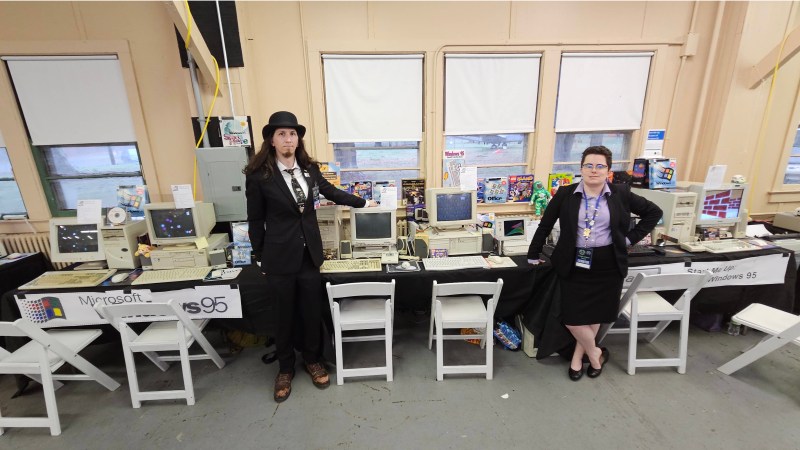
It’s been 30 years since Windows 95 launched. [Ms-Dos5] and [Commodore Z] are celebrating with an epic exhibit at VCF East 2025. They had no fewer than nine computers — all period-correct machines running versions of Windows 95. The pictures don’t do it justice, so if you are near Wall, NJ, on Sunday, April 5, 2025, definitely go check out this and the rest of the exhibits at VCF.
An exhibit like this isn’t thrown together overnight. [Commodore Z] and [Ms-Dos5] worked for months to assemble the right mix of desktops, laptops, and prehiperals to showcase Windows 95. Many of the computers are networked as well – which was no easy task. One particular Thinkpad 760e required pliers and force to remove a stuck PCMCIA modem card. After a struggle that was ultimately destructive to the card, the pair determined it was stuck due to a sticker that had effectively glued the card into the laptop. As the sticker finally gave up, the card popped itself out of the laptop.
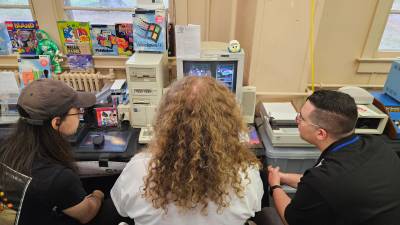
Hardware isn’t the only story of this Windows 95 exhibit. An operating system is software, after all. The team has plenty of software running. Some highlights are Kidpix, MS-paint, Lego Island, LucasArts Full Throttle, Duke Nukem 3D, Word 97, and Space Cadet Pinball, which came with the Plus! expansion pack. There is a huge array of original boxes for Windows 95 software. It’s a nostalgia trip to see software in boxes, especially in all those bright 90’s colors.
The various versions of Windows 95 are also represented. [Ms-Dos5] and [Commodore Z] are running all major versions from Chicago beta 73g to Windows 95 C / OSR2.5.
If you’re old enough to remember 1995, the Windows 95 launch event was a big deal. Windows 3.0 series was five years old at that point. Millions of people owned PC compatible computers and were ready for something new and flashy, and Windows 95 delivered. Thanks to [Commodore Z] and [Ms-Dos5] keeping this bit of internet history alive.
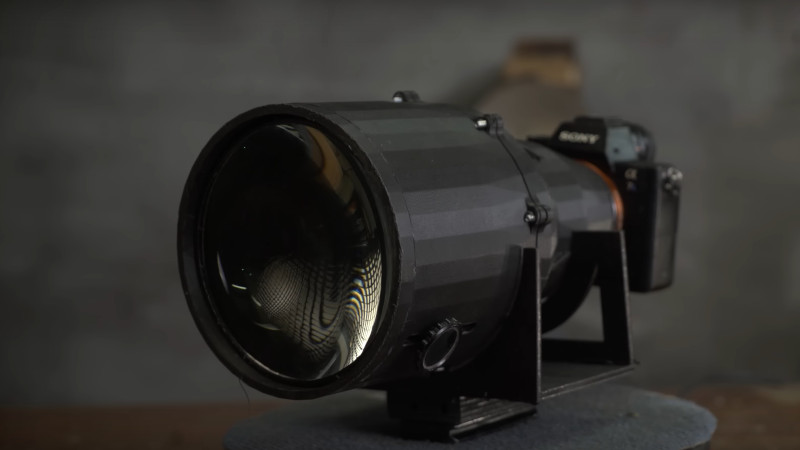
The F-number of a photographic lens is a measure of its light-gathering ability, and is expressed as its aperture diameter divided by its focal length. Lenses with low F-numbers are prized by photographers for their properties, but are usually expensive because making a good one can be something of a challenge. Nevertheless [Rulof] is giving it a go, making an 80mm F0.5 lens with a Sony E-mount. The video below the break has all the details, and also serves as a fascinating primer on lens design if you are interested.
Rather than taking individual lenses, he’s starting with the second-hand lens from an old projector. It’s got the required huge aperture, but it’s by no means a photographic lens. An interesting component is his choice of diaphragm for the variable aperture, it’s a drafting aid for drawing circles which closely resembles a photographic part. This is coupled with the triplet from an old SLR lens in a 3D-printed enclosure, and the result is a lens that works even if it may not be the best. We know from experiences playing with lens systems that adjusting the various components of a compound lens like this one can be very difficult; we can see it has the much sought-after bokeh or blurred background, but it lacks sharpness.
[Ben Eater]’s breadboard 6502 computer is no stranger to these parts, so it was a bit of a surprise that when [Mark] wrote in asking us if we’d covered [Ben]’s getting MS BASIC running on the breadboard, that our answer was “no”. Well, that changes today!
This is a three-part video series, documenting how [Ben Eater] ports a 1977 version of MS BASIC to his 6502-based computer. The first video is all about just getting the BASIC up and working. It’s full of detail about how MS BASIC adapts to different architectures on the inside, and [Ben] essentially defines his own along the way.
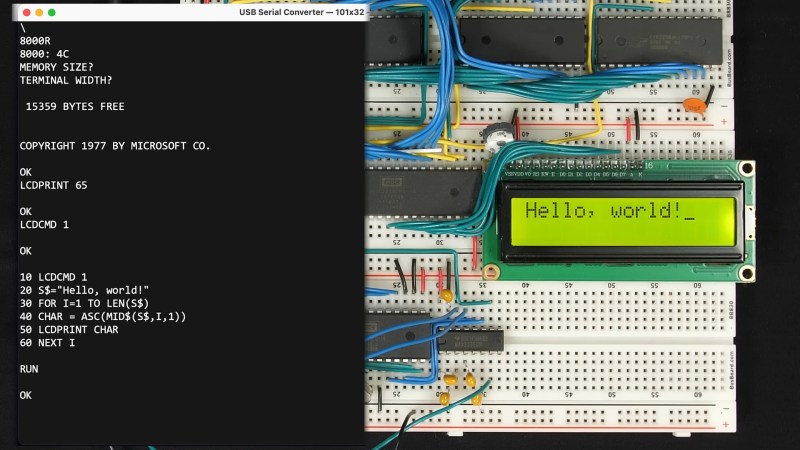
Once he has BASIC working, the next two videos are about making it work not just with the serial terminal that he has attached, but also with the LCD display peripheral he has plugged into the breadboard. BASIC fans will not be surprised to see that it’s all about using POKE. But that ends up being to slow, so he extends it out with his own LCDPRINT command written in assembly.
Now that he can write a character to the LCD, he wants to be able to pass it a string: LCDPRINT “Hello world”. But that requires his command to be able to parse a string, and this has him diving down the rabbit hole into how MS BASIC parses strings, handles evals, and so on. If you want to know how MS BASIC works on the inside, this is the video for you. This video makes a lot of use of wozmon, which seems an almost ideal tool for this kind of low-level poking around.
All of this is done in [Ben]’s very well rehearsed, accessible, but pulling-no-punches style. Get ready to nerd out. All three of the videos are embedded just below the break.
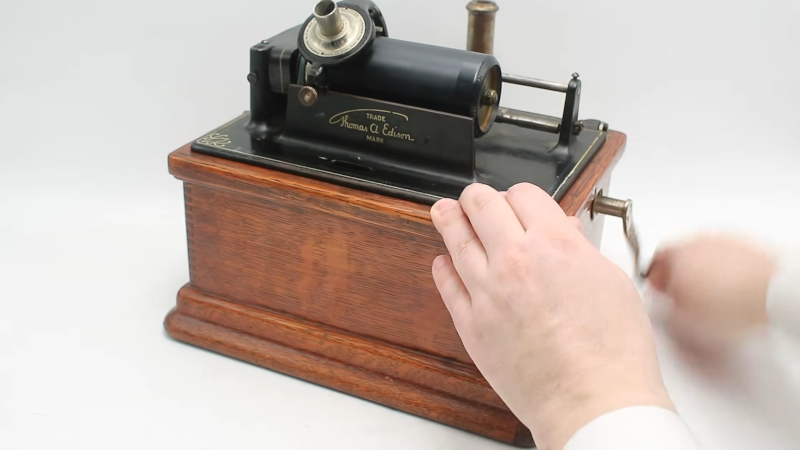
If you think of records as platters, you are of a certain age. If you don’t remember records at all, you are even younger. But there was a time when audio records were not flat — they were drums, which was how the original Edison phonograph worked. [Our Own Devices] did a video earlier showing one of these devices, but since it was in a museum, he didn’t get to open it up. Lucky for us, he now has one of his own, and we get to see inside in the video below.
Ironically, Edison was deaf yet still invented the phonograph. While he did create the working phonograph — his self-identified most important invention — the original invention wasn’t commercially viable. You could record and playback audio on tin foil wrapped around a drum. But you couldn’t remove the foil without destroying it.
Edison was busy, but another inventor related to Bell created a similar system that used wax cylinders instead of foil. Edison’s vision for his invention didn’t include popular music, which hurt sales.
If you want to skip the history lesson — although it is well worth watching — you can skip to the 9-minute mark. You can hear the machine play and then see the box come off.


 An exhibit like this isn’t thrown together overnight. [Commodore Z] and [Ms-Dos5] worked for months to assemble the right mix of desktops, laptops, and prehiperals to showcase Windows 95. Many of the computers are networked as well – which was no easy task. One particular Thinkpad 760e required pliers and force to remove a stuck PCMCIA modem card. After a struggle that was ultimately destructive to the card, the pair determined it was stuck due to a sticker that had effectively glued the card into the laptop. As the sticker finally gave up, the card popped itself out of the laptop.