Vista de Lectura

Hay nuevos artículos disponibles. Pincha para refrescar la página.

Big Chemistry: Cement and Concrete

Not too long ago, I was searching for ideas for the next installment of the “Big Chemistry” series when I found an article that discussed the world’s most-produced chemicals. It was an interesting article, right up my alley, and helpfully contained a top-ten list that I could use as a crib sheet for future articles, at least for the ones I hadn’t covered already, like the Haber-Bosch process for ammonia.

Number one on the list surprised me, though: sulfuric acid. The article stated that it was far and away the most produced chemical in the world, with 36 million tons produced every year in the United States alone, out of something like 265 million tons a year globally. It’s used in a vast number of industrial processes, and pretty much everywhere you need something cleaned or dissolved or oxidized, you’ll find sulfuric acid.

Staggering numbers, to be sure, but is it really the most produced chemical on Earth? I’d argue not by a long shot, when there’s a chemical that we make 4.4 billion tons of every year: Portland cement. It might not seem like a chemical in the traditional sense of the word, but once you get a look at what it takes to make the stuff, how finely tuned it can be for specific uses, and how when mixed with sand, gravel, and water it becomes the stuff that holds our world together, you might agree that cement and concrete fit the bill of “Big Chemistry.”

Rock Glue

To kick things off, it might be helpful to define some basic terms. Despite the tendency to use them as synonyms among laypeople, “cement” and “concrete” are entirely different things. Concrete is the finished building material of which cement is only one part, albeit a critical part. Cement is, for lack of a better term, the glue that binds gravel and sand together into a coherent mass, allowing it to be used as a building material.

What did the Romans ever do for us? The concrete dome of the Pantheon is still standing after 2,000 years. Source: Image by Sean O’Neill from Flickr via Monolithic Dome Institute (CC BY-ND 2.0)

It’s not entirely clear who first discovered that calcium oxide, or lime, mixed with certain silicate materials would form a binder strong enough to stick rocks together, but it certainly goes back into antiquity. The Romans get an outsized but well-deserved portion of the credit thanks to their use of pozzolana, a silicate-rich volcanic ash, to make the concrete that held the aqueducts together and built such amazing structures as the dome of the Pantheon. But the use of cement in one form or another can be traced back at least to ancient Egypt, and probably beyond.

Although there are many kinds of cement, we’ll limit our discussion to Portland cement, mainly because it’s what is almost exclusively manufactured today. (The “Portland” name was a bit of branding by its inventor, Joseph Aspdin, who thought the cured product resembled the famous limestone from the Isle of Portland off the coast of Dorset in the English Channel.)

Portland cement manufacturing begins with harvesting its primary raw material, limestone. Limestone is a sedimentary rock rich in carbonates, especially calcium carbonate (CaCO3), which tends to be found in areas once covered by warm, shallow inland seas. Along with the fact that limestone forms between 20% and 25% of all sedimentary rocks on Earth, that makes limestone deposits pretty easy to find and exploit.

Cement production begins with quarrying and crushing vast amounts of limestone. Cement plants are usually built alongside the quarries that produce the limestone or even right within them, to reduce transportation costs. Crushed limestone can be moved around the plant on conveyor belts or using powerful fans to blow the crushed rock through large pipes. Smaller plants might simply move raw materials around using haul trucks and front-end loaders. Along with the other primary ingredient, clay, limestone is stored in large silos located close to the star of the show: the rotary kiln.

Turning and Burning

A rotary kiln is an enormous tube, up to seven meters in diameter and perhaps 80 m long, set on a slight angle from the horizontal by a series of supports along its length. The supports have bearings built into them that allow the whole assembly to turn slowly, hence the name. The kiln is lined with refractory materials to resist the flames of a burner set in the lower end of the tube. Exhaust gases exit the kiln from the upper end through a riser pipe, which directs the hot gas through a series of preheaters that slowly raise the temperature of the entering raw materials, known as rawmix.

The rotary kiln is the centerpiece of Portland cement production. While hard to see in this photo, the body of the kiln tilts slightly down toward the structure on the left, where the burner enters and finished clinker exits. Source: by nordroden, via Adobe Stock (licensed).

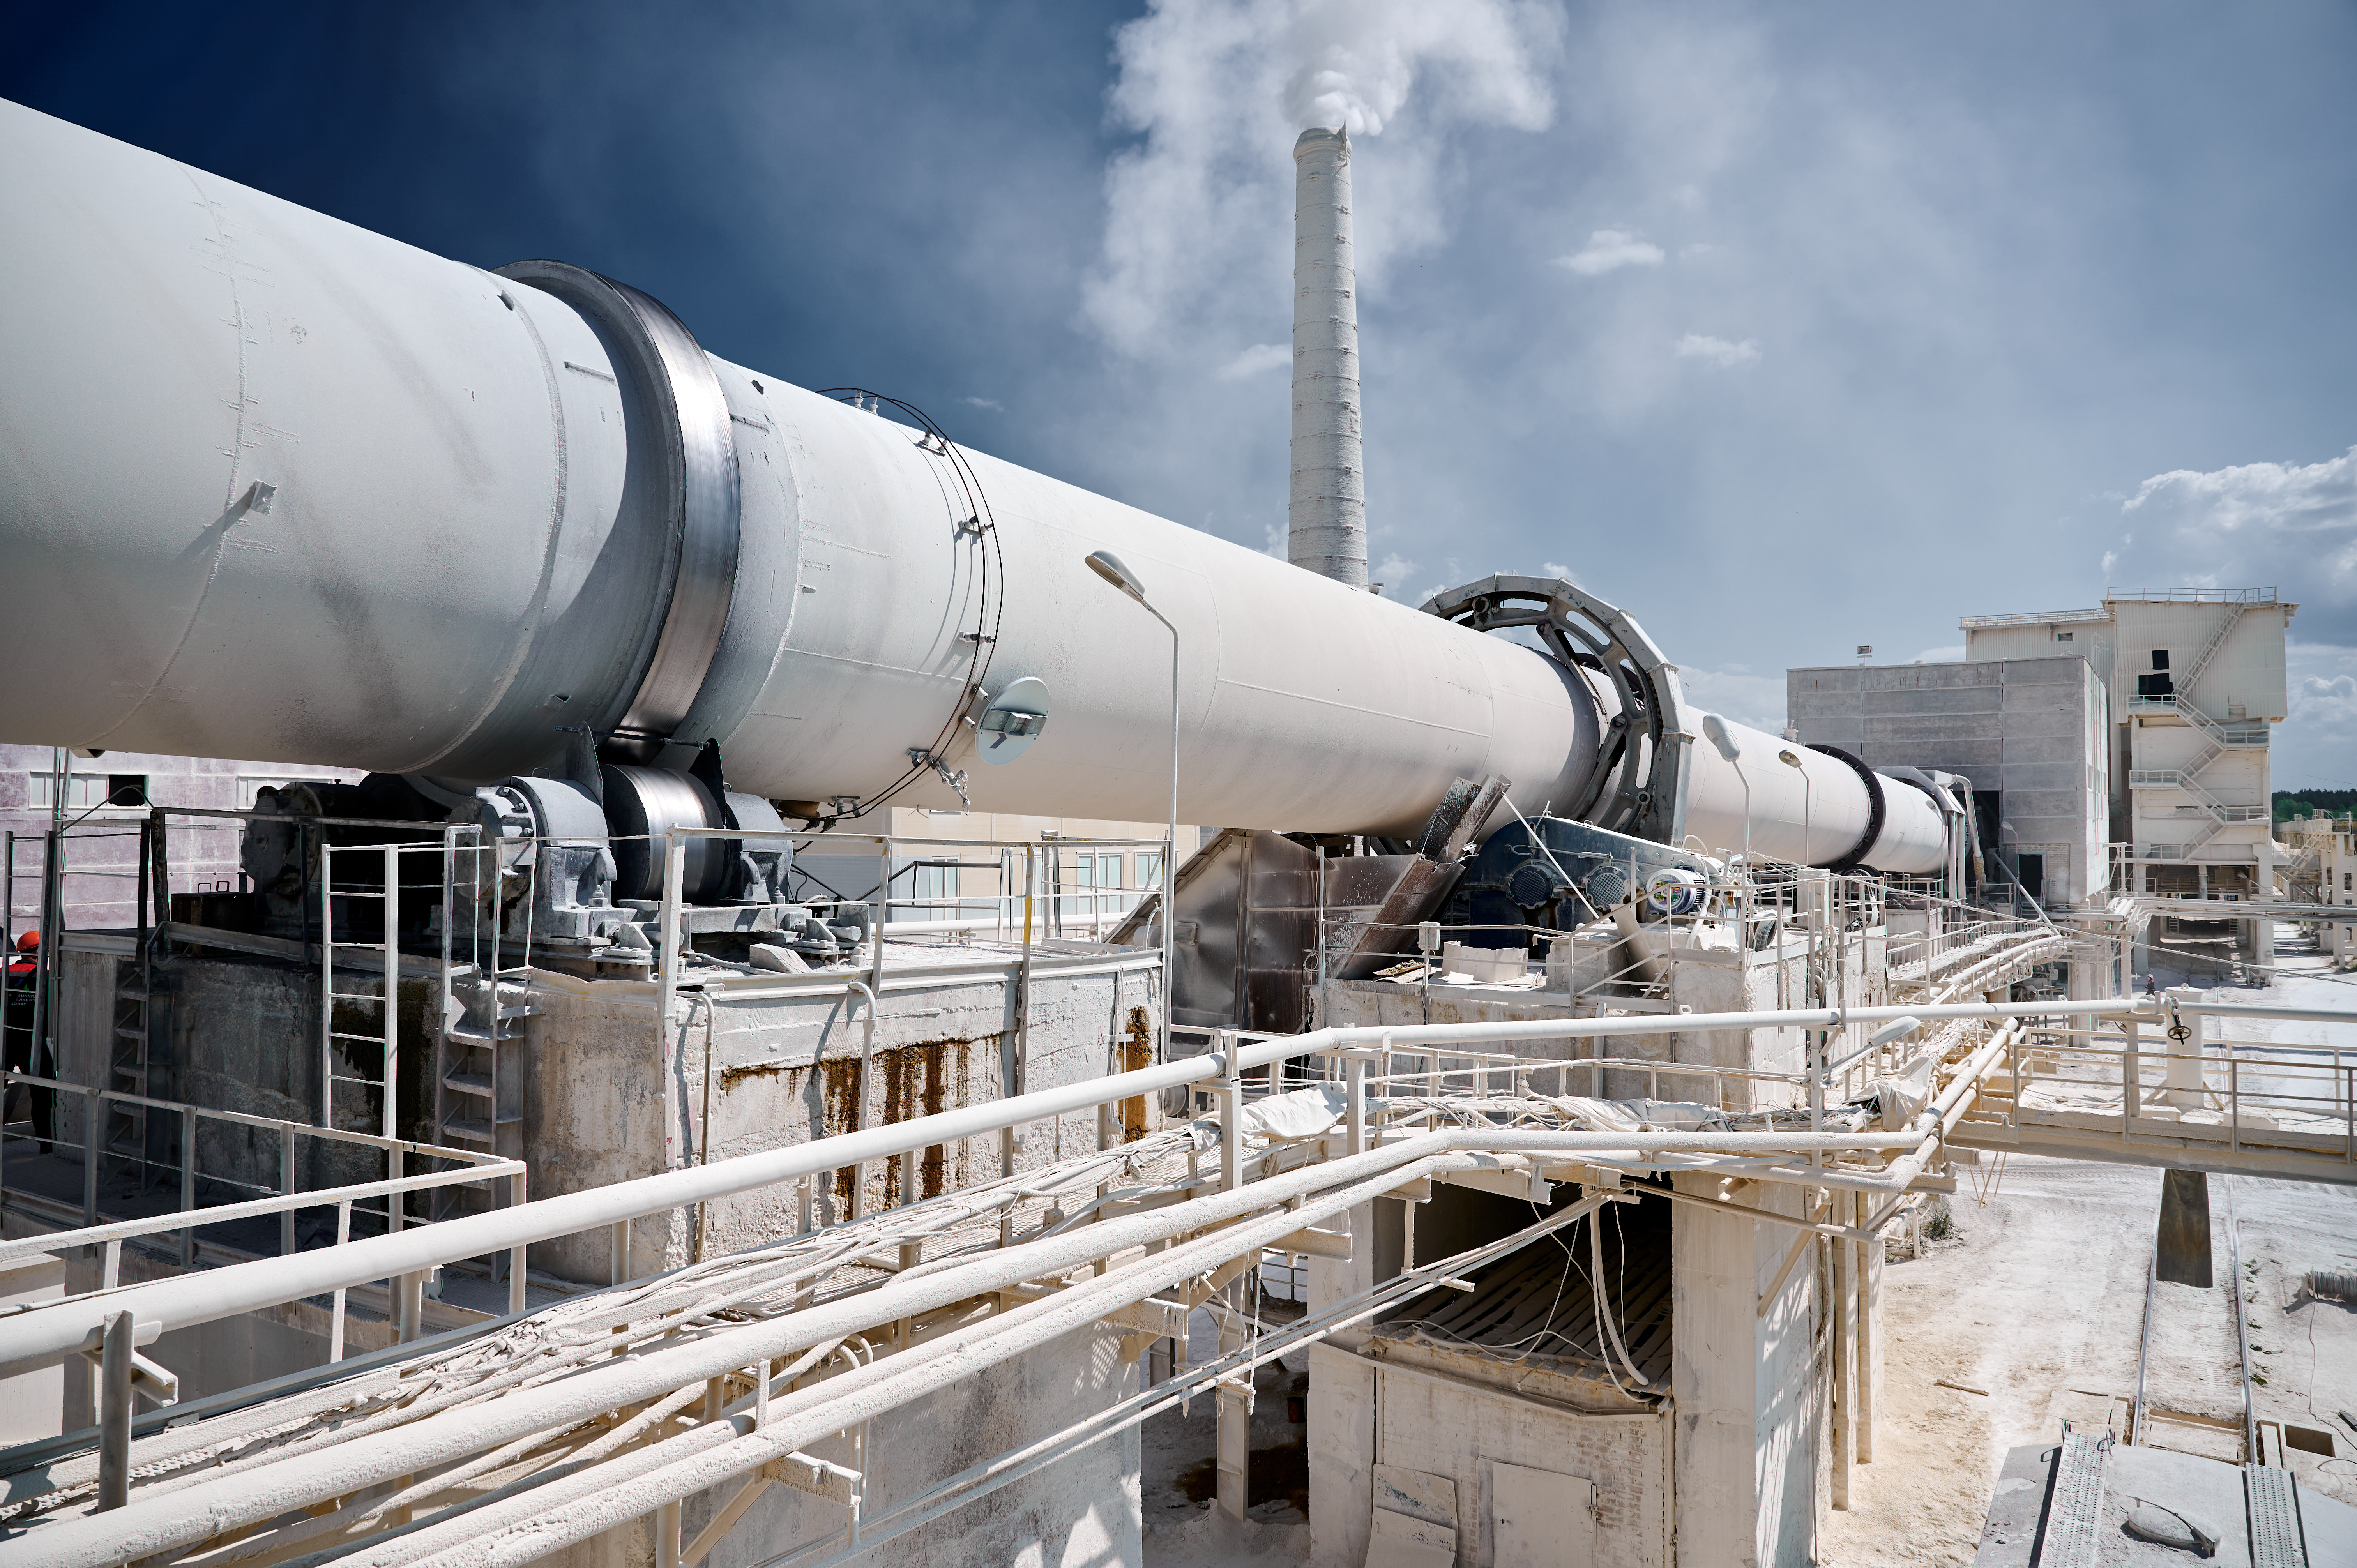
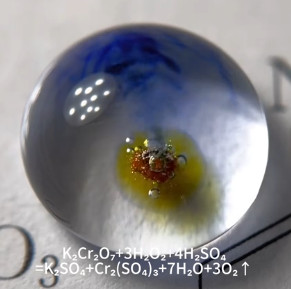
Preheating the rawmix drives off any remaining water before it enters the kiln, and begins the decomposition of limestone into lime, or calcium oxide:

CaCO_{3} \rightarrow CaO + CO_{2}

The rotation of the kiln along with its slight slope results in a slow migration of rawmix down the length of the kiln and into increasingly hotter regions. Different reactions occur as the temperature increases. At the top of the kiln, the 500 °C heat decomposes the clay into silicate and aluminum oxide. Further down, as the heat reaches the 800 °C range, calcium oxide reacts with silicate to form the calcium silicate mineral known as belite:

2CaO + SiO_{2} \rightarrow 2CaO\cdot SiO_{2}

Finally, near the bottom of the kiln, belite and calcium oxide react to form another calcium silicate, alite:

2CaO\cdot SiO_{2} + CaO \rightarrow 3CaO\cdot SiO_{2}

It’s worth noting that cement chemists have a specialized nomenclature for alite, belite, and all the other intermediary phases of Portland cement production. It’s a shorthand that looks similar to standard chemical nomenclature, and while we’re sure it makes things easier for them, it’s somewhat infuriating to outsiders. We’ll stick to standard notation here to make things simpler. It’s also important to note that the aluminates that decomposed from the clay are still present in the rawmix. Even though they’re not shown in these reactions, they’re still critical to the proper curing of the cement.

Portland cement clinker. Each ball is just a couple of centimeters in diameter. Source: مرتضا, Public domain

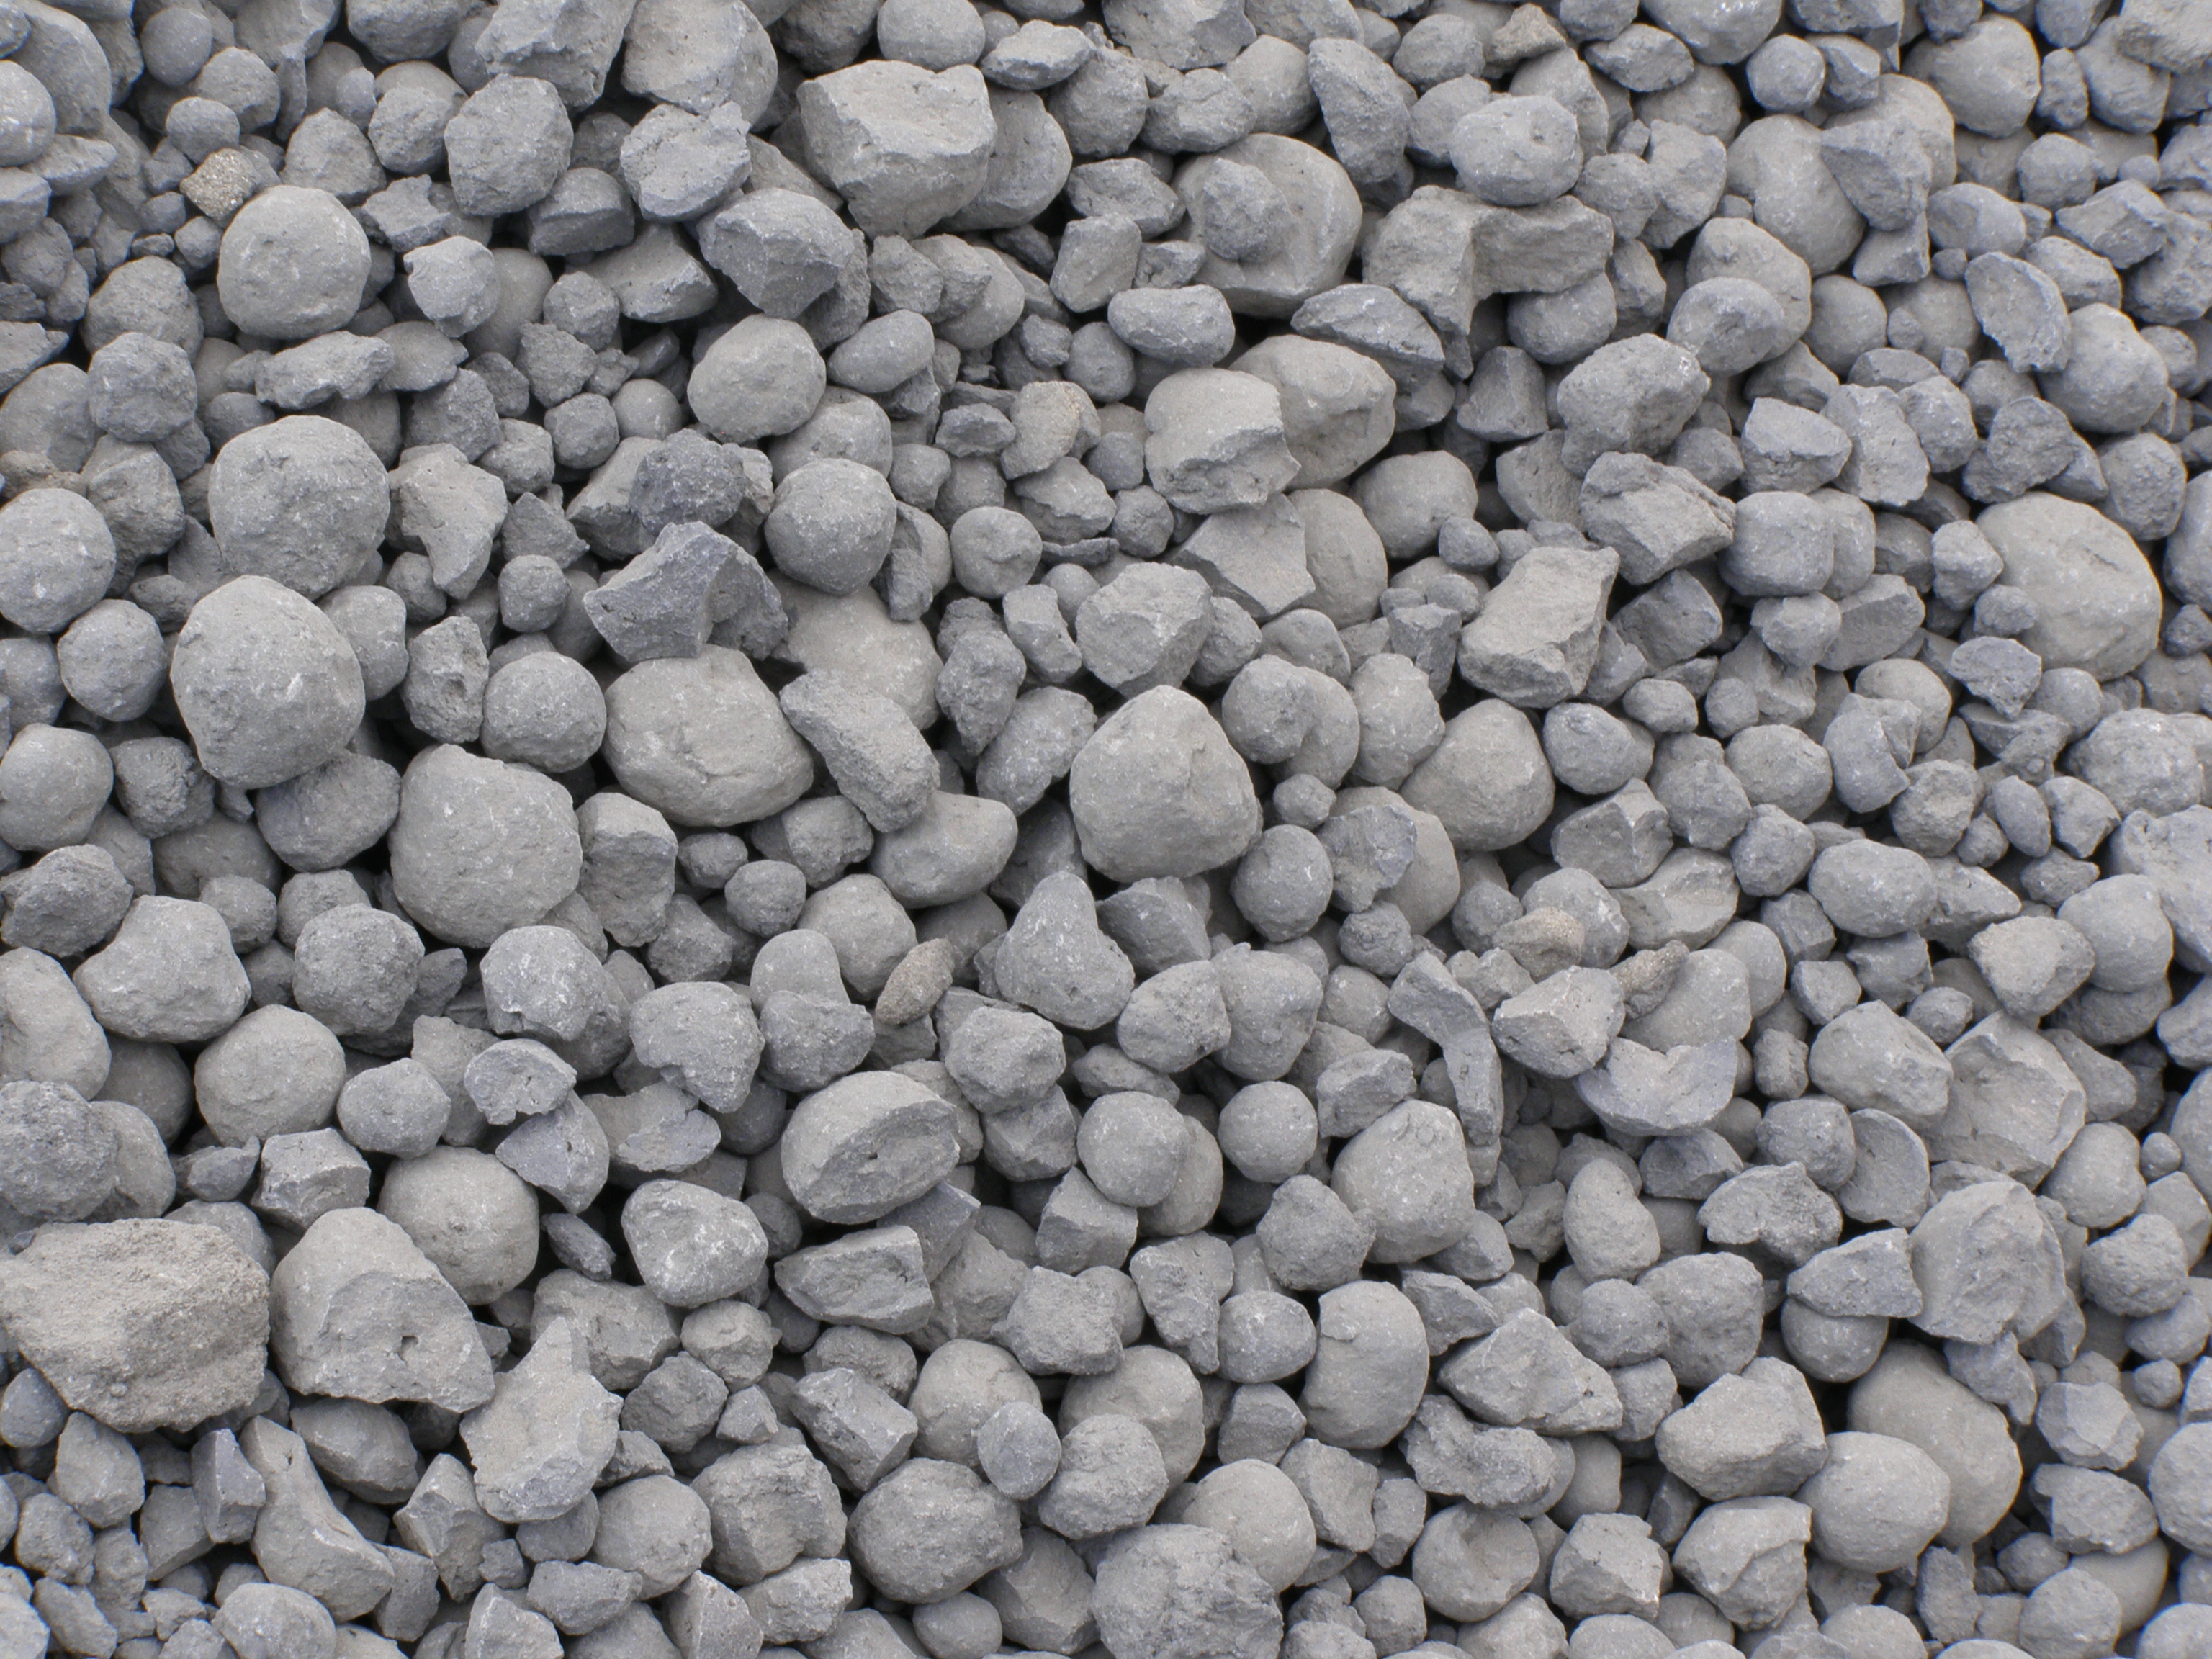
The final section of the kiln is the hottest, at 1,500 °C. The extreme heat causes the material to sinter, a physical change that partially melts the particles and adheres them together into small, gray lumps called clinker. When the clinker pellets drop from the bottom of the kiln, they are still incandescently hot. Blasts of air that rapidly bring the clinker down to around 100 °C. The exhaust from the clinker cooler joins the kiln exhaust and helps preheat the incoming rawmix charge, while the cooled clinker is mixed with a small amount of gypsum and ground in a ball mill. The fine gray powder is either bagged or piped into bulk containers for shipment by road, rail, or bulk cargo ship.

The Cure

Most cement is shipped to concrete plants, which tend to be much more widely distributed than cement plants due to the perishable nature of the product they produce. True, both plants rely on nearby deposits of easily accessible rock, but where cement requires limestone, the gravel and sand that go into concrete can come from a wide variety of rock types.

Concrete plants quarry massive amounts of rock, crush it to specifications, and stockpile the material until needed. Orders for concrete are fulfilled by mixing gravel and sand in the proper proportions in a mixer housed in a batch house, which is elevated above the ground to allow space for mixer trucks to drive underneath. The batch house operators mix aggregate, sand, and any other admixtures the customer might require, such as plasticizers, retarders, accelerants, or reinforcers like chopped fiberglass, before adding the prescribed amount of cement from storage silos. Water may or may not be added to the mix at this point. If the distance from the concrete plant to the job site is far enough, it may make sense to load the dry mix into the mixer truck and add the water later. But once the water goes into the mix, the clock starts ticking, because the cement begins to cure.

Cement curing is a complex process involving the calcium silicates (alite and belite) in the cement, as well as the aluminate phases. Overall, the calcium silicates are hydrated by the water into a gel-like substance of calcium oxide and silicate. For alite, the reaction is:

Ca_{3}SiO_{5} + H_{2}O \rightarrow CaO\cdot SiO_{2} \cdot H_{2}O + Ca(OH)_{2}

Scanning electron micrograph of cured Portland cement, showing needle-like ettringite and plate-like calcium oxide. Source: US Department of Transportation, Public domain

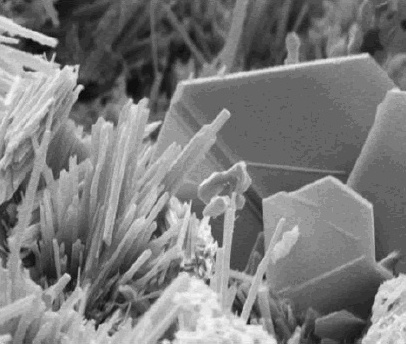
At the same time, the aluminate phases in the cement are being hydrated and interacting with the gypsum, which prevents early setting by forming a mineral known as ettringite. Without the needle-like ettringite crystals, aluminate ions would adsorb onto alite and block it from hydrating, which would quickly reduce the plasticity of the mix. Ideally, the ettringite crystals interlock with the calcium silicate gel, which binds to the surface of the sand and gravel and locks it into a solid.

Depending on which adjuvants were added to the mix, most concretes begin to lose workability within a few hours of rehydration. Initial curing is generally complete within about 24 hours, but the curing process continues long after the material has solidified. Concrete in this state is referred to as “green,” and continues to gain strength over a period of weeks or even months.

Magic On Your Desk via MagLev Toy

Diagram showing the structure of the base.

Magnets aren’t magic, but sometimes you can do things with them to fool the uninitiated — like levitating. [Jonathan Lock] does that with his new maglev desk toy, that looks like at least a level 2 enchantment.

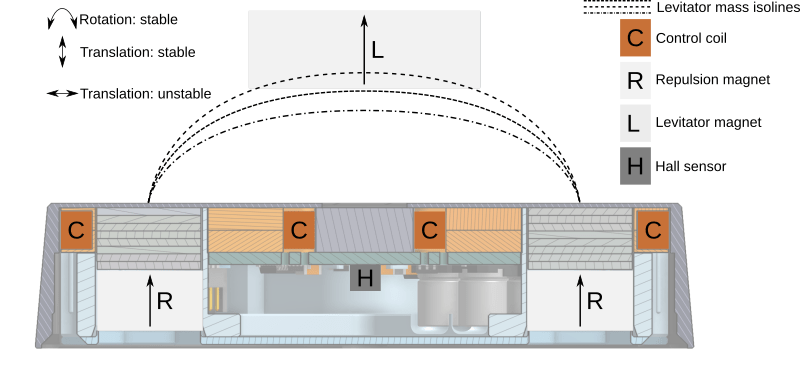
This levitator is USB-powered, and typically draws 1 W to 3 W to levitate masses between 10 g and 500 g. The base can provide 3 V to 5 V inductive power to the levitator to the tune of 10 mA to 50 mA, which is enough for some interesting possibilities, starting with the lights and motors [Jonathan] has tried.

In construction it is much like the commercial units you’ve seen: four permanent magnets that repel another magnet in the levitator. Since such an arrangement is about as stable as balancing a basketball on a piece of spaghetti, the permanent magnets are wrapped in control coils that pull the levitator back to the center on a 1 kHz loop. This is accomplished by way of a hall sensor and an STM32 microcontroller running a PID loop. The custom PCB also has an onboard ESP32, but it’s used as a very overpowered USB/UART converter to talk to the STM32 for tuning in the current firmware.

If you think one of these would be nice to have on your desk, check it out on [Jonathan]’s GitLab. It’s all there, from a detailed build guide (with easy-to-follow animated GIF instructions) to CAD files and firmware. Kudos to [Jonathan] for the quality write-up; sometimes documenting is the hardest part of a project, and it’s worth acknowledging that as well as the technical aspects.

We’ve written about magnetic levitation before, but it doesn’t always go as well as this project. Other times, it very much does. There are also other ways to accomplish the same feat, some of which can lift quite a bit more.

Tracking the Sun? Nah!

If you want solar power, you usually have to make a choice. You can put a solar panel in a fixed location and accept that it will only put out the maximum when the sun is properly positioned. Or, you can make the panels move to track the sun.

While this isn’t difficult, it does add cost and complexity, plus mechanical systems usually need more maintenance. According to [Xavier Derdenback], now that solar panels are cheaper than ever, it is a waste of money to make a tracking array. Instead, you can build a system that looks to the east and the west. The math says it is more cost effective.

The idea is simple. If you have panels facing each direction, then one side will do better than the other side in the morning. The post points out that a tracking setup, of course, will produce more power. That’s not the argument. However, for a given power output, the east-west solution has lower installation costs and uses less land.

Letting the post speak for itself:

East-West arrays are simple. They consist of parallel strings of PV modules that are oriented in opposing directions, one facing East and the other West. The current of the whole array is the summation of these string currents, effectively letting East-West arrays capture sunlight from dawn till dusk, similar to a tracked array.

So what do you think? Are solar trackers old hat? If you want one, they don’t have to be very complex. But still easier to just double your panels.

Adorable Robot Steals the Show

An ongoing refrain with modern movies is “Why is all of this CG?”– sometimes, it seems like practical effects are simultaneously a dying art, while at the same time modern technology lets them rise to new hights. [Davis Dewitt] proves that second statement with his RC movie star “robot” for an upcoming feature film.

The video takes us through the design process, including what it’s like to work with studio concept artists. As for the robot, it’s controlled by an Arduino Nano, lots of servos, and a COTS airplane R/C controller, all powered by li-po batteries. This is inside an artfully weathered and painted 3D printed body. Apparently weathering is important to make the character look like a well-loved ‘good guy’. (Shiny is evil, who knew?) Hats off to [Davis] for replicating that weathering for an identical ‘stunt double’.

Check out the video below for all the deets, or you can watch to see if “The Lightning Code” is coming to a theater near you. If you’re into films, this isn’t the first hack [Davis] has made for the silver screen. If you prefer “real” hacks to props, his Soviet-Era Nixie clock would look great on any desk. Thanks to [Davis] for letting us know about this project via the tips line.

DIY Penicillin

We don’t often consider using do-it-yourself projects as a hedge against the apocalypse. But [The Thought Emporium] thinks we should know how to make penicillin just in case. We aren’t so sure, but we do think it is a cool science experiment, and you can learn how to replicate it in the video below.

If you want to skip the history lesson, you need to fast-forward to about the six-minute mark. According to the video, we are surrounded by mold that can create anti-bacterial compounds. However, in this case, he starts with a special strain of mold made to produce lots of antibiotics.

You may not have all the gear he uses, including a bioreactor to generate liters of mold. Even with a lot of mold, the yield of penicillin is relatively low. Since Purina doesn’t make mold chow, you’ll have to create your own food for the mold colony.

All the work he did wound up producing 125 milligrams of drug. Obviously, if you are going to save the post-apocalyptic world, you are going to need to scale that process up.

If you are the sole survivor, maybe your AI companion can help out.

Five Oddest Op Amp Applications

You think of op amps as amplifiers because, no kidding, it is right in the name. But just like some people say, “you could do that with a 555,” [Doctor Volt] might say, “you can do that with an op amp.” In a recent video, you can see below, he looks at simulations and breadboards for five applications that aren’t traditional amplifiers.

Of course, you can split hairs. A comparator is sort of an amplifier with some very specific parameters, but it isn’t an amplifier in the classic sense.

In addition to comparators, there’s a flip flop, a few oscillators, and a PWM audio over optical transmitter and receiver. If you want to test your understanding of op amps, you can try to analyze the different circuits to see if you can explain how they work.

Op amps are amazing for analog design since you don’t have to build up high-quality amplifier blocks from discrete devices. Even the worst op amp you can buy is probably better than something you have the patience to design in a few minutes with a FET or a bipolar device. Fair to say that we do enjoy these oddball op amp circuits.

A New, Smarter Universal Remote

The remote for [Dillan Stock]’s TV broke, so he built a remote. Not just as a replacement but as something new. For some of us, there was a glorious time in the early 2000s when a smart remote was needed and there were options you could buy off the shelf. Just one handy button next to the screen had a macro programmed that would turn on the receiver, DVD player, and TV, and then configure it with the right inputs. However, the march of technological convenience has continued and nowadays soundbars turn on just in time and the TV auto switches the input. Many devices are (for better or worse) connected to WiFi, allowing all sorts of automation.

[Dillan] was lucky enough that his devices were connected to his home assistant setup. So this remote is an ESP32 running ESPHome. These automations could be triggered by your phone or via voice assistant. What is more interesting is watching [Dillan] go through the design process. Deciding what buttons there should be, where they should be placed, and how the case would snap together takes real effort. The design uses all through-hole components except for the ESP32 which is a module.

This isn’t the first thing [Dillan] has made with an ESP32, as he previously revamped a non-standard smart lamp with the versatile dev board. The 3d printable files for the remote are free available. Video after the break.


Optical Contact Bonding: Where the Macro Meets the Molecular

If you take two objects with fairly smooth surfaces, and put these together, you would not expect them to stick together. At least not without a liberal amount of adhesive, water or some other substance to facilitate a temporary or more permanent bond. This assumption gets tossed out of the window when it comes to optical contact bonding, which is a process whereby two surfaces are joined together without glue.

The fascinating aspect of this process is that it uses the intermolecular forces in each surface, which normally don’t play a major role, due to the relatively rough surfaces. Before intermolecular forces like Van der Waals forces and hydrogen bonds become relevant, the two surfaces should not have imperfections or contaminants on the order of more than a few nanometers. Assuming that this is the case, both surfaces will bond together in a way that is permanent enough that breaking it is likely to cause damage.

Although more labor-intensive than using adhesives, the advantages are massive when considering that it creates an effectively uninterrupted optical interface. This makes it a perfect choice for especially high-precision optics, but with absolutely zero room for error.

Intermolecular Forces

Thirty-six gages wrung together and held horizontally. (Credit: Goodrich & Stanley, 1907)
Thirty-six gauges wrung together and held horizontally. (Credit: Goodrich & Stanley, 1907)

As creatures of the macro world, we are largely only aware of the macro effects of the various forces at play around us. We mostly understand gravity, and how the friction of our hand against a glass prevents it from sliding out of our hand before shattering into many pieces on the floor. Yet add some water on the skin of our hands, and suddenly there’s not enough friction, leading to unfortunate glass slippage, or a lid on a jar of pickles that stubbornly refuses to open because we cannot generate enough friction until we manage to dry our hands sufficiently.

Many of these macro-level interactions are the result of molecular-level interactions, which range from the glass staying in one piece instead of drifting off as a cloud of atoms, to the system property that we refer to as ‘friction‘, which itself is also subdivided into static stiction and dynamic friction. The system of friction can be considered to be analogous to contact binding when we consider two plates with one placed on top of the other. If we proceed to change the angle of these stacked plates, at some point the top plate will slide off the bottom plate. This is the point where the binding forces can no longer compensate for the gravitational pull, with material type and surface finish affecting the final angle.

An interesting example of how much surface smoothness matters can be found in gauge blocks. These are precision ground and lapped blocks of metal or ceramic which match a specific thickness. Used for mainly calibration purposes, they posses the fascinating property due to their smooth surfaces that you can make multiple of them adhere together in a near-permanent manner in what is called wringing. This way you can combine multiple lengths to create a single gauge block with sub-millimeter accuracy.

Enabling all this are intermolecular forces, in particular the Van der Waals forces, including dipole-dipole electrostatic interactions. These do not rely on chemical or similar properties as they depend only on aspects like the mutual repulsion between the electron clouds of the atoms that make up the materials involved. Although these forces are very weak and drop off rapidly with distance, they are generally independent of aspects like temperature.

Hydrogen bonds can also occur if present, with each type of force having its own set of characteristics in terms of strength and effective distance.

Make It Smooth

Surface roughnesses of a SiO2 wafer (left, ≈1.01 nm RMS) and an ULE wafer (right, ≈1.03 nm RMS) (Credit: Kalkowski et al., 2011)

One does not simply polish a surface to a nanometer-perfect sheen, though as computer cooling enthusiasts and kin are aware, you can get pretty far with a smooth surface and various grits of sandpaper all the way up to ridiculously high levels. Giving enough effort and time, you can match the surface finish of something like gauge blocks and shave off another degree or two on that CPU at load.

Achieving even smoother surfaces is essentially taking this to the extreme, though it can be done without 40,000 grit sandpaper as well. The easiest way is probably found in glass and optics production, the latter of which has benefited immensely from the semiconductor industry. A good demonstration of this can be found in a 2011 paper (full PDF) by Fraunhofer researchers G. Kalkowski et al. as published in Optical Manufacturing and Testing.

They describe the use of optical contact bonding in the context of glass-glass for optical and precision engineering, specifically low-expansion fused silica (SiO2) and ultra-low expansion materials. There is significant overlap between semiconductor wafers and the wafers used here, with the same nanometer level precision, <1 nm RMS surface roughness, a given. Before joining, the surfaces are extensively cleaned of any contaminants in a vacuum environment.

Worse Than Superglue

Once the surfaces are prepared, there comes the tricky part of making both sides join together. Unlike with the gauge blocks, these super smooth surfaces will not come apart again without a fight, and there’s no opportunity to shimmy them around to get that perfect fit like when using adhesive. With the demonstrated method by Kalkowski et al., the wafers were joined followed by heating to 250 ℃ to create permanent Si-O-Si bonds between the two surfaces. In addition bonding pressure was applied for two hours at 2 MPa using either N2 or O2 gas.

This also shows another aspect of optical contact binding: although it’s not technically permanent, the bond is still just using intermolecular forces, and, as shown in this study, can be pried apart with a razorblade and some effort. By heating and applying pressure, the two surfaces can be annealed, forming molecular bonds and effectively turning the two parts into one.

Of course, there are many more considerations, such as the low-expansion materials used in the referenced study. If both sides use too dissimilar materials, the bond will be significantly more tenuous than if the materials with the same expansion properties are used. It’s also possible to use chemically activated direct bonding with a chemical activation process, all of which relies on the used materials.

In summary, optical contact bonding is a very useful technique, though you may want to have a well-equipped home lab if you want to give it a spin yourself.

Improving Flying Drones By Mimicking Flying Squirrels

With the ability to independently adjust the thrust of each of their four motors, quadcopters are exceptionally agile compared to more traditional aircraft. But in an effort to create an even more maneuverable drone platform, a group of South Korean researchers have studied adding flying squirrel tech to quadcopters. Combined with machine learning, this is said to significantly increase the prototype’s agility in an obstacle course.

Flying squirrels (tribe Pteromyini)) have large skin flaps (patagium) between their wrists and ankles which they use to control their flight when they glide from tree to tree, along with their fluffy squirrel tail. With flights covering up to 90 meters, they also manage to use said tail and patagium to air brake, which prevents them from smacking with bone jarring velocities into a tree trunk.

By taking these principles and adding a similar mechanism to a quadcopter for extending a patagium-like membrane between its rotors, the researchers could develop a new controller (thrust-wing coordination control, TWCC), which manages the extending of the membranes in coordination with thrust from the brushless motors. Rather than relying on trial-and-error to develop the controller algorithms, the researchers trained a recurrent neural network (RNN) which was pre-trained prior to first flights using simulation data followed by supervised learning to refine the model.

During experiments with obstacle avoidance on a test-track, the RNN-based controller worked quite well compared to a regular quadcopter. A disadvantage is of course that the range of these flying squirrel drones is less due to the extra weight and drag, but if one were to make flying drones that will perch on surfaces between dizzying feats of agility in the air, this type of drone tech might just be the ticket.

Hardware Built For Executing Python (Not Pythons)

Lots of microcontrollers will accept Python these days, with CircuitPython and MicroPython becoming ever more popular in recent years. However, there’s now a new player in town. Enter PyXL, a project to run Python directly in hardware for maximum speed.

What’s the deal with PyXL? “It’s actual Python executed in silicon,” notes the project site. “A custom toolchain compiles a .py file into CPython ByteCode, translates it to a custom assembly, and produces a binary that runs on a pipelined processor built from scratch.” Currently, there isn’t a hard silicon version of PyXL — no surprise given what it costs to make a chip from scratch. For now, it exists as logic running on a Zynq-7000 FPGA on a Arty-Z7-20 devboard. There’s an ARM CPU helping out with setup and memory tasks for now, but the Python code is executed entirely in dedicated hardware.

The headline feature of PyXL is speed. A comparison video demonstrates this with a measurement of GPIO latency. In this test, the PyXL runs at 100 MHz, achieving a round-trip latency of 480 nanoseconds. This is compared to MicroPython running on a PyBoard at 168 MHz, which achieves a much slower 15,000 nanoseconds by comparison. The project site claims PyXL can be 30x faster than MicroPython based on this result, or 50x faster when normalized for the clock speed differences.

Python has never been the most real-time of languages, but efforts like this attempt to push it this way. The aim is that it may finally be possible to write performance-critical code in Python from the outset. We’ve taken a look at Python in the embedded world before, too, albeit in very different contexts.

Nebula Mouse: The 6-DOF You Build Yourself

Nebula Mouse with sliced CAD view in the back

Let’s say your CAD workflow is starving for spatial awareness. Your fingers yearn to push, twist, and orbit – not just click. Enter the Nebula Mouse. A 6-DOF DIY marvel, blending 3D printing, magnets, and microcontroller wizardry into a handheld input device that emulates the revered 3DConnexion SpaceMouse – at a hacker price. It’s wireless, RGB-lit, powered by a chunky 1500 mAh cell, and fully configurable through standard apps. The catch? You print and build it yourself, with a little help of [DoTheDIY]’s design files.

This isn’t some half-baked enclosure on Thingiverse. The Nebula’s internals are crafted with the kind of precision that makes you file plastic for hours just to fit weights correctly. Hall effect sensors track real-world movement in all axes; a Seeed Xiao nRF52840 handles Bluetooth duty. It’s hefty (280 g), intentional, and smartly designed: auto-wake, USB-C, even a diffused LED bezel for night-time geek cred. Just beware that screw lengths matter. Misplace a 20 mm and you’ll hear the soft crack of PCB grief. No open firmware either – you’ll get compiled code only, unlocked per build via Discord.

In short: it’s not open source, but it is deeply open-ended. If your fingers itch after having seen the SpaceMouse teardown of last month, this might be what you’re looking for.

3D Print Your Own Injection Molds, Ejector Pins and All

3D printing is all well and good for prototyping, and it can even produce useful parts. If you want real strenght in plastics, though, or to produce a LOT of parts, you probably want to step up to injection molding. As it turns out, 3D printing can help in that regard, with injection molding company [APSX] has given us a look at how it printed injection molds for its APSX-PIM machine.

The concept is simple enough—additive manufacturing is great for producing parts with complex geometries, and injection molds fit very much under that banner. To demonstrate, [APSX] shows us a simple injection mold that it printed with a Formlabs Form3+ using Rigid 10K resin. The mold has good surface finish, which is crucial for injection molding nice parts. It’s also fitted with ejection pins for easy part removal after each shot of injection molded plastic. While it’s not able to hold up like a traditional metal injection mold, it’s better than you might think. [APSX] claims it got 500 automatic injection cycles out of the mold while producing real functional parts. The mold was used with the APSX-PIM injection molding machine squirting polypropylene at a cycle time of 65 seconds, producing a round part that appears to be some kind of lid or gear.

This looks great, but it’s worth noting it’s still not cheap to get into this sort of thing. On top of purchasing a Formlabs Form3+, you’ll also need the APSX-PIM V3, which currently retails for $13,500 or so. Still, if you regularly need to make 500 of something, this could be very desirable. You could get your parts quicker and stronger compared to running a farm of many 3D printers turning out the same parts.

We’ve seen similar projects along these lines before. The fact is that injections molds are complicated geometry to machine, so being able to 3D print them is highly desirable. Great minds and all that. Video after the break.

Water Drops Serve as Canvas for Microchemistry Art

A picture of a single water droplet on top of what appears to be a page from a chemistry text. An orange particle is attached to the right side of the droplet and blue and black tendrils diffuse through the drop from it. Under the water drop, the caption tells us the reaction we're seeing is "K2Cr2O7+ 3H2O2 + 4H2SO4 = K2SO4+Cr2(SO4)3+7H2O+3O2(gas)"

If you’re like us and you’ve been wondering where those viral videos of single water drop chemical reactions are coming from, we may have an answer. [yu3375349136], a scientist from Guangdong, has been producing some high quality microchemistry videos that are worth a watch.

While some polyglots out there won’t be phased, we appreciate the captioning for Western audiences using the elemental symbols we all know and love in addition to the Simplified Chinese. Reactions featured are typically colorful, but simple with a limited number of reagents. Being able to watch diffusion of the chemicals through the water drop and the results in the center when more than one chemical is used are mesmerizing.

We do wish there was a bit more substance to the presentation, and we’re aware not all readers will be thrilled to point their devices to Douyin (known outside of China as TikTok) to view them, but we have to admit some of the reactions are beautiful.

If you’re interested in other science-meets-art projects, how about thermal camera landscapes of Iceland, and given the comments on some of these videos, how do you tell if it’s AI or real anyway?

3D Printed Downspout Makes Life Just a Little Nicer

Sometimes, a hack solves a big problem. Sometimes, it’s just to deal with something that kind of bugs you. This hack from [Dillan Stock] is in the latter category, replacing an ugly, redundant downspout with an elegant 3D printed pipe.

As [Dillan] so introspectively notes, this was not something that absolutely required a 3D print, but “when all you have a hammer, everything is a nail, and 3D printing is [his] hammer.” We can respect that, especially when he hammers out such a lovely print.

By modeling this section of his house in Fusion 360, he could produce an elegantly swooping loft to combine the outflow into one downspout. Of course the assembly was too big to print at once, but any plumber will tell you that ABS welds are waterproof. Paint and primer gets it to match the house and hopefully hold up to the punishing Australian sun.

The video, embedded below, is a good watch and a reminder than not every project has to be some grand accomplishment. Sometimes, it can be as simple as keeping you from getting annoyed when you step into your backyard.

We’ve seen rainwater collection hacks before; some of them a lot less orthodox. Of course when printing with ABS like this, one should always keep in mind the ever-escalating safety concerns with the material.

What Happened to WWW.?

Once upon a time, typing “www” at the start of a URL was as automatic as breathing. And yet, these days, most of us go straight to “hackaday.com” without bothering with those three letters that once defined the internet.

Have you ever wondered why those letters were there in the first place, and when exactly they became optional? Let’s dig into the archaeology of the early web and trace how this ubiquitous prefix went from essential to obsolete.

Where Did You Go?

The first website didn’t bother with any of that www. nonsense! Credit: author screenshot

It may shock you to find out that the “www.” prefix was actually never really a key feature or necessity at all. To understand why, we need only contemplate the very first website, created by Tim Berners-Lee at CERN in 1990. Running on a NeXT workstation employed as a server, the site could be accessed at a simple URL: “http//info.cern.ch/”—no WWW needed. Berners-Lee had invented the World Wide Web, and called it as such, but he hadn’t included the prefix in his URL at all. So where did it come from?

McDonald’s were ahead of the times – in 1999, their website featured the “mcdonalds.com” domain, no prefix, though you did need it to actually get to the site. Credit: screenshot via Web Archive

As it turns out, the www prefix largely came about due to prevailing trends on the early Internet. It had become typical to separate out different services on a domain by using subdomains. For example, a company might have FTP access on http://ftp.company.com, while the SMTP server would be accessed via the smpt.company.com subdomain. In turn, when it came to establish a server to run a World Wide Web page, network administrators followed existing convention. Thus, they would put the WWW server on the www. subdomain, creating http://www.company.com.

This soon became standard practice, and in short order, was expected by members of the broader public as the joined the Internet in the late 1990s. It wasn’t long before end users were ignoring the http:// prefix at the start of domains, as web browsers didn’t really need you to type that in. However, www. had more of a foothold in the public consciousness. Along with “.com”, it became an obvious way for companies to highlight their new fancy website in their public facing marketing materials. For many years, this was simply how things were done. Users expected to type “www” before a domain name, and thus it became an ingrained part of the culture.

Eventually, though, trends shifted. For many domains, web traffic was the sole dominant use, so it became somewhat unnecessary to fold web traffic under its own subdomain. There was also a technological shift when the HTTP/1.1 protocol was introduced in 1999, with the “Host” header enabling multiple domains to be hosted on a single server. This, along with tweaks to DNS, also made it trivial to ensure “www.yoursite.com” and “yoursite.com” went to the same place. Beyond that, fashion-forward companies started dropping the leading www. for a cleaner look in marketing. Eventually, this would become the norm, with “www.” soon looking old hat.

Visit microsoft.com in Chrome, and you might think that’s where you really are… Credit: author screenshot

Of course, today, “www” is mostly dying out, at least as far as the industry and most end users are concerned. Few of us spend much time typing in URLs by hand these days, and fewer of us could remember the last time we felt the need to include “www.” at the beginning. Of course, if you want to make your business look out of touch, you could still include www. on your marketing materials, but people might think you’re an old fuddy duddy.

…but you’re not! Click in the address bar, and Chrome will show you the real URL. www. and all. Embarrassing! Credit: author screenshot
Hackaday, though? We rock without the prefix. Cutting-edge out here, folks. Credit: author screenshot

Using the www. prefix can still have some value when it comes to cookies, however. If you don’t use the prefix and someone goes to yoursite.com, that cookie would be sent to all subdomains. However, if your main page is set up at http://www.yoursite.com, it’s effectively on it’s own subdomain, along with any others you might have… like store.yoursite.com, blog.yoursite.com, and so on. This allows cookies to be more effectively managed across a site spanning multiple subdomains.

In any case, most browsers have taken a stance against the significance of “www”. Chrome, Safari, Firefox, and Edge all hide the prefix even when you are technically visiting a website that does still use the www. subdomain (like http://www.microsoft.com). You can try it yourself in Chrome—head over to a www. site and watch as the prefix disappears from the taskbar. If you really want to know if you’re on a www subdomain or not, though, you can click into the taskbar and it will give you the full URL, HTTP:// or HTTPS:// included, and all.

The “www” prefix stands as a reminder that the internet is a living, evolving thing. Over time, technical necessities become conventions, conventions become habits, and habits eventually fade away when they no longer serve a purpose. Yet we still see those three letters pop up on the Web now and then, a digital vestigial organ from the early days of the web. The next time you mindlessly type a URL without those three Ws, spare a thought for this small piece of internet history that shaped how we access information for decades. Largely gone, but not yet quite forgotten.


Rayhunter Sniffs Out Stingrays for $30

These days, if you’re walking around with a cellphone, you’ve basically fitted an always-on tracking device to your person. That’s even more the case if there happens to be an eavesdropping device in your vicinity. To combat this, the Electronic Frontier Foundation has created Rayhunter as a warning device.

Rayhunter is built to detect IMSI catchers, also known as Stingrays in the popular lexicon. These are devices that attempt to capture your phone’s IMSI (international mobile subscriber identity) number by pretending to be real cell towers. Information on these devices is tightly controlled by manufacturers, which largely market them for use by law enforcement and intelligence agencies.

Rayhunter in use.

To run Rayhunter, all you need is an Orbic RC400L mobile hotspot, which you can currently source for less than $30 USD online. Though experience tells us that could change as the project becomes more popular with hackers. The project offers an install script that will compile the latest version of the software and flash it to the device from a  computer running Linux or macOS — Windows users currently have to jump through a few extra hoops to get the same results.

Rayhunter works by analyzing the control traffic between the cell tower and the hotspot to look out for hints of IMSI-catcher activity. Common telltale signs are requests to switch a connection to less-secure 2G standards, or spurious queries for your device’s IMSI. If Rayhunter notes suspicious activity, it turns a line on the Orbic’s display red as a warning. The device’s web interface can then be accessed for more information.

While IMSI catchers really took off on less-secure 2G networks, there are developments that allow similar devices to work on newer cellular standards, too. Meanwhile, if you’ve got your own projects built around cellular security, don’t hesitate to notify the tipsline!

The Convoluted Way Intel’s 386 Implemented its Registers

The 386's main register bank, at the bottom of the datapath. The numbers show how many bits of the register can be accessed. (Credit: Ken Shirriff)

The fact that modern-day x86 processors still pretty much support the same operating systems and software as their ancestors did is quite a feat. Much of this effort had already been accomplished with the release of the 80386 (later 386) CPU in 1985, which was not only the first 32-bit x86 CPU, but was also backwards compatible with 8- and 16-bit software dating back to the 1970s. Making this work transparently was anything but straightforward, as [Ken Shirriff]’s recent analysis of the 80386’s main register file shows.

Labelled Intel 80386 die shot. (Credit: Ken Shirriff)

Using die shots of the 386’s registers and surrounding silicon, it’s possible to piece together how backwards compatibility was implemented. The storage cells of the registers are implemented using static memory (SRAM) as is typical, with much of the register file triple-ported (two read, one write).

Most interestingly is the presence of different circuits (6) to support accessing the register file for 8-, 16- or 32-bit writes and reads. The ‘shuffle’ network as [Ken] calls it is responsible for handling these distinct writes and reads, which also leads to the finding that the bottom 16 bits in the registers are actually interleaved to make this process work smoother.

Fortunately for Intel (and AMD) engineers, this feat wouldn’t have to be repeated again with the arrival of AMD64 and x86_64 many years later, when the 386’s mere 275,000 transistors on a 1 µm process would already be ancient history.

Want to dive even deeper in to the 386? This isn’t the first time [Ken] has looked at the iconic chip.

Lancing College Shares Critical Design Review for UK CanSat Entry

UK CanSat Competition, Space Ex, Lancing College, Critical Design Review

A group of students from Lancing College in the UK have sent in their Critical Design Review (CDR) for their entry in the UK CanSat project.

Per the competition guidelines the UK CanSat project challenges students aged 14 to 19 years of age to build a satellite which can relay telemetry data about atmospheric conditions such as could help with space exploration. The students’ primary mission is to collect temperature and pressure readings, and these students picked their secondary mission to be collection of GPS data, for use on planets where GPS infrastructure is available, such as on Earth. This CDR follows their Preliminary Design Review (PDR).

The six students in the group bring a range of relevant skills. Their satellite transmits six metrics every second: temperature, pressure, altitude reading 1, altitude reading 2, latitude, and longitude. The main processor is an Arduino Nano Every, a BMP388 sensor provides the first three metrics, and a BE880 GPS module provides the following three metrics. The RFM69HCW module provides radio transmission and reception using LoRa.

The students present their plan and progress in a Gantt chart, catalog their inventory of relevant skills, assess risks, prepare mechanical and electrical designs, breadboard the satellite circuitry and receiver wiring, design a PCB in KiCad, and develop flow charts for the software. The use of Blender for data visualization was a nice hack, as was using ChatGPT to generate an example data file for testing purposes. Mechanical details such as parachute design and composition are worked out along with a shiny finish for high visibility. The students conduct various tests to ensure the suitability of their design and then conduct an outreach program to advertise their achievements to their school community and the internet at large.

We here at Hackaday would like to wish these talented students every success with their submission and we hope you had good luck on launch day, March 4th!

The backbone of this project is the LoRa technology and if you’re interested in that we’ve covered that here at Hackaday many times before, such as in this rain gauge and these soil moisture sensors.

Train With Morse Master

Morse code can be daunting to learn when you’re new to the game, particularly if you need it to pass your desired radio license. However, these days, there are a great many tools to aid in the learning process. A good example is the Morse Master from [Arnov Sharma].

The Morse Master is a translator for Morse code, which works in two ways. You can access it via a web app, and type in regular letters which it then flashes out as code on its in-built LEDs. Alternatively, you can enter Morse manually using the physical key, and the results will be displayed on the web app. The Morse key itself is built into the enclosure using 3D printed components paired with a Cherry-style keyboard switch. It’s perhaps not the ideal solution for fast keying, with its limited rebound, but it’s a quick and easy way to make a functional key for practice purposes. If you want to go faster, though, you might want to upgrade to something more capable. We’d also love to see a buzzer added, since Morse is very much intended as an auditory method of communication.

We’ve seen some other great Morse code trainers before, too. If you’ve trained yourself in this method of communication, don’t hesitate to share your own learning tips below.

❌