Vista de Lectura

Hay nuevos artículos disponibles. Pincha para refrescar la página.

High-Stakes Fox Hunting: The FCC’s Radio Intelligence Division in World War II

With few exceptions, amateur radio is a notably sedentary pursuit. Yes, some hams will set up in a national or state park for a “Parks on the Air” activation, and particularly energetic operators may climb a mountain for “Summits on the Air,” but most hams spend a lot of time firmly planted in a comfortable chair, spinning the dials in search of distant signals or familiar callsigns to add to their logbook.

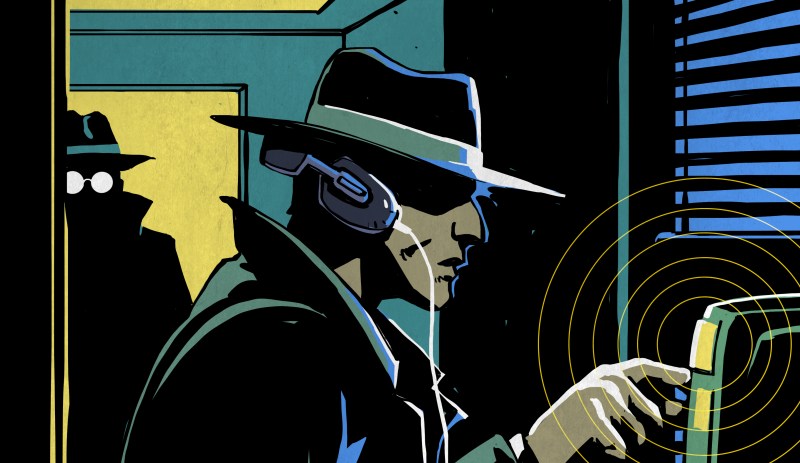
There’s another exception to the band-surfing tendencies of hams: fox hunting. Generally undertaken at a field day event, fox hunts pit hams against each other in a search for a small hidden transmitter, using directional antennas and portable receivers to zero in on often faint signals. It’s all in good fun, but fox hunts serve a more serious purpose: they train hams in the finer points of radio direction finding, a skill that can be used to track down everything from manmade noise sources to unlicensed operators. Or, as was done in the 1940s, to ferret out foreign agents using shortwave radio to transmit intelligence overseas.

That was the primary mission of the Radio Intelligence Division, a rapidly assembled organization tasked with protecting the United States by monitoring the airwaves and searching for spies. The RID proved to be remarkably effective during the war years, in part because it drew heavily from the amateur radio community to populate its many field stations, but also because it brought an engineering mindset to the problem of finding needles in a radio haystack.

Winds of War

America’s involvement in World War II was similar to Hemingway’s description of the process of going bankrupt: Gradually, then suddenly. Reeling from the effects of the Great Depression, the United States had little interest in European affairs and no appetite for intervention in what increasingly appeared to be a brewing military conflict. This isolationist attitude persisted through the 1930s, surviving even the recognized start of hostilities with Hitler’s sweep into Poland in 1939, at least for the general public.

But behind the scenes, long before the Japanese attack on Pearl Harbor, precipitous changes were afoot. War in Europe was clearly destined from the outset to engulf the world, and in the 1940s there was only one technology with a truly global reach: radio. The ether would soon be abuzz with signals directing troop movements, coordinating maritime activities, or, most concerningly, agents using spy radios to transmit vital intelligence to foreign governments. To be deaf to such signals would be an unacceptable risk to any nation that fancied itself a world power, even if it hadn’t yet taken a side in the conflict.

It was in that context that US President Franklin Roosevelt approved an emergency request from the Federal Communications Commission in 1940 for $1.6 million to fund a National Defense Operations section. The group would be part of the engineering department within the FCC and was tasked with detecting and eliminating any illegal transmissions originating from within the country. This was aided by an order in June of that year which prohibited the 51,000 US amateur radio operators from making any international contacts, and an order four months later for hams to submit to fingerprinting and proof of citizenship.

A Ham’s Ham

George Sterling (W1AE/W3DF). FCC commissioner in 1940, he organized and guided RID during the war. Source: National Assoc. of Broadcasters, 1948

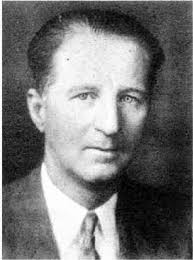
The man behind the formation of the NDO was George Sterling. To call Sterling an early adopter of amateur radio would be an understatement. He plunged into radio as a hobby in 1908 at the tender age of 14, just a few years after Marconi and others demonstrated the potential of radio. He was licensed immediately after the passage of the Radio Act of 1927, callsign 1AE (later W1AE), and continued to experiment with spark gap stations. When the United States entered World War I, Sterling served for 19 months in France as an instructor in the Signal Corps, later organizing and operating the Corps’ first radio intelligence unit to locate enemy positions based on their radio transmissions.

After a brief post-war stint as a wireless operator in the Merchant Marine, Sterling returned to the US to begin a career in the federal government with a series of radio engineering and regulatory jobs. He rose through the ranks over the 1920s and 1930s, eventually becoming Assistant Chief of the FCC Field Division in 1937, in charge of radio engineering for the entire nation. It was on the strength of his performance in that role that he was tapped to be the first — and as it would turn out, only — chief of the NDO, which was quickly raised to the level of a new division within the FCC and renamed the Radio Intelligence Division.

To adequately protect the homeland, the RID needed a truly national footprint. Detecting shortwave transmissions is simple enough; any single location with enough radio equipment and a suitable antenna could catch most transmissions originating from within the US or its territories. But Sterling’s experience in France taught him that a network of listening stations would be needed to accurately triangulate on a source and provide a physical location for follow-up investigation.

The network that Sterling built would eventually comprise twelve primary stations scattered around the US and its territories, including Alaska, Hawaii, and Puerto Rico. Each primary station reported directly to RID headquarters in Washington, DC, by telephone, telegraph, or teletype. Each primary station supported up to a few dozen secondary stations, with further coastal monitoring stations set up as the war ground on and German U-boats became an increasingly common threat. The network would eventually comprise over 100 stations stretched from coast to coast and beyond, staffed by almost 900 agents.

Searching the Ether

The job of staffing these stations with skilled radio operators wasn’t easy, but Sterling knew he had a ready and willing pool to pull from: his fellow hams. Recently silenced and eager to put their skills to the test, hams signed up in droves for the RID. About 80% of the RID staff were composed of current or former amateur radio operators, including the enforcement branch of sworn officers who carried badges and guns. They were the sharp end of the spear, tasked with the “last mile” search for illicit transmitters and possible confrontation with foreign agents.

But before the fedora-sporting, Tommy-gun toting G-men could swoop in to make their arrest came the tedious process of detecting and classifying potentially illicit signals. This task was made easier by an emergency order issued on December 8, 1941, the day after the Pearl Harbor attack, forbidding all amateur radio transmissions below 56 MHz. This reduced the number of targets the RID listening stations had to sort through, but the high-frequency bands cover a lot of turf, and listening to all that spectrum at the same time required a little in-house innovation.

Today, monitoring wide swaths of the spectrum is relatively easy, but in the 1940s, it was another story. Providing this capability fell to RID engineers James Veatch and William Hoffert, who invented an aperiodic receiver that covered everything from 50 kHz to 60 MHz. Called the SSR-201, this radio used a grid-leak detector to rectify and amplify all signals picked up by the antenna. A bridge circuit connected the output of the detector to an audio amplifier, with the option to switch an audio oscillator into the circuit so that continuous wave transmissions — the spy’s operating mode of choice — could be monitored. There was also an audio-triggered relay that could start and stop an external recorder, allowing for unattended operation.

SSR-201 aperiodic receiver, used by the RID to track down clandestine transmitters. Note the “Magic Eye” indicator. Source: Steve Ellington (N4LQ)

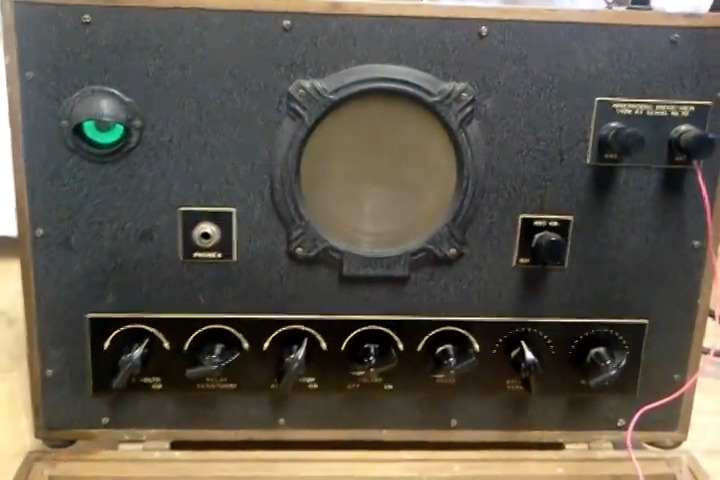
The SSR-201 and a later variant, the K-series, were built by Kann Manufacturing, a somewhat grand name for a modest enterprise operating out of the Baltimore, Maryland, basement of Manuel Kann (W3ZK), a ham enlisted by the RID to mass produce the receiver. Working with a small team of radio hobbyists and broadcast engineers mainly working after hours, Kann Manufacturing managed to make about 200 of the all-band receivers by the end of the war, mainly for the RID but also for the Office of Strategic Services (OSS), the forerunner of the CIA, as well as the intelligence services of other allied nations.

These aperiodic receivers were fairly limited in terms of sensitivity and lacked directional capability, and so were good only for a first pass scan of a specific area for the presence of a signal. Consequently, they were often used in places where enemy transmitters were likely to operate, such as major cities near foreign embassies. This application relied on the built-in relay in the receiver to trigger a remote alarm or turn on a recorder, giving the radio its nickname: “The Watchdog.” The receivers were also often mounted in mobile patrol vehicles that would prowl likely locations for espionage, such as Army bases and seaports. Much later in the war, RID mobile units would drive through remote locations such as the woods around Oak Ridge, Tennessee, and an arid plateau in the high desert near Los Alamos, New Mexico, for reasons that would soon become all too obvious.

Radio G-Men

Adcock-type goniometer radio direction finder. The dipole array could be rotated 360 degrees from inside the shack to pinpoint a bearing to the transmitter. Source: Radio Boulevard

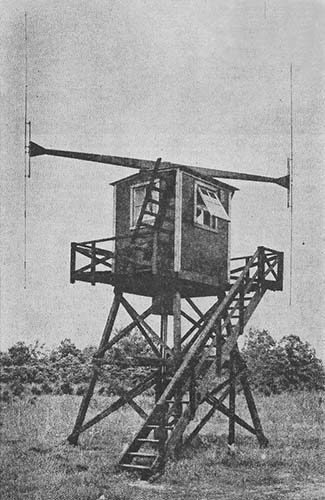
Once a candidate signal was detected and headquarters alerted to its frequency, characteristics, and perhaps even its contents, orders went out to the primary stations to begin triangulation. Primary stations were equipped with radio direction finding (RDF) equipment, including the Adcock-type goniometer. These were generally wooden structures elevated above the ground with a distinctive Adcock antenna on the roof of the shack. The antenna was a variation on the Adcock array using two vertical dipoles on a steerable mount. The dipoles were connected to the receiving gear in the shack 180 degrees out of phase. This produced a radiation pattern with very strong nulls broadside to the antenna, making it possible for operators to determine the precise angle to the source by rotating the antenna array until the signal is minimized. Multiple stations would report the angle to the target to headquarters, where it would be mapped out and a rough location determined by where the lines intersected.

With a rough location determined, RID mobile teams would hit the streets. RID had a fleet of mobile units based on commercial Ford and Hudson models, custom-built for undercover work. Radio gear partially filled the back seat area, power supplies filled the trunk, and a small steerable loop antenna could be deployed through the roof for radio direction finding on the go. Mobile units were also equipped with special radio sets for communicating back to their primary station, using the VHF band to avoid creating unwanted targets for the other stations to monitor.

Mobile units were generally capable of narrowing the source of a transmission down to a city block or so, but locating the people behind the transmission required legwork. Armed RID enforcement agents would set out in search of the transmitter, often aided by a device dubbed “The Snifter.” This was a field-strength meter specially built for covert operations; small enough to be pocketed and monitored through headphones styled to look like a hearing aid, the agents could use the Snifter to ferret out the spy, hopefully catching them in the act and sealing their fate.

A Job (Too) Well Done

For a hastily assembled organization, the RID was remarkably effective. Originally tasked with monitoring the entire United States and its territories, that scope very quickly expanded to include almost every country in South America, where the Nazi regime found support and encouragement. Between 1940 and 1944, the RID investigated tens of thousands, resulting in 400 unlicensed stations being silenced. Not all of these were nefarious; one unlucky teenager in Portland, Oregon, ran afoul of the RID by hooking an antenna up to a record player so he could play DJ to his girlfriend down the street. But other operations led to the capture of 200 spies, including a shipping executive who used his ships to refuel Nazi U-boats operating in the Gulf of Mexico, and the famous Dusquense Spy Ring operating on Long Island.

Thanks in large part to the technical prowess of the hams populating its ranks, the RID’s success contained the seeds of its downfall. Normally, such an important self-defense task as preventing radio espionage would fall to the Army or Navy, but neither organization had the technical expertise in 1940, nor did they have the time to learn given how woefully unprepared they were for the coming war. Both branches eventually caught up, though, and neither appreciated a bunch of civilians mucking around on their turf. Turf battles ensued, politics came into it, and by 1944, budget cuts effectively ended the RID as a standalone agency.

Tune In to “Higher Lower”, the Minimal Handheld Electronic Game

[Tommy] has a great write-up about designing and building a minimalistic handheld electronic game called
“Higher Lower”. It’s an audio-driven game in which the unit plays two tones and asks the player to choose whether the second tone was higher in pitch, or lower. The game relies on 3D printed components and minimal electronics, limiting player input to two buttons and output to whatever a speaker stuck to an output pin from an ATtiny85 can generate.

Fastener-free enclosure means fewer parts, and on the inside are pots for volume and difficulty. We love the thoughtful little tabs that hold the rocker switch in place during assembly.

Gameplay may be straightforward, but working with so little raises a number of design challenges. How does one best communicate game state (and things like scoring) with audio tones only? What’s the optimal way to generate a random seed when the best source of meaningful, zero-extra-components entropy (timing of player input) happens after the game has already started? What’s the most efficient way to turn a clear glue stick into a bunch of identical little light pipes? [Tommy] goes into great detail for each of these, and more.

In addition to the hardware and enclosure design, [Tommy] has tried new things on the software end of things. He found that using tools intended to develop for the Arduboy DIY handheld console along with a hardware emulator made for a very tight feedback loop during development. Being able to work on the software side without actually needing the hardware and chip programmer at hand was also flexible and convenient.

We’ve seen [Tommy]’s work before about his synth kits, and as usual his observations and shared insights about bringing an idea from concept to kit-worthy product are absolutely worth a read.

You can find all the design files on the GitHub repository, but Higher Lower is also available as a reasonably-priced kit with great documentation suitable for anyone with an interest. Watch it in action in the video below.

3D Printing a Modular Guitar Means It Can Look Like Whatever You Want

Got some spare filament and looking to build a guitar you can truly call your own? [The 3D Print Zone] has created a modular 3D printable guitar system that lets you easily mix and match different components for the ultimate in customization.

The build is based around a central core, which combines the pickups, bridge, and neck into one solid unit. This is really the heart of the guitar, containing all the pieces that need to be in precise alignment to get those strings vibrating precisely in tune. The core then mounts to a printed outer body via mating slots and rails, which in the main demo is made to look like a Les Paul-style design. This outer body also hosts the volume, tone, and pickup controls. Output from the pickups travels to the controls in the outer body via a set of metallic contacts.

What’s cool about this build is that the sky really is the limit for your creativity. As the video below demonstrates, the main build looks like a Les Paul. But, armed with the right CAD software, you can really make a guitar that looks like whatever you want, while the 3D printer does all the hard work of making it a reality. The files to print the guitar, along with the pickups and other components, are available as kits—but there’s also nothing stopping you from working up your own printed guitar design from scratch, either.

We’ve seen some other great 3D printed guitars before, too.

Making a LEGO Vehicle Which Can Cross Large Gaps

A Lego vehicle crossing a gap between two benches.

Here is a hacker showing off their engineering chops. This video shows successive design iterations for a LEGO vehicle which can cross increasingly large gaps.

At the time of writing this video from [Brick Experiment Channel] has been seen more than 110,000,000 times, which is… rather a lot. We guess with a view count like that there is a fairly good chance that many of our readers have already seen this video, but this is the sort of video one could happily watch twice.

This video sports a bunch of engineering tricks and approaches. We particularly enjoy watching the clever use of center of gravity. They hack gravity to make some of their larger designs work.

It is a little surprising that we haven’t already covered this video over here on Hackaday as it has been on YouTube for over three years now. But we have heard from [Brick Experiment Channel] before with videos such as Testing Various Properties Of LEGO-Compatible Axles and LEGO Guitar Is Really An Ultrasonically-Controlled Synth.

And of course we’ve covered heaps of LEGO stuff in the past too, such as Building An Interferometer With LEGO and Stepping On LEGO For Science.

Thanks to [Keith Olson] for writing in to remind us about the [Brick Experiment Channel].

Building An Automatic Wire Stripper And Cutter

Stripping and cutting wires can be a tedious and repetitive part of your project. To save time in this regard, [Red] built an automatic stripper and cutter to do the tiring work for him.

An ESP32 runs the show in this build. Via a set of A4988 stepper motor drivers, it controls two NEMA 17 stepper motors which control the motion of the cutting and stripping blades via threaded rods. A third stepper controls a 3D printer extruder to move wires through the device. There’s a rotary encoder with a button for controlling the device, with cutting and stripping settings shown on a small OLED display. It graphically represents the wire for stripping, so you can select the length of the wire and how much insulation you want stripped off each end. You merely need select the measurements on the display, press a button, and the machine strips and cuts the wire for you. The wires end up in a tidy little 3D-printed bin for collection.

The build should be a big time saver for [Red], who will no longer have to manually cut and strip wires for future builds. We’ve featured some other neat wire stripper builds before, too. Video after the break.

Building An Eight Channel Active Mixer

There are plenty of audio mixers on the market, and the vast majority all look the same. If you wanted something different, or just a nice learning experience, you could craft your own instead. That’s precisely what [Something Physical] did. 

The build was inspired by an earlier 3-channel mixer designed by [Moritz Klein]. This project stretches to eight channels, which is nice, because somehow it feels right that a mixer’s total channels always land on a multiple of four. As you might expect, the internals are fairly straightforward—it’s just about lacing together all the separate op-amp gain stages, pots, and jacks, as well as a power LED so you can tell when it’s switched on. It’s all wrapped up in a slant-faced wooden box with an aluminum face plate and Dymo labels. Old-school, functional, and fit for purpose.

It’s a simple build, but a satisfying one; there’s something beautiful about recording on audio gear you’ve hewn yourself. Once you’ve built your mixer, you might like to experiment in the weird world of no-input mixing. Video after the break.

Open Source Watch Movement Really Ticks All the Boxes

When you think of open-source hardware, you probably think of electronics and maker tools– RepRap, Arduino, Adafruit, et cetera. Yet open source is an ethos and license, and is in no way limited to electronics. The openmovement foundation is a case in point– a watch case, to be specific. The “movement” in Openmovement is a fully open-source and fully mechanical watch movement.

Openmovement has already released STEP files of OM10 the first movement developed by the group. (You do need to sign up to download, however.) They say the design is meant to be highly serviceable and modular, with a robust construction suited for schools and new watchmakers. The movement uses a “Swiss pallets escapement” we think that’s an odd translation of lever escapement, but if you’re a watchmaker let us know in the comments), and runs at 3.5 Hz / 25,200 vph. An OM20 is apparently in the works, as well, but it looks like only OM10 has been built from what we can see.

If you don’t have the equipment to finely machine brass from the STEP files, Openmovement is running a crowdfunding campaign to produce kits of the OM10, which you can still get in on until the seventh of June.

If you’re wondering what it takes to make a mechanical watch from scratch, we covered that last year. Spoiler: it doesn’t look easy. Just assembling the tiny parts of an OM10 kit would seem daunting to most of us. That might be why most of the watches we’ve covered over the years weren’t mechanical, but at least they tend to be open source, too.

My Winter of ’99: The Year of the Linux Desktop is Always Next Year

Growing up as a kid in the 1990s was an almost magical time. We had the best game consoles, increasingly faster computers at a pace not seen before, the rise of the Internet and World Wide Web, as well the best fashion and styles possible between neon and pastel colors, translucent plastic and also this little thing called Windows 95 that’d take the world by storm.

Yet as great as Windows 95 and its successor Windows 98 were, you had to be one of the lucky folks who ended up with a stable Windows 9x installation. The prebuilt (Daewoo) Intel Celeron 400 rig with 64 MB SDRAM that I had splurged on with money earned from summer jobs was not one of those lucky systems, resulting in regular Windows reinstalls.

As a relatively nerdy individual, I was aware of this little community-built operating system called ‘Linux’, with the online forums and the Dutch PC magazine that I read convincing me that it would be a superior alternative to this unstable ‘M$’ Windows 98 SE mess that I was dealing with. Thus it was in the Year of the Linux Desktop (1999) that I went into a computer store and bought a boxed disc set of SuSE 6.3 with included manual.

Fast-forward to 2025, and Windows is installed on all my primary desktop systems, raising the question of what went wrong in ’99. Wasn’t Linux the future of desktop operating systems?

Focus Groups

Boxed SuSE Linux 6.3 software. (Source: Archive.org)

Generally when companies gear up to produce something new, they will determine and investigate the target market, to make sure that the product is well-received. This way, when the customer purchases the item, it should meet their expectations and be easy to use for them.

This is where SuSE Linux 6.3 was an interesting experience for me. I’d definitely have classified myself in 1999 as your typical computer nerd who was all about the Pentiums and the MHz, so at the very least I should have had some overlap with the nerds who wrote this Linux OS thing.

The comforting marketing blurbs on the box promised an easy installation, bundled applications for everything, while suggesting that office and home users alike would be more than happy to use this operating system. Despite the warnings and notes in the installation section of the included manual, installation was fairly painless, with YAST (Yet Another Setup Tool) handling a lot of the tedium.

However, after logging into the new operating system and prodding and poking at it a bit over the course of a few days, reality began to set in. There was the rather rough-looking graphical interface, with what I am pretty sure was the FVWM window manager for XFree86, no font aliasing and very crude widgets. I would try the IceWM window manager and a few others as well, but to say that I felt disappointed was an understatement. Although it generally worked, the whole experience felt unfinished and much closer to using CDE on Solaris than the relatively Windows 98 or the BeOS Personal Edition 5 that I would be playing with around that time as well.

That’s when a friend of my older brother slipped me a completely legit copy of Windows 2000 plus license key. To my pleasant surprise, Windows 2000 ran smoothly, worked great and was stable as a rock even on my old Celeron 400 rig that Windows 98 SE had struggled with. I had found my new forever home, or so I thought.

Focus Shift

Start-up screen of FreeSCO. (Credit: Lewis “Lightning” Baughman, Wikimedia)

With Windows 2000, and later XP, being my primary desktop systems, my focus with Linux would shift away from the desktop experience and more towards other applications, such as the FreeSCO (en français) single-floppy router project, and the similar Smoothwall project. After upgrading to a self-built AMD Duron 600 rig, I’d use the Celeron 400 system to install various Linux distributions on, to keep tinkering with them. This led me down the path of trying out Wine to try out Windows applications on Linux in the 2000s, along with some Windows games ported by Loki Entertainment, with mostly disappointing results. This also got me to compile kernel modules, to make the onboard sound work in Linux.

Over the subsequent years, my hobbies and professional career would take me down into the bowels of Linux and similar with mostly embedded (Yocto) development, so that by now I’m more familiar with Linux from the perspective of the command line and architectural level. Although I have many Linux installations kicking around with a perfectly fine X/Wayland installation on both real hardware and in virtual machines, generally the first thing I do after logging in is pop open a Bash terminal or two or switching to a different TTY.

Yet now that the rainbows-and-sunshine era of Windows 2000 through Windows 7 has come to a fiery end amidst the dystopian landscape of Windows 10 and with Windows 11 looming over the horizon, it’s time to ask whether I would make the jump to the Linux desktop now.

Linux Non-Standard Base

Bringing things back to the ‘focus group’ aspect, perhaps one of the most off-putting elements of the Linux ecosystem is the completely bewildering explosion of distributions, desktop environments, window managers, package managers and ways of handling even basic tasks. All the skills that you learned while using Arch Linux or SuSE/Red Hat can be mostly tossed out the moment you are on a Debian system, never mind something like Alpine Linux. The differences can be as profound as when using Haiku, for instance.

Rather than Linux distributions focusing on a specific group of users, they seem to be primarily about doing what the people in charge want. This is illustrated by the demise of the Linux Standard Base (LSB) project, which was set up in 2001 by large Linux distributions in order to standardize various fundamentals between these distributions. The goals included a standard filesystem hierarchy, the use of the RPM package format and binary compatibility between distributions to help third-party developers.

By 2015 the project was effectively abandoned, and since then distributing software across Linux distributions has become if possible even more convoluted, with controversial ‘solutions’ like Canonical’s Snap, Flatpak, AppImage, Nix and others cluttering the landscape and sending developers scurrying back in a panic to compiling from source like it’s the 90s all over again.

Within an embedded development context this lack of standardization is also very noticeable, between differences in default compiler search paths, broken backwards compatibility — like the removal of ifconfig — and a host of minor and larger frustrations even before hitting big ticket items like service management flittering between SysV, Upstart, Systemd or having invented their own, even if possibly superior, alternatives like OpenRC in Alpine Linux.

Of note here is also that these system service managers generally do not work well with GUI-based applications, as CLI Linux and GUI Linux are still effectively two entirely different universes.

Wrong Security Model

For some inconceivable reason, Linux – despite not having UNIX roots like BSD – has opted to adopt the UNIX filesystem hierarchy and security model. While this is of no concern when you look at Linux as a wannabe-UNIX that will happily do the same multi-user server tasks, it’s an absolutely awful choice for a desktop OS. Without knowledge of the permission levels on folders, basic things like SSH keys will not work, and accessing network interfaces with Wireshark requires root-level access and some parts of the filesystem, like devices, require the user to be in a specific group.

When the expectation of a user is that the OS behaves pretty much like Windows, then the continued fight against an overly restrictive security model is just one more item that is not necessarily a deal breaker, but definitely grates every time that you run into it. Having the user experience streamlined into a desktop-friendly experience would help a lot here.

Unstable Interfaces

Another really annoying thing with Linux is that there is no stable kernel driver API. This means that with every update to the kernel, each of the kernel drivers have to be recompiled to work. This tripped me up in the past with Realtek chipset drivers for WiFi and Bluetooth. Since these were too new to be included in the Realtek driver package, I had to find an online source version on GitHub, run through the whole string of commands to compile the kernel driver and finally load it.

After running a system update a few days later and doing a restart, the system was no longer to be found on the LAN. This was because the WiFi driver could no longer be loaded, so I had to plug in Ethernet to regain remote access. With this experience in mind I switched to using Wireless-N WiFi dongles, as these are directly supported.

Experiences like this fortunately happen on non-primary systems, where a momentary glitch is of no real concern, especially since I made backups of configurations and such.

Convoluted Mess

This, in a nutshell, is why moving to Linux is something that I’m not seriously considering. Although I would be perfectly capable of using Linux as my desktop OS, I’m much happier on Windows — if you ignore Windows 11. I’d feel more at home on FreeBSD as well as it is a far more coherent experience, not to mention BeOS’ successor Haiku which is becoming tantalizingly usable.

Secretly my favorite operating system to switch to after Windows 10 would be ReactOS, however. It would bring the best of Windows 2000 through Windows 7, be open-source like Linux, yet completely standardized and consistent, and come with all the creature comforts that one would expect from a desktop user experience.

One definitely can dream.

Add Wood Grain Texture to 3D Prints – With a Model of a Log

Adding textures is a great way to experiment with giving 3D prints a different look, and [PandaN] shows off a method of adding a wood grain effect in a way that’s easy to play around with. It involves using a 3D model of a log (complete with concentric tree rings) as a print modifier. The good news is that [PandaN] has already done the work of creating one, as well as showing how to use it.

The model of the stump — complete with concentric tree rings — acts as a modifier for the much-smaller printed object (in this case, a small plate).

In the slicer software one simply uses the log as a modifier for an object to be printed. When a 3D model is used as a modifier in this way, it means different print settings get applied everywhere the object to be printed and the modifier intersect one another.

In the case of this project, the modifier shifts the angle of the fill pattern wherever the models intersect. A fuzzy skin modifier is used as well, and the result is enough to give a wood grain appearance to the printed object. When printed with a wood filament (which is PLA mixed with wood particles), the result looks especially good.

We’ve seen a few different ways to add textures to 3D prints, including using Blender to modify model surfaces. Textures can enhance the look of a model, and are also a good way to hide layer lines.

In addition to the 3D models, [PandaN] provides a ready-to-go project for Bambu slicer with all the necessary settings already configured, so experimenting can be as simple as swapping the object to be printed with a new 3D model. Want to see that in action? Here’s a separate video demonstrating exactly that step-by-step, embedded below.

Spin-Casting This Telescope Mirror In Resin Didn’t Go To Plan

For most of us, mirrors are something we buy instead of build. However, [Unnecessary Automation] wanted to craft mirrors of his own for a custom telescope build. As it turns out, producing optically-useful mirrors is not exactly easy.

For the telescope build in question, [Unnecessary Automation] needed a concave mirror. Trying to get that sort of shape with glass can be difficult. However, there’s such a thing as a “liquid mirror” where spinning fluid forms into a parabolic-like shape. Thus came the idea to spin liquid resin during curing to try and create a mirror with the right shape.

That didn’t quite work, but it inspired a more advanced setup where a spinning bowl and dense glycerine fluid was used to craft a silicone mold with a convex shape. This could then be used to produce a resin-based mirror in a relatively stationary fashion. From there, it was just necessary to plate a shiny metal layer on to the final part to create the mirror effect. Unfortunately, the end result was too messy to use as a viable telescope mirror, but we learn a lot about what didn’t work along the way.

The video is a great journey of trial and error. Sometimes, figuring out how to do something is the fun part of a project, even if you don’t always succeed. If you’ve got ideas on how to successfully spin cast a quality mirror, drop them in the comments below. We’ve seen others explore mirror making techniques before, too.

The Keyboard Sinclair Never Made

ZX Mechtrum Deluxe keyboard close-up

For those of us who’ve spent far too long hammering rubber keys into submission, a glorious solution has arrived. [Lee Smith] designed the ZX Mechtrum Deluxe, the ultimate keyboard upgrade for your beloved ZX Spectrum 48k. Thanks to [morefunmakingit], you can see this build-it-yourself mechanical mod below. It finally brings a proper spacebar and Spectrum-themed Wraith keycaps into your retro life.

The Metrum Deluxe is a full PCB redesign: no reused matrices or clunky membrane adapters here. [Lee Smith] got fed up with people (read: the community, plus one very persistent YouTuber) asking for a better typing experience, so he delivered. Wraith keycaps from AliExpress echo the original token commands and BASIC vibe, without going full collector-crazy. Best of all: the files are open. You can download the case on Printables and order the PCB through JLCPCB. Cherry on top (pun intended): you’ll finally have a spacebar your thumbs can be proud of.

So whether you’re into Frankenstein rigs or just want your Spectrum to stop feeling like an air mattress, check this video out. Build files and link to the keycaps can be found on Youtube, below the video.

Tip: if you foster a secret love for keyboards, don’t miss the Keebin’ with Kristina’s series on all sorts of keyboards.

The 1972 INTERCAL Compiler Revealed

Have you ever heard of INTERCAL? If you haven’t, don’t feel bad. This relatively obscure language dates back to 1972 with the goal of being difficult to read and write. It is the intellectual parent of systems like brainf**k and other bad languages. Now, you can read the INTERCAL-72 source code thanks to a found printout. It will help if you can read SPITBOL, another obscure language that is a compiled version of SNOBOL (which is like an old-fashioned non-Unix awk program).

How strange it INTERCAL? Well, one of the statements is PLEASE. If you don’t use it enough, you’ll offend the interpreter, who will then ignore your program. But if you use it too much, then you are a suck up and, therefore, your program will be ignored again. If you think GOTO is a bad idea, you’ll just hate COME FROM, although that was from a later version of INTERCAL.

Here’s the example program from the user’s manual:


1 DO (5) NEXT
2 (5) DO FORGET #1
3 PLEASE WRITE IN :1
4 DO .1 <- ’V-":1~’#32768c/#0’"c/#1’~#3
5 DO (1) NEXT
6 DO :1 <- "’V-":1~’#65535c/#0’"c/#65535’
7 ~’#0c/#65535’"c/"’V-":1~’#0c/#65535’"
c
8 /#65535’~’#0c/#65535’"
9 DO :2 <- #1
10 PLEASE DO (4) NEXT
11 (4) DO FORGET #1
12 DO .1 <- "V-’:1~:2’c/#1"~#3
13 DO :1 <- "’V-":1~’#65535c/#0’"c/":2~’#65535
1
c
14 /#0’"’~’#0c/#65535’"c/"’V-":1~’#0
c
15 /#65535’"c/":2~’#0c/#65535’"’~’#0c/#65535’"
16 DO (1) NEXT
17 DO :2 <- ":2~’#0c/#65535’"
c
18 /"’":2~’#65535c/#0’"c/#0’~’#32767c/#1’"
19 DO (4) NEXT
20 (2) DO RESUME .1
21 (1) PLEASE DO (2) NEXT
22 PLEASE FORGET #1
23 DO READ OUT :1
24 PLEASE DO .1 <- ’V-"’:1~:1’~#1"c/#1’~#3
25 DO (3) NEXT
26 PLEASE DO (5) NEXT
27 (3) DO (2) NEXT
28 PLEASE GIVE UP

Interestingly, you can get SPITBOL for modern systems, so it is entirely possible to run this version of INTERCAL on a modern machine. Why? That’s for you to answer.

The heart of it all is on GitHub. You’ll also find links to the manual should you attempt to use it. We’ve looked at INTERCAL and other similar languages before. However, you are free to write unreadable code in a more conventional language.

Planetary Poetry with a Tiny Digital Core

Render of a simple clockwork orrery

Some hacks just tickle the brain in a very particular way. They’re, for a change, not overly engineered; they’re just elegant, anachronistic, and full of mischief. That’s exactly what [Frans] pulls off with A Gentleman’s Orrery, a tiny, simple clockwork solar system. Composed of shiny brass and the poise of 18th-century craftsmanship, it hides a modern secret: there’s barely any clockwork inside. You can build it yourself.

Mechanism of a simple clockwork orreryPeek behind the polished face and you’ll find a mechanical sleight of hand. This isn’t your grandfather’s gear-laden planetarium. Instead of that, it operates on a pared-down system that relies on a stepper motor, driving planetary movement through a 0.8 mm axle nested inside a 1 mm brass tube. That micro-mechanical coupling, aided by a couple of bevel gears, manages to rotate the Moon just right, including its orientation. Most of the movement relies on clever design, not gear cascades. The real wizardry happens under the hood: a 3D-printed chassis cradles an ESP32-C6, a TTP223 capacitive touch module, STSPIN220 driver, and even a reed switch with magnetic charging.

You can even swap out the brass for a stone shell where the full moon acts as the touch control. It’s tactile, it’s poetic, and therefore, a nice hack for a weekend project. To build it yourself, read [Frans]’ Instructable.

3D Printing A Capable RC Car

You can buy all sorts of RC cars off the shelf, but doing so won’t teach you a whole lot. Alternatively, you could follow [TRDB]’s example, and design your own from scratch.

The Lizard, as it is known, is a fun little RC car. It’s got a vaguely Formula 1-inspired aesthetic, and looks fetching with the aid of two-tone 3D printed parts. It’s designed for speed and handling, with a rear-wheel-drive layout and sprung suspension at all four corners to soak up the bumps. The majority of the vehicle is 3D printed in PETG, including the body and the gearbox and differential. However, some suspension components are made in TPU for greater flexibility and resistance to impact. [TRDB] specified commercial off-the-shelf wheels to provide good grip that couldn’t easily be achieved with 3D-printed tires. An ESP32 is responsible for receiving commands from [TRDB’s] custom RC controller running the same microcontroller. It sends commands to the speed controller that runs the Lizard’s brushed DC motor from a 3S lithium-polymer battery.

The final product looks sleek and handles well. It also achieved a GPS-verified top speed of 48 km/h as per [TRDB’s] testing. We’ve seen some other great DIY RC cars over the years, too, like this example that focuses on performance fundamentals. Video after the break.

The Potential Big Boom In Every Dust Cloud

To the average person, walking into a flour- or sawmill and seeing dust swirling around is unlikely to evoke much of a response, but those in the know are quite likely to bolt for the nearest exit at this harrowing sight. For as harmless as a fine cloud of flour, sawdust or even coffee creamer may appear, each of these have the potential for a massive conflagration and even an earth-shattering detonation.

As for the ‘why’, the answer can be found in for example the working principle behind an internal combustion engine. While a puddle of gasoline is definitely flammable, the only thing that actually burns is the evaporated gaseous form above the liquid, ergo it’s a relatively slow process; in order to make petrol combust, it needs to be mixed in the right air-fuel ratio. If this mixture is then exposed to a spark, the fuel will nearly instantly burn, causing a detonation due to the sudden release of energy.

Similarly, flour, sawdust, and many other substances in powder form will burn gradually if a certain transition interface is maintained. A bucket of sawdust burns slowly, but if you create a sawdust cloud, it might just blow up the room.

This raises the questions of how to recognize this danger and what to do about it.

Welcome To The Chemical Safety Board

In an industrial setting, people will generally acknowledge that oil refineries and chemical plants are dangerous and can occasionally go boom in rather violent ways. More surprising is that something as seemingly innocuous as a sugar refinery and packing plant can go from a light sprinkling of sugar dust to a violent and lethal explosion within a second. This is however what happened in 2008 at the Georgia Imperial Sugar refinery, which killed fourteen and injured thirty-six. During this disaster, a primary and multiple secondary explosions ripped through the building, completely destroying it.

Georgia Imperial Sugar Refinery aftermath in 2008. (Credit: USCSB)

As described in the US Chemical Safety Board (USCSB) report with accompanying summary video (embedded below), the biggest cause was a lack of ventilation and cleaning that allowed for a build-up of sugar dust, with an ignition source, likely an overheated bearing, setting off the primary explosion. This explosion then found subsequent fuel to ignite elsewhere in the building, setting off a chain reaction.

What is striking is just how simple and straightforward both the build-up towards the disaster and the means to prevent it were. Even without knowing the exact air-fuel ratio for the fuel in question, there are only two points on the scale where you have a mixture that will not violently explode in the presence of an ignition source.

These are either a heavily saturated solution — too much fuel, not enough air — or the inverse. Essentially, if the dust-collection systems at the Imperial Sugar plant had been up to the task, and expanded to all relevant areas, the possibility of an ignition event would have likely been reduced to zero.

Things Like To Burn

In the context of dust explosions, it’s somewhat discomforting to realize just how many things around us are rather excellent sources of fuel. The aforementioned sugar, for example, is a carbohydrate (Cm(H2O)n). This chemical group also includes cellulose, which is a major part of wood dust, explaining why reducing dust levels in a woodworking shop is about much more than just keeping one’s lungs happy. Nobody wants their backyard woodworking shop to turn into a mini-Imperial Sugar ground zero, after all.

Carbohydrates aren’t far off from hydrocarbons, which includes our old friend petrol, as well as methane (CH4), butane (C4H10), etc., which are all delightfully combustible. All that the carbohydrates have in addition to carbon and hydrogen atoms are a lot of oxygen atoms, which is an interesting addition in the context of them being potential fuel sources. It incidentally also illustrates how important carbon is for life on this planet since its forms the literal backbone of its molecules.

Although one might conclude from this that only something which is a carbohydrate or hydrocarbon is highly flammable, there’s a whole other world out there of things that can burn. Case in point: metals.

Lit Metals

On December 9, 2010, workers were busy at the New Cumberland AL Solutions titanium plant in West Virginia, processing titanium powder. At this facility, scrap titanium and zirconium were milled and blended into a powder that got pressed into discs. Per the report, a malfunction inside one blender created a heat source that ignited the metal powder, killing three employees and injuring one contractor. As it turns out, no dust control methods were installed at the plant, allowing for uncontrolled dust build-up.

As pointed out in the USCSB report, both titanium and zirconium will readily ignite in particulate form, with zirconium capable of auto-igniting in air at room temperature. This is why the milling step at AL Solutions took place submerged in water. After ignition, titanium and zirconium require a Class D fire extinguisher, but it’s generally recommended to let large metal fires burn out by themselves. Using water on larger titanium fires can produce hydrogen, leading conceivably to even worse explosions.

The phenomenon of metal fires is probably best known from thermite. This is a mixture of a metal powder and a metal oxide. After ignited by an initial source of heat, the redox process becomes self-sustaining, providing the fuel, oxygen, and heat. While generally iron(III) oxide and aluminium are used, many more metals and metal oxides can be combined, including a copper oxide for a very rapid burn.

While thermite is intentionally kept as a powder, and often in some kind of container to create a molten phase that sustains itself, it shouldn’t be hard to imagine what happens if the metal is ground into a fine powder, distributed as a fine dust cloud in a confined room and exposed to an ignition source. At that point the differences between carbohydrates, hydrocarbons and metals become mostly academic to any survivors of the resulting inferno.

Preventing Dust Explosions

As should be quite obvious at this point, there’s no real way to fight a dust explosion, only to prevent it. Proper ventilation, preventing dust from building up and having active dust extraction in place where possible are about the most minimal precautions one should take. Complacency as happened at the Imperial Sugar plant merely invites disaster: if you can see the dust build-up on surfaces & dust in the air, you’re already at least at DEFCON 2.

A demonstration of how easy it is to create a solid dust explosion came from the Mythbusters back in 2008 when they tested the ‘sawdust cannon’ myth. This involved blowing sawdust into a cloud and igniting it with a flare, creating a massive fireball. After nearly getting their facial hair singed off with this roaring success, they then tried the same with non-dairy coffee creamer, which created an even more massive fireball.

Fortunately the Mythbusters build team was supervised by adults on the bomb range for these experiments, as it shows just how incredibly dangerous dust explosions can be. Even out in the open on a secure bomb range, never mind in an enclosed space, as hundreds have found out over the decades in the US alone. One only has to look at the USCSB’s dust explosions statistics to learn to respect the dangers a bit more.

Depositing Metal On Glass with Fiber Laser

Fiber lasers aren’t nearly as common as their diode and CO2 cousins, but if you’re lucky enough to have one in your garage or local makerspace, this technique for depositing thin films of metals in [Breaking Taps] video, embedded below, might be worth checking out. 

It’s a very simple hack: a metal shim or foil is sandwiched between two pieces of glass, and the laser is focused on the metal. Etching the foil blasts off enough metal to deposit a thin film of it onto the glass.  From electron microscopy, [Breaking Taps] reveals that what’s happening is that microscopic molten metal droplets are splashing up to the ̶m̶e̶t̶a̶l̶  glass, rather than this being any kind of plasma process like sputtering. He found this technique worked best with silver of all the materials tested, and there were a few. While copper worked, it was not terribly conductive — he suggests electroplating a thicker layer onto the (probably rather oxidized) copper before trying to solder, but demonstrates soldering to it regardless, which seems to work. 

This might be a neat way to make artistic glass-substrate PCBs. More testing will be needed to see if this would be worth the effort over just gluing copper foil to glass, as has been done before. [Breaking Taps] suspects, and we agree, that his process would work better under an inert atmosphere, and we’d like to see it tried.

One thing to note is that, regardless of atmosphere, alloys are a bit iffy with this technique, as the ‘blast little drops off’ process can cause them to demix on the glass surface. He also reasons that ‘printing’ a large area of metal onto the glass, and then etching it off would be a more reliable technique than trying to deposit complex patterns directly to the glass in one go. Either way, though, it’s worth a try if you have a fiber laser. 

Don’t have a fiber laser? Maybe you could build one. 

This BB Shooter Has a Spring, But Not For What You Think

[It’s on my MIND] designed a clever BB blaster featuring a four-bar linkage that prints in a single piece and requires no additional hardware. The interesting part is how it turns a trigger pull into launching a 6 mm plastic BB. There is a spring, but it only acts as a trigger return and plays no part in launching the projectile. So how does it work?

There’s a spring in this BB launcher, but it’s not used like you might expect.

The usual way something like this functions is with the trigger pulling back a striker of some kind, and putting it under tension in the process (usually with the help of a spring) then releasing it. As the striker flies forward, it smacks into a BB and launches it. We’ve seen print-in-place shooters that work this way, but that is not what is happening here.

With [It’s on my MIND]’s BB launcher, the trigger is a four-bar linkage that transforms a rearward pull of the trigger into a forward push of the striker against a BB that is gravity fed from a hopper. The tension comes from the BB’s forward motion being arrested by a physical detente as the striker pushes from behind. Once that tension passes a threshold, the BB pops past the detente and goes flying. Thanks to the mechanical advantage of the four-bar linkage, the trigger finger doesn’t need to do much work. The spring? It’s just there to reset the trigger by pushing it forward again after firing.

It’s a clever design that doesn’t require any additional hardware, and even prints in a single piece. Watch it in action in the video, embedded just below.

Testing Brick Layers in OrcaSlicer With Staggered Perimeters

The OrcaSlicer staggered perimeters in an FDM print, after slicing through the model. (Credit: CNC Kitchen)

The idea of staggered (or brick) layers in FDM prints has become very popular the past few years, with now nightly builds of OrcaSlicer featuring the ‘Stagger Perimeters’ option to automate the process, as demonstrated by [Stefan] in a recent CNC Kitchen video. See the relevant OrcaSlicer GitHub thread for the exact details, and to obtain a build with this feature. After installing, slice the model as normal, after enabling this new parameter in the ‘Strength’ tab.

In the video, [Stefan] first tries out a regular and staggered perimeter print without further adjustments. This perhaps surprisingly results in the staggered version breaking before the regular print, which [Stefan] deduces to be the result of increasing voids within the print. After increasing the extrusion rate to 110% to fill up said voids, this does indeed result in the staggered part showing a massive boost in strength.

What’s perhaps more telling is that a similar positive effect is observed when the flow is increased with the non-staggered part, albeit with the staggered part still showing more of a strength increase. This makes it obvious that just staggering layers isn’t enough, but that the flowrate and possibly other parameters have to be adjusted as well to fully realize the potential of brick layers. That said, it’s encouraging to see this moving forward despite questionable patent claims.

2025 Pet Hacks Contest: Weigh Your Dog The Easy Way

If you need to weigh your pet, you’ll soon find that getting an animal to stand on a weighing machine to order is very difficult indeed. If the critter in question is a cat or a small dog you can weigh yourself both holding them and not holding them, and compute the difference. But in the case of a full size Bernese mountain dog, the hound is simply too big for that. Lateral thinking is required, and that’s how [Saren Tasciyan] came up with the idea of making a dog bed that’s also a weighing machine. When the mutt settles down, the weight can be read with ease. The bed itself is a relatively straightforward wooden frame, with load cells placed above rubber feet. The load cells in turn talk to an ESP8266 which has an LCD display to deliver the verdict. Dog weighed, without the drama.

This project is of course part of the Hackaday 2025 Pet Hacks contest, an arena in which any of the cool hacks you’ve made to enhance you and your pet’s life together can have an airing. Meanwhile this isn’t the first time this particular pooch has had a starring role; he’s sported a rather fetching barrel in a previous post.

2025 Hackaday Pet Hacks Contest
❌