Vista de Lectura

Hay nuevos artículos disponibles. Pincha para refrescar la página.

New Release of Vision Basic: Hot New Features!

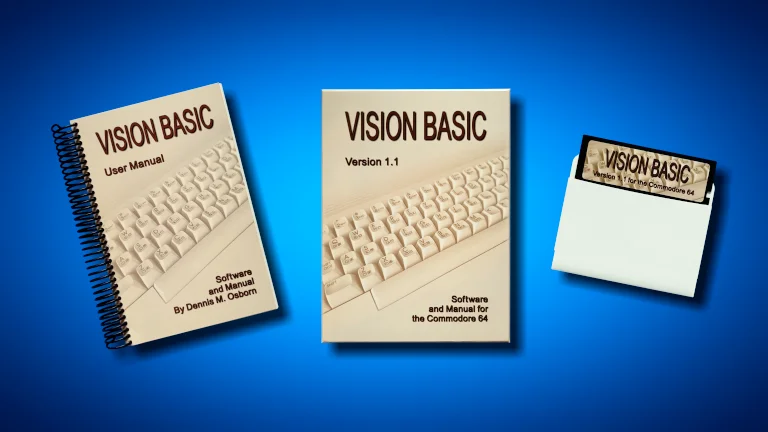
As the Commodore 64 ages, it seems to be taking on a second life. Case in point: Vision BASIC is a customized, special version of the BASIC programming language with a ton of features to enable Commodore 64 programs to be written more easily and with all sorts of optimizations. We’ve tested out both the original 1.0 version of Vision BASIC, and now with version 1.1 being released there are a whole host of tweaks and updates to make the experience even better!

One of the only limitation of Vision BASIC is the requirement for expanded RAM. It will not run on an unexpanded C64 — but the compiled programs will, so you can easily distribute software made using Vision on any C64. A feature introduced in version 1.1 is support for GeoRAM, a different RAM expansion cartridge, and modern versions of GeoRAM like the NeoRAM which has battery-backed RAM. This allows almost instantaneous booting into the Vision BASIC development environment.

Some of the standout features include a doubling of compilation speed, which is huge for large programs that take up many REU segments in source form. There are new commands, including ALLMOBS for setting up all sprites with a single command; POLL to set up which joystick port is in use; CATCH to wait for a particular scanline; and plenty more! Many existing commands have been improved as well. As in the original version of Vision BASIC, you can freely mix 6510 assembly and BASIC wherever you want. You can use the built-in commands for bitmaps, including panning, collision detection, etc., or you can handle it in assembly if you want! And of course, it comes with a full manual — yes, a real, printed book!

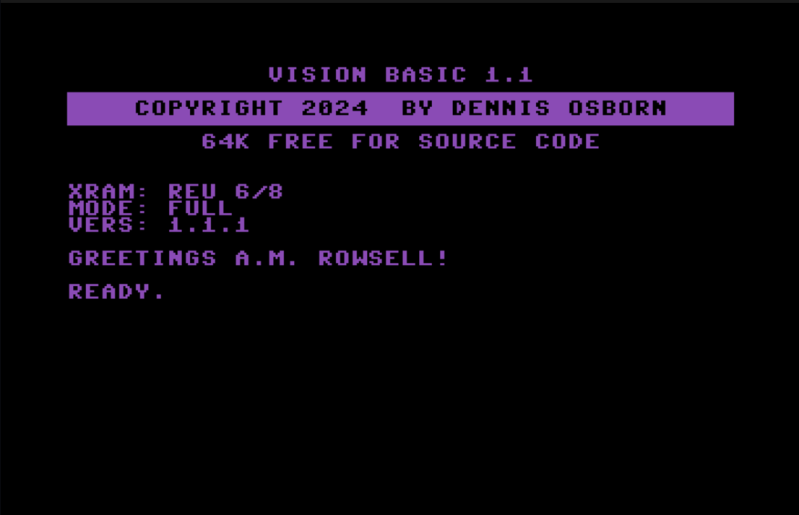
One of the nice features of Vision BASIC is the customization of the development environment. On the first run, after agreeing to the software terms, you enter your name and it gets saved to the Vision BASIC disk. Then, every time you start the software up, it greets you by name! You can also set up a custom colour scheme, which also gets saved. It’s a very pleasant environment to work in. Depending on how much additional RAM you have, you can hold multiple program segments in different RAM banks. For example, you could have all your source code in one bank, all your bitmaps and sprites in another, and your SID tunes in yet another. The compiler handles all this for you when you go to compile the program to disk, so it’s easy to keep large programs organized and easy to follow.

If you’ve always wanted to write a game or application for the C64 but just didn’t know how to get started, or you felt daunted at having to learn assembly to do sprites and music, Vision BASIC is a great option. You will be blown away at the number of commands available, and as you become more experienced you can start to sprinkle in assembly to optimize certain parts of your code if desired.

IBM’s 1969 Educational Computing

IBM got their PCs and PS/2 computers into schools in the 1980s and 1990s. We fondly remember educational games like Super Solvers: Treasure Mountain. However, IBM had been trying to get into the educational market long before the PC. In 1969, the IBM Schools Computer System Unit was developed. Though it never reached commercial release, ten were made, and they were deployed to pilot schools. One remained in use for almost a decade! And now, there’s a new one — well, a replica of IBM’s experimental school computer by [Menadue], at least. You can check it out in the video below.

The internals were based somewhat on the IBM System/360’s technology. Interestingly, it used a touch-sensitive keypad instead of a traditional keyboard. From what we’ve read, it seems this system had a lot of firsts: the first system to use a domestic TV as an output device, the first system to use a cassette deck as a storage medium, and the first purpose-built educational computer. It was developed at IBM Hursley in the UK and used magnetic core memory. It used BCD for numerical display instead of hexadecimal or octal, with floating point numbers as a basic type. It also used 32-bit registers, though they stored BCD digits and not binary. In short, this thing was way ahead of its time.

[Menadue] saw the machine at the IBM Hursley museum and liked it so much that he proceeded to build a prototype machine based partially on a document shown at the museum that showed the instructions. Further research revealed a complete document explaining the instruction set. The initial prototype was made on a small PCB with a Raspberry Pi Pico W, an OLED display, and key switches, which proved that he understood the system enough to replicate it.

An inside view

After that prototype, work began on the replica. It’s a half-scale model, but it does use a touch keyboard like the original. The attention to detail is nice, with the colours of the case matching and even a small IBM logo replica on the front! It’s made from a metal chassis, with the keyboard surround being plastic (as on the original) so as not to interfere with the touch keyboard. It’s programmed using the same set of instructions as the original — a combination of low-level commands, similar to assembly for microprocessors, but with an extra set of slightly higher-level instructions that IBM called Extra Codes. For a more in-depth explanation, check out the video going over the original system and the prototype replica!

Photos courtesy of IBM Hursley Museum

CCFL Scanner Bulb Makes a Cool Desk Lamp

The bulbs inside scanners (before transitioning to LED, anyway) were cold cathode fluorescent tubes that emit a fairly wide bandwidth of light. They were purpose-built to produce a very specific type and shape of light, but [Julius Curt] has taken this in a new, upcycled direction. Instead of just producing light, the light itself is also part of the aesthetic. A very cool 3D printed case houses the bulb and power supply and smartly hides the connecting wires to achieve a very clean look.

Part of the design involves adding a DC-DC converter before the lamp driver, allowing fading of the light. This isn’t anything new in lamps, but [Julius] noticed an interesting effect when dimming the vertically oriented lamp: as the power was reduced, the column of light would start to extinguish from one end, leading to an elongated teardrop-shaped light source.

This leads to a very interesting look, and the neat case design leads to an extremely unique lamp! The emitted light’s color temperature seems to vary a bit as the voltage drops, going from what appears to be a pretty cold white to a slightly warmer tone.

The design process is detailed on the project page, with a quick look at the CAD design process for the case. A neat touch was using a greeble (part of a coffee grinder) to add some different textures and break up the plastic-only look. That’s one we’ll have to note in our design books!

❌