Vista de Lectura

Hay nuevos artículos disponibles. Pincha para refrescar la página.

Digital Audio Workstation In A Box

Although it’s still possible to grab a couple of friends, guitars, and a set of drums and start making analog music like it’s 1992 and there are vacant garages everywhere yearning for the sounds of power chords, the music scene almost demands the use of a computer now. There are a lot of benefits, largely that it dramatically lowers the barrier to entry since it greatly reduces the need for expensive analog instruments. It’s possible to get by with an impressively small computer and only a handful of other components too, as [BAussems] demonstrates with this tiny digital audio workstation (DAW).

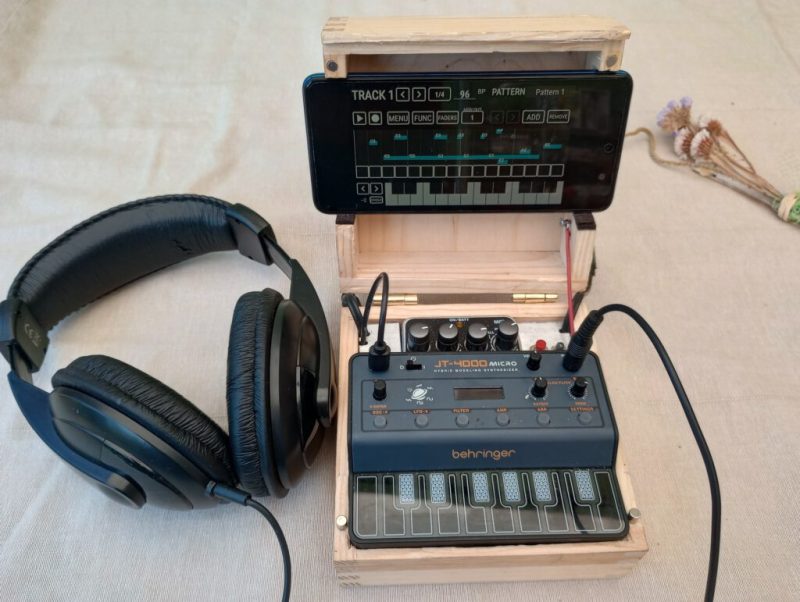
The DAW is housed inside a small wooden box and is centered around a Behringer JT-4000 which does most of the heavy lifting in this project. It’s a synthesizer designed to be as small as possible, but [BAussems] has a few other things to add to this build to round out its musical capabilities. A digital reverb effects pedal was disassembled to reduce size and added to the DAW beneath the synthesizer. At its most basic level this DAW can be used with nothing but these components and a pair of headphones, but it’s also possible to add a smartphone to act as a sequencer and a stereo as well.

For a portable on-the-go rig, this digital audio workstation checks a lot of the boxes needed including MIDI and integration with a computer. It’s excellent inspiration for anyone else who needs a setup like this but doesn’t have access, space, or funds for a more traditional laptop- or desktop-centered version. For some other small on-the-go musical instruments we recently saw a MIDI-enabled keyboard not much larger than a credit card.

Player Ukulele Pulls Your Strings

Automated musical instruments aren’t a new idea. From water chimes to player pianos, they’ve been around for a while. But we can’t remember the last time we saw a player ukulele. [Zeroshot] shows us one, though, and it uses an Arduino. You can see and hear it in the video below.

Honestly, with all the stepper motors, linear rails, and belts, we thought it looked like a 3D printer, at least up at the business end. [Zeroshot] thought it would be easier to build a robot than to actually learn to play the instrument. We aren’t sure we agree.

The first problem was automating both picking strings and strumming. Then, you needed a way to press down on the strings at each fret. Solenoids can act like your fingers. With the mechanics in place, it is all software, right? There were quite a few unexpected little hardware wrinkles.

The solenoids don’t move along the fretboard, so it limits the range a bit. Also, the mechanical noises sometimes seem to drown out the instrument, but it does work. Kind of. We don’t think we are going to see AI buskers anytime soon.

Don’t have a ukulele? Do you have a GameBoy? If you are building an automated ukulele, you might as well add LEDs.

Doing MIDI With Discrete Logic Is Neat, If Not Particularly Useful

MIDI is normally baked into the chipset of a synthesizer, or something you use a microcontroller to handle. But that’s not the only way to speak the language! [Kevin] decided to have some fun doing MIDI with discrete logic instead, with some pretty neat results.

[Kevin] had previously built a control voltage step sequencer called the Baby8, which relied on 4017 counter ICs. He later realized he could repurpose three of his old Baby8 PCBs to create something that could generate MIDI using nothing more than discrete logic. The stack of three boards generate a simple MIDI message—in this case, a two-byte Program Change command. At 8 bits per byte, plus a start and stop bit, that comes out to 20 bits in total. The bits to be sent are configured via the switches on the PCBs, and clocked out through the counter ICs via a clock running at the MIDI baud rate of 31,250 Hz.

Obviously, it’s not very practical to code your MIDI commands manually via DIP switches and then clock them out in this fashion. But—it does work, and you can do it! If you wanted to build an old-school logic circuit that just spits out simple short MIDI commands, this is one way to go about it.

We’ve seen [Kevin]’s work before, too, like this neat musical rotary phone build.

Digital Bumper Sticker Tells Everyone What You’re Listening To

Bumper stickers are usually political, crude, or otherwise inflammatory. Rather a more fun example is this digital creation from [Guy Dupont], who made a bumper sticker that broadcasts what he’s listening to on the stereo.

[Guy] found a nice wide 11-inch bar LCD that was the right aspect ratio to suit the “bumper sticker” aesthetic. It had an HDMI interface, so he decided to drive it with a Raspbery Pi Zero 2W. Power for the system was derived from 12-volt lines going to his vehicle’s rear view camera. For an enclosure, he simply stuck the Pi and a buck converter on the back of the display and heat shrinked the whole thing. He also threw some magnets in there to stick it to the car.

How does the screen know what song to display? Well, [Guy] already has his Spotify listens scrobbling to Last.fm. Thus, he just made a script that scrapes his Last.fm page, which runs on a Particle Boron microcontroller, which has a cellular connection of its own. The Boron gets the song data, and spits it over to the Pi via Bluetooth. Then the Pi generates an image for the display.

Oh, and there’s also a neat Easter Egg. In honor of brat summer, the background changes to #8ACE00 green if the system detects you’re listening to Charli XCX. Neat.

It’s a neat build with a lot of moving parts. We’re surprised we haven’t seen anything like this before though, it’s really rather fun. Also, how’s about that taste of the old Internet—when was the last time you heard somebody mention scrobbling? Gosh, we’re getting old.

We’ve featured some of [Guy’s] works before, too, like the amusing Mailblocks project. Video after the break.

❌