Vista de Lectura

Hay nuevos artículos disponibles. Pincha para refrescar la página.

Meet Cucumber, The Robot Dog

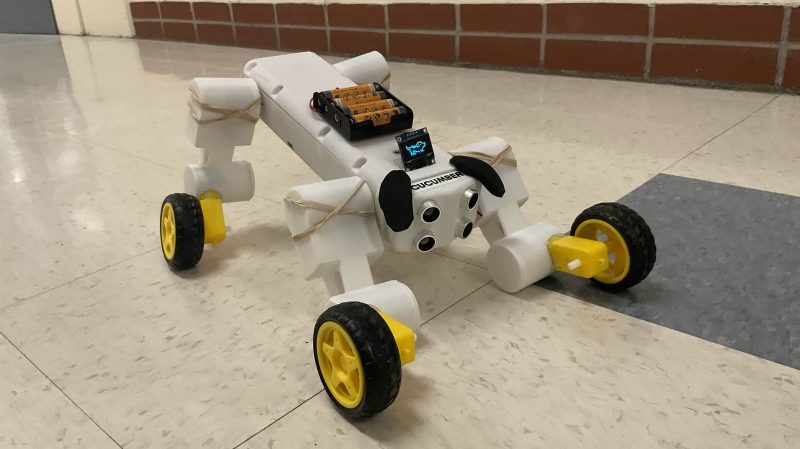
Robots can look like all sorts of things, but they’re often more fun if you make them look like some kind of charming animal. That’s precisely what [Ananya], [Laurence] and [Shao] did when they built Cucumber the Robot Dog for their final project in the ECE 4760 class.

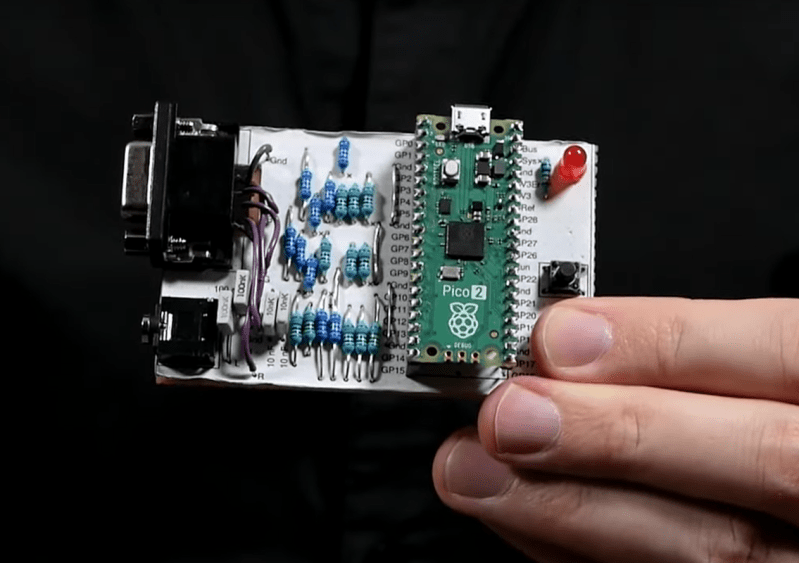
Cucumber is controllable over WiFi, which was simple enough to implement by virtue of the fact that it’s based around the Raspberry Pi Pico W. With its custom 3D-printed dog-like body, it’s able to move around on its four wheels driven by DC gear motors, and it can flex its limbs thanks to servos in its various joints. It’s able to follow someone with some autonomy thanks to its ultrasonic sensors, while it can also be driven around manually if so desired. To give it more animal qualities, it can also be posed, or commanded to bark, howl, or growl, with commands issued remotely via a web interface.

The level of sophistication is largely on the level of the robot dogs that were so popular in the early 2000s. One suspects it could be pretty decent at playing soccer, too, with the right hands behind the controls. Video after the break.

Tamagotchi Torture Chamber is Equal Parts Nostalgia and Sadism

Coming in hot from Cornell University, students [Amanda Huang], [Caroline Hohner], and [Rhea Goswami] bring a project that is guaranteed to tickle the funny bone of anyone in the under-40 set, and sadists of all ages: The Tamagochi Torture Chamber.

Tamagotchi Torture Chamber displaying Tombstone
He’s dead, Jim.

In case you somehow missed it, Bandai’s Tamagochi is a genre-defining digital pet that was the fad toy at the turn of the millennium, and has had periodic revivals since. Like the original digital pet, there are three pushbuttons to allow you to feed, play with, and clean your digital pet. These affect the basic stats of happiness, health, food and weight in ways that will be familiar to anyone who played with the original Tamagochi. Just as with the original, mistreatment or neglect causes the Tamagochi to “die” and display a tombstone on the TFT display.

Where the “Torture Chamber” part comes in is the presence of an accelerometer and soft physics simulation– the soft physics gets an entire core of the Pi Pico at the heart of this build dedicated to it, while the other core handles all inputs, display and game logic. What this enables is the ability to bounce the digital pet off the walls of its digital home with an adorable squish (and drop in health stat) by tilting the unit. You can check that out in the demo video blow.

Is it overkill for a kids toy to have a full soft body simulation, rather than just a squish-bounce animation? Probably, but for an ECE project, it lets the students show off their chops… and possibly work out some frustrations.

We won’t judge. We will point you to other Tamagotchi-inspired projects, though: like this adorable fitness buddy, or this depressingly realistic human version.

If you’ve got an innovative way to torture video game characters, or a project less likely to get you on Skynet’s hitlist, don’t forget to send in a tip!


Converting an E-Paper Photo Frame into Weather Map

Photo of Inky Frame e-paper display

Here’s a great hack sent in to us from [Simon]. He uses an e-paper photo frame as a weather map!

By now you are probably aware of e-paper technology, which is very low power tech for displaying images. E-paper only uses energy when it changes its display, it doesn’t draw power to maintain a picture it has already rendered. The particular e-paper used in this example is fairly large (as e-paper goes) and supports color (not just black and white) which is why it’s expensive. For about US$100 you can get a 5.7″ 7-color EPD display with 600 x 448 pixels.

Beyond the Inky Frame 5.7″ hardware this particular hack is mostly a software job. The first program, written in python, collects weather data from the UK Met Office. Once that image data is available a BASH script is run to process the image files with imagemagick. Finally a Micro Python script runs on the Pico to download the correct file based on the setting of the real-time clock, and update the e-paper display with the weather map.

Thanks to [Simon] for sending this one in via the tipsline. If you have your own tips, please do let us know! If you’re interested in e-paper tech we have certainly covered that here in the past, check out E-Paper Anniversary Counter Is A Charming Gift With Minimal Power Draw and A Neat E-Paper Digit Clock (or Four).

The video below the break is a notice from the UK Met Office regarding their data services.

Fission Simulator Melts Down RP2040

Screenshot of Pi Pico RMBK simulator

We’ve seen a lot of projects based on the Pi Pico, but a nuclear reactor simulation is a new one. This project was created by [Andrew Shim], [Tyler Wisniewski] and another group member for Cornell’s ECE 4760 class on embedded design (which should silence naysayers who think the Pi Pico can’t be a “serious” microcontroller), and simulates the infamous soviet RMBK reactor of Chernobyl fame. 

The simulation uses a 4-bit color VGA model. The fission model includes uranium fuel, water, graphite moderator, control rods and neutrons. To simplify the math, all decayed materials are treated identically as non-fissile, so no xenon poisoning is going to show up, for example. You can, however, take manual control to both scram the reactor and set it up to melt down with the hardware controller.

The RP2040’s dual-core nature comes in handy here: one core runs the main simulation loop, and the main graphic on the top of the VGA output; the other core generates the plots on the bottom half of the screen, and the Geiger-counter sound effect, and polls the buttons and encoders for user input. This is an interesting spread compared to the more usual GPU/CPU split we see on projects that use the RP2040 with VGA output.

An interesting wrinkle that has been declared a feature, not a bug, by the students behind this project, is that the framebuffer cannot keep up with all the neutrons in a meltdown simulation. Apparently the flickering and stuttering of frame-rate issues is “befitting of the meltdown scenario”. The idea that ones microcontroller melts down along with the simulated reactor is rather fitting, we agree. Check it out in a full walkthrough in the video below, or enjoy the student’s full writeup at the link above.

This project comes to us via Cornell University’s ECE 4760 course, which we’ve mentioned before. Thanks to [Hunter Adams] for the tipoff. You may see more student projects in the coming weeks.


When Wireless MIDI Has Latency, a Hardwired Solution Saves the Day

[Moby Pixel] wanted to build a fun MIDI controller. In the end, he didn’t build it just once, but twice—with the aim of finding out which microcontroller was most fit for this musical purpose. Pitted against each other? The ESP32 and Raspberry Pi Pico.

The MIDI controller itself is quite fetching. It’s built with a 4 x 4 array of arcade buttons to act as triggers for MIDI notes or events. They’re assembled in a nice wooden case with a lovely graphic wrap on it. The buttons themselves are wired to a microcontroller, which is then responsible for sending MIDI data to other devices.

At this point, the project diverges. Originally, [Moby Pixel] set the device up to work with an ESP32 using wireless MIDI over Bluetooth. However, he soon found a problem. Musical performance is all about timing, and the ESP32 setup was struggling with intermittent latency spikes that would ruin the performance. Enter the Raspberry Pi Pico using MIDI over USB. The hardwired solution eliminated the latency problems and made the controller far more satisfying to use.

There may be solutions to the latency issue with the wireless ESP32 setup, be they in code, hardware configuration, or otherwise. But if you want to play with the most accuracy and the minimum fuss, you’ll probably prefer the hardwired setup.

Latency is a vibe killer in music as we’ve explored previously.

PentaPico: A Pi Pico Cluster For Image Convolution

The five picos on two breadboards and the results of image convolution.

Here’s something fun. Our hacker [Willow Cunningham] has sent us a copy of his homework. This is his final project for the “ECE 574: Cluster Computing” course at the University of Maine, Orono.

It was enjoyable going through the process of having a good look at everything in this project. The project is a “cluster” of 5x Raspberry Pi Pico microcontrollers — with one head node as the leader and four compute nodes that work on tasks. The software for the both types of node is written in C. The head node is connected to a workstation via USB 1.1 allowing the system to be controlled with a Python script.

The cluster is configured to process an embarrassingly parallel image convolution. The input image is copied into the head node via USB which then divvies it up and distributes it to n compute nodes via I2C, one node at a time. Results are given for n = {1,2,4} compute nodes.

It turns out that the work of distributing the data dwarfs the compute by three orders of magnitude. The result is that the whole system gets slower the more nodes we add. But we’re not going to hold that against anyone. This was a fascinating investigation and we were impressed by [Willow]’s technical chops. This was a complicated project with diverse hardware and software challenges and he’s done a great job making it all work and in the best scientific tradition.

It was fun reading his journal in which he chronicled his progress and frustrations during the project. His final report in IEEE format was created using LaTeX and Overleaf, at only six pages it is an easy and interesting read.

For anyone interested in cluster tech be sure to check out the 256-core RISC-V megacluster and a RISC-V supercluster for very low cost.

The ZX Spectrum Logic Analyzer

We know [Happy Little Diodes] frequently works with logic analyzer projects. His recent wireless logic analyzer for the ZX Spectrum is one of the oddest ones we’ve seen in a while. The heart of the system is an RP2040, and there are two boards. One board interfaces with the computer, and another hosts the controller.

The logic analyzer core is powered by a common open-source analyzer from [Eldrgusman]. This is one of the nice things about open source tools. Most people probably don’t need a logic analyzer that plugs directly into a ZX Spectrum. But if you do, it is fairly simple to repurpose a more generic piece of code and rework the hardware, if necessary.

You used to pay top dollar to get logic analyzers that “knew” about common CPUs and could capture their bus cycles, show execution, and disassemble the running code. But using a technique like this, you could easily decode any processor, even one you’ve designed yourself. All you need to do is invest the time to build it, if no one else has done it yet.

[Happy Little Diodes] is a big fan of the [Eldrgusman] design. What we would have given for a logic analyzer like this forty years ago.

Kaleidoscopico Shows Off Pi Pico’s Capabilities

In the early days of computing, and well into the era where home computers were common but not particularly powerful, programming these machines was a delicate balance of managing hardware with getting the most out of the software. Memory had to be monitored closely, clock cycles taken into account, and even video outputs had to be careful not to overwhelm the processor. This can seem foreign in the modern world where double-digit gigabytes of memory is not only common, it’s expected, but if you want to hone your programming skills there’s no better way to do it than with the limitations imposed by something like a retro computer or a Raspberry Pi Pico.

This project is called Kaleidoscopio, built by [Linus Åkesson] aka [lft] and goes deep into the hardware of the Pi Pico in order to squeeze as much out of the small, inexpensive platform as possible. The demo is written with 17,000 lines of assembly using the RISC-V instruction set. The microcontroller has two cores on it, with one core acting as the computer’s chipset and the other acts as the CPU, rendering the effects. The platform has no dedicated audio or video components, so everything here is done in software using this setup to act as a PC from the 80s might. In this case, [lft] is taking inspiration from the Amiga platform, his favorite of that era.

The only hardware involved in this project apart from the Pi Pico itself are a few resistors, an audio jack, and a VGA port, further demonstrating that the software is the workhorse in this build. It’s impressive not only for wringing out as much as possible from the platform but for using the arguably weaker RISC-V cores instead of the ARM cores, as the Pi Pico includes both. [lft] goes into every detail on the project’s page as well, for those who are still captivated by the era of computer programming where every bit mattered. For more computing demos like this, take a look at this one which is based on [lft]’s retrocomputer of choice, the Amiga.

The Mohmmeter: A Steampunk Multimeter

mohmmeter

[Agatha] sent us this stunning multimeter she built as a gift for her mom. Dubbed the Mohmmeter — a playful nod to its ohmmeter function and her mom — this project combines technical ingenuity with heartfelt craftsmanship.

brass nameplates

At its core, a Raspberry Pi Pico microcontroller reads the selector knob, controls relays, and lights up LEDs on the front panel to show the meter’s active range. The Mohmmeter offers two main measurement modes, each with two sub-ranges for greater precision across a wide spectrum.

She also included circuitry protections against reverse polarity and over-voltage, ensuring durability. There was also a great deal of effort put into ensuring it was accurate, as the device was put though its paces using a calibrated meter as reference to ensure the final product was as useful as it was beautiful.

The enclosure is a work of art, crafted from colorful wooden panels meticulously jointed together. Stamped brass plates label the meter’s ranges and functions, adding a steampunk flair. This thoughtful design reflects her dedication to creating something truly special.

Want to build a meter for mom, but she’s more of the goth type? The blacked-out Hydameter might be more here style.

❌