Vista de Lectura

Hay nuevos artículos disponibles. Pincha para refrescar la página.

Train Speed Signaling Adapted For Car

One major flaw of designing societies around cars is the sheer amount of signage that drivers are expected to recognize, read, and react to. It’s a highly complex system that requires constant vigilance to a relatively boring task with high stakes, which is not something humans are particularly well adapted for. Modern GPS equipment can solve a few of these attention problems, with some able to at least show the current speed limit and perhaps an ongoing information feed of the current driving conditions., Trains, on the other hand, solved a lot of these problems long ago. [Philo] and [Tris], two train aficionados, were recently able to get an old speed indicator from a train and get it working in a similar way in their own car.

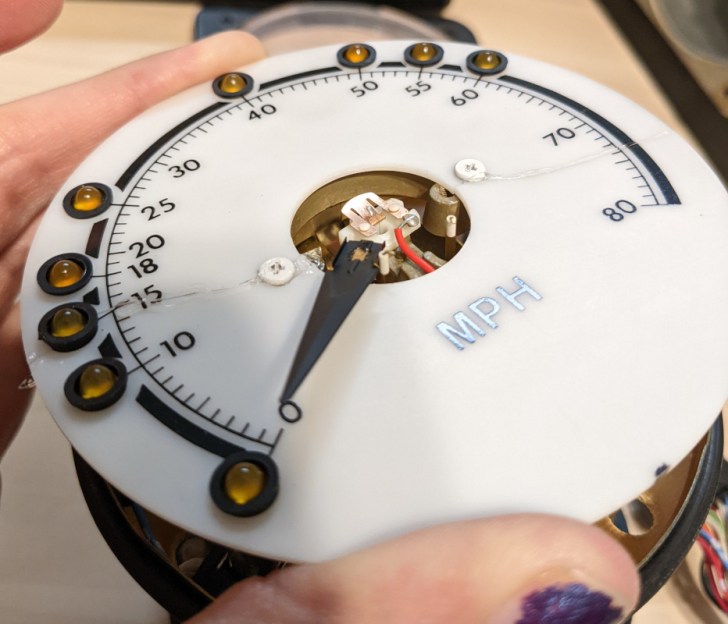
The speed indicator itself came from a train on the Red Line of the T, Boston’s subway system run by the Massachusetts Bay Transportation Authority (MBTA). Trains have a few unique ways of making sure they go the correct speed for whatever track they’re on as well as avoid colliding with other trains, and this speed indicator is part of that system. [Philo] and [Tris] found out through some reverse engineering that most of the parts were off-the-shelf components, and were able to repair a few things as well as eventually power everything up. With the help of an Arduino, an I/O expander, and some transistors to handle the 28V requirement for the speed indicator, the pair set off in their car to do some real-world testing.

This did take a few tries to get right, as there were some issues with the power supply as well as some bugs to work out in order to interface with the vehicle’s OBD-II port. They also tried to use GPS for approximating speed as well, and after a few runs around Boston they were successful in getting this speed indicator working as a speedometer for their car. It’s an impressive bit of reverse engineering as well as interfacing newer technology with old. For some other bits of train technology reproduced in the modern world you might also want to look at this recreation of a train whistle.

Misleading GPS, Philosophy of Maps, And You

The oft-quoted saying “all models are wrong, but some are useful” is a tounge-in-cheek way of saying that at some level, tools we use to predict how the world behaves will differ from reality in some measurable way. This goes well beyond the statistics classroom it is most often quoted in, too, and is especially apparent to anyone who has used a GPS mapping device of any sort. While we might think that our technological age can save us from the approximations of maps and models, there are a number of limitations with this technology that appear in sometimes surprising ways. [Kyle] has an interesting writeup about how maps can be wrong yet still be incredibly useful especially in the modern GPS-enabled world.

[Kyle] is coming to us with a background in outdoor travel, involving all kinds of activities like hiking and backcountry skiing. When dealing with GPS tracking under these conditions, often the user’s actual position will deviate from their recorded position by a significant margin. Obvious causes like a loss of GPS signal are one thing, but there are some other reasons for this behavior. GPS can be off by tens of meters, so the question then becomes whether or not mapping software should record these errors or attempt to guess where it thinks the most likely location is, based on available data like barometric pressure, existing trails, elevation profiles, and other data. Especially in areas where the elevation changes rapidly, these errors can compound quickly and provide some truly mystifying data. Where mapping software draws these distinctions is a matter of active debate in these communities, with some taking more approximate routes that make more sense while sacrificing the raw data, and others letting the GPS pins fall where they may.

For anyone who’s been confused by Strava or Garmin data at the end of a run, hike, or bike ride, this is a fairly informative explanation of why the GPS data might differ from the actual distance of any of these activities. [Kyle] also notes that unless you’re out with a measuring wheel (and perhaps even then) any method to determine a true distance like this will have some amount of approximation or error. The closest technological solution to a problem like this we’ve seen is this GPS receiver which claims centimeter-level precision using some unique tricks.

Large Language Models on Small Computers

As technology progresses, we generally expect processing capabilities to scale up. Every year, we get more processor power, faster speeds, greater memory, and lower cost. However, we can also use improvements in software to get things running on what might otherwise be considered inadequate hardware. Taking this to the extreme, while large language models (LLMs) like GPT are running out of data to train on and having difficulty scaling up, [DaveBben] is experimenting with scaling down instead, running an LLM on the smallest computer that could reasonably run one.

Of course, some concessions have to be made to get an LLM running on underpowered hardware. In this case, the computer of choice is an ESP32, so the dataset was reduced from the trillions of parameters of something like GPT-4 or even hundreds of billions for GPT-3 down to only 260,000. The dataset comes from the tinyllamas checkpoint, and llama.2c is the implementation that [DaveBben] chose for this setup, as it can be streamlined to run a bit better on something like the ESP32. The specific model is the ESP32-S3FH4R2, which was chosen for its large amount of RAM compared to other versions since even this small model needs a minimum of 1 MB to run. It also has two cores, which will both work as hard as possible under (relatively) heavy loads like these, and the clock speed of the CPU can be maxed out at around 240 MHz.

Admittedly, [DaveBben] is mostly doing this just to see if it can be done since even the most powerful of ESP32 processors won’t be able to do much useful work with a large language model. It does turn out to be possible, though, and somewhat impressive, considering the ESP32 has about as much processing capability as a 486 or maybe an early Pentium chip, to put things in perspective. If you’re willing to devote a few more resources to an LLM, though, you can self-host it and use it in much the same way as an online model such as ChatGPT.

It’s Spreadsheets All The Way Down for This 80s Handheld

Unlike the today’s consumer computer market, the 1980s were the wild west in comparison. There were all kinds of different, incompatible operating systems, hardware, and programs, all competing against one another, and with essentially no networking to tie everything together. Some of these products were incredibly niche as well, only running one program or having a limited use case to keep costs down. Such was the Convergent WorkSlate, a computer that ran only a spreadsheet with any programs also needing to be built into a spreadsheet.

Upon booting the device, the user is presented with a fairly recognizable blank spreadsheet, albeit with a now-dated LCD display (lacking a backlight) and a bespoke keyboard and cursor that wouldn’t have allowed for easy touch typing. The spreadsheet itself is quite usable though, complete with formatting tools and the capability to use formulas like a modern spreadsheet program would. It also hosted a tape deck for audio and data storage, a modem for communicating with other devices, and an optional plotter-style printer. The modem port is how [Old VCR] eventually interfaces with the machine, although as one can imagine is quite a task for a piece of small-batch technology from the 80s like this. After learning how to send and receive information, a small game is programmed into the machine and then a Gopher interface is built to give the device limited Internet connectivity.

The investigation that [Old VCR] goes into on this project to get this obsolete yet unique piece of hardware running and programmed to do other tasks is impressive, and worth taking a look at especially because spreadsheets like this aren’t Turing-complete, leading to a few interesting phenomenon that most of us wouldn’t come across in the modern computing world. Since only around 60,000 units were ever made it’s difficult to come across these machines, but if you want to take a look at the spreadsheet world of the 80s without original hardware you can still run Lotus 1-2-3 natively in Linux today.

Thanks to [Cameron] for the tip!

A Clean Linux Installation For an Android TV Box

Although Android technically runs on top of Linux, generally most Android devices abstract away the underlying Linux-ness of these machines. In theory this is a good thing; we wouldn’t necessarily want to live in a world where we have to log in to a command-line interface just to make a phone call. But too much abstraction often needlessly restricts the capabilities of the underlying hardware. [Murray] a.k.a [Green Bug-Eyed Monster] has an Android TV box with just such a problem, as the Android OS included with it allows for watching TV just fine, but with a few tweaks it can run a full Linux installation instead, turning it into a much more versatile machine.

This specific Android TV box is based on the Rockchip 3566, a popular single-board computer used in a wide array of products. As such it is one of the easier targets for transforming a limited TV machine into a fully capable desktop computer. The first step is to compile an Armbian image for the machine, in this case using an x86 installation of Ubuntu to cross-compile for the ARM-based machine. With a viable image in hand, there’s an option to either solder on a microSD slot to the included pins on the computer’s PCB or to flash the image directly to the on-board eMMC storage by tricking the machine into thinking that the eMMC is missing. Either option will bring you into a full-fledged Linux environment, with just a few configuration steps to take to get it running like any other computer.

[Murray] began this process as an alternative to paying the inflated prices of Raspberry Pis over the past few years, and for anyone in a similar predicament any computer with the Rockchip 3566 processor in it could be a potential target for a project like this. You might need to make a few tweaks to the compile options and hardware, but overall the process should be similar. And if you don’t have an RK3566, don’t fret too much. We’ve seen plenty of other Android TV boxes turned into similar devices like this one which runs RetroPie instead.

Universal Power Bank Customized To Your Liking

One of the most troubling trends of almost every modern consumer product that uses electricity is that the software that controls the product is likely to be proprietary and closed-source, which could be doing (or not doing) any number of things that its owner has no control over. Whether it’s a computer, kitchen appliance, or even a device that handles the electricity directly, it’s fairly rare to find something with software that’s open and customizable. That’s why [Traditional-Code9728] is working on a power bank with an open-source firmware.

From a hardware perspective the power bank is fairly open as well, with a number of options for connecting this device to anything else that might need power. It sports a bidirectional USB-C port as well as a DC barrel plug, either of which can either charge other devices or receive energy to charge its own battery. These ports can also accept energy from a solar panel and have MPPT built in. There’s also dual USB-A ports which can provide anywhere from five to 12 volts at 25 watts, and a color screen which shows the current status of the device.

While this is a prototype device, it’s still actively being worked on. Some future planned upgrades to the power bank include a slimmer design, charge limiting features to improve battery life, and more fine-tuned control of the output voltage and current on the USB-C port. With all of the software being open-source, as well as the circuit diagram and 3D printing files, it could find itself in plenty of applications as well. This power bank also stays under the energy limits for flying on most commercial airlines as well, but if you don’t plan on taking your power bank on an airplane then you might want to try out this 2000-watt monster instead.

Putting a Pi in a Container

Docker and other containerization applications have changed a lot about the way that developers create new software as well as how they maintain virtual machines. Not only does containerization reduce the system resources needed for something that might otherwise be done in a virtual machine, but it standardizes the development environment for software and dramatically reduces the complexity of deploying on different computers. There are some other tricks up the sleeves as well, and this project called PI-CI uses Docker to containerize an entire Raspberry Pi.

The Pi container emulates an entire Raspberry Pi from the ground up, allowing anyone that wants to deploy software on one to test it out without needing to do so on actual hardware. All of the configuration can be done from inside the container. When all the setup is completed and the desired software installed in the container, the container can be converted to an .img file that can be put on a microSD card and installed on real hardware, with support for the Pi models 3, 4, and 5. There’s also support for using Ansible, a Docker automation system that makes administering a cluster or array of computers easier.

Docker can be an incredibly powerful tool for developing and deploying software, and tools like this can make the process as straightforward as possible. It does have a bit of a learning curve, though, since sharing operating system tools instead of virtualizing hardware can take a bit of time to wrap one’s mind around. If you’re new to the game take a look at this guide to setting up your first Docker container.

2024 Tiny Games Contest: Realistic Steering Wheel Joystick In Miniature

For racing games, flight simulators, and a few other simulation-style games, a simple controller just won’t do. You want something that looks and feels closer to the real thing. The major downsides to these more elaborate input methods is that they take up a large amount of space, requiring extra time for setup, and can be quite expensive as well. To solve both of these problems [Rahel zahir Ali] created a miniature steering wheel controller for some of his favorite games.

While there are some commercial offerings of small steering wheels integrated into an otherwise standard video game controller and a few 3D printed homebrew options, nothing really felt like a true substitute. The main design goal with this controller was to maintain the 900-degree rotation of a standard car steering wheel in a smaller size. It uses a 600P/R rotary encoder attached to a knob inside of a printed case, with two spring-loaded levers to act as a throttle and brake, as well as a standard joystick to adjust camera angle and four additional buttons. Everything is wired together with an Arduino Leonardo that sends the inputs along to the computer.

Now he’s ready to play some of his favorite games and includes some gameplay footage using this controller in the video linked below. If you’re racing vehicles other than cars and trucks, though, you might want a different type of controller for your games instead.

2024 Tiny Games Challenge

Adding Human Detection to Home Automation

Radar made a huge impact when it was first invented, allowing objects to be detected using radio waves which would normally be difficult or impossible to observe through other means. Radio waves of all frequencies can be used for radar as well, whether that’s detecting ships beyond the horizon, tracking aircraft near an airport, penetrating the ground, or imaging objects with a high resolution. At the millimeter wavelength it’s fairly easy to detect humans with the right hardware, and using some inexpensive radar modules [Tech Dregs] shows us how to add this capability a home automation system.

Since these modules aren’t trying to image humans with fine detail or detect them at long range, the hardware can be fairly inexpensive. [Tech Dregs] is using the LD2410B modules which have not only an on-board microcontroller but also have the radio antennas used for radar built right onto the PCB. They have a simple binary output which can communicate whether or not a human is detected, but there’s also UART for communicating more details about what the module senses in the room. [Tech Dregs] is using this mode to connect the modules to Home Assistant, where they will be used to help automate his home’s lighting.

The only significant problem he had setting these modules up was getting them built into an enclosure. The short wavelengths used in this type of radar module don’t penetrate solid objects very well at all, so after trying to hide one behind an e-ink screen he eventually settled on hollowing out a space in a bezel with very thin plastic between the module and the room. If you need more out of your radar modules than object detection, though, you can always try building a pulse compression radar which can provide much more accurate ranging of objects.

A Non-Musical Use Case for 8-Track

There was a time in the not-too-distant past when magnetic tape was the primary way of listening to and recording audio. Most of us are familiar with the cassette tape, a four-track system that plays first one side of the tape, then the other. There was the eight-track tape as well which did not have quite as much popularity or longevity but did have a few interesting features that [Serial Hobbyism] took advantage of to make an interactive game.

The defining feature of the eight-track system, beyond the obvious eight tracks on the tape, is that the tape runs in a continuous loop, never needing to be stopped or flipped over. Instead, four buttons select pairs of the eight tracks, moving a head immediately to make the switch on-the-fly. [Serial Hobbyism]’s game plays a trivia-style audio recording and asks the player to answer questions by pushing one of the four “program” buttons to switch tracks. If the correct track is selected, the recorded audio congratulates the player and then continues on with the game. Likewise, if an incorrect track is selected, the recording notes that and the game continues.

Another interesting feature of this game is that it can be played without modifying an eight-track player, as the selectable tracks are a core function of this technology. They can be used in a similar way as cassette tapes to store computer data and a data recorder similar to the eight-track system was used on the Voyager space probes, although these only bear a passing resemblance.

Creating Customized Diffraction Lenses For Lasers

[The Thought Emporium] has been fascinated by holograms for a long time, and in all sorts of different ways. His ultimate goal right now is to work up to creating holograms using chocolate, but along the way he’s found another interesting way to manipulate light. Using specialized diffraction gratings, a laser, and a few lines of code, he explores a unique way of projecting hologram-like images on his path to the chocolate hologram.

There’s a lot of background that [The Thought Emporium] has to go through before explaining how this project actually works. Briefly, this is a type of “transmission hologram” that doesn’t use a physical object as a model. Instead, it uses diffraction gratings, which are materials which are shaped to light apart in specific ways. After some discussion he demonstrates creating diffraction gratings using film. Certain diffraction patterns, including blocking all of the light source, can actually be used as a lens as the light bends around the blockage into the center of the shadow where there can be focal points. From there, a special diffraction lens can be built.

The diffraction lens can be shaped into any pattern with a small amount of computer code to compute the diffraction pattern for a given image. Then it’s transferred to film and when a laser is pointed at it, the image appears on the projected surface. Diffraction gratings like these have a number of other uses as well; the video also shows a specific pattern being used to focus a telescope for astrophotography, and a few others in the past have used them to create the illusive holographic chocolate that [The Thought Emporium] is working towards.

Rebuilding The First Digital Personal Computer

When thinking of the first PCs, most of us might imagine something like the Apple I or the TRS-80. But even before that, there were a set of computers that often had no keyboard, or recognizable display beyond a few blinking lights. [Artem Kalinchuk] is attempting to recreate one of these very early digital computers, the Kenbak-1, using as many period-correct parts as possible.

Considered by many to be the world’s first personal computer, the Kenbak-1 was an 8-bit machine with 256 bytes of memory, using TTL integrated circuits for the logic as there was no commercially available microprocessor available at the time it was designed. For [Artem]’s build, most of these parts can still be sourced including the 7400-series chips and carbon resistors although the shift registers were a bit of a challenge to find. A custom PCB was built to replicate the original, and with all the parts in order it’s ready to be assembled and put into a case which was built using the drawings for the original unit.

Although [Artem] plans to build a period-correct linear power supply for this computer, right now he’s using a modern switching power supply for testing. The only other major components that are different are the status lamps, in this case switched to LEDs because he wasn’t able to source incandescent bulbs that drew low enough current, and the switches which he’s replaced with MX-style keys. We’ll stay tuned as he builds and tests this over the course of several videos, but in the meantime if you’re curious how this early computer actually worked we featured an emulator for it a while back.

The Sunchronizer Keeps Your Solar Panel Aligned

In the past few years, the price-per-watt for solar panels has dropped dramatically. This has led to a number of downstream effects beyond simple cost savings. For example, many commercial solar farms have found that it’s now cheaper to install a larger number of panels in fixed positions, rather than accepting the extra cost, maintenance, and complexity of a smaller number panels that use solar tracking to make up the difference. But although this practice is fading for large-scale power production, there are still some niche uses for solar tracking. Like [Fabian], if you need to maximize power production with a certain area or a small number of panels you’ll wan to to build a solar tracker.

[Fabian]’s system is based on a linear actuator which can tilt one to four panels (depending on size) in one axis only. This system is an elevation tracker, which is the orientation generally with respect to latitude, with a larger elevation angle needed in the winter and a lower angle in the summer. [Fabian] also designs these to be used in places like balconies where this axis can be more easily adjusted. The actuator is controlled with an ESP32 which, when paired with a GPS receiver, can automatically determine the sun’s position for a given time of day and adjust the orientation of the panel to provide an ideal elevation angle on a second-by-second basis. The ESP32 also allows seamless integration with home automation systems like SmartHome as well.

Although this system only tracks the sun in one axis right now, [Fabian] is working on support for a second axis which mounts the entire array on a rotating table similar to an automatic Lazy Susan. This version also includes a solar tracking sensor which measures solar irradiance in the direction the panel faces to verify that the orientation of the panel is maximizing power output for a given amount of sunlight. Tracking the sun in two axes can be a complicated problem to solve, but some solutions we’ve seen don’t involve any GPS, programming, or even control electronics at all.

Autonomous Boat Plots Lake Beds

Although the types of drones currently dominating headlines tend to be airborne, whether it’s hobbyist quadcopters, autonomous delivery vehicles, or military craft, autonomous vehicles can take nearly any transportation method we can think of. [Clay Builds] has been hard at work on his drone which is actually an autonomous boat, which he uses to map the underwater topography of various lakes. In this video he takes us through the design and build process of this particular vehicle and then demonstrates it in action.

The boat itself takes inspiration from sailing catamarans, which have two hulls of equal size connected above the waterline, allowing for more stability and less drag than a standard single-hulled boat. This is [Clay]’s second autonomous boat, essentially a larger, more powerful version of one we featured before. Like the previous version, the hulls are connected with a solar panel and its support structure, which also provides the boat with electrical power and charges lithium-iron phosphate batteries in the hull. Steering is handled by two rudders with one on each hull, but it also employs differential steering for situations where more precise turning is required. The boat carries a sonar-type device for measuring the water depth, which is housed in a more hydrodynamic 3d-printed enclosure to reduce its drag in the water, and it can follow a waypoint mission using a combination of GPS and compass readings.

Like any project of this sort, there was a lot of testing and design iteration that had to go into this build before it was truly seaworthy. The original steering mechanism was the weak point, with the initial design based on a belt connecting the two rudders that would occasionally skip. But after a bit of testing and ironing out these kinks, the solar boat is on its way to measure the water’s depths. The project’s code as well as some of the data can be found on the project’s GitHub page, and if you’re looking for something more human-sized take a look at this solar-powered kayak instead.

Original Game Boy Gets Display “Upgrade”

Before LCD and LED screens were ubiquitous, there was a time when the cathode ray tube (CRT) was essentially the only game in town. Even into the early 2000s, CRTs were everywhere and continuously getting upgrades, with the last consumer displays even having a semi-flat option. Their size and weight was still a major problem, though, but for a long time they were cutting edge. Wanting to go back to this time with their original Game Boy, [James Channel] went about replacing their Game Boy screen with a CRT.

The CRT itself is salvaged from an old video conferencing system and while it’s never been used before, it wasn’t recently made. To get the proper video inputs for this old display, the Game Boy needed to be converted to LCD first, as some of these modules have video output that can be fed to other displays. Providing the display with power was another challenge, requiring a separate boost converter to get 12V from the Game Boy’s 6V supply. After getting everything wired up a few adjustments needed to be made, and with that the CRT is up and running.

Unfortunately, there was a major speed bump in this process when [James Channel]’s method of automatically switching the display to the CRT let the magic smoke out of the Game Boy’s processor. But he was able to grab a replacement CPU from a Super Game Boy, hack together a case, and fix the problem with the automatic video switcher. Everything now is in working order for a near-perfect retro display upgrade. If you’d like to do this without harming any original hardware, we’ve seen a similar build based on the ESP32 instead.

Thanks to [Lurch] for the tip!

❌