Vista de Lectura

Hay nuevos artículos disponibles. Pincha para refrescar la página.

Compound Press Bends, Punches and Cuts Using 3D Printed Plastic

It’s not quite “bend, fold or mutilate” but this project comes close– it actually manufactures a spring clip for [Super Valid Designs] PETAL light system. In the video (embedded below) you’ll see why this tool was needed: by-hand manufacturing worked for the prototype, but really would not scale.
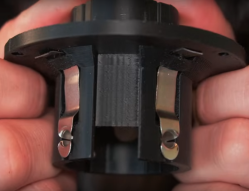
Two examples of the spring in question, embedded in the 3D printed light socket. There’s another pair you can’t see.

The lights themselves might be worthy of a post, being a modular, open source DMX stage lighting rig. Today though we’re looking at how they are manufactured– specifically how one part is manufactured. With these PETAL lights, the lights slot into a base station, which obviously requires a connection of some sort. [Super Valid Designs] opted for a spring connector, which is super valid.

It’s also a pain to work by hand: spring steel needed to be cut to length, hole punched, and bent into the specific shape required. The hand-made springs always needed adjustment after assembly, too, which is no good when people are giving you money for objects. Even when using a tent-pole spring that comes halfway to meeting their requirements, [Super Valid Designs] was not happy with the workflow.

Enter the press: 3D Printed dies rest inside a spring-loaded housing, performing the required bends. Indeed, they were able to improve the shape of the design thanks to the precision afforded by the die. The cutting step happens concurrently, with the head of a pair of tin snips mounted to the jig, and a punch finishes it off. All of this is actuated with a cheap, bog simple , hand-operated arbor press. What had been tedious minutes of work is reduced to but a moment of lever-pushing.

It great story about scaling and manufacturing that may hopefully inspire others in their projects. Perhaps with further optimization and automation, [Super Valid Designs] may find himself in the market for a modular conveyor belt design.

While this process remains fundamentally manual, we have seen automation in maker-type businesses before, like this coaster-slinging CNC setup. Of course automation doesn’t have to be part of a business model; sometimes it’s nice just to skip a tedious bunch of steps, like when building a star lamp.


A Close Look at the Mitxela Precision Clock Mk IV

Over on his secondary YouTube channel, [Jeff Geerling] recently demoed the new Mitxela Precision Clock Mk IV.

This clock uses GPS to get the current time, but also your location so it can figure out what time zone you’re in and which daylight savings time might apply. On the back a blinking diode announces the arrival of each second. A temperature-compensated crystal oscillator (TCXO) is employed for accurate time-keeping.

The clock can be folded in half, thereby doubling as a clapperboard for movie makers. The dimming system is analog, not pulse width modulation (PWM), which means no visible flashing artifacts when recording. It is highly configurable and has USB connectivity. And it has not one but two ARM microcontrollers, an ARM STM32L476, and an ARM STM32L010. If you’re interested, you can pick one up for yourself from [Mitxela]’s shop.

Toward the end of his video [Jeff] does some navel gazing, thinking about what might be required if future versions of the clock wanted to get down into precision at the nanosecond level. Do you arrange it so the light arrives at the viewer’s eyeball at the right time? Or do you update it on the clock at the right time and let the viewer know about it after a minuscule delay? Philosophical preponderances for another day!

We should add that we’ve seen plenty of cool stuff from [Mitxela] before, including the Euroknob and these soldering tweezers.

Behold Self-Synchronizing, Air-Flopping Limbs That Hop and Swim

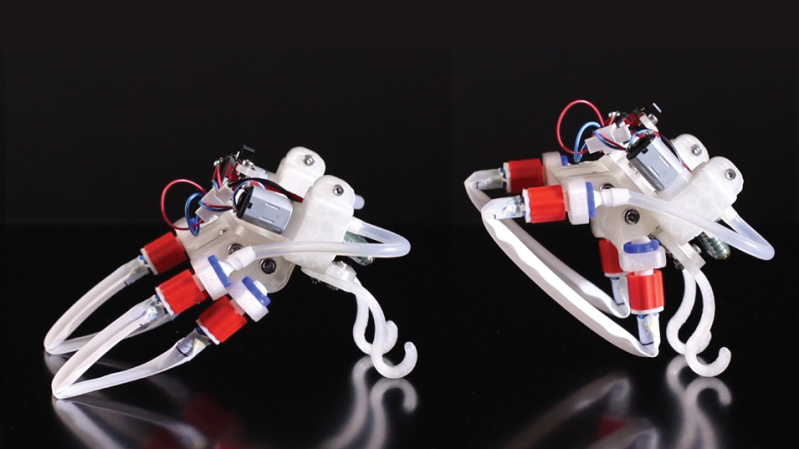
Dutch research institute [AMOLF] shows off a small robot capable of walking, hopping, and swimming without any separate control system. The limbs synchronize thanks to the physical interplay between the robot’s design and its environment. There are some great videos on that project page, so be sure to check it out.

A kinked soft tube oscillates when supplied with continuous air.

Powered by a continuous stream of air blown into soft, kinked tubular limbs, the legs oscillate much like the eye-catching “tube man” many of us have seen by roadsides. At first it’s chaotic, but the movements rapidly synchronize into a meaningful rhythm that self-synchronizes and adapts. On land, the robot does a sort of hopping gait. In water, it becomes a paddling motion. The result in both cases is a fast little robot that does it all without any actual control system, relying on physics.

You can watch it in action in the video, embedded below. The full article “Physical synchronization of soft self-oscillating limbs for fast and autonomous locomotion” is also available.

Gait control is typically a nontrivial problem in robotics, but it doesn’t necessarily require a separate control system. Things like BEAM robotics and even the humble bristlebot demonstrate the ability for relatively complex behavior and locomotion to result from nothing more than the careful arrangement of otherwise simple elements.

You Can 3D Print These Assistive Typing Tools

Typing can be difficult to learn at the best of times. Until you get the muscle memory down, it can be quite challenging. However, if you’ve had one or more fingers amputated, it can be even more difficult. Just reaching the keys properly can be a challenge. To help in this regard, [Roei Weiman] built some assistive typing tools for those looking for a little aid at the keyboard.

The devices were built for [Yoni], who works in tech and has two amputated fingers. [Roei] worked on many revisions to create a viable brace and extension device that would help [Yoni] type with greater accuracy and speed.

While [Roei] designed the parts for SLS 3D printing, it’s not mandatory—these can easily be produced on an FDM printer, too. For SLS users, nylon is recommended, while FDM printers will probably find best results with PETG. It may also be desirable to perform a silicone casting to add a grippier surface to some of the parts, a process we’ve explored previously.

The great thing about 3D printing is that it enables just about anyone to have a go at producing their own simple assistive aids like these. Files are on Instructables for the curious. Video after the break.

Simulating High-Side Bootstrap Circuits With LTSpice

LTSpice is a tool that every electronics nerd should have at least a basic knowledge of. Those of us who work professionally in the analog and power worlds rely heavily on the validity of our simulations. It’s one of the basic skills taught at college, and essential to truly understand how a circuit behaves. [Mano] has quite a collection of videos about the tool, and here is a great video explanation of how a bootstrap circuit works, enabling a high-side driver to work in the context of driving a simple buck converter. However, before understanding what a bootstrap is, we need to talk a little theory.

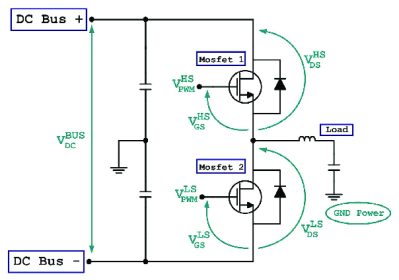
Bootstrap circuits are very common when NMOS (or NPN) devices are used on the high side of a switching circuit, such as a half-bridge (and by extension, a full bridge) used to drive a motor or pump current into a power supply.

A simple half-bridge driving illustrates the high-side NMOS driving problem.

From a simplistic viewpoint, due to the apparent symmetry, you’d want to have an NMOS device at the bottom and expect a PMOS device to be at the top. However, PMOS and PNP devices are weaker, rarer and more expensive than NMOS, which is all down to the device physics; simply put, the hole mobility in silicon and most other semiconductors is much lower than the electron mobility, which results in much less current. Hence, NMOS and NPN are predominant in power circuits.

As some will be aware, to drive a high-side switching transistor, such as an NPN bipolar or an NMOS device, the source end will not be at ground, but will be tied to the switching node, which for a power supply is the output voltage. You need a way to drive the gate voltage in excess of the source or emitter end by at least the threshold voltage. This is necessary to get the device to fully turn on, to give the lowest resistance, and to cause the least power dissipation. But how do you get from the logic-level PWM control waveform to what the gate needs to switch correctly?

The answer is to use a so-called bootstrap capacitor. The idea is simple enough: during one half of the driving waveform, the capacitor is charged to some fixed voltage with respect to ground, since one end of the capacitor will be grounded periodically. On the other half cycle, the previously grounded end, jumps up to the output voltage (the source end of the high side transistor) which boosts the other side of the capacitor in excess of the source (because it got charged already) providing a temporary high-voltage floating supply than can be used to drive the high-side gate, and reliably switch on the transistor. [Mano] explains it much better in a practical scenario in the video below, but now you get the why and how of the technique.

We see videos about LTSpice quite a bit, like this excellent YouTube resource by [FesZ] for starters.

Clickspring’s Experimental Archaeology: Concentric Thin-Walled Tubing

It’s human nature to look at the technological achievements of the ancients — you know, anything before the 1990s — and marvel at how they were able to achieve precision results in such benighted times. How could anyone create a complicated mechanism without the aid of CNC machining and computer-aided design tools? Clearly, it was aliens.

Or, as [Chris] from Click Spring demonstrates by creating precision nesting thin-wall tubing, it was human beings running the same wetware as what’s running between our ears but with a lot more patience and ingenuity. It’s part of his series of experiments into how the craftsmen of antiquity made complicated devices like the Antikythera mechanism with simple tools. He starts by cleaning up roughly wrought brass rods on his hand-powered lathe, followed by drilling and reaming to create three tubes with incremental precision bores. He then creates matching pistons for each tube, with an almost gas-tight enough fit right off the lathe.

Getting the piston fit to true gas-tight precision came next, by lapping with a jeweler’s rouge made from iron swarf recovered from the bench. Allowed to rust and ground to a paste using a mortar and pestle, the red iron oxide mixed with olive oil made a dandy fine abrasive, perfect for polishing the metal to a high gloss finish. Making the set of tubes concentric required truing up the bores on the lathe, starting with the inner-most tube and adding the next-largest tube once the outer diameter was lapped to spec.

Easy? Not by a long shot! It looks like a tedious job that we suspect was given to the apprentice while the master worked on more interesting chores. But clearly, it was possible to achieve precision challenging today’s most exacting needs with nothing but the simplest tools and plenty of skill.

The Evertop: a Low-Power, Off-Grid Solar Gem

Black and white photo of Evertop computer on desk

When was the last time you saw a computer actually outlast your weekend trip – and then some? Enter the Evertop, a portable IBM XT emulator powered by an ESP32 that doesn’t just flirt with low power; it basically lives off the grid. Designed by [ericjenott], hacker with a love for old-school computing and survivalist flair, this machine emulates 1980s PCs, runs DOS, Windows 3.0, and even MINIX, and stays powered for hundreds of hours. It has a built-in solar panel and 20,000mAh of battery, basically making it an old-school dream in a new-school shell.

What makes this build truly outstanding – besides the specs – is how it survives with no access to external power. It sports a 5.83-inch e-ink display that consumes zilch when static, hardware switches to cut off unused peripherals (because why waste power on a serial port you’re not using?), and a solar panel that pulls 700mA in full sun. And you guessed it – yes, it can hibernate to disk and resume where you left off. The Evertop is a tribute to 1980s computing, and a serious tool to gain some traction at remote hacker camps.

For the full breakdown, the original post has everything from firmware details to hibernation circuitry. Whether you’re a retro purist or an off-grid prepper, the Evertop deserves a place on your bench. Check out [ericjenott]’s project on Github here.

Browse AI

Browse AI is an easy-to-use tool that allows you to extract and monitor data from any website, without coding. The prebuilt robots can be trained in 2 minutes and can extract specific data from various websites such as LinkedIn, Indeed, ProductHunt, Eventbrite, Google, Upwork, and more. You can also set up monitoring and get notified […]

Source

❌