Vista de Lectura

Hay nuevos artículos disponibles. Pincha para refrescar la página.

Upgraded Raster Laser Projector Goes RGB

We’ve covered a scanning laser project by Ben Make’s Everything last year, and now he’s back with a significant update. [Ben]’s latest project now offers a higher resolution and RGB lasers. A couple of previous versions of the device used the same concept of a rotating segmented mirror synchronised to a pulsed laser diode to create scanlines. When projected onto a suitable surface, the distorted, pixelated characters looked quite funky, but there was clearly room for improvement.

More scanlines and a faster horizontal pixel rate

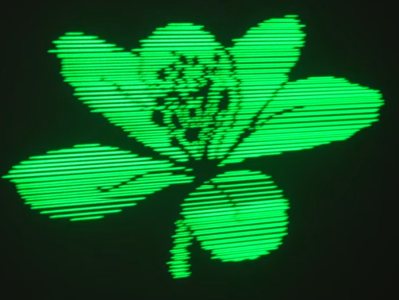
The previous device used slightly inclined mirrors to deflect the beam into scanlines, with one mirror per scanline limiting the vertical resolution. To improve resolution, the mirrors were replaced with identically aligned mirrors of the type used in laser printers for horizontal scanning. An off-the-shelf laser galvo was used for vertical scanning, allowing faster scanning due to its small deflection angle. This setup is quicker than then usual vector galvo application, as the smaller movements require less time to complete. Once the resolution improvement was in hand, the controller upgrade to a Teensy 4 gave more processing bandwidth than the previous Arduino and a consequent massive improvement in image clarity.

Finally, monochrome displays don’t look anywhere near as good as an RGB setup. [Ben] utilised a dedicated RGB laser setup since he had trouble sourcing the appropriate dichroic mirrors to match available lasers. This used four lasers (with two red ones) and the correct dichroic mirrors to combine each laser source into a single beam path, which was then sent to the galvo. [Ben] tried to find a DAC solution fast enough to drive the lasers for a proper colour-mixing input but ended up shelving that idea for now and sticking with direct on-off control. This resulted in a palette of just seven colours, but that’s still a lot better than monochrome.

The project’s execution is excellent, and care was taken to make it operate outdoors with a battery. Even with appropriate safety measures, you don’t really want to play with high-intensity lasers around the house!

Here’s the previous version we covered, a neat DIY laser galvo using steppers, and a much older but very cool RGB vector projector.

Thanks to [Chan] for the tip!

Archiving Data On Paper Using 2D Images

It seems like only yesterday we covered a project using QR codes to archive data on paper (OK, it was last Thursday), so here’s another way to do it, this time with a dedicated codec using the full page. Optar or OPTical ARchiver is a project capable of squeezing a whopping 200 Kb of data onto a single A4 sheet of paper, with writing and reading achieved with a standard laser printer and a scanner. It’s a bit harder than you might think to get that much data on the page, given that even a 600 DPI printer can’t reliably place every dot each time. Additionally, paper is rarely uniform at the microscopic scale, so Optar utilizes a forward error-correcting coding scheme to cater for a little irregularity in both printing and scanning.

The error-correcting scheme selected was an Extended Golay code (24, 12, 8),  which, interestingly, was also used for image transmission by the NASA Voyager 1 and 2 missions. In information theory terms, this scheme has a minimum Hamming Distance of 8, giving detection of up to seven bit errors. This Golay code implementation is capable of correcting three-bit errors in each 24-bit block, with 12 bits available for payload. That’s what the numbers in those brackets mean.

Another interesting problem is paper stretch during printing. A laser printer works by feeding the paper around rollers, some of which are heated. As a printer wears or gets dirty, the friction coefficient along the rollers can vary, leading to twisting and stretching of the paper during the printing process. Water absorbed by the paper can also lead to distortion. To compensate for these effects, Optar regularly inserts calibration targets throughout the bit image, which are used to locally resynchronize the decoding process as the image is processed. This is roughly similar to how the alignment patterns work within larger QR codes. Finally, similar to the position detection targets (those square bits) in QR codes, Optar uses a two-pixel-wide border around the bit image. The border is used to align to the corners well enough to locate the rows of bits to be decoded.

In the distant past of last week, we covered a similar project that uses QR codes. This got us thinking about how QR codes work, and even if encoding capacity can be increased using more colors than just black and white?

Thanks to [Petr] for the tip!

❌