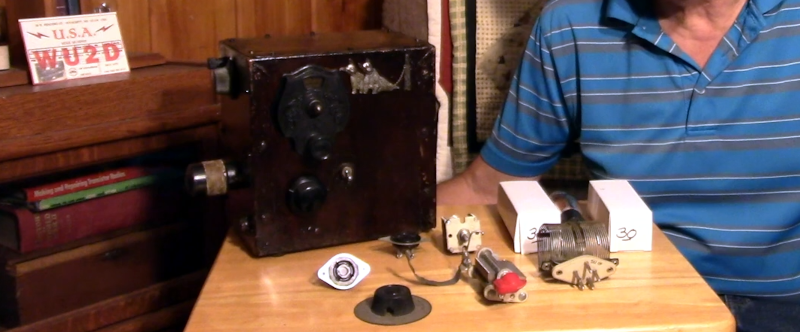
[Project 326] wanted to know exactly what gas was in some glass tubes. The answer, of course, is to use a spectrometer, but that’s an expensive piece of gear, right? Not really. Sure, these cheap devices aren’t perfect, but they are serviceable and, as the video below shows, there are ways to work around some of the limitations.
The two units in question are “The Little Garden” spectrometer and a TLM-2. Neither are especially sensitive, but both are well under $100, so you can’t expect much. Because the spectrometers were not very sensitive, a 3D printed jig and lens were used to collect more light and block ambient light interference. The jigs also allowed the inclusion of special filters, which enhanced performance quite a bit. The neon bulbs give off the greatest glow when exposed to high voltage. Other bulbs contain things like helium, xenon, and carbon dioxide. There were also tubes with mercury vapor and even deuterium.
We’ll admit it. Not everyone needs a spectrometer, but if you do, there’s a lot of really interesting info on how to get the most out of these cheap devices. Apparently, [Project 326] was frustrated that he couldn’t buy an X-ray spectrometer and has vowed to create one, so we’ll be interested to see how that goes.
[Ben] may be 15 years old, but he’s got the knack for 3D printing and artistic mechanical design. When you see his 3D-printed mechanical jellyfish lamp, we think you’ll agree. Honestly, it is hardly fair to call it a lamp. It is really — as [Ben] points out — a kinetic sculpture.
One of the high points of the post is the very detailed documentation. Not only is everything explained, but there is quite a bit of background information on jellyfish, different types of gears, and optimizing 3D prints along with information on how to recreate the sculpture.
There is quite a bit of printing, including the tentacles. There are a few options, like Arduino-controlled LEDs. However, the heart of the operation is a geared motor.
All the design files for 3D printing and the Arduino code are in the post. There’s also a remote control. The design allows you to have different colors for various pieces and easily swap them with a screwdriver.
One major concern was how noisy the thing would be with a spinning motor. According to [Ben], the noise level is about 33 dB, which is about what a whisper sounds like. However, he mentions you could consider using ball bearings, quieter motors, or different types of gears to get the noise down even further.
We imagine this jellyfish will come in at well under $6 million. If you don’t want your jellyfish to be art, maybe you’d prefer one that creates art.
It is a pretty common first project to use an Arduino (or similar) to blink an LED. Which, of course, brings taunts of: you could have used a 555! You can, of course, also use any sort of oscillator, but [Mustafa] has a different approach. Blinking an LED with three resistors and a capacitor. Ok, ok… one of the resistors is a light-dependent resistor, but still.
In reality, this is a classic relaxation oscillator. The capacitor charges until the LED lights. This, however, causes the capacitor to discharge, which eventually turns off the LED, and the process starts again.
There is one wrinkle that could be considered a feature. In daylight, the capacitor will stay in the off state, so the blinking only occurs in darkness. Of course, the resistor also has to have a sufficient view of the LED. You might use this as a safety light that only works in the dark.
A simple circuit, but it just goes to show that we tend to forget the simple solutions in a world where a computer costs less than a dollar.
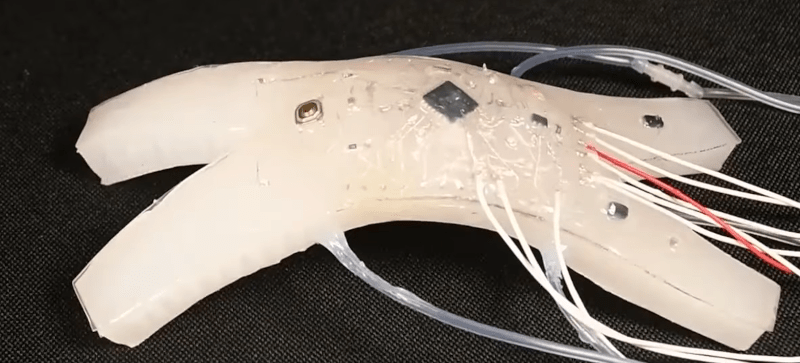
The Faboratory at Yale University has set a number of stretch goals. We don’t mean that in the usual sense. They’ve been making, as you can see in the video below, clones of commercial devices that can stretch over 300%. They’ve done Ardunios and similar controllers along with sensors. The idea is to put computer circuits in flexible robots and other places where flexibility is key, like wearable electronics.
If you are interested in details, you’ll want to read the paper in Science Robotics. They take the existing PCB layout and use a laser to cut patterns in a paper mask over the stretchable substrate. They then apply oxidized gallium-indium to build conductors.
We aren’t sure what we want with a stretchable Arduino, but we are sure someone wants them. We also wonder how much stretching these devices will survive before something happens. In the video, some of the motion looked pretty violent! There are also pictures of the circuits twisting in strange ways, too.
The starfish-like robot shows the controlling Arduino bucking like a faux cowboy on a mechanical horse. On the other hand, a full-sized Arduino wouldn’t have been practical. However, you might consider using tiny circuits, which are certainly possible these days.
Want to build your own? You are in luck, as the Faboratory has instructions and details on GitHub about how you can make your own flex circuit. Perhaps we will see a flexible SAO badge at Supercon this year? You’d think these were totally unique, but there have been many attempts at making stretchy circuits, including some other DIY guides for different techniques.
If you need an amplifier, [Hans Rosenberg] has some advice. Don’t design your own; grab cheap and tiny RF amplifier modules and put them on a PCB that fits your needs. These are the grandchildren of the old mini circuits modules that were popular among hams and RF experimenters decades ago. However, these are cheap, simple, and tiny.
You only need a handful of components to make them work, and [Hans] shows you how to make the selection and what you need to think about when laying out the PC board. Check out the video below for a very detailed deep dive.
To get the best performance, the PCB layout is at least as important as the components. [Hans] shows what’s important and how to best work out what you need using some online calculators.
Using a NanoVNA and a USB spectrum analyzer, [Hans] makes some measurements on the devices using different components, which is very instructive. The measurements lined up fairly well with the theory, and you can see the effects of changing key components in the design.
You probably think of them as “Ziploc” bags, but, technically, the generic term is zipper bag. Everything from electronic components to coffee beans arrive in them. But they weren’t always everywhere, and it took a while for them to find their niche.
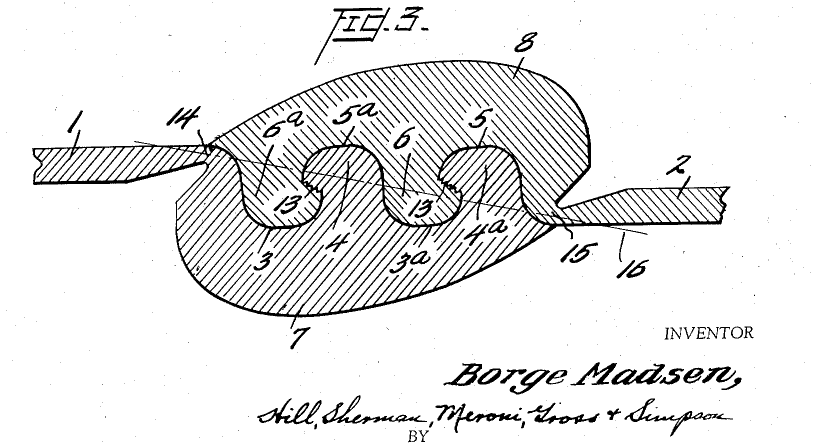
Image from an early Madsen patent
A Dane named Borge Madsen was actually trying to create a new kind of zipper for clothes in the 1950s and had several patents on the technology. The Madsen zipper consisted of two interlocking pieces of plastic and a tab to press them together. Unfortunately, the didn’t work very well for clothing.
A Romanian immigrant named Max Ausnit bought the rights to the patent and formed Flexigrip Inc. He used the zippers on flat vinyl pencil cases and similar items. However, these still had the little plastic tab that operated like a zipper pull. While you occasionally see these in certain applications, they aren’t what you think of when you think of zipper bags.
Zipping
Ausnit’s son, Steven, figured out how to remove the tab. That made the bags more robust, a little handier to use, and it also rendered them less expensive to produce. Even so, cost was a barrier because the way they were made was to heat seal the zipper portion to the bags.
That changed in the 1960s when the Ausnits learned of a Japanese company, Seisan Nippon Sha, that had a process to integrate the bags and zippers in one step which slashed the production cost in half. Flexigrip acquired the rights in the United States and created a new company, Minigrip, to promote this type of bag.
Enter Dow
In 1964, Dow Chemical wanted to acquire the rights to the Minigrip bags to sell in supermarkets using Down’s polyethylene bags. And with this marriage, the Ziploc bag as we know it was born.
Dow continued driving down the cost, tasking R. Douglas Behr to improve how the Ziploc production line worked. Eventually, the bags were flying off the line at 150 feet per minute.
You can find plenty of videos of machines that “make” zipper bags on YouTube (like the one below). Many of them are surprisingly light on detail, and it isn’t clear now how many of them are molding zippers and how many are sealing premade zippers to bags or using rolls of bags with zippers in them already. However, the video below shows making “zip lines” from pellets and then creating bags from film. This creates giant rolls of zipper bag stock which are then cut into individual bags.
Slow Start
At first, consumers weren’t sure what to do with the zipper bags. Supposedly, a record company was set to put records in the bags but when an executive handed one to his assistant, the assistant ripped the bag open without using the zipper.
Regardless, consumers finally figured it out. Now, the zipper bag is a staple in electronics, food storage, and many other areas, too.
More Than Meets the Eye
Even the most ordinary things have details you don’t think about, but someone does. For example, zip bags can have one, two, or three zippers. Some have color indicators that show the seal. Some have strips that conceal the zipper so you can tell if the bag was opened.
There are special zippers for liquids and different ones that resist getting powder stuck in the seal. Some zip bags still have pulls, and some of those pulls are child-proof, requiring the user to pinch the tab to slide it. You can even get zipper bags that don’t use locking zippers but hook-and-loop closures.
Even though zipper bags don’t seem very glamorous, you can learn a lot from the Ausnits. Improve your product in ways that make people want to use it. Also, improve your product in ways that lower costs. We’d guess that when Ausnit bought the zipper patents, he’d never imagine how the market would grow.
You can see a talk from Steve Ausnit at Marquette University in the video below. If you’ve ever had the urge to be an entrepreneur, you can learn a lot from his talk.
Old radios often had selenium rectifiers to convert AC to DC. The problem is that the old units, dating back to 1933, are prone to failure and to release dangerous chemicals like hydrogen selenide. [M Caldeira] has a new board made to fit a particular rectifier and also allows a varying voltage drop. The circuit consists of a few diodes, a MOSFET, and a pot for adjusting the voltage drop. An IRF840 MOSFET provides the adjustment.
Did it work? It did. The good news is that if it fails — which shouldn’t happen very often — it won’t release stinky and noxious fumes
We wondered if he should 3D print a fake case to make it look more the part. If you haven’t seen a real selenium rectifier, they were made of stacks of metal plates coated with bismuth or nickel. Then, a film of doped selenium was annealed to the surface to form cadmium selenide. Each plate could handle about 20 V and the more plates you used, the more reverse voltage the device could withstand.
If you are a retrocomputer person, at least in North America and Europe, you probably only have a hazy idea of what computers were in the Japanese market at the time we were all buying MSDOS-based computers. You may have heard of PC-98, but there were many Japanese-only computers out there, and a recent post by [Misty De Meo] asks the question: What happened to the Japanese computers?
To answer that question, you need a history lesson on PC-98 (NEC), FM Towns (Fujitsu), and the X68000 (Sharp). The PC-98 was originally a text-only MSDOS-based computer. But eventually, Microsoft and NEC ported Windows to the machine.
The FM Towns had its own GUI operating system. However, it too had a Windows port and the machine became just another Windows platform. The X68000, as you may well have guessed, used a 68000 CPU. Arguably, this was a great choice at the time. However, history shows that it didn’t work out, and when Sharp began making x86-based Windows machines — and, of course, they did — there was no migration path.
[Misty] makes an interesting point. While we often think of software like Microsoft Office as driving Windows adoption, that wasn’t the case in Japan. It turns out that multitasking was the key feature since Office, at the time, wasn’t very friendly to the native language.
So where did the Japanese computers go? The answer for two of them is: nowhere. They just morphed into commodity Windows computers. The 68000 was the exception — it just withered away.
Japanese pocket computers were common at one time and have an interesting backstory. Japanese can be a challenge for input but, of course, hackers are up to the challenge.
For as long as there have been machines, there have been fears of machines taking your job. One of the latest incarnations of this phenomenon is the fast-food ordering kiosk. No longer will you have some teenager asking you if you want fries with that. These days, you are more likely going to find the question on a touch screen. So, are those poor kids out of an entry-level job? Apparently not, according to a recent CNN story.
According to McDonald’s, a business that embraces the kiosks, the new technology increases sales and creates more jobs, albeit more jobs further behind the counter. Part of the reason is that while “Do you want fries with that” is a cliche, it is also a sound business practice. Cashiers should try to upsell but don’t always do so. The kiosk always remembers to offer you an apple pie or whatever else they want to move today.
Of course, there are other new jobs. A decade ago, very few restaurants would deliver food to your car while you were parked. Now, that’s practically a norm, and it requires humans for now. Of course, there are other studies that show people at kiosks with a line behind them tend to order less or have more trouble entering their order. But the consensus seems to be that it is generally a good thing and is leading to more jobs in the sector instead of less.
We like tech, of course. We can’t help but wonder if this isn’t a case where the computer isn’t great, but it is better than what you are likely to get in real life. If you are feeling smug with your job at the grill, don’t worry. The robots are coming for you next. What do you think? Are robots, AI, and tech taking jobs or making them?
Like many of us, [Gabe] has things he just can’t stop buying. In his case, it is portable satellite dishes. You’ve seen these. They look like a dome or maybe a hard hat on some kind of motorized base. What’s in them? What can you do with them? Watch the video below and find out.
As [Gabe] points out, you can often find these on the surplus market for very little money. You can sometimes find them on the side of the road for free, too. Although we’ve never been that lucky.
The video shows three generations of Winegard antennas. It shows what’s inside and how to command them. Of course, the obvious use for these is as an antenna. But we also were thinking they’d make a fair motion base for something, too.
Some of the antennas lack any limit switches. On startup, the system spins until it grinds the plastic gears to find its travel limits. We expect that’s not good for the gears, but it does work. [Gabe] mentions it might be a bit of planned obsolescence, but we imagine it is more of a cost-saving measure.
While many of us now have laser cutters — either a K40-style machine or one of the newer high-output diodes — you probably don’t have one that cuts metal. True, some hobby lasers now offer IR laser heads with modest power to engrave metal. The xTool S1, for example, accepts a 2 W IR laser as an option, but we doubt it would cut through anything thicker than foil. However, there are a growing number of fiber and carbon dioxide lasers that can cut metal at semi-reasonable prices, and [All3DP] has a primer on the technology that is worth a read.
According to the post, CO2 lasers are less expensive but require gas assist, can’t work with shiny metals well, and are finicky because of the mirrors and glass tube inside. Fiber lasers cost more, but don’t need gas, work on more materials, and have fewer parts that need maintenance or may be prone to damage. There are other kinds of lasers, but the post focuses on these, the most common ones.
Machines that can cut metal aren’t cheap. They start at about $10,000. However, prices are dropping and we remember when $10,000 would buy you what would today be a terrible oscilloscope, so maybe there’s hope for an impulse-buy metal-cutting laser one day.
It isn’t that diode lasers can’t cut metal at all, but the results are not terribly useful. What would you rather have? A metal cutter or a metal 3D printer?
If you cut your teeth on Z-80 assembly and have dabbled in other assembly languages, you might not find much mystery in creating programs using the next best thing to machine code. However, if you have only used high level languages, assembly can be somewhat daunting. [Shikaan] has an introductory article aimed to get you started at the “hello world” level of x86-64 assembly language. The second part is already up, too, and covers control structures.
You can argue that you may not need to know assembly language these days, and we’ll admit it’s certainly not as important as it used to be. However, there are unusual cases where you really need either the performance or the small footprint, which is only possible in assembly language. What’s more, it is super useful to be able to read assembly from your high-level tools when something goes wrong.
Of course, one of the problems is that each assembly language is different. For example, knowing that the x86 assembly doesn’t completely transfer to ARM instructions. However, in most cases, the general concepts apply, and it is usually fairly easy to learn your second, third, or fourth instruction set.
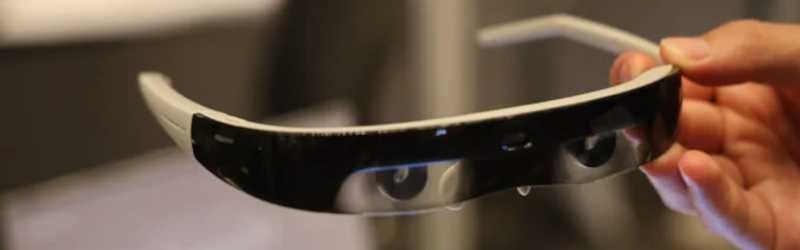
As we get older, our eyes get worse. That’s just a fact of life. It is a rite of passage the first time you leave the eye doctor with a script for “progressive” lenses which are just fancy bifocals. However, a new high-tech version of bifocals promises you better vision, but with a slight drawback, as [Sherri L. Smith] found.
Remember how users of Google Glass earned the nickname “glassholes?” Well, these new bifocals make Google Glass look like a fashion statement. If you are too young to need them, bifocals account for the fact that your eyes need different kinds of help when you look close up (like soldering) or far away (like at an antenna up on a roof). A true bifocal has two lenses and you quickly learn to look down at anything close up and up to see things far away. Progressives work the same, but they transition between the two settings instead of having a discrete mini lens at the bottom.
The new glasses, the ViXion01 change based on what you are looking for. They measure range and adjust accordingly. For $555, or a monthly rental, you can wear what looks like a prototype for a Star Trek visor and let it deduce what you are looking at and change its lenses accordingly.
Of course, this takes batteries that last about ten hours. It also requires medical approval to be real glasses and it doesn’t have that, yet. Honestly, if they worked well and didn’t look so dorky, the real use case might be allowing your eye doctor to immediately download a new setting as your vision changes. How about you? How much odd headgear are you willing to wear in public and why?
If you want to smooth out the top surface of your FDM 3D prints, you can try ironing. Many slicers allow you to set this option, which drags the hot printhead through the top surface with a tiny bit of plastic to smooth out the extrusion lines. However, a recent paper explains how non-planar ironing can provide a better result.
Usually, non-planar printing requires rotating the print bed in addition to the normal linear motion. However, you can also manipulate the layer height in real time to create bulges in the 3D print. This is the approach taken by Curvislicer, which shares authors with this paper. Another approach is to build a part conventionally but add non-planar printing to the last few layers.
The non-planar ironing is a variation of the latter technique. After slicing, the top layer of g-code passes through a Python script. The results on a test object look very impressive. We’d be interested to see how some more complex shapes look, though.
Of course, it looks like all you need is an ordinary printer, a modified copy of Slic3r, and the script, so if you try it yourself, let us know what you think. It would be great to smooth prints without extra chemicals and post-processing. While you can get good results, it is a lot of work.
[Mikrowave1] wanted to build an authentic 1930s-style ham radio station that was portable. He’s already done a regenerative receiver, but now he’s starting on a tube transmitter that runs on batteries. He’s settled on a popular design for the time, a Jones push-pull transmitter. Despite the tubes, it will only put out a few watts, which is probably good for the batteries which, at the time, wouldn’t have been like modern batteries. You can see the kickoff video below.
According to the video, these kinds of radios were popular with expeditions to exotic parts of the world. He takes a nostalgic look back at some of the radios and antennas used in some of those expeditions.
The Jones oscillator originates with [Frank Jones, W6AJF] and was quite popular in the day, as he was well-known in ham radio circles then. Normally, these took a dual triode and a crystal along with some passive components. In this case, though, the transmitter will use two type 30 tubes. If you missed the series on the receiver, that’ll give you something to watch while you wait for the next installment on the transmitter.
Automated musical instruments aren’t a new idea. From water chimes to player pianos, they’ve been around for a while. But we can’t remember the last time we saw a player ukulele. [Zeroshot] shows us one, though, and it uses an Arduino. You can see and hear it in the video below.
Honestly, with all the stepper motors, linear rails, and belts, we thought it looked like a 3D printer, at least up at the business end. [Zeroshot] thought it would be easier to build a robot than to actually learn to play the instrument. We aren’t sure we agree.
The first problem was automating both picking strings and strumming. Then, you needed a way to press down on the strings at each fret. Solenoids can act like your fingers. With the mechanics in place, it is all software, right? There were quite a few unexpected little hardware wrinkles.
The solenoids don’t move along the fretboard, so it limits the range a bit. Also, the mechanical noises sometimes seem to drown out the instrument, but it does work. Kind of. We don’t think we are going to see AI buskers anytime soon.
Don’t have a ukulele? Do you have a GameBoy? If you are building an automated ukulele, you might as well add LEDs.
There was a time when building a telescope was a rite of passage for budding astronomers, much as building a radio was the coming age for electronics folks. These days, many things are cheaper to buy than build, even though we do enjoy building anything we can. Orion was a big name in telescopes for many years. Their parent company also owned Meade and Coronado, both well-known optical brands. A recent video from [Reflactor] brought it to our attention that Orion abruptly ceased operations on July 9th.
We always hate to hear when well-known brands that serve a big part of our community vanish. According to [Reflactor], people who have telescopes with the company for repair are likely to never see them again. [Dylan O’Donnell] also had a video about it (see below), and, as he notes, at that time, the website was still operating, but it’s gone now. To add further fuel to the fire Sky & Telescope ran an article on July 12th saying that Meade was also on the chopping block, although at the time of this writing, their site is still online.
You have to wonder what problems you might have selling telescopes today. Many people live where there is light pollution. We’d like to think there are still people who want to ponder the universe from their backyard, though.
There are still people selling telescopes, so presumably, one of them — maybe Celestron — will take up the slack. Or maybe we’ll see a resurgence in telescope homebrewing.
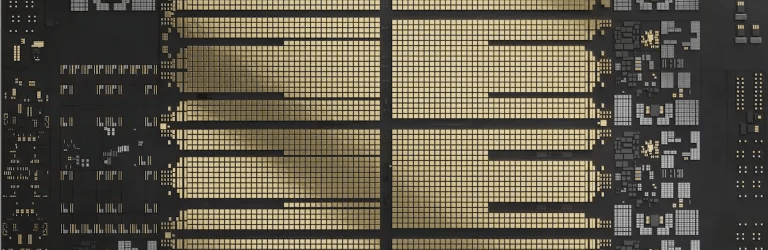
It is hard to imagine what a mainframe or supercomputer can do when we all have what amounts to supercomputers on our desks. But if you look at something like IBM’s mainframe Telum chip, you’ll get some ideas. The Telum II has “only” eight cores, but they run at 5.5 GHz. Unimpressed? It also has 360 MB of on-chip cache and I/O and AI accelerators. A mainframe might use 32 of these chips, by the way.
[Clamchowder] explains in the post how the cache has a unique architecture. There are actually ten 36 MB L2 caches on the chip. There are eight caches, one for each core, plus one for the I/O accelerator, and another one that is uncommitted.
A typical CPU will have a shared L3 cache, but with so much L2 cache, IBM went a different direction. As [Clamchowder] explains, the chip reuses the L2 capacity to form a virtual L3 cache. Each cache has a saturation metric and when one cache gets full, some of its data goes to a less saturated cache block.
Remember the uncommitted cache block? It always has the lowest saturation metric so, typically, unless the same data happens to be in another cache, it gets moved to the spare block.
There’s more to it than that — read the original post for more details. You’ll even read speculation about how IBM managed a virtual L4 cache, across CPUs.
[Michelle Hampson] reports in IEEE Spectrum that Chinese researchers may improve self-driving cars by mimicking how the human eye works. In some autonomous cars, two cameras use polarizing filters to help understand details about what the car sees. However, these filters can penalize the car’s vision in low light conditions.
Humans, however, have excellent vision in low-lighting conditions. The Retinex theory (based on the Land Effect discovered by [Edwin Land]) attributes this to the fact that our eyes sense both the reflectance and the illumination of light. The new approach processes polarized light from the car’s cameras in the same way.
The images pass through two algorithms. One compensates for brightness levels, while the other processes the reflective properties of the incoming light. They mounted cameras on real cars and drove them in actual dim environments to test everything out.
The result? Studies show that the approach improved driving accuracy by approximately 10%. However, the algorithms require extensive training on difficult-to-obtain data sets, so that is one challenge to adoption.
Self-driving cars certainly need improving. Oddly enough, navigation can be done with polarizing filter cameras and a clear view of the sky. Or, you can look under the road.