Vista de Lectura

Hay nuevos artículos disponibles. Pincha para refrescar la página.

Reverse Time Back to the Days of RPN

While Texas Instruments maintains dominance in the calculator market (especially graphing calculators), there was a time when this wasn’t the case. HP famously built the first portable scientific calculator, the HP-35, although its reverse-Polish notation (RPN) might be a bit of a head-scratcher to those of us who came up in the TI world of the last three or four decades. Part of the reason TI is so dominant now is because they were the first to popularize infix notation, making the math on the calculator look much more like the math written on the page, especially when compared to the RPN used by HP calculators. But if you want to step into a time machine and see what that world was like without having to find a working HP-35, take a look at [Jeroen]’s DIY RPN calculator.

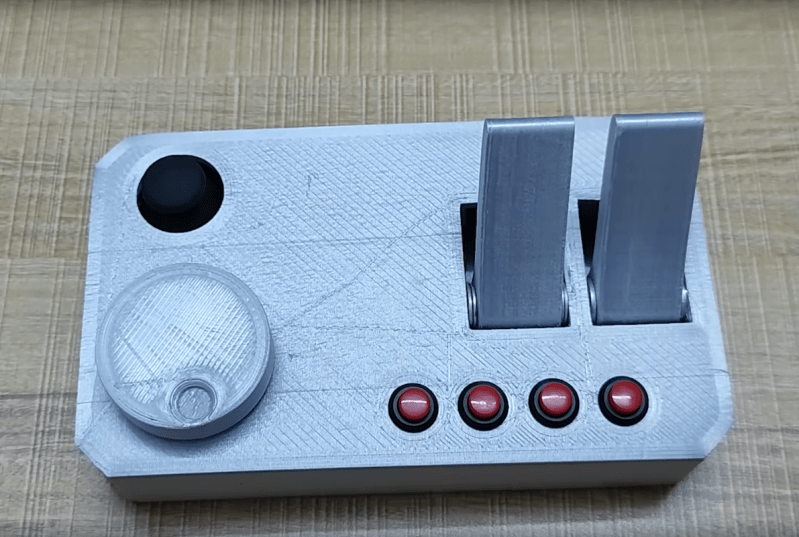
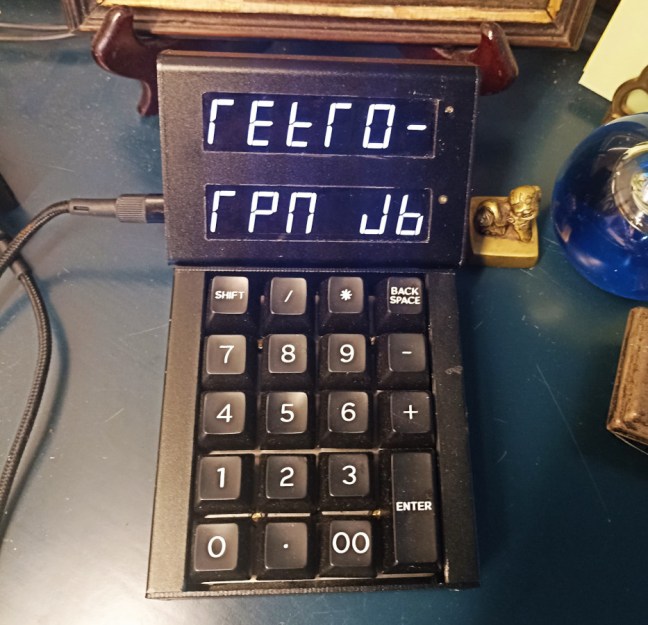
Since the calculator is going to be RPN-based, it needs to have a classic feel. For that, mechanical keyboard keys are used for the calculator buttons with a custom case to hold it all together. It uses two rows of seven-segment displays to show the current operation and the results. Programming the Arduino Nano to work as an RPN calculator involved a few tricks, though. [Jeroen] wanted a backspace button, but this disrupts the way that the Arduino handles the input and shows it on the display but it turns out there’s an Arudino library which solves some of these common problems with RPN builds like this.

One of the main reasons that RPN exists at all is that it is much easier for the processor in the calculator to understand the operations, even if it makes it a little bit harder for the human. This is because early calculators made much more overt use of a stack for performing operations in a similar way to Assembly language. Rather than learning Assembly, an RPN build like this can be a great introduction to this concept. If you want to get into the weeds of Assembly programming this is a great place to go to get started.

Digital Audio Workstation In A Box

Although it’s still possible to grab a couple of friends, guitars, and a set of drums and start making analog music like it’s 1992 and there are vacant garages everywhere yearning for the sounds of power chords, the music scene almost demands the use of a computer now. There are a lot of benefits, largely that it dramatically lowers the barrier to entry since it greatly reduces the need for expensive analog instruments. It’s possible to get by with an impressively small computer and only a handful of other components too, as [BAussems] demonstrates with this tiny digital audio workstation (DAW).

The DAW is housed inside a small wooden box and is centered around a Behringer JT-4000 which does most of the heavy lifting in this project. It’s a synthesizer designed to be as small as possible, but [BAussems] has a few other things to add to this build to round out its musical capabilities. A digital reverb effects pedal was disassembled to reduce size and added to the DAW beneath the synthesizer. At its most basic level this DAW can be used with nothing but these components and a pair of headphones, but it’s also possible to add a smartphone to act as a sequencer and a stereo as well.

For a portable on-the-go rig, this digital audio workstation checks a lot of the boxes needed including MIDI and integration with a computer. It’s excellent inspiration for anyone else who needs a setup like this but doesn’t have access, space, or funds for a more traditional laptop- or desktop-centered version. For some other small on-the-go musical instruments we recently saw a MIDI-enabled keyboard not much larger than a credit card.

Linux, Now In Real Time

Although Linux runs almost every supercomputer, most of the web, the majority of smart phones, and a few writers’ ancient Macbooks, there’s one major weak point in the Linux world that will almost always have developers reaching for a different operating system. Linux is not a real-time operating system (RTOS), meaning that it can’t respond to requests in the real world within a set timeframe. This means that applications needing computer control in industry, medicine, robotics, and other real-world situations generally need a purpose-built RTOS. At least, that was true until recently when an update to the Linux kernel added real-time capabilities.

The feature, called PREEMPT_RT, forces the Linux kernel to respond to certain request within a set limit of time. This means that a system with this support built into the kernel can “preempt” any current task, stopping everything else a computer is doing in order to execute that task right away. There are some existing solutions to getting a functional equivalent system working with Linux now, but they can be clunky or inelegant, requiring the user to install patches or other software to get it to work. With the support built directly into the kernel this will become much less of a pain point for anyone who needs this functionality going forward.

This feature has been in the works for around two decades now, so with this entering general use now we would expect to start seeing it show up in various projects as well as in commercial offerings soon, especially since other RTOS solutions can be pricey. Don’t recompile the kernel in your desktop for this feature just yet, though; real-time function can cause some unintended consequences with normal use you’ll need to account for. There’s some more discussion on this in the /r/Linux subreddit and there are some other real-time operating systems available for computers not typically capable of running Linux to take a look at as well.

Amateur Astronomer Images Spy Satellite

As anyone who’s looked at the sky just before dawn or right after dusk can confirm, for the last seventy years or so there have been all kinds of artificial satellites floating around in low-Earth orbit that are visible to the naked eye. Perhaps the most famous in the last few decades is the International Space Station, but there are all kinds of others up there from amateur radio satellites, the Starlink constellation, satellite TV, and, of course, various spy satellites from a few of the world’s governments. [Felix] seems to have found one and his images of it can be found here.

[Felix] has been taking pictures of the night sky for a while now, including many different satellites. While plenty of satellites publish their paths to enable use, spy satellites aren’t generally public record but are still able to be located nonetheless. He uses a large Dobsonian telescope to resolve the images of several different satellites speculated to be spy satellites, with at least one hosting a synthetic aperture radar (SAR) system. His images are good enough to deduce the size and shape of the antennas used, as well as the size of the solar panels on board.

As far as being concerned about the ramifications of imaging top-secret technology, [Felix] is not too concerned. He states that it’s likely that most rival governments would be able to observe these satellites with much more powerful telescopes that he has, so nothing he has published so far is likely to be a surprise to anyone. Besides, these aren’t exactly hidden away, either; they’re up in the sky for anyone to see. If you want to take a shot at that yourself you can get a Dobsonian-like telescope mostly from parts at Ikea, and use a bit of off-the-shelf electronics to point them at just the right position too.

Mechanical Logic Gates With Amplification

One of the hardest things about studying electricity, and by extension electronics, is that you generally can’t touch or see anything directly, and if you can you’re generally having a pretty bad day. For teaching something that’s almost always invisible, educators have come up with a number of analogies for helping students understand the inner workings of this mysterious phenomenon like the water analogy or mechanical analogs to electronic circuits. One of [Thomas]’s problems with most of these devices, though, is that they don’t have any amplification or “fan-out” capability like a real electronic circuit would. He’s solved that with a unique mechanical amplifier.

Digital logic circuits generally have input power and ground connections in addition to their logic connection points, so [Thomas]’s main breakthrough here is that the mechanical equivalent should as well. His uses a motor driving a shaft with a set of pulleys, each of which has a fixed string wrapped around the pulley. That string is attached to a second string which is controlled by an input. When the input is moved the string on the pulley moves as well but the pulley adds a considerable amount of power to to the output which can eventually be used to drive a much larger number of inputs. In electronics, the ability to drive a certain number of inputs from a single output is called “fan-out” and this device has an equivalent fan-out of around 10, meaning each output can drive ten inputs.

[Thomas] calls his invention capstan lever logic, presumably named after a type of winch used on sailing vessels. In this case, the capstan is the driven pulley system. The linked video shows him creating a number of equivalent circuits starting with an inverter and working his way up to a half adder and an RS flip-flop. While the amplifier pulley does take a minute to wrap one’s mind around, it really helps make the equivalent electronic circuit more intuitive. We’ve seen similar builds before as well which use pulleys to demonstrate electronic circuits, but in a slightly different manner than this build does.

Trees Turned Into Wind Turbines, Non-Destructively

Trees and forests are an incredibly important natural resource not only for lumber and agricultural products, but also maintain a huge amount of biodiversity in the various types of forests across the globe, stabilize their local environments, and can be protective against climate change as a way to sequester atmospheric carbon. But the one thing they don’t do is make electricity. At least, not directly. [Concept Crafted Creations] is working on solving this issue by essentially turning an unmodified tree into a kind of wind turbine.

The turbine works by first attaching a linear generator to the trunk of a tree. This generator has a hand-wound set of coils on the outside, with permanent magnets on a shaft that can travel up and down inside the set of coils. The motion to power the generator comes from a set of ropes connected high up in the tree to a tree branch. When the wind moves the branch, the ropes transfer the energy to a 3D-printed rotational mechanism that transfers this movement to a pulley attached to a gearbox which then pumps the generator up and down. The more ropes, branches, and generators attached to a tree the more electricity can be generated.

Admittedly, this project is still a proof-of-concept, although the working prototype does seem to be working on a real tree in a forest at the current time. [Concept Crafted Creations] hopes to work with others building similar devices to improve on the idea and build more refined prototypes in the future. It’s also not the only way of building a wind energy generator outside of the traditional bladed design, either. It’s possible to build a wind-powered generator with no moving parts that uses vibrations instead of rotational motion as well.

Blowing Up Shell Scripts

One of the most universal experiences of any Linux or Unix user is working through a guide or handbook and coming across an almost unbelievably complex line of code meant to be executed with a shell. At the time of encountering a snippet like this it’s difficult to imagine any human ever having written it in the first place, but with some dedication it is possible to tease out what these small bits of code do when they’re typed into the terminal and run (unless it’s something like :(){ :|:& };: but that’s another story entirely). [noperator] recently built a tool which helps users in this predicament understand these shell scripts by expanding them into a more human-intelligible form.

The tool is named sol and does much more than expanding shell one-liners into a readable format. It also provides an interactive shell environment where the user can explore the exploded code in detail, modify it in any way they see fit, and collapse it back down to a single line so it can easily be sent to other users. It can be used with most of the major text editors as well as piped directly to standard input, and has a number of other options as well such as custom configurations and the ability to see non-standard bits of code that might not be compatible from one shell environment to another, as well as helping to translate those bits of code.

[noperator] has made the code available in the linked GitHub page for anyone curious about its use, and has a to-do list for future versions of the tool as well including adding support beyond bash. We’d definitely recommend a tool like this especially if you’re still relatively new to bash scripting (or shell scripting in general) and, as always, we’d just to remind everyone not to blindly copy and paste commands into their terminal windows. If you’re the type of person to go out on a limb and run crazy commands to see what they actually do, though, make sure you’re at least logged into the right computer first.

Raspberry Pi Becomes Secure VPN Router

OpenWRT is a powerful piece of open-source software that can turn plenty of computers into highly configurable and capable routers. That amount of versatility comes at a cost, though; OpenWRT can be difficult to configure outside of the most generic use cases. [Paul] generally agrees with this sentiment and his latest project seeks to solve a single use case for routing network traffic, with a Raspberry Pi configured to act as a secure VPN-enabled router configurable with a smartphone.

The project is called PiFi and, while it’s a much more straightforward piece of software to configure, at its core it is still running OpenWRT. The smartphone app allows most users to abstract away most of the things about OpenWRT that can be tricky while power users can still get under the hood if they need to. There’s built-in support for Wireguard-based VPNs as well which will automatically route all traffic through your VPN of choice. And, since no Pi router is complete without some amount of ad blocking, this router can also take care of removing most ads as well in a similar way that the popular Pi-hole does. More details can be found on the project’s GitHub page.

This router has a few other tricks up its sleeve as well. There’s network-attached storage (NAS) built in , with the ability to use the free space on the Pi’s microSD card or a USB flash drive. It also has support for Ethernet and AC1300 wireless adapters which generally have much higher speeds than the built-in WiFi on a Raspberry Pi. It would be a great way to build a guest network, a secure WiFi hotspot when traveling, or possibly even as a home router provided that the home isn’t too big or the limited coverage problem can be solved in some other way. If you’re looking for something that packs a little more punch for your home, take a look at this guide to building a pfSense router from the ground up.

Train Speed Signaling Adapted For Car

One major flaw of designing societies around cars is the sheer amount of signage that drivers are expected to recognize, read, and react to. It’s a highly complex system that requires constant vigilance to a relatively boring task with high stakes, which is not something humans are particularly well adapted for. Modern GPS equipment can solve a few of these attention problems, with some able to at least show the current speed limit and perhaps an ongoing information feed of the current driving conditions., Trains, on the other hand, solved a lot of these problems long ago. [Philo] and [Tris], two train aficionados, were recently able to get an old speed indicator from a train and get it working in a similar way in their own car.

The speed indicator itself came from a train on the Red Line of the T, Boston’s subway system run by the Massachusetts Bay Transportation Authority (MBTA). Trains have a few unique ways of making sure they go the correct speed for whatever track they’re on as well as avoid colliding with other trains, and this speed indicator is part of that system. [Philo] and [Tris] found out through some reverse engineering that most of the parts were off-the-shelf components, and were able to repair a few things as well as eventually power everything up. With the help of an Arduino, an I/O expander, and some transistors to handle the 28V requirement for the speed indicator, the pair set off in their car to do some real-world testing.

This did take a few tries to get right, as there were some issues with the power supply as well as some bugs to work out in order to interface with the vehicle’s OBD-II port. They also tried to use GPS for approximating speed as well, and after a few runs around Boston they were successful in getting this speed indicator working as a speedometer for their car. It’s an impressive bit of reverse engineering as well as interfacing newer technology with old. For some other bits of train technology reproduced in the modern world you might also want to look at this recreation of a train whistle.

Misleading GPS, Philosophy of Maps, And You

The oft-quoted saying “all models are wrong, but some are useful” is a tounge-in-cheek way of saying that at some level, tools we use to predict how the world behaves will differ from reality in some measurable way. This goes well beyond the statistics classroom it is most often quoted in, too, and is especially apparent to anyone who has used a GPS mapping device of any sort. While we might think that our technological age can save us from the approximations of maps and models, there are a number of limitations with this technology that appear in sometimes surprising ways. [Kyle] has an interesting writeup about how maps can be wrong yet still be incredibly useful especially in the modern GPS-enabled world.

[Kyle] is coming to us with a background in outdoor travel, involving all kinds of activities like hiking and backcountry skiing. When dealing with GPS tracking under these conditions, often the user’s actual position will deviate from their recorded position by a significant margin. Obvious causes like a loss of GPS signal are one thing, but there are some other reasons for this behavior. GPS can be off by tens of meters, so the question then becomes whether or not mapping software should record these errors or attempt to guess where it thinks the most likely location is, based on available data like barometric pressure, existing trails, elevation profiles, and other data. Especially in areas where the elevation changes rapidly, these errors can compound quickly and provide some truly mystifying data. Where mapping software draws these distinctions is a matter of active debate in these communities, with some taking more approximate routes that make more sense while sacrificing the raw data, and others letting the GPS pins fall where they may.

For anyone who’s been confused by Strava or Garmin data at the end of a run, hike, or bike ride, this is a fairly informative explanation of why the GPS data might differ from the actual distance of any of these activities. [Kyle] also notes that unless you’re out with a measuring wheel (and perhaps even then) any method to determine a true distance like this will have some amount of approximation or error. The closest technological solution to a problem like this we’ve seen is this GPS receiver which claims centimeter-level precision using some unique tricks.

Large Language Models on Small Computers

As technology progresses, we generally expect processing capabilities to scale up. Every year, we get more processor power, faster speeds, greater memory, and lower cost. However, we can also use improvements in software to get things running on what might otherwise be considered inadequate hardware. Taking this to the extreme, while large language models (LLMs) like GPT are running out of data to train on and having difficulty scaling up, [DaveBben] is experimenting with scaling down instead, running an LLM on the smallest computer that could reasonably run one.

Of course, some concessions have to be made to get an LLM running on underpowered hardware. In this case, the computer of choice is an ESP32, so the dataset was reduced from the trillions of parameters of something like GPT-4 or even hundreds of billions for GPT-3 down to only 260,000. The dataset comes from the tinyllamas checkpoint, and llama.2c is the implementation that [DaveBben] chose for this setup, as it can be streamlined to run a bit better on something like the ESP32. The specific model is the ESP32-S3FH4R2, which was chosen for its large amount of RAM compared to other versions since even this small model needs a minimum of 1 MB to run. It also has two cores, which will both work as hard as possible under (relatively) heavy loads like these, and the clock speed of the CPU can be maxed out at around 240 MHz.

Admittedly, [DaveBben] is mostly doing this just to see if it can be done since even the most powerful of ESP32 processors won’t be able to do much useful work with a large language model. It does turn out to be possible, though, and somewhat impressive, considering the ESP32 has about as much processing capability as a 486 or maybe an early Pentium chip, to put things in perspective. If you’re willing to devote a few more resources to an LLM, though, you can self-host it and use it in much the same way as an online model such as ChatGPT.

It’s Spreadsheets All The Way Down for This 80s Handheld

Unlike the today’s consumer computer market, the 1980s were the wild west in comparison. There were all kinds of different, incompatible operating systems, hardware, and programs, all competing against one another, and with essentially no networking to tie everything together. Some of these products were incredibly niche as well, only running one program or having a limited use case to keep costs down. Such was the Convergent WorkSlate, a computer that ran only a spreadsheet with any programs also needing to be built into a spreadsheet.

Upon booting the device, the user is presented with a fairly recognizable blank spreadsheet, albeit with a now-dated LCD display (lacking a backlight) and a bespoke keyboard and cursor that wouldn’t have allowed for easy touch typing. The spreadsheet itself is quite usable though, complete with formatting tools and the capability to use formulas like a modern spreadsheet program would. It also hosted a tape deck for audio and data storage, a modem for communicating with other devices, and an optional plotter-style printer. The modem port is how [Old VCR] eventually interfaces with the machine, although as one can imagine is quite a task for a piece of small-batch technology from the 80s like this. After learning how to send and receive information, a small game is programmed into the machine and then a Gopher interface is built to give the device limited Internet connectivity.

The investigation that [Old VCR] goes into on this project to get this obsolete yet unique piece of hardware running and programmed to do other tasks is impressive, and worth taking a look at especially because spreadsheets like this aren’t Turing-complete, leading to a few interesting phenomenon that most of us wouldn’t come across in the modern computing world. Since only around 60,000 units were ever made it’s difficult to come across these machines, but if you want to take a look at the spreadsheet world of the 80s without original hardware you can still run Lotus 1-2-3 natively in Linux today.

Thanks to [Cameron] for the tip!

A Clean Linux Installation For an Android TV Box

Although Android technically runs on top of Linux, generally most Android devices abstract away the underlying Linux-ness of these machines. In theory this is a good thing; we wouldn’t necessarily want to live in a world where we have to log in to a command-line interface just to make a phone call. But too much abstraction often needlessly restricts the capabilities of the underlying hardware. [Murray] a.k.a [Green Bug-Eyed Monster] has an Android TV box with just such a problem, as the Android OS included with it allows for watching TV just fine, but with a few tweaks it can run a full Linux installation instead, turning it into a much more versatile machine.

This specific Android TV box is based on the Rockchip 3566, a popular single-board computer used in a wide array of products. As such it is one of the easier targets for transforming a limited TV machine into a fully capable desktop computer. The first step is to compile an Armbian image for the machine, in this case using an x86 installation of Ubuntu to cross-compile for the ARM-based machine. With a viable image in hand, there’s an option to either solder on a microSD slot to the included pins on the computer’s PCB or to flash the image directly to the on-board eMMC storage by tricking the machine into thinking that the eMMC is missing. Either option will bring you into a full-fledged Linux environment, with just a few configuration steps to take to get it running like any other computer.

[Murray] began this process as an alternative to paying the inflated prices of Raspberry Pis over the past few years, and for anyone in a similar predicament any computer with the Rockchip 3566 processor in it could be a potential target for a project like this. You might need to make a few tweaks to the compile options and hardware, but overall the process should be similar. And if you don’t have an RK3566, don’t fret too much. We’ve seen plenty of other Android TV boxes turned into similar devices like this one which runs RetroPie instead.

Universal Power Bank Customized To Your Liking

One of the most troubling trends of almost every modern consumer product that uses electricity is that the software that controls the product is likely to be proprietary and closed-source, which could be doing (or not doing) any number of things that its owner has no control over. Whether it’s a computer, kitchen appliance, or even a device that handles the electricity directly, it’s fairly rare to find something with software that’s open and customizable. That’s why [Traditional-Code9728] is working on a power bank with an open-source firmware.

From a hardware perspective the power bank is fairly open as well, with a number of options for connecting this device to anything else that might need power. It sports a bidirectional USB-C port as well as a DC barrel plug, either of which can either charge other devices or receive energy to charge its own battery. These ports can also accept energy from a solar panel and have MPPT built in. There’s also dual USB-A ports which can provide anywhere from five to 12 volts at 25 watts, and a color screen which shows the current status of the device.

While this is a prototype device, it’s still actively being worked on. Some future planned upgrades to the power bank include a slimmer design, charge limiting features to improve battery life, and more fine-tuned control of the output voltage and current on the USB-C port. With all of the software being open-source, as well as the circuit diagram and 3D printing files, it could find itself in plenty of applications as well. This power bank also stays under the energy limits for flying on most commercial airlines as well, but if you don’t plan on taking your power bank on an airplane then you might want to try out this 2000-watt monster instead.

Putting a Pi in a Container

Docker and other containerization applications have changed a lot about the way that developers create new software as well as how they maintain virtual machines. Not only does containerization reduce the system resources needed for something that might otherwise be done in a virtual machine, but it standardizes the development environment for software and dramatically reduces the complexity of deploying on different computers. There are some other tricks up the sleeves as well, and this project called PI-CI uses Docker to containerize an entire Raspberry Pi.

The Pi container emulates an entire Raspberry Pi from the ground up, allowing anyone that wants to deploy software on one to test it out without needing to do so on actual hardware. All of the configuration can be done from inside the container. When all the setup is completed and the desired software installed in the container, the container can be converted to an .img file that can be put on a microSD card and installed on real hardware, with support for the Pi models 3, 4, and 5. There’s also support for using Ansible, a Docker automation system that makes administering a cluster or array of computers easier.

Docker can be an incredibly powerful tool for developing and deploying software, and tools like this can make the process as straightforward as possible. It does have a bit of a learning curve, though, since sharing operating system tools instead of virtualizing hardware can take a bit of time to wrap one’s mind around. If you’re new to the game take a look at this guide to setting up your first Docker container.

2024 Tiny Games Contest: Realistic Steering Wheel Joystick In Miniature

For racing games, flight simulators, and a few other simulation-style games, a simple controller just won’t do. You want something that looks and feels closer to the real thing. The major downsides to these more elaborate input methods is that they take up a large amount of space, requiring extra time for setup, and can be quite expensive as well. To solve both of these problems [Rahel zahir Ali] created a miniature steering wheel controller for some of his favorite games.

While there are some commercial offerings of small steering wheels integrated into an otherwise standard video game controller and a few 3D printed homebrew options, nothing really felt like a true substitute. The main design goal with this controller was to maintain the 900-degree rotation of a standard car steering wheel in a smaller size. It uses a 600P/R rotary encoder attached to a knob inside of a printed case, with two spring-loaded levers to act as a throttle and brake, as well as a standard joystick to adjust camera angle and four additional buttons. Everything is wired together with an Arduino Leonardo that sends the inputs along to the computer.

Now he’s ready to play some of his favorite games and includes some gameplay footage using this controller in the video linked below. If you’re racing vehicles other than cars and trucks, though, you might want a different type of controller for your games instead.

2024 Tiny Games Challenge

Adding Human Detection to Home Automation

Radar made a huge impact when it was first invented, allowing objects to be detected using radio waves which would normally be difficult or impossible to observe through other means. Radio waves of all frequencies can be used for radar as well, whether that’s detecting ships beyond the horizon, tracking aircraft near an airport, penetrating the ground, or imaging objects with a high resolution. At the millimeter wavelength it’s fairly easy to detect humans with the right hardware, and using some inexpensive radar modules [Tech Dregs] shows us how to add this capability a home automation system.

Since these modules aren’t trying to image humans with fine detail or detect them at long range, the hardware can be fairly inexpensive. [Tech Dregs] is using the LD2410B modules which have not only an on-board microcontroller but also have the radio antennas used for radar built right onto the PCB. They have a simple binary output which can communicate whether or not a human is detected, but there’s also UART for communicating more details about what the module senses in the room. [Tech Dregs] is using this mode to connect the modules to Home Assistant, where they will be used to help automate his home’s lighting.

The only significant problem he had setting these modules up was getting them built into an enclosure. The short wavelengths used in this type of radar module don’t penetrate solid objects very well at all, so after trying to hide one behind an e-ink screen he eventually settled on hollowing out a space in a bezel with very thin plastic between the module and the room. If you need more out of your radar modules than object detection, though, you can always try building a pulse compression radar which can provide much more accurate ranging of objects.

A Non-Musical Use Case for 8-Track

There was a time in the not-too-distant past when magnetic tape was the primary way of listening to and recording audio. Most of us are familiar with the cassette tape, a four-track system that plays first one side of the tape, then the other. There was the eight-track tape as well which did not have quite as much popularity or longevity but did have a few interesting features that [Serial Hobbyism] took advantage of to make an interactive game.

The defining feature of the eight-track system, beyond the obvious eight tracks on the tape, is that the tape runs in a continuous loop, never needing to be stopped or flipped over. Instead, four buttons select pairs of the eight tracks, moving a head immediately to make the switch on-the-fly. [Serial Hobbyism]’s game plays a trivia-style audio recording and asks the player to answer questions by pushing one of the four “program” buttons to switch tracks. If the correct track is selected, the recorded audio congratulates the player and then continues on with the game. Likewise, if an incorrect track is selected, the recording notes that and the game continues.

Another interesting feature of this game is that it can be played without modifying an eight-track player, as the selectable tracks are a core function of this technology. They can be used in a similar way as cassette tapes to store computer data and a data recorder similar to the eight-track system was used on the Voyager space probes, although these only bear a passing resemblance.

Creating Customized Diffraction Lenses For Lasers

[The Thought Emporium] has been fascinated by holograms for a long time, and in all sorts of different ways. His ultimate goal right now is to work up to creating holograms using chocolate, but along the way he’s found another interesting way to manipulate light. Using specialized diffraction gratings, a laser, and a few lines of code, he explores a unique way of projecting hologram-like images on his path to the chocolate hologram.

There’s a lot of background that [The Thought Emporium] has to go through before explaining how this project actually works. Briefly, this is a type of “transmission hologram” that doesn’t use a physical object as a model. Instead, it uses diffraction gratings, which are materials which are shaped to light apart in specific ways. After some discussion he demonstrates creating diffraction gratings using film. Certain diffraction patterns, including blocking all of the light source, can actually be used as a lens as the light bends around the blockage into the center of the shadow where there can be focal points. From there, a special diffraction lens can be built.

The diffraction lens can be shaped into any pattern with a small amount of computer code to compute the diffraction pattern for a given image. Then it’s transferred to film and when a laser is pointed at it, the image appears on the projected surface. Diffraction gratings like these have a number of other uses as well; the video also shows a specific pattern being used to focus a telescope for astrophotography, and a few others in the past have used them to create the illusive holographic chocolate that [The Thought Emporium] is working towards.

❌