Vista de Lectura

Hay nuevos artículos disponibles. Pincha para refrescar la página.

Rapid Prototyping PCBs With The Circuit Graver
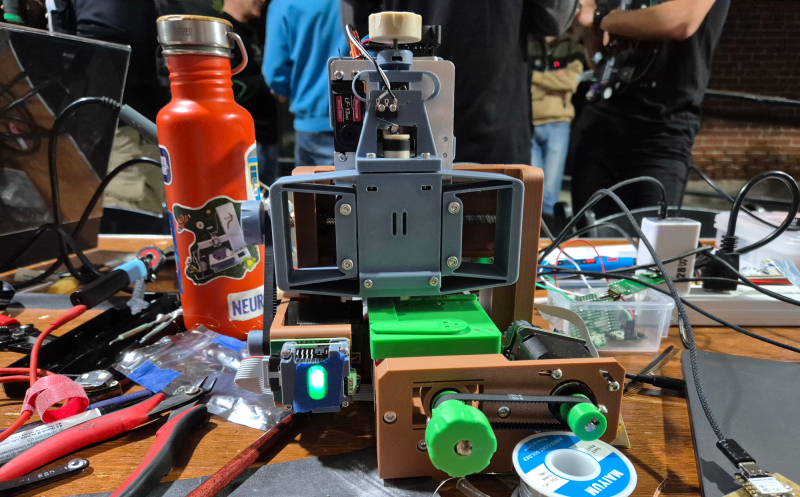
Walking around the alley at Hackaday Supercon 2024, we noticed an interesting project was getting quite a bit of attention, so we got nearer for a close-up. The ‘Circuit Graver’ by [Zach Fredin] is an unconventional PCB milling machine, utilizing many 3D printed parts, the familiar bed-slinger style Cartesian bot layout and a unique cutting head. The cutting tool, which started life as a tungsten carbide lathe tool, is held on a rotary (‘R’) axis but can also move vertically via a flexure-loaded carriage driven by a 13 kg servo motor.

The stocky flexure took a lot of iteration, as the build logs will show. Despite a wild goose chase attempting to measure the cutting force, a complete machine solution was found by simply making everything stiff enough to prevent the tool from chattering across the surface of the FR4 blank. Controlling and maintaining the rake angle was a critical parameter here. [Zach] actually took an additional step, which we likely wouldn’t have thought of, to have some copper blanks pre-fabricated to the required size and finished with an ENIG coating. It’s definitely a smart move!
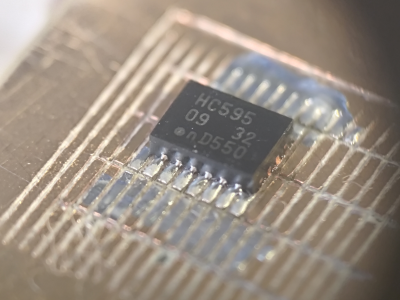
To allow the production of PCB-class feature sizes compatible with a traditional PCB router, the cutting tool was sharpened to a much smaller point than would be used in a lathe using a stone. This reduced the point size sufficiently to allow feature sizes down to 4 mils, or at least that’s what initial characterization implied was viable.  As you can see from the build logs, [Zach] has achieved a repeatable enough process to allow building a simple circuit using an SMT 74HC595 and some 0402 LEDs to create an SAO for this year’s Supercon badge. Neat stuff!

We see a fair few PCB mills, some 3D printed, and some not. Here’s a nice one that fits in that former category. Milling PCBs is quite a good solution for the rapid prototyping of electronics. Here’s a guide about that.
A CO2 Traffic Light On An SAO

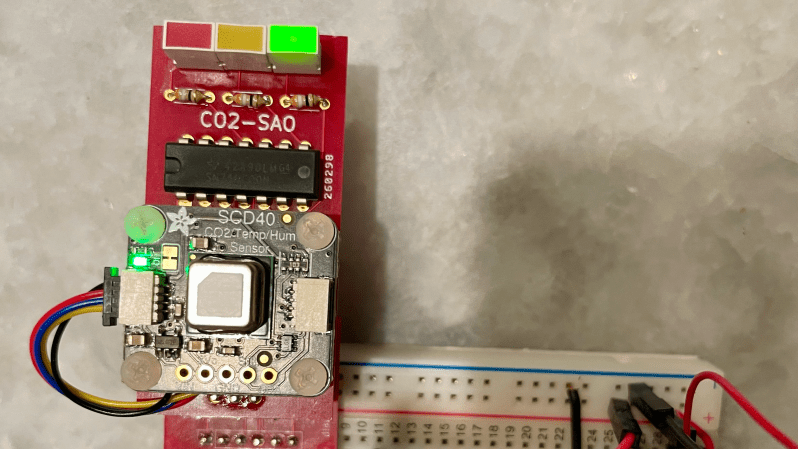
[David Bryant] clearly has an awareness of the impact of an excess concentration of CO2 in the local environment and has designed an SAO board to add a CO2 traffic light indicator to one of the spare slots on the official Hackaday Supercon 2024 badge.

The part used is the Sensirion SCD40 ‘true’ CO2 sensor, sitting atop an Adafruit rider board. [David] got a leg up on development by creating a simple SAO breakout board, which could have either the male and female connectors fitted, as required. Next, he successfully guessed that the badge would be based around the RP2040 running MicroPython and hooked up an Adafruit Feather RP2040 board to get started on some software to drive the thing. This made hooking up to the official badge an easy job. Since the SAO has only two GPIOs, [David] needed to decode these to drive the three LEDs. There are a few ways to avoid this, but he wanted to relive his earlier EE college years and do it the direct way using a pair of 74HC00 quad NAND gate chips.

We’ve seen a few CO2 monitors over the years. This sleek little unit is based around the Seeeduino XIAO module and uses an LED ring as an indicator. Proper CO2 monitors can be a little pricey, and there are fakes out there. Finally, CO2 is not the only household pollutant; check out this project.

PicoROM, A DIP-32 8-Bit ROM Emulator

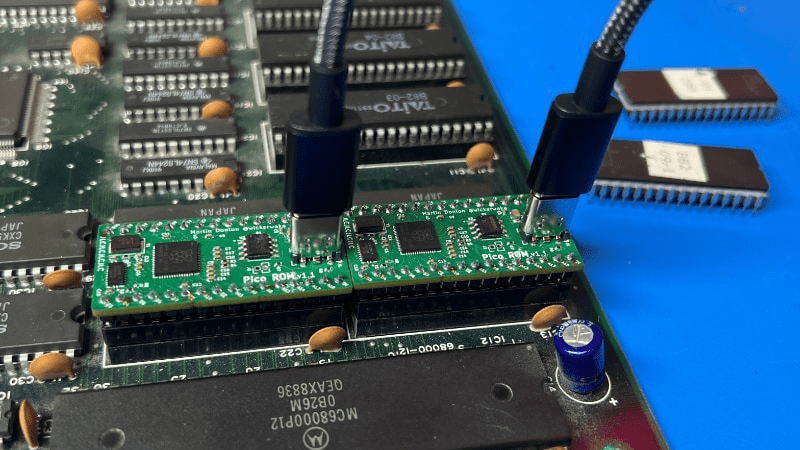
As we all know, when developing software for any platform or simply hacking a bit of code to probe how something works, the ability to deploy code rapidly is a huge help. [Martin Donlon], aka [wickerwaka], is well known in retro gaming and arcade hardware reverse engineering circles and had the usual issues figuring out how an arcade CPU board worked while developing a MiSTer core. Some interesting ASICs needed quite a bit of poking, and changing the contents of socketed ERPOMs is a labour-intensive process. The solution was PicoROM, a nicely designed ROM emulator in a handy DIP-32 form factor.

As the title suggests, PicoROM is based on the Raspberry Pi RP2040. It emulates an 8-bit ROM up to 2MBits in size with speeds up to 100ns. Since it uses the RP2040, USB connectivity is simple, enabling rapid uploading of new images to one (or more) PicoROMs in mere seconds. A vertically orientated USB-C connector allows multiple PicoROMs to be cabled to the host without interfering with neighbouring hardware. The firmware running on core 1 passes data from the internal 264K SRAM, using the PIO block as a bus interface to the target. A neat firmware feature is the addition of a mechanism to use a ROM region as a bidirectional control channel, which the software running on the target can use to communicate back to the host computer. This allows remote triggering of actions and the reporting of responses. Responses which may not be physically observable externally. [Martin] is using this feature extensively to help probe the functionality of some special function chips on the target boards, which is still a slow process but helped massively by reducing that critical software iteration time. The PCB was designed with KiCAD. The project files for which can be found here.

This isn’t the first time we’ve seen the RP2040 used for ROM emulation; here’s a pile of wires that does the same job. It just isn’t as pretty. Of course, if you really must use EPROMs, then you could give this sweet programmer a look over.

An RP2040-based PC-FX Development Cartridge

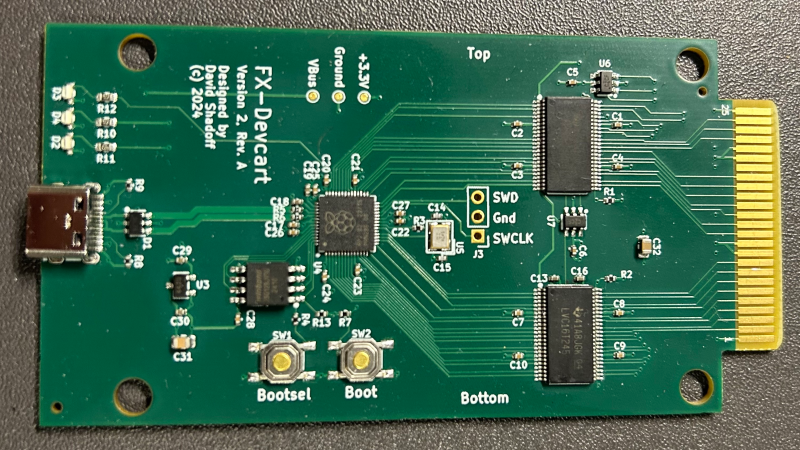
[David Shadoff] has a clear soft spot for the NEC console systems and has been collecting many tools and data about them. When developing with these old systems, having a way to upload code quickly is a real bonus, hence the creation of the PC-FX Dev Cart. Based on the Raspberry Pi RP2040, the custom cartridge PCB has everything needed to run software uploadable via a USB-C connection.

While the PC-FX is a CDROM-based system, it does sport a so-called FX-BMP or backup memory port cartridge slot, which games can use to save state and perform other special functions. Under certain circumstances, the PC-FX can be instructed to boot from this memory space, and this cartridge project is intended to enable this. Having a quick way to upload and execute code is very useful when exploring how these old systems work, developing new applications, or improving the accuracy of system emulators. The original FX-BMP cartridge has little more inside than a supercapacitor-backed SRAM and a custom interfacing IC, and of course, it would be quite a hassle to use this to develop custom code.

The RP2040 isn’t really being too tasked in this application, with one core dedicated to emulating a 128K x 8 SRAM, handling the PC-FX bus interface, and the other doing duty on the USB side. At the top of the PCB are a pair of 74LVC16T245 16-bit level shifter ICs, which need to be translated from the 5 Volt console voltage domain into the 3.3 Volts at which the microcontroller operates. Power for the board is taken from the USB, not the console, enabling code to be uploaded before powering up the target. This way, the power budget of the console isn’t compromised, and the cartridge can be initialized before powering up and booting.

[David] Needed to overclock the RP2040 to 240 MHz, way beyond the specification limit of 133 MHz, because despite the PIO block being fast enough to emulate the required interface timing, the latency passing data between the PIO and the CPU core was too large, hence the need for GPIO-based solution. The project was created in KiCAD; the design files can be found here, and only one mistake has been found so far!

[David] is also heavily involved with documenting and collecting all the PC-FX resources available in the wild. These can be found in this GitHub repo. It doesn’t look like we’ve covered the PC-FX before, but we have seen a few hacks about its older sibling, the PC Engine and the closely related TurboGrafx-16. Here’s a simple PC engine-to-TurboGrafx converter board for starters. If you lack the genuine hardware, do not despair; here is an FPGA-based emulator.

Bakelite to the Future – A 1950s Bluetooth Headset

A decade ago, [Jouke Waleson] bought a Dutch ‘model 1950’ PTT (The Dutch Postal Service) rotary-dial telephone of presumably 1950s vintage manufactured by a company called Standard Electric, and decided it would be neat to hack it to function as a Bluetooth hands-free device. Looking at the reverse, however, it is stamped “10.65” on the bottom, so maybe it was made as recently as 1965, but whatever, it’s still pretty old-tech now.

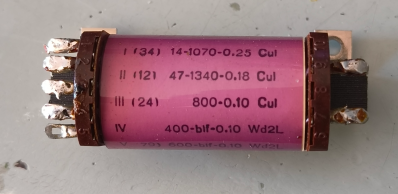
A well-specified transformer?

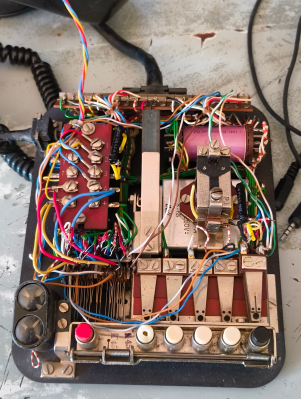
The plan was to utilise ESP32 hardware with the Espressif HFP stack to do all the Bluetooth heavy lifting. [Jouke] did find out the hard way that this is not a commonly-trodden path in hackerland, and working examples and documentation were sparse, but the fine folks from Espressif were on hand via GitHub to give him the help he needed. After ripping into the unit, it was surprisingly stuffed inside there. Obviously, all the switching, even the indication, was purely electromechanical, which should be no surprise. [Jouke] identified all the necessary major components, adding wires and interfacing components as required, but was a bit stumped at the function of one funky-looking component that we reckon must be a multi-tap audio transformer, oddly finished in baby pink! After renovating some interesting cross-shaped mechanical indicators and wiring up some driving transistors, it was time to get on to the audio interface.

Initially, [Joike] planned to use an INMP441 I2S digital microphone module, but this was incompatible with the standard ESP32 HFP client (used for Bluetooth hands-free support), so [Jouke] pivoted and used a WM8782-based ADC board for audio input. This also allowed the existing microphone to be used simply by biasing

Glorious electromechanical innards.

it to 5 Volts and hooking it straight up to the ADC board via a coupling capacitor. This was a happy outcome, as the modern digital microphone would have sounded very different to the original equipment! On the speaker side, a PCM5102 I2S audio DAC module was pressed into service. The ringer/buzzer needed seven volts, so adding a boost converter board was also necessary. It’s a minor annoyance for powering a single device, but this is a one-off hack, so it’s no big deal. Finally, the backplate was modified to add a USB-C module and a power switch so it could be power-cycled, giving access to the ESP32 boot loader and enabling firmware updates without opening the case.

The outfit’s brains are courtesy of a LilyGo T-Koala board, a basic breakout board based around the older ESP32-WROVER module. This was necessary as the newer ESP32 chips drop Bluetooth classic support and, with it, support for handling the Bluetooth hands-free protocol. We were particularly ticked by the project tagline, “Bakelite to the future”, and that lifting the phone when not answering an incoming call connects you to Google Assistant or Siri! Nice work! For a look over the source code for the project, check out the GitHub page.

This is not the first modernisation of a classic telephone, and we hope it won’t be the last. Here’s an older GSM-based hack. If all this talk of rotary phones and tethered handsets confuses you, here’s our guide to this older telephone system. Telephones weren’t the only old-school home appliances constructed from Bakelite—far from it. It was also used to make many radios.

Can You Homebrew A Running Shoe?

Unless you spend all your time lounging on the sofa, you probably own at least one pair of shoes. But have you ever thought to make your own to improve some aspect of your life? YouTube channel Answer in Progress set out to do precisely that, but it didn’t quite work out.

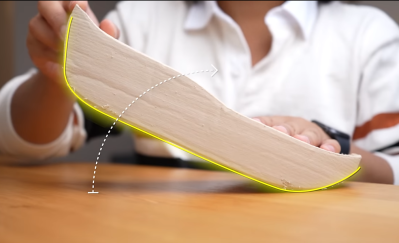
When you (well, other people) get into running, it’s tempting to believe a lot of the shoe company hype and just drop hundreds of dollars on the latest ‘super shoe’ and hope that will help you break your target time. But do you actually need to buy into all this, or can you make something yourself? The project aimed to get the 5k time down significantly, at any cost, but primarily by cheating with technology. The team set out to look at the design process, given that there is indeed a fair amount of science to shoe design. Firstly, after a quick run, the main issues with some existing shoes were identified, specifically that there are a lot of pain points; feet hurt from all the impacts, and knees take a real pounding, too. That meant they needed to increase the sole cushioning. They felt that too much energy was wasted with the shoes not promoting forward motion as much as possible; feet tended to bounce upwards so that a rocker sole shape would help. Finally, laces and other upper sole features cause distraction and some comfort issues, so those can be deleted.
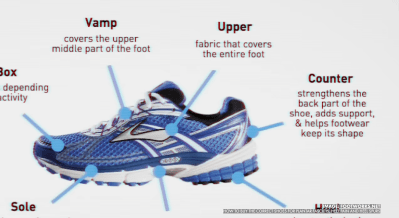
A thicker mid-sole allows for a rolled shape

The plan was to make a ‘sock’ shoe style, with an upper in one piece and stretchy enough to slip on without laces. The process started by wrapping the foot in cling film and then a few layers of duct tape to fix the shape. This was split down the top to extract the foot, open out the pattern, and transfer it to some nylon fabric. The outer profile was transferred and cut out with simple hand tools in a fashion that would allow the shape to be reconstructed as it was glued to a sole. It sounds simple, but it’s pretty fiddly work.

The latest running shoes use specialised rubber materials for the midsole. The solid foam wedge between the outer rubber and the inner sole cushions the foot. Those materials are only a few per cent ‘better’ than much more accessible foams that can be 3D printed. After sculpting a sole shape by hand using Blender, a friend 3D printed it. After that, the upper part was glued and ready for a test run. Which didn’t last long. It turned out that the lack of a stable heel counter (the bit around the back) that helps lock the heel in place meant the foot was too loose in the shoe, causing potential issues such as an ankle roll. That would be not good.  A follow-up session with a sports-focused chiropodist demonstrated that all this was rather pointless before the fundamental issues of strength and fitness were addressed. So, whilst it was fun to see an attempt to beat the big boys at their own game, it sure isn’t easy to pull it off, especially if you can’t get off the sofa.

The invention of flexible 3D printing filaments spurred the development of a wide range of 3D-printed footwear, like these low-poly beautiesWhile we’re 3D printing shoes, we also need some lace locks. Finally, with winter approaching for us Northerners, perhaps it’s time to run off a pair of 3D-printed strap-on cleats.

Thanks to [fluffy] for the tip!

Putting the New CryoGrip Build Plate to the Test

BIQU has released a new line of low-temperature build plates that look to be the next step in 3D printing’s iteration—or so YouTuber Printing Perspective thinks after reviewing one. The Cryogrip Pro is designed for the Bambu X1, P1, and A1 series of printers but could easily be adapted for other magnetic-bed machines.

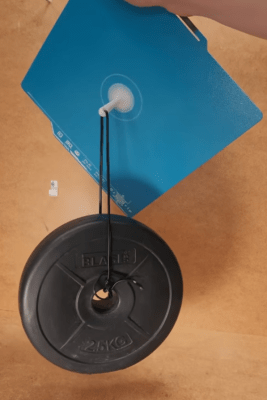
The bed adhesion strength when cold is immense!

The idea of the new material is to reduce the need for high bed temperatures, keeping enclosure temperatures low. As some enclosed printer owners may know, trying to print PLA and even PETG with the door closed can be troublesome due to how slowly these materials cool. Too high an ambient temperature can wreak havoc with this cooling process, even leading to nozzle-clogging.

The new build plate purports to enable low, even ambient bed temperatures, still with maximum adhesion. Two versions are available, with the ‘frostbite’ version intended for only PLA and PETG but having the best adhesion properties.  A more general-purpose version, the ‘glacier’ sacrifices a little bed adhesion but gains the ability to handle a much wider range of materials.

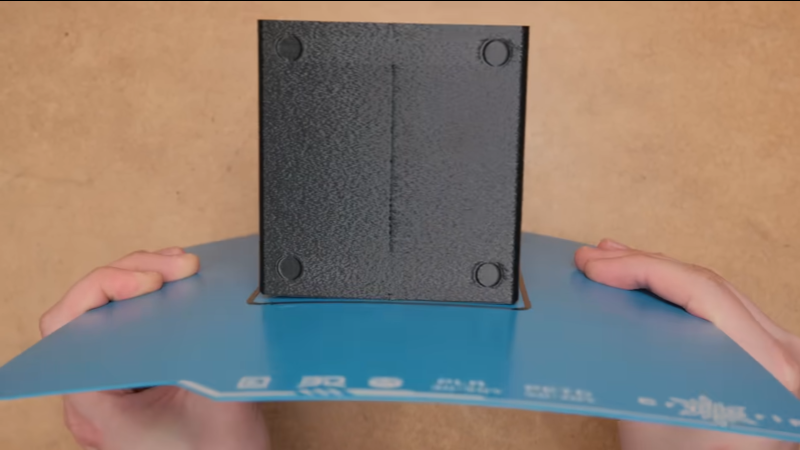
An initial test with a decent-sized print showed that the bed adhesion was excellent, but after removing the print, it still looked warped. The theory was that it was due to how consistently the magnetic build plate was attached to the printer bed plate, which was now the limiting factor. Switching to a different printer seemed to ‘fix’ that issue, but that was really only needed to continue the build plate review.

They demonstrated a common issue with high-grip build plates: what happens when you try to remove the print. Obviously, magnetic build plates are designed to be removed and flexed to pop off the print, and this one is no different. The extreme adhesion, even at ambient temperature, does mean it’s even more essential to flex that plate, and thin prints will be troublesome. We guess that if these plates allow the door to be kept closed, then there are quite a few advantages, namely lower operating noise and improved filtration to keep those nasty nanoparticles in check. And low bed temperatures mean lower energy consumption, which is got to be a good thing. Don’t underestimate how much power that beefy bed heater needs!

Ever wondered what mini QR-code-like tags are on the high-end build plates? We’ve got the answer. And now that you’ve got a pile of different build plates, how do you store them and keep them clean? With this neat gadget!

Seven New Street Fighter 2 Arcade Rom Hacks

[Sebastian Mihai] is a prolific programmer and hacker with a particular focus on retrocomputing and period games, and this latest hack, adding new gameplay elements to Capcom’s Street Fighter II – Champion Edition, is another great one. [Sebastian] was careful to resist changing the game physics, as that’s part of what makes this game ‘feel’ the way it does, but added some fun extra elements, such as the ability to catch birds, lob barrels at the other player, and dodge fire. The title screen was updated for each of the different versions, so there is no doubt about which was being played. This work was based on their previous hacks to Knights of the Round. Since both games shared the same Capcom CPS-1 hardware, the existing 68000 toolchain could be reused, reducing the overhead for this new series of hacks.

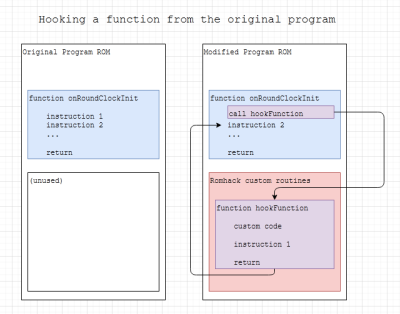
Binary modification program flow

Obviously, without access to the game’s source code, the hacks (all seven of them!) were made by binary modification, first learning about how the original program stores aspects of the game and hacking in a little hand-grafted assembly here and there to sneak in the extra elements without interfering too much with the original code operation. [Sebastian] stripped out some title screen effects to speed boot time and removed some in-game graphics, such as the score and the ‘insert coin’ images, to free up some graphical tiles to reuse for the new elements. [Sebastian] first needed to understand the game code, which meant disassembly and hand annotation of the entire binary, which was done using the MAME debugger. As the linked article demonstrates, saying this is a big task is somewhat of an understatement.

A simple approach was taken to the mods consisting of three types of binary patches. The first, or ‘short circuit’, are simple NOPs inserted to disable subroutine calls or RTS to force an early return in a subroutine. The second type is a blob of code residing in some unused ROM space and storing state in a spare section of RAM. This is where the main parts of the new code reside. Finally, hooks are injected into the code at key locations, which jump into the binary blob where modified behaviour is required. This can do any needed initialisation before returning to the main game logic. Making significant changes to the game would be very hard without any spare space in the system, but we guess you could do it by stripping out other game elements, but [Sebastian] didn’t need to go there. If you’re into retro gaming and particularly modding, then going deeper into [Sebastian]’s homepage will reveal an astonishing number of projects and hacks.

Sometimes, our fond memories of games of old are skewed a little over the years, and the gameplay wasn’t that great in reality. So, what can we do? How about a little Redux, Zelda II style? If you’re really down the rabbit hole of retro hardware, then dealing with all those pesky EPROM chips is getting more difficult these days. To help with that, here’s a modern take on the necessary hardware.

A 3D Printed, Open Source Lathe?

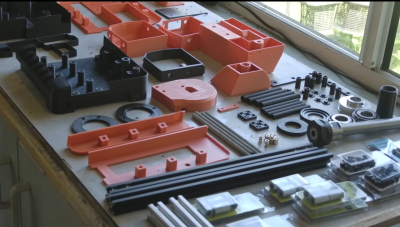
[Chris Borge] has spent the last few years creating some interesting 3D printed tools and recently has updated their 3D printable lathe design to make a few improvements. The idea was to 3D print the outer casing of the lathe in two parts, adding structural parts where needed to bolt on motors and tool holders, and then fill the whole thing with concrete for strength and rigidity.

Only a few parts to print

The printed base is initially held together with two lengths of studding, and a pile of bolts are passed through from below, mating with t-nuts on the top. 2020 extrusion is used for the motor mount. The headstock is held on with four thread rods inserted into coupling nuts in the base. The headstock unit is assembled separately, but similarly; 3D printed outer shell and long lengths of studding and bolts to hold it together. Decent-sized tapered roller bearings make an appearance, as some areas of a machine tool really cannot be skrimped. [Chris] explains that the headstock is separate because this part is most likely to fail, so it is removable, allowing it to be replaced.

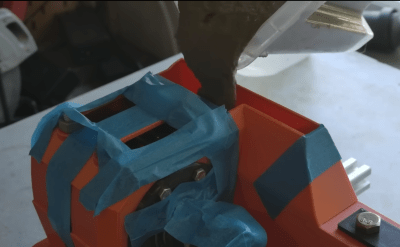
Yes, that’s right. We’re filling it with lovely runny concrete.
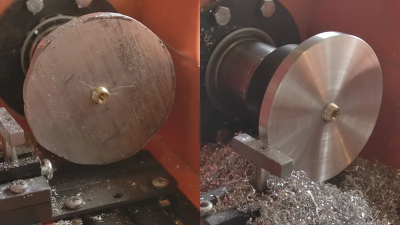
Not a bad job on aluminium for a DIY lathe!

Once together, the whole assembly is filled with runny concrete and set aside to cure. Before fully curing, the top surfaces are scraped flat to remove excess concrete so the top covers will fit. A belt-driven motor is fitted, with associated control electronics, and then it’s time to talk tooling. The first tool shown is a simple T-shaped rest, used with a hand tool known as a ‘graver.’  This is more likely to be used on a wood lathe, but we reckon you could about get away with it if you’re really careful with aluminium or perhaps brass. An adjustable rest was made using a few simple pieces (in steel!) and held in a short length of 2020 extrusion in a manner that makes it adjustable, albeit not shown in this video. Finally, a reasonable torture test is demonstrated, comprising a rough-cut aluminium disk screwed to a threaded carrier. This was tidied up to make it nice and round and clean up its surfaces. The lathe survived, only melting the 3D printed motor pulley, which, as they say, should not have been a 3D printed part when metal parts are so easy to acquire! If you want to build one for yourself, then everything you need is here, but like with projects of this type, more development is still needed to overcome a few shortcomings. Check out [Chris]’s channel for many more interesting ideas!

We’ve seen a few of [Chris]’s other 3D-printed tools, like this neat fractal vice for odd-shaped objects. We like tiny tool hacks; after all, when you’re making small things, you don’t need full-sized tools.

Thanks to [CJay] for the tip!

Tridora: A Full-Custom CPU Designed For Pascal

[Sebastian Lederer] has created Tridora: an unusual stack-based CPU core intended for FPGA deployment, co-developed with its own Pascal compiler. The 32-bit word machine is unusual in that it has not one but three stacks, 16-bit instruction words, and a limited ISA, more like those of the 8-bit world. No multiply or divide instructions will be found in this CPU.

The design consists of about 500 lines of Verilog targeting the Digilent Arty-A7 FPGA board, which is based around the Xilinx Artix-7 FPGA line. [Sebastian] plans to support the Nexys A7 board, which boasts a larger FPGA array but has less RAM onboard. The CPU clocks in at 83 MHz with four clock cycles per instruction, so over 20 MIPS, which is not so shabby for a homebrew design. Wrapped around that core are a few simple peripherals, such as the all-important UART, an SD card controller and a VGA display driver. On the software side, the Pascal implementation is created from scratch with quite a few restrictions, but it can compile itself, so that’s a milestone achieved. [Sebastian] also says there is a rudimentary operating system, but at the moment, it’s a little more than a loader that’s bundled with the program image.

The Tridora Gitlab project hosts the Verilog source, an emulator (written in Golang, not Pascal) and a suite of example applications. We see quite a few custom CPUs, often using older or less popular programming languages. Here’s an FPGA-based Forth machine to get you started. Implementing programming languages from scratch is also a surprisingly common hack. Check out this from-scratch compiler for the Pretty Laughable Programming language.

Zero To Custom MacroPad In 37 Easy Steps

[Jeremy Weatherford] clearly has a knack for explaining projects well enough for easy reproduction but goes way further than most and has created a four-part YouTube series detailing every step from project inception to the final assembly, covering all aspects of 3D modelling and PCB design for a custom MacroPad design. Many tools are introduced along the way, all of which help reduce complexity and, by extension, the scope for errors. As every beginner hacker knows, early successes breed confidence and make for better and more ambitious projects.

Part 1 covers the project motivation and scope and introduces a keyboard layout editor tool. This tool allows one to take a layout idea and generate a JSON file, which is then used to drive keyboard tools. XYZ to produce a usable KiCAD project. The tool only generates a PCB project and an associated netlist file. No schematic is created; you don’t need one for a simple layout.

A very basic keyboard layout

Part 2 is a walkthrough of the design process in KiCAD, culminating in ordering the PCB from JLCPCB and assembling the surface-mount parts. This particular design uses a controller based on the Sea-Picro RP2040 module, but there are many options if you have other preferences. [Jeremy] shows what’s possible with the selected suppliers, but you need not follow this step precisely if you have other ideas or want to use someone local.

Part 3 covers exporting the mechanical aspects of the PCB out of KiCAD and into a 3D CAD program, specifically OnShape. [Jeremy] covers some crucial details, such as how to read the mechanical drawing of the keys to work out where to place the top plate. It’s very easy to plough straight in at this stage and make a design which cannot be assembled! The plan is to use a simple laser-cut box with a bottom plate with mounting holes lining up with those on the PCB. A Top plate is created by taking the outline of the PCB and adding a little margin. An array of rectangular cutouts are designed for the keys to protrude, lining up perfectly with where the keys would be when mounted on the PCB below.  The sides of the case are formed from laser-cut sections that lock into each other and the laser-cut base—using the laser joint feature-script addon tool from the OnShape community channel. A second feature script addon is used to auto-layout the laser-cut components onto a single sheet. A CAM application called Kiri Moto is used to export for laser cutting and is available on the OnShape store.

Part 4 concerns the firmware. The QMK WSL build is compiled on Windows using WSL, minimizing the barrier to entry for intrepid hackers who are likely to start out with Windows-based hardware. The QMK layout is configured as an ortho_4x4, but [Jeremy] calmly and clearly explains how the other layouts are used and how they align with the earlier design choices. Finally, the VIAL keyboard layout editor is shown to be used for testing the finished macropad, and how it is used for programming those delicious macros we want to emit into the world.

Macropads are very individual things, and you really need to be pushing the limits of productivity to need one, let alone build a custom device. Here’s one for those who get stuck in MS Teams calls a lot. If you’re into video editing, that’s a valid use case. Video editing macropads have existed for decades, but have they been made out of wood?


❌