Vista de Lectura

Hay nuevos artículos disponibles. Pincha para refrescar la página.

Classic LED Bubble Displays Ride Again
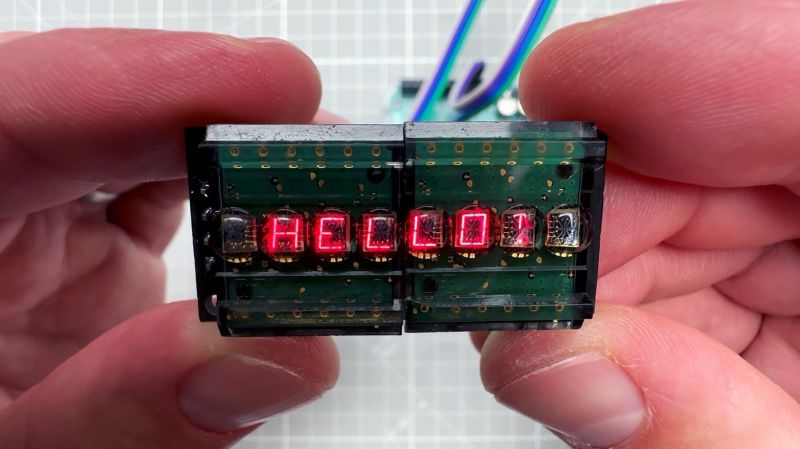
Hewlett-Packard used to make some pretty cool LED displays, many of which appeared in their iconic pocket calculators back in the 1970s and 1980s. [Upir] tracked down some of these classic bubble displays and used them with a microcontroller. We love the results!

The displays featured here, the HPDL-1414, aren’t quite what would have been found in an HP-35, of course. These displays have 16 segments for reasonably legible approximations of most of the ASCII character set. Also, these aren’t just the displays; rather, a pair of the bubble-topped displays, each with four characters, is mounted to a module that provides a serial interface. [Upir] found these modules online, but despite the HP logo on the PCB silkscreen, it’s not really clear who made them. The documentation was a bit thin, to say the least, but with a little translation help from Google, he figured out the serial parameters and the character encoding. The video below shows him putting these modules through their paces.

Unusually for [upir], who has made a name for himself hacking displays to do things they weren’t designed to do, he stuck with the stock character set baked into this module. We think it would be fun to get one of these modules and hack the firmware to provide alternative character sets or even get a few of the naked displays and build a custom interface. Sounds like a fun rainy-day project.

This reminded us of another HP display project we saw a while back. Or, roll your own displays.
Spotted at Supercon: Glowtape Wearable Display

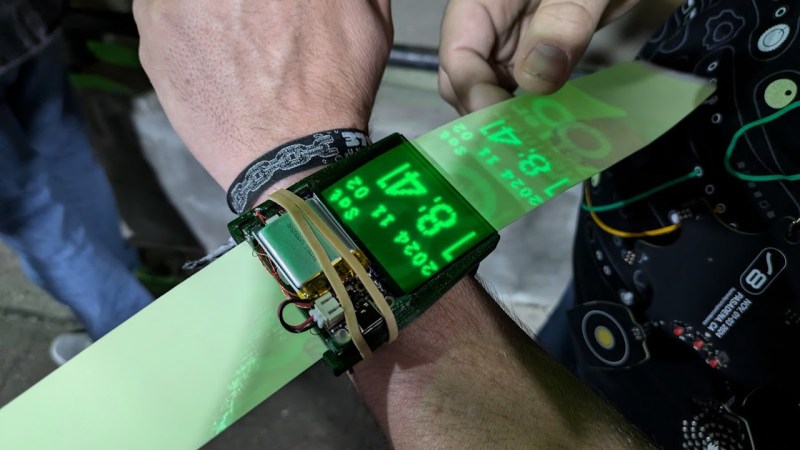
We’re big fans of unusual timepieces here at Hackaday, so it didn’t take long before somebody called our attention to the gloriously luminescent watch that [Henner Zeller] was wearing at this year’s Supercon.

He calls it the Glowtape, and it uses a dense array of UV LEDs and a long strip of glow-in-the-dark material to display the time and date, as well as images and long strings of text written out horizontally to create an impromptu banner. It looked phenomenal in person, with the energized areas on the tape glowing brightly during the evening festivities in the alleyway.

The text and images would fade fairly quickly, but in practice, that’s hardly a problem when you’re just trying to check the current time. If there was something to limit the practicality on this one, it would have to be the meter-long piece of material that you’ve got to keep pushing and pulling through the mechanism — but it’s a price we’re willing to pay.

Want one of your own? [Henner] has shared all of the source code for the wearable, from the OpenSCAD scripts to generate the 3D printed enclosure to the C firmware for the RP2040 that runs the show. The LED array itself is actually a spin-off of his Glowxels project, which is worth checking out if you’d like to recreate this concept on a much larger scale.

This isn’t the first time we’ve seen this technique used for this kind of thing, but it may be the most compact version of the concept we’ve seen so far.

How Purdue Hackers Made a Big Sign That They’re Really Proud Of

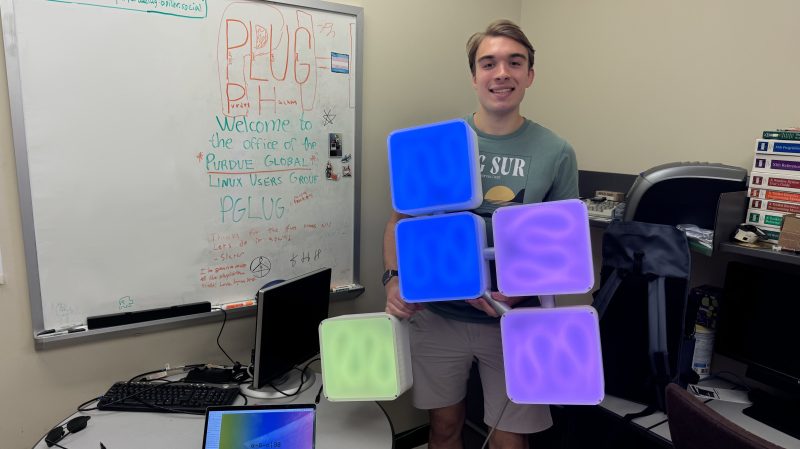
Let’s say you’ve got a fun little organization that does things together under a collective branding or banner. Maybe you want to celebrate that fact with some visually appealing signage? Well, that’s pretty much how [Jack] of the Purdue Hackers felt, so he and the gang put together a sizable logo sign to advertise their makerspace.

[Jack] explains that The Sign, as it is known, embodies the spirit of the Purdue Hackers. Basically, it’s about making something cool and sharing it with the world. He then outlines how they came to develop a “shining monument” to their organization with the use of LEDs and 3D printed components. The blog post explains how the group began with small prototypes, before stepping up to build a larger version for display in their makerspace window. It also chronicles the twists and turns of the project, including budget snarls and PCB errors that threatened to derail everything.

Ultimately, though, the Purdue Hackers prevailed, and The Sign has been shining bright ever since. Files are on GitHub for the curious, because it’s all open source! Meanwhile, if you’ve been cooking up your own neat signage projects, don’t hesitate to drop us a line!

Small Volumetric Lamp Spins at 6000 RPM

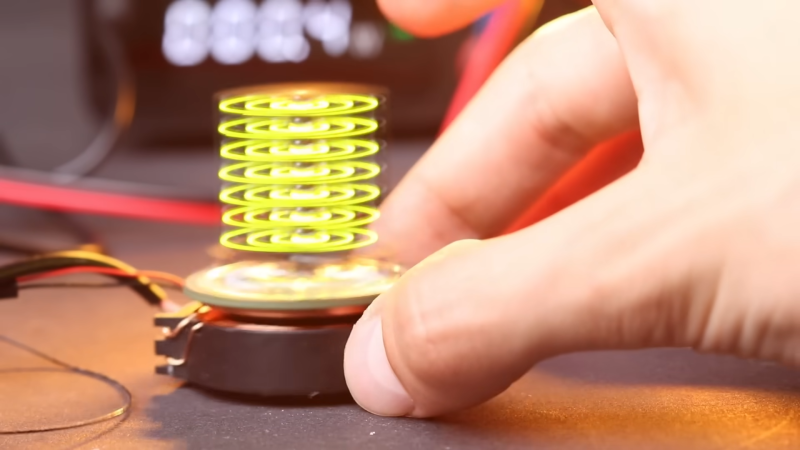
Volumetric displays are simply cool. Throw some LEDs together, take advantage of persistence of vision, and you’ve really got something. [Nick Electronics] shows us how its done with his neat little volumetric lamp build.

The concept is simple. [Nick] built a little device to spin a little rectangular array of LEDs. A small motor in the base provides the requisite rotational motion at a speed of roughly 6000 rpm. To get power to the LEDs while they’re spinning, the build relies on wire coils for power transmission, instead of the more traditional technique of using slip rings.

The build doesn’t do anything particularly fancy—it just turns on the whole LED array and spins it. That’s why it’s a lamp, rather than any sort of special volumetric display. Still, the visual effect is nice. We’ve seen some other highly capable volumetric displays before, though. Video after the break.

DIY Laser Tag Project Does it in Style

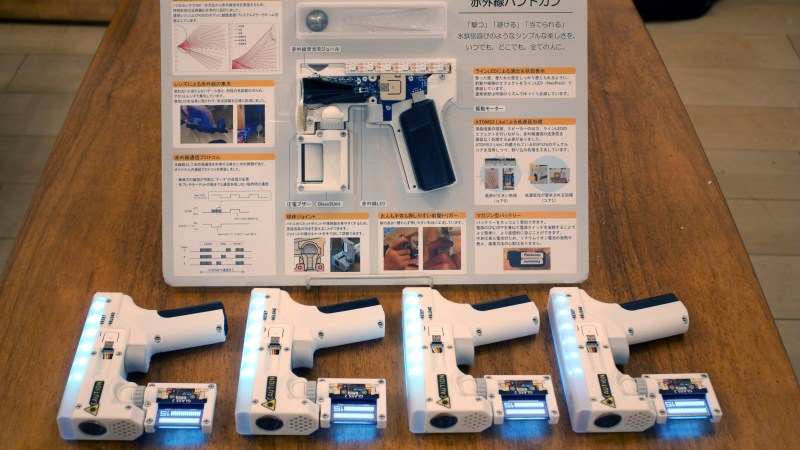
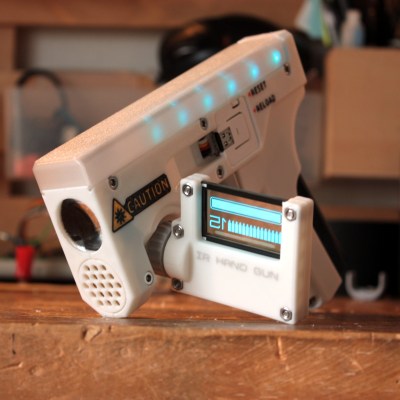
This DIY lasertag project designed by [Nii], which he brought to Tokyo Maker Faire back in September, is a treasure trove. It’s all in Japanese and you’ll need to visit X (formerly Twitter) to see it, but the images do a fine job of getting the essentials across and your favorite translator tool will do a fair job of the rest.

There’s a whole lot to admire in this project. The swing-out transparent OLED display is super slick, the electronics are housed on a single PCB, the back half of the grip is in fact a portable USB power bank that slots directly in to provide power, and there’s a really smart use of a short RGB LED strip for effects.

The optical elements show some inspired design, as well. An infrared LED points forward, and with the help of a lens, focuses the beam tightly enough to make aiming meaningful. For detecting hits, the top of the pistol conceals a custom-made reflector that directs any IR downward into a receiver, making it omnidirectional in terms of hit sensing but only needing a single sensor.

Want to know more? Check out [Nii]’s earlier prototypes on his website. It’s clear this has been in the works for a while, so if you like seeing how a project develops, you’re in for a treat.

As for the choice of transparent OLED displays? They are certainly cool, and we remember how wild it looks to have several stacked together.

Using an OLED Display’s Light for Embedded Sensors

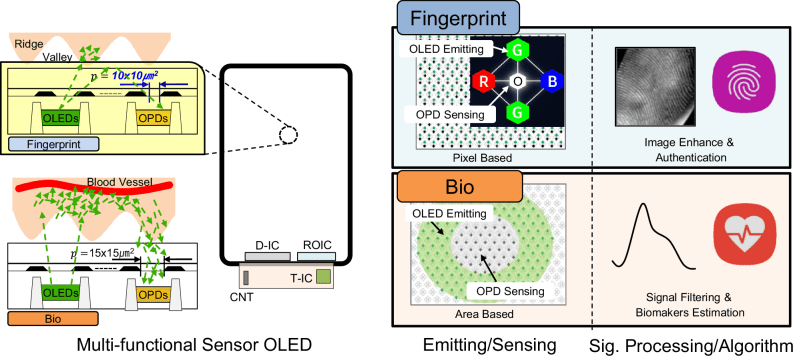
These days displays are increasingly expected to be bidirectional devices, accepting not only touch inputs, but also to integrate fingerprint sensing and even somehow combine a camera with a display without punching a hole through said display. Used primarily on smartphone displays, these attempts have been met with varying degrees of success, but a recently demonstrated version in Nature Communications which combines an OLED with photosensors in the same structure might provide a way to make such features much more effective.

The article by [Chul Kim] and colleagues of the Samsung Display Research Center in South Korea the construction of these bidirectional OLED displays is described, featuring the standard OLED pixels as well as an organic photodiode (OPD) placed side-by-side. Focusing on the OLED’s green light for its absorption characteristics with the human skin, the researchers were able to use the produced OLED/OPD hybrid display for fingerprint recognition, as well as a range of cardiovascular markers, including heart rate, blood pressure, etc.

The basic principle behind these measurements involves photoplethysmography, which is commonly used in commercially available pulse oximeters. Before these hybrid displays can make their way into commercial devices, there are still a few technical challenges to deal with, in particular electrical and optical leakage. The sample demonstrated appears to work well in this regard, but the proof is always in the transition from the lab to mass-production. We have to admit that it would be rather cool to have a display that can also handle touch, fingerprints and record PPG data without any special layers or sensor chips.

The 1983 Clock Four Decades in the Making

In 1983, a 14-year-old [Will] saw an LED clock in The Sharper Image store. At $250, it stayed in the store. That was a lot of money back then, especially for most teenagers. But [Will] didn’t forget. After high school, he and a friend planned to build one from scratch. They worked out how they would do it and did a little prototyping, but never really finished. Well, they never really finished at the time. Because 33 years later, [Will] decided to finally put it together. Check it out in the video below.

[Will’s] learned a lot since his original design, plus we have tech today that would have seemed like magic in the late 1980s. But he wanted to stay true to the original design, so there’s no microcontroller or smart LEDs. Just binary counters and a lot of LEDs. There’s even a 555 doing duty as a reset timer.

The original design used the 60 Hz signal from the AC power supply. [Will] made that one concession to modern times and powered the clock from USB-C. That meant adding a reference oscillator, which is a good thing, anyway, as he explains in the post.

The result looks good and we don’t envy him soldering 275 SMD parts! He even graciously made a few and sent one to his old friend.

We don’t know why we were surprised [Will] soldered all those parts. He’s a key member of the people who put on the SMD soldering challenge each year at Supercon. Most LED clock projects from those days used 7-segment displays.

❌