Vista de Lectura

Hay nuevos artículos disponibles. Pincha para refrescar la página.

New Documentary Details Ventilator Development Efforts During COVID

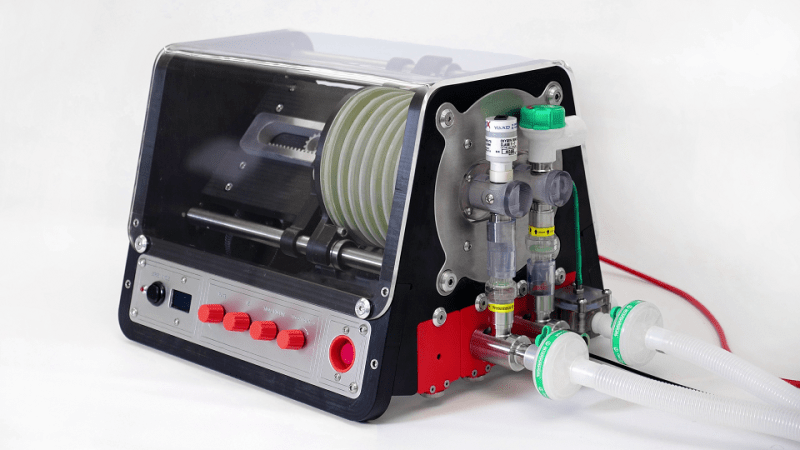
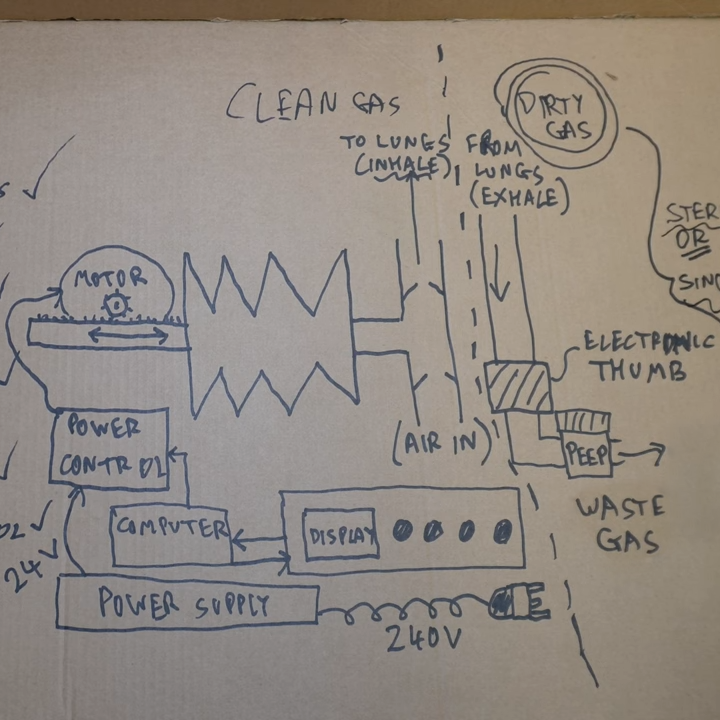
What would it be like to have to design and build a ventilator, suitable for clinical use, in ten days? One that could be built entirely from locally-sourced parts, and kept oxygen waste to a minimum? This is the challenge [John Dingley] and many others faced at the start of COVID-19 pandemic when very little was known for certain.

Back then it was not even known if a vaccine was possible, or how bad it would ultimately get. But it was known that hospitalized patients could not breathe without a ventilator, and based on projections it was possible that the UK as a whole could need as many as 30,000 ventilators within eight weeks. In this worst-case scenario the only option would be to build them locally, and towards that end groups were approached to design and build a ventilator, suitable for clinical use, in just ten days.

A ventilator suitable for use on a patient with an infectious disease has a number of design constraints, even before taking into account the need to use only domestically-sourced parts.

[John] decided to create a documentary called Breathe For Me: Building Ventilators for a COVID Apocalypse, not just to tell the stories of his group and others, but also as a snapshot of what things were like at that time. In short it was challenging, exhausting, occasionally frustrating, but also rewarding to be able to actually deliver a workable solution.

In the end, building tens of thousands of ventilators locally wasn’t required. But [John] felt that the whole experience was a pretty unique situation and a remarkable engineering challenge for him, his team, and many others. He decided to do what he could to document it, a task he approached with a typical hacker spirit: by watching and reading tutorials on everything from conducting and filming interviews to how to use editing software before deciding to just roll up his sleeves and go for it.

We’re very glad he did, and the effort reminds us somewhat of the book IGNITION! which aimed to record a history of technical development that would otherwise have simply disappeared from living memory.

You can watch Breathe for Me just below the page break, and there’s additional information about the film if you’d like to know a bit more. And if you are thinking the name [John Dingley] sounds familiar, that’s probably because we have featured his work — mainly on self-balancing personal electric vehicles — quite a few times in the past.

Make a Secret File Stash In The Slack Space

Disk space is allocated in clusters of a certain size. When a file is written to disk and the file size is smaller than the cluster(s) allocated for it, there is an unused portion of varying size between the end of the file’s data and the end of the allocated clusters. This unused space is the slack space, it’s perfectly normal, and [Zachary Parish] had an idea to write a tool to hide data in it.

The demo uses a usb drive, using the slack space from decoy files to read and write data.

[Zachary]’s tool is in Python and can map available slack space and perform read and write operations on it, treating the disparate locations as a single unified whole in which to store arbitrary files. A little tar and gzip even helps makes things more efficient in the process.

There’s a whole demo implemented on Linux using a usb drive with some decoy files to maximize the slack space, and you can watch it in action in the video embedded below. It’s certainly more practical than hiding data in a podcast!

Note that this is just a demo of the concept. The approach does have potential for handling secret data, but [Zachary] points out that there are — from a serious data forensics point of view– a number of shortcomings in its current form. For example, the way the tool currently structures and handles data makes it quite obvious that something is going on in the slack space.

[Zachary] created this a few years ago and has some ideas about how to address those shortcomings and evolve the tool, so if you have ideas of your own or just want to try it out, the slack_hider GitHub repository is where you want to go.

Make Custom Shirts With a 3D Print, Just Add Bleach

Bleach is a handy way to mark fabrics, and it turns out that combining bleach with a 3D-printed design is an awfully quick-working and effective way to stamp a design onto a shirt.

Plain PLA stamp with bleach gives a slightly distressed look to this design.

While conceptually simple, the details make the difference. Spraying bleach onto the stamp surface helps get even coverage, and having the stamp facing “up” and lowering the shirt onto the stamp helps prevent bleach from running where it shouldn’t. Prompt application of hot air with a heat gun (followed by neutralizing or flushing any remaining bleach by rinsing in plenty of cold water) helps keep the edges of the design clean and sharp.

We wondered if combining techniques with some of the tips on how to 3D print ink stamps would yield even better results. For instance, we notice the PLA stamp (used to make the design in the images here) produces sharp lines with a slightly “eroded” look overall. This is very much like the result of inking with a stamp printed in PLA. With a stamp printed in flex filament, inking gives much more even results, and we suspect the same might be true for bleach.

Of course, don’t forget that it’s possible to 3D print directly onto fabric if you want your designs to be a little more controlled (and possibly in multiple colors). Or, try silkscreening. Who knew there were so many options for putting designs onto shirts? If you try it out and learn anything, let us know by sending in a tip!

When Ignoring Spam Loses You an Ice Surfacer Patent

Bear with us for a moment for a little background. The Rideau Canal Skateway in Ottawa is the world’s largest natural skating rink, providing nearly 8 km of pristine ice surface during the winter. But maintaining such a large ice surface is a challenge. A regular Zamboni can’t do it; the job is just too big. So the solution is a custom machine called the Froster, conceived by Robert Taillefer and built by Sylvain Fredette.

Froster spans almost twenty meters, and carries almost 4000 L of water. There’s no other practical way to maintain almost 8 km of skating rink.

A patent was filed in 2010, granted by the Canadian Intellectual Property Office, and later lost because important notifications started going to an apparently unchecked spam folder. The annual fee went unpaid, numerous emails went unanswered, an expiry date came and went, and that was that.

It’s true that emailed reminders (the agreed-upon — and only — method of contact) going unnoticed to spam was what caused Robert to not take any action until it was too late. We’d all agree that digital assistants in general need to get smarter, and that includes being better at informing the user about automatically-handled things like spam.

But what truly cost Robert Taillefer his patent was having a single point of failure for something very, very important. The lack of any sort of backup method of communication in case of failure or problem meant that this sad experience was, in a way, a disaster just waiting to happen. At least that’s how the Federal Court saw it when he took his complaint to them, and that’s how they continued to see it when he appealed the decision.

If you’ve never heard of the Rideau Canal Skateway or would like to see the Froster in action, check out this short video from the National Capital Commission of Canada, embedded just under the page break.

Solid Tips for Designing Assistive Technology (Or Anything Else, Really)

Do you make things, and have you got almost ten minutes to spare? If not, make the time because this video by [PrintLab] is chock-full of healthy and practical design tips. It’s about effective design of Assistive Technology, but the design concepts extend far beyond that scope.

It’s about making things that are not just functional tools, but objects that are genuinely desirable and meaningful to people’s lives. There are going to be constraints, but constraints aren’t limits on creativity. Heck, some of the best devices are fantastic in their simplicity, like this magnetic spoon.

It’s not just about functionality. Colors, textures, and style are all meaningful — and have never been more accessible.

One item that is particularly applicable in our community is something our own [Jenny List] has talked about: don’t fall into the engineer-saviour trap. The video makes a similar point in that it’s easy and natural to jump straight into your own ideas, but it’s critical not to make assumptions. What works in one’s head may not work in someone’s actual life. The best solutions start with a solid and thorough understanding of an issue, the constraints, and details of people’s real lives.

Another very good point is that designs don’t spring fully-formed from a workbench, so prototype freely using cardboard, models, 3D printing, or whatever else makes sense to you. Don’t be stingy with your prototyping! As long as you’re learning something each time, you’re on the right path.

And when a design is complete? It has the potential to help others, so share it! But sharing and opening your design isn’t just about putting the files online. It’s also about making it as easy as possible for others to recreate, integrate, or modify your work for their own needs. This may mean making clear documentation or guides, optimizing your design for ease of editing, and sharing the rationale behind your design choices to help others can build on your work effectively.

The whole video is excellent, and it’s embedded here just under the page break. Does designing assistive technology appeal to you? If so, then you may be interested in the Make:able challenge which challenges people to design and make a 3D printable product (or prototype) that improves the day-to-day life of someone with a disability, or the elderly. Be bold! You might truly help someone’s life.

The Lowest-Effort Way Yet To Make 3D Printed Lenses Clear

This technique shared by [Andy Kong] is for 3D printed lenses, but would probably be worth a shot for any resin prints that need to be made nice and clear. The link to his post on X is here, but we’ll summarize below.

It’s entirely possible to print lenses on a resin printer, but some amount of polishing is inevitable because an SLA print still has layer lines, however small. We have seen ways to minimize the work involved to get a usable lens, but when it comes right down to it the printing process creates tiny (but inevitable) surface imperfections that have to be dealt with, one way or another.

3D-printed lenses fresh (and wet) from the printer look clear, but have tiny surface imperfections that must be dealt with.

One technique involves applying a thin layer of liquid resin to the surface of the printed lens, then curing it. This isn’t a complete solution because getting an even distribution of resin over the surface can be a challenge. [Andy] has refined this technique to make it ridiculously simple, and here’s how it works.

After printing the lens, place a drop of liquid resin on the lens surface and stretch some cling wrap over the lens. The cling wrap conforms to the shape and curve of the lens while trapping a super thin layer of liquid resin between the cling wrap film and the lens surface. One then cures the resin while holding the cling film taut. After curing, [Andy] says the film peels right off, leaving an ultra-smooth surface behind. No tedious polishing required!

But what about the flat back of the lens? [Andy] suggests that instead of using cling film (which is better at conforming to a curved surface) simply use a drop of resin in a similar way to bond the flat side of the lens to a smooth piece of glass. Or bond the backs of two lenses together to make a duplex lens. This technique opens quite a few possibilities!

Even if one isn’t 3D printing optical lenses, we suspect this technique might be applicable to making crystal-clear 3D prints with a little less effort than would otherwise be needed.

Keep it in mind, and if you find success (or failure!) let us know on the tips line because we absolutely want to hear about it.

More Details On Why DeepSeek is a Big Deal

The DeepSeek large language models (LLM) have been making headlines lately, and for more than one reason. IEEE Spectrum has an article that sums everything up very nicely.

We shared the way DeepSeek made a splash when it came onto the AI scene not long ago, and this is a good opportunity to go into a few more details of why this has been such a big deal.

For one thing, DeepSeek (there’s actually two flavors, -V3 and -R1, more on them in a moment) punches well above its weight. DeepSeek is the product of an innovative development process, and freely available to use or modify. It is also indirectly highlighting the way companies in this space like to label their LLM offerings as “open” or “free”, but stop well short of actually making them open source.

The DeepSeek-V3 LLM was developed in China and reportedly cost less than 6 million USD to train. This was possible thanks to developing DualPipe, a highly optimized and scalable method of training the system despite limitations due to export restrictions on Nvidia hardware. Details are in the technical paper for DeepSeek-V3.

There’s also DeepSeek-R1, a chain-of-thought “reasoning” model which handily provides its thought process enclosed within easily-parsed <think> and </think> pseudo-tags that are included in its responses. A model like this takes an iterative step-by-step approach to formulating responses, and benefits from prompts that provide a clear goal the LLM can aim for. The way DeepSeek-R1 was created was itself novel. Its training started with supervised fine-tuning (SFT) which is a human-led, intensive process as a “cold start” which eventually handed off to a more automated reinforcement learning (RL) process with a rules-based reward system. The result avoided problems that come from relying too much on RL, while minimizing the human effort of SFT. Technical details on the process of training DeepSeek-R1 are here.

DeepSeek-V3 and -R1 are freely available in the sense that one can access the full-powered models online or via an app, or download distilled models for local use on more limited hardware. It is free and open as in accessible, but not open source because not everything needed to replicate the work is actually released. Like with most LLMs, the training data and actual training code used are not available.

What is released and making waves of its own are the technical details of how researchers produced what they did, and that means there are efforts to try to make an actually open source version. Keep an eye out for Open-R1!

Winter-Proof (And Improve) Your Resin 3D Printing

Was your 3D printer working fine over the summer, and now it’s not? With colder temperatures comes an overall surge in print failure reports — particularly with resin-based printers that might reside in outbuildings, basements, or garages. If you think this applies to you, don’t miss [Jan Mrázek]’s tips on improving cold-weather print results. His tips target the main reasons prints fail, helping to make the process a little more resilient overall. [Jan]’s advice is the product of long experience and experimentation, so don’t miss out.

With environmental changes comes the possibility that things change just enough to interfere with layers forming properly. The most beneficial thing overall is to maintain a consistent resin temperature; between 22 and 30 degrees Celsius is optimal. A resin heater is one solution, and there are many DIY options using simple parts. Some of the newer (and more expensive) printers have heaters built in, but most existing hobbyist machines do not.

An extreme case of blooming.

Temperature control isn’t the only thing, either. Layer formation and build plate adhesion can all be improved by adding rest times between layers. Yes, this increases print time. It also allows resin to settle before the next layer, improving adhesion and preventing blooming (a rough texture caused by an imperfect cure.) Since resin flows less readily at lower temperatures, rest times can help improve results. The best setting depends heavily on your particular setup, so [Jan] gives tips on finding optimal rest times.

Most common knowledge and advice from well-meaning communities online focuses on increasing exposure time or blaming the build plate. [Jan] feels that these are ultimately the wrong way to go about addressing failures. Usually, an environmental change (like the arrival of winter) has simply pushed a printer that was not optimized in the first place outside of its narrow comfort zone. A little optimization can set things back on track, making the printer more resilient and reliable overall.

Handy Online Metric Screw, Nut, and Washer Generator

For those times when you could really use a quick 3D model, this metric screw generator will do the trick for screws between M2 and M16 with matching nuts and washers. Fastener hardware is pretty accessible, but one never knows when a 3D printed piece will hit the spot. One might even be surprised what can be usefully printed on a decent 3D printer at something like 0.08 mm layer height.

Behind the scenes, [Jason]’s tool is an OpenSCAD script with a very slick web-based interface that allows easy customization of just about any element one might need to adjust, including fine-tuning the thread sizing. We’re fans of OpenSCAD here and appreciate what’s going on behind the scenes, but one doesn’t need to know anything about it to use the online tool.

Generated models can be downloaded as .3mf or .stl, but if you really need a CAD model you’re probably best off looking up a part and downloading the matching 3D model from a supplier like McMaster-Carr.

Prefer to just use the OpenSCAD script yourself, instead of the web interface? Select “Download STL/CAD Files” from the dropdown of the project page to download ScrewGenerator.scad for local use, and you’re off to the races.

RGB LED Display Simply Solves The Ping-Pong Ball Problem

A few years ago [Brian McCafferty] created a nice big RGB LED panel in a poster frame that aimed to be easy to move, program, and display. We’d like to draw particular attention to one of his construction methods. On the software end of things there are multiple ways to get images onto a DIY RGB panel, but his assembly technique is worth keeping in mind.

The diameter of ping pong balls is a mismatch for the spacing of LEDs on a strip. The solution? A bit of force.

The technique we want to highlight is not the fact that he used table tennis balls as the diffusers, but rather the particular manner in which he used them. As diffusers, ping-pong balls are economical and they’re effective. But you know what else they are? An inconvenient size!

An LED strip with 30 LEDs per meter puts individual LEDs about 33 mm apart. A regulation ping-pong ball is 40 mm in diameter, making them just a wee bit too big to fit nicely. We’ve seen projects avoid this problem with modular frames that optimize spacing and layout. But [Brian]’s solution was simply to use force.

Observing that ping-pong balls don’t put up much of a fight and the size mismatch was relatively small, he just shoved those (slightly squashy) 40 mm globes into 33 mm spacing. It actually looks… perfectly fine!

We suspect that this method doesn’t scale indefinitely. Probably large displays like this 1200 pixel wall are not the right place to force a square peg into a round hole, but it sure seemed to hit the spot for his poster-sized display. Watch it in action in the video below, or see additional details on the project’s GitHub repository.

DIY Probe Clamps to Ease Your PCB Work

Those of us familiar with PCB work would agree that anything that helps hold probes secure and hands-free to components, traces, or test points is worth looking at. That’s where [2048bits]’ snap probe design comes in. With a little additional and inexpensive hardware, one can have all the hands-free probe clamps one’s workbench can fit!

That first link is where you’ll find a list of required hardware and the CAD files (in .step format) for the probe itself. The obvious approach to making the pieces would be to 3D print them, but we notice the design — while attractive — looks like a challenging print due to the features. We’re not the only ones to see that, and happily there’s already a remix by [user_2299476772] aimed at keeping the essential features while making them easier to print.

If you’re taking a DIY approach to PCB probes, we’d like to remind you that one of our readers discovered dental burrs make absolutely fantastic, non-slip probe tips. This seems like a good opportunity to combine two ideas, and having the CAD files for the probe clamp means modification is straightforward. Let us know on the tips line if you get something working!

[via Hackster]

3D Print Stamps, and Ink Stuff to Your Heart’s Content With These Tips

Ink stamps can be fun to make and use, and 3D printers are uniquely positioned to create quality stamps of all kinds with just a little care. As with most things, the devil is in the details and the best results will require some extra work. Luckily, [Prusa] has a blog post that goes through how to 3D print the best stamps and includes concrete recommendations and tips to get the most out of the process.

Resin printers can create stamps too, just ensure a flexible material is used.

What makes a good 3D-printed stamp? It should be easy to use, transfer an image cleanly, and retain ink reasonably well. To hit these bases, printing the stamp face out of a flexible material is probably the most important, but a flat and smooth stamp surface is equally crucial. Satin-finish build plates will give a weathered look to the stamp, but textured build plates in general are no good.

As for the design, turning an image into a 3D object can be a bit challenging for novices, but there are tools that make that much easier now than it used to be. Some slicers allow importing .svg files (scalable vector graphics) with which to emboss or deboss objects, and online tools as well as free software like Inkscape will let folks covert images into .svg format.

Flexible filaments tend to be stringy so they should be dried before use, especially if the stamp design has a lot of separate elements that invite stringing. Any flex filament should do the job, but of course some specific filament brands perform better than others. Check out the full blog post for specific recommendations.

Pausing a print and inserting a pre-printed support piece (removed after the print completes) helps form big overhangs.

The remaining tricky element is that flexible filaments also tend to be poor at bridging, and if one is printing a stamp face-down on the build plate (to get that important, ultra-flat face) then the upper inside of the stamp may need some support for it to come out right. As [Prusa] suggests, this is a good place to use a manual, drop-in pre-printed support piece. Or if one has the ability to print in multiple materials, perhaps print the support structure in PLA since it is just about the only material that won’t completely weld itself to flex filaments. Of course, if one is designing the stamp entirely in CAD, then the best option would be to chamfer the stamp elements so supports aren’t necessary in the first place. Finally, don’t overlook the value of a physical design that makes handling easy and attractive.

Since 3D printing makes iteration so fast and easy, maybe it would be worth using this to revisit using rubber stamps to help create PCBs?

Prompt Injection Tricks AI Into Downloading and Executing Malware

[wunderwuzzi] demonstrates a proof of concept in which a service that enables an AI to control a virtual computer (in this case, Anthropic’s Claude Computer Use) is made to download and execute a piece of malware that successfully connects to a command and control (C2) server. [wonderwuzzi] makes the reasonable case that such a system has therefore become a “ZombAI”. Here’s how it worked.

Referring to the malware as a “support tool” and embedding instructions into the body of the web page is what got the binary downloaded and executed, compromising the system.

After setting up a web page with a download link to the malicious binary, [wunderwuzzi] attempts to get Claude to download and run the malware. At first, Claude doesn’t bite. But that all changes when the content of the HTML page gets rewritten with instructions to download and execute the “Support Tool”. That new content gets interpreted as orders to follow; being essentially a form of prompt injection.

Claude dutifully downloads the malicious binary, then autonomously (and cleverly) locates the downloaded file and even uses chmod to make it executable before running it. The result? A compromised machine.

Now, just to be clear, Claude Computer Use is experimental and this sort of risk is absolutely and explicitly called out in Anthropic’s documentation. But what’s interesting here is that the methods used to convince Claude to compromise the system it’s using are essentially the same one might take to convince a person. Make something nefarious look innocent, and obfuscate the true source (and intent) of the directions. Watch it in action from beginning to end in a video, embedded just under the page break.

This is a demonstration of the importance of security and caution when using or designing systems like this. It’s also a reminder that large language models (LLMs) fundamentally mix instructions and input data together in the same stream. This is a big part of what makes them so fantastically useful at communicating naturally, but it’s also why prompt injection is so tricky to truly solve.

AI Mistakes Are Different, and That’s a Problem

People have been making mistakes — roughly the same ones — since forever, and we’ve spent about the same amount of time learning to detect and mitigate them. Artificial Intelligence (AI) systems make mistakes too, but [Bruce Schneier] and [Nathan E. Sanders] make the observation that, compared to humans, AI models make entirely different kinds of mistakes. We are perhaps less equipped to handle this unusual problem than we realize.

The basic idea is this: as humans we have tremendous experience making mistakes, and this has also given us a pretty good idea of what to expect our mistakes to look like, and how to deal with them. Humans tend to make mistakes at the edges of our knowledge, our mistakes tend to clump around the same things, we make more of them when bored or tired, and so on. We have as a result developed controls and systems of checks and balances to help reduce the frequency and limit the harm of our mistakes. But these controls don’t carry over to AI systems, because AI mistakes are pretty strange.

The mistakes of AI models (particularly Large Language Models) happen seemingly randomly and aren’t limited to particular topics or areas of knowledge. Models may unpredictably appear to lack common sense. As [Bruce] puts it, “A model might be equally likely to make a mistake on a calculus question as it is to propose that cabbages eat goats.” A slight re-wording of a question might be all it takes for a model to suddenly be confidently and utterly wrong about something it just a moment ago seemed to grasp completely. And speaking of confidence, AI mistakes aren’t accompanied by uncertainty. Of course humans are no strangers to being confidently wrong, but as a whole the sort of mistakes AI systems make aren’t the same kinds of mistakes we’re used to.

There are different ideas on how to deal with this, some of which researchers are (ahem) confidently undertaking. But for best results, we’ll need to invent new ways as well. The essay also appeared in IEEE Spectrum and isn’t terribly long, so take a few minutes to check it out and get some food for thought.

And remember, if preventing mistakes at all costs is the goal, that problem is already solved: GOODY-2 is undeniably the world’s safest AI.

It’s Never Too Late For a Fixed SimCity 2000

Some retro games need a little help running on modern systems, and it’s not always straightforward. SimCity 2000 Special Edition is one such game and [araxestroy]’s sc2kfix bugfix DLL shows that the process can require a nontrivial amount of skill and finesse. The result? A SimCity 2000 Special Edition that can run without crash or compromise on modern Windows machines, surpassing previous fixes.

SimCity 2000 Special Edition was a release for Windows 95 that allowed the game to work in windowed glory. The executable is capable of running under modern Windows systems (and at high resolutions!) but it’s got a few problems lurking under the hood.

There are crash issues during save/load dialog boxes, and a big visual problem. Animations rely on palette swapping for the game’s animations, and the technique originally used simply does not work right on modern displays. A fellow named [Guspaz] created SC2KRepainter to partially deal with this by forcing window redraws, but it’s an imperfect fix with a few side effects of it’s own.

[araxestroy]’s new solution eliminates dialog crashes and restores the animations, letting them look exactly as they should even on modern systems. It does this elegantly not by patching the executable or running a separate process, but by making the changes in memory at runtime with the help of a specially-crafted .dll file. Just grab winmm.dll from the latest release and put it into the same folder as simcity.exe, then launch the game to enjoy it as the designers intended!

Patching old games is a scene that helps ensure not only that classics never die, but also helps them be appreciated in new ways. Heck, even E.T. for the Atari 2600 has gotten tweaked, highlighting the misunderstood nature of the game in the process.

Make Your VR Controllers Handle Like Two-Handed Weapons

Wielding things like two-handed swords in VR can be awkward. There’s no sense of grasping a solid object. The controllers (and therefore one’s hands) feel floaty and disconnected from one another, because they are. [Astro VR Gaming] aims to fix this with a DIY attachment they are calling the ARC VR Sword Attachment.

The ARC is a 3D-printed attachment that allows a player to connect two controllers together. They can just as easily be popped apart, which is good because two separate controllers is what one wants most of the time. But for those moments when hefting a spear or swinging a two-handed sword is called for? Stick them together and go wild.

The original design (the first link up above) uses magnets, but an alternate version uses tapered inserts instead, and provides a storage stand. Want to know if the ARC is something you’d like to make for yourself? Watch it in action in the video embedded just under the page break.

VR is an emerging technology with loads of space for experimentation and DIY problem solving. We wish more companies would follow Valve’s example of hacker-friendly hardware design, but even just providing CAD models of your hardware to make attachments easier to design would be a big step forward, and something every hacker would welcome.

Nice PDF, But Can It Run DOOM? Yup!

DOOM is a classic game to implement on a variety of platforms, but doompdf by [ading2210] is one we didn’t see coming. It runs a bit slow and controls are a little awkward but it does run. Entirely within a PDF file, at that.

How is this possible? PDFs are technically capable of much more than just displaying static content, and support JavaScript with their own library of functions. Adobe Acrobat implements the full spec, but modern web browsers implement at least a subset of the functionality in a sandboxed JavaScript runtime environment. Input and output are limited to things one might expect from a fancy PDF form (text input boxes, clickable buttons, things of that nature) but computation-wise, just about anything goes.

The playable DOOM PDF therefore implements keyboard input by reading characters typed into a text entry box, or has the user click buttons with the mouse. It’s not the smoothest of input methods but it’s gloriously hacky. What’s even better is the video output, which is essentially ASCII-art video frames. Zoom in and you’ll see for yourself! It’s not the fastest frame rate, but it’s fantastic all the same.

As shown by zooming in, video frames are rendered as rows of ASCII. It’s enough to implement 6-color monochrome and make in-game text legible.

This project was partly inspired by Tetris in a PDF which demonstrated a lot of the concepts used, and if you like electronic document related shenanigans, be sure to check out playing chess against your printer with PostScript. PostScript is actually a fully functional interpreted language, but unlike JavaScript it was never intended to be used directly by humans.

Thanks to everyone who sent this to our tips line!

Modern AI on Vintage Hardware: LLama 2 Runs on Windows 98

[EXO Labs] demonstrated something pretty striking: a modified version of Llama 2 (a large language model) that runs on Windows 98. Why? Because when it comes to personal computing, if something can run on Windows 98, it can run on anything. More to the point: if something can run on Windows 98 then it’s something no tech company can control how you use, no matter how large or influential they may be. More on that in a minute.

Ever wanted to run a local LLM on 25 year old hardware? No? Well now you can, and at a respectable speed, too!

What’s it like to run an LLM on Windows 98? Aside from the struggles of things like finding compatible peripherals (back to PS/2 hardware!) and transferring the required files (FTP over Ethernet to the rescue) or even compilation (some porting required), it works maybe better than one might expect.

A Windows 98 machine with Pentium II processor and 128 MB of RAM generates a speedy 39.31 tokens per second with a 260K parameter Llama 2 model. A much larger 15M model generates 1.03 tokens per second. Slow, but it works. Going even larger will also work, just ever slower. There’s a video on X that shows it all in action.

It’s true that modern LLMs have billions of parameters so these models are tiny in comparison. But that doesn’t mean they can’t be useful. Models can be shockingly small and still be perfectly coherent and deliver surprisingly strong performance if their training and “job” is narrow enough, and the tools to do that for oneself are all on GitHub.

This is a good time to mention that this particular project (and its ongoing efforts) are part of a set of twelve projects by EXO Labs focusing on ensuring things like AI models can be run anywhere, by anyone, independent of tech giants aiming to hold all the strings.

And hey, if local AI and the command line is something that’s up your alley, did you know they already exist as single-file, multi-platform, command-line executables?

Custom Case Turns Steam Deck Into Portable Workstation

DIY portable computing takes many forms, and doesn’t always require getting down and dirty with custom electronics. [Justinas Jakubovskis]’s Steam Deck Play and Work case demonstrates this with some really smart design features.

It’s primarily a carrying case for Valve’s Steam Deck portable PC gaming console, but the unit also acts as a fold-out workstation with keyboard. Add a wireless mouse to the mix and one can use it much like a mini laptop, or just pull the Steam Deck out and use it in the usual way.

The case is 3D printed and while the model isn’t free (links are in the video description) some of the design features are worth keeping in mind even if you’re not buying. The top clasp, for example, doubles as a cover for the buttons and exhaust vents and the kickstand at the rear covers the cooling intake when closed, and exposes it when deployed. We also really like the use of thick fabric tape lining the inside of the case to support and cushion the Steam Deck itself; it’s an effective and adjustable way to provide a soft place for something to sit.

The case is intended to fit a specific model of keyboard, in this case the Pebble Keys 2 K380s (also available as a combo with a mouse). But if you want to roll your own Steam Deck keyboard and aren’t afraid of some low-level work, check out the Keysheet. Or go deeper and get some guidance on modding the Steam Deck itself.

❌