Vista de Lectura

Hay nuevos artículos disponibles. Pincha para refrescar la página.

All Aboard the Hack Train: Nottingham’s LED Revival

Nottingham Railway departure board in Hackspace

Hackerspaces are no strangers to repurposing outdated tech, and Nottingham Hackspace happens to own one of those oddities one rarely gets their hands on: a railway departure board. Left idle for over a decade, it was brought back to life by [asjackson]. Originally salvaged around 2012, it remained unused until mid-2024, when [asjackson] decided to reverse-engineer it. The board now cycles between displaying Discord messages and actual train departures from Nottingham Railway Station every few minutes. The full build story can be found in this blog post.

The technical nitty-gritty is fascinating. Each side of the board contains 4,480 LEDs driven as two parallel chains. [asjackson] dove into its guts, decoding circuits, fixing misaligned logic levels, and designing custom circuit boards in KiCAD. The latest version swaps WiFi for a WizNet W5500 ethernet module and even integrates the Arduino Uno R4 directly into the board’s design. Beyond cool tech, the display connects to MQTT, pulling real-time train data and Discord messages via scripts that bridge APIs and custom Arduino code.

This board is a true gem for any hackerspace, even more so now it’s working. It waited for the exact mix of ingredients why hackerspaces exist in the first place: curiosity, persistence, and problem-solving. Nottingham Hackspace is home to a lot more, as we once wrote in this introductory article.If you don’t have room for the real thing, maybe set your sights a bit smaller.

Do you have a statement piece this cool in your hackerspace or your home? Tip us!

PoE-Power Protection: The Hornet Nest Alarm Panel

Close up of a Hornet Nest circuit board

Have you ever thought of giving new buzz to outdated wired alarm systems or saving money while upgrading your home security? The Hornet Nest Alarm Panel, to which hacker [Patrick van Oosterwijck] contributes, does just that. Designed for domotics enthusiasts, it offers 42 sensor zones and seamless integration with Home Assistant and ESPHome. This open-source gem uses the wESP32 board, which combines an ESP32 with Ethernet and Power over Ethernet (PoE) for robust, reliable connectivity. Check out the Crowd Supply campaign for details.

So what makes this Hornet Nest special? Besides its hackable nature, it repurposes existing wired sensors, reducing waste and cost. Unlike WiFi-dependent solutions, the PoE-powered ESP32 ensures stable performance, even in hard-to-reach locations. The optional USB programming port is genius—it’s there when you need it but doesn’t clutter the board when you don’t. With its isolated circuits, long-cable safety, and smart Ethernet, WiFi, and Bluetooth combination, this system ticks every DIY box.

Hackaday has featured other DIY PoE-powered projects, offering more inspiration for smart automation enthusiasts.

Crafting a Cardboard Tribute to Puzzle Bobble

Puzzle Bobble on a screen with a physical gadget in front

What do you get when you cross cardboard, deodorant rollers, and a love for retro gaming? A marvel of DIY engineering that brings the arcade classic Puzzle Bobble to life—once again! Do you remember the original Puzzle Bobble aiming mechanism we featured 12 years ago? Now, creator [TomTilly] has returned with a revamped version, blending ingenuity with a touch of nostalgia. [Tom] truly is a Puzzle Bobble enthusiast. And who could argue that? The game’s simplicty makes for innocent yet addictive gameplay.

[Tom]’s new setup recreates Puzzle Bobble’s signature aiming mechanic using surprising materials: deodorant roller balls filled with hot glue (to diffuse LED colours), bamboo skewers, and rubber bands. At its heart is an Arduino UNO, which syncs the RGB LED ‘bubbles’ and a servo-driven aiming arm to the game’s real-time data. A Lua script monitors MAME’s memory locations to match the bubble colours and aimer position.

But this isn’t just a static display. [Tom] hints at a version 2.0: a fully functional controller complete with a handle. Imagine steering this tactile masterpiece through Puzzle Bobble’s frantic levels!

Need more inspiration? Check out other quirky hacks like [Tom]’s deodorant roller controller we featured in 2023. Whether you’re into cardboard mechanics or retro gaming, there’s no end to what clever hands can create.

Beam me Up: Simple Free-Space Optical Communication

Bokeh photo of red light particles in the dark

Let’s think of the last time you sent data without wires. We’re not talking WiFi here, but plain optical signals. Free-space optical communication, or FSO, is an interesting and easy way to transmit signals through light beams. Forget expensive lasers or commercial-grade equipment; this video by [W1VLF] offers a simple and cheap entry point for anyone with a curiosity for DIY tech. Inspired by a video on weak signal sources for optical experiments, this project uses everyday components like a TV remote-control infrared LED and a photo diode. The goal is simply to establish optical communication across distances for under $10.

Click through the break to see more…

The heart of this setup is a basic pulse-width modulator driving the LED. Pair it with a photo diode for reception, and voilà—light beams become data carriers. Add a lens for focus, and you’ll instantly see the dramatic signal gain. LEDs from remote controls are surprisingly effective. For more precision, swap to narrow-beam LEDs or use filtered photo diodes to block ambient noise from sunlight or fluorescent lights. It’s delightfully simple yet endlessly tweakable.

[W1VLF]’s advice: start small, but don’t stop there—enthusiasts have built entire FSO networks to link rural areas! If you’re intrigued, [W1VLF] has more videos to explore. Want to dig deeper into the history of optical communications?  We’ve got that!  Once you advance, share your tips and thoughts in the comments below to help others get set up.

Circuit Secrets: Exploring a $5 Emergency Light

close up hands holding lighting pcb

Who would’ve thought a cheap AliExpress emergency light could be packed with such crafty design choices? Found for about $5, this unit uses simple components yet achieves surprisingly sophisticated behaviors. Its self-latching feature and decisive illumination shut-off are just the beginning. A detailed analysis by [BigCliveDotCom] reveals a smart circuit that defies its humble price.

The circuit operates via a capacitive dropper, a cost-effective way to power low-current devices. What stands out, though, is its self-latching behavior. During a power failure, transistors manage to keep the LEDs illuminated until the battery voltage drops below a precise threshold, avoiding the dreaded fade-to-black. Equally clever is the automatic shut-off when the voltage dips too low, sparing the battery from a full drain.

Modifications are possible, too. For regions with 220V+ mains, swapping the dropper capacitor with a 470nF one can reduce heat dissipation. Replacing the discharge resistor (220k) with a higher value improves longevity by running cooler. What remarkable reverse engineering marvels have you come across? Share it in the comments!  After all, it is fun to hack into consumer stuff. Even if it is just a software hack.

Esperanto: The Language That Hoped to Unite the World

Close up of a Dutch etymology dictionary showing Esperanto, and a candle

Christmas: a good time to broach a topic of hope. We’re talking Esperanto. This language that spurred the hope it one day could hack the barriers between people, eliminating war and miscommunication. The video below unpacks the history of this linguistic marvel. Esperanto was a constructed language dreamed up in 1887 by Ludwik Zamenhof, a Polish-Russian eye doctor with a knack for linguistics and great ideals. If you’re a little into linguistics yourself, you’ll sure know the name stems from the Latin sperare: to hope.

Inspired by the chaos of multilingual strife in his hometown, Zamenhof created Esperanto to unite humanity under a single, simple, easy-to-learn tongue. With just 16 grammar rules, modular word-building, and no pesky exceptions — looking at you, English — Esperanto was a linguistic hack ahead of its time.

But Esperanto wasn’t just a novelty—it almost became the lingua franca of diplomacy. In 1920, Iran proposed Esperanto as the official language of the League of Nations, but the French vetoed it, fearing their language’s global dominance was at risk. From there, Esperanto’s journey took a darker turn as both Nazi Germany and Stalinist Russia persecuted its speakers. Despite this, Esperanto persisted, surfacing in quirky corners of culture, from William Shatner’s Esperanto-only horror film Incubus to its inclusion on NASA’s Voyager Golden Record.

Fast-forward to the digital age: Esperanto is thriving on online learning platforms, where over a million learners explore its minimalist elegance. It appears at places in various editions of Grand Theft Auto. It has even inspired modern makers to create new constructed languages, like Loglan, Toki Pona, and even Klingon. Could Esperanto—or any reimagined language—rise again to unite us? For curious minds, watch the video here.

Going Digital: Teaching a TI-84 Handwriting Recognition

close up of a TI-84 Plus CE running custom software

You wouldn’t typically associate graphing calculators with artificial intelligence, but hacker [KermMartian] recently made it happen. The innovative project involved running a neural network directly on a TI-84 Plus CE to recognize handwritten digits. By using the MNIST dataset, a well-known collection of handwritten numbers, the calculator could identify digits in just 18 seconds. If you want to learn how, check out his full video on it here.

The project began with a proof of concept: running a convolutional neural network (CNN) on the calculator’s limited hardware, a TI-84 Plus CE with only 256 KB of memory and a 48 MHz processor. Despite these constraints, the neural network could train and make predictions. The key to success: optimizing the code, leveraging the calculator’s C programming tools, and offloading the heavy lifting to a computer for training. Once trained, the network could be transferred to the calculator for real-time inference. Not only did it run the digits from MNIST, but it also accepted input from a USB mouse, letting [KermMartian] draw digits directly on the screen.

While the calculator’s limited resources mean it can’t train the network in real-time, this project is a proof that, with enough ingenuity, even a small device can be used for something as complex as AI. It’s not just about power; it’s about resourcefulness. If you’re into unconventional projects, this is one for the books.

Crawler Challenge: Building Rope-Traversing Robots

students overlooking their rope-traversing robots

Rope-climbing robots are the stuff of engineering dreams. As kids, didn’t we all clutter our family home with constructions of towers and strings – Meccano, or Lego – to have ziplines spanning entire rooms? Good for the youngsters of today, this has been included in school curricula. At the University of Illinois, the ME 370 students have been given the task of building a robot that can hang from a rope and walk across it—without damaging the rope. The final projects show not only how to approach tricky design problems, but also the creative solutions they stumbled upon.

Imagine a tiny, rope-climbing walker in your workshop—what could you create?

The project is full of opportunities for those thinking out of the box. It’s all about the balance between innovation and practicality: the students have to come up with a solution that can move at least 2 meters per minute, fits in a shoebox, and has some creative flair—no wheels allowed! The constraints provide an extra layer of challenge, but that’s where the fun lies. Some students use inverted walkers, others take on a more creature-like approach. The clever use of motors and batteries shows just how far simple tech can go when combined with a bit of engineering magic.

This project is a fantastic reminder that even small, seemingly simple design challenges can lead to fascinating creations. It invites us adults to play, and by that, we learn: a win-win situation. You can find the original article here, or grab some popcorn and watch the video below.

Rudolph’s Sleigh on a North Pole PCB

pcb with santa sleigh racing circuit

Each Christmas, [Adam Anderson], [Daniel Quach], and [Johan Wheeler] (going by ‘the Janky Jingle Crew’)—set themselves the challenge of outdoing their previous creations. Last year’s CH32 Fireplace brought an animated LED fire to life with CH32V003 microcontrollers.

This year, they’ve gone a step further with the North Pole Circuit, a holiday project that combines magnetic propulsion, festive decorations, and a bit of engineering flair. Inspired by a miniature speedway based on Friedrich Gauss’ findings, the North Pole Circuit includes sleighs and reindeer that glide along a custom PCB track, a glowing village with flickering lights, and a buzzer to play Christmas tunes.

The propulsion system works using the Lorentz force, where vertical magnets interact with PCB traces to produce motion. A two-phase design, similar to a stepper motor, ensures smooth operation, while guard rails maintain stability on curves. A separate CH32V003 handles lighting and synchronized jingles, creating a cohesive festive display. As we mentioned in the article on their last year’s creation, going from a one-off to a full batch will make one rethink the joy of repetitive production. Consider the recipients of these tiny Christmas cards quite the lucky ones. We deem this little gift a keeper to put on display when Christmas rolls around again.

This annual tradition highlights the Crew’s knack for combining fun and engineering. Curious about the details or feeling inspired to create your own? Explore the full details and files on their GitHub.

Back to the Future of Texting: SMS on a Panasonic Typewriter

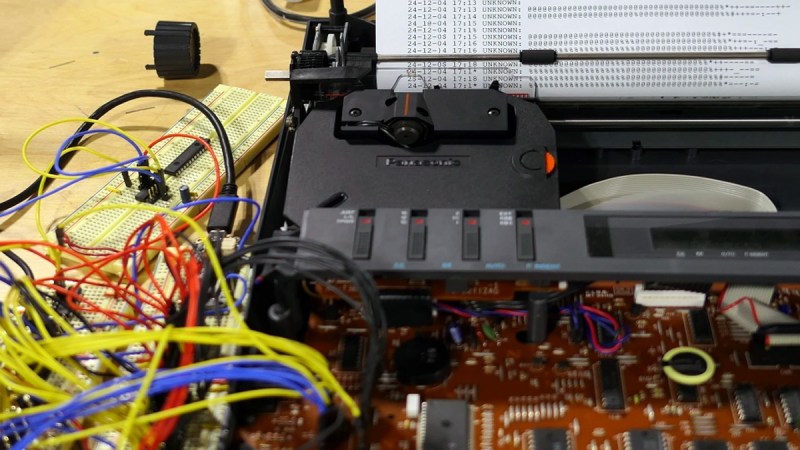
Close up of a typewriter annex SMS-receiver

Among us Hackaday writers, there are quite a few enthusiasts for retro artifacts – and it gets even better when they’re combined in an unusual way. So, when we get a tip about a build like this by [Sam Christy], our hands sure start itching.

The story of this texting typewriter is one that beautifully blends nostalgia and modern technology. [Sam], an engineering teacher, transformed a Panasonic T36 typewriter into a device that can receive SMS messages, print them out, and even display the sender’s name and timestamp. For enthusiasts of retro gadgets, this creation bridges the gap between analog charm and digital convenience.

What makes [Sam]’s hack particularly exciting is its adaptability. By effectively replacing the original keyboard with an ESP32 microcontroller, he designed the setup to work with almost any electric typewriter. The project involves I2C communication, multiplexer circuits, and SMS management via Twilio. The paper feed uses an “infinite” roll of typing paper—something [Sam] humorously notes as outlasting magnetic tape for storage longevity.

Beyond receiving messages, [Sam] is working on features like replying to texts directly from the typewriter. For those still familiar with the art form of typing on a typewriter: how would you elegantly combine these old machines with modern technology? While you’re thinking, don’t overlook part two, which gives a deeper insight in the software behind this marvel!

Versatile, yet Grounded: The Rotodyne Revisited

Fairey Rotodyne in flight

When it comes to aviation curiosities, few machines captivate the imagination like the Fairey Rotodyne. This British hybrid aircraft was a daring attempt to combine helicopter and fixed-wing efficiency into a single vehicle. A bold experiment in aeronautical design, the Rotodyne promised vertical takeoffs and landings in cramped urban spaces while offering the speed and range of a regional airliner. First flown in 1957, it captured the world’s attention but ultimately failed to realize its potential. Despite featured before, new footage keeps fascinating us. If you have never heard about this jet, keep reading.

The Rotodyne’s innovative design centered around a massive, powered rotor that utilized a unique tip-jet system. Compressed air, mixed with fuel and ignited at the rotor tips, created lift without the need for a tail rotor. The result: a smoother transition between vertical and forward flight modes. Inside, it offered spacious seating for 50 passengers and even had clamshell doors for cargo. Yet its futuristic approach wasn’t without drawbacks—most notably, the thunderous noise produced by its rotor jets, earning complaints from both city planners and residents.

Despite these hurdles, the helicopter-plane crossover demonstrated its versatility, setting a world speed record and performing groundbreaking intercity flights. Airlines and militaries expressed interest, but escalating development costs and noise concerns grounded this ambitious project.

To this day, the Rotodyne remains a symbol of what could have been—a marvel of engineering ahead of its time. Interested in more retro-futuristic aircraft tales? Read our previous story on it, or watch the original footage below and share your thoughts.

Walkie Talkies, Jedi Style: Building a Communicator

Creators demonstrating their Jedi Watch

Playing Star Wars Outlaws sparked an idea with [3DSage]: why not recreate the game’s wrist communicator as a functioning gadget? Inspired by the relatively simplistic design, he and his friend Ben set out to build their own device to take to Galaxy’s Edge in Disneyland. Armed with an arsenal of tools—3D printers, CNC machines, and soldering irons—he aimed to turn imagination into reality.

After ordering multiple walkie-talkies, they meticulously tested each one for audio quality, circuit board size, and compatibility with custom components. The ‘world’s tiniest walkie-talkie’ had potential but demanded creative modifications, including disassembling and resoldering components. They crafted their own circuit board and designed a 3D printed housing to fit both electronics and style. For the finishing touch, they weathered the device with paints and even glow-in-the-dark accents, making it authentic to the Star Wars universe. Even Chewbacca himself gave one a thumbs-up!

Weathering goes a long way towards creating a convincing prop — it can turn a bundle of pipes and some foam blocks into a movie-ready WWII machine gun.

Tiny PONG, Big Ambitions: World’s Smallest Arcade

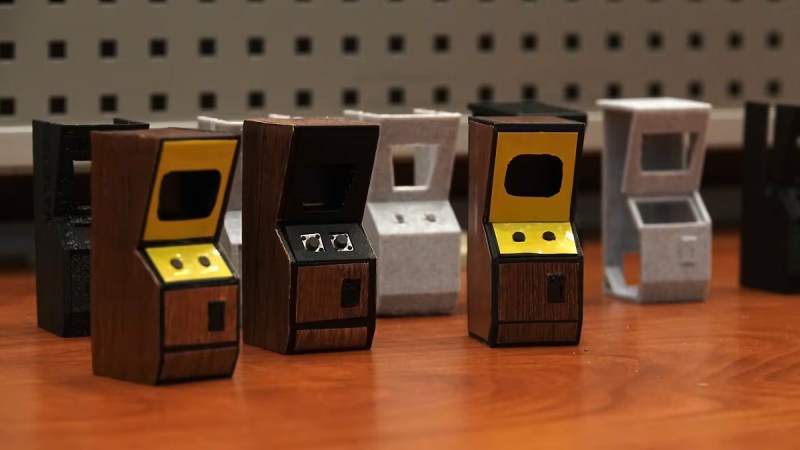
Tiny arcade machines on a tabletop

London, Ontario college student [Victoria Korhonen] has captured the attention of tech enthusiasts and miniaturization lovers with her creation of what might be the world’s smallest arcade machine. Standing just 64 mm tall, 26 mm wide, and 30 mm deep, this machine is a scaled-down marvel playing the classic Atari game PONG. While the record isn’t yet official—it takes about three months for Guinness to certify—it’s clear [Korhonen]’s creation embodies ingenuity and dedication.

[Korhonen], an electromechanical engineering student, took six months to design and build this micro arcade. Inspired by records within reach, she aimed to outdo the previous tiniest arcade machine by shaving off just a few millimeters During the project she faced repeated failures, but viewed each iteration as a step towards success. Her miniature machine isn’t just a gimmick; it’s fully functional, with every component—from paddle mechanics to coding—developed from scratch.

[Korhonen] is already eyeing new projects, including creating the smallest humanoid robot. She also plans to integrate her electromechanical expertise into her family’s escape room business. Her journey aligns with other hobbyist projects pushing the limits of miniaturization, such as this credit card-sized Tetris clone or [Aliaksei Zholner]’s paper micro engines.

From Felt to Fate: Building Your Own Sorting Hat

[Wills] and his purple DIY sorting hat

Ever wondered how it feels to have the Sorting Hat decide your fate? [Will Dana] wanted to find out, so he conjured a bit of Hogwarts magic, and crafted a fully animatronic Sorting Hat from scratch. In the video below, he covers every step of bringing this magical purple marvel to life—from rapid joystick movements to the electronics behind it all.

The heart of the project is two 9g servos—one actuates the mouth, and the other controls the eyebrows—powered by an ESP32 microcontroller. Communication between two ESP32 boards ensures smooth operation via the ESP-NOW protocol, making this a wireless wonder. The design process involved using mechanical advantage to solve jittery servo movements, a trick that will resonate with anyone who’s fought with uncooperative motors.

If animatronics or themed projects excite you, Hackaday has covered similar builds, from a DIY BB-8 droid to a robot fox.

An Engineer’s Perspective on Baking Gingerbread Houses

Optical illusion gingerbread house from an odd perspective

If you’ve ever wanted to merge the worlds of holiday cheer and clever geometry, [Kris Wilk]’s gingerbread house hack is your ultimate inspiration. Shared in a mesmerising video, [Wilk] showcases his 2024 entry for his neighborhood’s gingerbread house contest. Designed in FreeCAD and baked to perfection, this is no ordinary holiday treat. His pièce de résistance was a brilliant trompe l’oeil effect, visible only from one carefully calculated angle. Skip to the last twenty seconds of the video to wrap your head around how it actually looks.

[Wilk] used FreeCAD’s hidden true perspective projection function—a rarity in CAD software. This feature allowed him to calculate the perfect forced perspective, essential for crafting the optical illusion. The supporting structures were printed on a Prusa MK4, while the gingerbread itself was baked at home. Precision photography captured the final reveal, adding a professional touch to this homemade masterpiece. [Wilk]’s meticulous process highlights how accessible tools and a sprinkle of curiosity can push creative boundaries.

For those itching to experiment with optical illusions, this bakery battle is only the beginning. Why not build a similar one inside out? Or construct a gingerbread man in the same way? Fire up the oven, bend your mind, and challenge your CAD skills!

Do 3D Printers Dream of LEGO Sheep?

3D scanned image of LEGO sheep

Imagine the power to clone your favorite LEGO piece—not just any piece, but let’s say, one that costs €50 second-hand. [Balazs] from RacingBrick posed this exact question: can a 3D scanner recreate LEGO pieces at home? Armed with Creality’s CR-Scan Otter, he set out to duplicate a humble DUPLO sheep and, of course, tackle the holy grail of LEGO collectibles: the rare LEGO goat.

The CR-Scan Otter is a neat gadget for hobbyists, capable of capturing objects as small as a LEGO piece. While the scanner proved adept with larger, blocky pieces, reflective LEGO plastic posed challenges, requiring multiple scans for detailed accuracy. With clever use of 3D printed tracking points, even the elusive goat came to life—albeit with imperfections. The process highlighted both the potential and the limitations of replicating tiny, complex shapes. From multi-colored DUPLO sheep to metallic green dinosaur jaws, [Balazs]’s experiments show how scanners can fuel customization for non-commercial purposes.

For those itching to enhance or replace their builds, this project is inspiring but practical advice remains: cloning LEGO pieces with a scanner is fun but far from plug-and-play. Check out [Balazs]’s exploration below for the full geeky details and inspiration.

Robot Rodents: How AI Learned to Squeak and Play

Render of life-size robot rat animatronic on blue plane

In an astonishing blend of robotics and nature, SMEO—a robot rat designed by researchers in China and Germany — is fooling real rats into treating it like one of their own.

What sets SMEO apart is its rat-like adaptability. Equipped with a flexible spine, realistic forelimbs, and AI-driven behavior patterns, it doesn’t just mimic a rat — it learns and evolves through interaction. Researchers used video data to train SMEO to “think” like a rat, convincing its living counterparts to play, cower, or even engage in social nuzzling. This degree of mimicry could make SMEO a valuable tool for studying animal behavior ethically, minimizing stress on live animals by replacing some real-world interactions.

For builders and robotics enthusiasts, SMEO is a reminder that robotics can push boundaries while fostering a more compassionate future. Many have reservations about keeping intelligent creatures in confined cages or using them in experiments, so imagine applying this tech to non-invasive studies or even wildlife conservation. In a world where robotic dogs, bees, and even schools of fish have come to life, this animatronic rat sounds like an addition worth further exploring. SMEO’s development could, ironically, pave the way for reducing reliance on animal testing.

Pedaling your Mobile Web Server Across the Globe

Front view of blue bicycle with Raspberry Pi webserver

We tinkerers often have ideas we know are crazy, and we make them up in the most bizarre places, too. For example, just imagine hosting a website while pedaling across the world—who would (not) want that? Meet [Jelle Reith], a tinkerer on an epic cycling adventure, whose bicycle doubles as a mobile web server. [Jelle]’s project, jelle.bike, will from the 6th of December on showcase what he’s seeing in real time, powered by ingenuity and his hub dynamo. If you read this far, you’ll probably guess: this hack is done by a Dutchman. You couldn’t be more right.

At the heart of [Jelle]’s setup is a Raspberry Pi 4 in a watertight enclosure. The tiny powerhouse runs off energy generated by a Forumslader V3, a clever AC-to-DC converter optimized for bike dynamos. The Pi gets internet access via [Jelle]’s phone hotspot, but hosting a site over cellular networks isn’t as simple as it sounds. With no static IP available, [Jelle] routes web traffic through a VPS using an SSH tunnel. This crafty solution—expanded upon by Jeff Geerling—ensures seamless access to the site, even overcoming IPv6 quirks.

The system’s efficiency and modularity exemplify maker spirit: harnessing everyday tools to achieve the extraordinary. For more details, including a parts list and schematics, check out [Jelle]’s Hackaday.io project page.

WASM-4: Retro Game Dev Right in Your Browser

Pixel mashup with Wasm-4 logo and retro graphics

Have you ever dreamt of developing games that run on practically anything, from a modern browser to a microcontroller? Enter WASM-4, a minimalist fantasy console where constraints spark creativity. Unlike intimidating behemoths like Unity, WASM-4’s stripped-back specs challenge you to craft games within its 160×160 pixel display, four color palette, and 64 KB memory. Yes, you’ll curse at times, but as every tinkerer knows, limitations are the ultimate muse.

Born from the WebAssembly ecosystem, this console accepts “cartridges” in .wasm format. Any language that compiles to WebAssembly—be it Rust, Go, or AssemblyScript—can build games for it. The console’s emphasis on portability, with plans for microcontroller support, positions it as a playground for minimalist game developers. Multiplayer support? Check. Retro vibes? Double-check.

Entries from a 2022’s WASM-4 Game Jam showcase this quirky console’s charm. From pixel-perfect platformers to byte-sized RPGs, the creativity is staggering. One standout, “WasmAsteroids,” demonstrated real-time online multiplayer within these confines—proof that you don’t need sprawling engines to achieve cutting-edge design. This isn’t just about coding—it’s about coding smart. WASM-4 forces you to think like a retro engineer while indulging in modern convenience.

WASM-4 is a playground for anyone craving pure, unadulterated experimentation. Whether you’re a seasoned programmer or curious hobbyist, this console has the tools to spark something great.

❌