Vista de Lectura

Hay nuevos artículos disponibles. Pincha para refrescar la página.

Hackaday Links: December 22, 2024

Hackaday Links Column Banner

Early Monday morning, while many of us will be putting the finishing touches — or just beginning, ahem — on our Christmas preparations, solar scientists will hold their collective breath as they wait for word from the Parker Solar Probe’s record-setting passage through the sun’s atmosphere. The probe, which has been in a highly elliptical solar orbit since its 2018 launch, has been getting occasional gravitational nudges by close encounters with Venus. This has moved the perihelion ever closer to the sun’s surface, and on Monday morning it will make its closest approach yet, a mere 6.1 million kilometers from the roiling photosphere. That will put it inside the corona, the sun’s extremely energetic atmosphere, which we normally only see during total eclipses. Traveling at almost 700,000 kilometers per hour, it won’t be there very long, and it’ll be doing everything it needs to do autonomously since the high-energy plasma of the corona and the eight-light-minute distance makes remote control impossible. It’ll be a few days before communications are re-established and the data downloaded, which will make a nice present for the solar science community to unwrap.

While Parker has been in a similar position on previous orbits and even managed a fortuitous transit of a coronal mass ejection, this pass will be closer and faster than any previous approach. It’s the speed that really grabs our attention, though, as Parker will be traveling at a small but significant fraction of the speed of light for a bit. That makes us wonder if there was any need for mission planners to allow for relativistic effects. We’d imagine so; satellite navigation systems need to take relativity into account to work, and they don’t move anywhere near as fast as Parker. Time will be running slower for Parker at those speeds, and it sure seems like that could muck things up, especially regarding autonomous operation.

Ever since the seminal work of Cameron, Hamilton, Schwarzenegger, et al, it has been taken as canon that the end of humanity will come about when the moral equivalent of SkyNet becomes self-aware and launches all the missiles at once to blot us out with a few minutes of thermonuclear fire. But it looks like AI might be trying to raise an army of grumpy teenagers if this lawsuit over violence-inciting chatbots is any indication. The federal product liability lawsuit targets Character.AI, an outfit that creates LLM-powered chatbots for kids, for allegedly telling kids to do some pretty sketchy stuff. You can read the details in the story, but suffice it to say that one of the chatbots was none too pleased with someone’s parents for imposing screen time rules and hinted rather strongly about how the child should deal with them. The chat logs of that interaction and others that are part of the suit are pretty dark, but probably no darker than the advice that most teenagers would get online from their carbon-based friends. That’s the thing about chatbots; when an LLM is trained with online interactions, you pretty much know what’s going to come out.

In today’s “Who could have seen that coming?” segment, we have a story about how drivers are hacked by digital license plates and are keen to avoid tolls and tickets. The exploit for one specific brand of plate, Reviver, and while it does require physical access to the plates, it doesn’t take much more than the standard reverse engineering tools and skills to pull off. Once the plates are jailbroken — an ironic term given that license plate manufacturing has historically been a prison industry — the displayed numbers can be changed at will with a smartphone app. The worst part about this is that the vulnerability is baked right into the silicon, so there’s nothing to be patched; the plates would have to be recalled, and different hardware would need to be reissued. We’ve been skeptical about the need for these plates from the beginning and questioned why anyone would pay extra for them (last item). But maybe the ability to dump your traffic cam violations into someone else’s lap is worth the extra $20 a month.

And finally, this local news story from Great Falls, Montana, is a timely reminder of how machine tools can mess up your life if you let them. Machinist Butch Olson was alone at work in his machine shop back on December 6 when the sleeve of his jacket got caught in a lathe. The powerful machine pulled his arm in and threatened to turn him to a bloody pulp, but somehow, he managed to brace himself against the bed. He fought the lathe for 20 whole minutes before the motor finally gave out, which let him disentangle himself and get some help. He ended up with a broken back, four fractured ribs, and an arm that looks “like hamburger” according to his sister. That’s a high price to pay, but at least Butch gets to brag that he fought a lathe and won.
Measuring a Well with Just a Hammer and a Smartphone

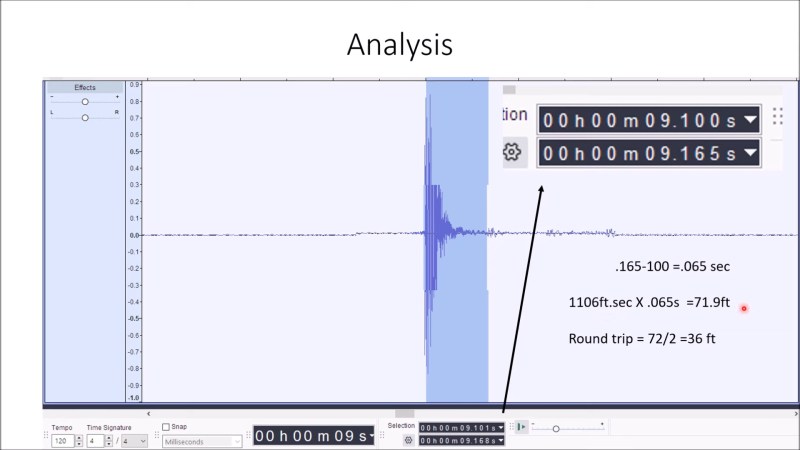
What’s the best way to measure the depth of a well using a smartphone? If you’re fed up with social media, you might kill two birds with one stone and drop the thing down the well and listen for the splash. But if you’re looking for a less intrusive — not to mention less expensive — method, you could also use your phone to get the depth acoustically.

This is a quick hack that [Practical Engineering Solutions] came up with to measure the distance to the surface of the water in a residential well, which we were skeptical would work with any precision due to its deceptive simplicity. All you need to do is start a sound recorder app and place the phone on the well cover. A few taps on the casing of the well with a hammer send sound impulses down the well; the reflections from the water show up in the recording, which can be analyzed in Audacity or some similar sound editing program. From there it’s easy to measure how long it took for the echo to return and calculate the distance to the water. In the video below, he was able to get within 3% of the physically measured depth — pretty impressive.

Of course, a few caveats apply. It’s important to use a dead-blow hammer to avoid ringing the steel well casing, which would muddle the return signal. You also might want to physically couple the phone to the well cap so it doesn’t bounce around too much; in the video it’s suggested a few bags filled with sand as ballast could be used to keep the phone in place. You also might get unwanted reflections from down-hole equipment such as the drop pipe or wires leading to the submersible pump.

Sources of error aside, this is a clever idea for a quick measurement that has the benefit of not needing to open the well. It’s also another clever use of Audacity to use sound to see the world around us in a different way.

Homebrew Electron Beam Lithography with a Scanning Electron Microscope

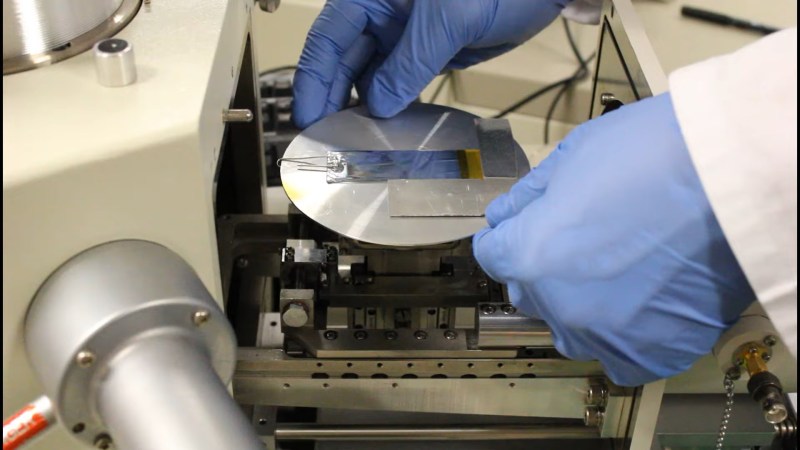
If you want to build semiconductors at home, it seems like the best place to start might be to find a used scanning electron microscope on eBay. At least that’s how [Peter Bosch] kicked off his electron beam lithography project, and we have to say the results are pretty impressive.

Now, most of the DIY semiconductor efforts we’ve seen start with photolithography, where a pattern is optically projected onto a substrate coated with a photopolymer resist layer so that features can be etched into the surface using various chemical treatments. [Peter]’s method is similar, but with important differences. First, for a resist he chose poly-methyl methacrylate (PMMA), also known as acrylic, dissolved in anisole, an organic substance commonly used in the fragrance industry. The resist solution was spin-coated into a test substrate of aluminized Mylar before going into the chamber of the SEM.

As for the microscope itself, that required a few special modifications of its own. Rather than rastering the beam across his sample and using a pattern mask, [Peter] wanted to draw the pattern onto the resist-covered substrate directly. This required an external deflection modification to the SEM, which we’d love to hear more about. Also, the SEM didn’t support beam blanking, meaning the electron beam would be turned on even while moving across areas that weren’t to be exposed. To get around this, [Peter] slowed down the beam’s movements while exposing areas in the pattern, and sped it up while transitioning to the next feature. It’s a pretty clever hack, and after development and etching with a cocktail of acids, the results were pretty spectacular. Check it out in the video below.

It’s pretty clear that this is all preliminary work, and that there’s much more to come before [Peter] starts etching silicon. He says he’s currently working on a thermal evaporator to deposit thin films, which we’re keen to see. We’ve seen a few sputtering rigs for thin film deposition before, but there are chemical ways to do it, too.

Simple Fluorometer Makes Nucleic Acid Detection Cheap and Easy

Back in the bad old days, dealing with DNA and RNA in a lab setting was often fraught with peril. Detection technologies were limited to radioisotopes and hideous chemicals like ethidium bromide, a cherry-red solution that was a fast track to cancer if accidentally ingested. It took time, patience, and plenty of training to use them, and even then, mistakes were commonplace.

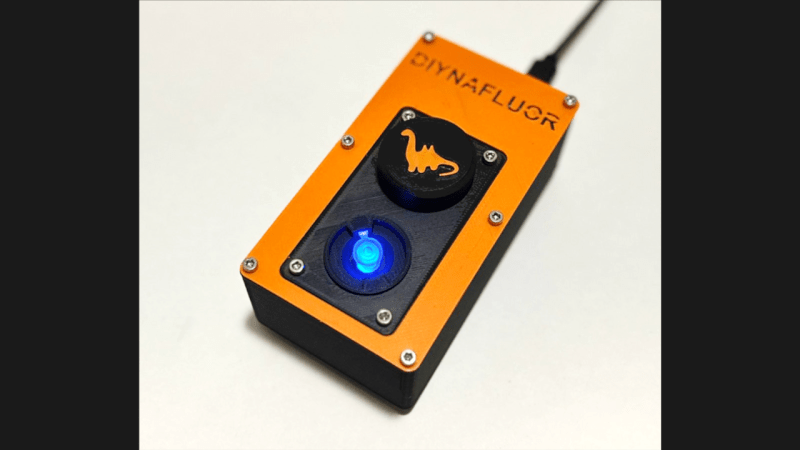
Luckily, things have progressed a lot since then, and fluorescence detection of nucleic acids has become much more common. The trouble is that the instruments needed to quantify these signals are priced out of the range of those who could benefit most from them. That’s why [Will Anderson] et al. came up with DIYNAFLUOR, an open-source nucleic acid fluorometer that can be built on a budget. The chemical principles behind fluorometry are simple — certain fluorescent dyes have the property of emitting much more light when they are bound to DNA or RNA than when they’re unbound, and that light can be measured easily. DIYNAFLUOR uses 3D-printed parts to hold a sample tube in an optical chamber that has a UV LED for excitation of the sample and a TLS2591 digital light sensor to read the emitted light. Optical bandpass filters clean up the excitation and emission spectra, and an Arduino runs the show.

The DIYNAFLUOR team put a lot of effort into making sure their instrument can get into as many hands as possible. First is the low BOM cost of around $40, which alone will open a lot of opportunities. They’ve also concentrated on making assembly as easy as possible, with a solder-optional design and printed parts that assemble with simple fasteners. The obvious target demographic for DIYNAFLUOR is STEM students, but the group also wants to see this used in austere settings such as field research and environmental monitoring. There’s a preprint available that shows results with commercial fluorescence nucleic acid detection kits, as well as detailing homebrew reagents that can be made in even modestly equipped labs.

Catching the View from the Edge of Space

Does “Pix or it didn’t happen” apply to traveling to the edge of space on a balloon-lofted solar observatory? Yes, it absolutely does.

The breathtaking views on this page come courtesy of IRIS-2, a compact imaging package that creators [Ramón García], [Miguel Angel Gomez], [David Mayo], and [Aitor Conde] recently decided to release as open source hardware. It rode to the edge of space aboard Sunrise III, a balloon-borne solar observatory designed to study solar magnetic fields and atmospheric plasma flows.

To do that the observatory needed a continual view of the Sun over an extended period, so the platform was launched from northern Sweden during the summer of 2024. It rose to 37 km (23 miles) and stayed aloft in the stratosphere tracking the never-setting Sun for six and a half days before landing safely in Canada.

Strictly speaking, IRIS-2 wasn’t part of the primary mission, at least in terms of gathering solar data. Rather, the 5 kg (11 pound) package was designed to provide engineering data about the platform, along with hella cool video of the flight. To that end, it was fitted with four GoPro cameras controlled by an MPS340 microcontroller. The cameras point in different directions to capture all the important action on the platform, like the main telescope slewing to track the sun, as well as details of the balloon system itself.

The controller was programmed to record 4K video at 30 frames per second during launch and landing, plus fifteen minutes of 120 FPS video during the balloon release. The rest of the time, the cameras took a single frame every two minutes, which resulted in some wonderful time-lapse sequences. The whole thing was powered by 56 AA batteries, and judging by the video below it performed flawlessly during the flight, despite the penetrating stratospheric cold and blistering UV exposure.

Hats off to the IRIS-2 team for this accomplishment. Sure, the videos are a delight, but this is more than just eye candy. Seeing how the observatory and balloon platform performed during flight provides valuable engineering data that will no doubt improve future flights.

Hackaday Links: December 15, 2024

Hackaday Links Column Banner

It looks like we won’t have Cruise to kick around in this space anymore with the news that General Motors is pulling the plug on its woe-beset robotaxi project. Cruise, which GM acquired in 2016, fielded autonomous vehicles in various test markets, but the fleet racked up enough high-profile mishaps (first item) for California regulators to shut down test programs in the state last year. The inevitable layoffs ensued, and GM is now killing off its efforts to build robotaxis to concentrate on incorporating the Cruise technology into its “Super Cruise” suite of driver-assistance features for its full line of cars and trucks. We feel like this might be a tacit admission that surmounting the problems of fully autonomous driving is just too hard a nut to crack profitably with current technology, since Super Cruise uses eye-tracking cameras to make sure the driver is paying attention to the road ahead when automation features are engaged. Basically, GM is admitting there still needs to be meat in the seat, at least for now.

Speaking of accidents, the results of the first aircraft accident investigation on another world were released this week, and there were a few surprises. Ingenuity, the little helicopter that hitched a ride to Mars in the belly of the Perseverance rover in 2021, surpassed all expectations by completing 71 flights successfully and becoming an integral part of the search for ancient life on Mars. But flight 72 proved to be a bridge too far and ended with a hard landing that terminally damaged its rotor system. At the time it was speculated that the relatively bland terrain it was flying over at the time of the accident was the root cause. This was confirmed by analysis of the flight logs, but the degree to which the flight computer’s down-looking navigation camera was confused by the featureless dunes is new information. As for why the rotor blades broke, it doesn’t appear that it was because they impacted the surface. Rather, as Scott Manley points out, the blades appear to have broken at their weakest point due to extreme flexing induced by the high vertical speed while touching down on a slope, which caused one set of legs to hit the surface before the others.

Also roughly in the realm of space-based failures comes the story of a hapless senior citizen in New York who has been issued thousands of dollars in traffic tickets because of her love for Star Trek. Years ago, Long Island resident Beda Koorey got a New York vanity license plate for her car emblazoned with “NCC-1701,” the registration number of the USS Enterprise. She turned in those plates years ago when she gave up driving, but in the meantime, novelty NCC-1701 plates began popping up on Amazon and other sites. They were clearly not intended to be used on cars, but that didn’t stop some people from putting them on over their real plates in an attempt to defeat traffic cameras. It worked, at least from their point of view, since it left poor Beda with a collection of tickets for speeding and red light violations from as far away as Chicago. She even got a ticket for a violation committed by a motorcycle with a phony plate, which you think would not map to the registration for an automobile, but there you go. We always knew it was hard to be a Trekkie, especially back in the ’70s, but at least it never cost us much money. It did cost us a lot of dates, though.

We featured plenty of stories of start-up tech companies with the next must-have IoT device that fold up shop after a few years and abandon their users by effectively bricking their widgets. Heck, we’ve even suffered that fate ourselves; curse you, Logitech, for killing the SqueezeBox. However, one company recently took IoT bricking to a new low by ending support for a line of AI-powered companion bots for kids. The company was called Embodied, and they hawked $800 AI bots for kids called Moxie, with a cute face and a huggable form factor that kids couldn’t help falling in love with. Embodied couldn’t make a go of it financially and since Moxie uses a cloud-based LLM to interact with kids, the bots are now bricked. This leaves parents who invested in these devices with the quandary of having to explain to young kids that their robot pal is dead. Some of the TikToks of parents breaking the news are heartbreaking, and we can’t help but think that this is a perfect opportunity for someone in our community to reverse-engineer these things and bring them back to life.

And finally, the burning of the Yule Log is an ancient tradition, one that reminds us of the time our grandfather brought an entire telephone pole that had washed up on the beach home and burned it for days on end, feeding it slowly into the fireplace in the living room through the open front door. Good times. Not everyone is blessed with a fireplace in their abode, though, which has given rise to the popularity of video Yule Logs that you can just play on your TV. And now NASA is in on the action with an eight-hour 4K video of the SLS main engines and boosters. Framed by a lovely stone fireplace and replete with crackling wood sound effects over the subdued roar of the four RS-25 engines and twin solid-fuel boosters, it’ll make a nice addition to your holiday festivities. Although given that NASA just announced that the next Artemis missions are delayed until at least 2026, we’re not sure that it’s a great idea to show a rocket that never lifts off. You’ll also want to be careful that the neighbors don’t see the action.

Wago Terminals Make This Ham Radio Dipole Light and Packable

For the amateur radio operator with that on-the-go lifestyle, nothing is more important than having your gear as light and packable as possible. If you’re lugging even a modest setup out into the woods, every ounce counts, which is why we love projects like this packable dipole antenna feedpoint.

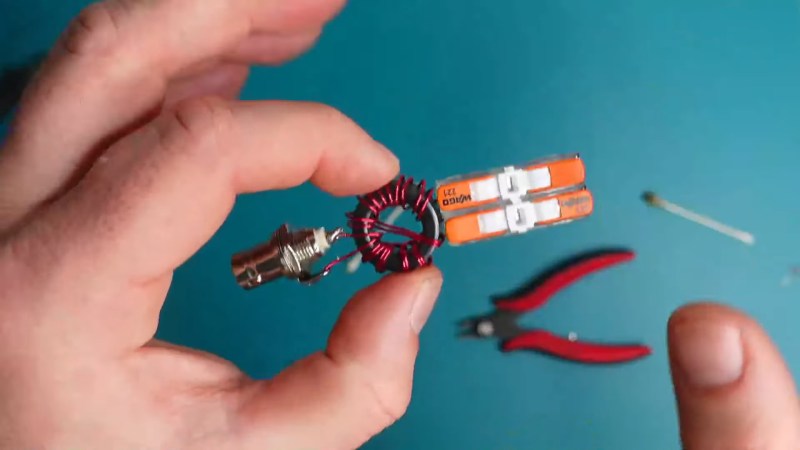
At its simplest, a dipole antenna is just two pieces of wire cut to a specific, frequency-dependent length connected to a feedline. In practical terms, though, complications arise, such as keeping common-mode currents off the feedline and providing sturdy mechanical support for the antenna to suspend it safely. [Ham Radio Dude]’s design handles both those requirements while staying as small and packable as possible. The design starts with a bifilar 1:1 current balun, which is wound on an FT82-43 ferrite toroid with 22 AWG magnet wire. One side of the balun is connected to a BNC connector while the other is connected to a pair of Wago splice connectors that are glued together. A loop of paracord for mechanical strain relief is added, and the whole thing gets covered in heat-shrink tubing. The antenna is deployed by attaching a feedline to the BNC, clipping quarter-wave wires into the Wago terminals, and hoisting the whole thing aloft. Full build details are in the video below.

People will no doubt be quick to point out that these Wago terminals are rated for a minimum of 18 AWG wire, making them inappropriate for use with fine magnet wire. True enough, but [Dude] was able to get continuity through the Wagos, so the minimum gauge is probably more of an electrical code thing. Still, you’ll want to be careful that the connections stay solid, and it might pay to look at alternatives to the Wago brand, too.

Automated Rig Grows Big, Beautiful Crystals Fast

We haven’t seen [Les Wright] in a while, and with the release of his new video, we know why — he’s been busy growing crystals.

Now, that might seem confusing to anyone who has done the classic “Crystal Garden” trick with table salt and laundry bluing, or tried to get a bit of rock candy out of a supersaturated sugar solution. Sure, growing crystals takes time, but it’s not exactly hard work. But [Les] isn’t in the market for any old crystals. Rather, he needs super-sized, optically clear crystals of potassium dihydrogen phosphate, or KDP, which are useful as frequency doublers for lasers. [Les] has detailed his need for KDP crystals before and even grown some nice ones, but he wanted to step up his game and grow some real whoppers.

And boy, did he ever. Fair warning; the video below is long and has a lot of detail on crystal-growing theory, but it’s well worth it for anyone taking the plunge. [Les] ended up building an automated crystal lab, housing it in an old server enclosure for temperature and dust control. The crystals are grown on a custom-built armature that slowly rotates in a supersaturated solution of KDP which is carefully transitioned through a specific temperature profile under Arduino control. As a bonus, he programmed the rig to take photographs of the growing crystals at intervals; the resulting time-lapse sequences are as gorgeous as the crystals, one of which grew to 40 grams in only a week.

We’re keen to see how [Les] puts these crystals to work, and to learn exactly what a “Pockels Cell” is and why you’d want one. In the meantime, if you’re interested in how the crystals that make the whole world work are made, check out our deep dive into silicon.

Thanks to [Joseph Hopfield] for the tip.

Good Lighting on a Budget with Cordless Tool Batteries

It’s perhaps not fair, but even if you have the best idea for a compelling video, few things will make people switch off than poor lighting. Good light and plenty of it is the order of the day when it comes to video production, and luckily there are many affordable options out there. Affordable, that is, right up to the point where you need batteries for remote shoots, in which case you’d better be ready to open the purse strings.

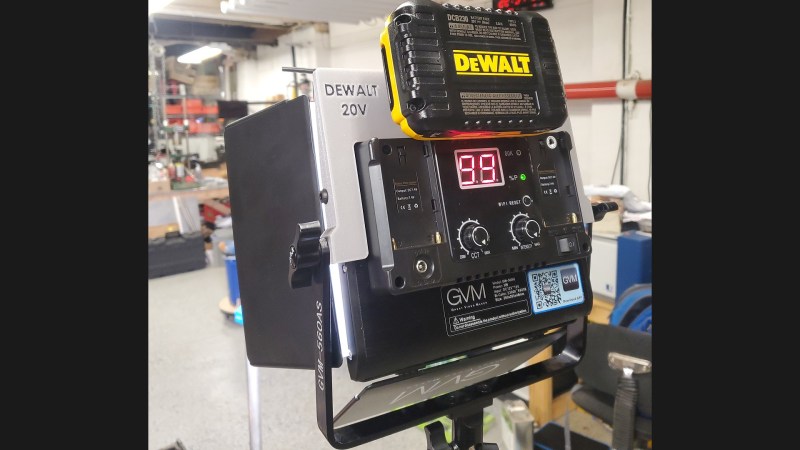
When [Dane Kouttron] ran into the battery problem with his video lighting setup, he fought back with these cheap and clever cordless tool battery pack adapters. His lights were designed to use Sony NP-F mount batteries, which are pretty common in the photography trade but unforgivably expensive, at least for Sony-branded packs. Having access to 20 volt DeWalt battery packs, he combined an off-the-shelf battery adapter with a 3D printed mount that slips right onto the light. Luckily, the lights have a built-in DC-DC converter that accepts up to 40 volts, so connecting the battery through a protection diode was a pretty simple exercise. The battery pack just slots right in and keeps the lights running for portable shoots.

Of course, if you don’t already have DeWalt batteries on hand, it might just be cheaper to buy the Sony batteries and be done with it. Then again, there are battery adapters for pretty much every cordless tool brand out there, so you should be able to adapt the design. We’ve also seen cross-brand battery adapters which might prove useful, too.

Unexpectedly Interesting Payphone Gives Up Its Secrets

Reverse engineering a payphone doesn’t sound like a very interesting project, at least in the United States, where payphones were little more than ruggedized versions of residential phones with a coin mechanism attached. Phones in other parts of the world were far more interesting, though, as this look at the mysteries of a payphone from Israel reveals (in Hebrew; English translation here.)

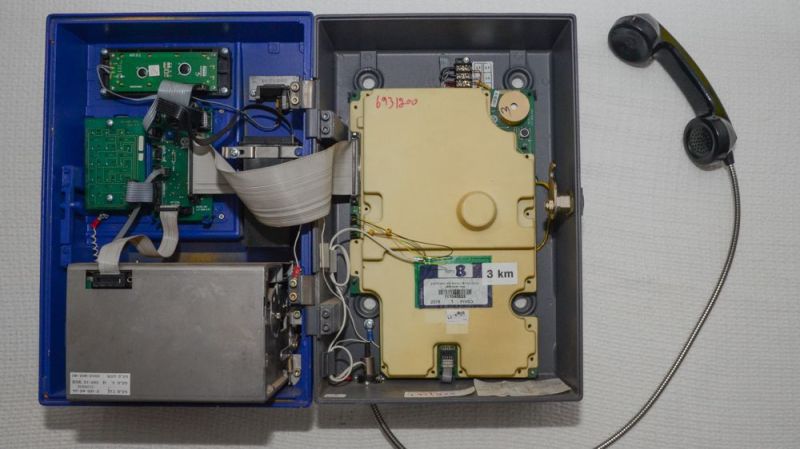
This is a project [Inbar Raz] worked on quite a while ago, but only got around to writing up recently. The payphone in question was sourced from the usual surplus market channels, and appears to have been removed from service by Israeli telecommunications company Bezeq only shortly before he found it. It was in pretty good shape, and was even still locked tight, making some amateur locksmithing the first order of the day. The internals of the phone are surprisingly complex, with a motherboard that looks more like something from a PC. Date codes on the chips and through-hole construction date the device to the early- to mid-1990s.

With physical access gained, [Inbar] turned to the firmware. An Atmel flash chip seemed a good place to look, and indeed he was able to pull code off the chip. That’s where things took a turn thanks to the CPU the code was written for — the CDP1806, a later version of the more popular but still fringe CDP1802. This required [Inbar] to fall down the rabbit hole of writing a new processor definition file for Ghidra so that the firmware could be reverse-engineered. This got him to the point of understanding 1806 assembly well enough that he was able to re-flash the phone to print debugging messages on the built-in 16×2 LCD screen, which allowed him to figure out which routines were being called under various error conditions.

It doesn’t appear that [Inbar] ever completed the reverse engineering project, but as he points out, what does that even mean? He got inside, took a look around, and made the phone do some cool things it couldn’t do before, and in the process made things easier for anyone working with 1806 processors in Ghidra. That’s a pretty complete win in our books.

Hackaday Links: December 8, 2024

Hackaday Links Column Banner

For some reason, we never tire of stories highlighting critical infrastructure that’s running outdated software, and all the better if it’s running on outdated hardware. So when we learned that part of the San Francisco transit system still runs on 5-1/4″ floppies, we sat up and took notice. The article is a bit stingy with the technical details, but the gist is that the Automatic Train Control System was installed in the Market Street subway station in 1998 and uses three floppy drives to load DOS and the associated custom software. If memory serves, MS-DOS as a standalone OS was pretty much done by about 1995 — Windows 95, right? — so the system was either obsolete before it was even installed, or the 1998 instance was an upgrade of an earlier system. Either way, the San Francisco Municipal Transportation Agency (SFMTA) says that the 1998 system due to be replaced originally had a 25-year lifespan, so they’re more or less on schedule. Replacement won’t be cheap, though; Hitachi Rail, the same outfit that builds systems that control things like the bullet train in Japan, is doing the job for the low, low price of $212 million.

We don’t know who needs to here this, but we got a tip from Clem Mayer about upcoming changes to EU regulations that might affect the maker community. It concerns the General Product Safety Regulations, or GPSR, which appears to be an extension of current rules that will impose additional compliance burdens on anyone selling products to the EU market on online marketplaces. We won’t pretend to know the intricacies of GPSR, or even the basics, but Smander.com has a brief summary of the rules and how best to comply, which seems to amount to retaining the services of a company to take care of the compliance paperwork. We also took a look at the official EU information page for GPSR, which is pretty thin on information but at least it’s a primary source. If you’re selling kits or other products into the EU market, chances are good that you’re going to need to figure this out, and soon — seems like the rules go into effect December 13th.

You’ve got to feel for the authors of open-source software. As if developing, maintaining, and supporting the software that keeps the Internet running wasn’t a thankless enough job, you can actually get doxxed by your own creation. A case in point is Daniel Stenberg, the original author and lead developer on curl and libcurl. His name and email address are often found in the documentation for products using his software, so frustrated users who find his contact information tend to reach out to him after being ignored by the product’s support team. It seems annoying, and we sympathize with Daniel and others like him, but then again, it’s a measure of your impact that your contact information is literally everywhere.

If you’re in the market for a unique gift for the geek in your life and have an extra $230 to spread around, check out this custom Lego kit of the ASML TWINSCAN EXE:500 extreme UV lithography machine. Actually, strike that; now that we look at the specs, this kit is tiny. It’s only 851 pieces and 13.9″ (35 cm) wide when assembled, and isn’t exactly a richly detailed piece. Sure, Lego kits are fun, but there seem to be much better choices out there; we had a blast putting together the Apollo 11 Lunar Module Eagle kit a few years back, and that was only about $70.

And finally, Festo fans will want to check out this literal air guitar from the automation company’s “Experience Center” in Lupfig, Switzerland. Festo engineers bedazzled an acoustic guitar with pneumatic cylinders and control valves and programmed the system to pluck out the intro riff from AC/DC’s “Thunderstruck.” It’s actually pretty good, and we especially appreciate the pneumatic party whistle that chips in from time to time. There’s a missed opportunity here, though; we really expected a pneumatic cylinder to do the characteristic double rap on the body of the guitar when you get to the “Thun-der!” part. Too bad — maybe for version two.

Liquid Metal Ion Thrusters Aren’t Easy

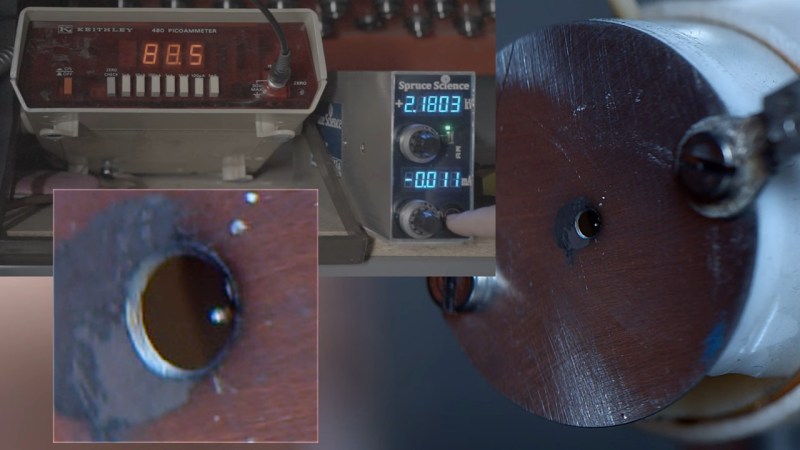
What do scanning electron microscopes and satellites have in common? On the face of things, not much, but after seeing [Zachary Tong]’s latest video on liquid metal ion thrusters, we see that they seem to have a lot more in common than we’d initially thought.

As you’d expect with such a project, there were a lot of false starts and dead ends. [Zach] started with a porous-emitter array design, which uses a sintered glass plate with an array of tiny cones machined into it. The cones are coated in a liquid metal — [Zach] used Galinstan, an alloy of gallium, indium, and tin — and an high voltage is applied between the liquid metal and an extraction electrode. Ideally, the intense electric field causes the metal to ionize at the ultra-sharp tips of the cones and fling off toward the extraction electrode and into the vacuum beyond, generating thrust.

Getting that working was very difficult, enough so that [Zach] gave up and switched to a slot thruster design. This was easier to machine, but alas, no easier to make work. The main problem was taming the high-voltage end of things, which seemed to find more ways to produce unwanted arcs than the desired thrust. This prompted a switch to a capillary emitter design, which uses a fine glass capillary tube to contain the liquid metal. This showed far more promise and allowed [Zach] to infer a thrust by measuring the tiny current created by the ejected ions. At 11.8 μN, it’s not much, but it’s something, and that’s the thing with ion thrusters — over time, they’re very efficient.

To be sure, [Zach]’s efforts here didn’t result in a practical ion thruster, but that wasn’t the point. We suspect the idea here was to explore the real-world applications for his interests in topics like electron beam lithography and microfabrication, and in that, we think he did a bang-up job with this project.

3D Printed Caliper Extensions Make Hole Measurement Easier

If there’s anything more frustrating than mounting holes that don’t line up with the thing you’re mounting, we don’t know what it could be. You measure as carefully as possible, you drill the holes, and yet at least one hole ends up being just out of place. Sometimes you can fudge it, but other times you’ve got to start over again. It’s maddening.

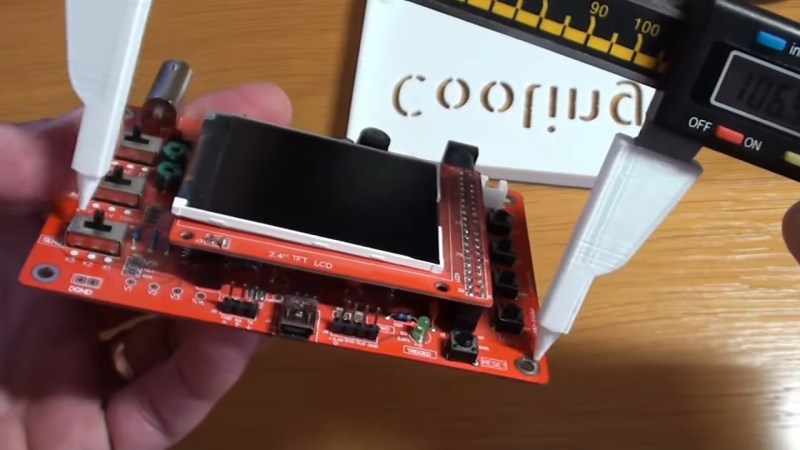
Getting solid measurements of the distance between holes would help, which is where these neat snap-on attachments for digital calipers come in. [Chris Long] came up with the 3D printed tools to make this common shop task a little easier, and they look promising. The extensions have cone-shaped tips that align perfectly with the inside edge of the caliper jaws, which lines the jaws up with the center of each hole. You read the center-to-center distance directly off the caliper display, easy peasy.

Of course, there’s also the old machinist’s trick (last item) about zeroing out the calipers after reading the diameter of one of the holes and then measuring the outside-to-outside distance between the two holes. That works great when you’ve got plenty of clearance, but the shorter inside jaws might make measuring something like a populated PCB with this method tricky. For the price of a little filament and some print time, these might be just the tool to get you out of a bind.

Exercise Wheel Tracker Confirms Suspicions About Cats

What do cats get up to in the 30 minutes or so a day that they’re awake? Being jerks, at least in our experience. But like many hackers, [Brent] wanted to quantify the activity of his cat, and this instrumented cat exercise wheel was the result.

To pull this off, [Brent] used what he had on hand, which was an M5Stack ESP32 module, a magnetic reed switch, and of course, the cat exercise wheel [Luna] seemed to be in the habit of using at about 4:00 AM daily. The wheel was adorned with a couple of neodymium magnets to trip the reed switch twice per revolution, with the pulse stream measured on one of the GPIOs. The code does a little debouncing of the switch and calculates the cat’s time and distance stats, uploading the data to OpenSearch for analysis and visualization. [Brent] kindly includes the code and the OpenSearch setup in case you want to duplicate this project.

As for results, they’re pretty consistent with what we’ve seen with similar cat-tracking efforts. A histogram of [Luna]’s activity shows that she does indeed hop on the wheel at oh-dark-thirty every day, no doubt in an effort to assassinate [Brent] via sleep deprivation. There’s also another burst of “zoomies” around 6:00 PM. But the rest of the day? Pretty much sleeping.

Gas Gauge Upgrade Keeps VW Restoration Classy

Getting every detail perfectly right is often the goal in automotive restorations, and some people will go to amazing lengths to make sure the car looks and acts just like it did when it rolled off the dealer’s lot all those decades ago. That ethos can be pushed a little too far, though, especially with practical matters like knowing how much gas is left in the tank. Get that wrong and you’ll be walking.

Unwilling to risk that cruel fate with his restoration of 1978 Volkswagen Bus, [Pegork] came up with a replacement fuel gauge that looks identical to the original meter, but actually works. The gas gauges on ’60s and ’70s VWs were notoriously finicky, and when they bothered to work at all they were often wildly inaccurate. The problem was usually not with the sender unit in the tank, but the gauge in the dash, which used a bimetallic strip heated by a small coil of wire to deflect a needle. [Pegor]’s “SmoothBus” modification replaces the mechanical movement with a micro servo to move the needle. The variable voltage coming back from the fuel sender is scaled through a voltage divider and read by an analog input on an ATtiny85, which does a little algorithmic smoothing to make sure the needle doesn’t jump around too much. A really nice addition is an LED low fuel indicator, a feature that would have saved us many walks to the gas station back in our VW days. Except for the extra light, the restored gauge looks completely stock, and it works far better than the original.

Hats off to [Pregor] for this fantastic restomod. As we’ve noted before, classic VWs are perhaps the most hackable of cars, and we applaud any effort to keep these quirky cars going.

Rolling Your Own Ball Screws

We’ve got mixed feelings about a new video from [AndysMachines] that details how he makes custom ball screws. On the one hand, there’s almost zero chance that we’ll ever have an opportunity to put this information to practical use. But on the other hand, the video gives a fantastic look at the inner workings and design considerations for ball screws, which is worth the price of admission alone

The story behind these ball screws is that [Andy] is apparently in cahoots with SkyNet and is building a T-800 Terminator of his own. Whatever, we don’t judge, but the build requires a short-throw linear drive mechanism that can be back-driven, specs that argue for a ball screw. [Andy] goes through the challenges of building such a thing, which mainly involve creating threads with a deep profile and wide pitch. The screw itself wasn’t too hard to cut, although there were some interesting practical details in the thread profile that we’d never heard of before.

The mating nut was another. Rather than try to cut deep internal threads, [Andy] took a sort of “open-face sandwich” approach, creating half-nuts in a single piece of brass using a CNC machine and a ball-nose mill. The threads were completed by cutting the two halves apart and bolting them together — very clever! [Andy] also showed how the balls recirculate in the nut through channels cut into one of the half-nuts.

Whether the results were worth the effort is up to [Andy], but we were just glad to be along for the ride. And if you want a little more detail on lead screws and ball screws, we’ve got just the article for that.

Fail of the Week: The SMD Crystal Radio That Wasn’t

The crystal radio is a time-honored build that sadly doesn’t get much traction anymore. Once a rite of passage for electronics hobbyists, the classic coil-on-an-oatmeal-carton and cat’s whisker design just isn’t that easy to pull off anymore, mainly because the BOM isn’t really something that you can just whistle up from DigiKey or Mouser.

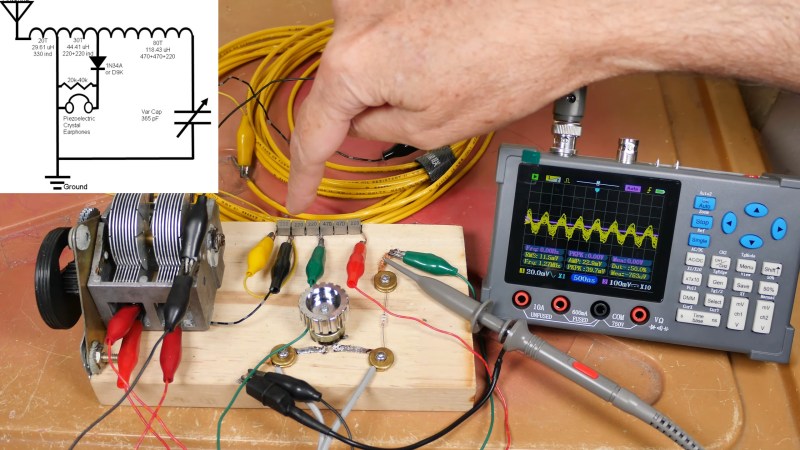
Or is it? To push the crystal radio into the future a bit, [tsbrownie] tried to design a receiver around standard surface-mount inductors, and spoiler alert — it didn’t go so well. His starting point was a design using a hand-wound air-core coil, a germanium diode for a detector, and a variable capacitor that was probably scrapped from an old radio. The coil had three sections, so [tsbrownie] first estimated the inductance of each section and sourced some surface-mount inductors that were as close as possible to their values. This required putting standard value inductors in series and soldering taps into the correct places, but at best the SMD coil was only an approximation of the original air-core coil. Plugging the replacement coil into the crystal radio circuit was unsatisfying, to say the least. Only one AM station was heard, and then only barely. A few tweaks to the SMD coil improved the sensitivity of the receiver a bit, but still only brought in one very local station.

[tsbrownie] chalked up the failure to the lower efficiency of SMD inductors, but we’re not so sure about that. If memory serves, the windings in an SMD inductor are usually wrapped around a core that sits perpendicular to the PCB. If that’s true, then perhaps stacking the inductors rather than connecting them end-to-end would have worked better. We’d try that now if only we had one of those nice old variable caps. Still, hats off to [tsbrownie] for at least giving it a go.

Note: Right after we wrote this, a follow-up video popped up in our feed where [tsbrownie] tried exactly the modification we suggested, and it certainly improves performance, but in a weird way. The video is included below if you want to see the details.

Torque Testing 3D Printed Screws

Unless you’ve got a shop with a well-stocked hardware bin, it’s a trip to the hardware store when you need a special screw. But [Sanford Prime] has a different approach: he prints his hardware, at least for non-critical applications. Just how much abuse these plastic screws can withstand was an open question, though, until he did a little torque testing to find out.

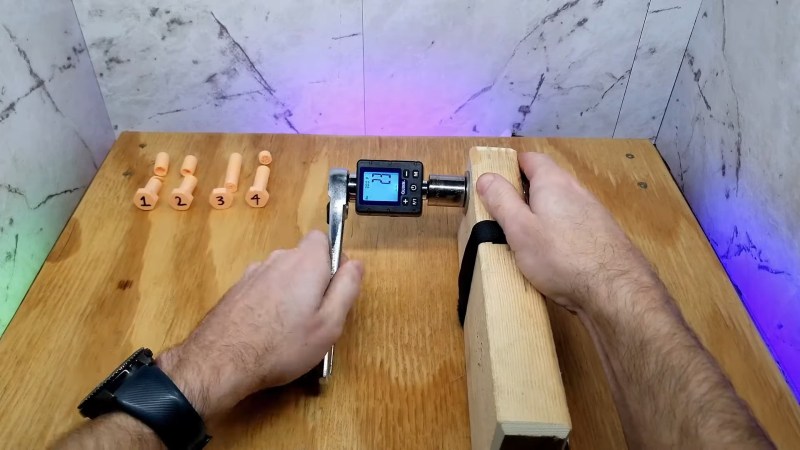
To run the experiments, [Sanford]’s first stop was Harbor Freight, where he procured their cheapest digital torque adapter. The test fixture was similarly expedient — just a piece of wood with a hole drilled in it and a wrench holding a nut. The screws were FDM printed in PLA, ten in total, each identical in diameter, length, and thread pitch, but with differing wall thicknesses and gyroid infill percentages. Each was threaded into the captive nut and torqued with a 3/8″ ratchet wrench, with indicated torque at fastener failure recorded.

Perhaps unsurprisingly, overall strength was pretty low, amounting to only 11 inch-pounds (1.24 Nm) at the low end. The thicker the walls and the greater the infill percentage, the stronger the screws tended to be. The failures were almost universally in the threaded part of the fastener, with the exception being at the junction between the head and the shank of one screw. Since the screws were all printed vertically with their heads down on the print bed, all the failures were along the plane of printing. This prompted a separate test with a screw printed horizontally, which survived to a relatively whopping 145 in-lb, which is twice what the best of the other test group could manage.

[Sanford Prime] is careful to note that this is a rough experiment, and the results need to be taken with a large pinch of salt. There are plenty of sources of variability, not least of which is the fact that most of the measured torques were below the specified lower calibrated range for the torque tester used. Still, it’s a useful demonstration of the capabilities of 3D-printed threaded fasteners, and their limitations.

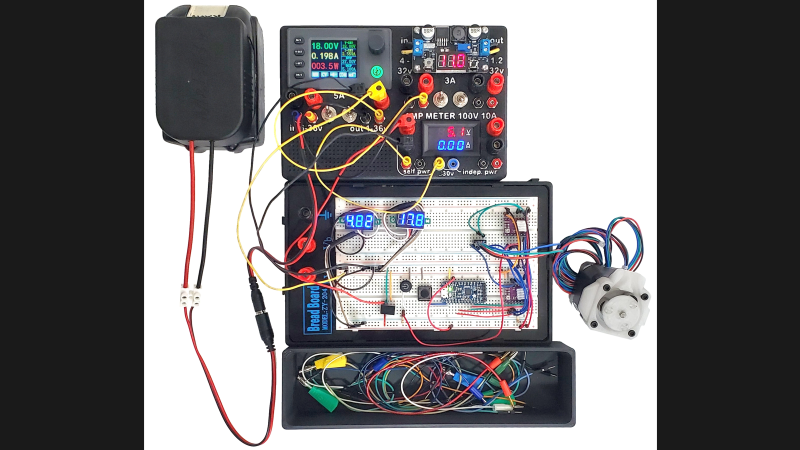
Modular Breadboard Snaps You Into Benchtop Tidiness

Solderless breadboards are a fantastic tool for stirring the creative juices. In a few seconds, you can go from idea to prototype without ever touching the soldering iron. Unfortunately, the downside to this is that projects tend to expand to occupy all the available space on the breadboard, and the bench surrounding the project universally ends up cluttered with power supplies, meters, jumpers, and parts you’ve swapped in and out of the circuit.

In an attempt to tame this runaway mess, [Raph] came up with this neat modular breadboard system. It hearkens back to the all-in-one prototyping systems we greatly coveted when the whole concept of solderless breadboards was new and correspondingly unaffordable. Even today, combination breadboard and power supply systems command a pretty penny, so rolling your own might make good financial sense. [Raph] made his system modular, with 3D-printed frames that lock together using clever dovetail slots. The prototyping area snaps to an instrumentation panel, which includes two different power supplies and a digital volt-amp meter. This helps keep the bench clean since you don’t need to string leads all over the place. The separate bin for organizing jumpers and tidbits that snaps into the frame is a nice touch, too.

Want to roll your own? Not a problem, as [Raph] has thoughtfully made all the build files available. What’s more, they’re parametric so you can customize them to the breadboards you already have. The only suggestion we have would be that making this compatible with [Zack Freedman]’s Gridfinity system might be kind of cool, too.

❌