Vista de Lectura

Hay nuevos artículos disponibles. Pincha para refrescar la página.

A Unique Linear Position Sensor Using Magnetostriction

To the extent that you’re familiar with magnetostriction, you probably know that it’s what makes big transformers hum, or that it’s what tips you off if you happen to walk out of a store without paying for something. But magnetostriction has other uses, too, such as in this clever linear position sensor.

Magnetostriction is just the tendency for magnetic materials to change size or shape slightly while undergoing magnetization, thanks to the tiny magnetic domains shifting within the material while they’re aligning. [Florian B.]’s sensor uses a side effect of magnetostriction known as the Wiedenmann effect, which causes a wire to experience a twisting force if a current pulse is applied to it in a magnetic field. When the current pulse is turned off, a mechanical wave travels along the wire to a coil, creating a signal. The difference in time between sending the pulse and receiving the reflection can be used to calculate the position of the magnet along the wire.

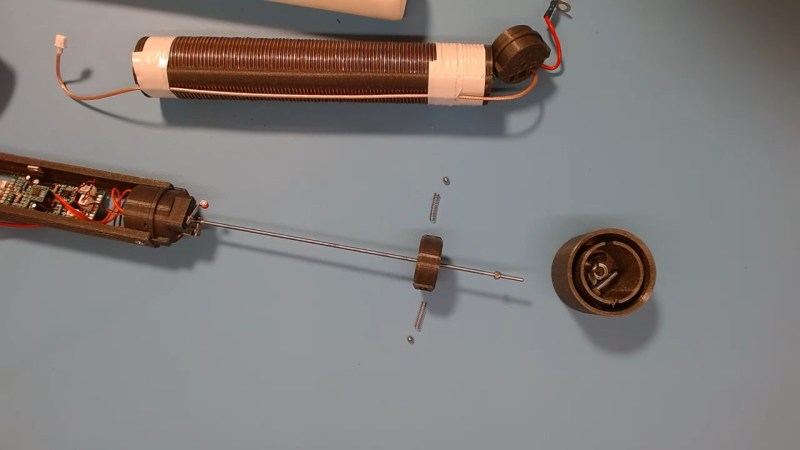
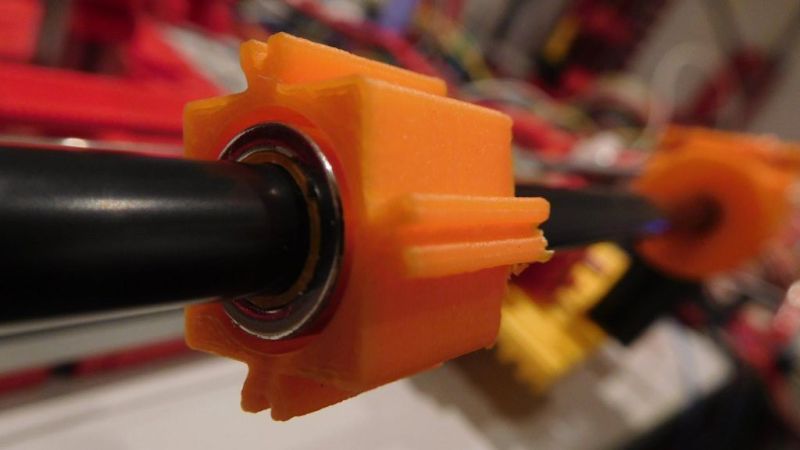
To turn that principle into a practical linear sensor, [Florian B.] used nickel wire stretched tightly down the middle of a PVC tube. At one end is a coil of copper magnet wire, while the other end has a damper to prevent reflections. Around the tube is a ring-shaped cursor magnet, which can move up and down the tube. An exciter circuit applies the current pulse to the wire, and an oscilloscope is used to receive the signal from the wire.

This project still appears to be in the prototype phase, as evidenced by the Fischertechnik test rig. [Florian] has been working on the exciter circuit most recently, but he’s done quite a bit of work on optimizing the cursor magnet and the coil configuration, as well as designs for the signal amplifier. It’s a pretty neat project, and we’re looking forward to updates.

If you need a deeper dive into magnetostriction, [Ben Krasnow] points the way.

Scrapyard Vacuum Dehydrator Sucks the Water from Hydraulic Oil

Anyone who has ever had the misfortune of a blown head gasket knows that the old saying “oil and water don’t mix” is only partially true. When what’s coming out of the drain plug looks like a mocha latte, you know you’re about to have a very bad day.

[SpankRanch Garage] recently found himself in such a situation, and the result was this clever vacuum dehydrator, which he used to clean a huge amount of contaminated hydraulic fluid from some heavy equipment. The machine is made from a retired gas cylinder welded to a steel frame with the neck pointing down. He added a fill port to the bottom (now top) of the tank; as an aside, we had no idea the steel on those tanks was so thick. The side of the tank was drilled and threaded for things like pressure and temperature gauges as well as sight glasses to monitor the process and most importantly, a fitting for a vacuum pump. Some valves and a filter were added to the outlet, and a band heater was wrapped around the tank.

To process the contaminated oil, [Spank] glugged a bucket of forbidden milkshake into the chamber and pulled a vacuum. The low pressure lets the relatively gentle heat boil off the water without cooking the oil too badly. It took him a couple of hours to treat a 10-gallon batch, but the results were pretty stark. The treated oil looked far better than the starting material, and while it still may have some water in it, it’s probably just fine for excavator use now. The downside is that the vacuum pump oil gets contaminated with water vapor, but that’s far easier and cheaper to replace that a couple hundred gallons of hydraulic oil.

Never doubt the hacking abilities of farmers. Getting things done with what’s on hand is a big part of farm life, be it building a mower from scrap or tapping the power of the wind.

Cool Kinetic Sculpture Has Tooling Secrets to Share

Occasionally, we get a tip for a project that is so compelling that we just have to write it up despite lacking details on how and why it was built. Alternatively, there are other projects where the finished product is cool, but the tooling or methods used to get there are the real treat. “Homeokinesis,” a kinetic art installation by [Ricardo Weissenberg], ticks off both those boxes in a big way.

First, the project itself. Judging by the brief video clip in the reddit post below, Homeokinesis is a wall-mounted array of electromagnetically actuated cards. The cards are hinged so that solenoids behind them flip the card out a bit, making interesting patterns of shadow and light, along with a subtle and pleasing clicking sound. The mechanism appears to be largely custom-made, with ample use of 3D printed parts to make the frame and the armatures for each unit of the panel.

Now for the fun part. Rather than relying on commercial solenoids, [Ricardo] decided to roll his own, and built a really cool CNC machine to do it. The machine has a spindle that can hold at least eleven coil forms, which appear to be 3D printed. Blank coil forms have a pair of DuPont-style terminal pins pressed into them before mounting on the spindle, a job facilitated by another custom tool that we’d love more details on. Once the spindle is loaded up with forms, magnet wire feeds through a small mandrel mounted on a motorized carriage and wraps around one terminal pin by a combination of carriage and spindle movements. The spindle then neatly wraps the wire on the form before making the connection to the other terminal and moving on to the next form.

The coil winder is brilliant to watch in action — however briefly — in the video below. We’ve reached out to [Ricardo] for more information, which we’ll be sure to pass along. For now, there are a lot of great ideas here, both on the fabrication side and with the art piece itself, and we tip our hats to [Ricardo] for sharing this.

Development of my kinetic art installation
byu/musicatristedonaruto inEngineeringPorn

Motorized Coil Tunes Your Ham Antenna on a Budget

When it comes to amateur radio, one size definitely does not fit all. That’s especially true with antennas, which need to be just the right size for the band you’re working, lest Very Bad Things happen to your expensive radio. That presents a problem for the ham who wants the option to work whichever band is active, and doubly so if portable operation is desired.

Of course, there are commercial solutions to this problem, but they tend to be expensive. Luckily [Øystein (LB8IJ)] seems to have found a way around that with this low-cost homebrew motorized antenna coil, which is compatible with the Yaesu Automatic Tuning Antenna System. ATAS is supported by several Yaesu transceivers, including the FT-891 which [Øystein] favors for field operations. ATAS sends signals up the feedline to a compatible antenna, which then moves a wiper along a coil to change the electrical length of the antenna, allowing it to resonate on the radio’s current frequency.

The video below details [Øystein]’s implementation of an ATAS-compatible tuning coil, mainly focusing on the mechanical and electrical aspects of the coil itself, which takes up most of the room inside a 50-mm diameter PVC tube. The bore of the air-core coil has a channel that guides a wiper, which moves along the length of the coil thanks to a motor-driven lead screw. [Øystein] put a lot of work into the wiper, to make it both mechanically and electrically robust. He also provides limit switches to make sure the mechanism isn’t over-driven.

There’s not much detail yet on how the control signals are detected, but a future video on that subject is promised. We’re looking forward to that, but in the meantime, the second video below shows [Øystein] using the tuner in the field, with great results.

❌