Vista de Lectura

Hay nuevos artículos disponibles. Pincha para refrescar la página.

Fictional Computers: EMERAC was the Chatbot of 1957

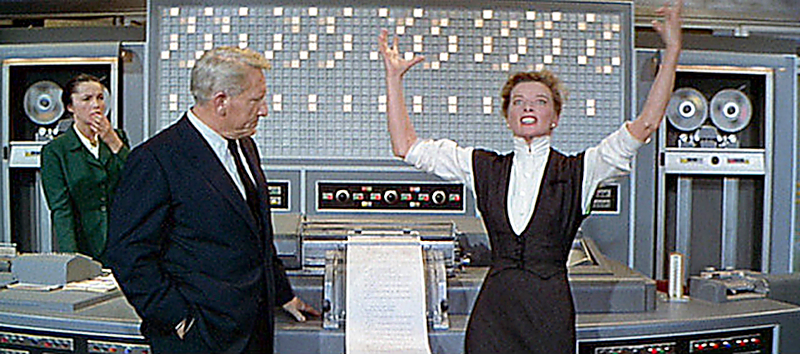
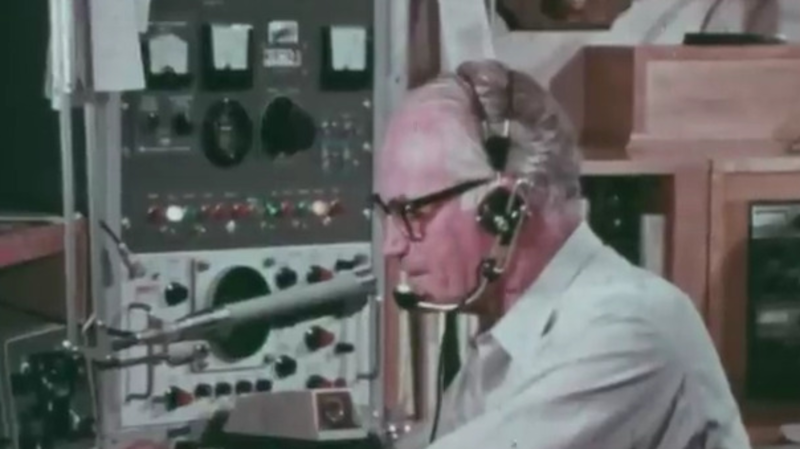
Movies mirror the time they were made. [ErnieTech] asserts that we can see what people thought about computers back in 1957 by watching the classic Spencer Tracy/Katharine Hepburn movie “Desk Set.” What’s more, he thinks this might be the first movie appearance of a human-like computer. On a side note, in the UK this movie was known as “The Other Woman.”

The story is about an MIT computer expert computerizing a broadcasting company who, of course, finds romance and, at least towards the end, comedy.

Of course, we are interested in the computer. It was supposedly an IBM machine and while IBM apparently provided some equipment (probably typewriters and tape drives), the computer is clearly just a ton of light bulbs. It was named Emmie, which was a nickname for EMERAC. Oddly enough, it was about like a modern web search engine or chatbot, answering random research questions. The difference is they had fed all the world’s knowledge into it themselves using punched cards.

The video has spoilers, but for a movie made in 1957, that’s not really an issue. The ending is pretty predictable, anyway. Like many people in 1957, there was a fear that “computers were going to take all our jobs!” [Ernie] makes the point that this was a common trope where the computer would run the Enterprise company and then made a big mistake, and everyone realized we still needed humans. EMERAC later guest-starred in the movie “The Fly.” It was just a background player in the chorus, though.

He also points out that many of the things people thought about the widespread adoption of computers are still true today if you replace computer with AI. Turns out, you still need to know how to reset the system.

[Ernie] did a video about Colossus last month, a topic we also visited last year. One of our favorite fictional computers, though, was more recent from “The Three Body Problem.”

This Laser Knows about Gasses

What’s that smell? If you can’t tell, maybe a new laser system from CU Bolder and NIST can help. The device is simple and sensitive enough to detect gasses at concentrations down to parts per trillion.

The laser at the system’s heart is a frequency comb laser, originally made for optical atomic clocks. The laser has multiple optical frequencies in its output. The gas molecules absorb light of different wavelengths differently, giving each type of molecule a unique fingerprint.

Unlike traditional lasers, which emit a single frequency,  a frequency comb laser can emit thousands or millions of colors at once. The inventor picked up the Nobel prize in 2005 for that work.

The gas is placed between two highly-reflective mirrors. The beam bounces in this optical cavity, although previous attempts were difficult because the cavity has a particular affinity for frequencies. The answer was to jiggle the mirrors to change the size of the cavity during measurments.

This is one of those things that doesn’t seem very complicated except — whoops — you need an exotic comb laser. But if those ever become widely available, you could probably figure out how to replicate this.

This could revolutionize air quality instruments. Small quantities of hydrogen sulfide can be detected easily (although, paradoxically, too much is hard to smell).

Tearing Down a Vintage Word Processor

There was a time when the line between typewriters and word processing software was a bit fuzzy. [Poking Technology] found a Xerox 6040 which can’t decide what it is. It looks like a typewriter but has a monitor and a floppy drive, along with some extra buttons. You can watch him tear it down in the video below.

The old device uses a daisywheel type element, which, back then, was state of the art. A wheel had many spokes with letters and the printer would spin the wheel and then strike the plastic spoke.

Inside there is a computer of sorts. Like a lot of gear from those days, there is a huge linear power supply. The video is a couple of hours long, so you’ll have plenty of chances to see the inside. There is an 8031 on the first logic board and some odd connections for external devices. As it turns out, that board wasn’t the main wordprocessing board which is under the keyboard.

On that board, there is another small CPU and some very large gate arrays. Under an odd-looking socket, however, lives an 80188, which is sort of an 8086/8088 variant.

The video is a very long deep dive into the internals, including reverse engineering of some of the ROM chips and even a surprise or two.

These machines always look retro-chic to us. Even then, though, we preferred WordStar.

Repairing a 1955 Classic Radio

We used to say that fixing something was easier than bringing up a design for the first time. After all, the thing you are fixing, presumably, worked at one time or another. These days, that’s not always true as fixing modern gear can be quite a challenge. Watching [Ken’s] repair of an old 1955 Silvertone radio reminded us of a simpler time. You can watch the action on the video below.

If you’ve never had the pleasure of working on an AM radio, you should definitely try it. Some people would use an amplifier to find where the signal dies out. Others will inject a signal into the radio to find where it stops. A good strategy is to start at the volume control and decide if it is before or after that. Then split the apparently bad section roughly in half and test that portion—sort of a hardware binary search. Of course, your first step should probably be to verify power, but after that, the hunt is on.

There’s something very satisfying about taking a dead radio and then hearing it come to life on your bench. In this case, some of the problems were from a previous repair.

Troubleshooting is an art all by itself. Restoring old radios is also great fun.

Combined Crypto, Anglo-American Style

If you think about military crypto machines, you probably think about the infamous Enigma machine. However, as [Christos T.] reminds us, there were many others and, in particular, the production of a “combined cipher” machine for the US and the UK to use for a variety of purposes.

The story opens in 1941 when ships from the United States and the United Kingdom were crossing the Atlantic together in convoys. The US wanted to use the M-138A and M-209 machines, but the British were unimpressed. They were interested in the M-134C, but it was too secret to share, so they reached a compromise.

Starting with a British Typex, a US Navy officer developed an attachment with additional rotors and converted the Typex into a CCM or Combined Cipher Machine. Two earlier verisons of the attachment worked with the M-134C. However the CSP 1800 (or CCM Mark III) was essentially the same unit made to attach to the Typex. Development cost about $6 million — a huge sum for the middle of last century.

By the end of 1943, there were enough machines to work with the North Atlantic convoys. [Christos] says at least 8,631 machines left the factory line. While the machine was a marvel, it did have a problem. With certain settings, the machine had a very low cipher period (338 compared to 16,900 for Enigma). This wasn’t just theoretical, either. A study showed that bad settings showed up seven times in about two months on just one secure circuit.

This led to operational changes to forbid certain settings and restrict the maximum message length. The machine saw service at the Department of State until 1959. There were several variations in use within NATO as late as 1962. It appears the Germans didn’t break CCM during the war, but the Soviets may have been able to decode traffic from it in the post-war period.

You can see a CCM/Typex combo in the video below from the Cryptomuseum. Of course, the Enigma is perhaps the most famous of these machines. These days, you can reproduce one easily.

Plastic Gear Repair

We’ve seen several methods of repairing plastic gears. After all, a gear is usually the same all the way around, so it is very tempting to duplicate a good part to replace a damaged part. That’s exactly what [repairman 101] does in the video below. He uses hot glue to form a temporary mold and casts a resin replacement in place with a part of a common staple as a metal reinforcement.

The process starts with using a hobby tool to remove even more of the damaged gear, making a V-shaped slot to accept the repair. The next step is to create a mold. To do that, he takes a piece of plastic and uses hot glue to secure it near a good part of the gear. Then, he fills the area with more hot glue and carefully removes it.

He uses WD-40 as a mold release. He moves the mold to the damaged area and cuts a bit of wire to serve as a support, using a soldering iron to melt it into the gear’s body. Some resin fills the mold, and once it is cured, the gear requires a little rework, but then it seems to work fine.

We would be tempted to use some 3D printing resin with UV curing, since we have it on hand. Then again, you could easily scan the gear, repair it digitally on the computer and just print a new one. That would work, too.

We’ve seen the same process using candle wax and epoxy. If you want to see an example of just printing an entire replacement, we’ve seen that, too.

Ptychography for High Resolution Microscopy

Nowadays, if you have a microscope, you probably have a camera of some sort attached. [Applied Science] shows how you can add an array of tiny LEDs and some compute power to produce high-resolution images — higher than you can get with the microscope on its own. The idea is to illuminate each LED in the array individually and take a picture. Then, an algorithm constructs a higher-resolution image from the collected images. You can see the results and an explanation in the video below.

You’d think you could use this to enhance a cheap microscope, but the truth is you need a high-quality microscope to start with. In addition, color cameras may not be usable, so you may have to find or create a monochrome camera.

The code for the project is on GitHub. The LEDs need to be close to a point source, so smaller is better, and that determines what kind of LEDs are usable. Of course, the LEDs go through the sample, so this is suitable for transmissive microscopes, not metallurgical ones, at least in the current incarnation.

You can pull the same stunt with electrons. Or blood.

Speaking Computers from the 1970s

Talking computers are nothing these days. But in the old days, a computer that could speak was quite the novelty. Many computers from the 1970s and 1980s used an AY-3-8910 chip and [InazumaDenki] has been playing with one of these venerable chips. You can see (and hear) the results in the video below.

The chip uses PCM, and there are different ways to store and play sounds. The video shows how different they are and even looks at the output on the oscilloscope. The chip has three voices and was produced by General Instruments, the company that initially made PIC microcontrollers. It found its way into many classic arcade games, home computers, and games like Intellivision, Vectrex, the MSX, and ZX Spectrum. Soundcards for the TRS-80 Color Computer and the Apple II used these chips. The Atari ST used a variant from Yamaha, the YM2149F.

There’s some code for an ATmega, and the video says it is part one, so we expect to see more videos on this chip soon.

General instruments had other speech chips and some of them are still around in emulated form. In fact, you can emulate the AY-3-8910 with little more than a Raspberry Pi Pico.

Inexpensive Powder Coating

[Pete] had a friend who would powder coat metal parts for him, but when he needed 16 metal parts coated, he decided he needed to develop a way to do it himself. Some research turned up the fluid bed method and he decided to go that route. He 3D printed a holder and you can see how it all turned out in the video below.

A coffee filter holds the powder in place. The powder is “fluidized” by airflow, which, in this case, comes from an aquarium pump. The first few designs didn’t work out well. Eventually, though, he had a successful fluid bed. You preheat the part so the powder will stick and then, as usual, bake the part in an oven to cure the powder. You can expect to spend some time getting everything just right. [Pete] had to divert airflow and adjust the flow rate to get everything to work right.

With conventional powder coating, you usually charge the piece you want to coat, but that’s not necessary here. You could try a few other things as suggested in the video comments: some suggested ditching the coffee filter, while others think agitating the powder would make a difference. Let us know what you find out.

This seems neater than the powder coating guns we’ve seen. Of course, these wheels had a great shape for powder coating, but sometimes it is more challenging.


To Test a (Smart) LED

Adding LEDs to a project used to be enough to make it cool. But these days, you need arrays of addressable multi-color LEDs, and that typically means WS2812B or something similar. The problem is that while it was pretty easy to test garden-variety LEDs, these devices can be a bit harder to troubleshoot. [Gokux] has the answer, as you can see in the video below.

Testing these was especially important to [Gokux] because they usually swipe the modules from other modules or LED strips. The little fixture sends the correct pulses to push the LED through several colors when you hold it down to the pads.

However, what if the LED is blinking but not totally right? How can you tell? Easy, there’s a reference LED that changes colors in sync with the device under test. So, if the LEDs match, you have a winner. If not… well, it’s time to desolder another donor LED.

This is one of those projects that you probably should have thought of, but also probably didn’t. While the tester here uses a Xiao microcontroller, any processor that can drive the LEDs would be easy to use. We’d be tempted to breadboard the tester, but you’d need a way to make contact with the LED. Maybe some foil tape would do the trick. Or pogo pins.

Unhacked Mattress Phones Home

[Dylan] has a fancy bed that can be set to any temperature. Apparently this set him back about $2,000, it only works if it has Internet, and the bed wants $19 a month for anything beyond basic features. Unsurprisingly, [Dylan] decided to try to hack the mattress firmware and share what he learned with us.

Oddly enough, it was easy to just ask the update URL for the firmware and download it. Inside, it turned out there was a mechanism for “eng@eightsleep.com” to remotely SSH into any bed and — well — do just about anything. You may wonder why anyone wants to gain control of your bed. But if you are on the network, this could be a perfect place to launch an attack on the network and beyond.

Of course, they can also figure out when you sleep, if you sleep alone or not, and, of course, when no one is in the bed. But if those things bother you, maybe don’t get an Internet-connected bed.

Oddly enough, the last time we saw a bed hack, it was from [Dillan], not [Dylan]. Just because you don’t want Big Sleep to know when you are in bed doesn’t mean it isn’t useful for your private purposes.

Learn Assembly the FFmpeg Way

You want to learn assembly language. After all, understanding assembly unlocks the ability to understand what compilers are doing and it is especially important for time-critical code. But most tutorials are — well — boring. So you can print “Hello World” super fast. Who cares?

But decoding video data is something where assembly can really pay off, so why not study a real project like FFmpeg to see how they do things? Sounds like a pain, but thanks to the FFmpeg asm-lessons repository, it’s actually quite accessible.

According to the repo, you should already understand C — especially C pointers. They also expect you to understand some basic mathematics. Most of the FFmpeg code that uses assembly uses the single instruction multiple data (SIMD) opcodes. This allows you to do something like “add 5 to these 200 data items” very quickly compared to looping 200 times.

There are three lessons so far. Of course, some of the material is a little introductory, but they do jump in quickly to SIMD including upcoming instruction sets like AVX10 and older instructions like MMX and AVX512. It is no surprise that FFmpeg needs to understand all these variations since it runs on behalf of (their words) “billions of users.”

We enjoyed their link to a simplified instruction list. Not to mention the visual organizer for SIMD instructions.

The course’s goal is to prepare developers to contribute to FFmpeg. If you are more interested in using FFmpeg, you might enjoy this browser-based GUI. Then again, not all video playback needs high performance.

Over the Counter Glucose Monitor Dissected

If you deal with diabetes, you probably know how to prick your finger and use a little meter to read your glucose levels. The meters get better and better which mostly means they take less blood, so you don’t have to lacerate your finger so severely. Even so, taking your blood several times a day is hard on your fingertips. Continuous monitoring is available, but — until recently — required a prescription and was fairly expensive. [Andy] noticed the recent introduction of a relatively inexpensive over-the-counter sensor, the Stelo CGM. Of course, he had to find out what was inside, and thanks to him, you can see it, too.

If you haven’t used a continuous glucose monitor (CGM), there is still a prick involved, but it is once every two weeks or so and occurs in the back of your arm. A spring drives a needle into your flesh and retracts. However, it leaves behind a little catheter. The other end of the catheter is in an adhesive-backed module that stays put. It sounds a little uncomfortable, but normally, it is hardly noticeable, and even if it is, it is much better than sticking your finger repeatedly to draw out a bunch of blood.

So, what’s in the module? Plenty. There is a coin cell, of course. An nRF52832 microcontroller wakes up every 30 seconds to poll the sensor. Every 5 minutes it wakes up to send data via Bluetooth to your phone. There are antennas for Bluetooth and NFC (the phone or meter reads the sensor via NFC to pair with it). There are also a few custom chips of unknown function.

[Andy] makes the point that the battery could last much longer than the two-week span of the device, but we would guess that a combination of the chemicals involved, the adhesive stickiness, the need to clean the site (you usually alternate arms), and accounting for battery life during storage, two weeks might be conservative, but not ridiculous.

It’s amazing that we live in a time when this much electronics can be considered disposable. CGM is a hard problem. What we really want is an artificial pancreas.

Retrotectacular: Ham Radio As It Was

We hear a lot about how ham radio isn’t what it used to be. But what was it like? Well, the ARRL’s film “The Ham’s Wide World” shows a snapshot of the radio hobby in the 1960s, which you can watch below. The narrator is no other than the famous ham [Arthur Godfrey] and also features fellow ham and U.S. Senator [Barry Goldwater]. But the real stars of the show are all the vintage gear: Heathkit, Swan, and a very oddly placed Drake.

The story starts with a QSO between a Mexican grocer and a U.S. teenager. But it quickly turns to a Field Day event. Since the film is from the ARRL, the terminology and explanations make sense. You’ll hear real Morse code and accurate ham lingo.

Is ham radio really different today? Truthfully, not so much. Hams still talk to people worldwide and set up mobile and portable stations. Sure, hams use different modes in addition to voice. There are many options that weren’t available to the hams of the 1960s, but many people still work with old gear and older modes and enjoy newer things like microwave communications, satellite work, and even merging radio with the Internet.

In a case of history repeating itself, there is an example of hams providing communications during a California wildfire. Hams still provide emergency communication in quite a few situations. It is hard to remember that before the advent of cell phones, a significant thing hams like [Barry Goldwater] did was to connect servicemen and scientists overseas to their families via a “phone patch.” Not much of that is happening today, of course, but you can still listen in to ham radio contacts that are partially over the Internet right in your web browser.

A New 8-bit CPU for C

It is easy to port C compilers to architectures that look like old minicomputers or bigger CPUs. However, as the authors of the Small Device C Compiler (SDCC) found, pushing C into a typical 8-bit CPU is challenging. Lessons learned from SDCC inspired a new 8-bit architecture, F8. This isn’t just a theoretical architecture. You can find an example Verilog implementation in the SDDC project and on GitHub. The name choice may turn out to be unfortunate as there was an F8 CPU from Fairchild back in the 1970s that apparently few people remember.

In the video from FOSDEM 2025, [Phillip Krause] provides a nice overview of the how and why of F8. While it might seem odd to create a new 8-bit CPU when you can get bigger CPUs for pennies, you have to consider that 8-bit machines are more than enough for many jobs, and if you can squeeze one into an FPGA, it might be a good choice as opposed to having to get a bigger FPGA to hold your design and a 32-bit CPU.

Many 8-bit computers struggle with efficient C code mainly because the data size is smaller than the width of a pointer. Doing things like adding two numbers takes more code, even in common situations. For example, suppose you have a pointer to an array, and each element of the array is four bytes wide. To find the address of the n’th element, you need to compute: element_n = base_address + (n *4). On, say, an 8086 with 16-bit pointers and many 16-bit instructions and addressing modes can do the calculation very succinctly.

Other problems you frequently run into with compiling code for small CPUs include segmented address spaces, dedicated registers for memory indexing, and difficulties putting wider items on a stack (or, for some very small CPUs, even having a stack, at all).

The wish list was to include stack-relative addressing, hardware 8-bit multiplication, and BCD support to help support an efficient printf implementation.

Keep in mind, it isn’t that you can’t compile C for strange 8-bit architectures. SDDC is proof that you can. The question is how efficient is the generated code. F8 provides features that facilitate efficient binaries for C programs.

We’ve seen other modern 8-bit CPUs use SDCC. Writing C code for the notorious PIC (with it’s banked memory, lack of stack, and other hardships) was truly a surreal experience.

In a World Without USB…

It is easy to forget that many technology juggernauts weren’t always the only game in town. Ethernet seems ubiquitous today, but it had to fight past several competing standards. VHS and Blu-ray beat out their respective competitors. But what about USB? Sure, it was off to a rocky start in the beginning, but what was the real competition at that time? SCSI? Firewire? While those had plusses and minuses, neither were really in a position to fill the gap that USB would inhabit. But [Ernie Smith] remembers ACCESS.bus (or, sometimes, A.b) — what you might be using today if USB hadn’t taken over the world.

Back in the mid-1980s, there were several competing serial bus systems including Apple Desktop Bus and some other brand-specific things from companies like Commodore (the IEC bus) and Atari (SIO). The problem is that all of these things belong to one company. If you wanted to make, say, keyboards, this was terrible. Your Apple keyboard didn’t fit your Atari or your IBM computer. But there was a very robust serial protocol already in use — one you’ve probably used yourself. IIC or I2C (depending on who you ask).

I2C is robust, simple, and cheap to implement with reasonable licensing from Philips. It just needed a little tweaking to make it suitable for peripheral use, and that was the idea behind ACCESS.bus. [Ernie] tracked down a 1991 article that covered the technology and explained a good bit of the how and why. You can also find a comparison of A.b, I2C, and SMBus in this old datasheet. You can even find the 3.0 version of the spec online. While DEC was instrumental in the standard, some of their equipment used SERIAL.bus, which was identical except for using 12 V power and having a slightly different pinout.

The DEC Station 5000 was an early adopter of ACCESS.bus. From the user’s guide:

In theory, one ACCESS.bus port could handle 125 devices. It didn’t have a hub architecture like USB, but instead, you plugged one device into another. So your mouse plugs into your keyboard, which plugs into your printer, and finally connects to your PC.

The speed wasn’t that great — about 100 kilobits per second. So if ACCESS.bus had won, it would have needed to speed up when flash drives and the like became popular. However, ACCESS.bus does sort of live even today. Computer monitors that support DDC — that is, all of them in modern times — use a form of ACCESS.bus so the screen you are reading this on is using it right now so the monitor and PC can communicate things like refresh rates.

We love to read (and write) these deep dives into obscure tech. The Avatar Shark comes to mind. Or drives that used photographic film.

DaVinci’s New Threads

Last year, we saw [How To Make Everything’s] take on [DaVinci’s] machine for cutting threads. However, they stopped short of the goal, which was making accurate metal screw threads. After much experimentation, they have a working solution. In fact, they tried several different methods, each with varying degrees of success.

Some of the more unusual methods included heating a bar red hot and twisting it, and casting a screw out of bronze. The last actually worked well with a normal screw as the mold, although presumably, a good wood or wax shape would have resulted in a workable mold, too.

The real goal, though, was to make the DaVinci machine more capable on its own. The machine uses leadscrews and can cut its own leadscrews, so, in theory, if you improve the machine, it can cut better components for itself, which may make it possible to cut even better leadscrews.

The reality was the machine required some significant rework to correctly cut metal threads. But it does, as you can see in the video below. With some additional scaling of gears, they were able to cut a 20 TPI threaded rod that would take an off-the-shelf nut.

If you missed the original post on the machine, you can still go back and read it. Of course, once you have a threaded rod, you are just a few steps away from a tap, too.

How Hard is it to Write a Calculator App?

How hard can it be to write a simple four-function calculator program? After all, computers are good at math, and making a calculator isn’t exactly blazing a new trail, right? But [Chad Nauseam] will tell you that it is harder than you probably think. His post starts with a screenshot of the iOS calculator app with a mildly complex equation. The app’s answer is wrong. Android’s calculator does better on the same problem.

What follows is a bit of a history lesson and a bit of a math lesson combined. As you might realize, the inherent problem with computers and math isn’t that they aren’t good at it. Floating point numbers have a finite precision and this leads to problems, especially when you do operations that combine large and small numbers together.

Indeed, any floating point representation has a bigger infinity of numbers that it can’t represent than those that it can. But the same is true of a calculator. Think about how many digits you are willing to type in, and how many digits you want out. All you want is for each of them to be correct, and that’s a much smaller set of numbers.

Google’s developer, [Hans-J. Boehm] tackled this problem by turning to recursive real arithmetic (RRA). Here, each math function is told how accurate it needs to be, and a set of rules determines the highest required accuracy.

But every solution brings a problem. With RRA, there is no way to tell very small numbers from zero. So computing “1-1” might give you “0.000000000”, which is correct but upsetting because of all the excess precision. You could try to test if “0.00000000” was equal to “0”, and simplify the output. But testing for equality of two numbers in RRA is not guaranteed to terminate: you can tell if two numbers are unequal by going to more and more precision until you find a difference, but if the numbers happen to be equal, this procedure never ends.

The key realization for [Boehm] and his collaborators was that you could use RRA only for cases where you deal with inexact numbers. Most of the time, the Android calculator deals with rationals. However, when an operation produces a potentially irrational result, it switches to RRA for the approximation, which works because no finite representation ever gets it exactly right. The result is a system that doesn’t show excess precision, but correctly displays all of the digits that it does show.

We really like [Chad’s] step-by-step explanation. If you would rather dive into the math, you can read [Boehm’s] paper on the topic. If you ever wonder how many computer systems handle odd functions like sine and cosine, read about CORDIC. Or, avoid all of this and stick to your slide rule.

Piano Gets an Arduino Implant

[Paul] likes his piano, but he doesn’t know how to play it. The obvious answer: program an Arduino to do it. Some aluminum extrusion and solenoids later, and it was working. Well, perhaps not quite that easy — making music on a piano is more than just pushing the keys. You have to push multiple keys together and control the power behind each strike to make the music sound natural.

The project is massive since he chose to put solenoids over each key. Honestly, we might have been tempted to model ten fingers and move the solenoids around in two groups of five. True, the way it is, it can play things that would not be humanly possible, but ten solenoids, ten drivers, and two motors might have been a little easier and cheaper.

The results, however, speak for themselves. He did have one problem with the first play, though. The solenoids have a noticeable click when they actuate. The answer turned out to be orthodontic rubber bands installed on the solenoids. We aren’t sure we would have thought of that.

Player pianos, of course, are nothing new. And, yes, you can even make one with a 555. If a piano isn’t your thing, maybe try a xylophone instead.

❌