Vista de Lectura

Hay nuevos artículos disponibles. Pincha para refrescar la página.

What Happened to WWW.?

Once upon a time, typing “www” at the start of a URL was as automatic as breathing. And yet, these days, most of us go straight to “hackaday.com” without bothering with those three letters that once defined the internet.

Have you ever wondered why those letters were there in the first place, and when exactly they became optional? Let’s dig into the archaeology of the early web and trace how this ubiquitous prefix went from essential to obsolete.

Where Did You Go?

The first website didn’t bother with any of that www. nonsense! Credit: author screenshot

It may shock you to find out that the “www.” prefix was actually never really a key feature or necessity at all. To understand why, we need only contemplate the very first website, created by Tim Berners-Lee at CERN in 1990. Running on a NeXT workstation employed as a server, the site could be accessed at a simple URL: “http//info.cern.ch/”—no WWW needed. Berners-Lee had invented the World Wide Web, and called it as such, but he hadn’t included the prefix in his URL at all. So where did it come from?

McDonald’s were ahead of the times – in 1999, their website featured the “mcdonalds.com” domain, no prefix, though you did need it to actually get to the site. Credit: screenshot via Web Archive

As it turns out, the www prefix largely came about due to prevailing trends on the early Internet. It had become typical to separate out different services on a domain by using subdomains. For example, a company might have FTP access on http://ftp.company.com, while the SMTP server would be accessed via the smpt.company.com subdomain. In turn, when it came to establish a server to run a World Wide Web page, network administrators followed existing convention. Thus, they would put the WWW server on the www. subdomain, creating http://www.company.com.

This soon became standard practice, and in short order, was expected by members of the broader public as the joined the Internet in the late 1990s. It wasn’t long before end users were ignoring the http:// prefix at the start of domains, as web browsers didn’t really need you to type that in. However, www. had more of a foothold in the public consciousness. Along with “.com”, it became an obvious way for companies to highlight their new fancy website in their public facing marketing materials. For many years, this was simply how things were done. Users expected to type “www” before a domain name, and thus it became an ingrained part of the culture.

Eventually, though, trends shifted. For many domains, web traffic was the sole dominant use, so it became somewhat unnecessary to fold web traffic under its own subdomain. There was also a technological shift when the HTTP/1.1 protocol was introduced in 1999, with the “Host” header enabling multiple domains to be hosted on a single server. This, along with tweaks to DNS, also made it trivial to ensure “www.yoursite.com” and “yoursite.com” went to the same place. Beyond that, fashion-forward companies started dropping the leading www. for a cleaner look in marketing. Eventually, this would become the norm, with “www.” soon looking old hat.

Visit microsoft.com in Chrome, and you might think that’s where you really are… Credit: author screenshot

Of course, today, “www” is mostly dying out, at least as far as the industry and most end users are concerned. Few of us spend much time typing in URLs by hand these days, and fewer of us could remember the last time we felt the need to include “www.” at the beginning. Of course, if you want to make your business look out of touch, you could still include www. on your marketing materials, but people might think you’re an old fuddy duddy.

…but you’re not! Click in the address bar, and Chrome will show you the real URL. www. and all. Embarrassing! Credit: author screenshot
Hackaday, though? We rock without the prefix. Cutting-edge out here, folks. Credit: author screenshot

Using the www. prefix can still have some value when it comes to cookies, however. If you don’t use the prefix and someone goes to yoursite.com, that cookie would be sent to all subdomains. However, if your main page is set up at http://www.yoursite.com, it’s effectively on it’s own subdomain, along with any others you might have… like store.yoursite.com, blog.yoursite.com, and so on. This allows cookies to be more effectively managed across a site spanning multiple subdomains.

In any case, most browsers have taken a stance against the significance of “www”. Chrome, Safari, Firefox, and Edge all hide the prefix even when you are technically visiting a website that does still use the www. subdomain (like http://www.microsoft.com). You can try it yourself in Chrome—head over to a www. site and watch as the prefix disappears from the taskbar. If you really want to know if you’re on a www subdomain or not, though, you can click into the taskbar and it will give you the full URL, HTTP:// or HTTPS:// included, and all.

The “www” prefix stands as a reminder that the internet is a living, evolving thing. Over time, technical necessities become conventions, conventions become habits, and habits eventually fade away when they no longer serve a purpose. Yet we still see those three letters pop up on the Web now and then, a digital vestigial organ from the early days of the web. The next time you mindlessly type a URL without those three Ws, spare a thought for this small piece of internet history that shaped how we access information for decades. Largely gone, but not yet quite forgotten.

 

Rayhunter Sniffs Out Stingrays for $30

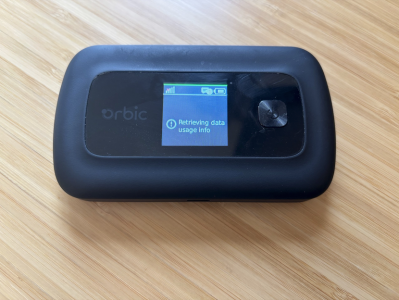
These days, if you’re walking around with a cellphone, you’ve basically fitted an always-on tracking device to your person. That’s even more the case if there happens to be an eavesdropping device in your vicinity. To combat this, the Electronic Frontier Foundation has created Rayhunter as a warning device.

Rayhunter is built to detect IMSI catchers, also known as Stingrays in the popular lexicon. These are devices that attempt to capture your phone’s IMSI (international mobile subscriber identity) number by pretending to be real cell towers. Information on these devices is tightly controlled by manufacturers, which largely market them for use by law enforcement and intelligence agencies.

Rayhunter in use.

To run Rayhunter, all you need is an Orbic RC400L mobile hotspot, which you can currently source for less than $30 USD online. Though experience tells us that could change as the project becomes more popular with hackers. The project offers an install script that will compile the latest version of the software and flash it to the device from a  computer running Linux or macOS — Windows users currently have to jump through a few extra hoops to get the same results.

Rayhunter works by analyzing the control traffic between the cell tower and the hotspot to look out for hints of IMSI-catcher activity. Common telltale signs are requests to switch a connection to less-secure 2G standards, or spurious queries for your device’s IMSI. If Rayhunter notes suspicious activity, it turns a line on the Orbic’s display red as a warning. The device’s web interface can then be accessed for more information.

While IMSI catchers really took off on less-secure 2G networks, there are developments that allow similar devices to work on newer cellular standards, too. Meanwhile, if you’ve got your own projects built around cellular security, don’t hesitate to notify the tipsline!

Train With Morse Master

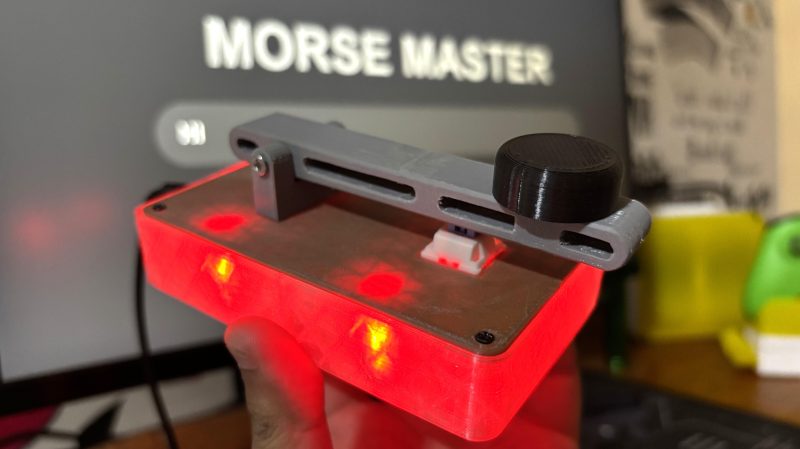
Morse code can be daunting to learn when you’re new to the game, particularly if you need it to pass your desired radio license. However, these days, there are a great many tools to aid in the learning process. A good example is the Morse Master from [Arnov Sharma].

The Morse Master is a translator for Morse code, which works in two ways. You can access it via a web app, and type in regular letters which it then flashes out as code on its in-built LEDs. Alternatively, you can enter Morse manually using the physical key, and the results will be displayed on the web app. The Morse key itself is built into the enclosure using 3D printed components paired with a Cherry-style keyboard switch. It’s perhaps not the ideal solution for fast keying, with its limited rebound, but it’s a quick and easy way to make a functional key for practice purposes. If you want to go faster, though, you might want to upgrade to something more capable. We’d also love to see a buzzer added, since Morse is very much intended as an auditory method of communication.

We’ve seen some other great Morse code trainers before, too. If you’ve trained yourself in this method of communication, don’t hesitate to share your own learning tips below.

A Delay Line Memory Demo Board

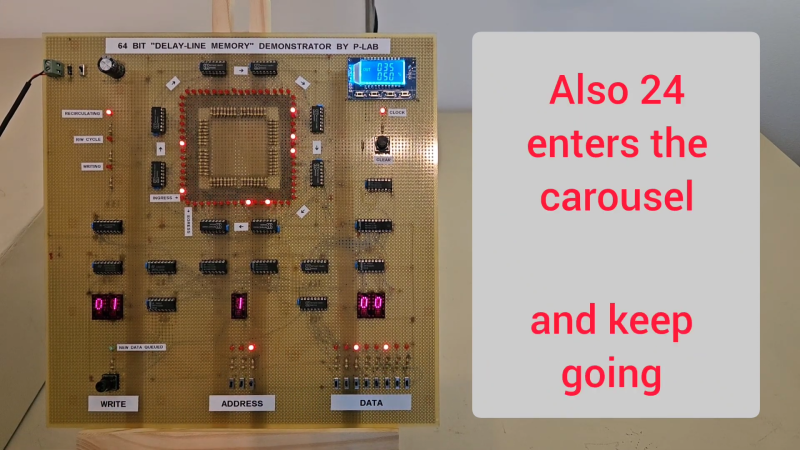
Delay line memory is a technology from yesteryear, but it’s not been entirely forgotten. [P-Lab] has developed a demo board for delay-line memory, which shows how it worked in a very obvious way with lots of visual aids.

If you’re unfamiliar with the technology, it’s a form of memory that was used in classic computers like the Univac-I and the Olivetti Programma 101. It’s a sequential-access technology, where data is stored as pulses in some kind of medium, and read out in order. Different forms of the technology exist, such as using acoustic pulses in mercury or torsional waves passing through coiled nickel wire.

In this case, [P-Lab] built a solid state delay line using TTL ICs, capable of storing a full 64 bits of information and running at speeds of up to 150 kHz. It also features a write-queuing system to ensure bits are written at the exact correct time — the sequential-access nature of the technology means random writes and reads aren’t actually possible. The really cool thing is that [P-Lab] paired the memory with lots of LEDs to show how it works. There are lights to indicate the operation of the clock, and the read and write cycles, as well as individual LEDs indicating the status of each individual bit as they roll around the delay line. Combined with the hexadecimal readouts, it makes it easy to get to grips with this old-school way of doing things.

We’ve seen previous work from[P-Lab] in this regard using old-school core rope memory, too.

[Thanks to Giuseppe for the tip!]

LLM Ported To The C64, Kinda

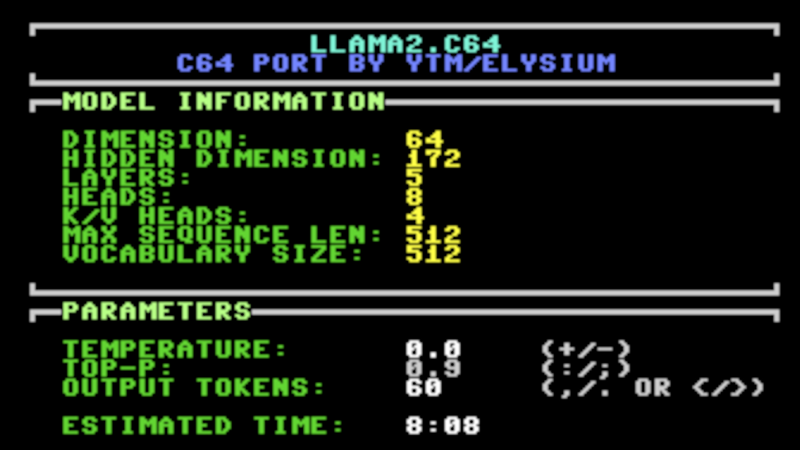
“If there’s one thing the Commodore 64 is missing, it’s a large language model,” is a phrase nobody has uttered on this Earth. Yet, you could run one, if you so desired, thanks to [ytm] and the Llama2.c64 project!

[ytm] did the hard work of porting the Llama 2 model to the most popular computer ever made. Of course, as you might expect, the ancient 8-bit machine doesn’t really have the stones to run an LLM on its own. You will need one rather significant upgrade, in the form of 2 MB additional RAM via a C64 REU.

Now, don’t get ahead of things—this is no wide-ranging ChatGPT clone. It’s not going to do your homework, counsel you on your failed marriage, or solve the geopolitical crisis in your local region. Instead, you’re getting the 260 K tinystories model, which is a tad more limited. In [ytm]’s words… “Imagine prompting a 3-year-old child with the beginning of a story — they will continue it to the best of their vocabulary and abilities.”

It might not be supremely capable, but there’s something fun about seeing such a model talking back on an old-school C64 display. If you’ve been hacking away at your own C64 projects, don’t hesitate to let us know. We certainly can’t get enough of them!

Thanks to [ytm] for the tip!

A Neat E-Paper Digit Clock (or Four)

[sprite_tm] had a problem. He needed a clock for the living room, but didn’t want to just buy something off the shelf. In his own words, “It’s an opportunity for a cool project that I’d rather not let go to waste.” Thus started a project to build a fun e-paper digit clock!

There were several goals for the build from the outset. It had to be battery driven, large enough to be easily readable, and readily visible both during the day and in low-light conditions. It also needed to be low maintenance, and “interesting,” as [sprite_tm] put it. This drove the design towards an e-paper solution. However, large e-paper displays can be a bit pricy. That spawned a creative idea—why not grab four smaller displays and make a clock with separate individual digits instead?

The build description covers the full design, from the ESP32 at the heart of things to odd brownout issues and the old-school Nokia batteries providing the juice. Indeed, [sprite_tm] even went the creative route, making each individual digit of the clock operate largely independently. Each has its own battery, microcontroller, and display. To save battery life, only the hours digit has to spend energy syncing with an NTP time server, and it uses the short-range ESPNow protocol to send time updates to the other digits.

It’s an unconventional clock, to be sure; you could even consider it four clocks in one. Ultimately, though, that’s what we like in a timepiece here at Hackaday. Meanwhile, if you’ve come up with a fun and innovative way to tell time, be sure to let us know on the tipsline!

[Thanks to Maarten Tromp for the tip!]

Single-Board Z80 Computer Draws Inspiration From Picasso

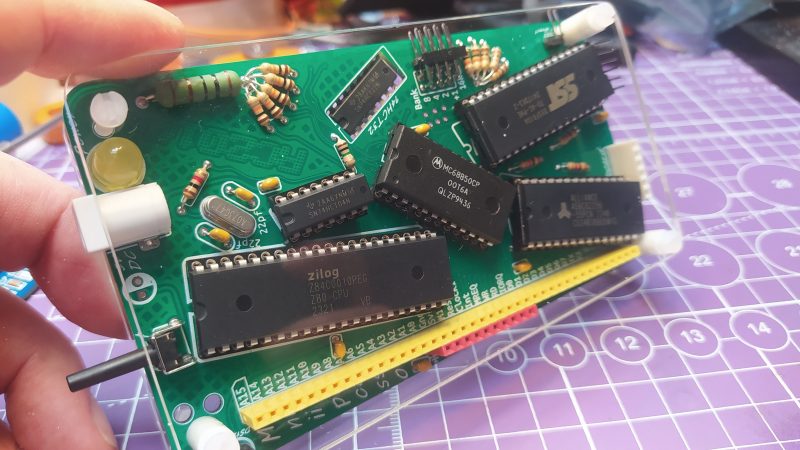
Picasso and the Z80 microprocessor are not two things we often think about at the same time. One is a renowned artist born in the 19th century, the other, a popular CPU that helped launch the microcomputer movement. And yet, the latter has come to inspire a computer based on the former. Meet the RC2014 Mini II Picasso!

As [concretedog] tells the story, what you’re fundamentally looking at is an RC2014 Mini II. As we’ve discussed previously, it’s a single-board Z80 retrocomputer that you can use to do fun things like run BASIC, Forth, or CP/M. However, where it gets kind of fun is in the layout. It’s the same fundamental circuitry as the RC2014, but it’s been given a rather artistic flair. The ICs are twisted this way and that, as are the passive components; even some of the resistors are dancing all over the top of one another. The kit is a limited edition, too, with each coming with a unique combination of colors where the silkscreen and sockets and LED are concerned. Kits are available via Z80Kits for those interested.

We love a good artistic PCB design; indeed, we’ve supported the artform heavily at Supercon and beyond. It’s neat to see the RC2014 designers reminding us that components need not live on a rigid grid; they too can dance and sway and flop all over the place like the eyes and or nose on a classic Picasso.

It’s weird, though; in a way, despite the Picasso inspiration, the whole thing ends up looking distinctly of the 1990s. In any case, if you’re cooking up any such kooky builds of your own, modelled after Picasso or any other Spanish master, don’t hesitate to notify the tipsline.


Make Your Own Telescope, Right Down To The Glass

Telescopes are great tools for observing the heavens, or even surrounding landscapes if you have the right vantage point. You don’t have to be a professional to build one though; you can make all kinds of telescopes as an amateur, as this guide from the Springfield Telesfcope Makers demonstrates.

The guide is remarkably deep and rich; no surprise given that the Springfield Telescope Makers club dates back to the early 20th century. It starts out with the basics—how to select a telescope, and how to decide whether to make or buy your desired instrument. It also explains in good detail why you might want to start with a simple Newtonian reflector setup on Dobsonian mounts if you’re crafting your first telescope, in no small part because mirrors are so much easier to craft than lenses for the amateur. From there, the guide gets into the nitty gritty of mirror production, right down to grinding and polishing techniques, as well as how to test your optical components and assemble your final telescope.

It’s hard to imagine a better place to start than here as an amateur telescope builder. It’s a rich mine of experience and practical advice that should give you the best possible chance of success. You might also like to peruse some of the other telescope projects we’ve covered previously. And, if you succeed, you can always tell us of your tales on the tipsline!

Researchers Create A Brain Implant For Near-Real-Time Speech Synthesis

Brain-to-speech interfaces have been promising to help paralyzed individuals communicate for years. Unfortunately, many systems have had significant latency that has left them lacking somewhat in the practicality stakes.

A team of researchers across UC Berkeley and UC San Francisco has been working on the problem and made significant strides forward in capability. A new system developed by the team offers near-real-time speech—capturing brain signals and synthesizing intelligible audio faster than ever before.

New Capability

The aim of the work was to create more naturalistic speech using a brain implant and voice synthesizer. While this technology has been pursued previously, it faced serious issues around latency, with delays of around eight seconds to decode signals and produce an audible sentence. New techniques had to be developed to try and speed up the process to slash the delay between a user trying to “speak” and the hardware outputting the synthesized voice.

The implant developed by researchers is used to sample data from the speech sensorimotor cortex of the brain—the area that controls the mechanical hardware that makes speech: the face, vocal chords, and all the other associated body parts that help us vocalize. The implant captures signals via an electrode array surgically implanted into the brain itself. The data captured by the implant is then passed to an AI model which figures out how to turn that signal into the right audio output to create speech. “We are essentially intercepting signals where the thought is translated into articulation and in the middle of that motor control,” said Cheol Jun Cho, a Ph.D student at UC Berkeley. “So what we’re decoding is after a thought has happened, after we’ve decided what to say, after we’ve decided what words to use, and how to move our vocal-tract muscles.”

The AI model had to be trained to perform this role. This was achieved by having a subject, Ann, look at prompts and attempting to “speak ” the phrases. Ann has suffered from paralysis after a stroke which left her unable to speak. However, when she attempts to speak, relevant regions in her brain still lit up with activity, and sampling this enabled the AI to correlate certain brain activity to intended speech. Unfortunately, since Ann could no longer vocalize herself, there was no target audio for the AI to correlate the brain data with. Instead, researchers used a text-to-speech system to generate simulated target audio for the AI to match with the brain data during training. “We also used Ann’s pre-injury voice, so when we decode the output, it sounds more like her,” explains Cho. A recording of Ann speaking at her wedding provided source material to help personalize the speech synthesis to sound more like her original speaking voice.

To measure performance of the new system, the team compared the time it took the system to generate speech to the first indications of speech intent in Ann’s brain signals. “We can see relative to that intent signal, within one second, we are getting the first sound out,” said Gopala Anumanchipalli, one of the researchers involved in the study. “And the device can continuously decode speech, so Ann can keep speaking without interruption.” Crucially, too, this speedier method didn’t compromise accuracy—in this regard, it decoded just as well as previous slower systems.

Pictured is Ann using the system to speak in near-real-time. The system also features a video avatar. Credit: UC Berkeley

The decoding system works in a continuous fashion—rather than waiting for a whole sentence, it processes in small 80-millisecond chunks and synthesizes on the fly. The algorithms used to decode the signals were not dissimilar from those used by smart assistants like Siri and Alexa, Anumanchipalli explains. “Using a similar type of algorithm, we found that we could decode neural data and, for the first time, enable near-synchronous voice streaming,” he says. “The result is more naturalistic, fluent speech synthesis.”

It was also key to determine whether the AI model

was genuinely communicating what Ann was trying to say. To investigate this, Ann was qsked to try and vocalize words outside the original training data set—things like the NATO phonetic alphabet, for example. “We wanted to see if we could generalize to the unseen words and really decode Ann’s patterns of speaking,” said Anumanchipalli. “We found that our model does this well, which shows that it is indeed learning the building blocks of sound or voice.”

For now, this is still groundbreaking research—it’s at the cutting edge of machine learning and brain-computer interfaces. Indeed, it’s the former that seems to be making a huge difference to the latter, with neural networks seemingly the perfect solution for decoding the minute details of what’s happening with our brainwaves. Still, it shows us just what could be possible down the line as the distance between us and our computers continues to get ever smaller.

Featured image: A researcher connects the brain implant to the supporting hardware of the voice synthesis system. Credit: UC Berkeley

Vintage Stereo Stack Becomes Neat PC Case

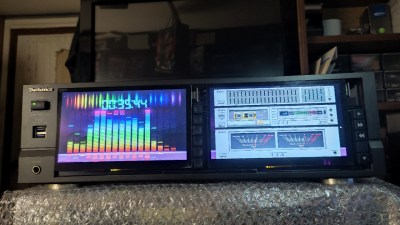
Vintage hi-fi gear has a look and feel all its own. [ThunderOwl] happened to be playing in this space, turning a heavily-modified Technics stereo stack into an awesome neo-retro PC case. Meet the “TechnicsPC!”

This is good. We like this.

You have to hunt across BlueSky for the goodies, but it’s well worth it. The main build concerned throwing a PC into an old Technics receiver, along with a pair of LCD displays and a bunch of buttons for control. If the big screens weren’t enough of a tell that you’re looking at an anachronism, the USB ports just below the power switch will tip you off. A later addition saw a former Technics tuner module stripped out and refitted with card readers and a DVD/CD drive. Perhaps the most era-appropriate addition, though, is the scrolling LED display on top. Stuffed inside another tuner module, it’s a super 90s touch that somehow just works.

These days, off-the-shelf computers are so fancy and glowy that DIY casemodding has fallen away from the public consciousness. And yet, every so often, we see a magnificent build like this one that reminds us just how creative modders can really be. Video after the break.

“Live test”. All more or less as planned, as “cons” – it does not interrupt ongoing scroll cycle with new stuff, it puts new content info with next cycle, so, kinda “info delays”:

[image or embed]

— ThunderOwl (@thunderowl.one) 10 March 2025 at 07:39


A New And Weird Kind of Typewriter

Typewriters aren’t really made anymore in any major quantity, since the computer kind of rained all over its inky parade. That’s not to say you can’t build one yourself though, as [Toast] did in a very creative fashion.

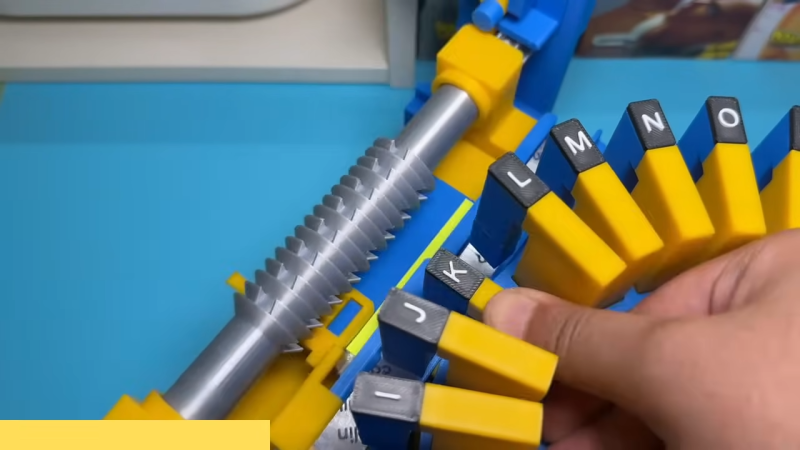
After being inspired by so many typewriters on YouTube, [Toast] decided they simply had to 3D print one of their own design. They decided to go in a unique direction, eschewing ink ribbons for carbon paper as the source of ink. To create a functional typewriter, they had to develop a typebar mechanism to imprint the paper, as well as a mechanism to move the paper along during typing. The weird thing is the letter selection—the typewriter doesn’t have a traditional keyboard at all. Instead, you select the letter of your choice from a rotary wheel, and then press the key vertically down into the paper. The reasoning isn’t obvious from the outset, but [Toast] explains why this came about after originally hitting a brick wall with a more traditional design.

If you’ve ever wanted to build a typewriter of your own, [Toast]’s example shows that you can have a lot of fun just by having a go and seeing where you end up. We’ve seen some other neat typewriter hacks over the years, too. Video after the break.

[Thanks to David Plass for the tip!]

VESC Mods Made Via Vibe Coding

[David Bloomfield] wanted to make some tweaks to an embedded system, but didn’t quite have the requisite skills. He decided to see if vibe coding could help.

[David]’s goal was simple. To take the VESC Telemetry Display created by [Lukas Janky] and add some tweaks of his own. He wanted to add more colors to the display, while changing the format of the displayed data and tweaking how it gets saved to EEPROM. The only problem was that [David] wasn’t experienced in coding at all, let alone for embedded systems like the Arduino Nano. His solution? Hand over the reigns to a large language model. [David] used Gemini 2.5 Pro to make the changes, and by and large, got the tweaks made that he was looking for.

There are risks here, of course. If you’re working on an embedded system, whatever you’re doing could have real world consequences. Meanwhile, if you’re relying on the AI to generate the code and you don’t fully understand it yourself… well, the possibilities are obvious. It pays to know what you’re doing at the end of the day. In this case, it’s hard to imagine much going wrong with a simple telemetry display, but it bears considering the risks whatever you’re doing.

We’ve talked about the advent of vibe coding before, too, with [Jenny List] exploring this nascent phenomenon. Expect it to remain a topic of controversy in coding circles for some time. Video after the break.

Creating An Electronic Board For Catan-Compatible Shenanigans

[Sean Boyce] has been busy building board games. Specifically, an electronic strategy boardgame that is miraculously also compatible with Settlers of Catan.

[Sean’s] game is called Calculus. It’s about mining asteroids and bartering. You’re playing as a corporation attempting to mine the asteroid against up to three others doing the same. Do a good job of exploiting the space-based resource, and you’ll win the game.

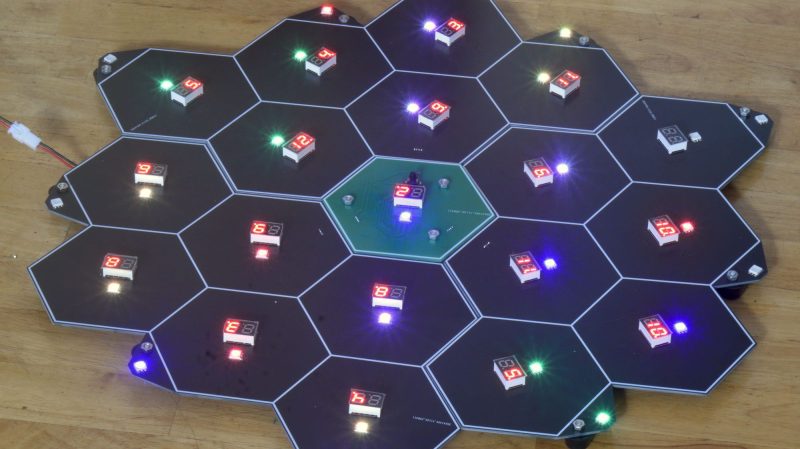
Calculus is played on a board made out of PCBs. A Xiao RP2040 microcontroller board on the small PCB in the center of the playfield is responsible for running the show. It controls a whole ton of seven-segment displays and RGB LEDs across multiple PCBs that make up the gameboard. The lights and displays help players track the game state as they vie for asteroid mining supremacy. Amusingly, by virtue of its geometry and some smart design choices, you can also use [Sean]’s board to play Settlers of Catan. He’s even designed a smaller, cheaper travel version, too.

We do see some interesting board games around these parts, because hackers and makers are just that creative. If you’ve got your own board game hacks or builds in the works, don’t hesitate to let us know!

Amazing Oscilloscope Demo Scores The Win At Revision 2025

Classic demos from the demoscene are all about showing off one’s technical prowess, with a common side order of a slick banging soundtrack. That’s precisely what [BUS ERROR Collective] members [DJ_Level_3] and [Marv1994] delivered with their prize-winning Primer demo this week.

This demo is a grand example of so-called “oscilloscope music”—where two channels of audio are used to control an oscilloscope in X-Y mode. The sounds played determine the graphics on the screen, as we’ve explored previously.

The real magic is when you create very cool sounds that also draw very cool graphics on the oscilloscope. The Primer demo achieves this goal perfectly. Indeed, it’s intended as a “primer” on the very artform itself, starting out with some simple waveforms and quickly spiraling into a graphical wonderland of spinning shapes and morphing patterns, all to a sweet electronic soundtrack. It was created with a range of tools, including Osci-Render and apparently Ableton 11, and the recording performed on a gorgeous BK Precision Model 2120 oscilloscope in a nice shade of green.

If you think this demo is fully sick, you’re not alone. It took out first place in the Wild category at the Revision 2025 demo party, as well as the Crowd Favorite award. High praise indeed.

We love a good bit of demoscene magic around these parts.

Thanks to [STrRedWolf] for the tip!

Robot Gets a DIY Pneumatic Gripper Upgrade

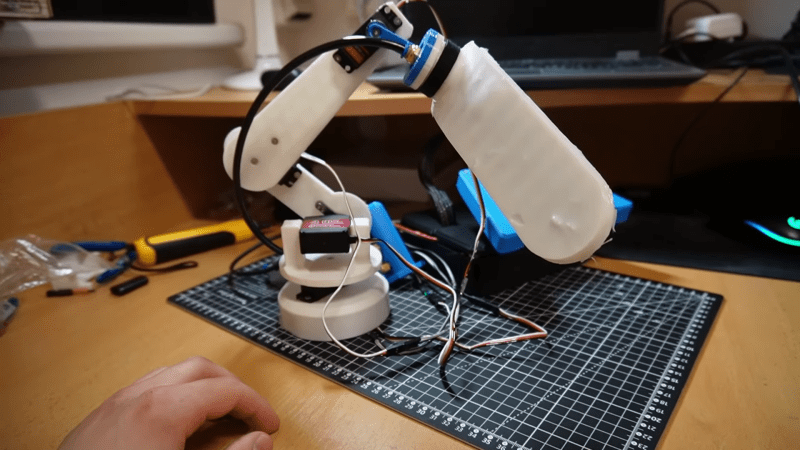
[Tazer] built a small desktop-sized robotic arm, and it was more or less functional. However, he wanted to improve its ability to pick things up, and attaching a pneumatic gripper seemed like the perfect way to achieve that. Thus began the build!

The concept of [Tazer]’s pneumatic gripper is simple enough. When the pliable silicone gripper is filled with air, the back half is free to expand, while the inner section is limited in its expansion thanks to fabric included in the structure. This causes the gripper to deform in such a way that it folds around as it fills with air, which lets it pick up objects. [Tazer] designed the gripper so that that could be cast in silicone using 3D printed molds. It’s paired with a 3D printed manifold which delivers air to open and close the gripper as needed. Mounted on the end of [Tazer]’s robotic arm, it’s capable of lifting small objects quite well.

It’s a fun build, particularly for the lovely sounds of silicone parts being ripped out of their 3D printed molds. Proper ASMR grade stuff, here. We’ve also seen some other great work on pneumatic robot grippers over the years.

Adding an Atari Joystick Port to TheC64 USB Joystick

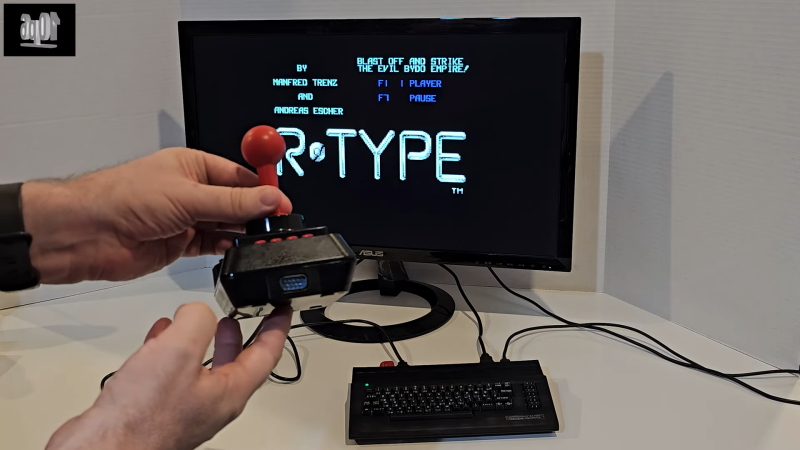
“TheC64” is a popular recreation of the best selling computer of all time, the original Commodore 64. [10p6] enjoys hacking on this platform, and recently whipped up a new mod — adding a 9-pin Atari joystick connector for convenience.

When it comes to TheC64 units, they ship with joysticks that look retro, but aren’t. These joysticks actually communicate with the hardware over USB. [10p6]’s hack was to add an additional 9-pin Atari joystick connector into the joystick itself. It’s a popular mod amongst owners of TheC64 and the C64 Mini. All one needs to do is hook up a 9-pin connector to the right points on the joystick’s PCB. Then, it effectively acts as a pass-through adapter for hooking up other joysticks to the system.

While this hack could have been achieved by simply chopping away at the plastic housing of the original joystick, [10p6] went a tidier route. Instead, the joystick was granted a new 3D printed base that had a perfect mounting spot for the 9-pin connector. Clean!

We’ve seen some great hacks from [10p6] lately, like the neat reimagined “C64C” build that actually appears in this project video, too.

3D Printing A Useful Fixturing Tool

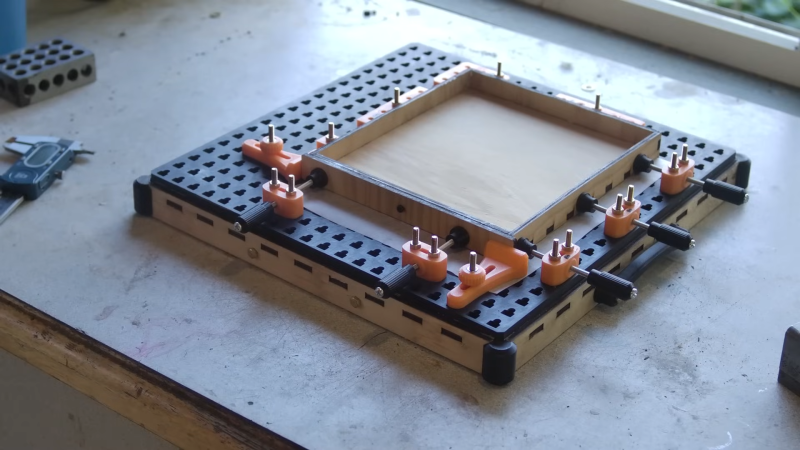
When you start building lots of something, you’ll know the value of accurate fixturing. [Chris Borge] learned this the hard way on a recent mass-production project, and decided to solve the problem. How? With a custom fixturing tool! A 3D printed one, of course.

Chris’s build is simple enough. He created 3D-printed workplates covered in a grid of specially-shaped apertures, each of which can hold a single bolt. Plastic fixtures can then be slotted into the grid, and fastened in place with nuts that thread onto the bolts inserted in the base. [Chris] can 3D print all kinds of different plastic fixtures to mount on to the grid, so it’s an incredibly flexible system.

3D printing fixtures might not sound the stoutest way to go, but it’s perfectly cromulent for some tasks. Indeed, for [Chris]’s use case of laser cutting, the 3D printed fixtures are more than strong enough, since the forces involved are minimal. Furthermore, [Chris] aided the stability of the 3D-printed workplate by mounting it on a laser-cut wooden frame filled with concrete. How’s that for completeness?

We’ve seen some other great fixturing tools before, too. Video after the break.

Onkyo Receiver Saved With An ESP32

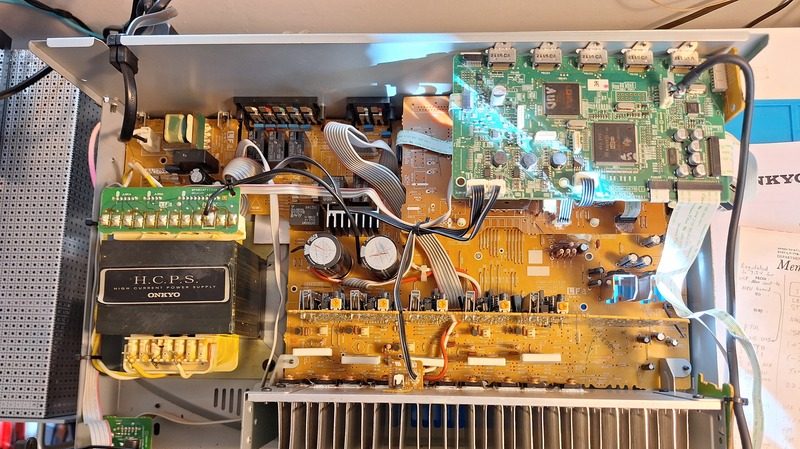
[Bill Dudley] had a problem. He had an Onkyo AV receiver that did a great job… until it didn’t. A DSP inside failed. When that happened, the main microprocessor running the show decided it wouldn’t play ball without the DSP operational. [Bill] knew the bulk of the audio hardware was still good, it was just the brains that were faulty. Thus started a 4-month operation to resurrect the Onkyo receiver with new intelligence instead.

[Bill’s] concept was simple. Yank the dead DSP, and the useless microprocessor as well. In their place, an ESP32 would be tasked with running things. [Bill] no longer cared if the receiver had DSP abilities or even the ability to pass video—he just wanted to use it as the quality audio receiver that it was.

His project report steps through all the hard work he went through to get things operational again. He had to teach the ESP32 to talk to the front panel display, the keys, and the radio tuner. More challenging was the core audio processor—the obscure Renaisys R2A15218FP. However, by persevering, [Bill] was able to get everything up and running, and even added some new functionality—including Internet radio and Bluetooth streaming.

It’s a heck of a build, and [Bill] ended up with an even more functional audio receiver at the end of it all. Bravo, we say. We love to see older audio gear brought back to life, particularly in creative ways. Meanwhile, if you’ve found your own way to save a piece of vintage audio hardware, don’t hesitate to let us know!

Making Parts Feeders Work Where They Weren’t Supposed To

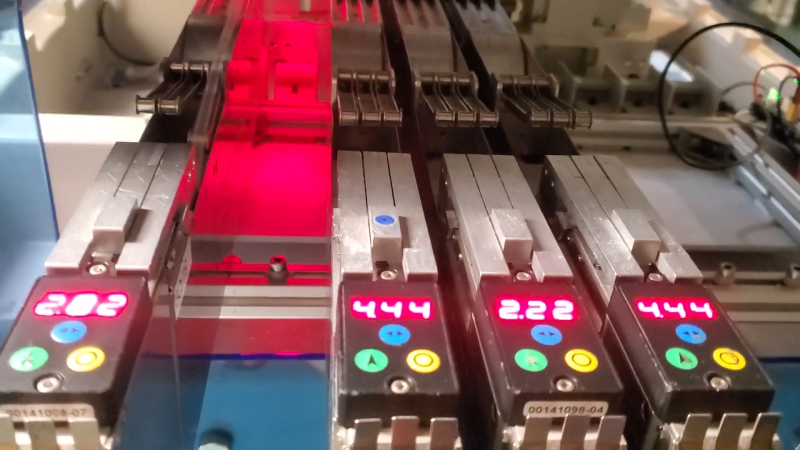
[Chris Cecil] had a problem. He had a Manncorp/Autotronik MC384V2 pick and place, and needed more feeders. The company was reluctant to support an older machine and wanted over $32,000 to supply [Chris] with more feeders. He contemplated the expenditure… but then came across another project which gave him pause. Could he make Siemens feeders work with his machine?

It’s one of those “standing on the shoulders of giants” stories, with [Chris] building on the work from [Bilsef] and the OpenPNP project. He came across SchultzController, which could be used to work with Siemens Siplace feeders for pick-and-place machines. They were never supposed to work with his Manncorp machine, but it seemed possible to knit them together in some kind of unholy production-focused marriage. [Chris] explains how he hooked up the Manncorp hardware to a Smoothieboard and then Bilsef’s controller boards to get everything working, along with all the nitty gritty details on the software hacks required to get everything playing nice.

For an investment of just $2,500, [Chris] has been able to massively expand the number of feeders on his machine. Now, he’s got his pick and place building more Smoothieboards faster than ever, with less manual work on his part.

We feature a lot of one-off projects and home production methods, but it’s nice to also get a look at methods of more serious production in bigger numbers, too. It’s a topic we follow with interest. Video after the break.

[Editor’s note: Siemens is the parent company of Supplyframe, which is Hackaday’s parent company. This has nothing to do with this story.]

❌