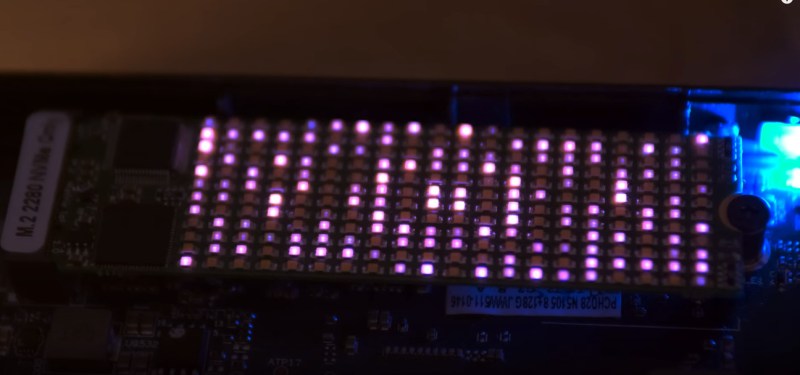
The M.2 slot is usually used for solid-state storage devices. However, [bitluni] had another fun idea for how to use the interface. He built an M.2 compatible LED matrix that adds a little light to your motherboard.
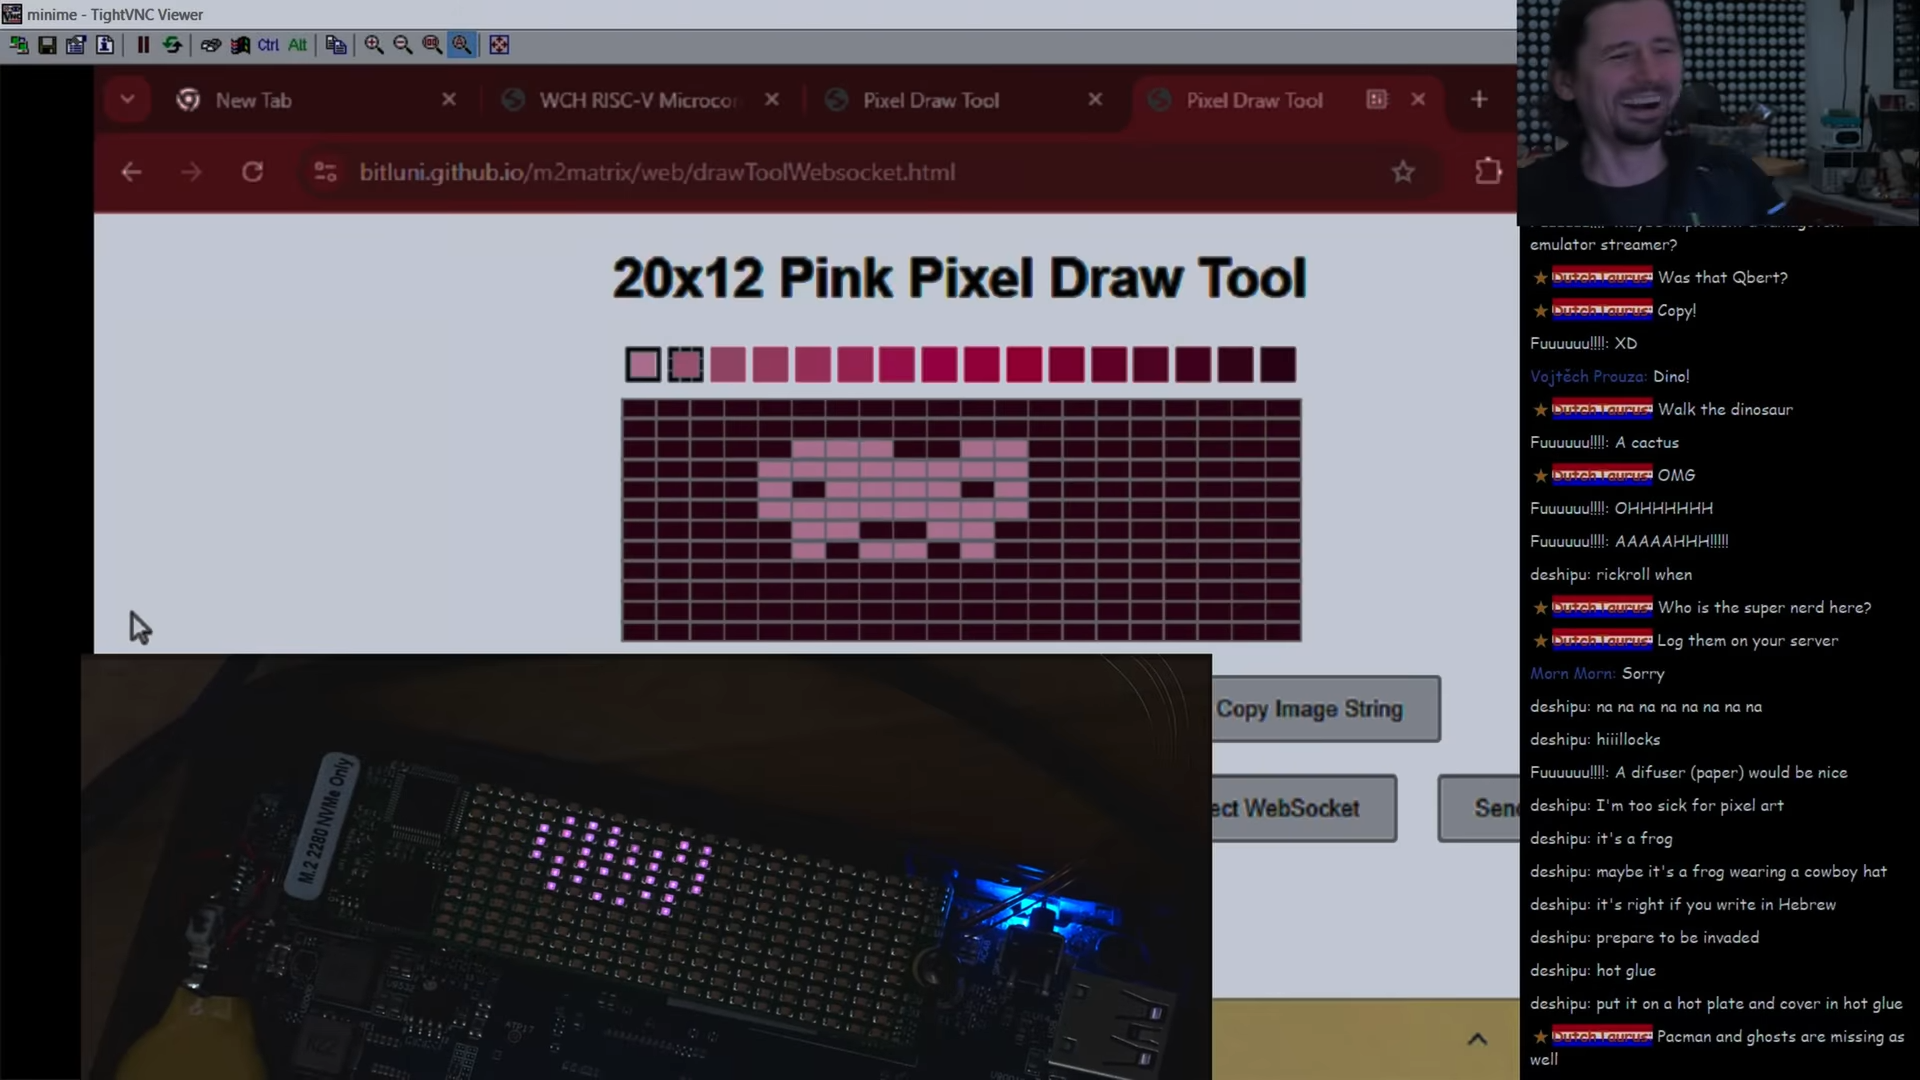
[bitluni] built a web tool for sending images to the matrix.[bitluni] noted that the M.2 interface is remarkably flexible, able to offer everything from SATA connections to USB, PCI Express, and more. For this project, he elected to rely on PCI Express communication, using a WCH CH382 chip to translate from that interface to regular old serial communication.
He then hooked up the serial interface to a CH32V208 microcontroller, which was tasked with driving a 12×20 monochrome LED matrix. Even better, he was even able to set the microcontroller up to make it programmable upon first plugging it into a machine, thanks to its bootloader supporting serial programming out of the box. Some teething issues required rework and modification, but soon enough, [bitluni] had the LEDs blinking with the best of them. He then built a web-based drawing tool that could send artwork over serial direct to the matrix.
While most of us are using our M.2 slots for more traditional devices, it’s neat to see this build leverage them for another use. We could imagine displays like this becoming a neat little add-on to a blingy computer build for those with a slot or two to spare. Meanwhile, if you want to learn more about M.2, we’ve dived into the topic before.
Typically, when we think about forming metal parts, we think about beating them with hammers, or squeezing them with big hydraulic presses. But what if magnets could do the squeezing? As it turns out—Grumman Aerospace discovered they can, several decades ago! Even better, they summed up this technique in a great educational video which we’ve placed below the break.
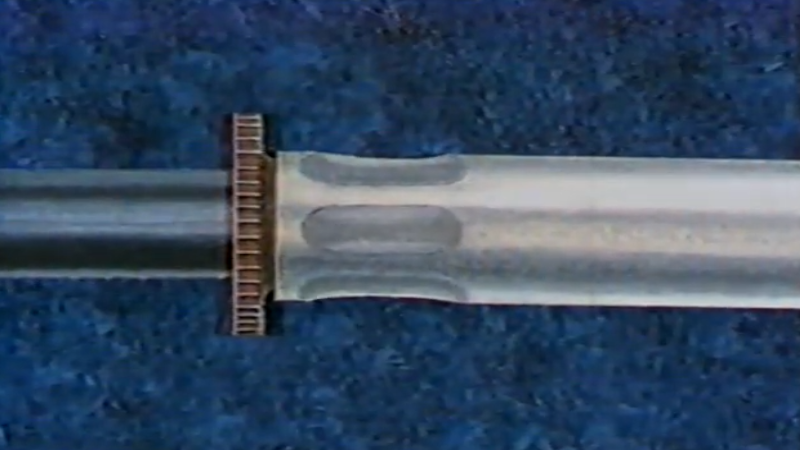
The video concerns the development of the Grumman EMF Torque Tube. The parts are essentially tubes with gear-like fittings mounted in either end, which are fixed with electromagnetic forming techniques instead of riveting or crimping. Right away, we’re told the key benefits—torque tubes built this way are “stronger, lighter, and more fatigue resistant” than those built with conventional techniques. Grumman used these torque tubes in such famous aircraft as the F-14 Tomcat, highlighting their performance and reliability.
Before……and after. The part is formed and the coil is destroyed.
The video goes on to explain the basics of the EMF torque tube production process. A tube is placed inside a coil, with the end fitting then installed inside. A capacitor bank dumps current through the coil to generate a strong electromagnetic field. This field is opposed by a secondary field generated by eddy currents. The two forces result in an explosive force which drives the tube inwards, gripping into the grooves of the end fitting, and destroys the coil in the process. Grumman notes that it specifically optimized a grooving profile for bonding tubes with end fittings, which maximised the strength of these EMF-produced joints.
This tip was sent in by [irox]. The video itself was posted by [Greg Benoit], who notes his father Robert Benoit was intimately involved with the development of the technique. Indeed, it was useful enough that the technology was licensed to Boeing, generating many millions of dollars for Grumman.
We feature all kinds of machining and forming techniques here, but this sort of forming isn’t something we see a lot of around these parts. Still, we’re sure someone will be Kickstarting a home EMF forming machine before the end of next week.
[Dmytro] was able to lay his hands on a InfiRay T2S+ camera. It’s a capable thermal imaging unit that comes at a cheaper price than many of its rivals. [Dmytro] decided to pull it apart to see what makes it tick, and he discovered a few interesting things along the way.
Like so much modern hardware, pulling the case apart does require some spudging and levering. Once inside, though, it comes apart in a relatively straightforward manner. Once inside, [Dmytro] notes some similarities between this camera and the Flir Lepton, another affordable thermal camera on the market. He also finds a clone of the Cypress FX2LP chip, which is used for talking USB. There’s also an Gowin FPGA inside, with [Dmytro] suspecting the gateware onboard could be modified. If so, the camera may be a candidate for running open source firmware in future.
What bothered [Dmytro] about this camera, though, was the software. When used with an Android phone, the camera demands the use of a proprietary app with with questionable permissions. It can be used on a regular computer, where it appears as a standard webcam. However, in this mode, the camera fails to self-calibrate, and the images quickly become useless. [Dmytro] worked to hack around this, by figuring out a way to trigger calibrations and run the proper image corrections manually when using the camera without the smartphone app. He also explores techniques to improve the resolution of the thermal measurements made by the camera.
We’ve seen some other neat thermal camera hacks over the years. Video after the break.
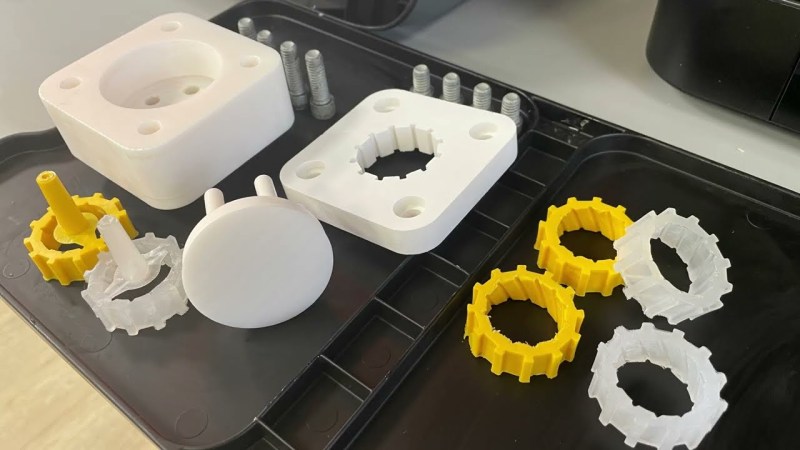
Typing can be difficult to learn at the best of times. Until you get the muscle memory down, it can be quite challenging. However, if you’ve had one or more fingers amputated, it can be even more difficult. Just reaching the keys properly can be a challenge. To help in this regard, [Roei Weiman] built some assistive typing tools for those looking for a little aid at the keyboard.
The devices were built for [Yoni], who works in tech and has two amputated fingers. [Roei] worked on many revisions to create a viable brace and extension device that would help [Yoni] type with greater accuracy and speed.
While [Roei] designed the parts for SLS 3D printing, it’s not mandatory—these can easily be produced on an FDM printer, too. For SLS users, nylon is recommended, while FDM printers will probably find best results with PETG. It may also be desirable to perform a silicone casting to add a grippier surface to some of the parts, a process we’ve explored previously.
The great thing about 3D printing is that it enables just about anyone to have a go at producing their own simple assistive aids like these. Files are on Instructables for the curious. Video after the break.
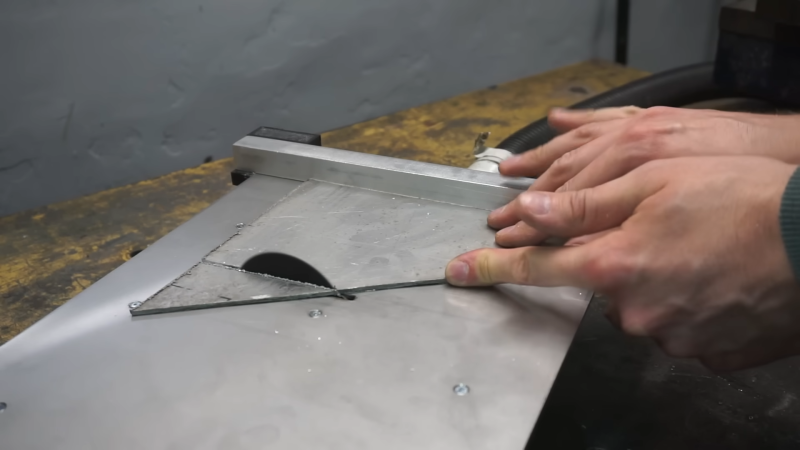
If you want a regular table saw, you’re probably best off just buying one—it’s hard to beat the economies of scale that benefit the major manufacturers. If you want a teeny one, though, you might like to build it yourself. [Maciej Nowak] has done just that.
The concept is simple enough; a small motor and a small blade make a small table saw. [Maciej] sourced a remarkably powerful 800-watt brushless motor for the build. From there, the project involved fabricating a suitable blade mount, belt drive, and frame for the tool. Some time was well-spent on the lathe producing the requisite components out of steel and aluminum, as well as a stout housing out of plywood. The motor was then fitted with a speed controller, with the slight inconvenience that it’s a hobby unit designed to run off DC batteries rather than a wall supply. Ultimately, though, this makes the saw nicely portable. All that was left to do was to fit the metal top plate, guides, and a suitably small 3″ saw blade to complete the build.
The seeds of the Internet were first sown in the late 1960s, with computers laced together in continent-spanning networks to aid in national defence. However, it was in the late 1990s that the end-user explosion took place, as everyday people flocked online in droves.
Many astute individuals saw the potential at the time, and rushed to establish their own ISPs to capitalize on the burgeoning market. Amongst them was a famous figure of some repute. David Bowie might have been best known for his cast of rock-and-roll characters and number one singles, but he was also an internet entrepreneur who got in on the ground floor—with BowieNet.
Is There Dialup On Mars?
The BowieNet website was very much of its era. Credit: Bowienet, screenshot
Bowie’s obsession with the Internet started early. He was well ahead of the curve of many of his contemporaries, becoming the first major artist to release a song online. Telling Lies was released as a downloadable track, which sold over 300,000 downloads, all the way back in 1996. A year later, the Earthling concert would be “cybercast” online, in an era when most home internet connections could barely handle streaming audio.
These moves were groundbreaking, at the time, but also exactly what you might expect of a major artist trying to reach fans with their music. However, Bowie’s interests in the Internet lay deeper than mere music distribution. He wanted a richer piece of the action, and his own ISP—BowieNet— was the answer.
The site was regularly updated with new styling and fresh content from Bowie’s musical output. Eventually, it became more website than ISP. Credit: BowieNet, screenshot
Bowie tapped some experts for help, enlisting Robert Goodale and Ron Roy in his nascent effort. The service first launched in the US, on September 1st 1998, starting at a price of $19.95 a month. The UK soon followed at a price of £10.00. Users were granted a somewhat awkward email address of username@davidbowie.com, along with 5MB of personal web hosting. Connectivity was provided in partnership with established network companies, with Concentric Network Corp effectively offering a turnkey ISP service, and UltraStar handling the business and marketing side of things. It was, for a time, also possible to gain a free subscription by signing up for a BowieBanc credit card, a branded front end for a banking services run by USABancShares.com. At its peak, the service reached a total of 100,000 subscribers.
Bonuses included access to a network of chatrooms. The man himself was a user of the service, regularly popping into live chats, both scheduled and casually. He’d often wind up answering a deluge of fan questions on topics like upcoming albums and whether or not he drank tea. The operation was part ISP, part Bowie content farm, with users also able to access audio and video clips from Bowie himself. BowieNet subscribers were able to access exclusive tracks from the Earthling tour live album, LiveAndWell.com, gained early access to tickets, and could explore BowieWorld, a 3D interactive city environment. To some controversy, users of other ISPs had to stump up a $5.95 fee to access content on davidbowie.com, which drew some criticism at the time.
Bowienet relied heavily on the leading Internet technologies of the time. Audio and graphics were provided via RealAudio and Flash, standards that are unbelievably janky compared to those in common use today. A 56K modem was recommended for users wishing to make the most of the content on offer. New features were continually added to the service; Christmas 2004 saw users invited to send “BowieNet E-Cards,” and the same month saw the launch of BowieNet blogs for subscribers, too.
Bowie spoke to the BBC in 1999 about his belief in the power of the Internet.
BowieNet didn’t last forever. The full-package experience was, realistically, more than people expected even from one of the world’s biggest musicians. In May 2006, the ISP was quietly shutdown, with the BowieNet web presence slimmed down to a website and fanclub style experience. In 2012, this too came to an end, and DavidBowie.com was retooled to a more typical artist website of the modern era.
Ultimately, BowieNet was an interesting experiment in the burgeoning days of the consumer-focused Internet. The most appealing features of the service were really more about delivering exclusive content and providing a connection between fans and the artist himself. It eventually became clear that Bowie didn’t need to be branding the internet connection itself to provide that.
Still, we can dream of other artists getting involved in the utilities game, just for fun. Gagaphone would have been a slam dunk back in 2009. One suspects DojaGas perhaps wouldn’t have the same instant market penetration without some kind of hit single about clean burning fuels. Speculate freely in the comments.
If you’ve ever looked at widgets on your iPhone, you’ve probably noticed they’re largely static, save for a few first-party apps. By and large, third party developers are not supposed to be able to animate them. However, [Bryce Bostwick] found a workaround.
You might be confused as to the idea of animated widgets, but it’s quite simple. For example, think of a clock app with a widget in which the hands always display the current time, or a calendar app with an icon that shows the current date. Apple’s own apps have long been able to do this, but the functionality has mostly been locked out for third parties.
One way to get around this limitation is by using a timer feature baked into the widget functionality. The timer tool is one of the few ways that third-party apps are allowed to do animation. By running a timer with a custom font, you can display various graphical elements instead of numbers counting down to create a hacky animation that updates every second.
However, there are even more advanced techniques that can get you faster, smoother animations. [Bryce] breaks down the private techniques used to rotate the clock hands on Apple’s own widget, and how to use those tools for your own purposes. It takes some sneaky Xcode tricks and a bit of math to make it fully flexible for doing arbitrary animations, but it works surprisingly well.
A terrarium is a little piece of the living world captured in a small enclosure you can pop on your desk or coffee table at home. If you want to keep it as alive as possible, though, you might like to implement some controls. That’s precisely what [yotitote] did with their smart terrarium build.
At the heart of the build is an ESP32 microcontroller. It’s armed with temperature and humidity sensors to detect the state of the atmosphere within the terrarium itself. However, it’s not just a mere monitor. It’s able to influence conditions by activating an ultrasonic fogger to increase humidity (which slightly impacts temperature in turn). There are also LED strips, which the ESP32 controls in order to try and aid the growth of plants within, and a small OLED screen to keep an eye on the vital signs.
It’s a simple project, but one that serves as a basic starting point that could be readily expanded as needed. It wouldn’t take much to adapt this further, such as by adding heating elements for precise temperature control, or more advanced lighting systems. These could be particularly useful if you intend your terrarium to support, perhaps, reptiles, in addition to tropical plant life.
Garage doors! You could get out of your vehicle and open and close them yourself, but that kinda sucks. It’s much preferable to have them raise and lower courtesy some mechanical contrivance, and even better if that is controlled via the web. [Juan Schiavoni] shows us how to achieve the latter with their latest project.
The web-based controller is based around a Xiao ESP32 microcontroller board, chosen for its baked-in WiFi connectivity. It’s set up to host its own web interface which you can login to with a password via a browser. If you have the correct authorization, you can then hit a button to open or close the garage door.
To interface the ESP32 with the garage door itself, [Juan] went the easy route. To trigger opening or closing the door, the ESP32 merely flicks an IO pin to toggle a transistor, which is hooked up to the button of the original garage door opener. Meanwhile, the ESP32 is also hooked up with a magnetic switch which is activated by a magnet on the garage door itself. This serves as a crude indicator as to the current status of the door—whether currently open or closed. This is crucial to ensure the indicated door status shown in the web app remains synced with the status of the door in reality.
It’s a simple project, and reminds us that we needn’t always do things the hard way. [Juan] could have figured out how to hook the ESP32 up with some radio chips to emulate the original garage door opener, but why bother? hooking it up to the original remote was far easier and more reliable anyway. We’ve seen a good few garage door hacks over the years; if you’ve got your own unique take on this classic, don’t hesitate to notify the tipsline!
Lots of microcontrollers will accept Python these days, with CircuitPython and MicroPython becoming ever more popular in recent years. However, there’s now a new player in town. Enter PyXL, a project to run Python directly in hardware for maximum speed.
What’s the deal with PyXL? “It’s actual Python executed in silicon,” notes the project site. “A custom toolchain compiles a .py file into CPython ByteCode, translates it to a custom assembly, and produces a binary that runs on a pipelined processor built from scratch.” Currently, there isn’t a hard silicon version of PyXL — no surprise given what it costs to make a chip from scratch. For now, it exists as logic running on a Zynq-7000 FPGA on a Arty-Z7-20 devboard. There’s an ARM CPU helping out with setup and memory tasks for now, but the Python code is executed entirely in dedicated hardware.
The headline feature of PyXL is speed. A comparison video demonstrates this with a measurement of GPIO latency. In this test, the PyXL runs at 100 MHz, achieving a round-trip latency of 480 nanoseconds. This is compared to MicroPython running on a PyBoard at 168 MHz, which achieves a much slower 15,000 nanoseconds by comparison. The project site claims PyXL can be 30x faster than MicroPython based on this result, or 50x faster when normalized for the clock speed differences.
3D printing is all well and good for prototyping, and it can even produce useful parts. If you want real strenght in plastics, though, or to produce a LOT of parts, you probably want to step up to injection molding. As it turns out, 3D printing can help in that regard, with injection molding company [APSX] has given us a look at how it printed injection molds for its APSX-PIM machine.
The concept is simple enough—additive manufacturing is great for producing parts with complex geometries, and injection molds fit very much under that banner. To demonstrate, [APSX] shows us a simple injection mold that it printed with a Formlabs Form3+ using Rigid 10K resin. The mold has good surface finish, which is crucial for injection molding nice parts. It’s also fitted with ejection pins for easy part removal after each shot of injection molded plastic. While it’s not able to hold up like a traditional metal injection mold, it’s better than you might think. [APSX] claims it got 500 automatic injection cycles out of the mold while producing real functional parts. The mold was used with the APSX-PIM injection molding machine squirting polypropylene at a cycle time of 65 seconds, producing a round part that appears to be some kind of lid or gear.
This looks great, but it’s worth noting it’s still not cheap to get into this sort of thing. On top of purchasing a Formlabs Form3+, you’ll also need the APSX-PIM V3, which currently retails for $13,500 or so. Still, if you regularly need to make 500 of something, this could be very desirable. You could get your parts quicker and stronger compared to running a farm of many 3D printers turning out the same parts.
We’ve seen similar projects along these lines before. The fact is that injections molds are complicated geometry to machine, so being able to 3D print them is highly desirable. Great minds and all that. Video after the break.
Once upon a time, typing “www” at the start of a URL was as automatic as breathing. And yet, these days, most of us go straight to “hackaday.com” without bothering with those three letters that once defined the internet.
Have you ever wondered why those letters were there in the first place, and when exactly they became optional? Let’s dig into the archaeology of the early web and trace how this ubiquitous prefix went from essential to obsolete.
Where Did You Go?
The first website didn’t bother with any of that www. nonsense! Credit: author screenshot
It may shock you to find out that the “www.” prefix was actually never really a key feature or necessity at all. To understand why, we need only contemplate the very first website, created by Tim Berners-Lee at CERN in 1990. Running on a NeXT workstation employed as a server, the site could be accessed at a simple URL: “http//info.cern.ch/”—no WWW needed. Berners-Lee had invented the World Wide Web, and called it as such, but he hadn’t included the prefix in his URL at all. So where did it come from?
McDonald’s were ahead of the times – in 1999, their website featured the “mcdonalds.com” domain, no prefix, though you did need it to actually get to the site. Credit: screenshot via Web Archive
As it turns out, the www prefix largely came about due to prevailing trends on the early Internet. It had become typical to separate out different services on a domain by using subdomains. For example, a company might have FTP access on http://ftp.company.com, while the SMTP server would be accessed via the smpt.company.com subdomain. In turn, when it came to establish a server to run a World Wide Web page, network administrators followed existing convention. Thus, they would put the WWW server on the www. subdomain, creating http://www.company.com.
This soon became standard practice, and in short order, was expected by members of the broader public as the joined the Internet in the late 1990s. It wasn’t long before end users were ignoring the http:// prefix at the start of domains, as web browsers didn’t really need you to type that in. However, www. had more of a foothold in the public consciousness. Along with “.com”, it became an obvious way for companies to highlight their new fancy website in their public facing marketing materials. For many years, this was simply how things were done. Users expected to type “www” before a domain name, and thus it became an ingrained part of the culture.
Eventually, though, trends shifted. For many domains, web traffic was the sole dominant use, so it became somewhat unnecessary to fold web traffic under its own subdomain. There was also a technological shift when the HTTP/1.1 protocol was introduced in 1999, with the “Host” header enabling multiple domains to be hosted on a single server. This, along with tweaks to DNS, also made it trivial to ensure “www.yoursite.com” and “yoursite.com” went to the same place. Beyond that, fashion-forward companies started dropping the leading www. for a cleaner look in marketing. Eventually, this would become the norm, with “www.” soon looking old hat.
Visit microsoft.com in Chrome, and you might think that’s where you really are… Credit: author screenshot
Of course, today, “www” is mostly dying out, at least as far as the industry and most end users are concerned. Few of us spend much time typing in URLs by hand these days, and fewer of us could remember the last time we felt the need to include “www.” at the beginning. Of course, if you want to make your business look out of touch, you could still include www. on your marketing materials, but people might think you’re an old fuddy duddy.
…but you’re not! Click in the address bar, and Chrome will show you the real URL. www. and all. Embarrassing! Credit: author screenshotHackaday, though? We rock without the prefix. Cutting-edge out here, folks. Credit: author screenshot
Using the www. prefix can still have some value when it comes to cookies, however. If you don’t use the prefix and someone goes to yoursite.com, that cookie would be sent to all subdomains. However, if your main page is set up at http://www.yoursite.com, it’s effectively on it’s own subdomain, along with any others you might have… like store.yoursite.com, blog.yoursite.com, and so on. This allows cookies to be more effectively managed across a site spanning multiple subdomains.
In any case, most browsers have taken a stance against the significance of “www”. Chrome, Safari, Firefox, and Edge all hide the prefix even when you are technically visiting a website that does still use the www. subdomain (like http://www.microsoft.com). You can try it yourself in Chrome—head over to a www. site and watch as the prefix disappears from the taskbar. If you really want to know if you’re on a www subdomain or not, though, you can click into the taskbar and it will give you the full URL, HTTP:// or HTTPS:// included, and all.
The “www” prefix stands as a reminder that the internet is a living, evolving thing. Over time, technical necessities become conventions, conventions become habits, and habits eventually fade away when they no longer serve a purpose. Yet we still see those three letters pop up on the Web now and then, a digital vestigial organ from the early days of the web. The next time you mindlessly type a URL without those three Ws, spare a thought for this small piece of internet history that shaped how we access information for decades. Largely gone, but not yet quite forgotten.
These days, if you’re walking around with a cellphone, you’ve basically fitted an always-on tracking device to your person. That’s even more the case if there happens to be an eavesdropping device in your vicinity. To combat this, the Electronic Frontier Foundation has created Rayhunter as a warning device.
Rayhunter is built to detect IMSI catchers, also known as Stingrays in the popular lexicon. These are devices that attempt to capture your phone’s IMSI (international mobile subscriber identity) number by pretending to be real cell towers. Information on these devices is tightly controlled by manufacturers, which largely market them for use by law enforcement and intelligence agencies.
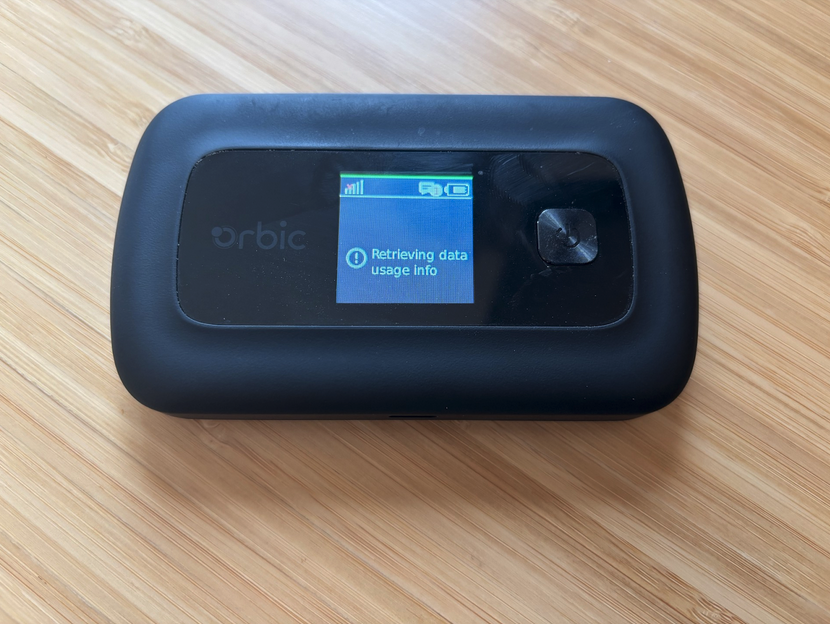
Rayhunter in use.
To run Rayhunter, all you need is an Orbic RC400L mobile hotspot, which you can currently source for less than $30 USD online. Though experience tells us that could change as the project becomes more popular with hackers. The project offers an install script that will compile the latest version of the software and flash it to the device from a computer running Linux or macOS — Windows users currently have to jump through a few extra hoops to get the same results.
Rayhunter works by analyzing the control traffic between the cell tower and the hotspot to look out for hints of IMSI-catcher activity. Common telltale signs are requests to switch a connection to less-secure 2G standards, or spurious queries for your device’s IMSI. If Rayhunter notes suspicious activity, it turns a line on the Orbic’s display red as a warning. The device’s web interface can then be accessed for more information.
Morse code can be daunting to learn when you’re new to the game, particularly if you need it to pass your desired radio license. However, these days, there are a great many tools to aid in the learning process. A good example is the Morse Master from [Arnov Sharma].
The Morse Master is a translator for Morse code, which works in two ways. You can access it via a web app, and type in regular letters which it then flashes out as code on its in-built LEDs. Alternatively, you can enter Morse manually using the physical key, and the results will be displayed on the web app. The Morse key itself is built into the enclosure using 3D printed components paired with a Cherry-style keyboard switch. It’s perhaps not the ideal solution for fast keying, with its limited rebound, but it’s a quick and easy way to make a functional key for practice purposes. If you want to go faster, though, you might want to upgrade to something more capable. We’d also love to see a buzzer added, since Morse is very much intended as an auditory method of communication.
Delay line memory is a technology from yesteryear, but it’s not been entirely forgotten. [P-Lab] has developed a demo board for delay-line memory, which shows how it worked in a very obvious way with lots of visual aids.
If you’re unfamiliar with the technology, it’s a form of memory that was used in classic computers like the Univac-I and the Olivetti Programma 101. It’s a sequential-access technology, where data is stored as pulses in some kind of medium, and read out in order. Different forms of the technology exist, such as using acoustic pulses in mercury or torsional waves passing through coiled nickel wire.
In this case, [P-Lab] built a solid state delay line using TTL ICs, capable of storing a full 64 bits of information and running at speeds of up to 150 kHz. It also features a write-queuing system to ensure bits are written at the exact correct time — the sequential-access nature of the technology means random writes and reads aren’t actually possible. The really cool thing is that [P-Lab] paired the memory with lots of LEDs to show how it works. There are lights to indicate the operation of the clock, and the read and write cycles, as well as individual LEDs indicating the status of each individual bit as they roll around the delay line. Combined with the hexadecimal readouts, it makes it easy to get to grips with this old-school way of doing things.
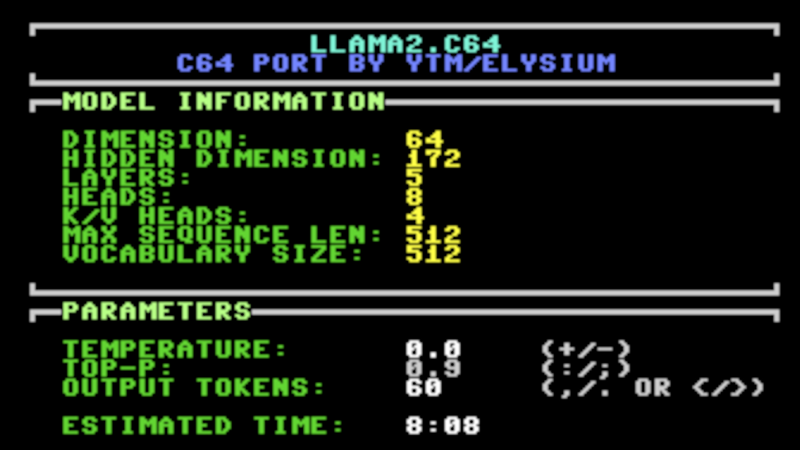
“If there’s one thing the Commodore 64 is missing, it’s a large language model,” is a phrase nobody has uttered on this Earth. Yet, you could run one, if you so desired, thanks to [ytm] and the Llama2.c64 project!
[ytm] did the hard work of porting the Llama 2 model to the most popular computer ever made. Of course, as you might expect, the ancient 8-bit machine doesn’t really have the stones to run an LLM on its own. You will need one rather significant upgrade, in the form of 2 MB additional RAM via a C64 REU.
Now, don’t get ahead of things—this is no wide-ranging ChatGPT clone. It’s not going to do your homework, counsel you on your failed marriage, or solve the geopolitical crisis in your local region. Instead, you’re getting the 260 K tinystories model, which is a tad more limited. In [ytm]’s words… “Imagine prompting a 3-year-old child with the beginning of a story — they will continue it to the best of their vocabulary and abilities.”
It might not be supremely capable, but there’s something fun about seeing such a model talking back on an old-school C64 display. If you’ve been hacking away at your own C64 projects, don’t hesitate to let us know. We certainly can’t get enough of them!
[sprite_tm] had a problem. He needed a clock for the living room, but didn’t want to just buy something off the shelf. In his own words, “It’s an opportunity for a cool project that I’d rather not let go to waste.” Thus started a project to build a fun e-paper digit clock!
There were several goals for the build from the outset. It had to be battery driven, large enough to be easily readable, and readily visible both during the day and in low-light conditions. It also needed to be low maintenance, and “interesting,” as [sprite_tm] put it. This drove the design towards an e-paper solution. However, large e-paper displays can be a bit pricy. That spawned a creative idea—why not grab four smaller displays and make a clock with separate individual digits instead?
The build description covers the full design, from the ESP32 at the heart of things to odd brownout issues and the old-school Nokia batteries providing the juice. Indeed, [sprite_tm] even went the creative route, making each individual digit of the clock operate largely independently. Each has its own battery, microcontroller, and display. To save battery life, only the hours digit has to spend energy syncing with an NTP time server, and it uses the short-range ESPNow protocol to send time updates to the other digits.
It’s an unconventional clock, to be sure; you could even consider it four clocks in one. Ultimately, though, that’s what we like in a timepiece here at Hackaday. Meanwhile, if you’ve come up with a fun and innovative way to tell time, be sure to let us know on the tipsline!
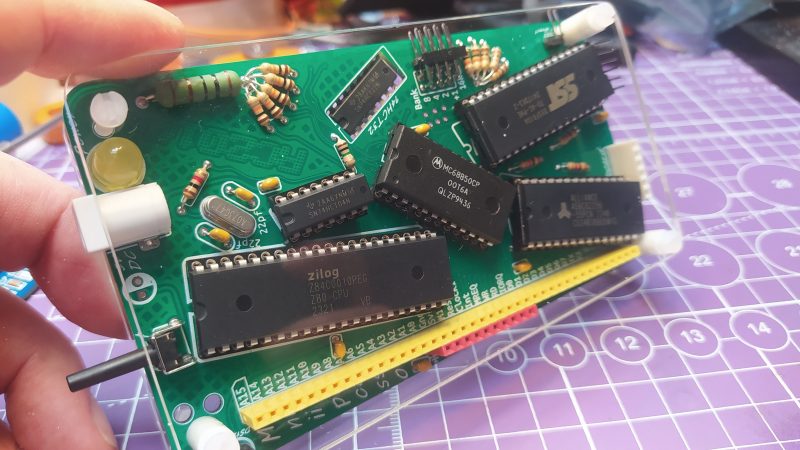
Picasso and the Z80 microprocessor are not two things we often think about at the same time. One is a renowned artist born in the 19th century, the other, a popular CPU that helped launch the microcomputer movement. And yet, the latter has come to inspire a computer based on the former. Meet the RC2014 Mini II Picasso!
As [concretedog] tells the story, what you’re fundamentally looking at is an RC2014 Mini II. As we’ve discussed previously, it’s a single-board Z80 retrocomputer that you can use to do fun things like run BASIC, Forth, or CP/M. However, where it gets kind of fun is in the layout. It’s the same fundamental circuitry as the RC2014, but it’s been given a rather artistic flair. The ICs are twisted this way and that, as are the passive components; even some of the resistors are dancing all over the top of one another. The kit is a limited edition, too, with each coming with a unique combination of colors where the silkscreen and sockets and LED are concerned. Kits are available via Z80Kits for those interested.
We love a good artistic PCB design; indeed, we’ve supported the artform heavily at Supercon and beyond. It’s neat to see the RC2014 designers reminding us that components need not live on a rigid grid; they too can dance and sway and flop all over the place like the eyes and or nose on a classic Picasso.
It’s weird, though; in a way, despite the Picasso inspiration, the whole thing ends up looking distinctly of the 1990s. In any case, if you’re cooking up any such kooky builds of your own, modelled after Picasso or any other Spanish master, don’t hesitate to notify the tipsline.
Telescopes are great tools for observing the heavens, or even surrounding landscapes if you have the right vantage point. You don’t have to be a professional to build one though; you can make all kinds of telescopes as an amateur, as this guide from the Springfield Telesfcope Makers demonstrates.
The guide is remarkably deep and rich; no surprise given that the Springfield Telescope Makers club dates back to the early 20th century. It starts out with the basics—how to select a telescope, and how to decide whether to make or buy your desired instrument. It also explains in good detail why you might want to start with a simple Newtonian reflector setup on Dobsonian mounts if you’re crafting your first telescope, in no small part because mirrors are so much easier to craft than lenses for the amateur. From there, the guide gets into the nitty gritty of mirror production, right down to grinding and polishing techniques, as well as how to test your optical components and assemble your final telescope.
It’s hard to imagine a better place to start than here as an amateur telescope builder. It’s a rich mine of experience and practical advice that should give you the best possible chance of success. You might also like to peruse some of the other telescope projects we’ve covered previously. And, if you succeed, you can always tell us of your tales on the tipsline!