Vista de Lectura

Hay nuevos artículos disponibles. Pincha para refrescar la página.

Building the Marauder LowRacer from Bike Parts

Marauder LowRacer banner

Thanks to [Radical Brad] for writing in to let us know about his recent project, building a street racing bike from square tubing and old bike parts.

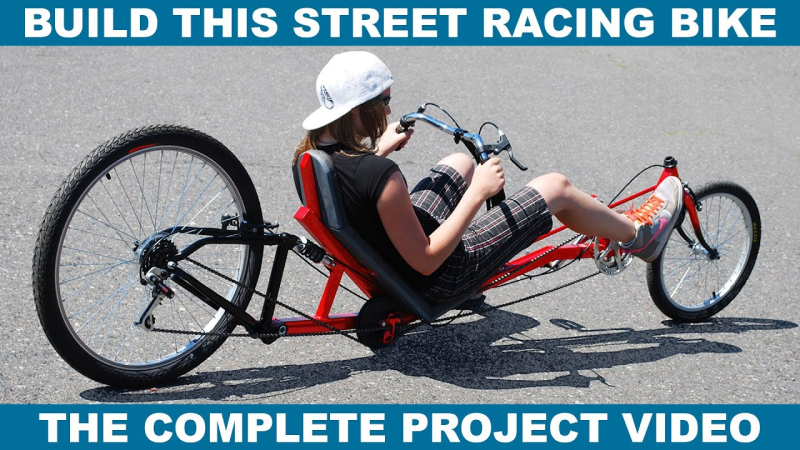
In this 50 minute video [Radical Brad] takes us through the process of building the Marauder v2, a street racing LowRacer. The entire build was done over a few weekends using only an AC welder, angle grinder, and basic hand tools you probably have in the garage.

The entire rear section of the Marauder is made from an unmodified stock rear triangle from a typical suspension mountain bike. The frame is made from 1.5″ mild steel square tubing with 1/16″ wall thickness, which is called “16 gauge tubing”.

[Radical Brad] runs you through the process of welding the pieces together at the appropriate angles along with some tips about how to clamp everything in place while you work on it. After completing the rear end he proceeds to the front end which uses the fork from the front of the old bike. A temporary seat is fashioned from some wooden boards joined together with hinges. Then the steering system is installed. Then the chains and pulleys for the motion system. Then the seat is finalized, and after a coat of paint, and installing some brakes, we’re done!

If you’re interested in projects for old bike parts you might like to check out Juice-Spewing Wind Turbine Bootstrapped From Bike Parts and Odd-Looking Mini EV Yard Tractor Is Made From Plywood And Bike Parts.

Making GameCube Keyboard Controller Work with Animal Crossing

Animal Crossing keyboard banner

[Hunter Irving] is a talented hacker with a wicked sense of humor, and he has written in to let us know about his latest project which is to make a GameCube keyboard controller work with Animal Crossing.

This project began simply enough but got very complicated in short order. Initially the goal was to get the GameCube keyboard controller integrated with the game Animal Crossing. The GameCube keyboard controller is a genuine part manufactured and sold by Nintendo but the game Animal Crossing isn’t compatible with this controller. Rather, Animal Crossing has an on-screen keyboard which players can use with a standard controller. [Hunter] found this frustrating to use so he created an adapter which would intercept the keyboard controller protocol and replace it with equivalent “keypresses” from an emulated standard controller.

Controller wiring schematic.In this project [Hunter] intercepts the controller protocol and the keyboard protocol with a Raspberry Pi Pico and then forwards them along to an attached GameCube by emulating a standard controller from the Pico. Having got that to work [Hunter] then went on to add a bunch of extra features.

First he designed and 3D-printed a new set of keycaps to match the symbols available in the in-game character set and added support for those. Then he made a keyboard mode for entering musical tunes in the game. Then he integrated a database of cheat codes to unlock most special items available in the game. Then he made it possible to import images (in low-resolution, 32×32 pixels) into the game. Then he made it possible to play (low-resolution) videos in the game. And finally he implemented a game of Snake, in-game! Very cool.

If you already own a GameCube and keyboard controller (or if you wanted to get them) this project would be good fun and doesn’t demand too much extra hardware. Just a Raspberry Pi Pico, two GameCube controller cables, two resistors, and a Schottky diode. And if you’re interested in Animal Crossing you might enjoy getting it to boot Linux!

Thanks very much to [Hunter] for writing in to let us know about this project. Have your own project? Let us know on the tipsline!

Repairing an Old Tektronix TDS8000 Scope

Tektronix TDS8000 banner

Over on his YouTube channel our hacker [CircuitValley] repairs an old TDS8000 scope.

The TDS8000 was manufactured by Tektronix circa 2001 and was also marketed as the CSA8000 Communications Signal Analyzer as well as the TDS8000 Digital Sampling Oscilloscope. Tektronix is no longer manufacturing and selling these scopes but the documentation is still available from their website, including the User Manual (268 page PDF), the Service Manual (198 page PDF), and some basic specs (in HTML).

You can do a lot of things with a TDS8000 scope but particularly its use case was Time-Domain Reflectometry (TDR). A TDR scope is the time-domain equivalent of a Vector Network Analyzer (VNA) which operates in the frequency-domain.

The TDS8000 needs sampling heads attached and it has two large slots on the front for optical sampling heads and four smaller slots for electrical sampling heads. In this video we don’t see any sampling heads actually used, the only thing we see in this video is troubleshooting and repair of the TDS8000 itself. The effective bandwidth of the scope is limited by the capabilities of the sampling heads but according to its datasheet can extend up to 50 GHz, which is seriously large, especially by the standards of 2001!

[CircuitValley] cleans, replaces, upgrades, and fixes a bunch of things during the service of this TDS8000 and documents the process in this YouTube video. In the end he seems to have fixed the problem the scope had in the beginning, where it would hang while loading its main application. We’d love to hear from [CircuitValley] again some time to see a complete system operating with sampling heads attached.

If you’re interested in old scope repair too, then how far back in time did you want to go? Maybe you could start at Recovering An Agilent 2000a/3000a Oscilloscope With Corrupt Firmware NAND Flash and then work your way back to Repairing An Old Heathkit ‘Scope.

Converting an E-Paper Photo Frame into Weather Map

Photo of Inky Frame e-paper display

Here’s a great hack sent in to us from [Simon]. He uses an e-paper photo frame as a weather map!

By now you are probably aware of e-paper technology, which is very low power tech for displaying images. E-paper only uses energy when it changes its display, it doesn’t draw power to maintain a picture it has already rendered. The particular e-paper used in this example is fairly large (as e-paper goes) and supports color (not just black and white) which is why it’s expensive. For about US$100 you can get a 5.7″ 7-color EPD display with 600 x 448 pixels.

Beyond the Inky Frame 5.7″ hardware this particular hack is mostly a software job. The first program, written in python, collects weather data from the UK Met Office. Once that image data is available a BASH script is run to process the image files with imagemagick. Finally a Micro Python script runs on the Pico to download the correct file based on the setting of the real-time clock, and update the e-paper display with the weather map.

Thanks to [Simon] for sending this one in via the tipsline. If you have your own tips, please do let us know! If you’re interested in e-paper tech we have certainly covered that here in the past, check out E-Paper Anniversary Counter Is A Charming Gift With Minimal Power Draw and A Neat E-Paper Digit Clock (or Four).

The video below the break is a notice from the UK Met Office regarding their data services.

Ben Eater Makes Computer Noises

Hand holding small speaker

When [Ben Eater] talks, hackers everywhere listen. In his latest video [Ben] shows us how to make computer noises using square waves and a 6502 microprocessor.

[Ben] uses the timer in the W65C22 Versatile Interface Adapter to generate the square waves which generate a tone. He then adds support for a new BEEP command into his MS BASIC interpreter. We covered [Ben Eater]’s MS BASIC here at Hackaday back in April, so definitely check that out if you missed it.

After checking the frequency of oscillation using his Keysight oscilloscope he then wires in an 8Ω 2W speaker via a LM386 audio amplifier. We can’t use the W65C22 output pin directly because that can only output a few milliwatts of power. [Ben] implements the typical circuit application from the LM386 datasheet to drive the speaker. To complete his video [Ben] writes a program for his BASIC interpreter which plays a tune.

Thanks to [Mark Stevens] for writing in to let us know about this one. If you’re planning to play along at home a good place to start is to build your own 6502, like [Ben] did!

Weighing an Airplane as it Flies Overhead

Photo of AlphaPhoenix looking at an airplane flying through the air

Recently, [AlphaPhoenix] weighed an airplane. Normally, that wouldn’t be much of an accomplishment. Except in this case, the airplane happened to be in flight at the time. In fact we’re not sure what is more remarkable, as he not only weighed real actual airplanes but a paper airplane too!

The sealed box essentially acts as a pressure sensor.

To test the concept, a large scale is made from foamcore and four load cells which feed into an Arduino which in turn is connected to a laptop for a visualization. After a brief test with a toy car, [AlphaPhoenix] goes on to weigh a paper airplane as it flies over the scale. What we learn from the demonstration is that any weight from a flying object is eventually transferred to the ground via the air.

In the second part of the video a new, smaller, type of scale is created and taken to the airport where airplanes flying overhead are weighed over the course of three days. This new apparatus is basically a pressure sensor enclosed in a nominally air-tight box, essentially a fancy type of barometer. Measurements are taken, assumptions are made, and figures are arrived at. Unfortunately the calculated results are off by more than one order of magnitude, but that doesn’t stop this experiment from having been very cool!

If you’re interested in weighing things for fun or profit be sure to check out Hackaday Prize 2022: Arduino-Powered Weighing Scale Has A Real Analog Display or Reverse Engineering A Bathroom Scale For Automated Weight Tracking.

Making a Brushless DC Motor Winding Machine

BLDC wire winding machine

Over on his YouTube channel our hacker [Yuchi] is building an STM32 BLDC motor winding machine.

This machine is for winding brushless motors because manual winding is highly labor intensive. The machine in turn is made from four brushless motors. He is using the SimpleFOC library to implement closed-loop angle control. Closed-loop torque control is also used to maintain correct wire tension.

The system is controlled by an STM32G431 microcontroller. The motor driver used is the DRV8313. There are three GBM5208 75T Gimbal motors for close-loop angle control, and one BE4108 60T Gimbal motor for torque control. The torque control motor was built with this machine! [Yuchi] says that the Gimbal motors used are designed to be smooth, precise, and powerful at low speeds.

The components of the machine communicate with each other over a CAN bus. This simplifies wiring as components (such as motor controller boards) only require four connections.

Thanks to [Ben] for writing in to let us know about this project. If you’re interested in automated wire winding we have certainly covered that before here at Hackaday. You might like to check out Tips For Winding Durable Coils With Nice, Flat Sides or Coil Winding Machine Makes It Easy.

Adapting an Old Rotary Dial for Digital Applications

Mousa rotary dial and circuit

Today in old school nostalgia our tipster [Clint Jay] wrote in to let us know about this rotary dial.

If you’re a young whippersnapper you might never have seen a rotary dial. These things were commonly used on telephones back in the day, and they were notoriously slow to use. The way they work is that they generate a number of pulses corresponding to the number you want to dial in. One pulse for 1, two pulses for 2, and so on, up to nine pulses for 9, then ten pulses for 0.

We see circuits like this here at Hackaday from time to time. In fact, commonly we see them implemented as USB keyboards, such as in Rotary Dial Becomes USB Keyboard and Rotary Dialer Becomes Numeric Keypad.

One thing that makes this particular project different from the ones we’ve seen before is that it doesn’t require a microcontroller. That said, our hacker [Mousa] shows us how to interface this dial with an Arduino, along with sample code, if that’s something you’d like to do. The schematic for the project shows how to connect the rotary dial (salvaged from an old telephone) to both a 7-segment display and a collection of ten LEDs.

The project write-up includes links to the PCB design files. The guts of the project are a 4017 decade counter and a 4026 7-segment display adapter. Good, honest, old school digital logic.

Build a 400 MHz Logic Analyzer for $35

Build a $35 400 MHz Logic Analyzer

What do you do when you’re a starving student and you need a 400 MHz logic analyzer for your digital circuit investigations? As [nanofix] shows in a recent video, you find one that’s available as an open hardware project and build it yourself.

The project, aptly named LogicAnalyzer was developed by [Dr. Gusman] a few years back, and has actually graced these pages in the past. In the video below, [nanofix] concentrates on the mechanics of actually putting the board together with a focus on soldering. The back of the build is the Raspberry Pi Pico 2 and the TXU0104 level shifters.

If you’d like to follow along at home, all the build instructions and design files are  available on GitHub. For your convenience the Gerber files have been shared at PCBWay

Of course we have heaps of material here at Hackaday covering logic analyzers. If you’re interested in budget options check out $13 Scope And Logic Analyzer Hits 18 Msps or how to build one using a ZX Spectrum! If you’re just getting started with logic analyzers (or if you’re not sure why you should) check out Logic Analyzers: Tapping Into Raspberry Pi Secrets.

Back to the Future Lunchbox Cyberdeck

Back to the Future Lunchbox Cyberdeck

Our hacker [Valve Child] wrote in to let us know about his Back to the Future lunchbox cyberdeck.

Great Scott! This is so awesome. We’re not sure what we should say, or where we should begin. A lot of you wouldn’t have been there, on July 3rd, 1985, nearly forty years ago. But we were there. Oh yes, we were there. On that day the movie Back to the Future was released, along with the hit song from its soundtrack: Huey Lewis & The News – The Power Of Love.

Flux CapacitorFor the last forty years Back to the Future has been inspiring nerds and hackers everywhere with its themes of time-travel and technology. If you know what to look for you will find references to the movie throughout nerd culture. The OUTATIME number plate behind Dave Jones in the EEVblog videos? Back to the Future. The Flux Capacitor for sale at the Australian electronics store Jaycar? Back to the Future. The EEVblog 121GW Multimeter? Back to the Future. But it’s not just those kooky Australians, it’s all over the place including Rick and Morty, The Big Bang Theory, Ready Player One, Family Guy, The Simpsons, Futurama, Marvel’s Avengers: Endgame, LEGO Dimensions, and more.

As [Valve Child] explains he has built this cyberdeck for use on his work bench from a lunchbox gifted to him by his children last Christmas. His cyberdeck is based on the Raspberry Pi 5 and includes a cool looking and completely unnecessary water cooling system, a flux capacitor which houses the power supply, voltage and current meters, an OLED display for temperature and other telemetry, a bunch of lighting for that futuristic aesthetic, and a Bluetooth boombox for 80’s flair. Click through to watch the video demonstration of this delightfully detailed cyberdeck and if you want check out the extra photos too.

We ran a search for “Back to the Future” in the Hackaday archives and found 73 articles that mentioned the movie! Over the years we’ve riffed on hoverboards, calculator watches, the DeLorean, and the slick Mr. Fusion unit; and long may we continue.

Building an Assembly Line for Origami Pigeons

Origami assembly line.

When it comes to hacks, the best ones go to extremes. Either beautiful in their simplicity, or magnificent in their excess. And, well, today’s hack is the latter: excessive. [HTX Studio] built an assembly line for origami pigeons!

One can imagine the planning process went something like this:

  1. Make origami pigeon assembly line
  2. ?
  3. Profit

But whatever the motivation, this is an impressive and obviously very well engineered machine. Even the lighting is well considered. It’s almost as if it were made for show…

Now, any self-respecting nerd should know the difference between throughput and latency. From what we could glean from the video, the latency through this assembly line is in the order of 50 seconds. Conservatively it could probably have say 5 birds in progress at a time. So let’s say every 10 seconds we have one origami pigeon off the assembly line. This is a machine and not a person so it can operate twenty four hours a day, save downtime for repairs and maintenance, call it 20 hours per day. We could probably expect more than 7,000 paper pigeons out of this machine every day. Let’s hope they’ve got a buyer lined up for all these birds.

If you’re interested in assembly lines maybe we could interest you in a 6DOF robotic arm, or if the origami is what caught your eye, check out the illuminating, tubular, or self-folding kind!

A Close Look at the Mitxela Precision Clock Mk IV

Over on his secondary YouTube channel, [Jeff Geerling] recently demoed the new Mitxela Precision Clock Mk IV.

This clock uses GPS to get the current time, but also your location so it can figure out what time zone you’re in and which daylight savings time might apply. On the back a blinking diode announces the arrival of each second. A temperature-compensated crystal oscillator (TCXO) is employed for accurate time-keeping.

The clock can be folded in half, thereby doubling as a clapperboard for movie makers. The dimming system is analog, not pulse width modulation (PWM), which means no visible flashing artifacts when recording. It is highly configurable and has USB connectivity. And it has not one but two ARM microcontrollers, an ARM STM32L476, and an ARM STM32L010. If you’re interested, you can pick one up for yourself from [Mitxela]’s shop.

Toward the end of his video [Jeff] does some navel gazing, thinking about what might be required if future versions of the clock wanted to get down into precision at the nanosecond level. Do you arrange it so the light arrives at the viewer’s eyeball at the right time? Or do you update it on the clock at the right time and let the viewer know about it after a minuscule delay? Philosophical preponderances for another day!

We should add that we’ve seen plenty of cool stuff from [Mitxela] before, including the Euroknob and these soldering tweezers.

Piko, Your ESP32 Powered Fitness Buddy

The bill of materials and the assembled smartwatch.

Over on Hackaday.io there’s a fun and playful write-up for a fun and playful project — the Piko, an ESP32 powered smartwatch.

Our hackers [Iloke Alusala], [Lulama Lingela], and [Rafael Cardoso] teamed up to design and manufacture this wrist-worn fitness wearable. Made from an ESP32 Beetle C6 and using an attached accelerometer with simple thresholds the Piko can detect if you’re idle, walking, jogging, or sprinting; and at the same time count your steps.

Design sketches

The team 3D printed the requisite parts in PLA using the printer in their university makerspace. In addition to the ESP32 and printed parts, the bill of materials includes a 240×240 IPS TFT LCD display, a LIS331HH triple-axis accelerometer, a 200 mAh battery, and of course, a watch strap.

Demonstrating splendid attention to detail, and inspired by the aesthetic of the Tamagotchi and pixel art, the Piko mimics your current activity with a delightful array of hand-drawn animations on its display. Should you want to bring a similar charm to your own projects, all the source is available under the MIT license.

If you’re interested in smartwatch technology be sure to check out our recent articles: Smartwatches Could Flatten The Curve Of The Next Pandemic and Custom Smartwatch Makes Diabetes Monitoring Easier For Kids.

Making a LEGO Vehicle Which Can Cross Large Gaps

A Lego vehicle crossing a gap between two benches.

Here is a hacker showing off their engineering chops. This video shows successive design iterations for a LEGO vehicle which can cross increasingly large gaps.

At the time of writing this video from [Brick Experiment Channel] has been seen more than 110,000,000 times, which is… rather a lot. We guess with a view count like that there is a fairly good chance that many of our readers have already seen this video, but this is the sort of video one could happily watch twice.

This video sports a bunch of engineering tricks and approaches. We particularly enjoy watching the clever use of center of gravity. They hack gravity to make some of their larger designs work.

It is a little surprising that we haven’t already covered this video over here on Hackaday as it has been on YouTube for over three years now. But we have heard from [Brick Experiment Channel] before with videos such as Testing Various Properties Of LEGO-Compatible Axles and LEGO Guitar Is Really An Ultrasonically-Controlled Synth.

And of course we’ve covered heaps of LEGO stuff in the past too, such as Building An Interferometer With LEGO and Stepping On LEGO For Science.

Thanks to [Keith Olson] for writing in to remind us about the [Brick Experiment Channel].

Can We Replace a Program Counter with a Linear-Feedback Shift Register? Yes We Can!

Circuit diagram of linear-feedback shift register.

Today we heard from [Richard James Howe] about his new CPU. This new 16-bit CPU is implemented in VHDL for an FPGA.

The really cool thing about this CPU is that it eschews the typical program counter (PC) and replaces it with a linear-feedback shift register (LFSR). Apparently an LFSR can be implemented in hardware with fewer transistors than are required by an adder.

Usually the program counter in your CPU increments by one, each time indicating the location of the next instruction to fetch and execute. When you replace your program counter with an LFSR it still does the same thing, indicating the next instruction to fetch and execute, but now those instructions are scattered pseudo-randomly throughout your address space!

When the instructions for your program are distributed pseudo-randomly throughout your address space you find yourself in need of a special compiler which can arrange for this to work, and that’s what this is for.

Of course all of this is shenanigans and is just for fun. This isn’t the first time we’ve heard from [Richard], we have seen his Bit-Serial CPU and Forth System-On-Chip in recent history. Glad to see he’s still at it!

Thanks to [Richard James Howe] for letting us know about this latest development.

A Love Letter to Embedded Systems by V. Hunter Adams

Banner for article: A Love Letter to Embedded Systems.

Today we’re going to make a little digression from things that we do to look at perhaps why we do the things that we do. This one is philosophical folks, so strap yourselves in. We’ve had an interesting item arrive on the tips line from [Bunchabits] who wanted to let us know about a video, Love Letter to Embedded Systems, from [V. Hunter Adams].

[V. Hunter Adams] is Lecturer of Electrical Engineering at Cornell University and is on the web over here: vanhunteradams.com

In this forty three minute video [Hunter] makes an attempt to explain why he loves engineering, generally, and why he loves embedded systems engineering, specifically. He tries to answer why you should love engineering projects, what makes such projects special, and how you can get started on projects of your own. He discusses his particular interest in other unrelated subjects such as birds and birdsong, and talks a little about the genius of polymath Leonardo da Vinci.

He goes on to explain that engineering can be the vehicle to learn about other fields of endeavor, that the constraints in embedded systems are like the constraints of poetry, that embedded systems are the right level of complexity where you can still hold the details of a complete system in your head, and that embedded systems let you integrate with the physical world through sensors and actuators leading to a greater appreciation of physics and nature.

In his submission to the tips line [Bunchabits] said that [Hunter] was a communicator in the league of Carl Sagan and that he could do for embedded systems what Sagan did for physics and astronomy. Having watched this presentation we are inclined to agree. He is a thoughtful person and a cogent communicator.

If today’s philosophical digression has left you feeling… philosophical, then you might enjoy a little nostalgia, too. Here’s some old philosophical material that we covered here on Hackaday back in 2013 which held some interest: Hacking And Philosophy: An Introduction; The Mentor’s Manifesto; Hacker Crackdown: Part 1, Part II, Part III, Part IV; Future Tech And Upgrading Your Brain; and Surveillance State. All still as relevant today as it was over a decade ago.

Thanks to [Bunchabits] for sending this one in.

Stamp: Modular Breakout Boards for SMD Prototyping

Stamp breakout boards.

[Kalesh Sasidharan] from Sciotronics wrote in to tell us about their project, Stamp: a modular set of template breakout boards designed to make prototyping with SMD components faster, easier, and more affordable. No breadboards, custom PCBs, or tangled jumper wires required. The project has blasted past its Kickstarter goal, and is on track to start shipping in September.

Stamp was created out of frustration with the traditional SMD prototyping workflow. Breadboards don’t support SMD parts directly, and using adapters quickly gets messy, especially when you need to iterate or modify a design. Ordering PCBs for every small revision just adds delay, and cost.

Stamp solves this by offering reusable template boards with commonly used SMD footprints. You place the main component on the front and the supporting components on the back. Many complete circuits, such as buck converters, sensor blocks, microcontrollers, and so on, can fit on a single 17.8 × 17.8 mm board.

Most Stamps feature custom castellated holes, designed for side-by-side or right-angle edge connections, enabling a modular, reconfigurable approach to circuit building. The plan is to make the designs fully open source, so that others can build or adapt them. Although many PCB manufacturers might not have the facilities to make the special castellated edges which are available on some Stamps.

Dave Jones from the EEVblog covered the Stamp on one of his recent Mailbag videos, which you can check out below. This isn’t the first time we’ve seen somebody promise to reinvent the breadboard, but we do appreciate the simplicity of this approach.

New Supermaterial: As Strong as Steel and as Light as Styrofoam

The supermaterial lattice.

Today in material science news we have a report from [German Science Guy] about a new supermaterial which is as strong as steel and as light as Styrofoam!

A supermaterial is a type of material that possesses remarkable physical properties, often surpassing traditional materials in strength, conductivity, or other characteristics. Graphene, for example, is considered a supermaterial because it is extremely strong, lightweight, and has excellent electrical conductivity.

This new supermaterial is a carbon nanolattice which has been developed by researchers from Canada and South Korea, and it has remarkably high strength and remarkably low weight. Indeed this new material achieved the compressive strength of carbon steels (180-360 MPa) with the density of Styrofoam (125-215 kg m-3).

One very important implication of the existence of such material is that it might lead to a reduction in transport costs if the material can be used to build vehicles such as airplanes and automobiles. For airplanes we could save up to 10 gallons per pound (80 liters per kilogram) per year, where an airplane like the Airbus A380-800 weighs in at more than one million pounds.

To engineer the new material the researchers employed two methods: the Finite Element Method (FEM) and Bayesian optimization. Technically these optimized lattices are manufactured using two-photon polymerization (2PP) nanoscale additive manufacturing with pyrolysis to produce carbon nanolattices with an average strut diameter of 300 and 600 nm.

If you have an interest in material science, you might also like to read about categorizing steel or the science of coating steel.

Thanks to [Stephen Walters] for letting us know about this one on the tips line.

Intercepting and Decoding Bluetooth Low Energy Data for Victron Devices

[ChrisJ7903] has created two Ardiuno programs for reading Victron solar controller telemetry data advertised via BLE. If you’re interested in what it takes to use an ESP32 to sniff Bluetooth Low Energy (BLE) transmissions, this is a master class.

The code is split into two main programs. One program is for the Victron battery monitor and the other is for any Victron solar controller. The software will receive, dissect, decrypt, decode, and report the data periodically broadcast from the devices over BLE.

The BLE data is transmitted in Link-Layer Protocol Data Units (PDUs) which are colloquially called “packets”. In this particular case the BLE functionality for advertising, also known as broadcasting, is used which means the overhead of establishing connections can be avoided thereby saving power.

Decryption is handled with the the wolfSSL library and [ChrisJ7903] had nice things to say about the helpful people over at wolfSSL. The AES-CTR algorithm is used and seeded with the per-device encryption key, a nonce/salt in little-endian format, and the encrypted data.

[ChrisJ7903] relied heavily on technical documentation provided by Victron in order to decode the received data; some of that documentation is made available in the Git repo and ultimately everything is revealed in the code itself.

We’ve done heaps of BLE stuff here at Hackaday in the past. If you’re interested in BLE tech check out this rain gauge and this doorbell.

❌