Vista Normal

Hay nuevos artículos disponibles. Pincha para refrescar la página.
AnteayerSalida Principal

An MXM Take On The 3dfx Voodoo

7 Junio 2024 at 23:00
The MXM card with the 3dfx chip in the center, black silkscreen, mounted on the MXM to PCIe adapter, green silkscreen

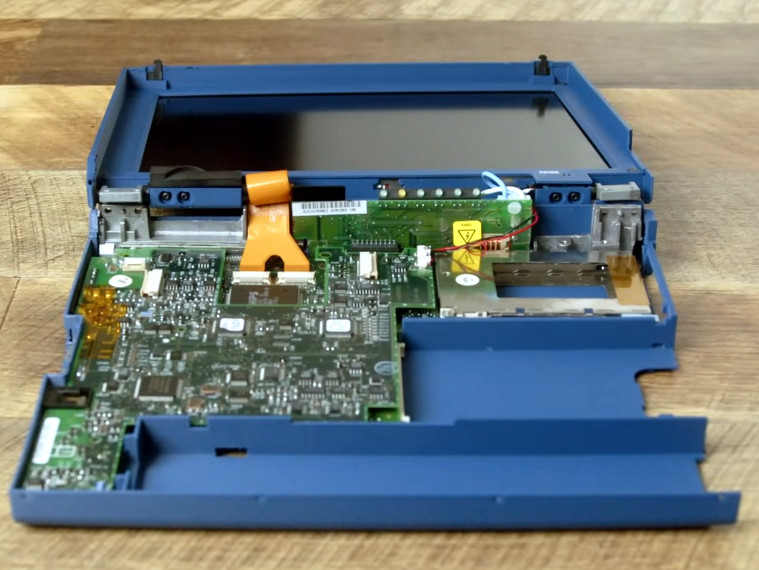
[sdz] of Vogons forum brings us an unexpected device for the 21st century – a 3dfx Voodoo 4 card in MXM format, equipped with 64MB of RAM. This isn’t just a showpiece – this card actually, properly works when installed into our hacker’s Dell Precision M4800, and [sdz] tells us more on how the card came to be.

Structure diagram of the card
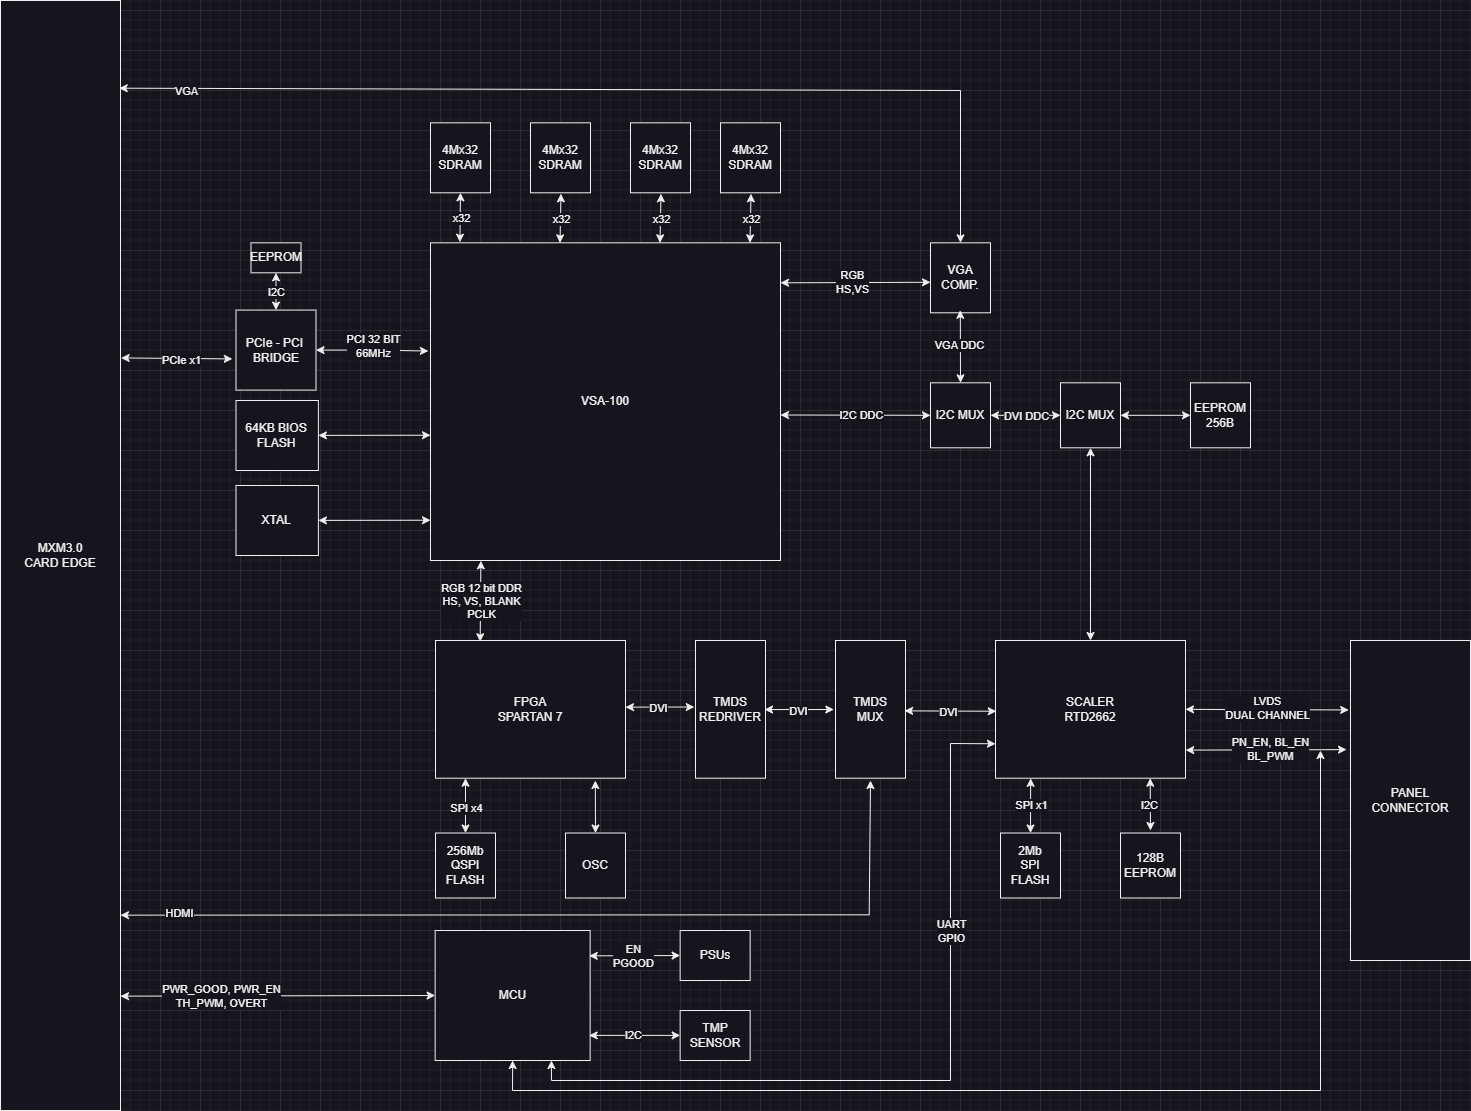
Equipped with a VSA-100 GPU, this card has a whole lot of support components for adapting old interfaces to modern ones. There’s a PCIe-PCI bridge IC, an FPGA, HDMI muxes, and a Realtek scaler for video conversion. Handling all the MXM interfaces would’ve been downright impossible, so the card also holds an LVDS header for the M4800’s panel. Plus, for testing all of it, [sdz] has developed a PCIe to MXM adapter board with minimal circuitry needed to have the card work – this is a seriously involved hack and it’s executed remarkably well.

The forum post shows a whole lot of the journey, from receiving the PCBs to code and FPGA gateware bringup, as well as videos of VGA and HDMI operation. In the end, our hacker shows us a fully working setup, the 3dfx card inserted into M4800 and driving its display, as well as overclocking experiments; the author has promised to open-source the card files in due time, too. It’s seriously nice to see DIY MXM cards in the wild, and if you ever wanted to build one, we’ve got an article tells you everything you could want to know about the MXM standard.

We thank [Misel] for sharing this with us!

Give Your Thinkpad X1 Nano An Internal USB Port

2 Junio 2024 at 11:00
Assembled FPC PCB panels of the project

How hard could it be to add an extra USB port inside your laptop? As [Joshua Stein] shows, it can be decently hard, but you will have fun along the way. His journey involves a Thinkpad X1 Nano, and his tech setup means it’d be most comfortable for him to have a USB port inside its case, for a Logitech mouse’s USB receiver. It wasn’t smooth sailing all throughout, but the end result is no doubt beautifully executed.

M.2 B-key, A-key and E-key slots have USB 2.0 available on them – you’d think that’s perfect for such a receiver, and there’s even plug and play adapters for this on places like eBay. Unfortunately, none of these, as Lenovo implements wireless card whitelists to this day. Tinkering with the whitelist on [Joshua]’s laptop resulted in BIOS digital signature check failures, and the USB-connected fingerprint reader was ultimately chosen as the most viable path.

Initially, he’s tested the fingerprint reader with an FPC breakout, having the USB connection work – many a hacker would stop here, pulling a few bodge wires from the breakout. [Joshua], however, raised the bar, creating a flexible PCB that would pull the fingerprint connector signals to a spot in the case where the USB receiver could fit neatly, with a 5 V step-up on the board, too.

[Joshua] tops it off by showing a 3D-printed spacer that goes into now-vacant spot where the fingerprint reader used to be. This mod is not open-source as far as we can see, but it’s definitely an inspiration. Want to put even more USB devices inside your laptop? Perhaps a tiny USB hub would help, in line with the EEE PC mods that aimed to stuff the tiny laptop with the largest amount of USB devices possible.

Printing a Replacement Case for the ThinkPad 701c

Por: Tom Nardi
29 Mayo 2024 at 15:30

Even among ThinkPads, which are nearly universally loved by hardware hackers and Linux tinkerers alike, the 701c is a particularly rare and desirable machine. Best known for it’s “butterfly” slide out keyboard, the IBM-designed subnotebook from the mid-1990s has gained a following all its own, with active efforts to repair and restore any surviving specimens still out in the wild.

[polymatt] has already taken on a number of 701c restoration projects, but the recent release of a 3D printable case for the vintage laptop is arguably the most impressive to date. After spending an untold number of hours with an original case and a pair of calipers, the final design has been released under the Creative Commons Attribution-NonCommercial license — in other words, you’re free to print one to spruce up your 701c, but don’t run off a stack of them and start trying to move them on Etsy.

Originally, [polymatt] just wanted to 3D print a replacement for the laptop’s display bezel. But as often happens with these sort of projects, things just sort of started rolling and pretty soon the whole case was modeled. As you might imagine, the printed case has some slight differences between the original. For example, the printed version is designed to use heat set inserts. There’s also certain components, such as the hinges, which need to be sourced from an original case.

The most obvious use of these files is to perform repairs — if a piece of your 701c case has broken, you might be able to use one of these files to create a replacement. But it also offers some fascinating possibilities for future modifications. If you were planning on replacing the internals of the 701c with something more modern, these files would make an excellent starting point to create a customized case to better fit more modern components.

Whatever you end up doing with these files, don’t be shy — let us know.

❌
❌