Vista Normal

Hay nuevos artículos disponibles. Pincha para refrescar la página.
AnteayerSalida Principal

Overengineered Freezer Monitor Fills Market Void

19 Mayo 2025 at 23:00

A lot of projects we see around here are built not just because they can be built, but because there’s no other option available. Necessity is the mother of invention, as they say. And for [Jeff] who has many thousands of dollars of food stowed in a chest freezer, his need for something to keep track of his freezer’s status was greater than any commercial offering available. Not only are freezers hard on batteries, they’re hard on WiFi signals as well, so [Jeff] built his own temperature monitor to solve both of these issues.

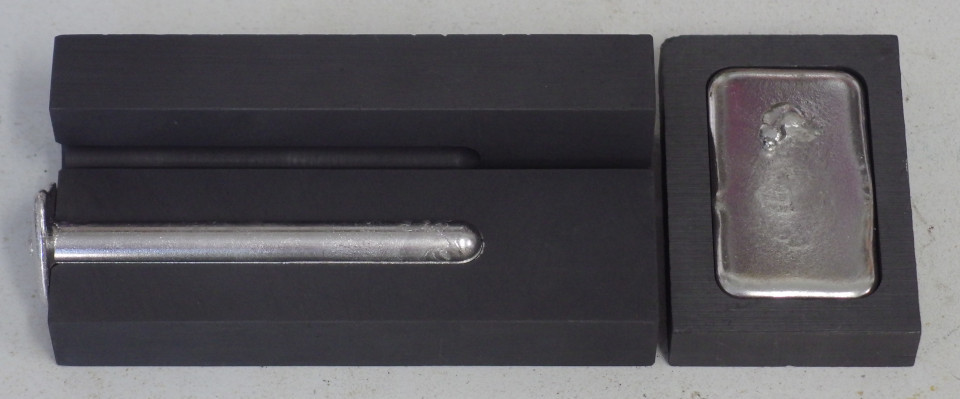
The obvious solution here is to have a temperature probe that can be fished through the freezer in some way, allowing the microcontroller, battery, and wireless module to operate outside of the harsh environment. [Jeff] is using K-type thermocouples here, wired through the back of the freezer. This one also is built into a block of material which allows him to get more diffuse temperature readings than a standard probe would provide. He’s also solving some other problems with commercially available probes here as well, as many of them require an Internet connection or store data in a cloud. To make sure everything stays local, he’s tying this in to a Home Assistant setup which also allows him to easily make temperature calibrations as well as notify him if anything happens to the freezer.

Although the build is very robust (or, as [Jeff] himself argues, overengineered) he does note that since he built it there have been some additional products offered for sale that fit this niche application. But even so, we always appreciate the customized DIY solution that avoids things like proprietary software, subscriptions, or cloud services. We also appreciate freezers themselves; one of our favorites was this restoration of a freezer with a $700,000 price tag.

Home-casting Thermoelectric Alloys

16 Mayo 2025 at 11:00
There are a number of metal cylinders displayed in a line. Each cylinder has a rectangular brass plate mounted to each end, and these brass plates stand upright, with the metal cylinders held horizontally between them.

If you want to convert heat into electrical power, it’s hard to find a simpler method than a thermoelectric generator. The Seebeck effect means that the junction of two dissimilar conductors will produce a voltage potential when heated, but the same effect also applies to certain alloys, even without a junction. [Simplifier] has been trying to find the best maker-friendly thermoelectric alloys, and recently shared the results of some extensive experimentation.

The experiments investigated a variety of bismuth alloys, and tried to determine the effects of adding lead, antimony, tin, and zinc. [Simplifier] mixed together each alloy in an electric furnace, cast it into a cylindrical mold, machined the resulting rod to a uniform length, and used tin-bismuth solder to connect each end to a brass electrode. To test each composition, one end of the cylinder was cooled with ice while the other was held in boiling water, then resistance was measured under this known temperature gradient. According to the Wiedemann-Franz law, this was enough information to approximate the metal’s thermal conductivity.

Armed with the necessary data, [Simplifier] was able to calculate each alloy’s thermoelectric efficiency coefficient. The results showed some useful information: antimony is a useful additive at about 5% by weight, tin and lead created relatively good thermoelectric materials with opposite polarities, and zinc was useful only to improve the mechanical properties at the expense of efficiency. Even in the best case, the thermoelectric efficiency didn’t exceed 6.9%, which is nonetheless quite respectable for a homemade material.

This project is a great deal more accessible for an amateur than previous thermoelectric material research we’ve covered, and a bit more efficient than another home project we’ve seen. If you just want to get straight to power generation, check out this project.

An Absolute Zero of a Project

17 Abril 2025 at 02:00

How would you go about determining absolute zero? Intuitively, it seems like you’d need some complicated physics setup with lasers and maybe some liquid helium. But as it turns out, all you need is some simple lab glassware and a heat gun. And a laser, of course.

To be clear, the method that [Markus Bindhammer] describes in the video below is only an estimation of absolute zero via Charles’s Law, which describes how gases expand when heated. To gather the needed data, [Marb] used a 50-ml glass syringe mounted horizontally on a stand and fitted with a thermocouple. Across from the plunger of the syringe he placed a VL6180 laser time-of-flight sensor, to measure the displacement of the plunger as the air within it expands.

Data from the TOF sensor and the thermocouple were recorded by a microcontroller as the air inside the syringe was gently heated. Plotting the volume of the gas versus the temperature results shows a nicely linear relationship, and the linear regression can be used to calculate the temperature at which the volume of the gas would be zero. The result: -268.82°C, or only about four degrees off from the accepted value of -273.15°. Not too shabby.

[Marb] has been on a tear lately with science projects like these; check out his open-source blood glucose measurement method or his all-in-one electrochemistry lab.

❌
❌