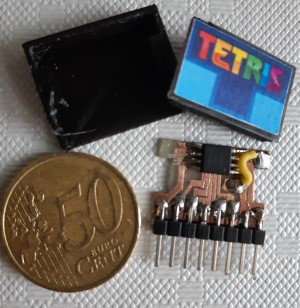
One way to keep things tiny is to make a system with cartridges where the brain lives on each cartridge instead of the platform itself. [Michael]’s Epic Minimalist Entertainment System (EMES) is one of those, and boy, is it tiny. EMES makes use of the ATtiny10, and they don’t get much AT-tinier than that.
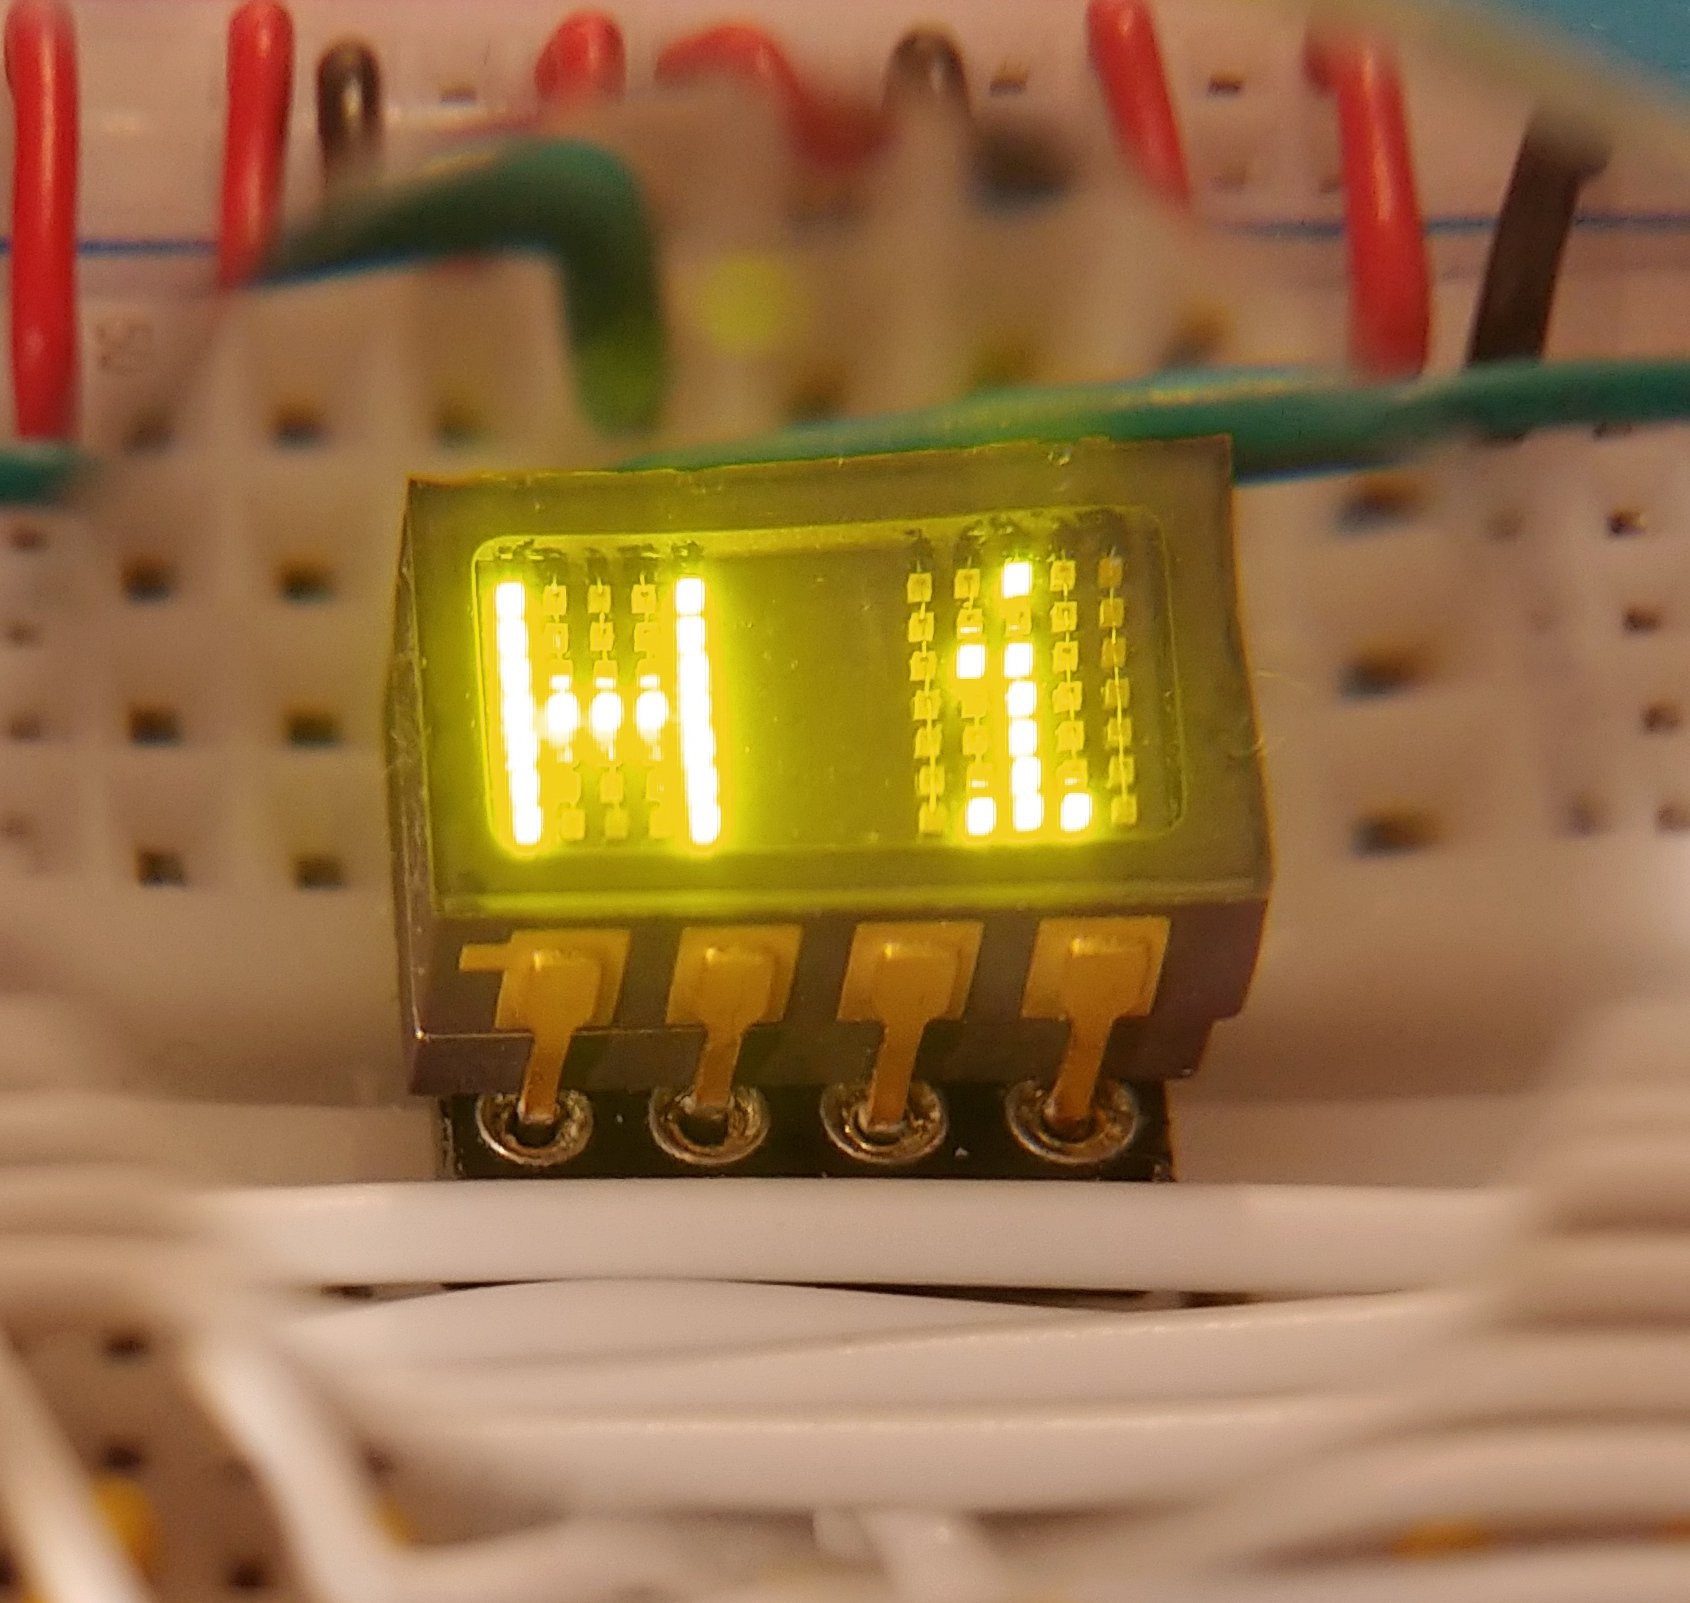
This nearly microscopic console uses an equally Lilliputian display — a Plessey GPD340 vintage LED display, in fact. (Check out [Michael]’s reverse engineering project if you want to play around with these.) There are four ultra-small buttons for control and a buzzer for sound.
Now, the ATtiny10 is an 8Mhz microcontroller with 1KB of flash and 32 bytes of RAM. It has an 8-bit ADC and a somewhat surprisingly high four GPIO pins. But of course, that’s not enough. Not with the display, the four buttons, and the buzzer, so [Michael] had to come up with a way to multiplex everything to four GPIOs.
PB0 is shared between the buttons and the display’s serial data input. PB1 cleverly outputs the same PWM for both the brightness control and the buzzer. When the buzzer is needed, [Michael]’s code switches to a lower frequency and adjusts the duty cycle of the display to keep it readable. PB2 and 3 are serial clock inputs for the two display halves. Be sure to check it out the heated PONG action in the video after the break!
Look, if something happened to you every three weeks or so to basically turn you into a different person and factored heavily into whether any new humans were created, you’d probably want to keep abreast of the schedule, yeah? Yeah. So, while there are, of course, a ton of ways to do this with your phone, most of those apps do gross things with your data. Are you angry yet?
The coolest part is that this is an actual egg from one of [Jakoba]’s backyard chickens. No. The coolest part is how she was able to make so many holes without breaking it. (It took four tries.)
After bleaching the insides, the egg was ready to glow. As [Jakoba] says, the guts are simple — just a Wemos D1 Mini ESP8266, a WS2812 LED, and a heatsink. The enclosure consists of an inverted peanut bowl with a glass ornament hot-glued in place.
Once it was put together, all she had to do was add it in Home Assistant and use the current calendar state to trigger services from the YAML configuration.
By now, probably everyone is familiar with the “You’re Offline” dinosaur that stars in Google’s T. Rex game. You know — jump cacti, avoid pterodactyls. Repeat until you lose, or, we suppose, make the leaderboard. Well, what if you theoretically couldn’t lose? That’s kind of the idea behind [Bas BotBerg]’s cactus detection-and-avoidance scheme (translated from Dutch).
Like many of us, [Bas] firmly believes that repetitive tasks should be automated, and that includes the controls of the famous T. Rex. Since the cacti are always dark gray and appear along the same plane, it’s easy to register the difference between cacti and screen electronically. In order to accomplish this, [Bas] is using a light-dependent resistor and a pull-up resistor to create a resistance bridge, which is then connected to an analog input pin on a Raspberry Pi Pico.
But [Bas] didn’t do this just to cheat at Offline Dinosaur. Really! It’s for educational purposes, to get people comfortable with embedded processing, sensors, and interfaces between different devices. Check it out in brief action after the break.
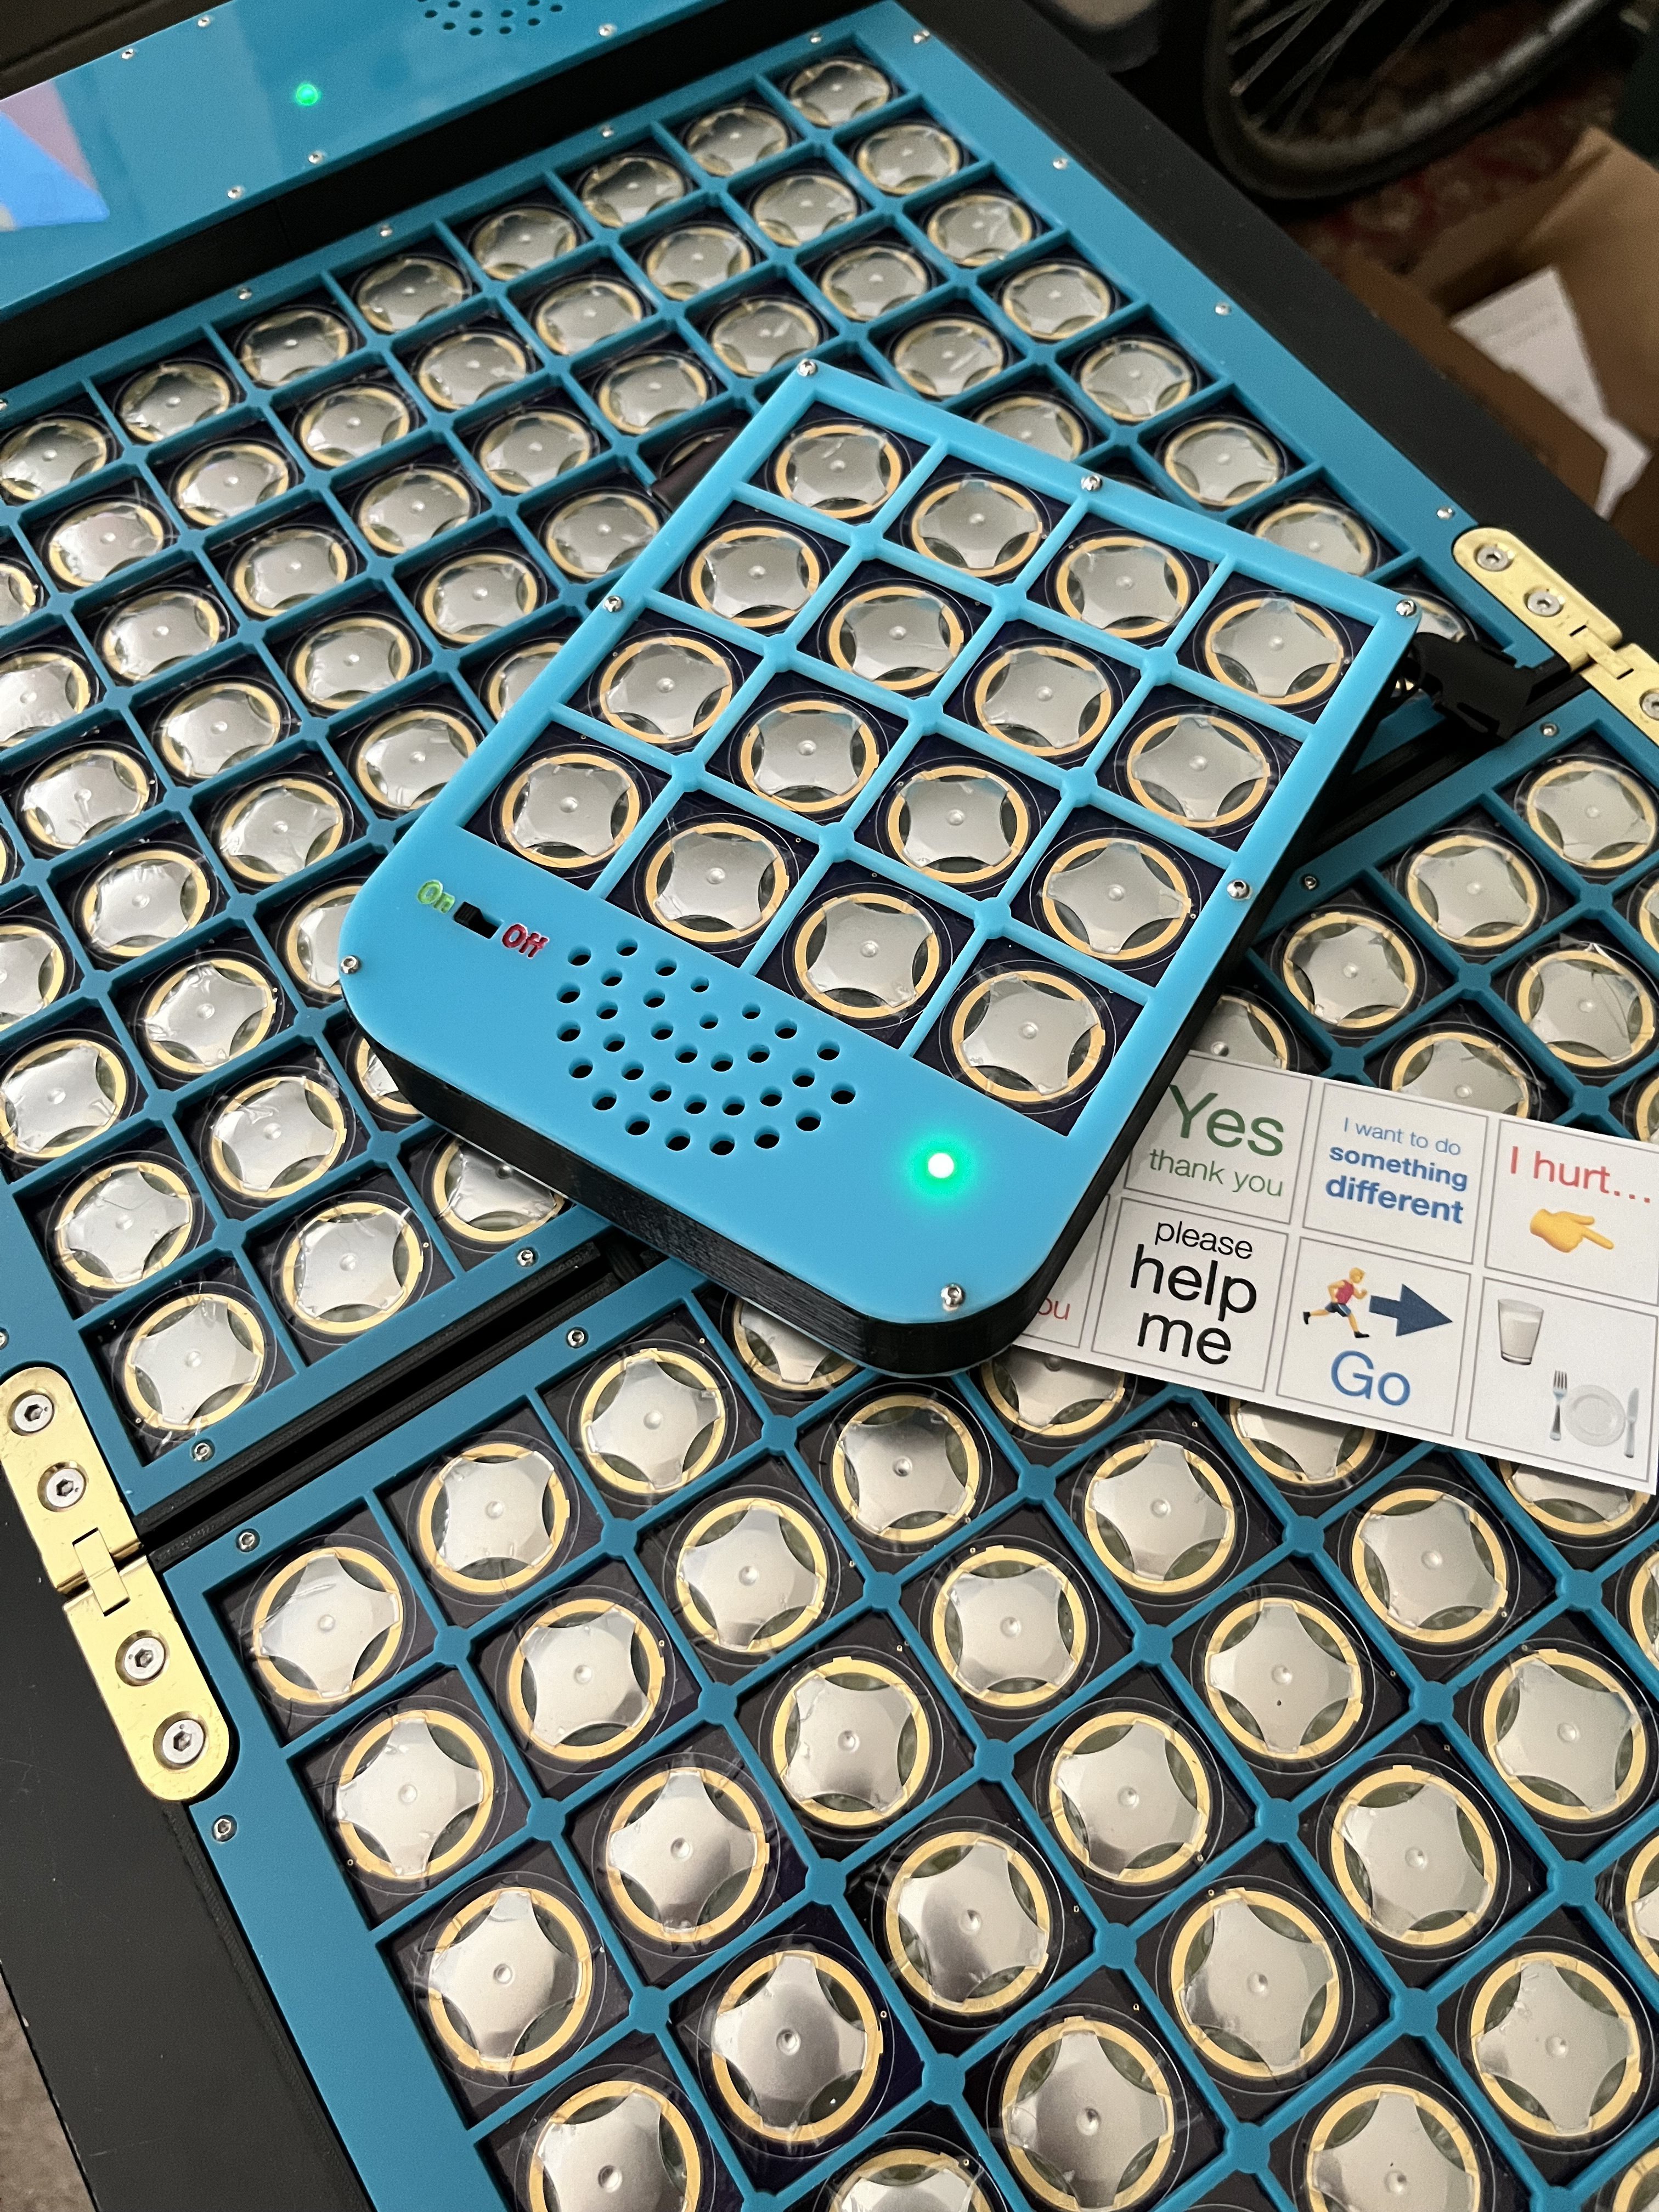
Sometimes, simple things can make a world of difference. Take for example a non-verbal person who can’t necessarily control a touch screen in order to tell someone else what they need or want or think.
This is where Augmentative and Alternative Communication (AAC) devices come in. Recently tasked with building such a device, [Thornhill!] came up with a great design that houses 160 different phrases in a fairly small package and runs on CircuitPython.
Basically, the client presses the appropriate snap-dome button button and the corresponding phrase is spoken through the speaker. The 10×16 grid of buttons is covered with a membrane that both feels nice and gives a bit of protection from spills.
The buttons can achieve high actuation forces and have a crisp tactile response, which means they’re probably gonna go a long way to keep the user from getting frustrated.
This handy AAC board is built on the Adafruit RP2040 Prop-Maker Feather and two keypad matrices. If this weren’t useful enough as it is, [Thornhill!] also built an even smaller version with 16 buttons for the client to wear around their neck.
Whether you have full use of your hands or not, a foot-operated keyboard is a great addition to any setup. Of course, it has to be a lot more robust than your average finger-operated keyboard, so building a keyboard into an existing footstool is a great idea.
When [Wingletang]’s regular plastic footrest finally gave up the ghost and split in twain, they ordered a stronger replacement with a little rear compartment meant to hold the foot switches used by those typing from dictation. Settling upon modifiers like Ctrl, Alt, and Shift, they went about designing a keyboard based on the ATmega32U4, which does HID communication natively.
For the switches, [Wingletang] used the stomp switches typically found in guitar pedals, along with toppers to make them more comfortable and increase the surface area. Rather than drilling through the top of the compartment to accommodate the switches, [Wingletang] decided to 3D print a new one so they could include circuit board mounting pillars and a bit of wire management. Honestly, it looks great with the black side rails.
So there’s this commercial electronic game out there called Catch Phrase, which, as the game’s own catch phrase explains, is the game that’s played one word at a time. See, a word comes up on the screen, and you have to get the other person or team to guess what it is using gestures and such before the timer goes off. There are a bunch of rules, like you can’t say a word that rhymes, give the first letter, or the number of syllables.
Well, [ahixson1230] and company got their hands on the After Dark NSFW version but found it lacking in the edginess department. So naturally, [ahixson1230] was inspired to build a better one, with a touch screen in lieu of buttons, and a way for players to suggest words to be added to the list. In this version, a player presses anywhere on the screen to start the game, and a random word or phrase comes up. They act it out, get the other person to guess, and then pass the unit over to continue the fun.
Batch Craze is based on the Cheap Yellow Display, aka the ESP32-2432S028R, and [ahixson1230] highly recommends [witnessmenow]’s excellent resource on the subject. As of this writing, [ahixson1230] is still trying to get the speaker to work, and welcomes any help. Can you assist?
There’s still time to enter the 2024 Tiny Games Contest! You have until Tuesday, September 10th, so head on over to Hackaday.IO and get started!
We (well, some of us) are complete suckers for things that are both much smaller and much larger than life. And if that thing actually does what its supposed to? Squee! So naturally, we rushed to bring you news of this mini NUC rack designed by [Jeremy Weatherford].
Inspiration comes from a lot of places, often times from stuff that lives on your desk. [Jeremy] had a pile of NUCs and thought they resembled a mini rack already, so why not build them one to live in? It was the perfect excuse to learn CAD, so off [Jeremy] went. Although this is a mini rack, the parts were too big to print. Another opportunity presented itself, and [Jeremy] tried out an online service to get the acrylic cut.
Assembly may have been fiddly with super glue all over the nice black acrylic, but [Jeremy] learned an important tip: excess glue can be removed with vegetable oil. Once it was built, he decided to make it into a control system lab and even found a perfect little five-port switch to top it off. The logo plate, of course, is the icing on this cake.
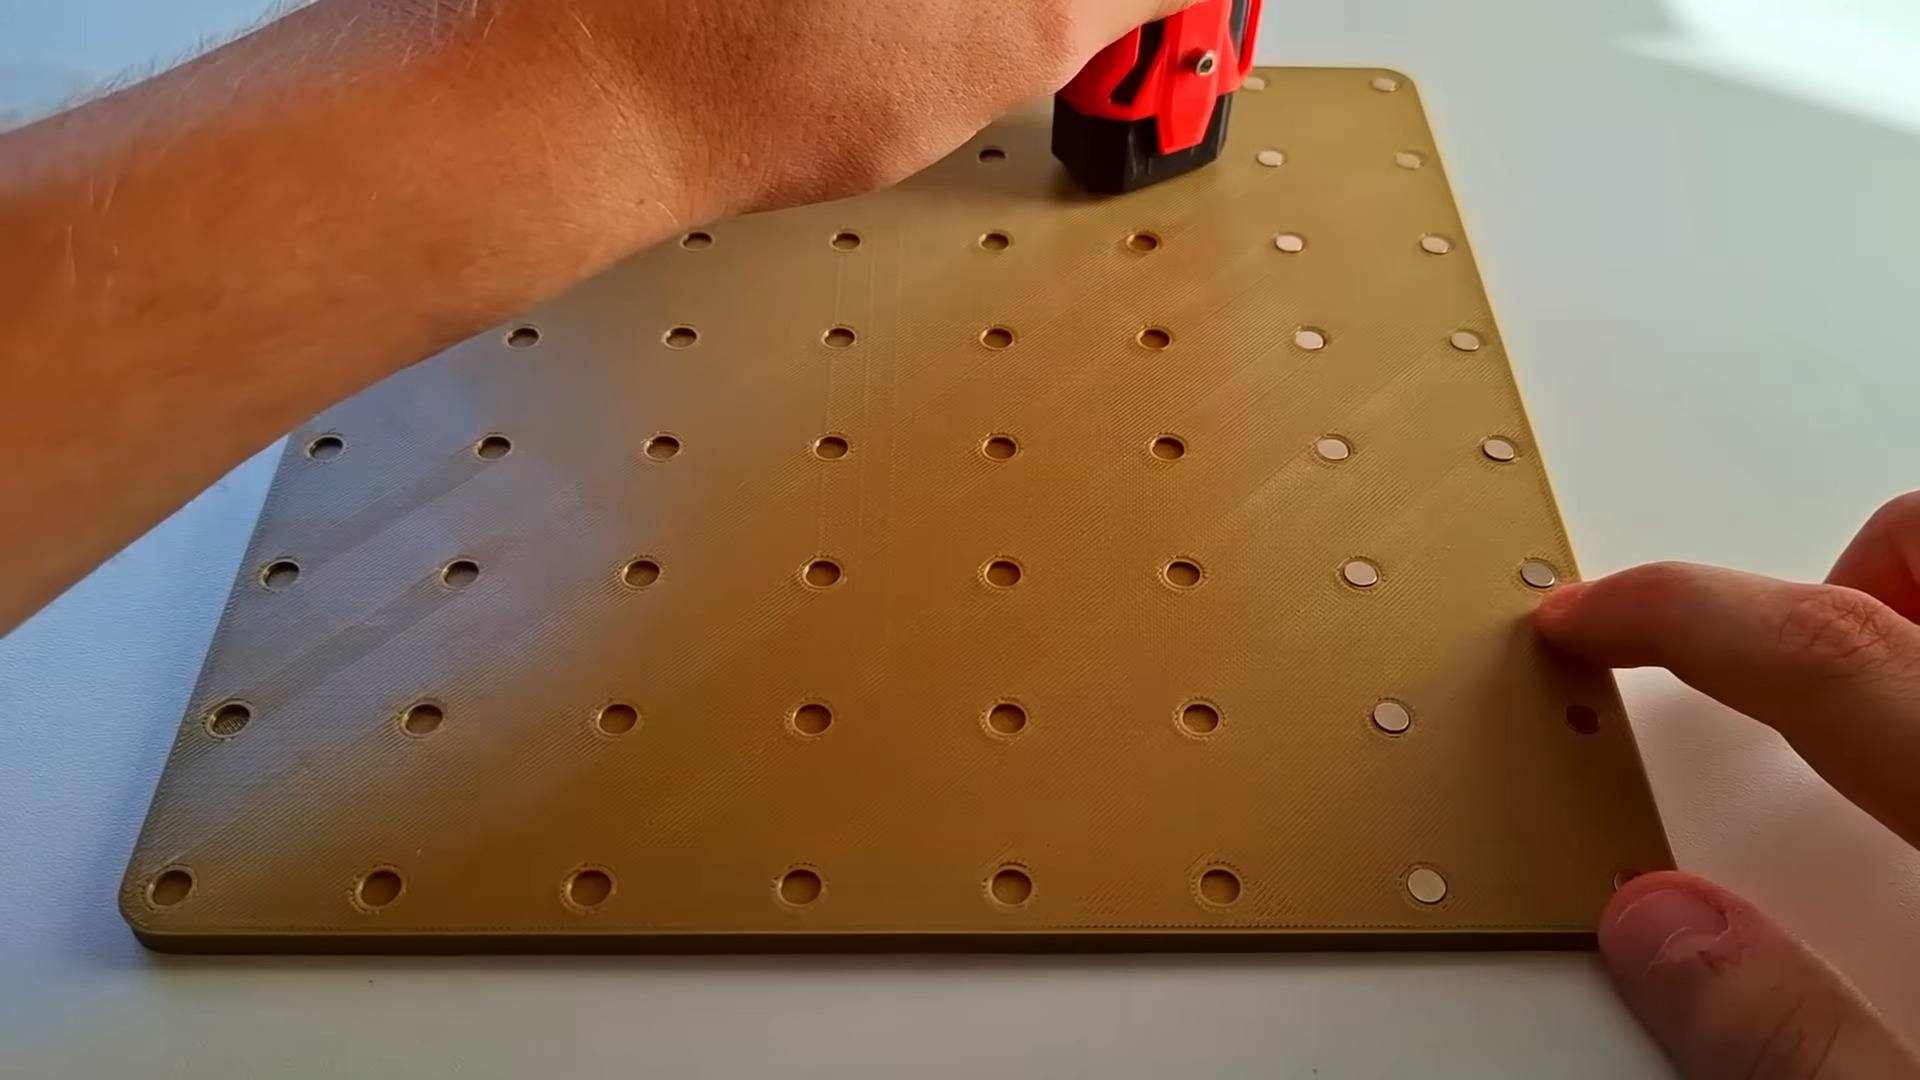
Magnets are pretty nice little tools. [EmGi] has used them in many a cool 3D printed build with great success. But getting them where you want can be really tricky. More often than not, you end up with glue all over your fingers, or the magnets fly out of place, or they stick together when you don’t want them to.
Well, [EmGi] created a mighty fine magnet insertion tool that you can print for yourself. It’s finger-operated and uses a single embedded magnet to place magnets wherever they’re needed.
This thing went through several designs before [EmGi] ever printed it out. Originally, there were two magnets, but there was an issue where if the tool wasn’t lifted off perfectly, it would send the magnet flying.
But now it works great, and [EmGi] even deposited an array of 64 magnets without using glue to test it out before printing a second one to handle the other polarity. Check out the build/demo video after the break.
What is it about tangible media? There’s just something neat about having an individual thing that represents each game, each album, each whatever. Sure, you can have a little console with a thousand games loaded on it, but what’s the fun in that?
Enter the ATtinyBoy. [Bram]’s entry into the Tiny Games Contest is based on the ATtiny85, and the whole thing is smaller than a credit card. In fact, each little game cartridge contains its own ATtiny85, with the pins broken out into headers.
That is, although the schematic is based on [Billy Cheung]’s gametiny, which uses an ATtiny85 as the brain, ATtinyBoy’s brain is divided among each of the games.
This certainly checks a lot of boxes when it comes to contest rules and requirements, and it’s just awesome besides. We particularly like the custom box that holds ATtinyBoy and all his distributed knowledge. If you want to make one of your own, the schematic, code, and STLs are all available over on IO.
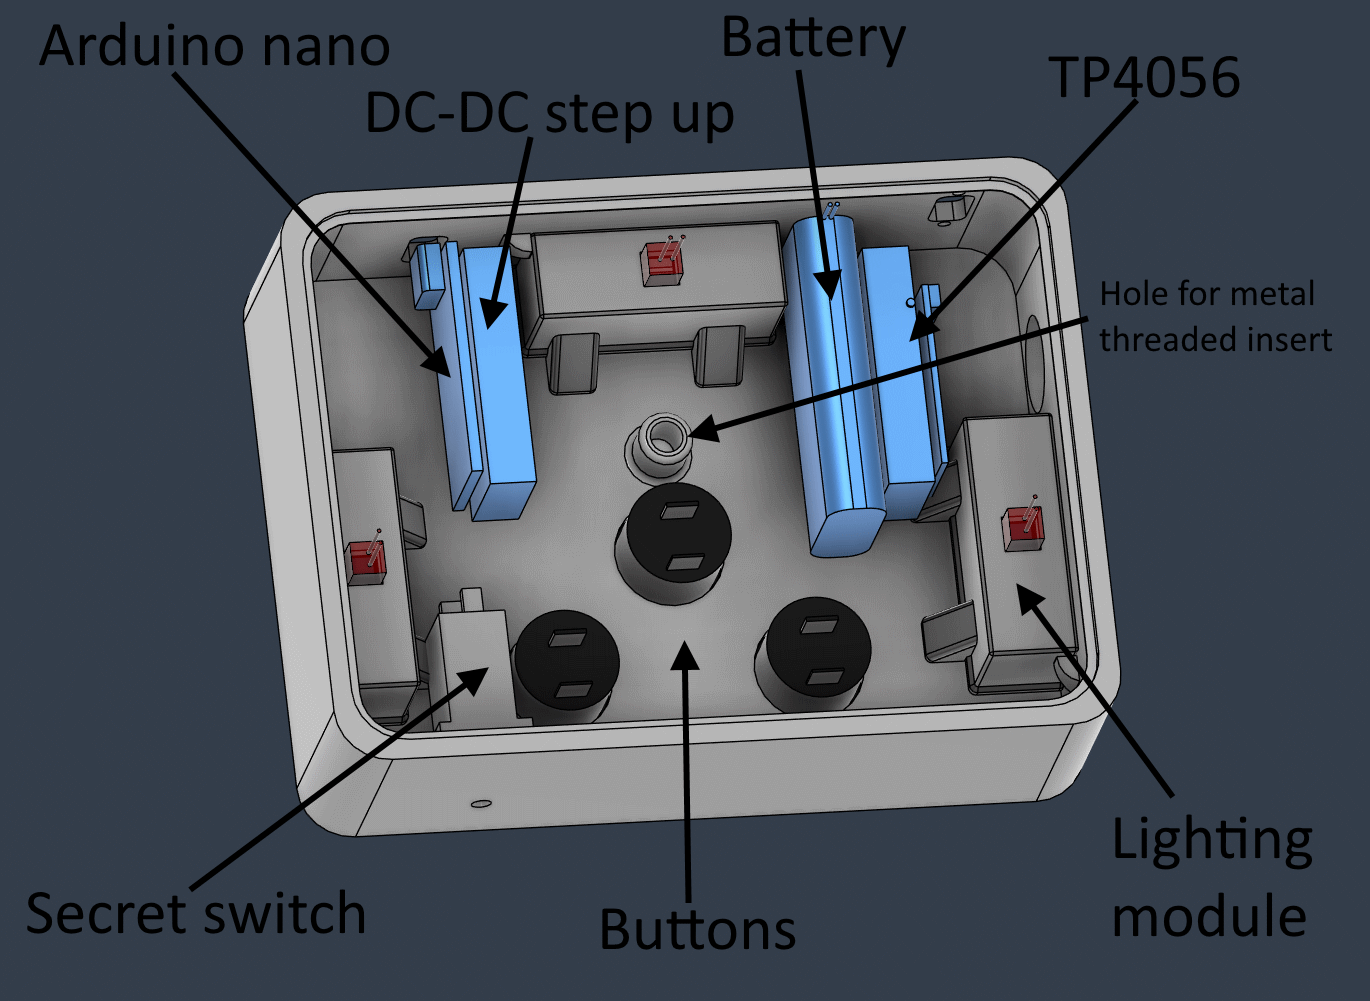
It may be the last gasp of summer here in the Northern Hemisphere, but it’s always cold somewhere, whether it’s outdoors or inside. If you suffer from cold, stiff hands, you know how difficult it can be to work comfortably on a computer all day. Somehow, all that typing and mousing does little to warm things up. What you need are hand warmers, obviously, and they might as well be smart and made to fit your hands.
Fifteen-year-old [Printerforge] created these bad boys in an effort to learn how to code LCDs and control heat like Magneto controls ferrous metals. Thanks to digital control, they can heat up to specific temperatures, and they happen to run for a long time.
Power-wise, these warmers use a 18650 cell and a TP4056 charging module. Everything is controlled by an Arduino Nano, which reads from both a thermistor and a potentiometer to control the output.
[Printerforge] really thought this project through, as you’ll see in the Instructable. There’s everything from a table of design requirements to quick but thorough explanations of nichrome wire and basic electronic theory.
And then there’s the material consideration. [Printerforge] decided that polymer clay offers the best balance of heat conductivity and durability. They ended up with two styles — flat, and joystick grip. The best part is, everything can fit in a generous pocket.
Round and round goes the red LED, and if you can push the button when it overlaps the green LED, then you win. Cyclone is almost too simple of a game, and that’s probably part of why it’s so addictive.
Want to make one for your desk? All it takes is an Arduino Nano R3 or comparable microcontroller, an RGB LED ring with 12 LEDs, a 16×2 LCD, a buzzer, and a momentary push button switch.
Interestingly, there aren’t successive levels with increasing speed, but each round begins with a randomized speed value. Of course, this can all be easily changed in the code, which is modified from [Joern Weise]’s original.
This is a tinier version of [mircemk]’s original project, which uses a 60-LED ring and does contain levels. As usual with [mircemk]’s builds, this project is mounted on their trademark 3 mm PVC board and covered with peel-and-stick wallpaper. Be sure to check out the demo and build video after the break.
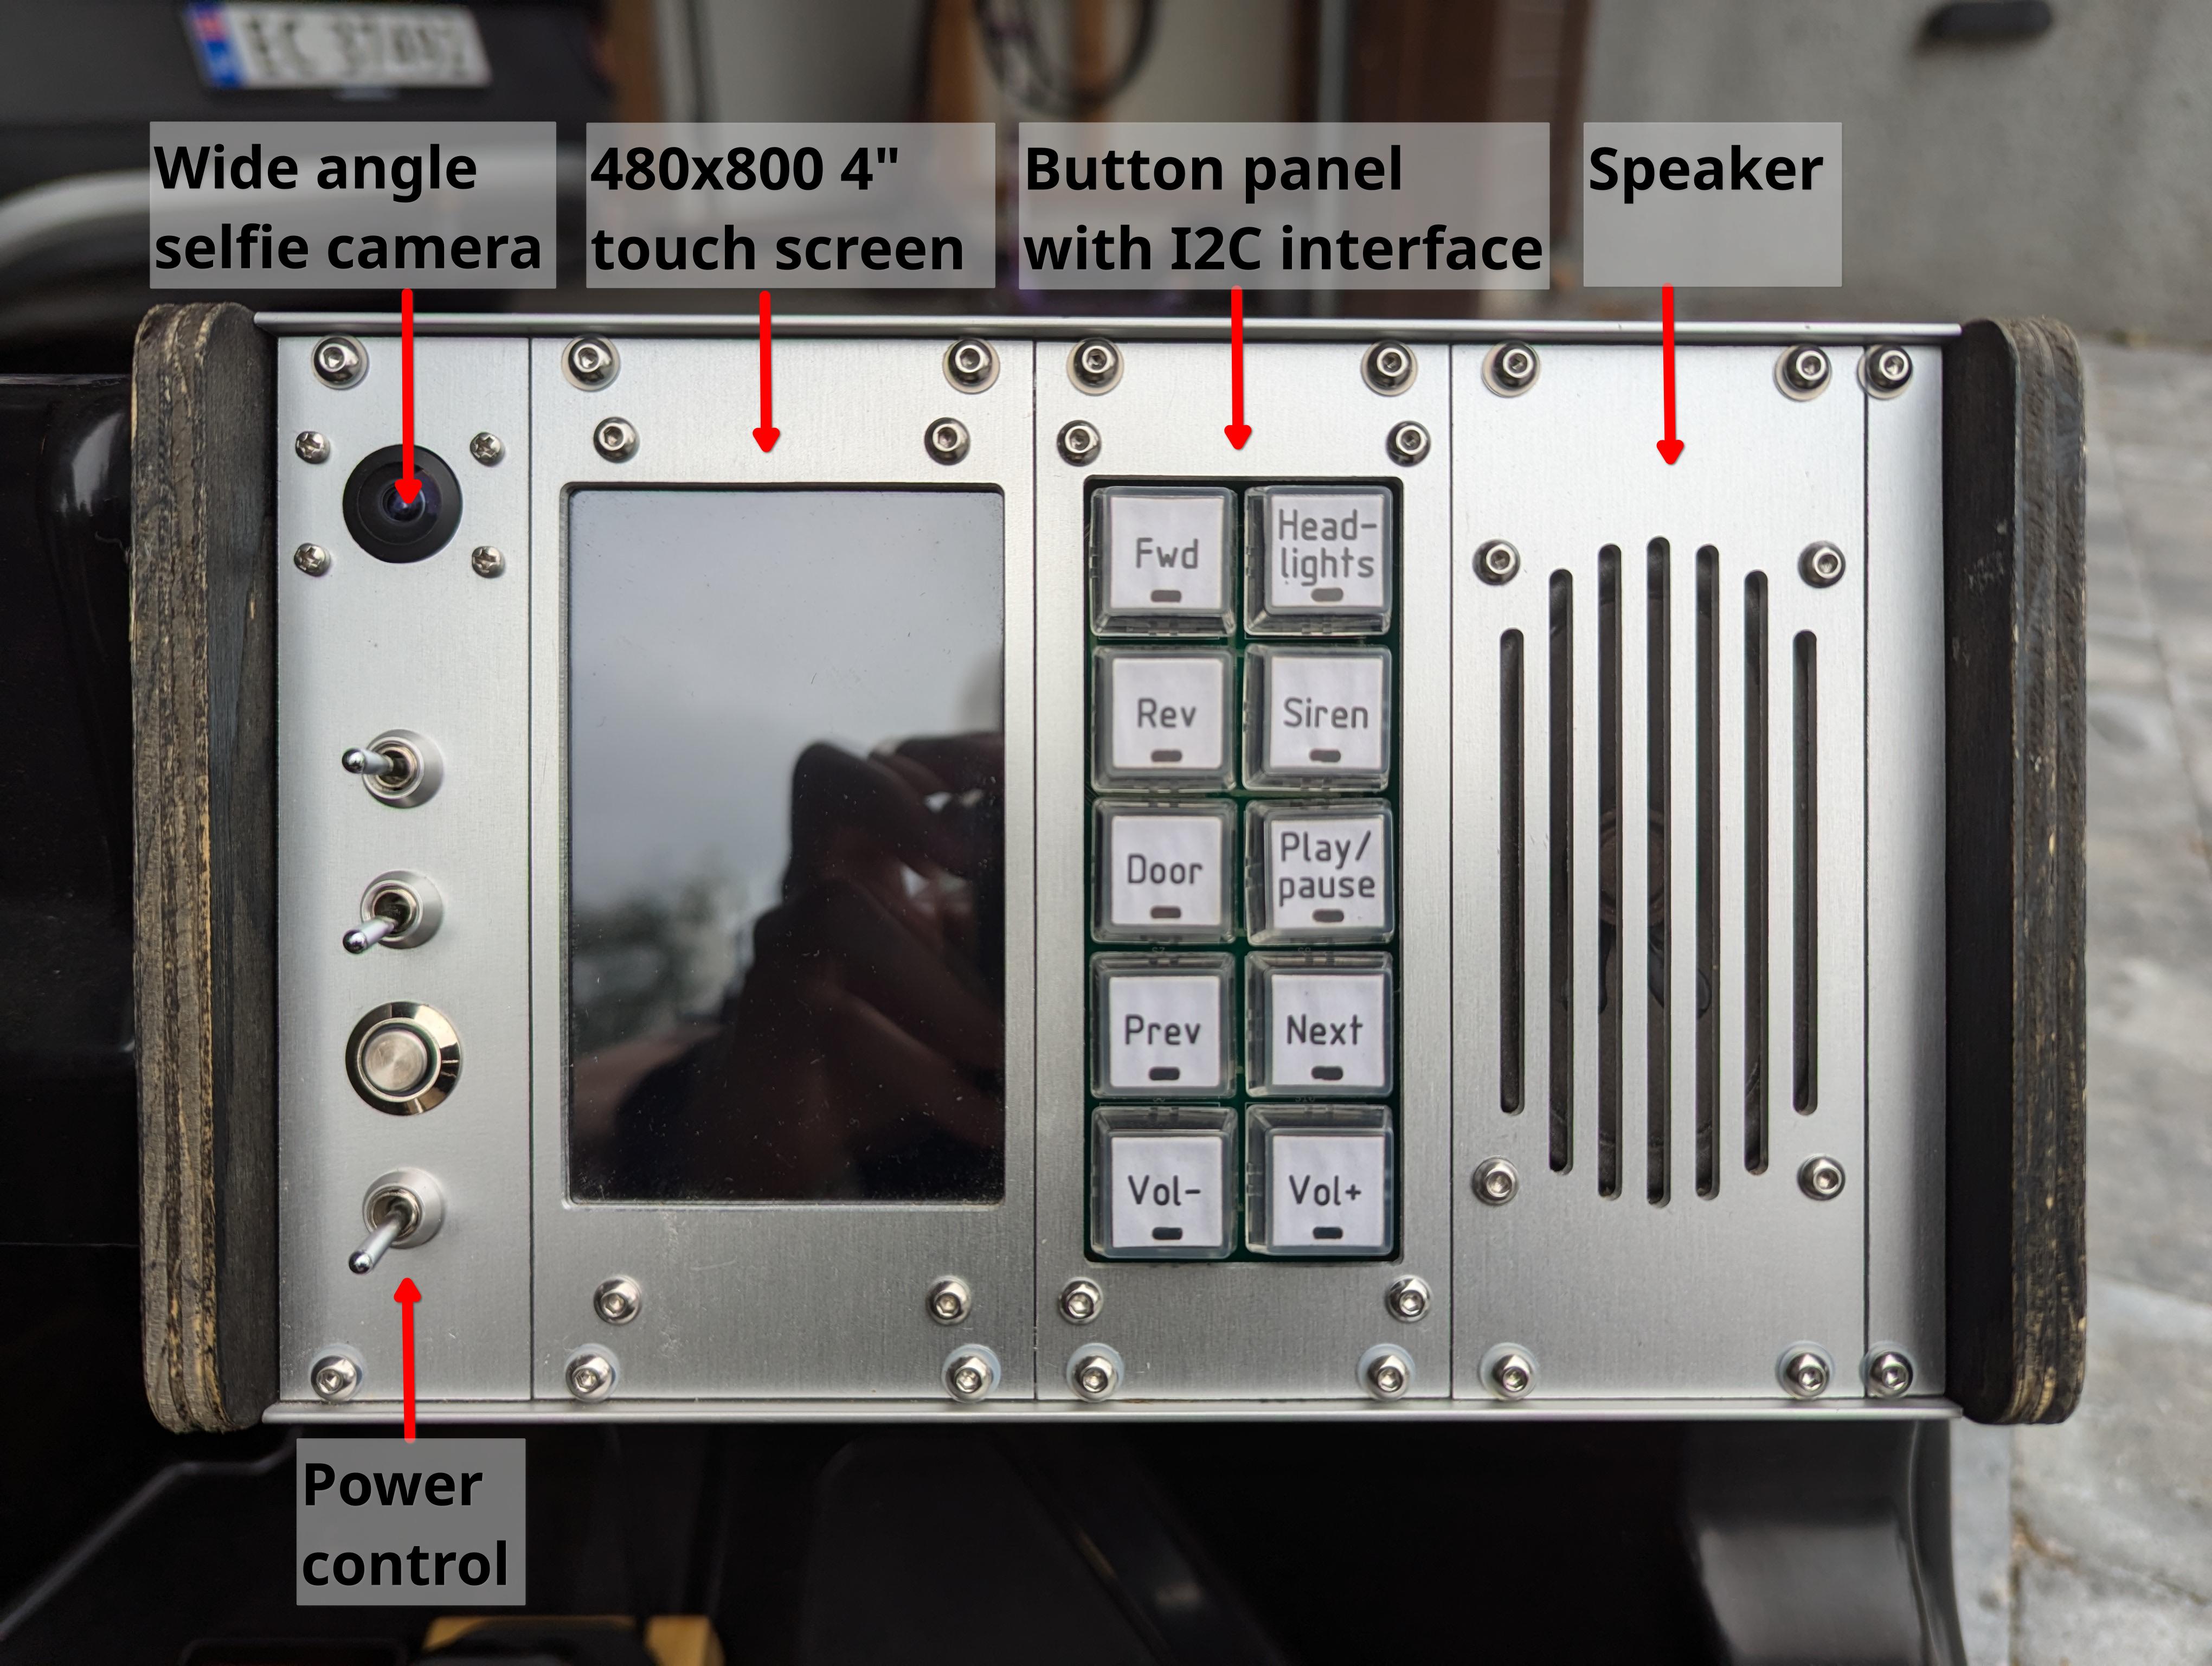
You know, it feels as though it’s getting more and more difficult to compete for Father of the Year around here. And [Jon Petter Skagmo] just laid down a new gauntlet — the incredibly overly-engineered kids car.
While the original plan was to build the entire car from scratch, [Jon] eventually opted to use an off-the-shelf car that had a dead battery.
While the original architecture was quite simple, the new hardware has just about everything a kid could want in a tricked-out ride, most of which is accessible through the really cool dashboard.
We’re talking headlights, a music player, a siren, a selfie video cam that doubles as two-way communication with the driver, and even a garage door opener that uses an MQTT connection.
Under the cute little hood is where you’ll find most of the electronics. The car’s brain is a Raspberry Pi 3B, and there’s a custom daughter board that includes GPS/GNSS. This was originally meant to geofence [Baby Girl Skagmo] in, but Dad quickly realized that kids are gonna kid and disabled it pretty soon after.
If you think about it, even difficult mazes on paper are pretty easy. You can see all the places you can and can’t go, and if you use a pencil instead of a pen, well, that’s almost like cheating.
However, using a pencil is pretty much a necessity to play [penumbriel]’s Blind Maze. In this game, you can’t even see the maze, or where you are. Well, that’s not exactly true — you can “touch” the wall (or lack thereof) in front of you and to the sides, but that’s it. So you’re going to need that pencil to draw out a map as you go along.
This game runs on an Arduino Nano and a 18650 cell. There are three LEDs deep within the enclosure, which is meant to give the depth of walls. But, even the vision-impaired can play the Blind Maze, because there’s haptic feedback thanks to a small vibration motor.
If you want to play in hard mode, there’s a hidden paperclip-accessible switch that turns off the LEDs. This way, you have to rely on hitting the walls with your head. Be sure to check out the video below.
Have you built yourself a macro pad yet? They’re all sorts of programmable fun, whether you game, stream, or just plain work, and there are tons of ideas out there.
Image by [CiferTech] via Hackaday.IOBut if you don’t want to re-invent the wheel, [CiferTech]’s MicroClick (or MacroClick — the jury is still out) might be just what you need to get started straight down the keyboard rabbit hole.
This baby runs on an ATmega32U4, which known for its Human Interface Device (HID) capabilities. [CiferTech] went with my own personal favorite, blue switches, but of course, the choice is yours.
There are not one but two linear potentiometers for volume, and these are integrated with WS2812 LEDs to show where you are, loudness-wise. For everything else, there’s an SSD1306 OLED display.
But that’s not all — there’s a secondary microcontroller, an ESP8266-07 module that in the current build serves as a packet monitor. There’s also a rotary encoder for navigating menus and such. Make it yours, and show us!
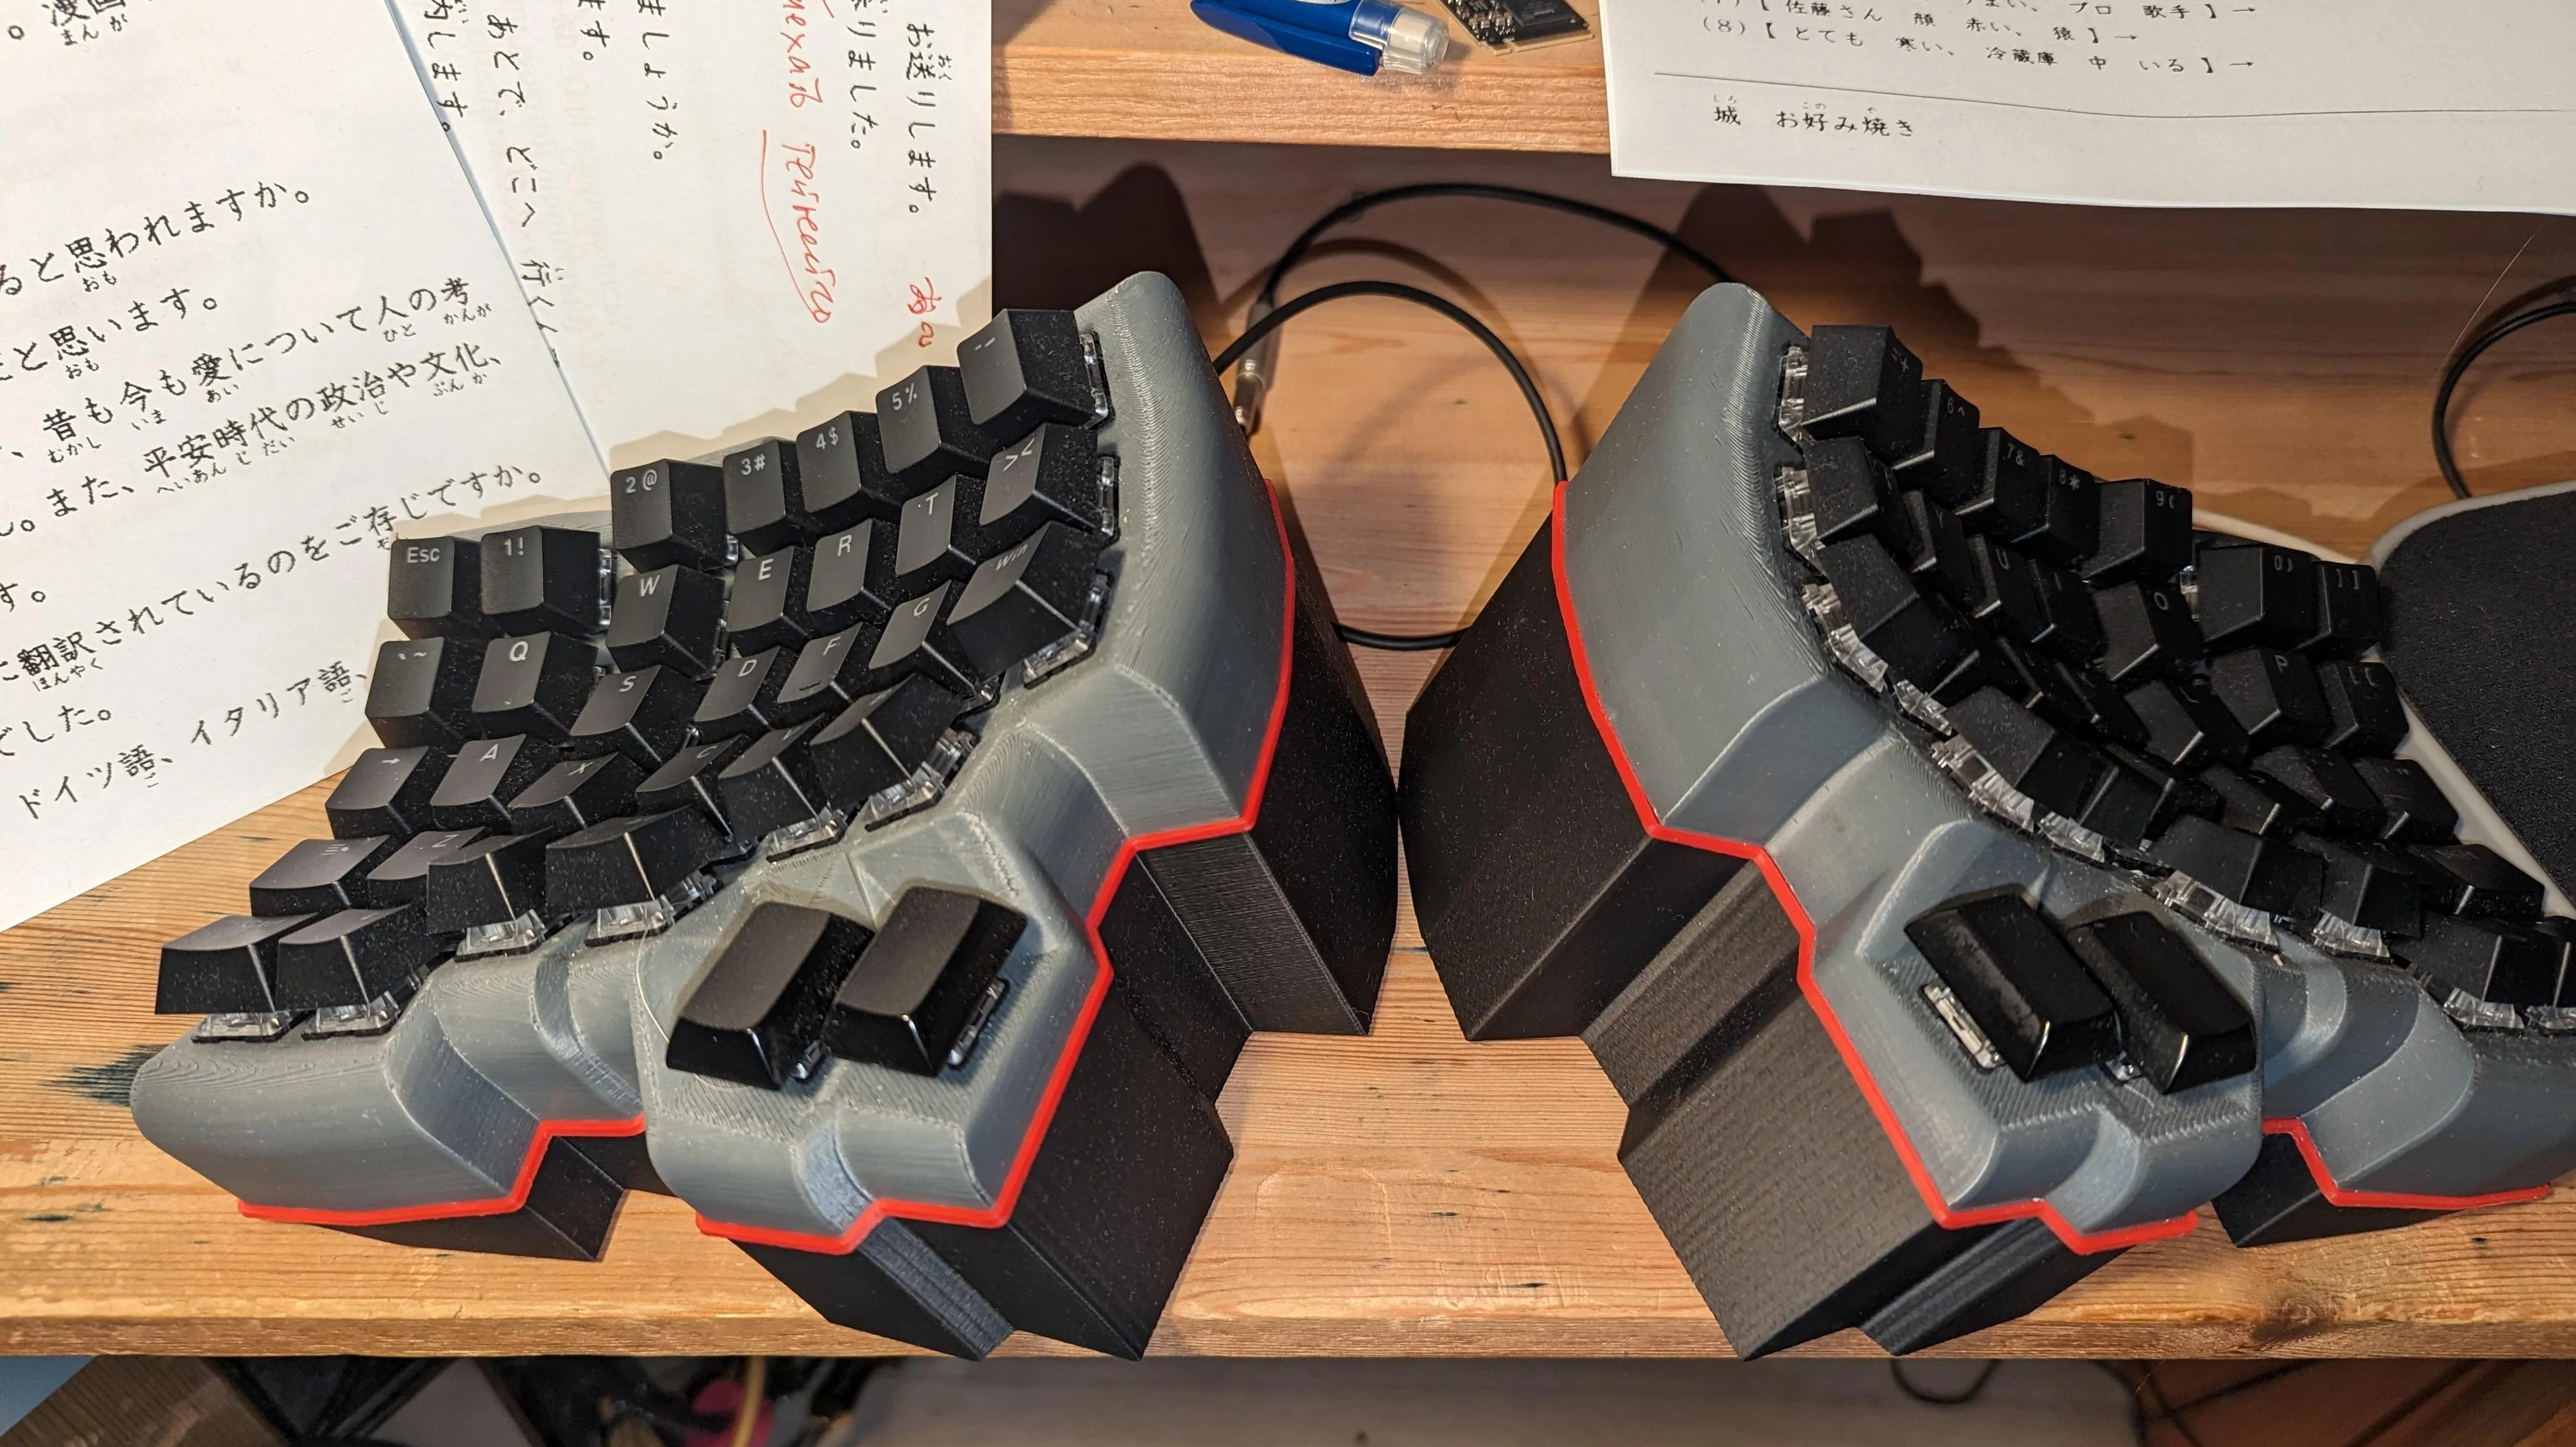
Presenting the Wedgetyl, and Lessons Learned
Believe it or not, the Wedgetyl is [burbilog]’s first build. If you can’t tell the lineage from the name or the photo, this is a dactyl manuform-like design with super wedgy bases and RP2040s for the brains, and Gateron clear switches.
Image by [burbilog] via redditAs this was a first build, there were plenty of lessons learned along the way, and that’s what the bulk of this post is about. While I won’t list all thirteen, here are some of the highlights including the revelation that finding the exact right location for the thumb cluster is the most difficult task of a project like this.
As far as building it goes, the hardest part might be the soldering/wiring, unless you use something like the Amoeba single-switch PCBs which allow for hot swapping. At first, the Wedgetyl had Cherry MX reds, but now it has those Gateron clears.
There are other gems in the post, like all wiring guides on the Internet are crap and TRRS connectors are stupid. While I’d love to see [burbilog] create the ideal wiring guide for at least this keyboard, I totally understand if that’s never going to happen. And apparently they fried some pins on the RP2040 trying to use a TRRS. There are a ton of options out there, and it seems [burbilog] already found one in the form of the 4-pin M8 connector. Great build, [burbilog], and I can’t wait to see your second one.
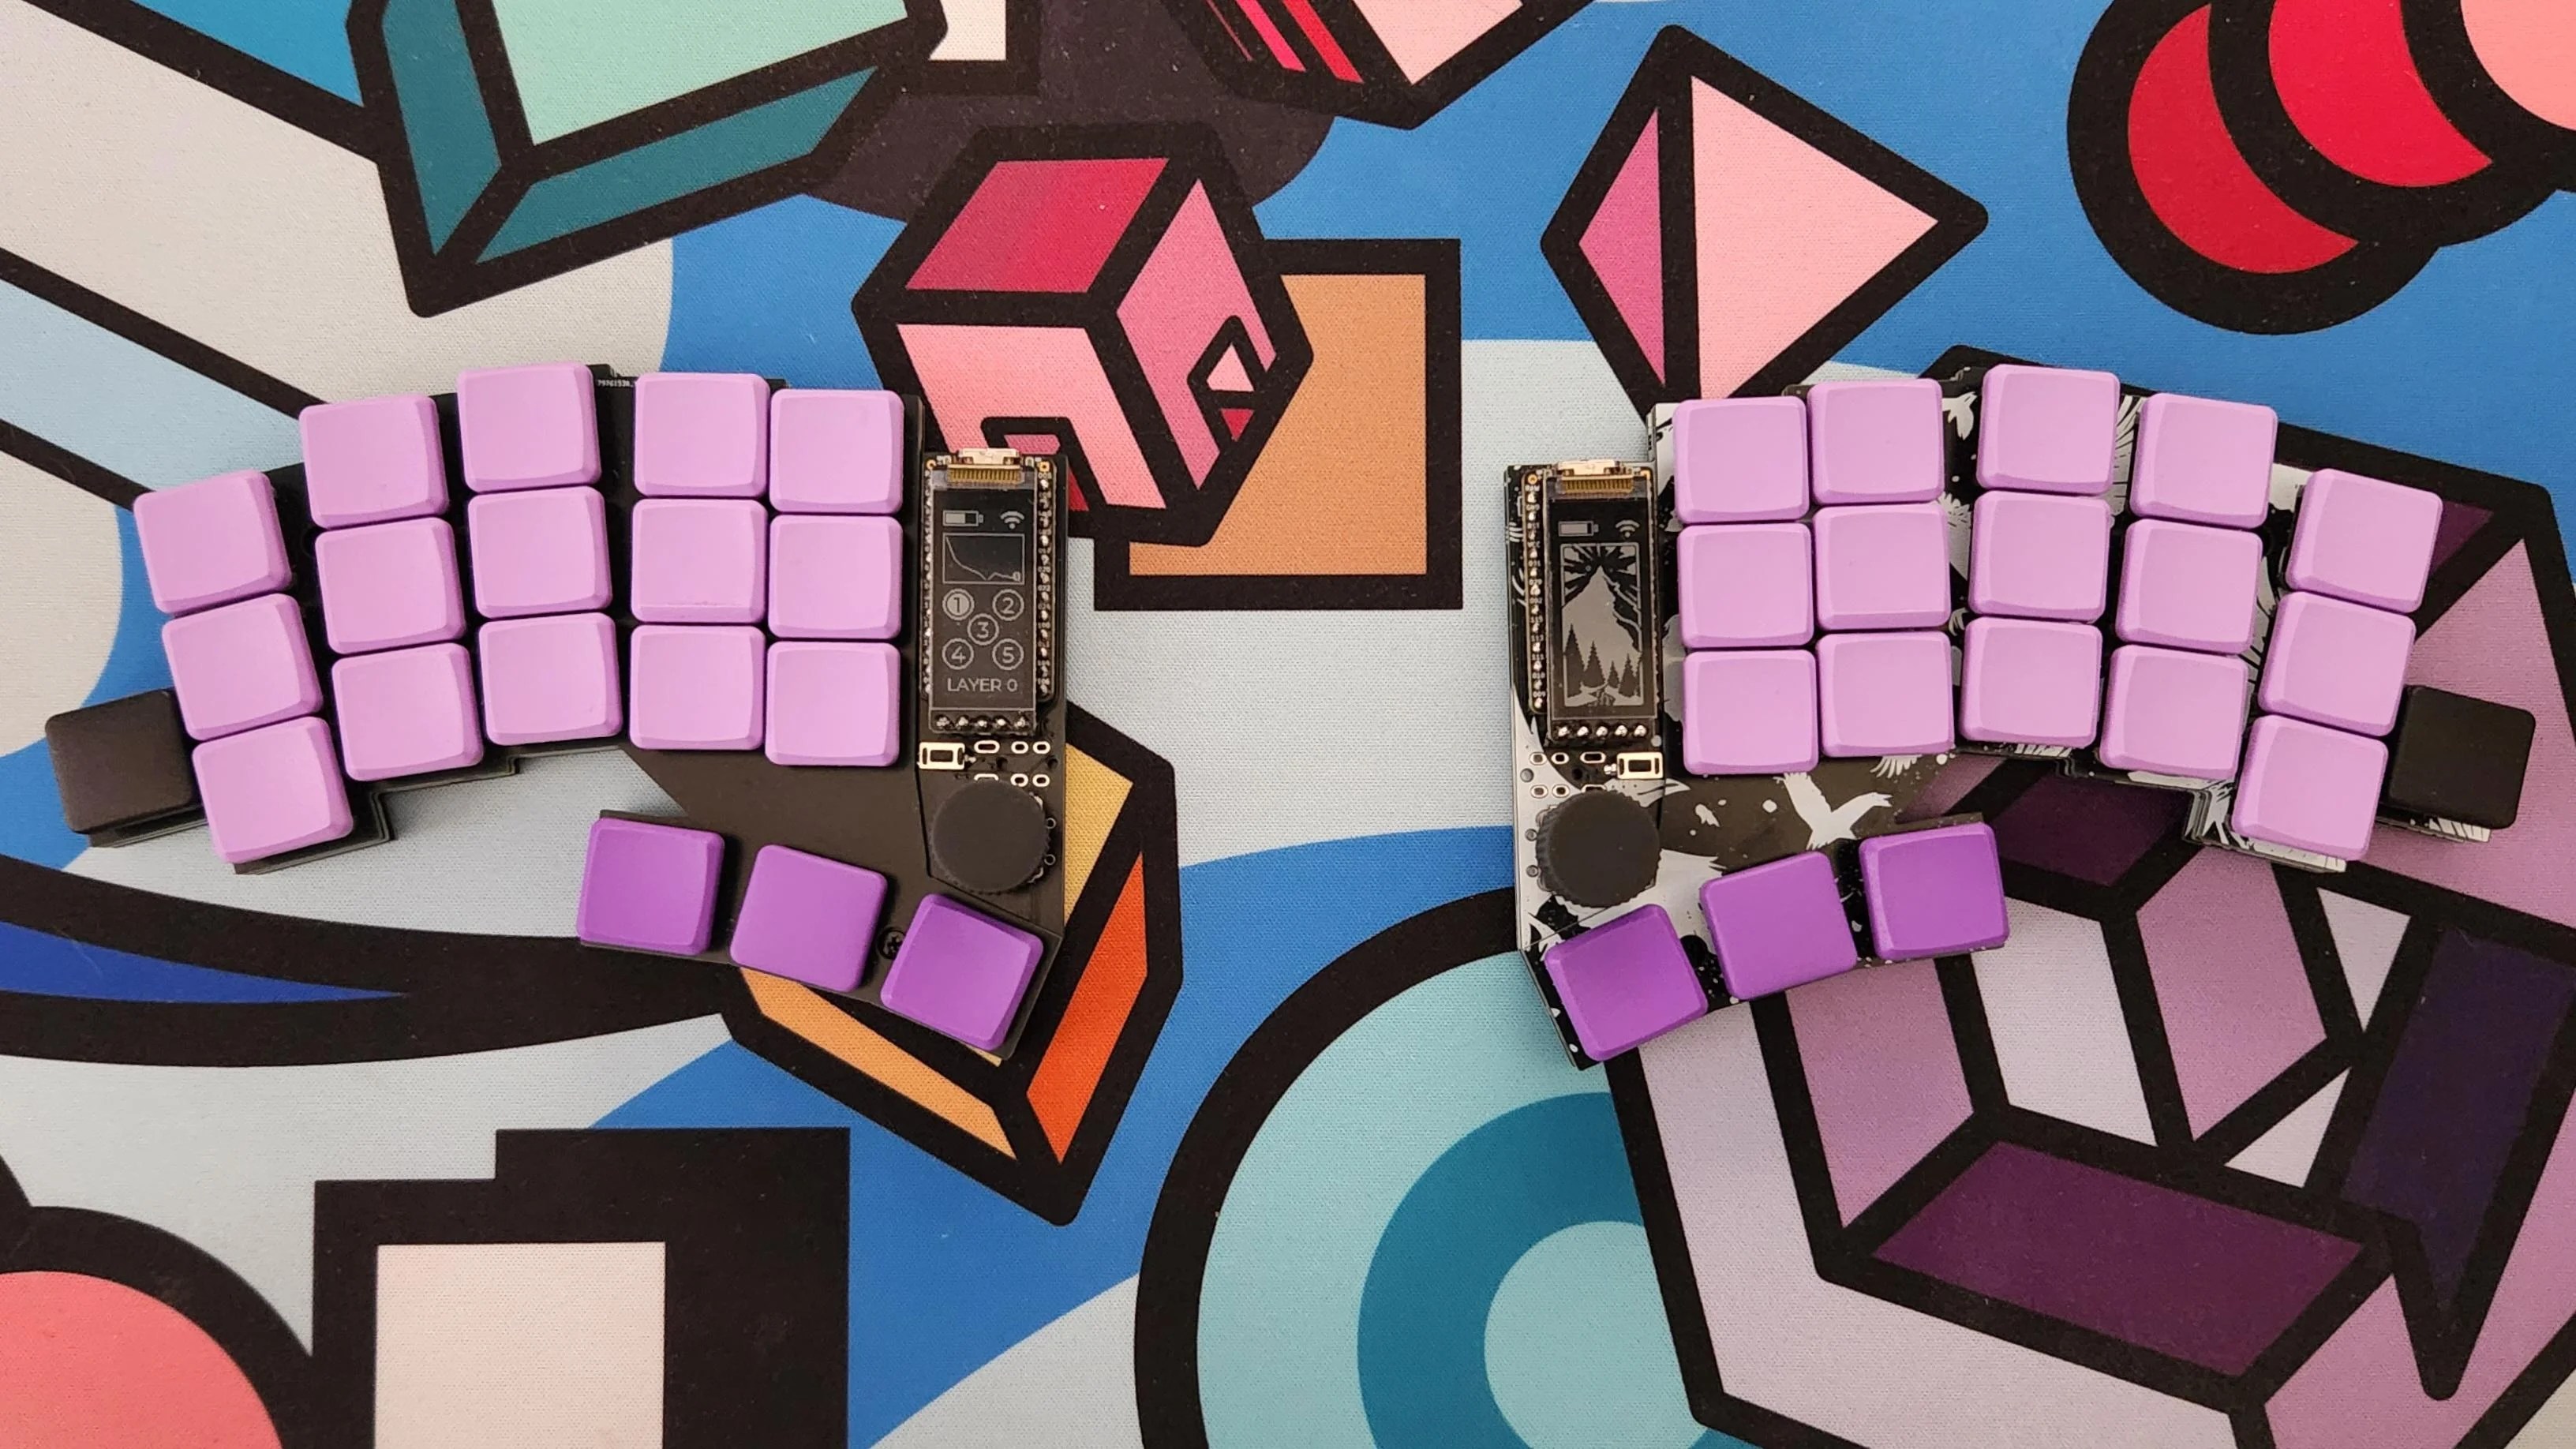
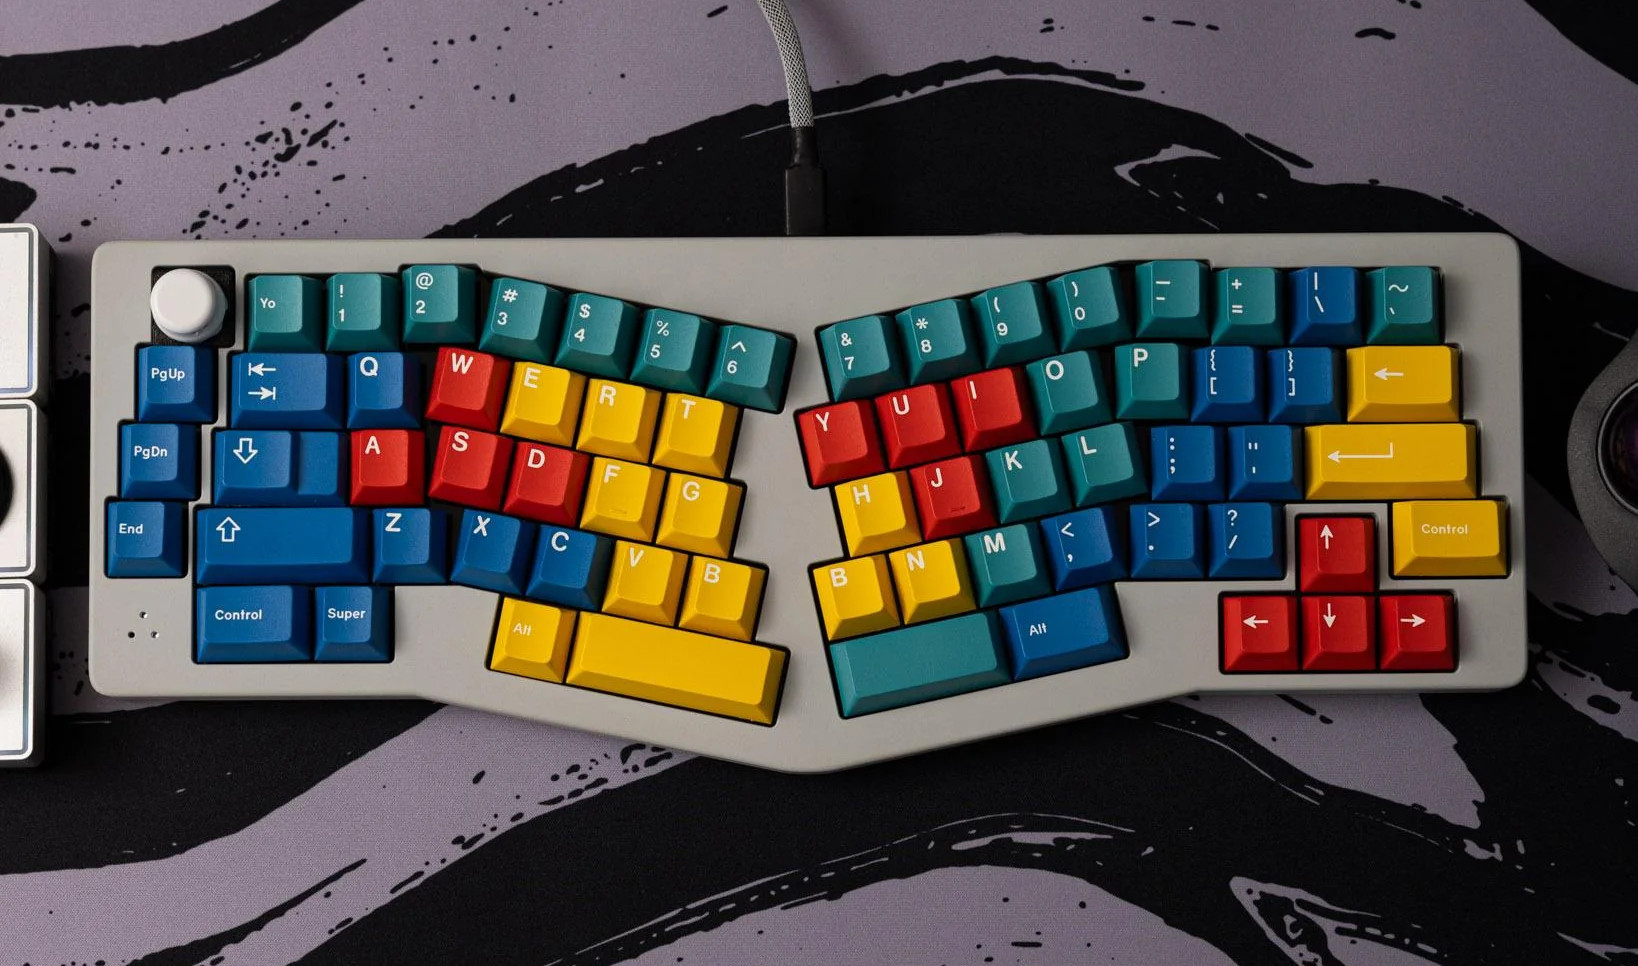
The Centerfold: Crowkb, Minus a Few Keys
Image by [CrackerRobot] via redditThis lovely little lavender number is the crowkb_38, which is a few keys removed from [CrackerRobot]’s original 46-key crowkb. That slammin’ desk mat is from One of Zero, and the key caps are MBKs. See those pinky keys on the sides there? [CrackerRobot] has them set up as Esc and Enter. What would you use them for?
Do you rock a sweet set of peripherals on a screamin’ desk pad? Send me a picture along with your handle and all the gory details, and you could be featured here!
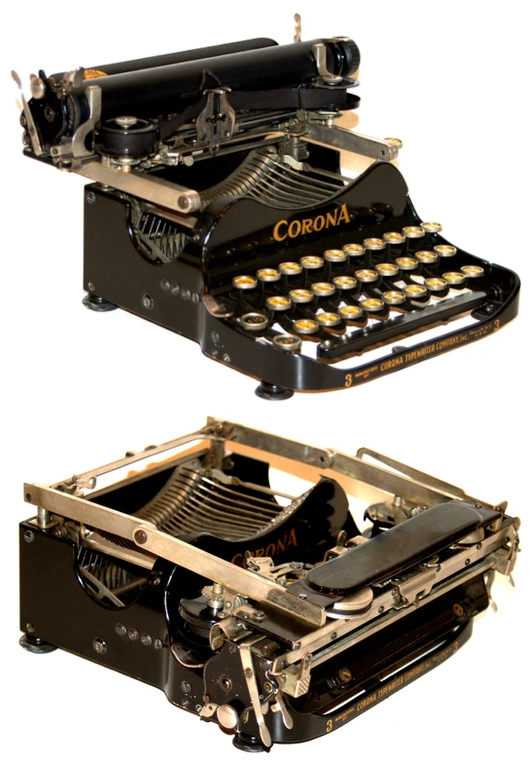
Historical Clackers: the Corona 3 Folding Typewriter
Each of the 28 regular keys has three characters on the type bar, so between lower case, upper case, and all the third functions, you have quite a full keyboard thanks to the layers you get with FIG and CAP. You can see some rather nice pictures here.
The Corona 3 was so successful that the Standard Typewriter company changed its name to the Corona Typewriting Company in 1914. The company merged with L.C. Smith & Brothers Typewriting to become Smith-Corona, and eventually Smith Corona Marchant (SCM) in 1958. After a couple of bankruptcies, the company settled on selling thermal paper.
ICYMI: Keyboard for Ants Gets RGB
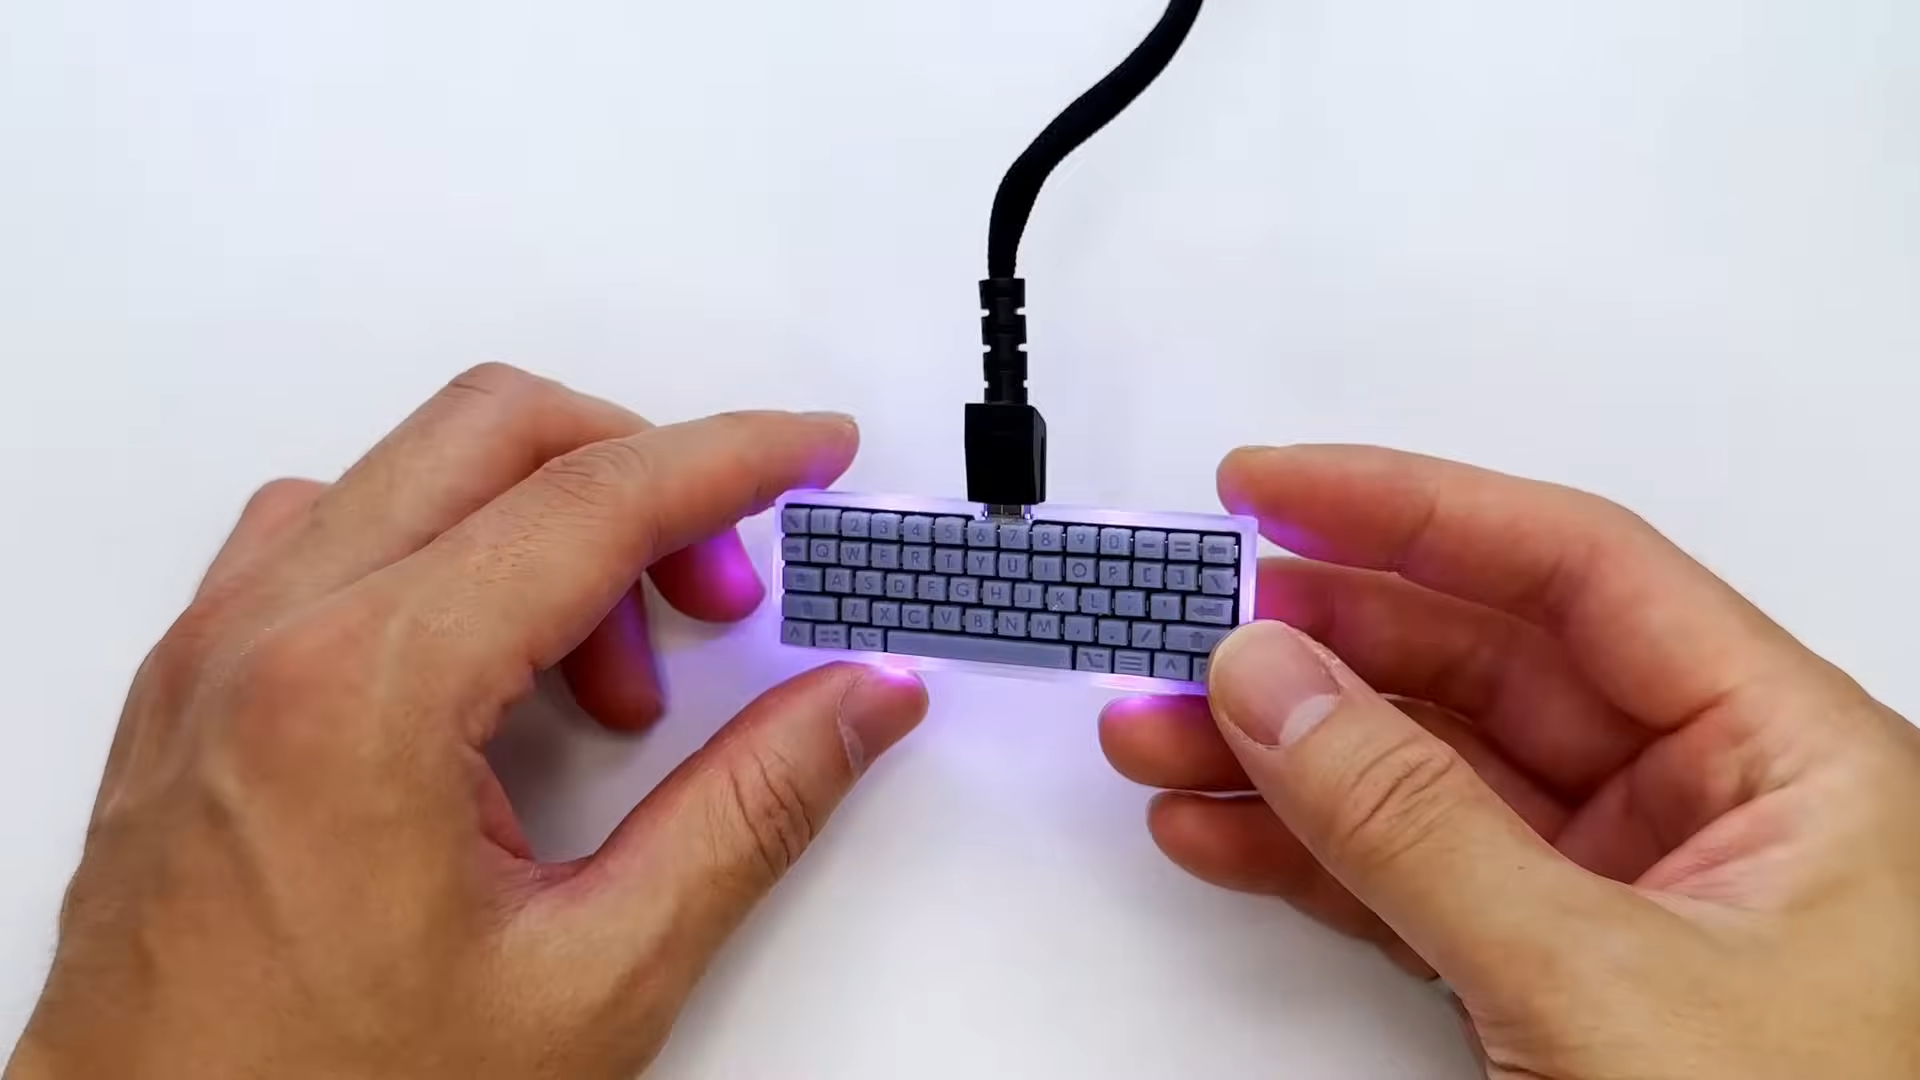
Image by [juskim] via YouTubeAughhhh, it’s so tiny! You know I can’t resist things that are either way smaller or way larger than life, and my only regret is that I didn’t see this tiny backlit keyboard before [Lewin] did. Hey, at least I can write about it here.
This actually isn’t [juskim]’s first tiny keyboard, but as you’ll see in the video, it’s much smaller than the previous attempt. Even though it’s tiny, this 60% design is really inclusive, sporting a number row, a function row, and even +/-/= and square brackets.
You can see that it’s small, but if you want to make a maquette to really fathom the size of this thing, it measures 66 mm x 21 mm. Smaller than a Blackberry keyboard. And yes, you can actually type on it, because it’s a real, working keyboard with an ATmega32U4 brain and tiny 3D printed key caps. [juskim] managed to bang out 14 words per minute on it, which is pretty good considering the size.
Children can be a great source of daily inspiration, especially when they are just beginning to speak in full sentences and starting to let their little personalities show.
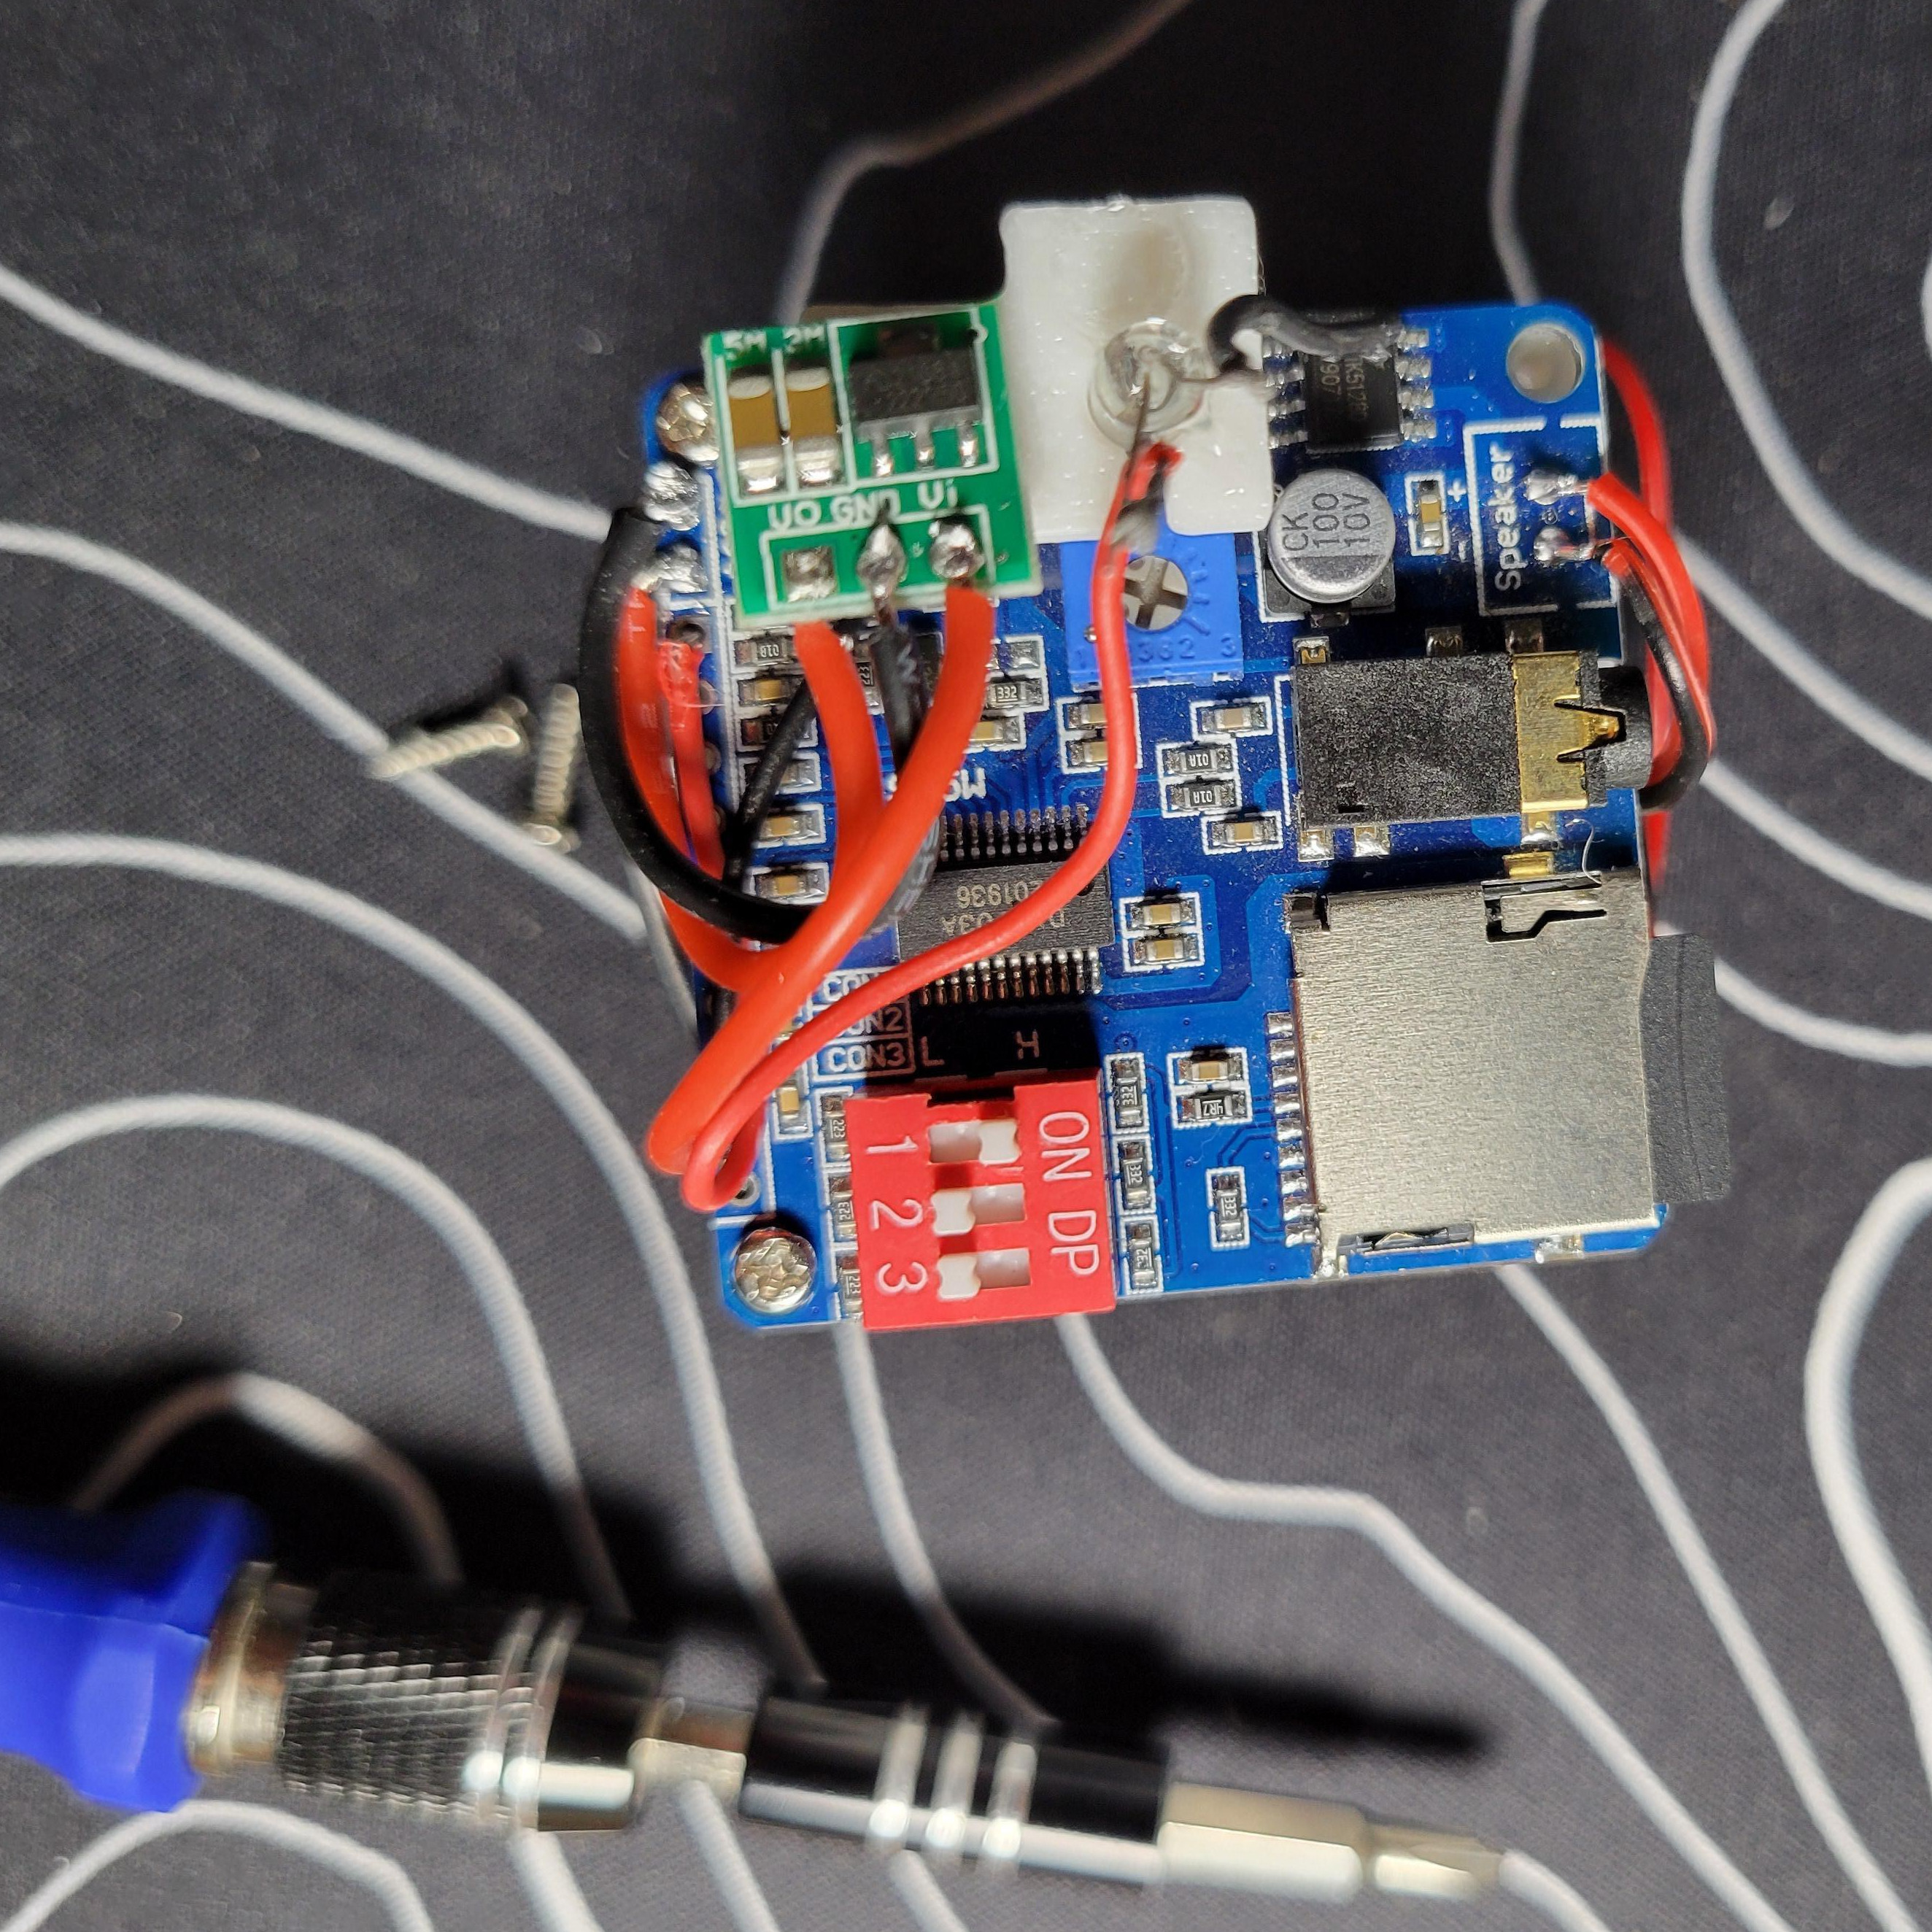
[Franklinstein] has the cutest toddler, and she loves her toy espresso machine, especially the little milk carton that came with it. Well, one day, Daddy made a glug-glug sound that delighted her, and he was inspired to build an entirely new milk jug that would make that special sound whenever it was turned over.
In order to keep the build relatively simple, [Franklinstein] used a sound module with an SD card and a tilt switch to activate it. There’s not much else to the build, really — just the usual suspects like a boost converter, a charging module, and a speaker, of course. In case you couldn’t tell, the enclosure and the internal skid that the electronics assemble onto are 3D printed.
This is really cute, and [Franklinstein]’s daughter seems to love it. Everything is available, including some nice instructions if you want to make one of your own. Be sure to check out the neat build video after the break.
Usually, if something is tiny, it’s probably pretty cute to boot. [Luke J. Barker]’s lunar navigation game is no exception to this unwritten rule. And as far as contest rules go, this one seems to fit rather nicely, as it is tiny on more than one level.
Moon Base P (for Puppies) is built upon a XIAO ESP32-C3, an SSD1306 OLED display, and a single button to keep the BOM tidy. In this riveting side-scroller which sort of marries Lunar Lander and Flappy Bird, the top bar is always yellow and displays fuel and such, and the bottom is a rough, blue lunar surface over which you must maneuver your lunar lander. Keep pressing the button to stay up and avoid mountains, or let off the gas to cool the engine.
Fly that thing over the terrain, avoiding stray meteors and picking up free fuel, and then land gently at Moon Base P to save the stranded puppies. But you must keep flying — touch down anywhere but where you’re supposed to, and it’s game over! Once you’ve picked up the puppies, you must fly them safely onward to the rescue pod in order to win. Don’t miss the walk-through and demo after the break.
A decade is a long time to carry around a project idea in your head. Fortunately, the Tiny Games Contest happens to coincide with [Senile Data Systems]’s getting back into ATMega programming, so they can finally make their zero-dimensional PONG dreams come true (and have the chance at great prizes, too, of course).
If you don’t already get what’s going on here, zero-dimensional PONG takes 1D PONG and turns it on the short side. Imagine the light coming toward you, then moving away toward your opponent, and you have the basic idea. So, how is this done? Pulse-width modulation controls the brightness of the LED, and, well, you have to be pretty fast, although there is a small margin for the inevitable error.
In the video after the break, you can watch [SDS] play themselves using a red/green LED. Player one must press the button when red is fully lit and green is off, and player two goes when green is fully lit and red is off. The cool thing is that this game uses sockets, so it can use any LED. There are nine difficulty levels to control the PWM speed, so one can really test one’s reaction time.
If you want to build one of these, you’ll need an ATtiny2313 or something similar, a couple of buttons, a display, and the optional but fun buzzer. The well-commented code is available through [Senile Data Systems]’s site.
What can you do with a one-button keyboard? Quite a bit, actually, especially if that key has a little screen on it. That’s the idea behind [Maker M0]’s MagicClick macro pad, which is an updated version of a highly useful project we have featured in the past. Well, now there’s a tiny game to go with it.
Think you’re pretty good at measuring the passage of time? This game will likely prove you wrong. Press and hold the button and the timer begins with some pre-determined interval, such as four seconds. Once you think those four seconds have passed, release the button and find out how far off you were.
While the first version of this keyboard used the CH582F RISC-V microcontroller, the second and this third version use an ESP32-S3 on a custom, tightly packed PCB. That TFT display measures 0.85″, and the battery is an 3.7 V 802025 Li-Po. [Maker M0] has also redesigned this to make it easier to print, and plans to support circular screens in the near future.
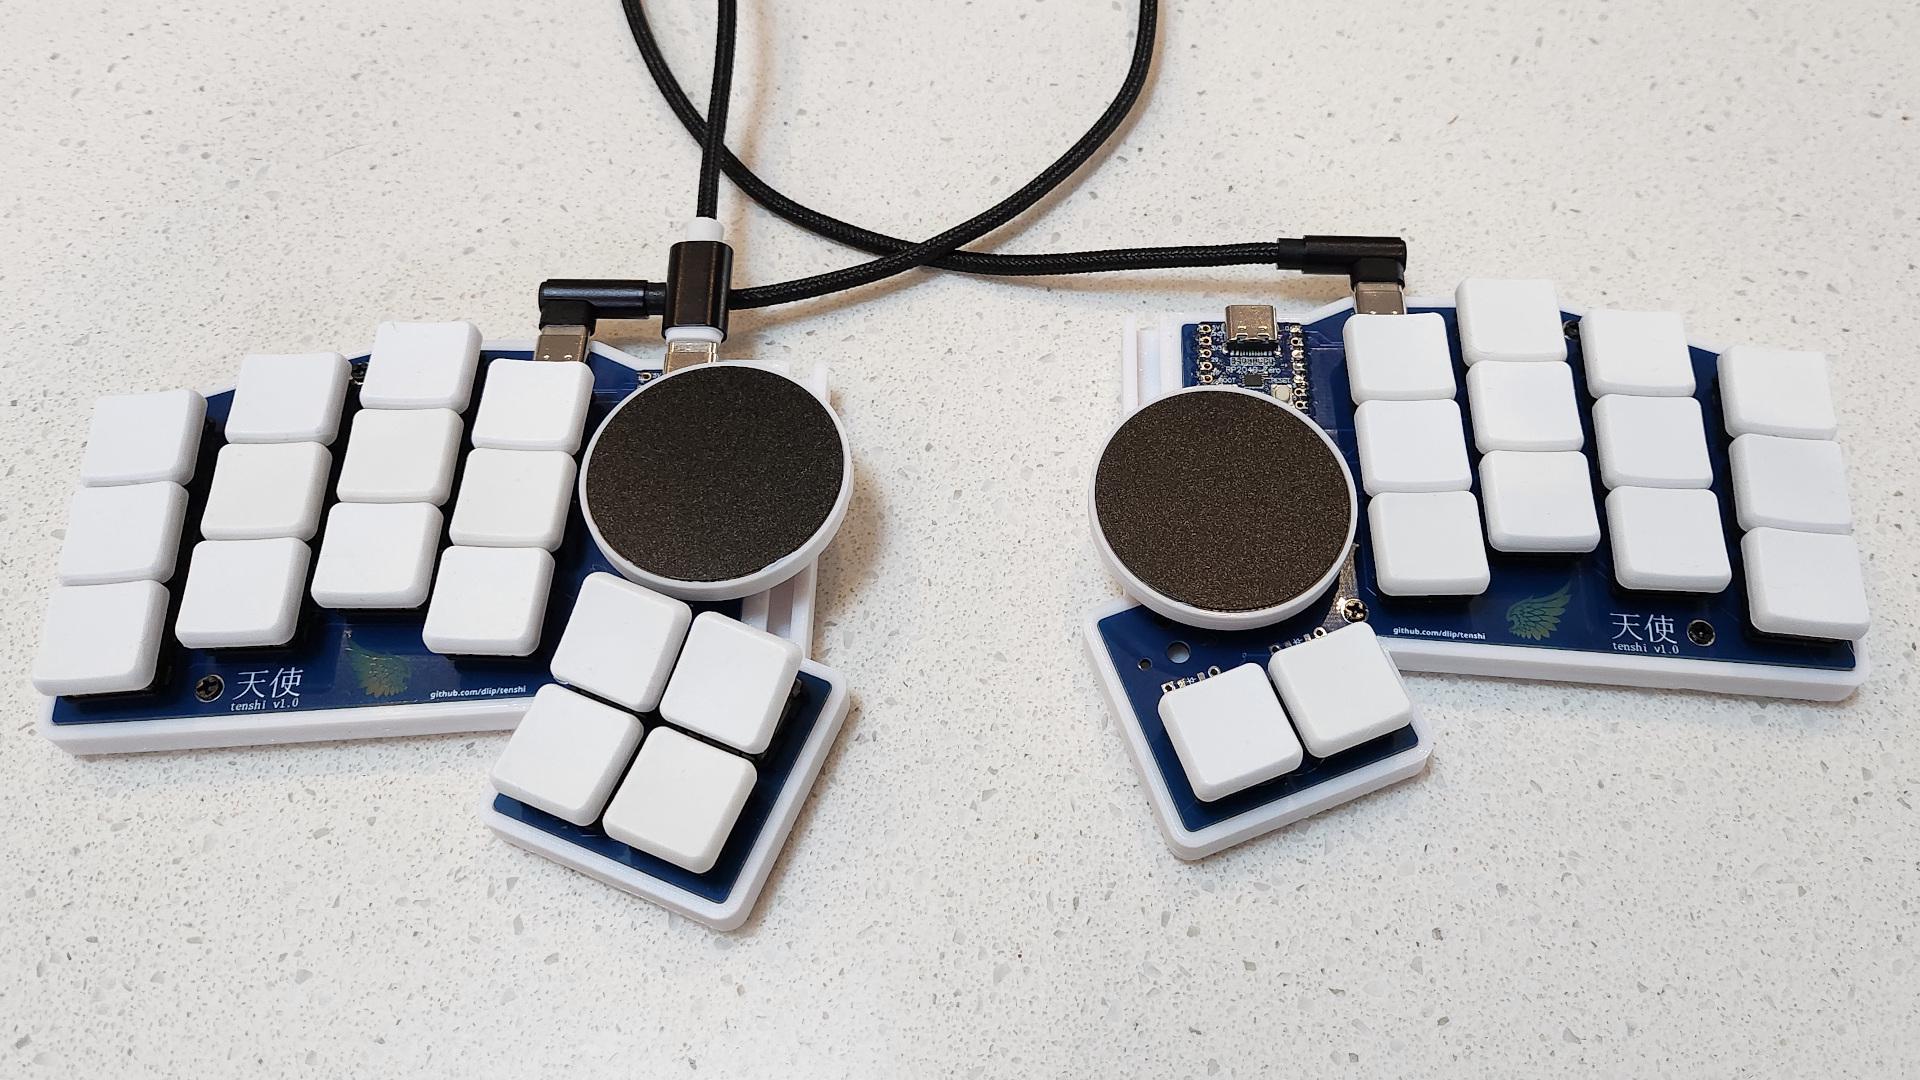
Image by [fata1err0r81] via redditThe most striking feature of the Tenshi keyboard has to be those dual track pads. But then you notice that [fata1err0r81] managed to sneak in two extra thumb keys on the left, and that those are tilted for comfort and ease of actuation.
The name Tenshi means ‘angel’ in Japanese, and creator [fata1err0r81] says that the track pads are the halos. Each one slides on a cool 3D-printed track that’s shaped like a half dovetail joint, which you can see it closer in this picture.
Tenshi uses a pair of RP2040 Zeros as controllers and runs QMK firmware. The track pads are 40 mm each and come from Cirque. While the Cirques have been integrated into QMK, the pull request for ZMK has yet to be merged in. And about those angled keys — [fata1err0r81] says they tried risers, but the tilting feels like less effort. Makes total sense to me, but then again I’m used to a whole keyboard full of tilted keys.
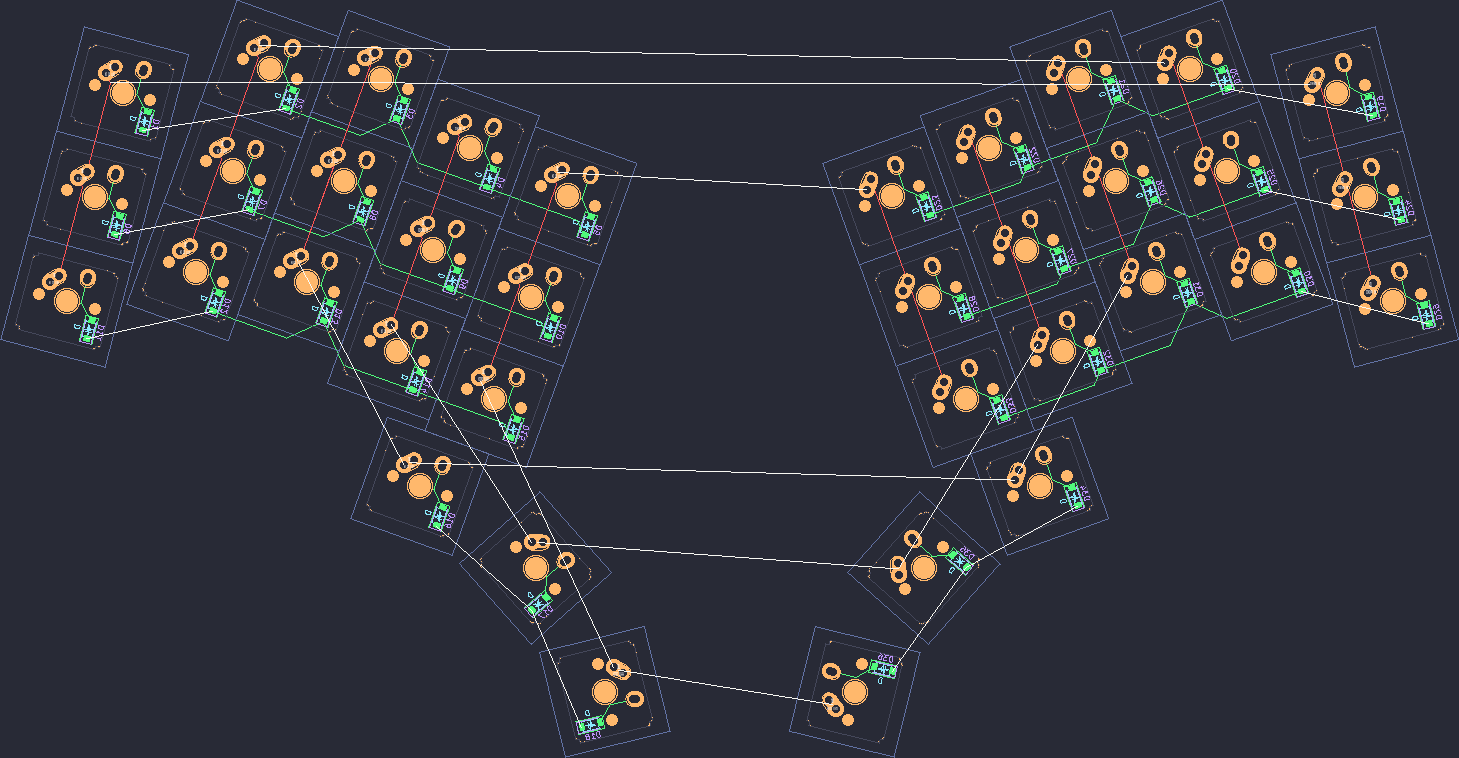
kbplacer Is Your New Best Friend
The finished result. Image by [Adam] via GitHubWhat’s the worst part about building custom mechanical keyboards? Well, it probably depends on the person, but for many, the answer would be placing the elements and routing them in order to create the actual PCB.
[Adam] wrote kbplacer, which is an open-source KiCad plugin for designing mechanical keyboards. kbplacer does automatic key placing and routing, and works with Keyboard Layout Editor, VIA, QMK, and, experimentally, Ergogen. It also places diodes, and lets the user select the diode position in relation to key position. In addition, kbplacer can also be installed with pip as a Python package for use with other tools.
Image by [hiphasreddit] via redditHarlequin all the things, I say, and bring back the four-color Volkswagen. That’s why I love this here Battleship Harleyquin. Don’t miss the gallery!
This may look like an Alice, but it’s really the AVA by Sneak Box with GMK Panels key caps. A matching Panels desk mat might have been too much; I think the GMK Slasher looks nice.
Do you rock a sweet set of peripherals on a screamin’ desk pad? Send me a picture along with your handle and all the gory details, and you could be featured here!
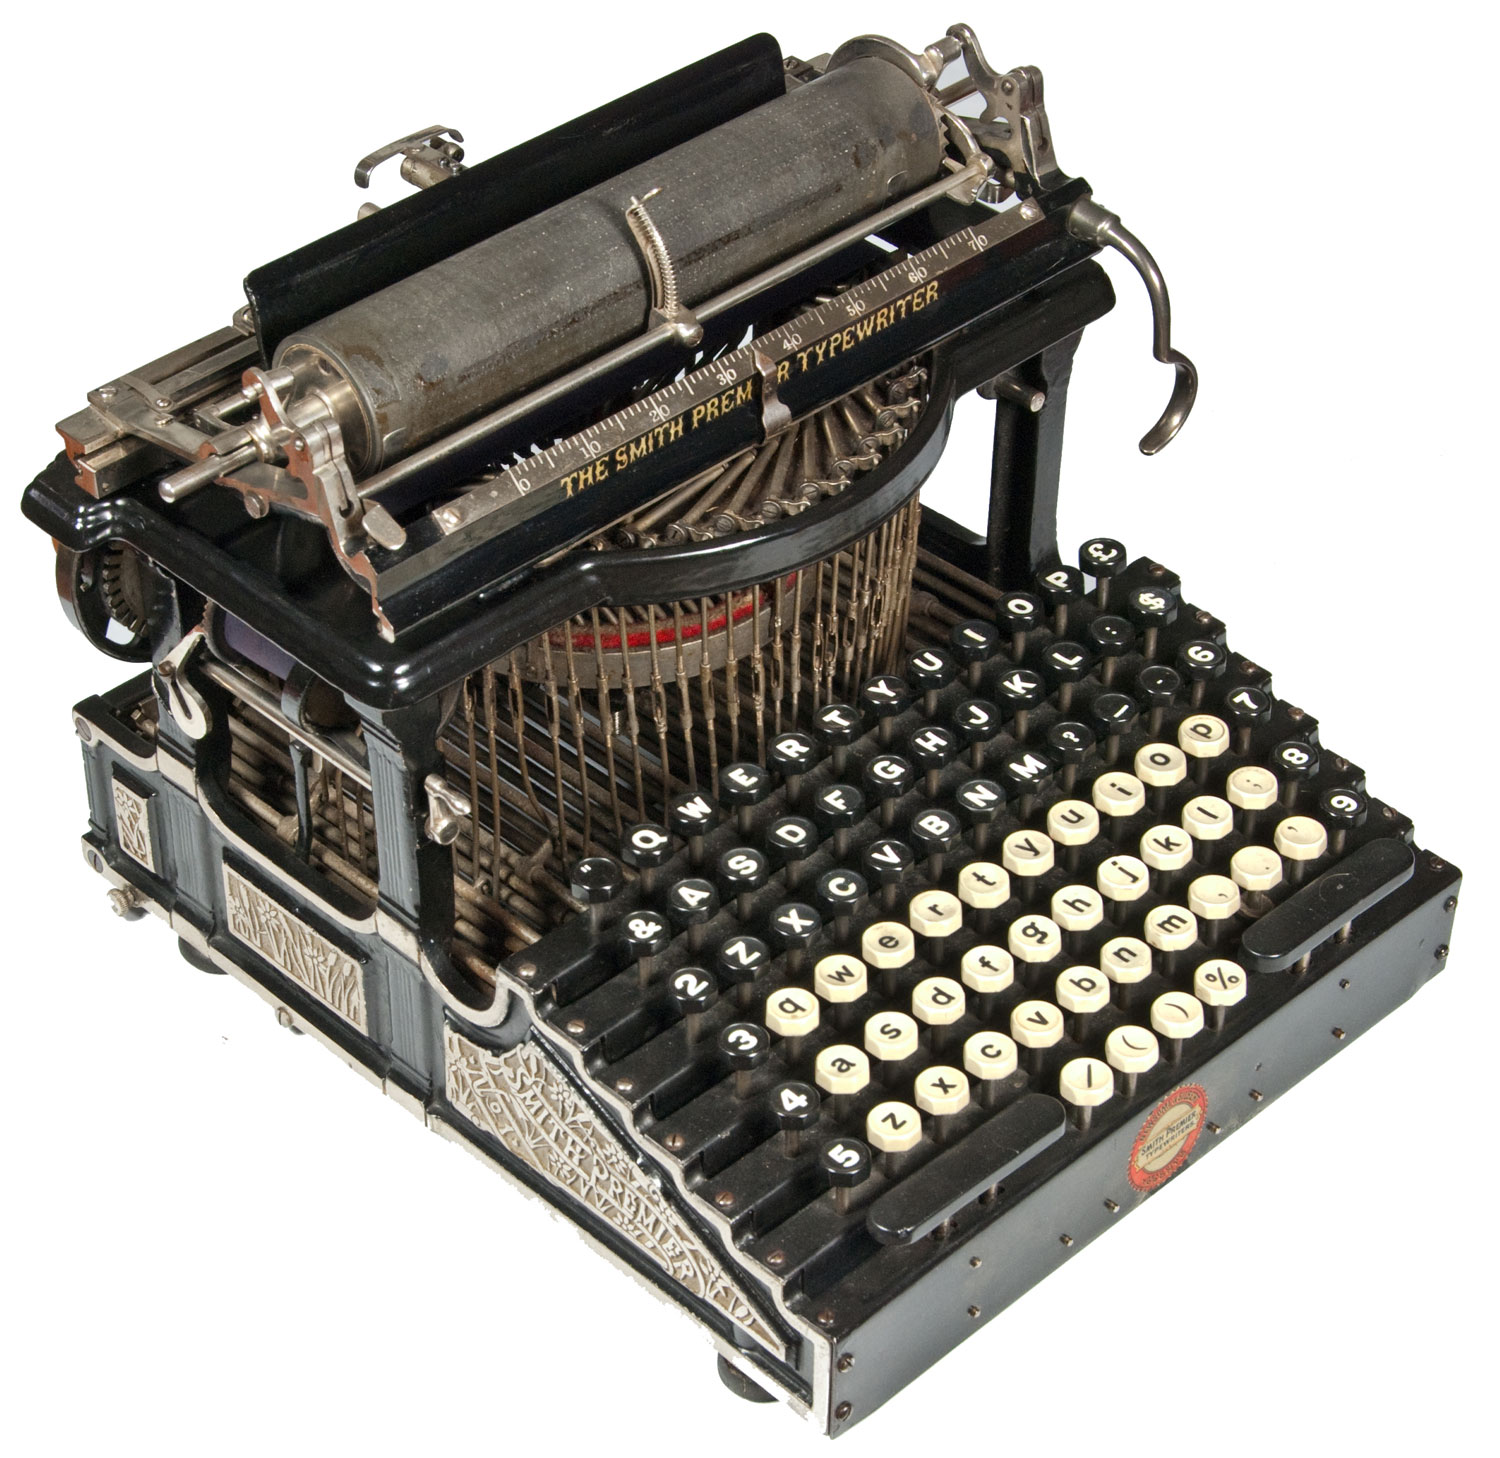
While not quite a 200% keyboard, the Smith Premier 1 definitely has one in spirit. As you can probably tell, there are separate keys for upper and lower case letters. No key performs a second function, so there is no Shift in sight. I particularly like the double space bars and the fact that the numerals run down both sides.
This machine, produced by the L.C. Smith Gun Co. of Syracuse, New York beginning in the late 1880s was “the most advertised and successful double keyboard typewriter of its time”. It sold for $100, which was about average for a keyboard typewriter at that time, when one could buy a horse-drawn carriage for $60.
While modern typewriters make use of keys attached to type bars with levers, the Smith Premier uses an array of turning rods in order to transfer motion from the key press to the type bar.
Pressing a key turns a particular horizontal rod that runs the length of the machine. At the rear, a small lever connected to the rod pulls down on the type bar above it, striking the paper. Apparently this design was quite smooth and responsive for the typist. Be sure to check out the detailed images on this one.
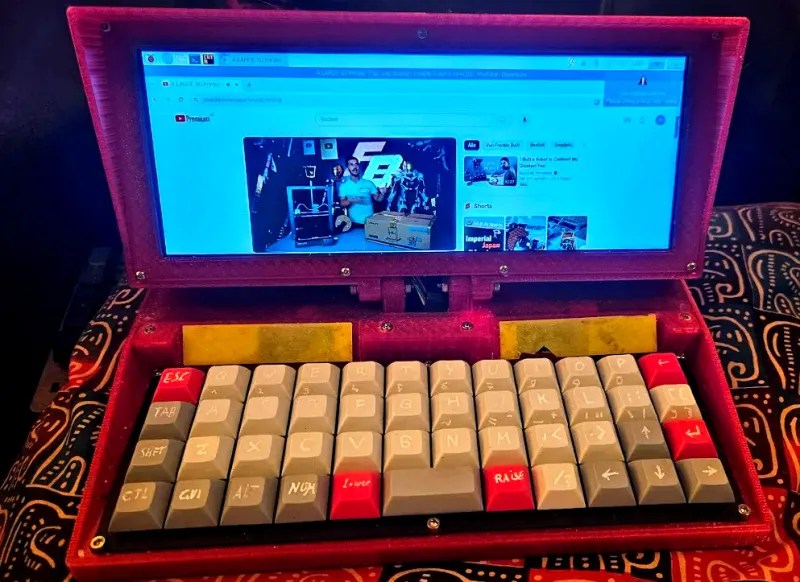
ICYMI: the Portable Pi 84
Image by [Michael Mayer] via PrintablesOver the years, the idea of ‘portable’ has changed significantly. While we once had luggable computers and chonky laptops, these have given way to sleek machines that look pretty much all alike from the outside.
Some of those laptops of yore had ultra-wide displays and were hinged in the center, leaving a sort of trunk the back. It is these classic computers that inspired [Michael Mayer] to build the Portable Pi 84.
Well, those, and in particular, [Michael]’s chosen mechanical keyboard, itself based on the Happy-Keyboard from [Luis Alegría]. The 9.3″ Waveshare display serendipitously just fits over the keyboard, and the rest is in that spacious trunk — the Raspberry Pi 4, a UPS hat, a couple of 21700 batteries, and a pair of speakers.
Be sure to check out the printed panels that let the user change up the ports and connection layout, because that’s an incredibly cool idea.
 This nearly microscopic console uses an equally Lilliputian display — a Plessey GPD340 vintage LED display, in fact. (Check out [Michael]’s reverse engineering project if you want to play around with these.) There are four ultra-small buttons for control and a buzzer for sound.