Modern RC cars can be pretty darn fast. That’s fun and all, but it also makes it easy to crash them into things. This problem inspired [Narrow Studios] to whip up something to offer a bit of protection.
The concept is simple enough—the RC car just needs some way to detect obstacles and stop before hitting them. The build relies on ultrasonic sensors as rangefinders to spot solid objects in the path of the vehicle. An Arduino Nano is in charge of reading the sensors. When it appears the car is approaching a wall or similar obstacle, it fires off a PWM signal to the car’s motor controller commanding it to brake. The additional hardware is held to the car with a bunch of custom printed brackets.
The setup isn’t perfect; the video notes that if you insist on accelerating quickly when close to a wall, you still have a fair chance of hitting it. That’s largely put down to the refresh time of the sensors and the overall system, which could be improved with further work. Still, if you’re always crashing your RC car into walls or curbs, this kind of thing might appeal to you.
The last interesting thing to happen in Donald, BC was when it burned down in the 1910s.
Well, they’ve thankfully moved out of the tent in their parents’ back yard where the prototype was built. They’ve bought themselves a company town: Donald, British Columbia, complete with a totally-not-controversial slogan “Make Donald Great Again”.
More interesting is that their commercial-off-the-shelf (COTS), right-to-repair centered approach isn’t just for semi-trucks: they’re now a certified OEM manufacturer of a rolling heavy truck chassis you can put your truck cab or RV body on, and they have partnered with three coach-builders for RVs and a goodly number of manufacturing partners for truck conversion kits. The kits were always in the plan, but selling the rolling chassis is new.
One amazingly honest take-away from the video is the lack of numbers for the pickups: top speed, shaft horsepower, torque? They know what all that should be, but unlike the typical vaporware startup, Edison won’t tell you the engineering numbers on the pickup truck kits until it has hit the race track and proved itself in the real world. These guys are gear-heads first and engineers second, so for once in a long time the adage “engineers hate mechanics” might not apply to a new vehicle.
The dirt track is the first thing under construction in Donald, so hopefully the next update we hear from Edison Motors will include those hard numbers, including pesky little things like MSRP and delivery dates. Stay tuned.
In our last post about an electric truck, a lot of you in the comments wanted something bigger, heavier duty, not pure battery, and made outside the USA. Well, here it is.
In this 50 minute video [Radical Brad] takes us through the process of building the Marauder v2, a street racing LowRacer. The entire build was done over a few weekends using only an AC welder, angle grinder, and basic hand tools you probably have in the garage.
The entire rear section of the Marauder is made from an unmodified stock rear triangle from a typical suspension mountain bike. The frame is made from 1.5″ mild steel square tubing with 1/16″ wall thickness, which is called “16 gauge tubing”.
[Radical Brad] runs you through the process of welding the pieces together at the appropriate angles along with some tips about how to clamp everything in place while you work on it. After completing the rear end he proceeds to the front end which uses the fork from the front of the old bike. A temporary seat is fashioned from some wooden boards joined together with hinges. Then the steering system is installed. Then the chains and pulleys for the motion system. Then the seat is finalized, and after a coat of paint, and installing some brakes, we’re done!
If you’ve put in all the necessary practice to learn bike tricks, you’d probably like an appropriately dramatic soundtrack to accompany your stunts. A team of students working on a capstone project at the University of Washington took this natural desire a step further with the Music Bike, a system that generates adaptive music in response to the bike’s motion.
The Music Bike has a set of sensors controlled by an ESP32-S3 mounted beneath the bike seat. The ESP32 transmits the data it collects over BLE to an Android app, which in turn uses the FMOD Studio adaptive sound engine to generate the music played. An MPU9250 IMU collects most position and motion data, supplemented by a hall effect sensor which tracks wheel speed and direction of rotation.
When the Android app receives sensor data, it performs some processing to detect the bike’s actions, then uses these to control FMOD’s output. The students tried using machine learning to detect bike tricks, but had trouble with latency and accuracy, so they switched to a threshold classifier. They were eventually able to detect jumps, 180-degree spins, forward and reverse motion, and wheelies. FMOD uses this information to modify music pitch, alter instrument layering, and change the track. The students gave an impressive in-class demonstration of the system in the video below (the demonstration begins at 4:30).
Everyone these days wants to talk about Small Modular Reactors (SMRs) when it comes to nuclear power. The industry seems to have pinned its hopes for a ‘nuclear renaissance’ on the exciting new concept. Exciting as it may be, it is not exactly new: small reactors date back to the heyday of the atomic era. There were a few prototypes, and a lot more paper projects that are easy to sneer at today. One in particular caught our eye, in a write-up from Steve Wientz, that is described as an atomic outboard motor.
It started as an outgrowth from General Electric’s 1950s work on airborne nuclear reactors. GE’s proposal just screams “1950s” — a refractory, air-cooled reactor serving as the heat source for a large turboprop engine. Yes, complete with open-loop cooling. Those obviously didn’t fly (pun intended, as always) but to try and recoup some of their investment GE proposed a slew of applications for this small, reactor-driven gas turbine. Rather than continue to push the idea of connecting it to a turboprop and spew potentially-radioactive exhaust directly into the atmosphere, GE proposed podding up the reactor with a closed-cycle gas turbine into one small, hermetically sealed-module.
Bolt-On Nuclear Power
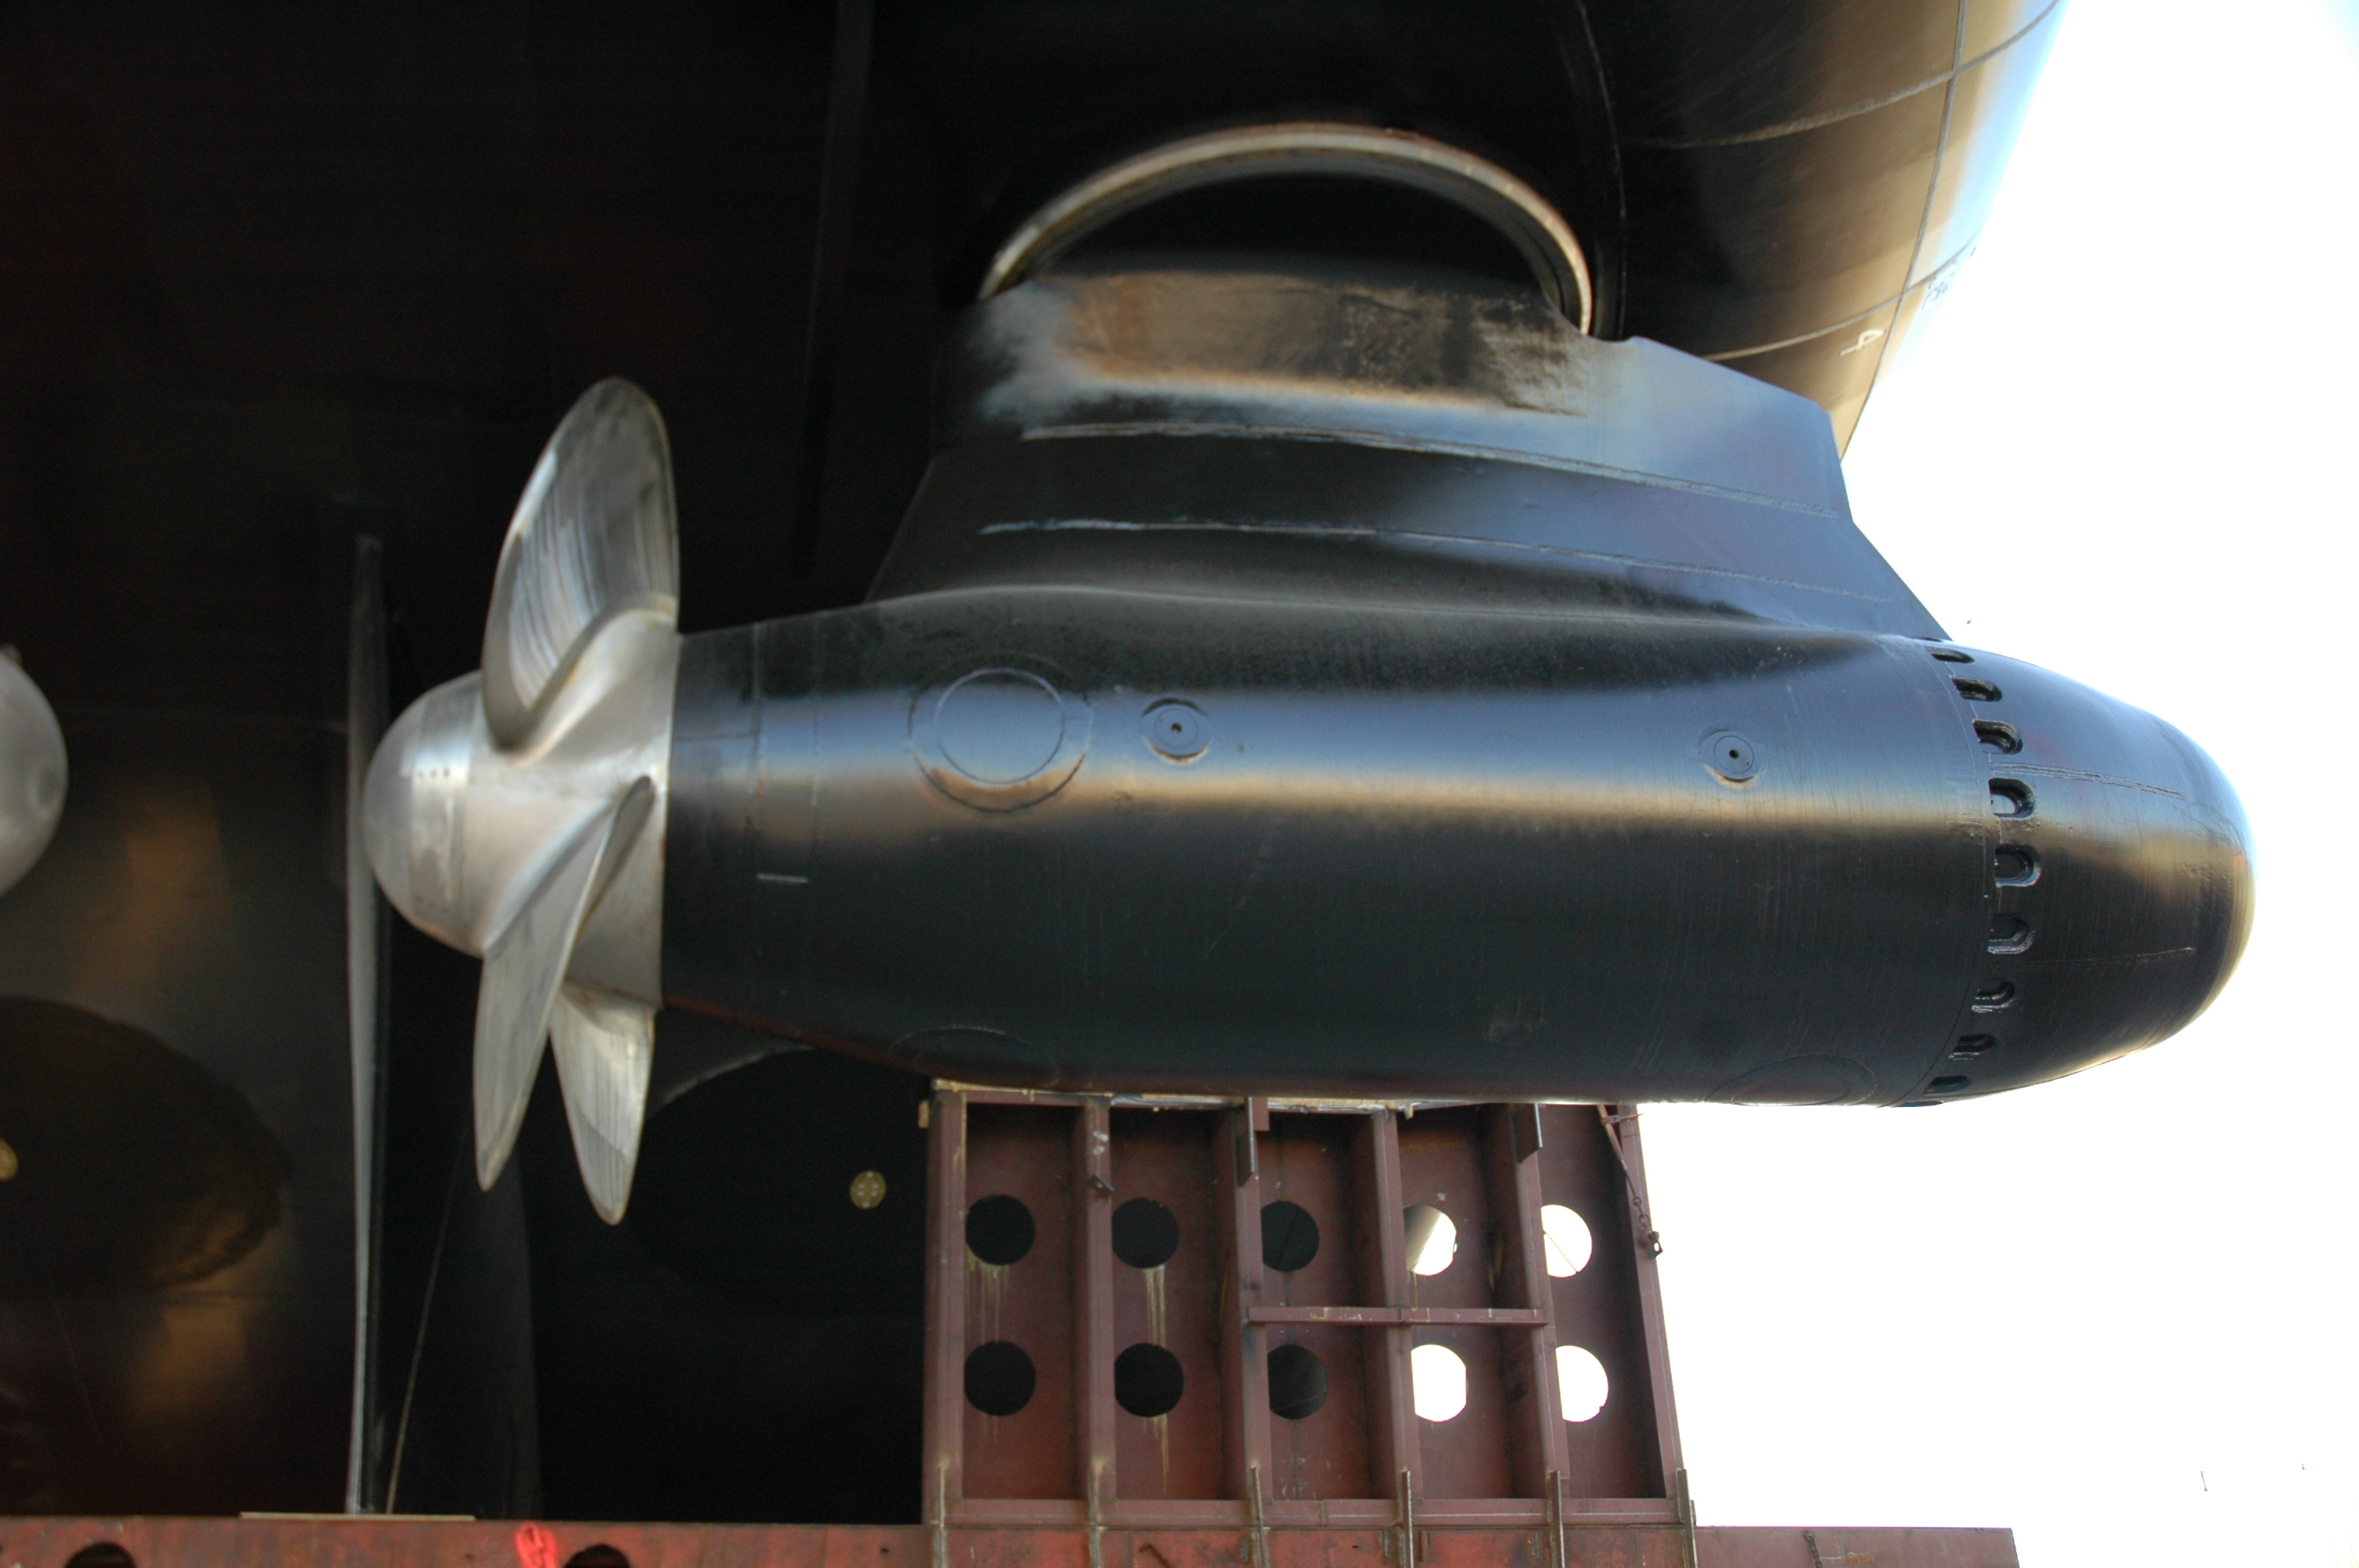
There were two variants of a sealed reactor/turbine module proposed by GE: the 601A, which would connect the turbine to an electric generator, and 601B, which would connect it to a gearbox and bronze propeller for use as a marine propulsion pod. While virtually no information seems to have survived about 601A, which was likely aimed at the US Army, the marine propulsion pod is fairly well documented in comparison in GE-ANP 910: Application Studies, which was reviewed by Mark at Atomic Skies. There are many applications in this document; 601 is the only one a modern reader might come close to calling sane.
Cutaway diagram of the General Electric 601B
The pod would be slung under a ship or submarine, much like the steerable electric azimuth thrusters popular on modern cruise ships and cargo vessels. Unlike them, this pod would not require any electrical plant onboard ship, freeing up an immense amount of internal volume. It would almost certainly have been fixed in orientation, at least if it had been built in 1961. Now that such thrusters are proven technology though, there’s no reason an atomic version couldn’t be put on a swivel.
A modern electric azimuth thruster.
Two sizes were discussed, a larger pod 60″ in diameter and 360″ long (1.5 m by 9.1 m) that would have weighed 45,000 lbs (20 metric tonnes) and output 15,000 shp (shaft horse power, equivalent to 11 MW). The runtime would have been 5000 hours on 450 lbs (204 kg) of enriched uranium. This is actually comparable to the shaft power of a large modern thruster.
There was also a smaller, 45″ diameter version that would produce only 3750 shp (2796 kW) over the same runtime. In both, the working gas of the turbines would have been neon, probably to minimize the redesign required of the original air-breathing turbine.
Steve seems to think that this podded arrangement would create drag that would prove fatally noisy for a warship, but the Spanish Navy seems to disagree, given that they’re putting azimuth thrusters under their flagship. A submarine might be another issue, but we’ll leave that to the experts. The bigger problem with using these on a warship is the low power for military applications. The contemporary Farragut-class destroyers made 85,000 shp (63 MW) with their steam turbines, so the two-pod ship in the illustration must be both rather small and rather slow.
Concept Art of 601B propulsion pods under a naval vessel, art by General Electric
Of course putting the reactors outside the hull of the ship also makes them very vulnerable to damage. In the 1950s, it might have seemed acceptable that a reactor damaged in battle could simply be dumped onto the seafloor. Nowadays, regulators would likely take a dimmer view of just dropping hundreds of pounds of uranium and tonnes of irradiated metal into the open ocean.
Civilian Applications
Rather than warships, this sort of small, modular reactor sounds perfect for the new fleet of nuclear cargo ships the UN is pushing for to combat climate change. The International Maritime Organization’s goal of net-zero emissions by 2050 is just not going to happen without nuclear power or a complete rethink of our shipping infrastructure. Most of the planning right now seems to center on next-generation small modular reactors: everything from pebble-bed to thorium. This Cold War relic of an idea has a few advantages, though.
Need to refuel? Swap pods. Mechanical problems? Swap pods. The ship and its nuclear power plant are wholly separate, which ought to please regulators and insurers. Converting a ship to use azimuth thrusters is a known factor, and not a huge job in dry dock. There are a great many ships afloat today that will need new engines anyway if they aren’t to be scrapped early and the shipping sector is to meet its ambitious emissions targets. Pulling out their original power plants and popping ‘atomic outboards’ underneath might be the easiest possible solution.
Sure, there are disadvantages to dusting off this hack — and we think a good case can be made that turning a turboprop into a ship-sized outboard ought to qualify as a ‘hack’. For one thing, 5000 hours before refueling isn’t very long. Most commercial cargo ships can cruise at least that long in a single season. But if swapping the pods can be done in-harbor and not in dry dock, that doesn’t seem like an insurmountable obstacle. Besides, there’s no reason to stay 100% faithful to a decades-old design; more fuel capacity is possible.
For another, most of the shielding on these things would have been provided by seawater by design, which is going to make handling the pods out of water an interesting experience. You certainly would not want to see a ship equipped with these pods capsize. Not close up, anyway.
Rather than pass judgement, we ask if General Electric’s “atomic outboard” was just way ahead of its time. What do you think?
The boat itself has a completely custom-built hull, using plywood as a mold for the ultimate fiberglass body. It’s a catamaran-like shape that seems to allow it to get on plane fairly easily, increasing its ultimate speed compared to a displacement hull. It gets up to that speed with two electric motors totaling 4 kW, mated to a belt-driven drivetrain spinning a fairly standard prop. Power is provided by a large battery, and the solar panel at the top can provide not only shade for the operator, but 300 W to charge the battery when the motors are not being used.
With the finishing touches put on, the small single-seat boat effortlessly powers around the water with many of the same benefits of an electric car: low noise, low pollution, a quiet ride, and a surprisingly quick feel. Electrification has come for other boats as well, like this sailing catamaran converted to electric-only. Even some commercial boats have begun to take the plunge.
For those motorcyclists looking to get a classic American-style cruiser, often the go-to brand is Harley-Davidson. However, these bikes not only have reputations for being stuck in the past, both in terms of design and culture, but they also tend to be extremely expensive—not only upfront, but in maintenance as well. If you want the style without all of that baggage, you might want to try out something like this custom motorcycle which not only looks the part, it reduces those costs by being built around a hand truck.
By the end of the project, though, the hand truck does not retain much of its original form or function. [Garage Avenger] has cut and welded it essentially into a custom frame for the diminutive motorcycle, while retaining much of its original look and feel. Keeping up with the costs savings aspect of this project, the four-stroke engine was free, although it did take some wrenching to get it running and integrated into the frame. A custom axle, a front end from another bike, a gas tank from an online retailer (that needed re-welding), and some wiring finishes out the build.
With a fresh paint job to match the original color of the hand truck, it’s off to the track. Of course it doesn’t have quite the performance of most street legal motorcycles, including some quirks with the handling and braking, but for the trails around [Garage Avenger]’s home it’s certainly a fun transportation mode he can add to his repertoire. If this is your first time seeing one of his projects, be sure to check out his other work including this drifting shopping cart and this turbine-powered sled.
Although there are some ferries and commercial boats that use a multi-hull design, the most recognizable catamarans by far are those used for sailing. They have a number of advantages over monohull boats including higher stability, shallower draft, more deck space, and often less drag. Of course, these advantages aren’t exclusive to sailboats, and plenty of motorized recreational craft are starting to take advantage of this style as well. It’s also fairly straightforward to remove the sails and add powered locomotion as well, as this electric catamaran demonstrates.
Not only is this catamaran electric, but it’s solar powered as well. With the mast removed, the solar panels can be fitted to a canopy which provides 600 watts of power as well as shade to both passengers. The solar panels charge two 12V 100ah LifePo4 batteries and run a pair of motors. That’s another benefit of using a sailing cat as an electric boat platform: the rudders can be removed and a pair of motors installed without any additional drilling in the hulls, and the boat can be steered with differential thrust, although this boat also makes allowances for pointing the motors in different directions as well.
In addition to a highly polished electric drivetrain, the former sailboat adds some creature comforts as well, replacing the trampoline with a pair of seats and adding an electric hoist to raise and lower the canopy. As energy density goes up and costs come down for solar panels, more and more watercraft are taking advantage of this style of propulsion as well. In the past we’ve seen solar kayaks, solar houseboats, and custom-built catamarans (instead of conversions) as well.
The drivetrain of most modern bicycles has remained relatively unchanged for nearly a century. There have been marginal upgrades here and there like electronic shifting but you’ll still mostly see a chain with a derailleur or two. [Matthew] is taking a swing at a major upgrade to this system by replacing the front derailleur with a torque converter, essentially adding an automatic transmission to his bicycle.
Most of us will come across a torque converter in passenger vehicles with automatic transmissions, but these use fluid coupling. [Matthew] has come up with a clever design that uses mechanical coupling instead using a ratchet and pawl mechanism. There are two gear ratios here, a 1:1 ratio like a normal bicycle crank and a 1.5:1 ratio that is automatically engaged if enough torque is applied to the pedals. This means that if a cyclist encounters a hill, the gear automatically shifts down to an easier gear and then will shift back once the strenuous section is finished.
[Matthew] machined all the parts for this build from scratch, and the heavy-duty solid metal parts are both impressive but also show why drivetrains like this haven’t caught on in the larger bicycling world since they’re so heavy. There have been some upgrades in internally geared hubs lately though, which do have a number advantages over traditional chain and derailleur-based bikes with the notable downside of high cost, and there have been some other interesting developments as well like this folding mechanical drivetrain and this all-electric one.
Odds are, if you have ridden a bicycle for any amount of time, you have crashed. Crashes are fast, violent and chaotic events that leave you confused, and very glad to have a helmet. But what if there was another way of protecting your head? [Seth] decided to find out by taking a look at the Hövding airbag helmet.
The Hövding sits around your neck and looks somewhat akin to a neck pillow. It uses accelerometers situated in the fore and aft of the device to detect what it thinks is a crash. If a crash is detected, it will release a charge of compressed helium to inflate an airbag that wraps around the user’s head protecting a larger amount of the head then a traditional helmet. It also inflates around the wearer’s neck providing neck bracing in the impact further improving safety. The inflation process is incredibly fast and violent, very much akin to a car’s airbag. [Seth] demonstrated this on the process on two occasions to great effect, and to his amazement. While the idea of relying on computers to protect your head may sound ridiculous, studies have shown that the Hövding is safer than a regular helmet in certain situations.
Unfortunately the deployment process was irreversible making the product single use. Moreover, the Hövding would deploy in a crash regardless of if you hit your head or not. While Hövding offered a crash replacement at a discount, this would have created large amounts of e-waste.
The Hövding helmet next to various commuter helmets
However, the design is not perfect. During the product’s use there were 27 reports of the device not deploying — particularly when struck by a vehicle. More reports exist of the device deploying erroneously when it detected, for example, bending over too quickly as a crash. It could not meet the US safety standards for helmets and therefore it was never allowed to be sold in the US.
Hövding argued that it was a helmet equivalent and should be exempt from those standards to no avail. Studies suggested that it was not able to properly protect against sharp corner impacts similar to the anvil tests used by the United States as the airbag would bottom out in such circumstances.
Ultimate Hövding’s failure as a business came down to software. As the project continued, scope broadened and the device’s firmware grew more complicated. New features were introduced including USB-C charging, OTA updates and phone crash notifications. However, this also appears to have resulted in a firmware bug that caused some units to not deploy, and were potentially sold this way with Hövding’s knowledge. This led the Swedish Consumer Agency to temporarily ban the product along with a stop-use and recall on all Hövding 3s. While the ban was lifted by a judge, the damage was done, consumer trust in Hövding was gone and they filed for bankruptcy in 2023. Unfortunately, this left the existing customers of the Hövding high and dry, without a working app, update method, or crash replacement program.
The life of a Hackaday writer often involves hours spent at a computer searching for all the cool hacks you love, but its perks come in not being tied to an office, and in periodically traveling around our community’s spaces. This suits me perfectly, because as well as having an all-consuming interest in technology, I am a lifelong rail enthusiast. I am rarely without an Interrail pass, and for me Europe’s railways serve as both comfortable mobile office space and a relatively stress free way to cover distance compared to the hell of security theatre at the airport. Along the way I find myself looking at the infrastructure which passes my window, and I have become increasingly fascinated with the power systems behind electric railways. There are so many different voltage and distribution standards as you cross the continent, so just how are they all accommodated? This deserves a closer look.
So Many Different Ways To Power A Train
Diesel trains like this one are for the dinosaurs.
In Europe where this is being written, the majority of main line railways run on electric power, as do many subsidiary routes. It’s not universal, for example my stomping ground in north Oxfordshire is still served by diesel trains, but in most cases if you take a long train journey it will be powered by electricity. This is a trend reflected in many other countries with large railway networks, except sadly for the United States, which has electrified only a small proportion of its huge network.
Of those many distribution standards there are two main groups when it comes to trackside, those with an overhead wire from which the train takes its power by a pantograph on its roof, or those with a third rail on which the train uses a sliding contact shoe. It’s more usual to see third rails in use on suburban and metro services, but if you take a trip to Southern England you’ll find third rail electric long distance express services. There are even four-rail systems such as the London Underground, where the fourth rail serves as an insulated return conductor to prevent electrolytic corrosion in the cast-iron tunnel linings.
These tracks in the south of England each have a 750 VDC third rail. Lamberhurst, CC BY-SA 4.0.
As if that wasn’t enough, we come to the different voltage standards. Those southern English trains run on 750 V DC while their overhead wire equivalents use 25 kV AC at 50Hz, but while Northern France also has 25 kV AC, the south of the country shares the same 3 kV DC standard as Belgium, and the Netherlands uses 1.5 kV DC. More unexpected still is Germany and most of Scandinavia, which uses 15 kV AC at only 16.7 Hz. This can have an effect on the trains themselves, for example Dutch trains are much slower than those of their neighbours because their lower voltage gives them less available energy for the same current.
This Dutch locomotive is on its 1.5 kV home turf, but it’s hauling an international service headed for the change to 3 kV DC in Belgium.
In general these different standards came about partly on national lines, but also their adoption depends upon how late the country in question electrified their network. For example aside from that southern third-rail network and a few individual lines elsewhere, the UK trains remained largely steam-powered until the early 1960s. Thus its electrification scheme used the most advanced option, 25 kV 50 Hz overhead wire. By contrast countries such as Belgium and the Netherlands had committed to their DC electrification schemes early in the 20th century and had too large an installed base to change course. That’s not to say that it’s impossible to upgrade though, as for example in India where 25 kV AC electrification has proceeded since the late 1950s and has included the upgrade of an earlier 1.5 kV DC system.
A particularly fascinating consequence of this comes at the moment when trains cross between different networks. Sometimes this is done in a station when the train isn’t moving, for example at Ashford in the UK when high-speed services switch between 25 kV AC overhead wire and 750 V DC third rail, and in other cases it happens on the move through having the differing voltages separated by a neutral section of overhead cable. Sadly I have never manged to travel to the Belgian border and witness this happening. Modern electric locomotives are often equipped to run from multiple voltages and take such changes in their stride.
Power To The People Movers
The 4-rail 750VDC system on the London Underground.
Finally, all this rail electrification infrastructure needs to get its power from somewhere. In the early days of railway electrification this would inevitably been a dedicated railway owned power station, but now it is more likely to involve a grid connection and some form of rectifier in the case of DC lines. The exception to this are systems with differing AC frequencies from their grid such as the German network, which has an entirely separate power generation and high voltage distribution system.
So that was the accumulated observations of a wandering Hackaday scribe, from the comfort of her air-conditioned express train. If I had to name my favourite of all the networks I have mentioned it would be the London Underground, perhaps because the warm and familiar embrace of an Edwardian deep tube line on a cold evening is an evocative feeling for me. When you next get the chance to ride a train keep an eye out for the power infrastructure, and may the experience be as satisfying and comfortable as it so often is for me.
The Sinclair C5 was Sir Clive’s famous first venture into electric mobility, a recumbent electric-assisted tricycle which would have been hardly unusual in 2025. In 1985, though, the C5 was so far out there that it became a notorious failure. The C5 retains a huge following among enthusiasts, though, and among those is [JSON Alexander, who has bought one and restored it.
We’re treated to a teardown and frank examination of the vehicle’s strengths and weaknesses, during which we see the Sinclair brand unusually on a set of tyres, and the original motor, which is surprisingly more efficient than expected. Sir Clive may be gone, but this C5 will live again.
We’ve had the chance to road test a C5 in the past, and it’s fair to say that we can understand why such a low-down riding position was not a success back in the day. It’s unusual to see one in as original a condition as this one, it’s more usual to see a C5 that’s had a few upgrades.
There are a number of plans for DIY boats available online, so [Phil] went in search of one for a custom catamaran to travel the inland waterways of Canada. But none of the plans he found had options for electric motors so he modified one popular plan to include not only that, but plenty of other unique features as well throughout a long series of videos.
This isn’t [Phil]’s first electric boat, either. His first was a monohull with a long canopy above, providing shade for the occupants and a platform to mount solar panels. But that one was top heavy and unstable, so he pivoted to this catamaran design instead which has the perk of not only stability but a small draft. The plans were modified to use a similar propulsion system, though, but mounting the heavy panels on the roof of this boat was much less problematic. The roof itself retracts, and also includes some mosquito netting to enclose the cabin. He’s also added a head which is situated inside one of the hulls and has doors which fit into the retractable roof structure as well.
For navigating the peaceful inland waterways of Canada like the famous Rideau Canal, the Trent Severn Waterway which [Phil] frequents, or even quiet Ontario lake towns like Bobcaygeon we can’t imagine a better way to go that a peaceful, small electric boat like this one.
Rear-view mirrors are important safety tools, but [Mike Kelly] observed that cyclists (himself included) faced hurdles to using them effectively. His solution? A helmet-mounted dual-mirror system he’s calling the Mantis Mirror that looks eminently DIY-able to any motivated hacker who enjoys cycling.
One mirror for upright body positions, the other for lower positions.
Carefully placed mirrors eliminate blind spots, but a cyclist’s position changes depending on how they are riding and this means mirrors aren’t a simple solution. Mirrors that are aligned just right when one is upright become useless once a cyclist bends down. On top of that, road vibrations have a habit of knocking even the most tightly-cinched mirror out of alignment.
[Mike]’s solution was to attach two small mirrors on a short extension, anchored to a cyclist’s helmet. The bottom mirror provides a solid rear view from an upright position, and the top mirror lets one see backward when in low positions.
[Mike] was delighted with his results, and got enough interest from others that he’s considering a crowdfunding campaign to turn it into a product. In the meantime, we’d love to hear about it if you decide to tinker up your own version.
You can learn all about the Mantis Mirror in the video below, and if you want to see the device itself a bit clearer, you can see that in some local news coverage.
As transport infrastructure in Europe moves toward a zero-carbon future, there remain a number of railway lines which have not been electrified. The question of replacing their diesel traction with greener alternatives, and there are a few different options for a forward looking railway company to choose from. In Germany the Rhine-Main railway took delivery of a fleet of 27 Alstom hydrogen-powered multiple units for local passenger services, but as it turns out they have not been a success (German language, Google translation.). For anyone enthused as we are about alternative power, this bears some investigation.
It seems that this time the reliability of the units and the supply of spare parts was the issue, rather than the difficulty of fuel transport as seen in other failed hydrogen transport problems, but whatever the reason it seems we’re more often writing about hydrogen’s failures than its successes. We really want to believe in a hydrogen future in which ultra clean trains and busses zip around on hydrogen derived from wind power, but sadly that has never seemed so far away. Instead trains seem inevitably to be following cars, and more successful trials using battery units point the way towards their being the future.
We’re sure that more hydrogen transport projects will come and go before either the technological problems are overcome, or they fade away as impractical as the atmospheric railway. Meanwhile we’d suggest hydrogen transport as the example when making value judgements about technology.