Although the ReactOS project is in no rush to dethrone Windows as the desktop operating system of choice, this doesn’t mean that some real changes aren’t happening. Most recently two big changes got merged, the first pertaining to the separate boot- and live CD images that are now merged into a single image, and the second being a new PnP-aware ATA storage stack for ATA and AHCI devices, with NT6+ compatibility.
Although there is still a separate live CD for now, this first change means that testing and installing ReactOS becomes easier, and that the old-school text-based installer may soon be on its way out as well.
Having the new ATA storage stack in place will translate into much better compatibility with real hardware, including the ability to use more hardware to install on and boot from compared to the old UniATA driver.
Combined, these two changes should bring the ReactOS installation and usage experience a lot closer to that of Windows, as well as many Linux distros. If you had issues with the OS on real hardware, this might be just the right time to give it another shake and provide detailed feedback to the developers if any remaining issues are encountered.
Peristaltic pumps are a very simple and effect device for transferring fluids without said fluid ever coming into contact with any part of the pump mechanism. At their core they involve a mechanism squeezing fluids through compressible tubing, but there are various implementations of such a mechanism that all have their pros and cons. In a recent article by [T. K. Hareendran] over at EDN these types are discussed and when you’d want to pick one over the other.
Also known as a roller pump, these positive displacement pumps have been known since the 19th century, finding uses in industrial, medical, research, agriculture and many other fields. Each of these fields have different requirements with the use of a peristaltic pump as a dosing pump being a specific application whereby e.g. a stepper motor can be used to provide exact dosing.
For industrial settings the typical rollers that compress the tube are replaced with shoes that provide higher pressures and endurance, with overall a bewildering number of motor types and tubing materials available. Depending on what your project needs, you may opt for continuous flow, fine control over dosing, the ability to reverse the flow, etc.
Unless your project is particularly rugged, a roller-based mechanism should be fine, while silicone tubing is great for biocompatibility and PVC is a cheaper tube material option. If you intend to transfer certain kinds of chemicals that will react with each of these there are some more exotic tubing options available as well.
After the Foucault pendulum at the Houston Museum of Natural Science stopped working a while back after maintenance on the building, workers set out to determine what was wrong with the mechanism that normally keeps it in motion. Fortunately, it turned out that all they had to do was fiddle with some knobs to get everything dialed back in proper-like.
When we previously covered this dire event, it was claimed that this was a one-off system, hacked together by some random bloke. But as can be seen in the video and further detailed in the comments to the video the reality is far more interesting.
This particular Foucault pendulum is one of many that were created by the California Academy of Sciences, with hundreds of them installed throughout the US and possibly elsewhere. That said, since a pendulum of any description will never be a perpetual motion device, the electromagnet installed near the top of the installation has to carefully add some kinetic energy back that was lost due to friction as the pendulum moves around.
Sadly the video doesn’t go into much detail on what exactly was wrongly configured with this particular pendulum. Keeping a weight at the end of a long cable moving around at a set velocity is a tricky business, so it’s little wonder that getting some parameters wrong would engage and disengage the electromagnets at the wrong times and making the pendulum stop swinging.
Since Sony’s PlayStation 5 console is quite literally an AMD-based gaming PC with a custom mainboard, the only thing that really keeps anyone from just installing another operating system on it is the hypervisor-based firmware. Since in older firmware for the original ‘phat’ PlayStation 5 there exists a hypervisor exploit, this logically means that you can totally run Linux on them, as demonstrated by [Andy Nguyen] with the PS5-linux project on GitHub.
PS5 firmware version 5.x from 2022 seems to have at least partially addressed this particular vulnerability, so this leaves firmware versions 3.x and 4.x supported by PS5-linux for now. Firmware versions 1.x and 2.x also have this vulnerability, but [Andy] hasn’t added support for these yet. As for the prospect of running PS5-linux on 5.x firmware the prospect is less certain, but it’s reckoned that since the OS would then run inside the hypervisor it’d be quite limited in its functionality. Firmware versions 6+ are currently still firmly locked-down.
If you have an original PS5 kicking around with the right firmware version, to use the project you need a 64+ GB USB drive to run from and USB dongles for Wi-Fi/Ethernet. For Bluetooth support you also need a dongle. With the USB drive inserted into the console, on boot it runs the jailbreak exploit and sends the bootloader as payload. If all goes well you should then see the desktop of Ubuntu 26.04 Resolute Raccoon pop up.
It’s arguable how practical this currently is, but since it doesn’t modify the PS5 firmware it’s not permanent at least. Unfortunately Linux doesn’t have drivers for much of the PS5’s hardware, so the available video resolutions are limited, power management features such as standby are not working, and there are currently bugs related to HDMI audio and video output on some monitors.
It’s unfortunate that features like OtherOS (before it got pulled) on the PlayStation 3 or the official Linux for the PlayStation 2 aren’t a thing any more, but this hack offers at least some glimpse of what that could have been like for a modern Sony console.
Simple paper hinge. (Credit: Itoshige Studio, YouTube)
One doesn’t generally associate cardboard with structural components like hinges, but [Itoshige Studio] assures us that you can absolutely create hinges out of this ubiquitous material. In total the video covers five different designs, ranging from the simple and straightforward to an interlocking tab design that approximates a typical steel hinge with paper rod to keep both sides of the hinge together.
The most simple hinge is unsurprisingly just a strip of craft paper, which is also demonstrated as the hinge for a wooden box in lieu of the typical metal hinge. This same principle is then demonstrated for a fancy cardboard box.
From here the hinge designs increasingly get more involved, with first a seamless hinge variation, and then a kamichoban hinge design that’s inspired by traditional Japanese room dividers and furniture, using panels that are interconnected with overlapping sections to create a fascinatingly flexible hinge that can fully fold either way.
The flush hinge design is somewhat like the craft paper hinge, but significantly fancier and probably sturdier, while also looking pretty good on something like a cabinet. Finally the interlocking tab hinge is effectively a cardboard version of the hinge design that’s found on every room’s door, with a similar level of flexibility. This is obviously the trickiest one to assemble and get right, but it has its own charm.
Considering that all of these examples use regular corrugated cardboard that we get shipped to our homes by the truckload, the cost to try these examples is your time plus some basic tools and glue. The author also sells a book that contains templates – in addition to digital versions – for these hinges and other designs, if you’d like to enjoy the 100% paper experience.
Doing software archaeology can be a harrowing task, as rarely do you find complete snapshots of particular versions of software. Case in point the development of MS-DOS – also known as IBM PC DOS – from 86-DOS, which recently got a lucky break in the form of printed source listings. These printouts come courtesy of [Tim Paterson], the creator of 86-DOS and of MS-DOS during his time working for Microsoft.
These code listings contain the sources of the 86-DOS 1.00 kernel, multiple development snapshots, and also listings for utilities like CHKDSK. These printed listings additionally contain many handwritten notes, making transcribing it into working source code somewhat of a chore. The results can be found on the GitHub project page, with the original scans available on Archive.org.
Of the ten bundles of continuous feed paper prints all but two have been transcribed so far, though with the various DOS kernels and the Seattle Computer Products (SCP) assembler source already ready for compilation. This includes 86-DOS 1.00, MS-DOS 1.25 and PC-DOS 1.00-dev, requiring the same SCP assembler to create a binary.
In the project page README a number of blog posts are also linked that add even more technical detail. Anyone who wants to pitch in with transcribing and/or testing recovered source code is welcome to do so.
There is a persistent belief in the ‘AI’ community that large language models (LLMs) have the ability to learn and self-improve by tweaking the weights in their vector space. Although there’s scant evidence that tweaking a probability vector space is anything like the learning process in biological brains, we nevertheless get sold the idea that artificial general intelligence (AGI) is just around the corner if we do just enough tweaking.
Instead of emerging super intelligence, the most likely outcome is what is called model collapse, with a recent paper by [Hector Zenil] going over the details on why self-training/learning in LLMs and similar systems is a fool’s errand. For those who just want the brief summary with all the memes, [Metin] wrote a blog post covering the basics.
In the end an LLM as well as a diffusion model (DM) is a statistical model of input data using which a statistically likely output can be generated (inferred) based on an input query. It follows intuitively that by using said output to adjust the model with, the model will over time converge on a kind of statistical singularity rather than some ‘AI singularity’ event. This is also why these models need to be constantly trained with external, human-generated data in order to prevent such a collapse.
In the paper by [Hector] a mathematical model is created to demonstrate that an LLM, DM or similar statistical model undergoes degenerative dynamics whenever said external input is reduced. Although in the paper a mechanism is suggested to counter the entropy decay within the model, the ultimate point is that a statistical model cannot improve itself without continuous external anchoring.
An often overlooked section in the datasheets for popular humidity sensors like the BME280 and DHT22 is the ‘non-condensing humidity’ bit, which puts an important constraint on which environments you can use this sensor in. This was the painful lesson that [Mellow Labs] recently had to learn when multiple of such sensors had kicked the bucket after being used in a nicely steamed-up bathroom. Fortunately, it introduced him to sensors that are rated for use in condensing humidity environments, such as the SHT40 that’s demonstrated in the video.
This particular sensor is made by Sensirion, and as we can see in the datasheet it features a built-in heater that allows it to keep working even in a condensing environment. This heater has three heating levels which are controlled via the I2C interface, though duration is limited to one second in order to prevent overheating the sensor.
Of note is that you cannot take measurements while the heater is operating, and its use obviously increases power draw significantly. This then mostly leaves when to turn on the heater as an exercise to the engineer, with [Mellow Labs] opting to start the heater when relative humidity hit 70% as a conservative choice.
In the comments to the video other options for suitable sensors were pitched, including the Bosch BME690 which is similarly rated for condensing environments. All of which condenses down to the importance of reading the datasheet for any part that you intend to use in possibly demanding environments.
After previously trying out low-tech compression molding with a toaster oven and 3D printed molds, [future things] is back with a video that seeks to explore some of the questions raised after the first video. Questions such as how well this method works with HDPE and PLA thermoplastics, whether the flashing could be cut off by the mold and the right temperatures and times to heat the plastic before a charge is ready for inserting into the mold.
In this video the same PHA-based mold is used, but in a three-piece configuration to allow for a more complex shape. This way game tokens could be made for use by the son of the author, which also shows one straightforward and very practical use of this method.
A big change here is that no more metal chopsticks are used to handle the charge, as this was found to cool down the heated plastic too much. Instead the hot charge is handled with fingers and wooden chopsticks, with the plastic heated until it has about the consistency of thick honey. For LDPE this takes about 5-7 minutes at 130°C. After compressing the charge into the mold, about 30 seconds are all it takes for the plastic to cool down enough.
There was a question about the use of mold release spray, but this didn’t seem to cause any issues, so can probably be used safely. As for other plastic types, HDPE works fine too when you heat it up at a slightly higher temperature and don’t mind it being tougher to handle.
Easiest is probably PLA, which would seem unsurprising. Using some chopped-up PLA printing waste it was easy enough to make a few more game tokens, demonstrating that this method is very viable for converting scrap FDM print waste into such items. As noted in the comments by [edmundchao] this method works great too for PETG, using PETG molds, while using a ratcheting clamp for extra pressure instead of just pressing by hand.
It seems fair to say that pinball machines are among the most universally loved gaming systems known today, yet the full-sized ones are both very expensive and very large, while even the good quality table-sized ones tend to be on the expensive side. That raises the question of whether a fully 3D printed pinball machine could at all be fun and not just feel like a cheapo toy? A recent video by [Steven] from [3D Printer Academy] on YouTube makes here a compelling argument that it might actually be worth something to consider.
In addition to being fully modular and customizable the most compelling element is probably that the design supports two- and four-player multiplayer. This sees the metal balls leaving at the rear and from there entering the playing field of another player’s machine, which can probably get pretty chaotic.
Unfortunately this is part of a Kickstarter campaign, so you’ll have to either shell out some cash to get access to the print files or DIY your own version. We’d also be remiss to not address the durability concerns of a 100% plastic pinball machine like this, plus the lack of serious heft to compensate for more enthusiastic playing styles.
Springs are great, but making them out of plastic tends to come with some downsides, for fairly obvious reasons. Creating a compliant mechanism that can be 3D printed and yet which doesn’t permanently deform or wear out after a few uses is therefore a bit of a struggle. The compliant toggle mechanism that [neotoy] designed is said to have addressed those issues, with the model available on Printables for anyone to give a shake.
The model in question is a toggle, which is the commonly seen plastic or metal device that clamps down on e.g. rope or cord and requires you to push on it to have it release said clamping force. Normally these use a metal spring inside, but this version is fully 3D printable and thus forms a practical way to test this particular compliant mechanism with a variety of materials.
The internal spring is a printed spiral spring, with the example in the video printed in PETG. You can of course also print it in other materials for different durability and springiness properties. As noted in the video, PLA makes for a very poor spring material, so you probably want to skip that one.
We covered compliant mechanisms in the past for purposes like blasters, including some that you can only see under a microscope.
When it comes to software developers, there are t a few distinct types. For example, the extroverted, chatty type, who is always going out there to share the latest and newest libraries and projects with everyone, and is very much into bouncing ideas off others, regardless of whether they know what you’re talking about. Then there is the introverted loner, who prefers to tackle programming challenges by bouncing things around inside their own minds and going on long walks to mull things over before committing to anything significant.
This leads to interesting scenarios when it comes to management-enforced ‘optimization’ strategies, like Pair Programming. This approach involves two developers sharing the same computer and keyboard, theoretically doubling the effective output by some kind of metric, but realistically often leading to at least one side feeling pretty miserable and disconnected unless you put two of the chatty types together.
As a certified introverted loner developer, the idea of using an LLM chatbot as a coding assistant naturally triggers unpleasant flashbacks to hours of forced awkward pair ‘programming’. However, maybe using an LLM chatbot could be more pleasant because you can skip the whole awkward socializing bit. In order to give it a shake, I put together a little experiment to see whether LLM-based coding assistants is something that I could come to appreciate, unlike pair programming.
Setting Expectations
Any good experimental setup features clear goals and parameters that define what will be tested and what the expectations are. Obviously I come from a somewhat negative angle into this whole experiment, so to make it easy I’ll be picking two fairly straightforward scenarios for the LLM to assist with:
C++ embedded coding for STM32 and CMSIS.
Ada network development.
These are topics that I’m fairly familiar and comfortable with, so that I know what questions I have here, and what I’m roughly expecting as output. I’ll be treating the chatbot for the most part as I would use StackOverflow or nag people on IRC, with my main fear being that it’ll be expecting pleasantries from me instead of brutal and cold professionalism. Ideally it’ll be a step above me hurling profanities at a search engine for clearly willfully misunderstanding what I am looking for.
My expectations are that it’ll have some answers for me for the questions I have about how to do certain aspects of the tasks, and may even produce half-way usable code that I can fairly easily understand and double-check using my usual documentation references.
This just leaves one big question, being which LLM chatbot to pick and how the heck any of it is supposed to work, since I have avoided the things like the proverbial plague.
Meeting the Crew
Although I am aware that everyone who is into using LLM-assisted programming seem to like to promote LLMs like Claude, I’d ideally not be signing up to another service. This pretty much just leaves GitHub Copilot, which I have access to already. I have written about this particular LLM chatbot quite a bit since it was introduced, with my generally negative feelings towards these tools increasingly backed up by research.
Biased I may be, but to be a true scientist you have to be able to set aside your biases for an experiment and accept reality in the face of new evidence. Thus, with all biases and doubts firmly pushed aside in favor of the aforementioned cold professionalism, let’s get down to brass tacks.
Micro Code
My pet project for STM32-related programming has for a while been my Nodate project, involving the use of the CMSIS standard headers and the macros defined therein in order to write things ranging from start-up to running the Dhrystone benchmark and deciphering the various flavors of real-time clocks.
Much of this work entails digging through datasheets, reference manuals and piles of reference code, as well as throwing queries at search engines to see what potentially useful results percolate out of that particular resource. Coming across the trials and tribulations of fellow STM32 developers in forum threads and the like can be both heartening and disheartening, but all of it tends to condense into something that you can use to progress in the project.
Perhaps ironically, the moment that I tried to use the chatbot in the browser I got an error with the GitHub status page indicating that some of their systems are down, including those for Copilot.
GitHub Copilot chat failed to load, with browser console open. (Credit: Maya Posch)
This raises another interesting point: regardless of whether an LLM chatbot makes for a good programming partner, a human partner doesn’t generally randomly keel over or become unresponsive in the midst of trying to do some work together. If they do, however, that’s absolutely a medical emergency and you should call 911, 112, or your local equivalent emergency number stat.
Ask for CMSIS, get HAL. (Credit: Maya Posch)
Anyway, after waiting for services to be restored, I was eventually able to ask the chatbot how to properly set the clock speed on an STM32F411 MCU, after getting tripped up previously by the need to set the regulator voltage scaling (VOS) in the power control register (PWR_CR). This is a power saving feature whose adjusting is required for hitting specific and clearly power-wasting clocks.
Shockingly, the chatbot happily spits out ST HAL code and ignores the ‘CMSIS’ bit, although you could maybe argue that the ST HAL uses CMSIS inside. But then so does Arduino code for many MCUs.
To its credit, it does mention in a ‘Key CMSIS Requirements’ list that you need to set PWR_REGULATOR_VOLTAGE_SCALE1 yet without further detail on where to set it. There is also the tiny detail that this isn’t even the CMSIS macro, which would be PWR_CR_VOS to set both bits for the full range.
Fortunately we can do the digital equivalent of smacking the chatbot upside the head and tell it to do the thing we asked it to do. This being to provide the real CMSIS version. Doing so results in another gobsmacking moment when it happily spits out code that doesn’t bother to include the CMSIS headers, but simply copies every single used struct definition and more into the code as well, bloating it up massively:
I guess that’s kinda what I asked for? (Credit: Maya Posch)
This is of course very annoying when it should have used #define macros, and it clearly can generate include statements based on its inclusion of <cstdint>, but the absolutely deadly sin here is that his code isn’t even functional for an STM32F411, as can be observed here:
Broken VOS scaling code courtesy of Copilot. (Credit: Maya Posch)
I’m not entirely sure where it got the PWR_CR_VOS_SCALE1 thing from, with asking a friendly search engine leading to just a handful of results, one of which is for an STM32F407 that runs at 168 MHz max. This is hilarious in light of the comments right above the code. It makes you wonder what example code it pilfered from.
At this point I could probably continue to pick at this generated code, but suffice it to say that my confidence level in its generated code and overall output hovers somewhere between ‘low’ and ‘bottom of a black hole’. I’m more than happy to flip this particular table, rage quit, and not lose what remains of my sanity.
Findings
Although I had intended to also do some fun porting to Ada together with my buddy Copilot of some C++ networking code in my NymphRPC remote procedure call library, I found my nerves to be sufficiently frayed and the bouts of near-hysterical laughter out of sheer disbelief worrisome enough to abort this attempt.
I also do not feel that it’d do much more than hammer home the point that GitHub Copilot at the very least doesn’t make for a good pair programming partner, nor as a programming tool, or a search engine, or much of anything. When the only thing that it got me was having to check its output for very obvious errors and shaking my head in disbelief when I found them, it beggars belief that anyone would voluntarily use it.
When we also got reports that the use of such LLM chatbots are likely to degrade human cognition and critical thinking skills, not to mention the worrisome prospect of cognitive surrender, then it’s probably best to avoid these chatbots altogether.
I also agree generally with Advait Sarkar et al. in their 2022 paper that you cannot really do pair programming as-such with an LLM chatbot, but that it offers something different. Something that’s very different from using a search engine and digesting various articles and forum posts along with reference material into something new.
Thus, after using an LLM chatbot for some coding ‘assistance’ I’ll be happily scurrying back to my boring references and yelling invectives at search engines.
Although the game Pizza Tycoon – known as Pizza Connection in Europe – probably doesn’t ring a bell for many folk, this 1994 DOS title is special enough for [cowomaly] to write an open source engine to bring it into the modern age as Pizza Legacy. Along the way, some questions popped up, such as how to animate the little cars that you see driving around in the simulated city and how the heck this was done back in the day on a 25 MHz 386 CPU.
On today’s GHz+, multi-core CPUs, we can just brute-force shovel pixels, sprites, and even 3D models around without a second thought while dedicating an entire core to pathfinding and other algorithms. Naturally, the original game developers had no such luxury. To understand how this animation was originally achieved, [cowomaly] had to dive into the assembly code of the original game.
The original algorithm was very simple: each road tile has at least one direction associated with it, so that a car that is on such a tile knows which direction it can travel, essentially creating a grid of one-way roads. When there’s a crossing, a random direction is picked, with the extra rule that you cannot do two consecutive turns in the same direction, presumably to keep cars from going around in circles.
Meanwhile, collision detection is simply a matter of checking the list of cars for a potential collision and not moving said car if it’s the case. This check is also optimized to take the road directions and one-way nature into account, with a 10-tick wait if there’s a block. Amusingly, this seems to enable the formation of brief traffic jams to add to that feeling of realism.
Although not a perfect algorithm and with some small bugs due to unchecked conditions with collisions, it’s hard to deny that the effect is very natural car movement, something that games like Sim City likely used as well.
It seems to be becoming a bit of a theme that consumer electronics are dying not due to some critical fault, but due to Cooked Capacitor Syndrome (CCS). Case in point, Dyson handheld vacuums and the capacitors on its driver board. After having his $800 Dyson V15 handheld vacuum die after two and a half years of regular use, [LeftyMaker] found himself elbows-deep in the dusty innards of the vacuum just to replace some capacitors.
After initially trying a new battery and other common troubleshooting steps, he found that lots of people were having the same flaky behavior with their Dyson vacuums, all with the same underlying cause. On the driver board for the DC brushless motor, there are a couple of capacitors that seem to cause issues across models, with the standard response by Dyson being to ‘buy a new body’.
While it’s definitely possible to tear down the vacuum to get to the driver board, you’ll be doing effectively a full disassembly, all to see the capacitors located right next to the hot motor in a very confined space. [LeftyMaker] confirmed a very high ESR on the old capacitors before replacing them with 125℃ rated Rubycon 35PZF270MT810X9 polymer capacitors for $1 a pop.
Unsurprisingly, the vacuum worked fine after that fix, but it shows a trend where CCS has become so commonplace that it’s no wonder that the phrase ‘planned obsolescence’ is being uttered alongside it. For this particular series of Dyson vacuums, the issue is apparently so bad that [Hasan] created a custom driver board that might be superior in multiple ways. Maybe we need an OSHW vacuum cleaner, just to avoid such shenanigans.
As unloved as IBM’s PCjr was, with only a one-year production run, it’s hard to complain about the documentation available for it. This includes the x86 assembly listing for the BIOS, which [dbalsom] recently used this print version to create an ASM project that can be built into a byte-identical copy of the PCjr BIOS.
In order to build the BIOS image, a ZIP file has been made available that contains the requisite assembler and linker tools, all of which can be run in DOS (or DOSBox) using the provided build.bat file. This creates an executable file, which can then be converted into a BIN file using the provided exe2bin.py Python script, or of course, manually.
This image cannot be used as-is, as the PCjr has its BIOS split across two 32 kB ROMs, so splitting them is required if you intend to burn fresh ROMs. Of note is that the BIOS code is still copyrighted by IBM, so do not take this as some kind of open sourcing, unless you wish to test IBM’s legal take on 1980s BIOS code for a generally unloved system.
With an estimated 240,000 – 275,000 PCjrs sold by January 1985 and reports of hundreds of thousands of unsold PCjrs languishing in warehouses by the end. It’s hard to say how many PCjrs have survived to today, but it’s good to see that keeping this glimpse of a budget, not-quite-IBM-PC-compatible legacy alive has become a little easier again.
Heading image: IBM PCjr internals. (Credit: Binarysequence, Wikimedia)
A lot has been made about a post-quantum computer future in which traditional encryption methods have suddenly been rendered obsolete. With this terrifying idea in mind, it’s reassuring to see some recent pushback to the idea with some factual evidence. In a recent blog post by [Filippo Valsorda] – a cryptography engineer – the point is raised that 128-bit symmetric keys like AES-128 and SHA-256 are at risk of being obliterated in a post-quantum future.
Rather than just taking [Filippo]’s word for it, he takes us through a detailed explanation of the flawed understanding of Grover’s algorithm that underlies much of the panic. While it’s very true that this quantum search algorithm can decrease the amount of time required to find a solution, the speed-up with a single thread is quadratic, not exponential. While asymmetric cryptography systems like ECDH, RSA, and kin are very much at risk courtesy of Shor’s algorithm, the same is not true for symmetric systems.
An interesting detail with Grover’s is also that you cannot simply run a search in parallel to get a corresponding speed-up, as it’s not a parallel problem. Barring a breakthrough that replaces Grover’s with something that lends itself better to such a parallel search, it would seem that we won’t have to abandon classical encryption any time soon.
Incidentally, even for Shor’s algorithm, there are still some hold-ups. Current quantum computers are not even able to factor 21 yet. Meanwhile, supposed quantum computing breakthroughs are being trolled with a Commodore 64.
One of the nice things about magnetic storage is that as long as the magnetic layer remains intact, the data it contains should stay readable pretty much indefinitely. That raises the prospect of recovering data from really old computer systems featuring magnetic memory, such as the 63-year old LGP-21 that [David Lovett] of Usagi Electric is currently restoring. Its magnetic memory disk is nothing amazing by modern standards, but after initial testing it seems to spin up and read data just fine, raising the question of what was left on the drive when it was last used, meaning what was in memory at the time.
The read/write head side of the LGP-21’s magnetic memory. (Credit: Usagi Electric, YouTube)
Non-invasive data recovery here involves writing a program that will simply read the entire disk from beginning to end. Tracks 0 and 1 were found to be unreadable due to some kind of hardware issue, but track 2 could be backed up by looking at the output on the CRT, thus providing a track to use. Fascinatingly the LGP-21’s memory disks uses interleaved tracks to reduce the number of read/write heads as part of the overall cost-saving measures relative to the more expensive LGP-30. As you might expect, this slows down memory access a lot over its big brother.
Before any recovery attempt could begin, the Flexowriter typewriter that forms the user interface to the computer had to be given some serious maintenance, along with a few other components like a switch and the paper tape reader. This restored the ability to even properly enter data and receive output instructions.
The subsequent effort to recover the stored data involved a bootstrap program that got loaded into memory, after which the remainder of the program was loaded from paper tape. Following this everything worked swimmingly, though with the caveat that with not even a floppy drive to use, the raw hexadecimal data was hammered out on paper with the Flexowriter over the course of 1.5 hours.
This data will now be scanned in and OCR-ed into something that can hopefully be easily analyzed. Hopefully we’ll know before long what this system was last used for.
Recently Haiku has become a bit of a popular subject of articles and videos, owing perhaps to how close it currently is to be a daily-driver OS and fulfilling the dream that BeOS set out with. That said, there are still quite a few hurdles before that glorious era can fully commence, with a video by [Ex-IT guy] on YouTube demonstrating some of the major hurdles by installing Haiku on Ryzen 3-based MiniPC that only supports UEFI boot.
Installing the UEFI bootloader is still a very much manual process with the user required to create UEFI boot and OS partitions before copying the bootloader into UEFI boot partition. After this Haiku can be installed as normal. The other variation of multi-boot is demonstrated in the video, with Haiku installed alongside Windows and Linux. This requires a more complex directory layout in the UEFI boot partition.
The other major hurdle with Haiku comes after the system boots into the OS following installation, with no driver available for the Vega-based iGPU as AMD GPU support peters out around the GCN 2 era for now. Without accelerated graphics the utility of an OS is quite diminished, but fortunately this seems to be a fixable issue considering that Linux has the appropriate GPU support.
Meanwhile features like sound worked out of the box, which makes it arguably a more pleasant experience than installing Haiku on a 2009 Mac Mini. It’s also very easy to port software from Linux to Haiku, often with very few changes since it has all the typical POSIX things.
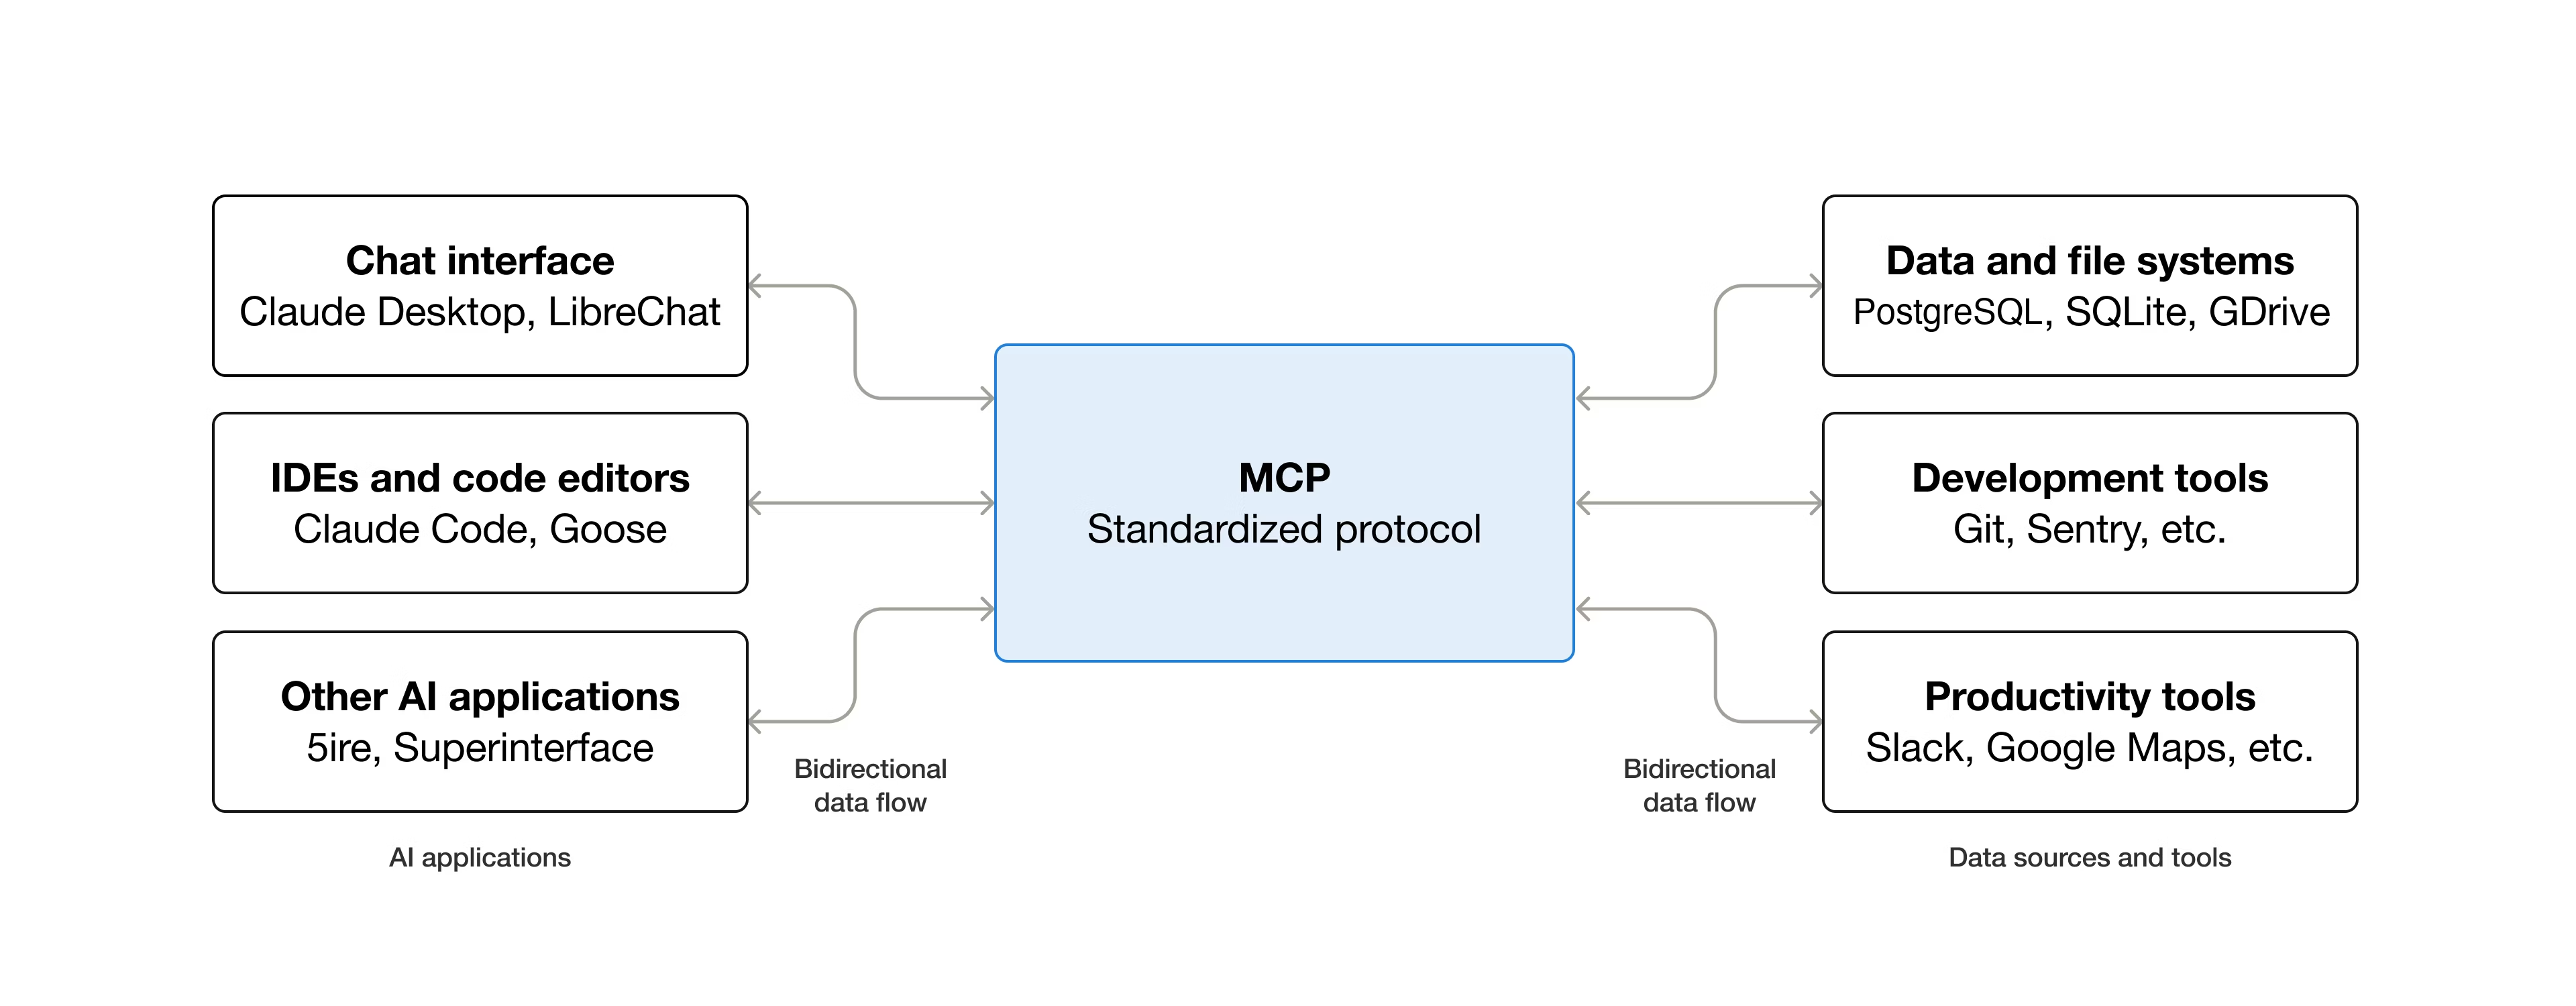
As part of the effort to push Large Language Model (LLM) ‘AI’ into more and more places, Anthropic’s Model Context Protocol (MCP) has been adopted as the standard to connect LLMs with various external tools and systems in a client-server model. A light oversight with the architecture of this protocol is that remote command execution (RCE) of arbitrary commands is effectively an essential part of its design, as covered in a recent article by [OX Security].
The details of this flaw are found in a detailed breakdown article, which applies to all implementations regardless of the programming language. Essentially the StdioServerParameters that are passed to the remote server to create a new local instance on said server can contain any command and arguments, which are executed in a server-side shell.
Essentially the issue is a lack of input sanitization, which is only the most common source of exploited CVEs. Across multiple real-world exploitation attempts on the software of LettaAI, LangFlow, Flowise and Windsurf it was possible to perform RCEs or perform local RCE in the case of the Windsurf IDE. Although Flowise had implemented some input sanitization by limiting allowed commands and the stripping of special characters, this was bypassed by using standard flags of the npx command.
After contacting Anthropic to inform them of these issues with MCP, the researchers were told that there was no design flaw and essentially had a ‘no-fix, works as designed’ hurled at them. According to Anthropic it’s the responsibility of the developer to perform input sanitization, which is interesting since they provide a range of implementations.