Selecting a random sample from a set is simple. But what about selecting a fair random sample from a set of unknown or indeterminate size? That’s where reservoir sampling comes in, and [Sam Rose] has a beautifully-illustrated, interactive guide to how reservoir sampling works. As far as methods go, it’s as elegant as it is simple, and particularly suited to fairly sampling dynamic datasets like sipping from a firehose of log events.
While reservoir sampling is simple in principle it’s not entirely intuitive to everyone. That’s what makes [Sam]’s interactive essay so helpful; he first articulates the problem before presenting the solution in a way that makes it almost self-evident.
[Sam] uses an imaginary deck of cards to illustrate the problem. If one is being dealt cards one at a time from a deck of unknown size (there could be ten cards, or a million), how can one choose a single card in a way that gives each an equal chance of having been selected? Without collecting them all first?
In a nutshell, the solution is to make a decision every time a new card arrives: hold onto the current card, or replace it with the new one. Each new card is given a 1/n chance of becoming held, where n is the number of cards we’ve seen so far. That’s all it takes. No matter when the dealer stops dealing, each card that has been seen will have had an equal chance of ending up the one selected.
There are a few variations which [Sam] also covers, and practical ways of applying it to log collection, so check it out for yourself.
If [Sam]’s knack for illustrating concepts in an interactive way is your jam, we have one more to point out. Our own Al Williams wrote a piece on Turing machines; the original “universal machine” being a theoretical device with a read/write head and infinite paper tape. A wonderful companion to that article is [Sam]’s piece illustrating exactly how such a Turing machines would work in an interactive way.
When it comes to text, how small is too small? The experts say a six point font is the minimum for readability, but as [James Bowman] shows us, you can get away with half of that.
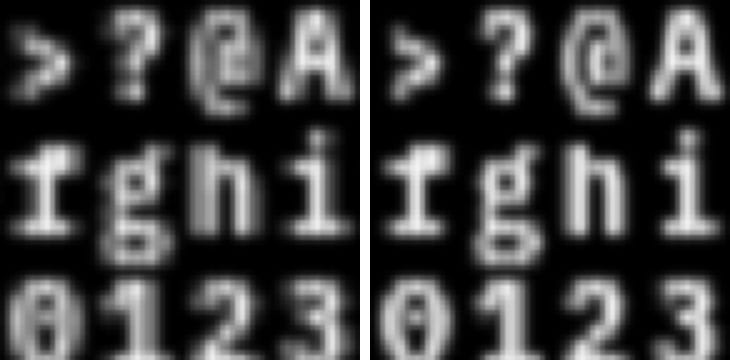
The goal is to produce a 40-character display on a 24 mm x 24 mm LCD that has a resolution of 240 x 240 to show a serial terminal (or other data) on the “TermDriver2” USB-to-Serial adapter. With 24 lines, that’s a line per millimeter: very small text. Three points, to be precise, half what the experts say you need. Diving this up into 40 columns gives a character cell of six by nine pixels. Is it enough?
The raw font on the left, the subpixel rendering on the right. For once, it’s better if you don’t click to enlarge.
Not by itself, no. That’s where the hack comes in: sub-pixel rendering. After all, a “white” pixel on an LCD is actually three elements: a red, a green, and a blue subpixel, stacked side-by-each. Drive each of those subpixels independently and 240 pixels now becomes 720. That’s plenty for a 40 column terminal.
The article discusses how, in general terms, they pulled off the subpixel rendering and kept the font as legible as possible. We think it’s a good try, though the colored fringe around the characters can be uncomfortable to look at for some people — and then we can’t forget the physical size of the characters being 1 mm tall.
If this trick were being used on a larger display with a 240-wide resolution, we’d say “yes, very legible, good job!”– but at this size? We hope we can find our reading glasses. Still, it’s a neat trick to have in your back pocket for driving low-resolution LCDs.
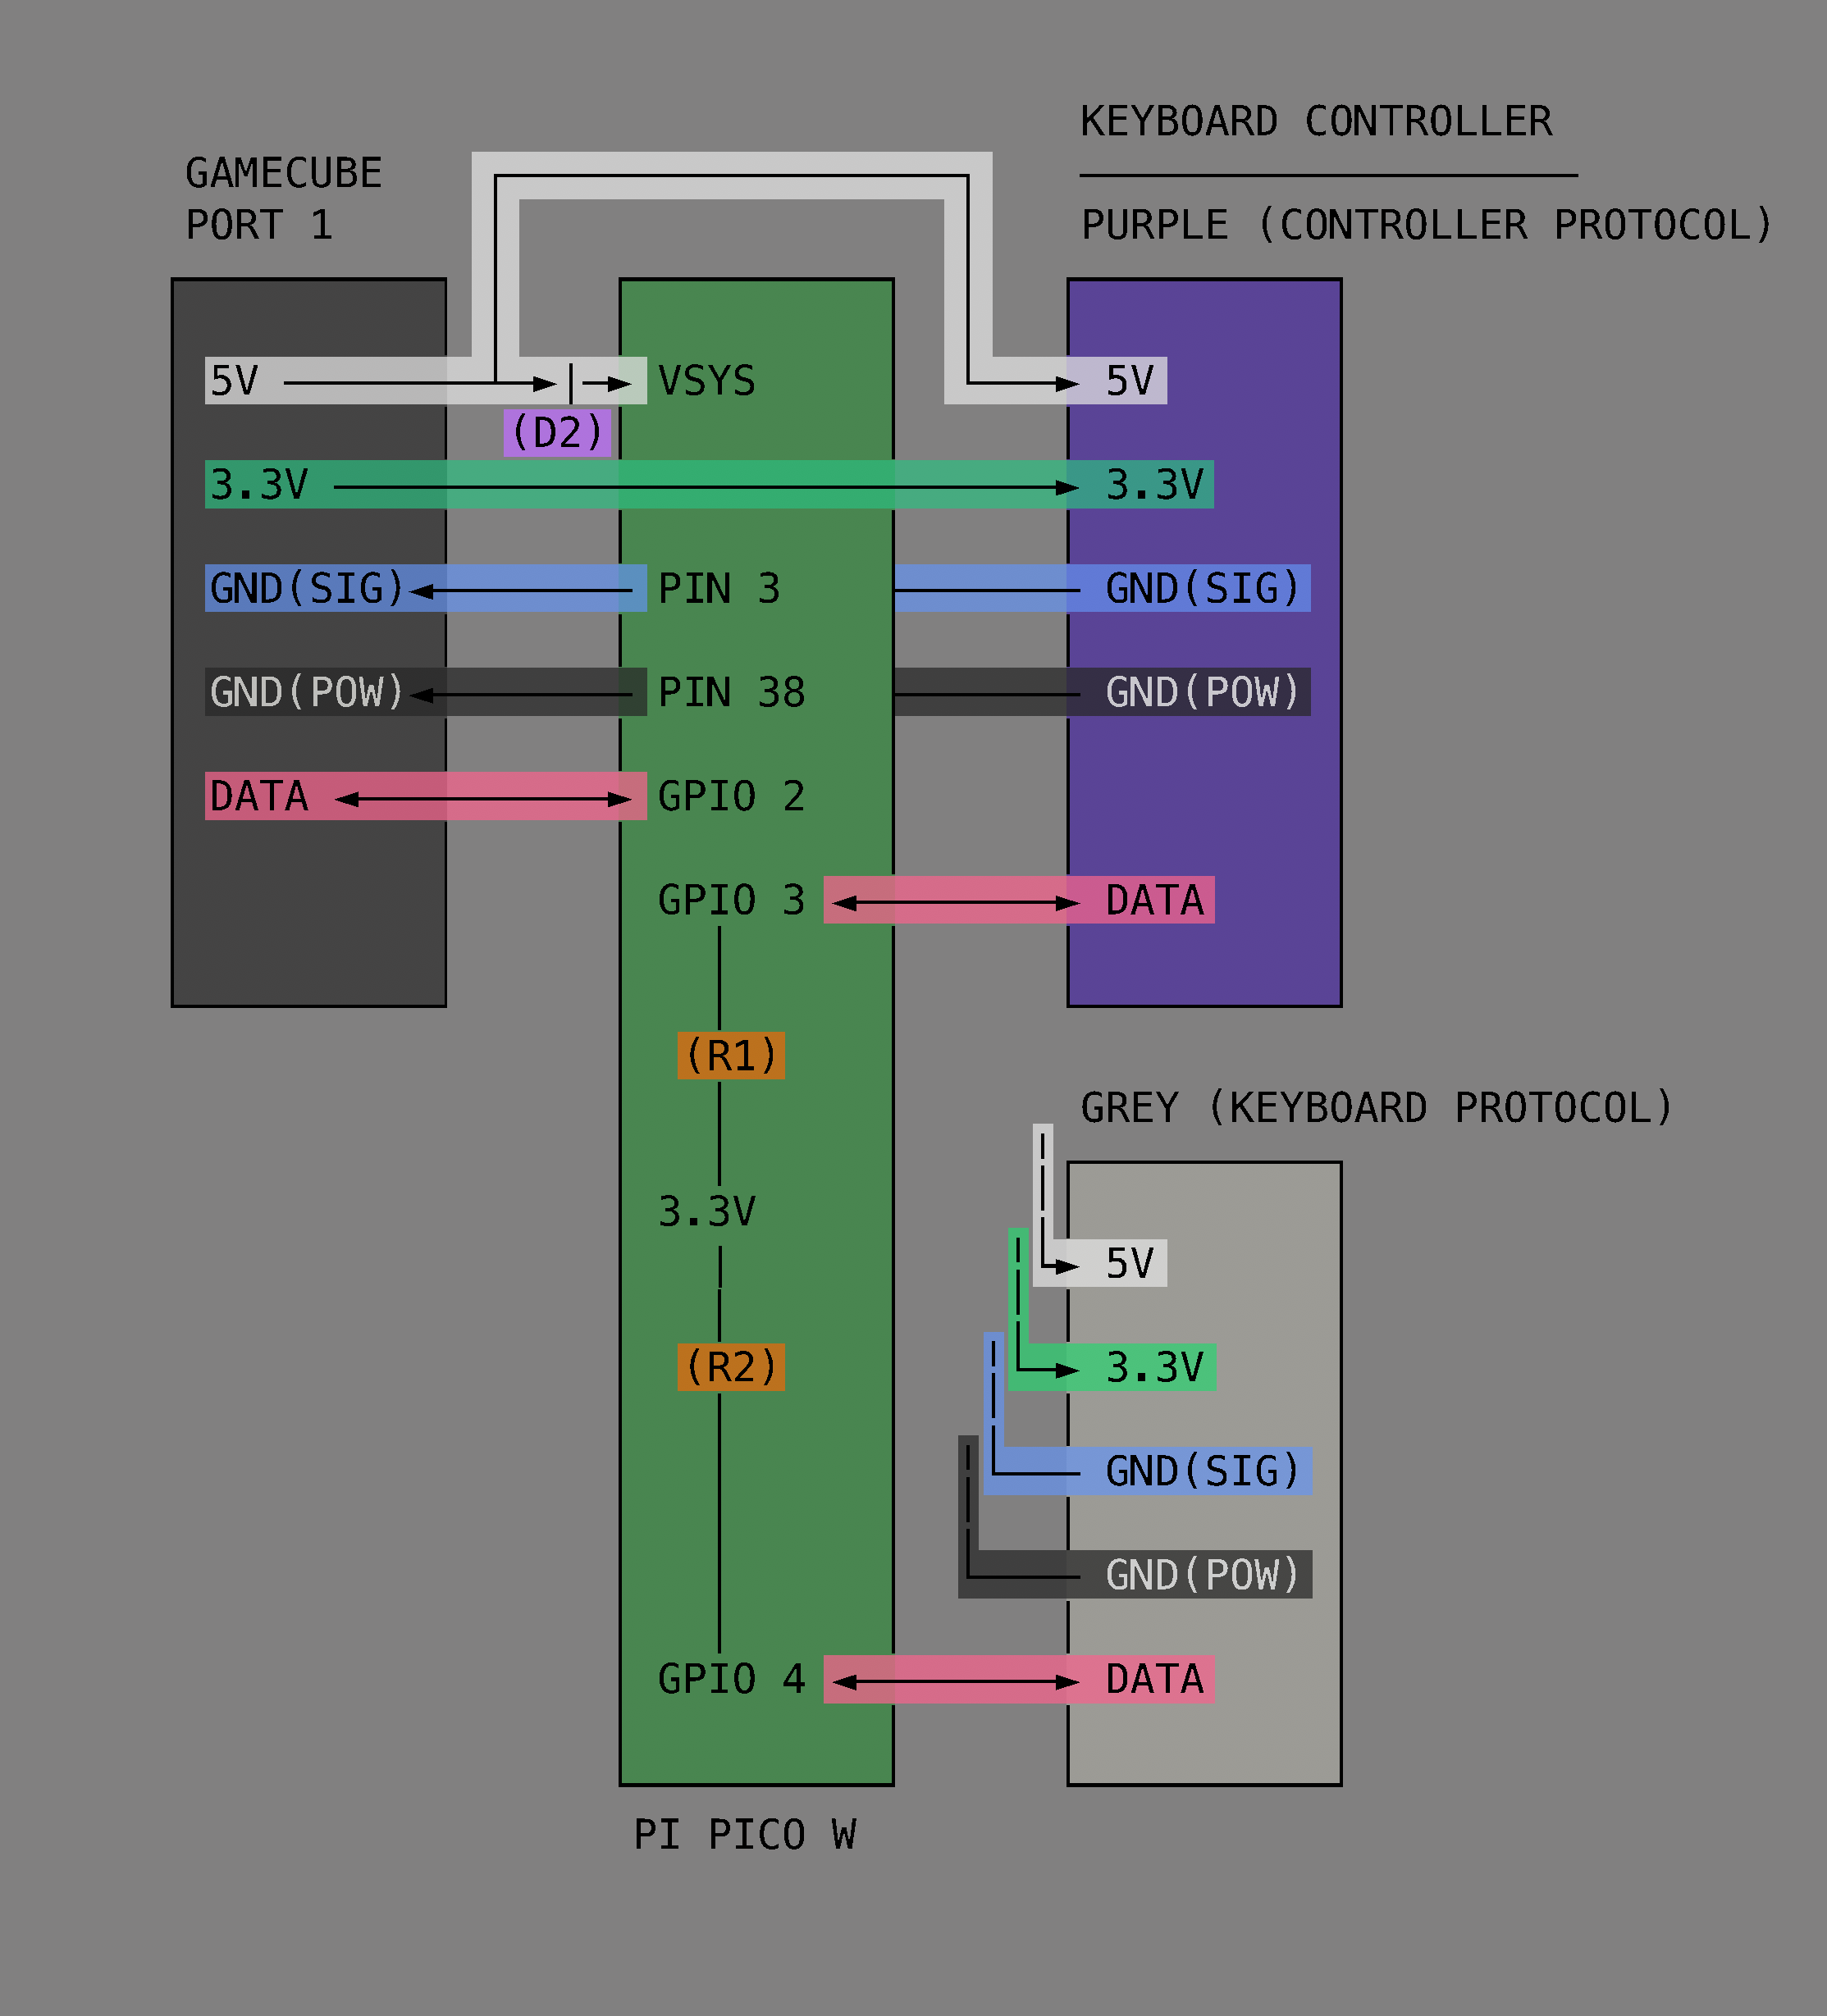
This project began simply enough but got very complicated in short order. Initially the goal was to get the GameCube keyboard controller integrated with the game Animal Crossing. The GameCube keyboard controller is a genuine part manufactured and sold by Nintendo but the game Animal Crossing isn’t compatible with this controller. Rather, Animal Crossing has an on-screen keyboard which players can use with a standard controller. [Hunter] found this frustrating to use so he created an adapter which would intercept the keyboard controller protocol and replace it with equivalent “keypresses” from an emulated standard controller.
In this project [Hunter] intercepts the controller protocol and the keyboard protocol with a Raspberry Pi Pico and then forwards them along to an attached GameCube by emulating a standard controller from the Pico. Having got that to work [Hunter] then went on to add a bunch of extra features.
First he designed and 3D-printed a new set of keycaps to match the symbols available in the in-game character set and added support for those. Then he made a keyboard mode for entering musical tunes in the game. Then he integrated a database of cheat codes to unlock most special items available in the game. Then he made it possible to import images (in low-resolution, 32×32 pixels) into the game. Then he made it possible to play (low-resolution) videos in the game. And finally he implemented a game of Snake, in-game! Very cool.
If you already own a GameCube and keyboard controller (or if you wanted to get them) this project would be good fun and doesn’t demand too much extra hardware. Just a Raspberry Pi Pico, two GameCube controller cables, two resistors, and a Schottky diode. And if you’re interested in Animal Crossing you might enjoy getting it to boot Linux!
Thanks very much to [Hunter] for writing in to let us know about this project. Have your own project? Let us know on the tipsline!
Can a 3D Minecraft implementation be done entirely in CSS and HTML, without a single line of JavaScript in sight? The answer is yes!
True, this small clone is limited to playing with blocks in a world that measures only 9x9x9, but the fact that [Benjamin Aster] managed it at all using only CSS and pure HTML is a fantastic achievement. As far as proofs of concept go, it’s a pretty clever one.
The project consists of roughly 40,000 lines of HTML radio buttons and labels, combined with fewer than 500 lines of CSS where the real work is done. In a short thread on X [Benjamin] explains that each block in the 9x9x9 world is defined with the help of tens of thousands of <label> and <input type="radio"> elements to track block types and faces, and CSS uses that as a type of display filter. Clicking a block is clicking a label, and changing a block type (“air” or no block is considered a type of block) switches which labels are visible to the user.
Viewing in 3D is implemented via CSS animations which apply transforms to what is displayed. Clicking a control starts and stops the animation, resulting in a view change. It’s a lot of atypical functionality for plain HTML and CSS, showing what is possible with a bit of out-of-the-box thinking.
QR codes are something that we all take for granted in this day and age. There are even a million apps to create your own QR codes, but what if you want to make a barcode? How about making a specific kind of barcode that follows UPC-E, CODE 39, or even the infamous… CODABAR? Well, it might be more difficult to find a single app that can handle all those different standards. Using “yet-another-web-app”, Barcode Tool – Generator & Scanner, you can rid these worries, created by [Ricardo de Azambuja].
When going to [Ricardo]’s simple application, you will find a straightforward interface that allows you to make far more different strips and square patterns than you’ve ever imagined. Of course, starting with the common QR code, you can create custom overlaid codes like many other QR generators. More uniquely, there are options for any barcode under the sun to help organize your hacker workspace. If you don’t want to download an app to scan the codes, you can even use the included scanner function.
If you want to use the web app, you can find it here! In-depth solutions to rather simple problems are something we strive to provide here at Hackaday, and this project is no exception. However, if you want something more physical, check out this specialized outdoor city cooking station.
Here’s a great hack sent in to us from [Simon]. He uses an e-paper photo frame as a weather map!
By now you are probably aware of e-paper technology, which is very low power tech for displaying images. E-paper only uses energy when it changes its display, it doesn’t draw power to maintain a picture it has already rendered. The particular e-paper used in this example is fairly large (as e-paper goes) and supports color (not just black and white) which is why it’s expensive. For about US$100 you can get a 5.7″ 7-color EPD display with 600 x 448 pixels.
Beyond the Inky Frame 5.7″ hardware this particular hack is mostly a software job. The first program, written in python, collects weather data from the UK Met Office. Once that image data is available a BASH script is run to process the image files with imagemagick. Finally a Micro Python script runs on the Pico to download the correct file based on the setting of the real-time clock, and update the e-paper display with the weather map.
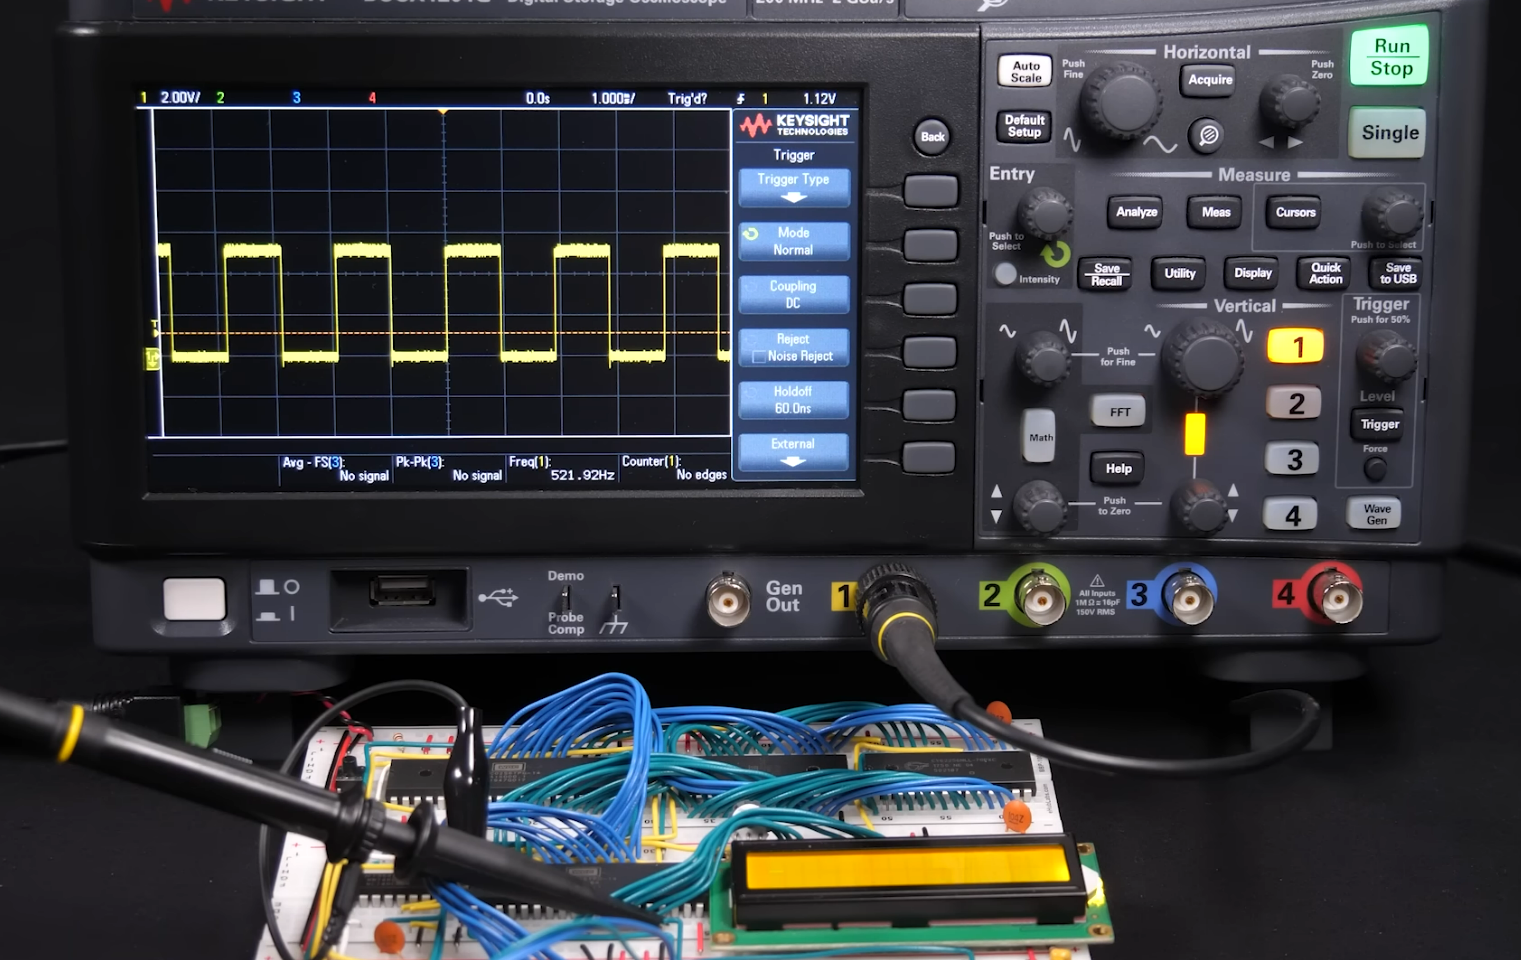
[Ben] uses the timer in the W65C22 Versatile Interface Adapter to generate the square waves which generate a tone. He then adds support for a new BEEP command into his MS BASIC interpreter. We covered [Ben Eater]’s MS BASIC here at Hackaday back in April, so definitely check that out if you missed it.
After checking the frequency of oscillation using his Keysight oscilloscope he then wires in an 8Ω 2W speaker via a LM386 audio amplifier. We can’t use the W65C22 output pin directly because that can only output a few milliwatts of power. [Ben] implements the typical circuit application from the LM386 datasheet to drive the speaker. To complete his video [Ben] writes a program for his BASIC interpreter which plays a tune.
Thanks to [Mark Stevens] for writing in to let us know about this one. If you’re planning to play along at home a good place to start is to build your own 6502, like [Ben] did!
Considered by many to be just a dull output for sequential text, the command-line terminal is a veritable canvas to the creative software developer. With the cursor as the brush, entire graphical user interfaces can be constructed, or even a basic text-based dashboard on which values can be updated without redrawing the entire screen over and over, or opting for a much heavier solution like a GUI.
Ncurses is one of the most well-known and rather portable Terminal User Interface (TUI) libraries using that such cursor control, and more, can be achieved in a fairly painless manner. That said, for anyone coming from a graphical user interface framework, the concepts and terminology with ncurses and similar can be confusingly different yet overlapping, so that getting started can be somewhat harrowing.
In this article we’ll take a look at ncurses’ history, how to set it up and how to use it with C and C++, and many more languages supported via bindings.
Tools And Curses
The acronym TUI is actually a so-called retronym, as TUIs were simply the way of life before the advent of bitmapped, videocard-accelerated graphics. In order to enable more than just basic, sequential character output, the terminal had to support commands that would move the cursor around the screen, along with commands that affect the way text is displayed. This basic sequence of moving the cursor and updating active attributes is what underlies TUIs, with the system’s supported character sets determining the scope of displayed characters.
Ncurses, short for “new curses“, is an evolution of the curses library by Ken Arnold as originally released in 1978 for BSD UNIX, where it saw use with a number of games like Rogue. Originally it was a freely distributable clone of System V Release 4.0 (SVr4) curses by the time of its release in 1993, based on the existing pcurses package. Later, ncurses adopted a range of new features over the course of its subsequent development by multiple authors that distinguished it from curses, and would result in it becoming the new de-facto default across a wide range of platforms.
The current version is maintained by Thomas Dickey, and the ncurses library and development files are readily available from your local package manager, or downloadable from the ncurses website. Compiling and running ncurses-based application is straightforward on Linux, BSD, and MacOS courtesy of the libncurses and related files being readily available and often already installed. On Windows you can use the MinGW port, with MSYS2 providing an appropriate terminal emulator, as well as the pacman package manager and access to the same ncurses functionality as on the other platforms.
Hello Curses
The core ncurses functionality can be accessed after including the ncurses.h header. There are two standard extensions in the panel.h and menu.h headers for panel stack management and menus, respectively. Panels are effectively wrappers around an ncurses window that automate a lot of the tedious juggling of multiple potentially overlapping windows. The menu extension is basically what it says on the tin, and makes creating and using menus easier.
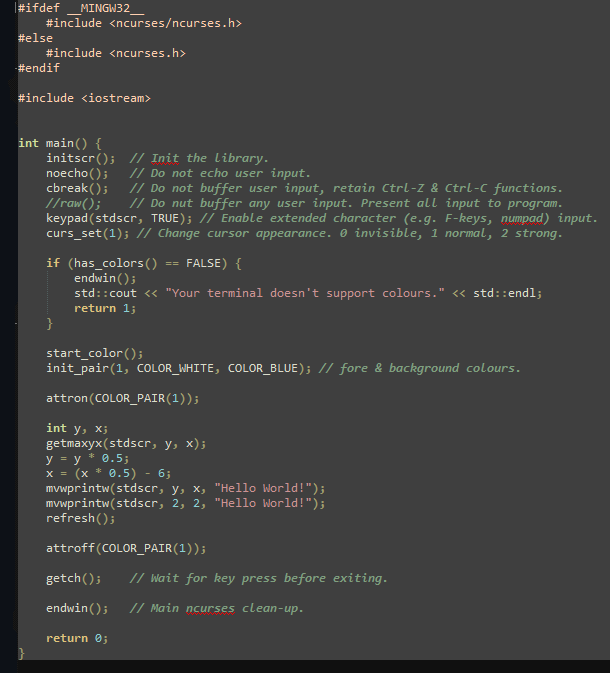
For a ‘hello world’ ncurses application we’d write the following:
This application initializes ncurses before writing the Hello World! string to both the top left, at (2, 2) and the center of the terminal window, with the terminal window size being determined dynamically with getmaxyx(). The mvprintw() and mvwprintw() work like printf(), with both taking the coordinates to move the cursor to the indicated position in row (y), column (x) order. The extra ‘w’ after ‘mv’ in the function name indicates that it targets a specific window, which here is stdscr, but could be a custom window. Do note that nurses works with y/x instead of the customary x/y order.
Next, we use attributes in this example to add some color. We initialize a pair, on index 1, using predefined colors and enable this attribute with attron() and the COLOR_PAIR macro before printing the text. Attributes can also be used to render text as bold, italic, blinking, dimmed, reversed and many more styles.
Finally, we turn the color attribute back off and wait for a keypress with getch() before cleaning up with endwin(). This code is also available along with a Makefile to build it in this GitHub repository as hello_ncurses.cpp. Note that on Windows (MSYS2) the include path for the ncurses header is different, and you have to compile with the -DNCURSES_STATIC define to be able to link.
Here the background, known as the standard screen (stdscr) is used to write to, but we can also segment this surface into windows, which are effectively overlays on top of this background.
Multi-Window Application
The Usagi Electric 1 (UE1) emulator with ncurses front-end.
There’s more to an ncurses application than just showing pretty text on the screen. There is also handling keyboard input and continuously updating on-screen values. These features are demonstrated in e.g. the emulator which I wrote recently for David Lovett’s Usagi Electric 1 (UE1) vacuum tube-based 1-bit computer. This was my first ever ncurses project, and rather educational as a result.
Using David’s QuickBasic-based version as the basis, I wrote a C++ port that differs from the QB version in that there’s no single large loop, but rather a separate CPU (processor.cpp) thread that processes the instructions, while the front-end (ue1_emu.cpp) contains the user input processing loop as well as the ncurses-specific functionality. This helps to keep the processor core’s code as generic as possible. Handling command line flags and arguments is taken care of by another project of mine: Sarge.
This UE1 front-end creates two ncurses windows with a specific size, draws a box using the default characters and refreshes the windows to make them appear. The default text is drawn with a slight offset into the window area, except for the ‘title’ on the border, which is simply text printed with leading and trailing spaces with a column offset but on row zero.
Handling user input with getch() wouldn’t work here, as that function is specific to stdscr and would foreground that ‘window’. Ergo we need to use the following: int key = wgetch(desc). This keeps the ‘desc’ window in focus and obtains the key input from there.
During each CPU cycle the update_display() function is called, in which successive mvwprintw() calls are made to update on-screen values, making sure to blank out previous data to prevent ghosting, with clrtoeol() and kin as the nuclear option. The only use of attributes is with color and bold around the processor state, indicating a running state in bold green and halted with bold red.
Finally, an interesting and crucial part of ncurses is the beep() function, which does what it says on the tin. For UE1 it’s used to indicate success by ringing the bell of the system (inspired by the Bendix G-15), which here provides a more subtle beep but can be used to e.g. indicate a successful test run. There’s also the flash() function that unsurprisingly flashes the terminal to get the operator’s attention.
A Much Deeper Rabbit Hole
By the time that you find yourself writing an ncurses-based application on the level of, say, Vim, you will need a bit more help just keeping track of all the separate windows that you will be creating. This is where the Panel library comes into play, which are basically wrappers for windows that automate a lot of the tedious stuff such as refreshing windows and keeping track of the window stack.
Applications also love to have menus, which can either be painstakingly created and managed using core ncurses features, or simplified with the Menu library. For everyone’s favorite data-entry widget, there is the Forms library, which provides not only the widgets, but also provides field validation features. If none of this is enough for your purposes, then there’s the Curses Development Kit (CDK). For less intensive purposes, such as just popping up a dialog from a shell script, there is the dialog utility that comes standard on Linux and many other platforms and provides easy access to ncurses functionality with very little fuss.
All of which serves to state that the ground covered in this article merely scratches the surface, even if it should be enough to get one at least part-way down the ncurses rabbit hole and hopefully appreciative of the usefulness of TUIs even in today’s bitmapped GUI world.
On the desktop, most people use the official HTML and JavaScript-based client for Discord in either a browser or a still-smells-like-a-browser Electron package. Yet what if there was a way to use a third-party client and even run it on Windows XP, Windows 95, and NT 3.1? This is exactly what [iDontProgramInCpp] did with their Discord Messenger project.
Fortunately, as a web ‘app’ the Discord API is readily accessible and they don’t seem to be in a rush to ban third-party clients. But it did require a bit of work to add newer versions of TLS encryption to Windows XP and older. Fortunately OpenSSL still supports these older platforms, so this was not a major hurdle and Windows XP happily ran this new Discord client. That left porting to older Windows versions.
Most of the challenge lies in writing shims for API calls that do not exist on these older platforms when backporting software from Windows XP to older Windows versions, and GCC (MinGW) had to be used instead of MSVC, but this also was a relatively minor detail. Finally, Windows NT 3.1 was picked as the last challenge for Discord Messenger, which ran into MSVCRT runtime issues and required backporting features to the NT 3.1 version that was still part of the OS back then.
[MattKC] covers the project in a recent video, as well as the AeroChat client which targets Windows Live Messenger fans. Hopefully the API that allows these projects to operate doesn’t get locked down, as third-party clients like these bring their own unique advantages to the Discord ecosystem.
The Portal games were revolutionary not only for their puzzle-based, narrative-driven gameplay, but also for their unique physics engine, which let players open portals anywhere and conserve momentum and direction through them. They’re widely regarded as some of the best video games ever made, but even beyond that they have some extra features that aren’t talked about as much. Namely, there are a number of level editors and mods that allow the in-game components to be used to build things like logic gates and computers, and this project goes even further by building a working NES emulator, all within Portal 2.
The main limitation here is that Portal 2 can only support a certain number of in-game objects without crashing, far lower than what would be needed to directly emulate NES hardware. The creator of the project, [PortalRunner], instead turned to Squirrel, the Portal 2 scripting language, and set about porting an existing NES emulator called smolnes to this scripting language. This is easier said than done, as everything in the code needs to be converted eight bits and then all of the pointers in smolnes need to be converted to use arrays, since Squirrel doesn’t support pointers at all. As can be easily imagined, this led to a number of bugs that needed to be sorted out before the game would run at all.
For those interested in code golfing, porting, or cross-compatibility, this project is a master class not only in the intricacies of the Portal 2 scripting language but in the way the NES behaves as well, not to mention the coding skill needed to recognize unique behaviors of the C language and the Squirrel scripting language. But eventually [PortalRunner] is able to get Super Mario Bros. running in Portal 2, albeit with low resolution and frame rate. Since we heard you like games within games, someone else put DOOM inside DOOM so you can DOOM while you DOOM.
What’s the GitHub repository you have created that you think is of most note? Which one do you think of as your magnum opus, the one that you will be remembered by? Was it the CAD files and schematics of a device for ending world hunger, or perhaps it was software designed to end poverty? Spare a thought for [AasishPokhrel] then, for his latest repository is one that he’ll be remembered by for all the wrong reasons. The poor guy created a repository with a scatalogical name, no doubt to store random things, but had the misfortune to inadvertently create the billionth repository on GitHub.
At the time of writing, the repository sadly contains no commits. But he seems to have won an unexpectedly valuable piece of Internet real estate judging by the attention it’s received, and if we were him we’d be scrambling to fill it with whatever wisdom we wanted the world to see. A peek at his other repos suggests he’s busy learning JavaScript, and we wish him luck in that endeavor.
We think everyone will at some time or another have let loose some code into the wild perhaps with a comment they later regret, or a silly name that later comes back to haunt them. We know we have. So enjoy a giggle at his expense, but don’t give him a hard time. After all, this much entertainment should be rewarded.
Some people love tools in their browsers. Others hate them. We certainly do like to see just how far people can push the browser and version 0.6 of CHILI3D, a browser-based CAD program, certainly pushes.
If you click the link, you might want to find the top right corner to change the language (although a few messages stubbornly refuse to use English). From there, click New Document and you’ll see an impressive slate of features in the menus and toolbars.
The export button is one of those stubborn features. If you draw something and select export, you’ll see a dialog in Chinese. Translated it has the title: Select and a checkmark for “Determined” and a red X for “Cancelled.” If you select some things in the drawing and click the green checkmark, it will export a brep file. That file format is common with CAD programs, but you’ll need to convert, probably, if you want to 3D print your design.
The project’s GitHub repository shows an impressive slate of features, but also notes that things are changing as this is alpha software. The CAD kernel is a common one brought in via WebAssembly, so there shouldn’t be many simple bugs involving geometry.
They say that if you let a million monkeys type on a million typewriters, they will eventually write the works of Shakespeare. While not quite the same thing [bbenchoff] (why does that sound familiar?), spent some computing cycles to generate random data and, via heuristics, find valid Atari 2600 “games” in the data.
As you might expect, the games aren’t going to be things you want to play all day long. In fact, they are more like demos. However, there are a number of interesting programs, considering they were just randomly generated.
Part of the reason this works is that the Atari has a fairly simple 6502-based CPU, so it is straightforward to evaluate the code, and a complete game fits in 4 K. Still, that means there are, according to [Brian], 1010159 possible ROMs. Compare that to about 1080 protons in the visible universe, and you start to see the scale of the problem.
To cut down the problem, you need some heuristics you can infer from actual games. For one thing, at least 75% of the first 1K of a ROM should be valid opcodes. It is also easy to identify code that writes to the TV and other I/O devices. Obviously, a program with no I/O isn’t going to be an interesting one.
Some of the heuristics deal with reducing the search space. For example, a valid ROM will have a reset vector in the last two bytes, so it is possible to generate random data and then apply the small number of legal reset vectors.
Why? Do you really need a reason? If you don’t have a 2600 handy, do like [Brian] and use an emulator. We wonder if the setup would ever recreate Tarzan?
At the dawn of the PC, IBM provided the Basic Input Output System (BIOS). It took care of bringing the machine up, and exposed a series of software hooks for the hardware. Over the years the BIOS and its updated descendants served us well, but as we entered a 64-bit world its limitations began to show.
The replacement was the Unified Extensible Firmware Interface or UEFI, and the chances are you’re viewing this on a machine which uses it in some capacity. But what if you only have UEFI and need BIOS to run a piece of older software? Never fear, because here’s CSMWrap, which brings it back, just for you.
Under the hood it’s a wrapper for the SeaBIOS compatibility support module, doing the work of setting up the memory mapping such that it will load, and ensuring that other services such as the VGA BIOS are loaded. As it stands it can boot FreeDOS and some older Windows versions under UEFI in QEMU, and it’s claimed also run on real hardware. We don’t often need to run DOS on our 2025 machine, but it’s neat to know we can.
It’s not often that we can include an operating system in a Hackaday article, but here’s the full 46-byte source of [Philippe Brochard]’s 10biForthOS in 8086 opcodes:
Admittedly, this is quite a minimal operating system. It’s written for the Intel 8086, and consists of a Forth implementation with only two instructions: compile (1) and execute (0). It can receive commands over a serial connection or from a keyboard. This allows a host computer to load more complex software onto it, one byte at a time. In particular, [Philippe] provides instructions for loading more advanced compilers, such as subleq-eForth for a more complete Forth implementation, or SectorC for C programming. He’s also written a 217-byte port of the OS to Linux Intel x64.
[Philippe] doesn’t take a strong stance on whether this should technically qualify as a Forth implementation, given that the base implementation lacks stacks, dictionaries, and the ability to define words. However, it does have an outer and inner interpreter, the ability to compile and execute code, and most importantly, “the simplicity and hacky feeling of Forth.”
To some, an operating system is a burden or waste of resources, like those working on embedded systems and other low-power applications. To others it’s necessary, abstracting away hardware so that higher-level programming can be done. For most people it’s perhaps not thought of at all. But for a few, the operating system is the most interesting piece of software running on a computer and if you’d like to investigate what makes this often overlooked aspect of computer science interesting, take a look at this course on operating systems from Cornell University.
The operating system itself is called Earth and Grass Operating System because it splits the functionality of the operating system into three separate parts. The Earth layer involves dealing with hardware, the Grass layer involves hardware-independent aspects, and a third application layer implements other key operating system features. It’s built for a RISC-V processor, since that instruction set is completely open source and transparent about what it’s doing. It’s also incredibly small, coming in at around 2000 lines of code. The course covers nine areas, with the first six being core operating system functions and the remaining three covering more advanced operating system concepts.
For understanding the intricacies and sometimes mysterious ways that operating systems work, a course like this can go a long way into unraveling those mysteries and developing a deeper understanding of how it brings the hardware to work for higher-level software. We actually featured this operating system two years ago, before this course was created, which covers this project for those who like to take a more self-directed approach, or simply want a lightweight OS for a RISC-V system.
The code is split into two main programs. One program is for the Victron battery monitor and the other is for any Victron solar controller. The software will receive, dissect, decrypt, decode, and report the data periodically broadcast from the devices over BLE.
The BLE data is transmitted in Link-Layer Protocol Data Units (PDUs) which are colloquially called “packets”. In this particular case the BLE functionality for advertising, also known as broadcasting, is used which means the overhead of establishing connections can be avoided thereby saving power.
Decryption is handled with the the wolfSSL library and [ChrisJ7903] had nice things to say about the helpful people over at wolfSSL. The AES-CTR algorithm is used and seeded with the per-device encryption key, a nonce/salt in little-endian format, and the encrypted data.
[ChrisJ7903] relied heavily on technical documentation provided by Victron in order to decode the received data; some of that documentation is made available in the Git repo and ultimately everything is revealed in the code itself.
We’ve done heaps of BLE stuff here at Hackaday in the past. If you’re interested in BLE tech check out this rain gauge and this doorbell.
Today from the team at Cesanta Software — the people who gave us the open-source Mongoose Web Server Library and Mongoose OS — we have an article covering how to build an STM32 web dashboard.
The article runs through setting up a development environment; creating the dashboard layout; implementing the dashboard, devices settings, and firmware update pages; building and testing the firmware; attaching UI controls to the hardware; and conclusion.
The web dashboard is all well and good, but in our opinion the killer feature remains the Over-The-Air (OTA) update facility which allows for authenticated wireless firmware updates via the web dashboard. The rest is just gravy. In the video you get to see how to use your development tools to create a firmware file suitable for OTA update.
If you’re thinking this all looks a little familiar, that’s because we recently wrote about their web dashboard for the ESP32. This is the same again but emphasizing the STM32 support this time around. We originally heard about the Mongoose technology line all the way back in 2017!
Thanks to [Toly] for letting us know about this new howto.
The MP3 file type has been around for so long, and is supported by essentially all modern media software and hardware, that it might be surprising to some to learn that it’s actually a proprietary format. Developed in the late 80s and early 90s, it rose to prominence during the Napster/Limewire era of the early 00s and became the de facto standard for digital music, but not all computers in these eras could play this filetype. This includes the Amigas of the early 90s, with one rare exception: this unreleased successor to the A3000 with a DSP chip, which now also has the software to play back these digital tunes.
The AA3000, developed as a prototype by Amiga, was never released to the general public. Unlike the original A3000 this one would have included a digital signal processing chip from AT&T called the DSP3210 which would have greatly enhanced its audio capabilities. A few prototype boards did make it out into the hands of the public, and the retrocomputing scene has used them to develop replicas of these rare machines. [Wrangler] used one to then develop the software needed for the MPEG layer 2 and 3 decoder using this extra hardware, since the original Amiga 3000 was not powerful enough on its own to play these files back.
If you want to follow along with the community still developing for this platform there’s a form post with some more detail for this specific build (although you may need to translate from German). [Wrangler] additionally points out that there are some limitations with this implementation as well, so you likely won’t get Winamp-level performance with this system, but for the Amiga fans out there it’s an excellent expansion of this computer’s capabilities nonetheless.