Hoy se levanto el embargo para los reviews de la RTX 5070 Ti y medios de alrededor del mundo han publicado sus correspondientes análisis. De a acuerdo a los benchmarks de TechPowerUp, la RTX 5070 Ti logra igualar a la RTX 4080 en 4K en rasterizado, mientras que con ray tracing está apenas 3% debajo, también en 4K. Ambos porcentajes teniendo en cuenta resultados promedio en varios títulos, de modo que en algunos la RTX 5070 Ti rinde más que la RTX 4080, y en otros menos.

Con Multi-Frame Generation, no obstante, la RTX 5070 Ti en 4X y DLSS en Modo Rendimiento, logra aventajar a la RTX 4080 por un promedio de
- Alan Wake 2 – RTX 5070 Ti Vs RTX 4080: 72%
- Hogwarts Legacy – RTX 5070 Ti Vs RTX 4080: 69%
- Star Wars Outlaws – RTX 5070 Ti Vs RTX 4080: 58%
- Dragon Age The Veilguard – RTX 5070 Ti Vs RTX 4080: 58%
- Promedio: 64.25%
Debajo podrán encontrar un resumen de todos los análisis publicadas hasta el momento, cortesía de Videocardz. Algunos están en formato de video y otros en sitios web.
Dado que la latencia incluso con el Modo X4 es 20 ms mayor que en la resolución nativa sin DLSS, gracias a Reflex 2 y Frame Warp, en mi opinión estos son los benchmarks que deberían determinar la compra entre una RTX 4080 y una RTX 5080, sobre todo sabiendo que cuestan lo mismo.
Debajo podrán ver las diferencias de latencia entre el nuevo modelo de transformador de DLSS y el antiguo modelo CNN (redes neuronales convolucionales), que trae mejoras visuales en DLSS y Ray Reconstrucion en todas las RTX.
Lamentablemente, TechPowerUp no publicó cifras de latencia con DLSS y Multi Frame Generation lo cual hubiera sido lo ideal y lo vamos a incluir cuando publiquemos nuestro análisis a fines de este mes o principios del próximo.
Upscaling & Frame Generation
Cyberpunk 2077 RT |
| Card |
Upscaling |
Framegen |
FPS |
Latency |
VRAM |
| RTX 5070 Ti |
Native |
Off |
31 FPS |
62 ms |
13603 MB |
| RTX 5070 Ti |
Transformer / DLAA |
Off |
30 FPS |
64 ms |
14163 MB |
| RTX 5070 Ti |
Transformer / Quality |
Off |
53 FPS |
39 ms |
11904 MB |
| RTX 5070 Ti |
Transformer / Balanced |
Off |
63 FPS |
35 ms |
11635 MB |
| RTX 5070 Ti |
Transformer / Performance |
Off |
75 FPS |
31 ms |
11631 MB |
| RTX 5070 Ti |
Transformer / Ultra Performance |
Off |
123 FPS |
23 ms |
11032 MB |
| RTX 5070 Ti |
CNN / DLAA |
Off |
30 FPS |
66 ms |
15405 MB |
| RTX 5070 Ti |
CNN / Quality |
Off |
55 FPS |
42 ms |
13176 MB |
| RTX 5070 Ti |
CNN / Balanced |
Off |
66 FPS |
36 ms |
12895 MB |
| RTX 5070 Ti |
CNN / Performance |
Off |
81 FPS |
30 ms |
12743 MB |
| RTX 5070 Ti |
CNN / Ultra Performance |
Off |
122 FPS |
25 ms |
12280 MB |
| RTX 5070 Ti |
Native |
x2 |
56 FPS |
75 ms |
14617 MB |
| RTX 5070 Ti |
Native |
x3 |
84 FPS |
78 ms |
14829 MB |
| RTX 5070 Ti |
Native |
x4 |
108 FPS |
86 ms |
15098 MB |
| RTX 5070 Ti |
Native |
AMD FSR |
53 FPS |
N/A |
14511 MB |
| RTX 5080 |
Native |
Off |
35 FPS |
55 ms |
13565 MB |
| RTX 5080 |
Transformer / DLAA |
Off |
34 FPS |
56 ms |
14478 MB |
| RTX 5080 |
Transformer / Quality |
Off |
62 FPS |
36 ms |
12233 MB |
| RTX 5080 |
Transformer / Balanced |
Off |
74 FPS |
32 ms |
11917 MB |
| RTX 5080 |
Transformer / Performance |
Off |
86 FPS |
29 ms |
11832 MB |
| RTX 5080 |
Transformer / Ultra Performance |
Off |
135 FPS |
23 ms |
11262 MB |
| RTX 5080 |
CNN / DLAA |
Off |
35 FPS |
54 ms |
15050 MB |
| RTX 5080 |
CNN / Quality |
Off |
66 FPS |
34 ms |
12832 MB |
| RTX 5080 |
CNN / Balanced |
Off |
78 FPS |
29 ms |
12544 MB |
| RTX 5080 |
CNN / Performance |
Off |
93 FPS |
29 ms |
12387 MB |
| RTX 5080 |
CNN / Ultra Performance |
Off |
135 FPS |
23 ms |
11957 MB |
| RTX 5080 |
Native |
x2 |
64 FPS |
71 ms |
14606 MB |
| RTX 5080 |
Native |
x3 |
91 FPS |
74 ms |
14885 MB |
| RTX 5080 |
Native |
x4 |
120 FPS |
74 ms |
15147 MB |
| RTX 5080 |
Native |
AMD FSR |
61 FPS |
N/A |
14703 MB |
| RTX 5090 |
Native |
Off |
54 FPS |
38 ms |
13916 MB |
| RTX 5090 |
Transformer / DLAA |
Off |
54 FPS |
38 ms |
14891 MB |
| RTX 5090 |
Transformer / Quality |
Off |
92 FPS |
29 ms |
12434 MB |
| RTX 5090 |
Transformer / Balanced |
Off |
106 FPS |
28 ms |
12167 MB |
| RTX 5090 |
Transformer / Performance |
Off |
124 FPS |
26 ms |
12130 MB |
| RTX 5090 |
Transformer / Ultra Performance |
Off |
129 FPS |
22 ms |
11588 MB |
| RTX 5090 |
CNN / DLAA |
Off |
57 FPS |
40 ms |
15994 MB |
| RTX 5090 |
CNN / Quality |
Off |
96 FPS |
27 ms |
13699 MB |
| RTX 5090 |
CNN / Balanced |
Off |
113 FPS |
27 ms |
13367 MB |
| RTX 5090 |
CNN / Performance |
Off |
128 FPS |
25 ms |
13307 MB |
| RTX 5090 |
CNN / Ultra Performance |
Off |
126 FPS |
23 ms |
12842 MB |
| RTX 5090 |
Native |
x2 |
105 FPS |
45 ms |
14734 MB |
| RTX 5090 |
Native |
x3 |
151 FPS |
51 ms |
14896 MB |
| RTX 5090 |
Native |
x4 |
196 FPS |
48 ms |
15164 MB |
| RTX 5090 |
Native |
AMD FSR |
99 FPS |
N/A |
15046 MB |
| RTX 4090 |
Native |
Off |
43 FPS |
59 ms |
14714 MB |
| RTX 4090 |
CNN / DLAA |
Off |
42 FPS |
50 ms |
14813 MB |
| RTX 4090 |
CNN / Quality |
Off |
78 FPS |
30 ms |
12560 MB |
| RTX 4090 |
CNN / Balanced |
Off |
93 FPS |
28 ms |
12267 MB |
| RTX 4090 |
CNN / Performance |
Off |
114 FPS |
25 ms |
12206 MB |
| RTX 4090 |
CNN / Ultra Performance |
Off |
155 FPS |
20 ms |
11687 MB |
| RTX 4090 |
Transformer / DLAA |
Off |
40 FPS |
47 ms |
14054 MB |
| RTX 4090 |
Transformer / Quality |
Off |
67 FPS |
33 ms |
11908 MB |
| RTX 4090 |
Transformer / Balanced |
Off |
80 FPS |
30 ms |
11643 MB |
| RTX 4090 |
Transformer / Performance |
Off |
97 FPS |
26 ms |
11570 MB |
| RTX 4090 |
Transformer / Ultra Performance |
Off |
153 FPS |
20 ms |
10967 MB |
| RTX 4090 |
Native |
DLSS |
74 FPS |
57 ms |
13714 MB |
| RX 7900 XTX |
Native |
Off |
21 FPS |
N/A |
12635 MB |
| RX 7900 XTX |
FSR 3 / Performance |
Off |
59 FPS |
N/A |
9250 MB |
| RX 7900 XTX |
Native |
FSR 3 |
39 FPS |
N/A |
13360 MB |
Durante el Editor’s Day 2025 en el CES, en el cual estuvimos presentes el pasado 8 de enero, Nvidia mostró benchmarks adicionales de la Serie RTX 50 de próxima generación, las cuales incluyen -por ahora- a la RTX 5090, 5080, 5070 Ti y 5070. Según la compañía verde, las cifras de rendimiento 2x que se presentaron durante la presentación de CES 2025 solo son posibles utilizando la nueva tecnología DLSS 4 con MFG (Multi-Frame Generation).
Sin DLSS 4 ni ninguna técnica de reescalado de DLSS, las mejoras de rendimiento nativas no son tan grandes, pero dadas las nuevas tecnologías que ofrece la empresa en los mismos rangos de precios, especialmente las RTX 5070 y 5070 Ti, se espera que ambas tengan muy buenas ventas, especialmente porque la integración de las tecnologías de reescalado y generación de fotogramas se está convirtiendo en algo muy importante en la industria de los juegos y Nvidia ha estado perfeccionando estas últimas para tener un mejor rendimiento e incluso menos latencia que antes.
Sin ir más lejos, con Multi-Frame Generation de DLSS 4 (exclusivo para las GeForce RTX 50), 15 de 16 píxeles serán generados por IA, lo cual deja al rasterizado como algo necesario, pero básicamente obsoleto en términos de rendimiento final.
Comenzando por arriba, NVIDIA declaró oficialmente un aumento del rendimiento del 30% en escenarios de juegos RT nativos sin DLSS involucrado para la GeForce RTX 5090 y del 15 % para la GeForce RTX 5080.
Si bien el salto de rendimiento en rasterizado quizás no sea lo que muchos esperaban, ya que hubo un gran salto de performance en la generación anterior, el Multi-Frame Generation de DLSS 4 y soporte para tecnologías futuras como Neural Rendering y Neural Shading junto con nuevas capacidades RTX como RTX Fur, RTX Hair y RTX Skin, debería haber una razón suficiente para optar por una RTX 50 en vez de una RTX 40.
En cuanto a las otras dos tarjetas, la GeForce RTX 5070 Ti y la GeForce RTX 5070, Nvidia afirma un aumento del rendimiento del 20 % en los mismos escenarios de juego RT nativo (sin DLSS) en comparación con la RTX 4070 Ti y la RTX 4070.
La RTX 5090 está equipada con una enorme capacidad de memoria de 32 GB, lo que la convierte en una solución potente para creadores de contenido y jugadores de alta resolución, especialmente aquellos que utilizan los últimos monitores QD-OLED DP 2.1 de 4K y 240 Hz, mientras que la RTX 5080 y la RTX 5070 Ti también vienen con una respetable capacidad de memoria GDDR7 de 16 GB, mientras que la RTX 5070 apunta al segmento de gama alta convencional con 12 GB de memoria GDDR7.
La NVIDIA GeForce RTX 5090 llegará a las tiendas el 30 de enero junto con la RTX 5080 por un precio de venta sugerido de US$ 1999 y US$ 999, respectivamente, mientras que la RTX 5070 Ti y la RTX 5070 estarán disponibles en febrero por US$ 749 y US$ 549, respectivamente.
Especificaciones de la Serie GeForce RTX 50 “Blackwell”
|
|
RTX 5090 |
RTX 5080 |
RTX 5070 Ti
|
RTX 5070 |
| Plaqueta & SKU |
PG144/145 SKU 30 |
PG144/147 SKU 45 |
PG147 SKU 60 |
PG146/147 SKU 70 |
| GPU |
GB202-300 |
GB203-400 |
GB203-300 |
GB205 -300 |
| SMs |
|
|
|
|
| Núcleos CUDA |
|
|
|
|
| Memoria |
|
|
|
|
| Bus de Memoria |
|
|
|
|
| Reloj de Memoria |
|
|
|
|
| Ancho de Banda |
|
|
|
|
| Conectores de Energía |
1x 16-pin |
1x 16-pin |
1x 16-pin |
1x 16-pin |
| Consumo |
|
|
|
|
| Salidas de Video |
3x DP 2.1a, 1x HDMI 2.1 |
3x DP 2.1a, 1x HDMI 2.1 |
3x DP 2.1a, 1x HDMI 2.1 |
3x DP 2.1a, 1x HDMI 2.1 |
| Interfaz |
PCIe 5.0×16 |
PCIe 5.0×16 |
PCIe 5.0×16 |
PCIe 5.0×16 |
| Precio de Lanzamiento |
US$ 1.999 |
US$ 999 |
US$ 749 |
US$ 549 |
| Fecha de Lanzamiento |
30 de Enero 2025 |
30 de Enero 2025 |
Febrero 2025 |
Febrero 2025 |
La Serie GeForce RTX 50, basada en la arquitectura NVIDIA Blackwell, los núcleos tensoriales de quinta generación y los núcleos RT de cuarta generación, ofrece grandes avances en renderizado basado en IA, lo que incluye sombreadores neuronales, tecnologías humanas digitales, geometría e iluminación.
«Blackwell, el motor de la IA, ha llegado para los jugadores, desarrolladores y creativos de PC», afirma Jensen Huang, fundador y CEO de NVIDIA. «Blackwell, que fusiona el renderizado neuronal basado en IA y el trazado de rayos, es la innovación más importante en gráficos de ordenador desde que introdujimos el sombreado programable hace 25 años.»
La GPU GeForce RTX 5090, la más rápida hasta la fecha, cuenta con 92.000 millones de transistores que proporcionan más de 3.352 billones de operaciones de IA por segundo (TOPS) de capacidad de cálculo. Gracias a las innovaciones de la arquitectura Blackwell y DLSS 4, la GPU GeForce RTX 5090 supera hasta 2 veces el rendimiento de la GPU GeForce RTX 4090.
GeForce Blackwell llega a los portátiles con todas las funciones de los modelos de sobremesa, lo que supone una mejora considerable de la informática portátil, que incluye una extraordinaria capacidad gráfica y una notable eficiencia.
La generación Blackwell de la tecnología NVIDIA Max-Q prolonga la duración de la batería hasta un 40% y permite crear portátiles finos y ligeros que mantienen su elegante diseño sin sacrificar potencia ni rendimiento.
NVIDIA DLSS 4 multiplica hasta por 8 el rendimiento
Con la Serie GeForce RTX 50, DLSS 4 estrena la generación de fotogramas múltiples para aumentar la velocidad de fotogramas utilizando la IA para generar hasta tres fotogramas por fotograma renderizado. Funciona al unísono con el conjunto de tecnologías DLSS para aumentar el rendimiento hasta 8 veces con respecto al renderizado tradicional, al tiempo que mantiene la capacidad de respuesta con la tecnología NVIDIA Reflex.
DLSS 4 también introduce la primera aplicación en tiempo real de la arquitectura de modelos de transformación en la industria gráfica. Los modelos de superresolución y reconstrucción de rayos DLSS basados en transformadores utilizan 2 veces más parámetros y 4 veces más capacidad de cálculo para proporcionar más estabilidad, reducir el efecto fantasma, aumentar el nivel de detalle y mejorar el antialiasing en las escenas de juego. DLSS 4 será compatible con las GPU GeForce RTX Serie 50 en más de 75 juegos y aplicaciones el día de su lanzamiento.
Blackwell introduce la IA en los sombreadores
Hace 25 años, NVIDIA introdujo GeForce 3 y los sombreadores programables, que sentaron las bases para dos décadas de innovación gráfica, desde el sombreado de píxeles hasta el sombreado por cálculo y el trazado de rayos en tiempo real. Junto con las GPU de la serie GeForce RTX 50, NVIDIA presenta los sombreadores neuronales RTX, que incorporan pequeñas redes de IA a los sombreadores programables, lo que desbloquea materiales de calidad cinematográfica, iluminación y mucho más en los juegos en tiempo real.
El renderizado de personajes de videojuegos es una de las tareas más difíciles de los gráficos en tiempo real, ya que la gente es propensa a notar los más pequeños errores o artefactos en los humanos digitales. RTX Neural Faces toma como entrada un rostro rasterizado sencillo y datos de pose en 3D, y utiliza IA generativa para renderizar en tiempo real un rostro digital de alta calidad y temporalmente estable.
RTX Neural Faces se complementa con las nuevas tecnologías RTX para el trazado de rayos del pelo y la piel. Junto con la nueva RTX Mega Geometry, que permite hasta 100 veces más triángulos trazados por rayos en una escena, estos avances están preparados para ofrecer un enorme salto en el realismo de los personajes y entornos de los juegos.
La potencia del renderizado neural, DLSS 4 y el nuevo modelo de transformador DLSS se muestra en las GPU de la Serie GeForce RTX 50 con Zorah, una innovadora demostración tecnológica de NVIDIA.
Personajes autónomos
Las GPU de la Serie GeForce RTX 50 incorporan la tecnología TOPS de IA más avanzada del mercado para dotar de autonomía a los personajes de los juegos en paralelo con el renderizado.
NVIDIA presenta un conjunto de nuevas tecnologías ACE que permiten a los personajes percibir, planificar y actuar como jugadores humanos. Los personajes autónomos controlados por ACE se están integrando en PUBG: BATTLEGROUNDS de KRAFTON y en InZOI, el próximo juego de simulación de vida del editor, así como en MIR5 de Wemade Next.
En PUBG, los compañeros equipados con NVIDIA ACE planifican y ejecutan acciones estratégicas, trabajando dinámicamente con los jugadores humanos para asegurar la supervivencia. InZOI incluye personajes Zoi inteligentes que ajustan su comportamiento de forma autónoma en función de los objetivos y los acontecimientos del juego. En MIR5, los jefes de las incursiones, controlados por modelos de lenguaje amplio (LLM), adaptan sus tácticas en función del comportamiento del jugador, lo que crea encuentros más dinámicos y desafiantes.
Modelos AI Foundation para PC RTX AI
Los casos de uso abarcan LLM, modelos de lenguaje de visión, generación de imágenes, habla, modelos de incrustación para recuperación-generación aumentada, extracción de PDF y visión por computador. Los microservicios NIM incluyen todos los componentes necesarios para ejecutar IA en PC y están optimizados para su implantación en todas las GPU NVIDIA.
Para mostrar cómo los entusiastas y desarrolladores de RTX pueden utilizar los microservicios NIM para crear agentes y asistentes de IA, NVIDIA lanzará una serie de microservicios NVIDIA NIM y AI Blueprints para PC RTX AI de los mejores desarrolladores de modelos como Black Forest Labs, Meta, Mistral y Stability.AI.
Para demostrar cómo entusiastas y desarrolladores pueden utilizar NIM para crear agentes y asistentes de IA, NVIDIA ha presentado hoy Project R2X, un avatar de PC dotado de visión que puede poner la información al alcance del usuario, ayudarle con aplicaciones de escritorio y llamadas de videoconferencia, leer y resumir documentos, etc.
Herramientas de IA para creadores
Las GPU GeForce RTX Serie 50 potencian los flujos de trabajo creativos. Las GPU de la serie RTX 50 son las primeras GPU de consumo que admiten precisión FP4, lo que multiplica por 2 el rendimiento de generación de imágenes de IA para modelos como FLUX y permite ejecutar modelos generativos de IA localmente en un espacio de memoria más reducido que el hardware de la generación anterior.
La aplicación NVIDIA Broadcast incorpora dos funciones beta basadas en IA para retransmisiones en directo: Studio Voice, que mejora el audio del micrófono, y Virtual Key light, que ilumina los rostros de los retransmisores. Streamlabs presenta el Asistente Inteligente de Retransmisión, basado en NVIDIA ACE e Inworld AI, que actúa como copresentador, productor y asistente técnico para mejorar las retransmisiones en directo.
Junto con el anuncio de la Serie GeForce RTX 50, Nvidia anunció DLSS 4, una tecnología exclusiva para la arquitectura Blackwell introduce la “generación de múltiples cuadros” (Multi-Frame Generation), la cual es capaz de generar aún más cuadros por adelantado (hasta 3, en comparación a 1 de las RTX 40).
NVIDIA afirma que ofrecerá un rendimiento hasta 8 veces mayor en juegos como Cyberpunk 2077 y representa la actualización más importante de DLSS desde su estreno en el 2020.
La tecnología mejora el rendimiento al introducir cuadros adicionales en el flujo de gráficos, todos generados artificialmente. Los usuarios de herramientas de terceros que duplican o triplican las velocidades de cuadros reconocerán el potencial en las imágenes debajo.
La actualización de DLSS4 mejorará los algoritmos y los modelos de IA para todas las series RTX. La serie NVIDIA RTX 50 generará esencialmente no uno sino tres cuadros por adelantado, todo ello manteniendo una baja latencia, gracias a la tecnología Reflex 2 actualizada (que no es exclusiva de la serie 50). Otras GPUs RTX también verán una mejora de latencia.
Sin embargo, el detalle importante es que NVIDIA ha confirmado que la generación de múltiples cuadros DLSS, la característica principal de DLSS 4, será exclusiva de la serie RTX 50. Si bien las tarjetas más antiguas pueden admitir la funcionalidad de escalado, no se beneficiarán de los cuadros adicionales generados por el hardware, algo que es predecible por parte de la compañía.
Para la serie RTX 40, esto significa que solo se genera un cuadro por adelantado, mientras que la serie RTX 20 no admitirá la generación de cuadros en absoluto. NVIDIA promete un aumento significativo del rendimiento, hasta 8 veces, lo que lo hace ideal para monitores 4K de 240 Hz.
DLSS 4 se lanzará con soporte para 75 juegos el primer día. Será totalmente compatible con todas las GPU de la serie RTX 50, mientras que las tarjetas de la serie RTX 40 utilizarán la tecnología de generación de un solo cuadro.
Lista de Juegos para DLSS 4:
- Alan Wake 2, Cyberpunk 2077, Indiana Jones and the Great Circle y Star Wars Outlaws se actualizarán con soporte nativo en el juego para la generación de múltiples cuadros DLSS cuando se lancen las GPU de la serie GeForce RTX 50.
- Black Myth: Wukong, NARAKA: BLADEPOINT, Marvel Rivals y Microsoft Flight Simulator 2024 se lanzarán poco después.
- Black State, DOOM: The Dark Ages y Dune: Awakening se lanzarán con la generación de múltiples cuadros DLSS habilitada.
NVIDIA DLSS 4 multiplica hasta por 8 el rendimiento
Con la Serie GeForce RTX 50, DLSS 4 estrena la generación de fotogramas múltiples para aumentar la velocidad de fotogramas utilizando la IA para generar hasta tres fotogramas por fotograma renderizado. Funciona al unísono con el conjunto de tecnologías DLSS para aumentar el rendimiento hasta 8 veces con respecto al renderizado tradicional, al tiempo que mantiene la capacidad de respuesta con la tecnología NVIDIA Reflex.
DLSS 4 también introduce la primera aplicación en tiempo real de la arquitectura de modelos de transformación en la industria gráfica. Los modelos de superresolución y reconstrucción de rayos DLSS basados en transformadores utilizan 2 veces más parámetros y 4 veces más capacidad de cálculo para proporcionar más estabilidad, reducir el efecto fantasma, aumentar el nivel de detalle y mejorar el antialiasing en las escenas de juego. DLSS 4 será compatible con las GPU GeForce RTX Serie 50 en más de 75 juegos y aplicaciones el día de su lanzamiento.
DLSS 4 también introduce la primera aplicación en tiempo real de la arquitectura de modelos de transformación en la industria gráfica. Los modelos de superresolución y reconstrucción de rayos DLSS basados en transformadores utilizan dos veces más parámetros y cuatro veces más capacidad de cálculo para proporcionar más estabilidad, reducir el efecto fantasma, aumentar el nivel de detalle y mejorar el antialiasing en las escenas de juego. DLSS 4 será compatible con las GPU GeForce RTX Serie 50 en más de 75 juegos y aplicaciones el día de su lanzamiento.
Reflex 2
La Serie GeForce RTX 50 NVIDIA Reflex 2 introduce Frame Warp, una técnica innovadora para reducir la latencia en los juegos mediante la actualización de un fotograma renderizado basado en la última entrada del ratón justo antes de que se envíe a la pantalla. Reflex 2 puede reducir la latencia hasta en un 75%. Esto da a los jugadores una ventaja competitiva en los juegos multijugador y hace que los títulos para un solo jugador respondan mejor.
Generación de múltiples cuadros con DLSS: multiplique el rendimiento con las GPU GeForce RTX Serie 50
El modelo de IA de la generación de cuadros con DLSS 3 utiliza datos del juego, como vectores de movimiento y profundidad, y un campo de flujo óptico del acelerador de flujo óptico de la serie GeForce RTX 40 para generar un cuadro adicional.
La generación de múltiples cuadros era prohibitivamente costosa, ya que se requerirían tanto el acelerador de flujo óptico como el modelo de IA para cada nuevo cuadro generado, y el costo de rendimiento limitaría la GPU, lo que daría como resultado velocidades de cuadros de entrada más bajas.
La generación de múltiples cuadros con DLSS 4 combina múltiples innovaciones de hardware Blackwell y software DLSS para hacer realidad la generación de múltiples cuadros.
El nuevo modelo de IA de generación de cuadros es un 40% más rápido, utiliza un 30% menos de VRAM y solo necesita ejecutarse una vez por cuadro renderizado para generar múltiples cuadros.
Por ejemplo, en Warhammer 40,000: Darktide, este modelo proporcionó una velocidad de cuadros un 10% más rápida, mientras usaba 400 MB menos de memoria a 4K, con la configuración máxima, usando la generación de cuadros DLSS.
También se ha acelerado la generación del campo de flujo óptico al reemplazar el flujo óptico de hardware con un modelo de IA muy eficiente. Juntos, los modelos de IA reducen significativamente el costo computacional de generar cuadros adicionales.
Velocidades de cuadros más rápidas y menor consumo total de VRAM con el nuevo modelo de generación de cuadros. Capturado en Warhammer 40,000: Darktide en una GeForce RTX 5090, a 4K, con la configuración más alta del juego y la generación de cuadros DLSS.
Incluso con estas eficiencias, la GPU aún necesita ejecutar 5 modelos de IA en Super Resolution, Ray Reconstruction y Multi Frame Generation para cada cuadro renderizado, todo en unos pocos milisegundos; de lo contrario, la generación de cuadros múltiples DLSS podría haberse convertido en un desacelerador. Para lograr esto, las GPU GeForce RTX Serie 50 incluyen núcleos Tensor de quinta generación con hasta 2,5 veces más rendimiento de procesamiento de IA.
Una vez que se generan los nuevos cuadros, se distribuyen de manera uniforme para brindar una experiencia fluida. La generación de cuadros DLSS 3 utiliza un ritmo basado en CPU con una variabilidad que puede combinarse con cuadros adicionales, lo que genera un ritmo de cuadros menos consistente entre cada cuadro, lo que afecta la fluidez.
Para abordar las complejidades de generar varios cuadros, Blackwell utiliza la medición de volteo de hardware, que traslada la lógica de ritmo de cuadros al motor de visualización, lo que permite que la GPU administre con mayor precisión el tiempo de visualización. El motor de visualización Blackwell también se ha mejorado con el doble de capacidad de procesamiento de píxeles para admitir resoluciones y frecuencias de actualización más altas para la medición de volteo de hardware con DLSS 4.
Al trabajar en conjunto, nuestras nuevas innovaciones de hardware y software permiten que DLSS 4 genere 15 de cada 16 píxeles con una excelente calidad de imagen, fluidez y latencia.
El nuevo modelo de transformador: mejoras en la calidad de imagen para todos los jugadores de GeForce RTX
DLSS 4 incluye una importante actualización de la arquitectura para la reconstrucción de rayos DLSS, la súper resolución DLSS y el DLAA, con el primer uso en tiempo real de un modelo basado en transformadores en la industria gráfica.
Anteriormente, DLSS utilizaba redes neuronales convolucionales (CNN) para generar nuevos píxeles mediante el análisis del contexto localizado y el seguimiento de los cambios en esas regiones en fotogramas sucesivos. Después de seis años de mejoras continuas, hemos alcanzado los límites de lo que es posible con la arquitectura CNN de DLSS.
El nuevo modelo de transformador DLSS utiliza un transformador de visión, lo que permite operaciones de autoatención para evaluar la importancia relativa de cada píxel en todo el fotograma y en varios fotogramas.
Al emplear el doble de parámetros del modelo CNN para lograr una comprensión más profunda de las escenas, el nuevo modelo genera píxeles que ofrecen mayor estabilidad, menor efecto fantasma, mayor detalle en movimiento y bordes más suaves en una escena.
En contenido con trazado de rayos intensivo, el nuevo modelo de transformador para Ray Reconstruction ofrece una gran mejora en la calidad de imagen, especialmente en escenas con condiciones de iluminación difíciles.
Por ejemplo, en estas escenas de Alan Wake 2, se aumenta la estabilidad en la cerca de alambre altamente detallada, se reduce el efecto fantasma en las aspas del ventilador y se elimina el brillo en las líneas eléctricas, lo que mejora la experiencia inmersiva del jugador en el juego en tercera persona.
El modelo de transformador para Super Resolution también muestra resultados prometedores y se lanzará como versión beta para permitir que los usuarios exploren las mejoras y brinden comentarios antes del lanzamiento oficial. El modelo ha demostrado una mejor estabilidad temporal, menos imágenes superpuestas y mayor detalle en movimiento.
La nueva arquitectura del modelo de transformador proporcionará años de margen para ofrecer mejoras continuas en la calidad de la imagen, como lo hemos hecho con la arquitectura CNN durante los últimos 6 años.
En Horizon Forbidden West Complete Edition, el nuevo modelo de transformador Super Resolution DLSS beta aumenta el detalle de la textura en la ropa y los accesorios de Aloy, así como la claridad general.
Disponibilidad de la Serie RTX 50 y DLSS 4
Para los usuarios de sistemas de sobremesa, la GPU GeForce RTX 5090 con 3.352 TOPS de IA y la GPU GeForce RTX 5080 con 1.801 TOPS de IA estarán disponibles el 30 de enero a un precio de US$ 1.999 y US$ 999, respectivamente.
La GPU GeForce RTX 5070 Ti con 1.406 AI TOPS y la GPU GeForce RTX 5070 con 988 AI TOPS estarán disponibles a partir de febrero a un precio de US$ 749 y US$ 549, respectivamente.
Las ediciones NVIDIA Founders de las GPU GeForce RTX 5090, RTX 5080 y RTX 5070 estarán disponibles directamente en nvidia.com y en tiendas selectas de todo el mundo.
Los fabricantes de tarjetas gráficas ASUS, Colorful, Gainward, GALAX, GIGABYTE, INNO3D, KFA2, MSI, Palit, PNY y ZOTAC ofrecerán modelos con reloj de fábrica y sobre-reloj, y los ensambladores de sistemas Falcon Northwest, Infiniarc, MAINGEAR, Mifcom, ORIGIN PC, PC Specialist y Scan Computers ofrecerán modelos para ordenadores de sobremesa.
Los portátiles con GPU GeForce RTX 5090, RTX 5080 y RTX 5070 Ti estarán disponibles a partir de marzo, y las GPU RTX 5070 para portátiles estarán disponibles a partir de abril en los principales fabricantes del mundo, incluidos Acer, ASUS, Dell, GIGABYTE, HP, Lenovo, MECHREVO, MSI y Razer.
Disponibilidad
Para los usuarios de sistemas de sobremesa, la GPU GeForce RTX 5090 con 3.352 TOPS de IA y la GPU GeForce RTX 5080 con 1.801 TOPS de IA estarán disponibles el 30 de enero a un precio de US$ 1.999 y US$ 999, respectivamente.
La GPU GeForce RTX 5070 Ti con 1.406 AI TOPS y la GPU GeForce RTX 5070 con 988 AI TOPS estarán disponibles a partir de febrero a un precio de US$ 749 y US$ 549, respectivamente.
Las ediciones NVIDIA Founders de las GPU GeForce RTX 5090, RTX 5080 y RTX 5070 estarán disponibles directamente en nvidia.com y en tiendas selectas de todo el mundo.
Los fabricantes de tarjetas gráficas ASUS, Colorful, Gainward, GALAX, GIGABYTE, INNO3D, KFA2, MSI, Palit, PNY y ZOTAC ofrecerán modelos con reloj de fábrica y sobre-reloj, y los ensambladores de sistemas Falcon Northwest, Infiniarc, MAINGEAR, Mifcom, ORIGIN PC, PC Specialist y Scan Computers ofrecerán modelos para ordenadores de sobremesa.
Los portátiles con GPU GeForce RTX 5090, RTX 5080 y RTX 5070 Ti estarán disponibles a partir de marzo, y las GPU RTX 5070 para portátiles estarán disponibles a partir de abril en los principales fabricantes del mundo, incluidos Acer, ASUS, Dell, GIGABYTE, HP, Lenovo, MECHREVO, MSI y Razer.
La entrada Reviews de RTX 5070 Ti: Igual de rápida que RTX 4080 en 4K en Rasterización y 64% más rápida que RTX 4080 Super con MFG 4X apareció primero en PC Master Race Latinoamérica.
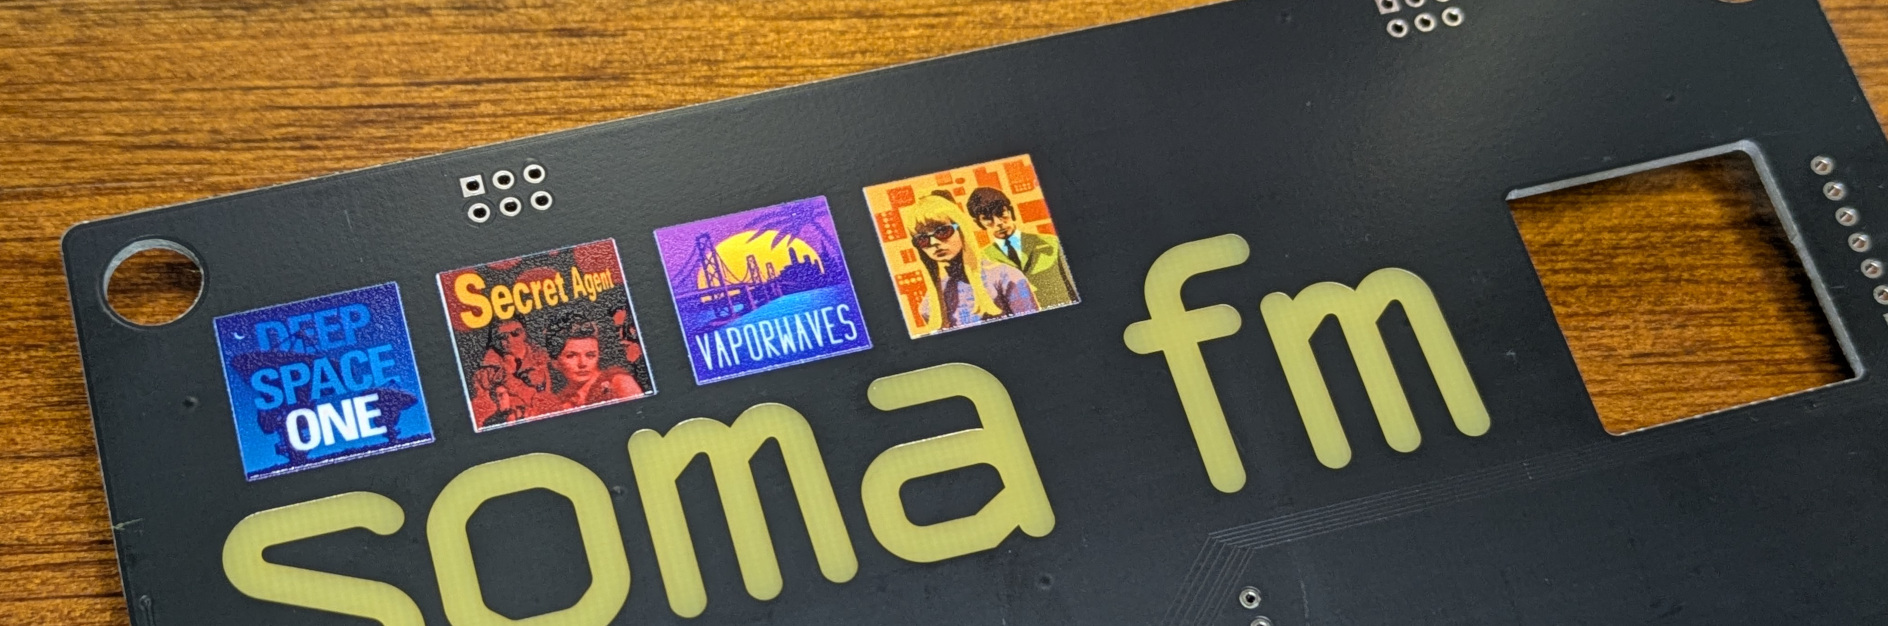
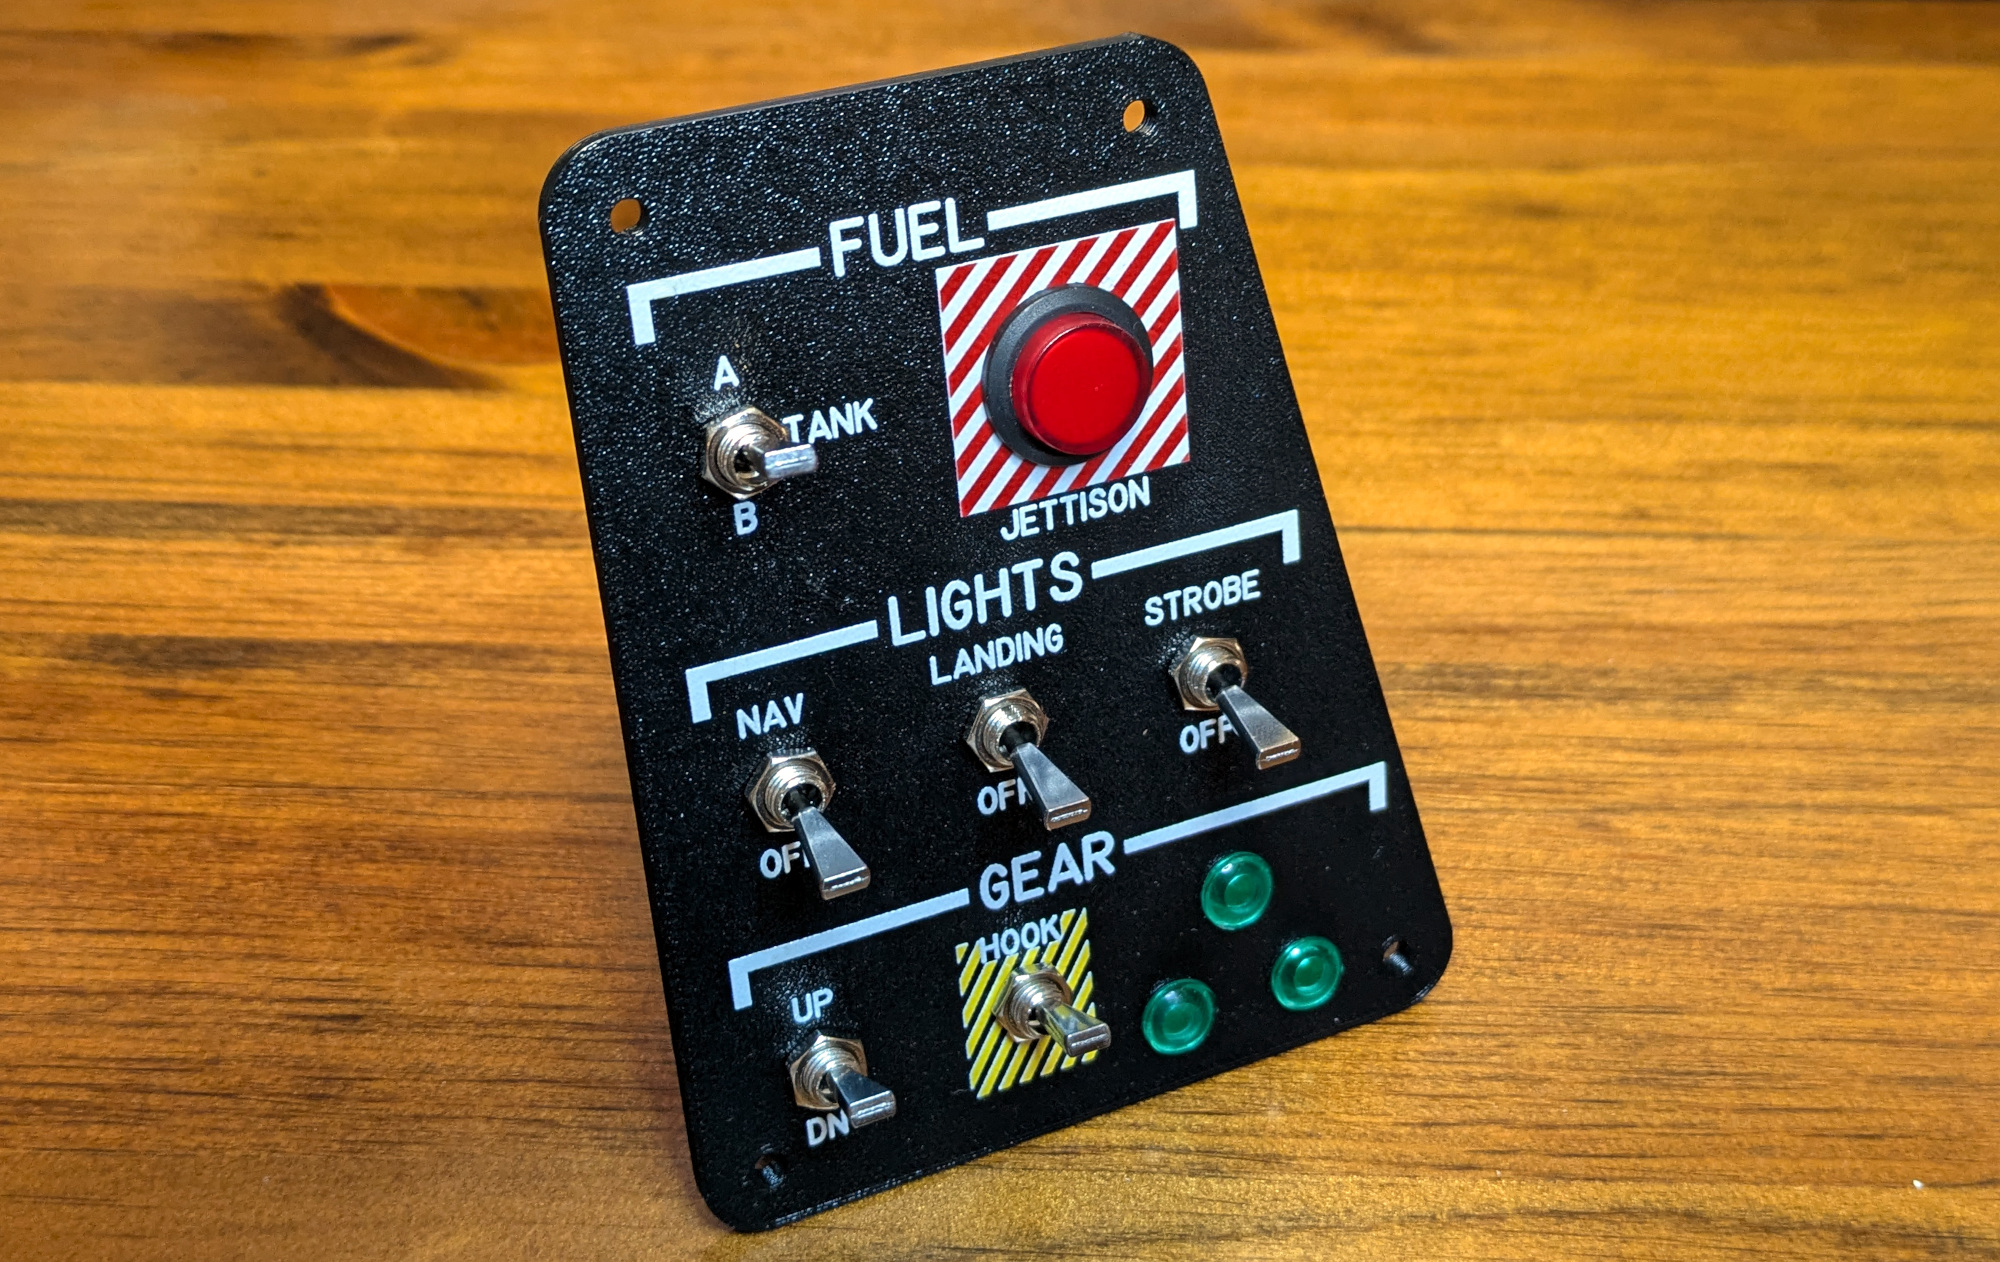
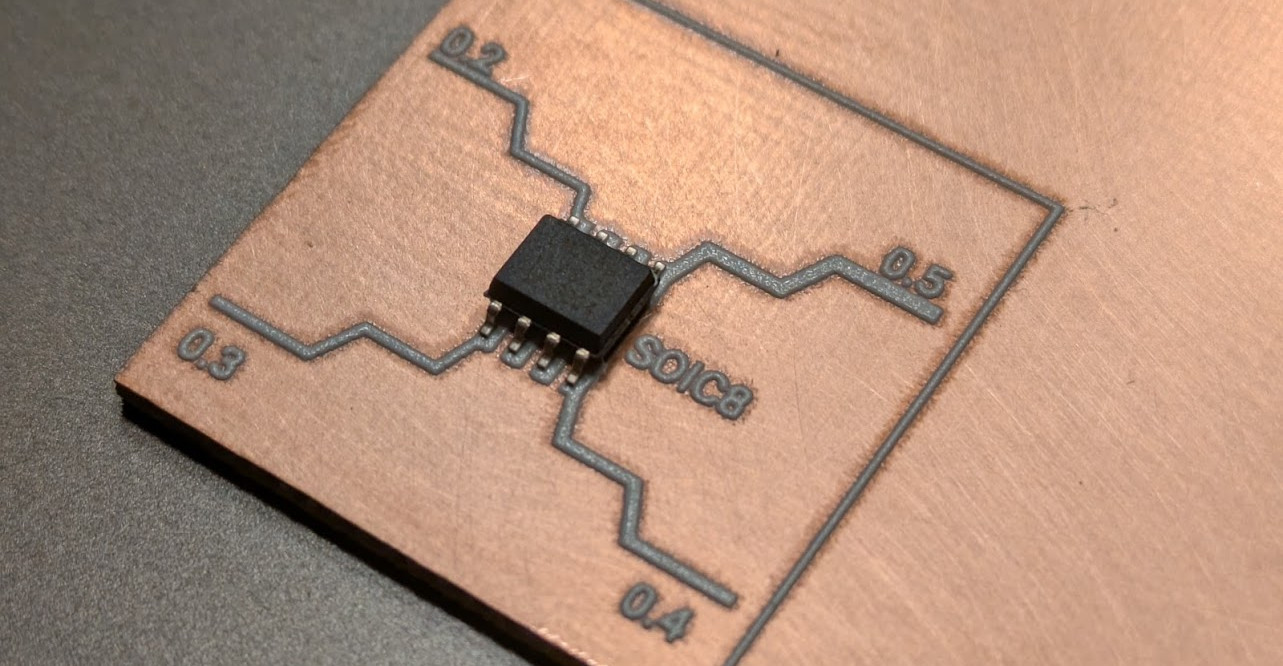
 After spending the last few weeks playing with it, I can confidently say the eufyMake E1 UV printer is one of those tools. The elevator pitch is simple: with a UV printer, you can print anything on anything. As you can imagine, the reality is somewhat more complex, but the fact that you can toss a three dimensional object in the chamber and spray it with a high-resolution color image with a few button presses holds incredible creative potential. Enough that the Kickstarter for the $1,700 printer has already raised a mind-boggling $27 million at the time of this writing, with more than a month yet to go before crossing the finish line.
 In the most basic case, you’ll open up the door of the E1, and stick an object on the bed. (There’s a larger bed that you can swap in for over-sized objects, but you have to run the printer with the doors open.) That’s a literal “stick”, by the way, as the bed is designed to be tacky to provide a bit of hold on smaller objects which might otherwise jump around as the machine moves. The E1 will then go through an automated process that includes flashing lights and sweeping red laser beams. This provides the machine with a 3D scan of the object on the bed, which is necessary for positioning the print head later on.