Vista Normal

Hay nuevos artículos disponibles. Pincha para refrescar la página.
AnteayerSalida Principal

Printed Robotic Arm Pumps Up With Brushless Motors

Por: Tom Nardi
8 Abril 2025 at 08:00

[JesseDarr] recently wrote in to tell us about their dynamic Arm for Robitc Mischief (dARM), a mostly 3D printed six degrees of freedom (6DOF) robotic arm that’s designed to be stronger and more capable than what we’ve seen so far from the DIY community.

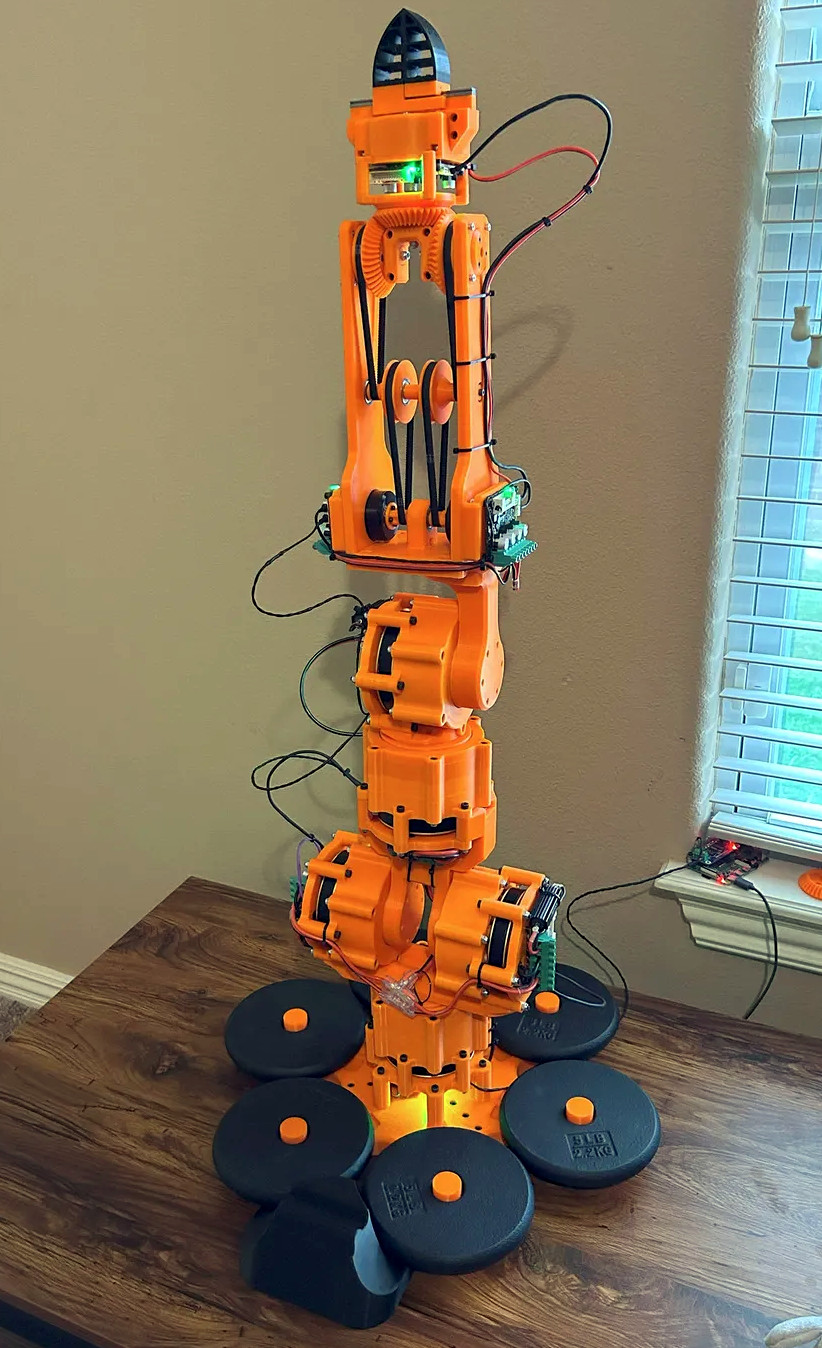
The secret? Rather than using servos, dARM uses brushless DC (BLDC) motors paired with ODrive S1 controllers. He credits [James Bruton] and [Skyentific] (two names which regular Hackaday readers are likely familiar with) for introducing him to not only the ODrive controllers, but the robotics applications for BLDCs in the first place.

dARM uses eight ODrive controllers on a CAN bus, which ultimately connect up to a Raspberry Pi 4B with a RS485 CAN Hat. The controllers are connected to each other in a daisy chain using basic twisted pair wire, which simplifies the construction and maintenance of the modular arm.

As for the motors themselves, the arm uses three different types depending on where they are located, with three Eaglepower 8308 units for primary actuators, a pair of GB36-2 motors in the forearm, and finally a GM5208-24 for the gripper. Together, [JesseDarr] says the motors and gearboxes are strong enough to lift a 5 pound (2.2 kilogram) payload when extended in a horizontal position.

The project’s documentation includes assembly instructions for the printed parts, a complete Bill of Materials, and guidance on how to get the software environment setup on the Raspberry Pi. It’s not exactly a step-by-step manual, but it looks like there’s more than enough information here for anyone who’s serious about building a dARM for themselves.

If you’d like to start off by putting together something a bit easier, we’ve seen considerably less intimidating robotic arms that you might be interested in.

Scanning Film The Way It Was Meant To Be

Por: Jenny List
28 Marzo 2025 at 08:00

Scanning a film negative is as simple as holding it up against a light source and photographing the result. But should you try such a straightforward method with color negatives it’s possible your results may leave a little to be desired. White LEDs have a spectrum which looks white to our eyes, but which doesn’t quite match that of the photographic emulsions.

[JackW01] is here with a negative scanning light that uses instead a trio of red, green, and blue LEDs whose wavelengths have been chosen for that crucial match. With it, it’s possible to make a good quality scan with far less post-processing.

The light itself uses 665 nm for red, 525 nm for green, and 450 nm blue diodes mounted in a grid behind a carefully designed diffuser. The write-up goes into great detail about the spectra in question, showing the shortcomings of the various alternatives.

We can immediately see the value here at Hackaday, because like many a photographer working with analogue and digital media, we’ve grappled with color matching ourselves.

This isn’t the first time we’ve considered film scanning but it may be the first project we’ve seen go into such detail with the light source. We have looked at the resolution of the film though.

Reconstructing 3D Objects With a Tiny Distance Sensor

Por: Lewin Day
20 Febrero 2025 at 12:00

There are a whole bunch of different ways to create 3D scans of objects these days. Researchers at the [UW Graphics Lab] have demonstrated how to use a small, cheap time-of-flight sensor to generate scans effectively.

Not yet perfect, but the technique does work…

The key is in how time-of-flight sensors work. They shoot out a distinct pulse of light, and then determine how long that pulse takes to bounce back. This allows them to perform a simple ranging calculation to determine how far they are from a surface or object.

However, in truth, these sensors aren’t measuring distance to a single point. They’re measuring the intensity of the received return pulse over time, called the “transient histogram”, and then processing it. If you use the full mathematical information in the histogram, rather than just the range figures, it’s possible to recreate 3D geometry as seen by the sensor, through the use of some neat mathematics and a neural network. It’s all explained in great detail in the research paper.

The technique isn’t perfect; there are some inconsistencies with what it captures and the true geometry of the objects its looking at. Still, the technique is young, and more work could refine its outputs further.

If you don’t mind getting messy, there are other neat scanning techniques out there—like using a camera and some milk.

❌
❌