Vista Normal

Hay nuevos artículos disponibles. Pincha para refrescar la página.
Hoy — 15 Abril 2025Hackaday

Keebin’ with Kristina: the One with John Lennon’s Typewriter

15 Abril 2025 at 14:00
Illustrated Kristina with an IBM Model M keyboard floating between her hands.

The Clawtype, a one-handed number with a handy strap and a good-sized display.
Image by [akavel] via GitHub
Reader [akavel] was kind enough to notify me about Clawtype, which is a custom wearable chorded keyboard/mouse combo based on the Chordite by [John W. McKown].

First of all, I love the brass rails — they give it that lovely circuit sculpture vibe. This bad boy was written in Rust and currently runs on a SparkFun ProMicro RP2040 board. For the mouse portion of the program, there’s an MPU6050 gyro/accelerometer.

[akavel]’s intent was to pair it with XR glasses, which sounds like a great combination to me. While typing is still a bit slow, [akavel] is improving at a noticeable pace and does some vim coding during hobby time.

In the future, [akavel] plans to try a BLE version, maybe even running off a single AA Ni-MH cell, and probably using an nRF52840. As for the 3D-printed shape, that was designed and printed by [akavel]’s dear friend [Cunfusu], who has made the files available over at Printables. Be sure to check it out in the brief demo video after the break.

Wooden You Like To Use the Typewriter?

The Typewriter, a wooden affair with a built-in copy holder and a nice fold-up case.
Image by [bilbonbigos] via reddit
I feel a bit late to the party on this one, but that’s okay, I made an nice entrance. The Typewriter is [bilbonbigos]’ lovely distraction-free writing instrument that happens to be primarily constructed of wood. In fact, [bilbonbigos] didn’t use any screws or nails — the whole thing is glued together.

The Typewriter uses a Raspberry Pi 3B+, and [bilbonbigos] is FocusWriter to get real work done on it. it runs off of a 10,000 mAh power bank and uses a 7.9″ Waveshare display.

The 60% mechanical keyboard was supposed to be Bluetooth but turned out not to be when it arrived, so that’s why you might notice a cable sticking out.

The whole thing all closed up is about the size of a ream of A4, and [bilbonbigos] intends to add a shoulder strap in order to make it more portable.

That cool notebook shelf doubles as a mousing surface, which is pretty swell and rounds out the build nicely. Still, there are some things [bilbonbigos] would change — a new Raspi, or a lighter different physical support for the screen, and a cooling system.

The Centerfold: A Keyboard For Your House In Palm Springs

A lovely mid-century-inspired keyboard.
Image by [the_real_jamied] via reddit
Can’t you feel the space age Palm Springs breezes just looking at this thing? No? Well, at least admit that it looks quite atomic-age with that font and those life-preserver modifier keycaps. This baby would look great on one of those giant Steelcase office desks. Just don’t spill your La Croix on it, or whatever they drink in Palm Springs.

Do you rock a sweet set of peripherals on a screamin’ desk pad? Send me a picture along with your handle and all the gory details, and you could be featured here!

Historical Clackers: the Odell Typewriter

First of all, the machine pictured here is not the true Odell number 1 model, which has a pair of seals’ feet at each end of the base and is referred to as the “Seal-Foot Odell“. Ye olde Seal-Foot was only produced briefly in 1889.

The Odell, an index typewriter with stunning detail.
Image via The Antikey Chop

But then inventor Levi Judson Odell completely redesigned the thing into what you see here — model 1b, for which he was awarded a patent in 1890. I particularly like the markings on the base. The nickel-plated, rimless model you see here was not typical; most had gold bases.

These babies cost 1/5th of a standard typewriter, and were quite easy to use to boot. With everything laid out in a line, it was far easier to use a slide mechanism than your ten fingers to select each character. On top of everything else, these machines were small enough to take with you.

No matter their appearance, or whether they typed upper case only or both, Odells were all linear index typewriters. The print element is called a type-rail. There is a fabric roller under the type-rail that applies ink to the characters as they pass. Pinch levers on the sides of the carriage did double duty as the carriage advance mechanism and the escapement.

Round-based Odells went by the wayside in 1906 and were replaced by square-based New American No. 5 models. They functioned the same, but looked quite different.

Finally, John Lennon’s Typewriter Is For Sale

John Lennon's SCM Electra 120, sitting in its open case.
Image via Just Collecting

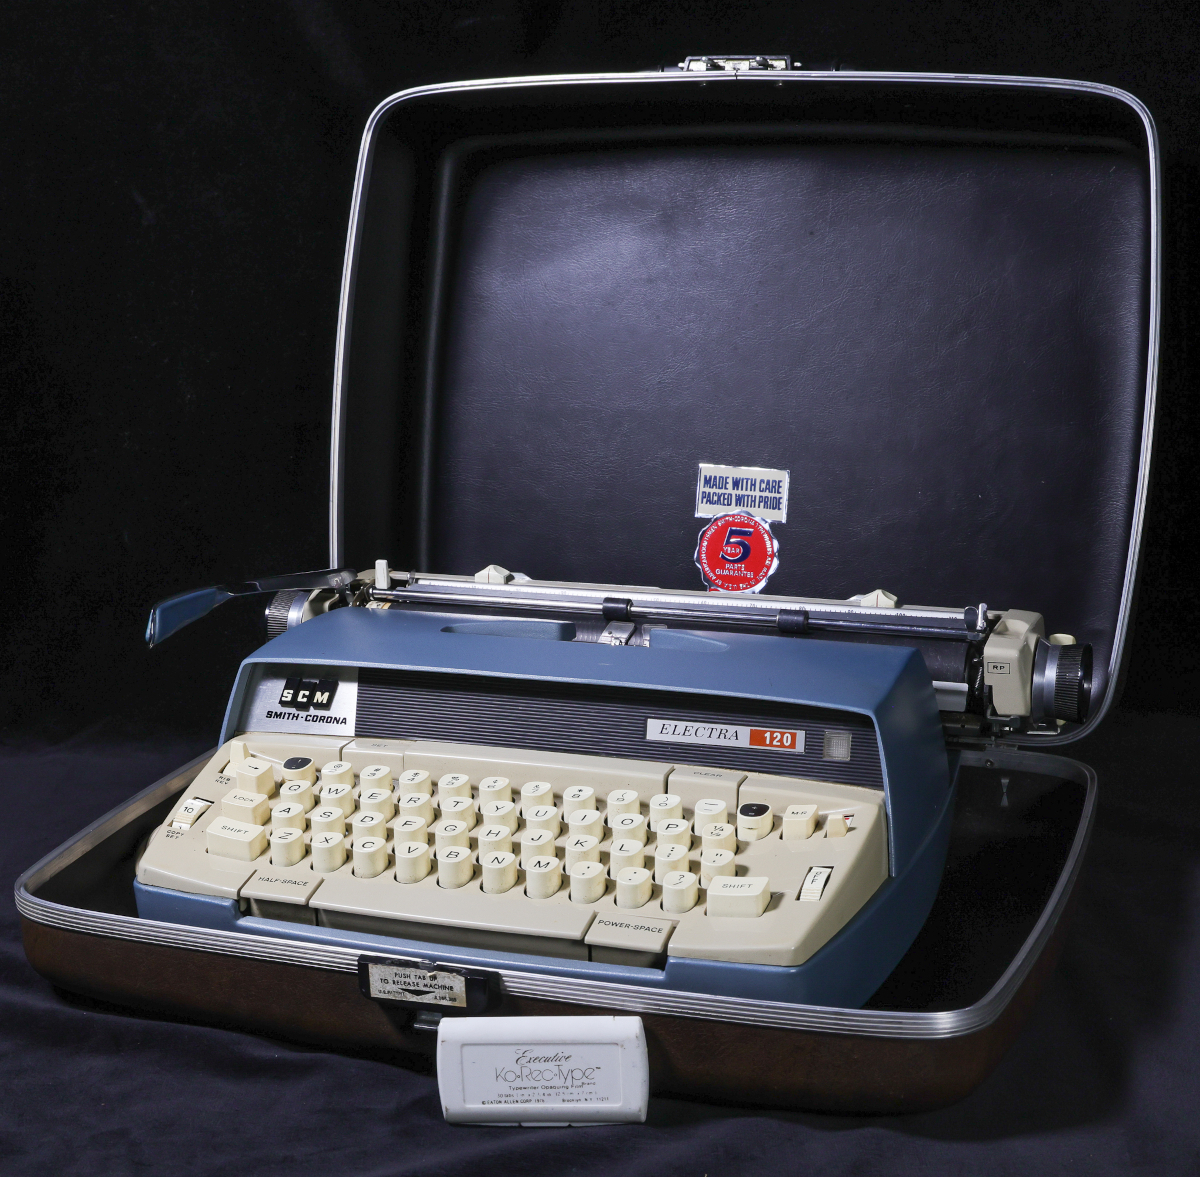
Got an extra ten grand lying around? You could own an interesting piece of history.

This image comes courtesy of Paul Fraser Collectibles, who are selling this typewriter once owned and used by the legendary Beatle himself. While Lennon composed poems and songs on the machine, it’s unclear whether he secretly wanted to be a paperback writer.

This machine, an SCM (Smith-Corona Marchant) Electra 120, is an interesting one; it’s electric, but the carriage return is still manual. I myself have an SCM Secretarial 300, which looks very much the same, but has a frightening ‘Power Return’ that sends the carriage back toward the right with enough power to shake the floor, depending upon the fortitude of your table.

Apparently Lennon would use the machine when traveling, but gave it to a close friend in the music industry when he upgraded or otherwise no longer needed it. A booking agent named Irwin Pate worked with this friend and obtained the typewriter from him, and Irwin and his wife Clarine held on to it until they sold it to Paul Fraser Collectibles. I find it interesting that this didn’t go to auction at Christie’s — I think it would ultimately go for more, but I’m a writer, not an auction-ologist.


Got a hot tip that has like, anything to do with keyboards? Help me out by sending in a link or two. Don’t want all the Hackaday scribes to see it? Feel free to email me directly.

Shine On You Crazy Diamond Quantum Magnetic Sensor

15 Abril 2025 at 11:00

We’re probably all familiar with the Hall Effect, at least to the extent that it can be used to make solid-state sensors for magnetic fields. It’s a cool bit of applied physics, but there are other ways to sense magnetic fields, including leveraging the weird world of quantum physics with this diamond, laser, and microwave open-source sensor.

Having never heard of quantum sensors before, we took the plunge and read up on the topic using some of the material provided by [Mark C] and his colleagues at Quantum Village. The gist of it seems to be that certain lab-grown diamonds can be manufactured with impurities such as nitrogen, which disrupt the normally very orderly lattice of carbon atoms and create a “nitrogen vacancy,” small pockets within the diamond with extra electrons. Shining a green laser on N-V diamonds can stimulate those electrons to jump up to higher energy states, releasing red light when they return to the ground state. Turning this into a sensor involves sweeping the N-V diamond with microwave energy in the presence of a magnetic field, which modifies which spin states of the electrons and hence how much red light is emitted.

Building a practical version of this quantum sensor isn’t as difficult as it sounds. The trickiest part seems to be building the diamond assembly, which has the N-V diamond — about the size of a grain of sand and actually not that expensive — potted in clear epoxy along with a loop of copper wire for the microwave antenna, a photodiode, and a small fleck of red filter material. The electronics primarily consist of an ADF4531 phase-locked loop RF signal generator and a 40-dB RF amplifier to generate the microwave signals, a green laser diode module, and an ESP32 dev board.

All the design files and firmware have been open-sourced, and everything about the build seems quite approachable. The write-up emphasizes Quantum Village’s desire to make this quantum technology’s “Apple II moment,” which we heartily endorse. We’ve seen N-V sensors detailed before, but this project might make it easier to play with quantum physics at home.

This Potato Virtual Assistant is Fully Baked

15 Abril 2025 at 08:00
GLaDOS Potato Assistant

There are a number of reasons you might want to build your own smart speaker virtual assistant. Usually, getting your weather forecast from a snarky, malicious AI potato isn’t one of them, unless you’re a huge Portal fan like [Binh Pham].

[Binh Pham] built the potato incarnation of GLaDOS from the Portal 2 video game with the help of a ReSpeaker Light kit, an ESP32-based board designed for speech recognition and voice control, and as an interface for home assistant running on a Raspberry Pi.

He resisted the temptation to use a real potato as an enclosure and wisely opted instead to print one from a 3D file he found on Thingiverse of the original GLaDOS potato. Providing the assistant with the iconic synthetic voice of GLaDOS was a matter of repackaging an existing voice model for use with Home Assistant.

Of course all of this attention to detail would be for not if you had to refer to the assistant as “Google” or “Alexa” to get its attention. A bit of custom modelling and on-device wake word detection, and the cyborg tuber was ready to switch lights on and off with it’s signature sinister wit.

We’ve seen a number of projects that brought Portal objects to life for fans of the franchise to enjoy, even an assistant based on another version of the GLaDOS the character. This one adds a dimension of absurdity to the collection.

Building A DIY Tornado Tower

Por: Lewin Day
15 Abril 2025 at 05:00

A tornado can be an awe-inspiring sight, but it can also flip your car, trash your house, and otherwise injure you with flying debris. If you’d like to look at swirling air currents in a safer context, you might appreciate this tornado tower build from [Gary Boyd].

[Gary]’s build was inspired by museum demonstrations and the tornado machine designs of [Harald Edens]. His build generates a vortex that spans 1 meter tall in a semi-open cylindrical chamber. A fan in the top of the device sucks in air from the chamber, and exhausts it through a vertical column of holes in the wall of the cylinder. This creates a vortex in the air, though it’s not something you can see on its own. To visualize the flow, the cylindrical chamber is also fitted with an ultrasonic mist generator in the base. The vortex in the chamber is able to pick up this mist, and it can be seen swirling upwards as it is sucked towards the fan at the top.

It’s a nice educational build, and one that’s as nice to look at as it is to study. It produces a thick white vortex that we’re sure someone could turn into an admirable lamp or clock or something, this being Hackaday, after all. In any case, vortexes are well worth your study. If you’re cooking up neat projects with this physical principle, you should absolutely let us know!

Plasmonic Modulators Directly Convert Terahertz Waves to Optical Signals

Por: Maya Posch
15 Abril 2025 at 02:00

A major bottleneck with high-frequency wireless communications is the conversion from radio frequencies to optical signals and vice versa. This is performed by an electro-optic modulator (EOM), which generally are limited to GHz-level signals. To reach THz speeds, a new approach was needed, which researchers at ETH Zurich in Switzerland claim to have found in the form of a plasmonic phase modulator.

Although sounding like something from a Star Trek episode, plasmonics is a very real field, which involves the interaction between optical frequencies along metal-dielectric interfaces. The original 2015 paper by [Yannick Salamin] et al. as published in Nano Letters provides the foundations of the achievement, with the recent paper in Optica by [Yannik Horst] et al. covering the THz plasmonic EOM demonstration.

The demonstrated prototype can achieve 1.14 THz, though signal degradation begins to occur around 1 THz. This is achieved by using plasmons (quanta of electron oscillators) generated on the gold surface, who affect the optical beam as it passes small slots in the gold surface that contain a nonlinear organic electro optic material that ‘writes’ the original wireless signal onto the optical beam.

Elastic Bands Enable Touchable Volumetric Display

14 Abril 2025 at 23:00
A man is looking at a volumetric display while using one finger to interact with it. Two roughly-spherical blue shapes are visible in the display, and he is moving his index finger toward one of them.

Amazing as volumetric displays are, they have one major drawback: interacting with them is complicated. A 3D mouse is nice, but unless you’ve done a lot of CAD work, it’s a bit unintuitive. Researchers from the Public University of Navarra, however, have developed a touchable volumetric display, bringing touchscreen-like interactions to the third dimension (preprint paper).

At the core, this is a swept-volume volumetric display: a light-diffusing screen oscillates along one axis, while from below a projector displays cross-sections of the scene in synchrony with the position of the screen. These researchers replaced the normal screen with six strips of elastic material. The finger of someone touching the display deforms one or more of the strips, allowing the touch to be detected, while also not damaging the display.

The actual hardware is surprisingly hacker-friendly: for the screen material, the researchers settled on elastic bands intended for clothing, and two modified subwoofers drove the screen’s oscillation. Indeed, some aspects of the design actually cite this Hackaday article. While the citation misattributes the design, we’re glad to see a hacker inspiring professional research.) The most exotic component is a very high-speed projector (on the order of 3,000 fps), but the previously-cited project deals with this by hacking a DLP projector, as does another project we’ve covered.

While interacting with the display does introduce some optical distortions, we think the video below speaks for itself. If you’re interested in other volumetric displays, check out this project, which displays images with a levitating styrofoam bead.

[Thanks to Xavi for the tip!]

ESP32-Powered Clock Brings Aviation Style To Your Desk

Por: Lewin Day
14 Abril 2025 at 20:00

There’s something cool about the visual design language used in the aviation world. You probably don’t get much exposure to it if you’re not regularly flying a plane, but there are other ways you can bring it into your life. A great example would be building an aviation-themed clock, like this stylish timepiece from [oliverb.]

The electronic heart of the build is an ESP32. This wireless-capable microcontroller is a popular choice for clock builds these days. This is because it can contact network time servers out of the box, which allows you to build an incredibly capable and accurate clock without any additional parts. No real-time-clock needed—just have the ESP32 buzz the Internet for an accurate update on the regular!

As for the display itself, three gauges show hours, minutes, and seconds on aviation-like gauges. They’re 3D-printed, which means you can build them from scratch. That’s a touch easier than having to go out and source actual surplus aviation hardware. Each gauge is driven by a NEMA17 stepper motor. There’s also an ATMEGA328 on hand to drive a 7-segment gauge on the seconds display, and a PIR sensor which shuts the clock down when nobody is around to view it.

It’s a tidy build, and one with a compelling aesthetic at that. We’ve seen some similar builds before using real aviation gauges, too. Video after the break.

Ayer — 14 Abril 2025Hackaday

Jenny’s (Not Quite) Daily Drivers: Raspberry Pi 1

Por: Jenny List
14 Abril 2025 at 14:05

An occasional series of mine on these pages has been Daily Drivers, in which I try out operating systems from the point of view of using them for my everyday Hackaday work. It has mostly featured esoteric or lesser-used systems, some of which have been unexpected gems and others have been not quite ready for the big time.

Today I’m testing another system, but it’s not quite the same as the previous ones. Instead I’m looking at a piece of hardware, and I’m looking at it for use in my computing projects rather than as my desktop OS. You’ll all be familiar with it: the original Raspberry Pi appeared at the end of February 2012, though it would be May of that year before all but a lucky few received one. Since then it has become a global phenomenon and spawned a host of ever-faster successors, but what of that original board from 2012 here in 2025? If you have a working piece of hardware it makes sense to use it, so how does the original stack up? I have a project that needs a Linux machine, so I’m dusting off a Model B and going down memory lane.

Rediscovering An Old Flame

My first Pi from 2012. The heatsinks are my addition.

It’s fair to say that Raspberry Pi have never had the fastest board on the block, or the highest specification. At any point there’s always some board or other touted as a Pi-killer because it claims to do more, but somehow they never make much impact. The reason for this is simple; alongside your Pi you are also buying the ability to run Raspberry Pi OS, and their achievement in creating a solid and well-supported operating system that still runs on their earliest boards is something their competitors can’t touch. So when I pulled out my Model B I was able to go to the Raspberry Pi downloads page and snag a Debian Bookworm image for its 32-bit processor. I went for the “lite” version; while an early Pi will run a desktop and could even be my desktop daily driver, it would be so painfully slow as to be frustrating.

A graph of the frequency of the word "Brexit" in UK news over 2016. There's a huge spike in the middle of the year, around the referendum.
This is what my word trend analysis tool can do. Everyone was talking about Brexit in the UK in 2016.

My purpose for using the Pi is to run a language analysis package. Aside from fiddling with old cameras and writing about tech, I have a long history in computational language processing, and I have recently returned to my news trend analysis code and made it open-source. It’s a project whose roots go back nearly two decades, so there’s been an element of working out what my younger self was thinking. It builds and processes a corpus of news data over time from RSS feeds, and presents a web-based analysis client. 2000s-era me wrote it in PHP (don’t judge!) and I evolved a corpus structure using a huge tree of small JSON files for fast access. An earlier version of this package ran on my first Pi for many years, sitting next to my router with a USB hard disk.

Firing up an original Pi in 2025 is easy enough, as with any Pi it’s simply a case of writing the image to an SD card, hooking up the Pi to screen and peripherals, and booting it. Raspberry Pi OS is as straightforward to set up as always, and after rebooting and logging in, there I was with a shell.

Remembering, Computers Weren’t Always This Quick

A Snail, on a rock.
Yes. it’s slow. But it’s got a shell. macrophile, CC BY 2.0.

My main machine is a fairly recent high-end Thinkpad laptop with an Intel Core i7, 32 GB of memory, and the fastest SSD I could afford, equipped with a hefty cache. It’s a supercomputer by any measure from the past, so I have become used to things I do in the shell being blisteringly quick. Sitting at the Pi, it’s evident that I’ll need to recalibrate my expectations, as there’s no way it can match the Thinkpad. As i waited – rather a long time – for apt to upgrade the packages, I had time to reflect. Back in the day when I set up Linux on my 486 or my Pentium machine, I was used to waiting like this. I remember apt upgrade being a go away and have a coffee thing, and I also remember thinking that Pentium was pretty quick, which it was for its day. But stripped of unnecessary services and GUI cruft, I was still getting all the power of the Pi in my terminal. It wasn’t bad, simply visibly slower than the Thinkpad, which to be fair, also applies to all the other computers I own.

So my little Pi 1 model B now sits again hooked up to my router and with a hefty USB drive, again waking up every couple of hours and number-crunching the world’s news. I’ve got used to its relative sloth, and to working again with nano and screen to get things done on it. It’s a useful little computer for the task I have for it, and it can run all day consuming only a couple of watts. As long as the Raspberry Pi people still make the Pi Zero, and I hope for a few years after they stop, it will continue to have OS support, and thus its future as my language processing machine looks assured.

The point of this piece has been to reflect on why we shouldn’t let our older hardware collect dust if it’s still useful. Of course Raspberry Pi want to sell us a new Pi 5, and that board is an amazing machine. But if your task doesn’t need all that power and you still have the earlier model lying around, don’t forget that it’s still a capable little Linux board that you probably paid quite a lot less for. You can’t argue with that.

DIY scanning spectrometer is a bright idea

14 Abril 2025 at 11:00
A photograph with labels showing the parts of a DIY scanning spectrometer.

Spectroscopy seems simple: split a beam of light into its constituent wavelengths with a prism or diffraction grating, and measure the intensity of each wavelength. The devil is in the details, though, and what looks simple is often much harder to pull of in practice. You’ll find lots of details in [Gary Boyd]’s write-up of his optical scanning spectrometer project, but no devils.

Schematic diagram of [Gary Boyd]'s spectrometer, showing optical elements and rays of light as well as major physical elements like the motor and linear stage.
Schematic diagram of [Gary Boyd]’s Czerny-Turner type scanning spectrometer.
A scanning spectrometer is opposed to the more usual camera-type spectrometer we see on these pages in that it uses a single-pixel sensor that sweeps across the spectrum, rather than spreading the spectrum across an imaging sensor.

Specifically, [Gary] has implemented a Czerny-Turner type spectrometer, which is a two-mirror design. The first concave mirror culminates the light coming into the spectrometer from its entrance slit, focusing it on a reflective diffraction grating. The second concave mirror focuses the various rays of light split by the diffraction grating onto the detector.

In this case [Gary] uses a cheap VEML 7700 ambient light sensor mounted to a small linear stage from amazon to achieve a very respectable 1 nm resolution in the range from 360 nm to 980 nm. That’s better than the human eye, so nothing to sneeze at — but [Gary] includes some ideas in his blog post to extend that even further. The whole device is controlled via an Arduino Uno that streams data to [Gary]’s PC.

[Gary] documents everything very well, from his optical mounts to the Arduino code used to drive the stepper motor and take measurements from the VEML 7700 sensor. The LED and laser “turrets” used in calibration are great designs as well. He also shares the spectra this device is capable of capturing– everything from the blackbody of a tungsten lamp used in calibration, to a cuvette of tea, to the sun itself as you can see here. If you have a couple minutes, [Gary]’s full writeup is absolutely worth a read.

This isn’t the first spectrometer we’ve highlighted– you might say we’ve shown a whole spectrum of them.

A Tricky Commodore PET Repair and a Lesson About Assumptions

Por: Maya Posch
14 Abril 2025 at 08:00
The PET opened, showing the motherboard. (Credit: Ken Shirriff)

An unavoidable part of old home computer systems and kin like the Commodore PET is that due to the age of their components they will develop issues that go far beyond what was covered in the official repair manual, not to mention require unconventional repairs. A case in point is the 2001 series Commodore PET that [Ken Shirriff] recently repaired.

The initial diagnosis was quite straightforward: it did turn on, but only displayed random symbols on the CRT, so obviously the ICs weren’t entirely happy, but at least the power supply and the basic display routines seemed to be more or less functional. Surely this meant that only a few bad ICs and maybe a few capacitors had to be replaced, and everything would be fully functional again.

Initially two bad MOS MPS6540 ROM chips had to be replaced with 2716 EPROMs using an adapter, but this did not fix the original symptom. After a logic analyzer session three bad RAM ICs were identified, which mostly fixed the display issue, aside from a quaint 2×2 checkerboard pattern and completely bizarre behavior upon running BASIC programs.

Using the logic analyzer capture the 6502 MPU was identified as writing to the wrong addresses. Ironically, this turned out to be due to a wrong byte in one of the replacement 2716 EPROMs as the used programmer wasn’t quite capable of hitting the right programming voltage. Using a better programmer fixed this, but on the next boot another RAM IC turned out to have failed, upping the total of failed silicon to four RAM & two ROM ICs, as pictured above, and teaching the important lesson to test replacement ROMs before you stick them into a system.

Introducing Infrared Remote Control Protocols

14 Abril 2025 at 05:00
The host stands in his electronics lab with the image of four remote controls overlaid.

Over on his YouTube channel [Electronic Wizard] has released a video that explains how infrared (IR) remote controllers work: IR Remote Controllers protocol: 101 to advanced.

This diagram indicates how the 38 kHz carrier wave is used to encode a binary signal.This video covers the NEC family of protocols, which are widely used in typical consumer IR remote control devices, and explains how the 38 kHz carrier wave is used to encode a binary signal.  [Electronic Wizard] uses his Rigol DS1102 oscilloscope and a breadboard jig to sniff the signal from an example IR controller.

There is also an honorable mention of the HS0038 integrated-circuit which can interpret the light waves and output a digital signal. Of course if you’re a tough guy you don’t need no stinkin’ integrated-circuit IR receiver implementation because you can build your own!

Before the video concludes there is a brief discussion about how to interpret the binary signal using a combination of long and short pulses. If this looks similar to Morse Code to you that’s because it is similar to Morse Code! But not entirely the same, as you will learn if you watch the video!

The ProStar: the Portable Gaming System and Laptop From 1995

Por: Maya Posch
14 Abril 2025 at 02:00

Whilst recently perusing the fine wares for sale at the Vintage Computer Festival East, [Action Retro] ended up adopting a 1995 ProStar laptop. Unlike most laptops of the era, however, this one didn’t just have the typical trackpad and clicky mouse buttons, but also a D-pad and four suspiciously game controller looking buttons. This makes it rather like the 2002 Sony VAIO PCG-U subnotebook, or the 2018 GPD Win 2, except that inexplicably the manufacturer has opted to put these (serial-connected) game controls on the laptop’s palm rest.

Sony VAIO PCG-U101. (Credit: Sony)

Though branded ProStar, this laptop was manufactured by Clevo, who to this day produces generic laptops that are rebranded by everyone & their dog. This particular laptop is your typical (120 MHz) Pentium-based unit, with two additional PCBs for the D-pad and buttons wired into the mainboard.

Unlike the sleek and elegant VAIO PCG-U and successors, this Clevo laptop is a veritable brick, as was typical for the era, which makes the ergonomics of the game controls truly questionable. Although the controls totally work, as demonstrated in the video, you won’t be holding the laptop, meaning that using the D-pad with your thumb is basically impossible unless you perch the laptop on a stand.

We’re not sure what the Clevo designers were thinking when they dreamed up this beauty, but it definitely makes this laptop stand out from the crowd. As would you, if you were using this as a portable gaming system back in the late 90s.

Our own [Adam Fabio] was at VCF East this year as well, and was impressed by an expansive exhibit dedicated to Windows 95.

Hackaday Links: April 13, 2025

13 Abril 2025 at 23:00
Hackaday Links Column Banner

It’s been a while since we’ve dunked on an autonomous taxi foul-up, mainly because it seemed for a while there that most of the companies field testing driverless ride-sharing services had either ceased operation or curtailed them significantly. But that appears not to be the case after a Waymo robotaxi got stuck in a Chick-fil-A drive-through. The incident occurred at the chicken giant’s Santa Monica, California location at about 9:30 at night, when the autonomous Jaguar got stuck after dropping off a passenger in the parking lot. The car apparently tried to use the drive-through lane to execute a multi-point turn but ended up across the entrance, blocking other vehicles seeking their late-evening chicken fix. The drive-through-only restaurant ended up closing for a short time while Waymo figured out how to get the vehicle moving again.

To be fair, drive-through lanes are challenging even for experienced drivers. Lanes are often narrow, curve radii are sometimes tighter than a large vehicle can negotiate smoothly, and the task-switching involved with transitioning from driver to customer can lead to mistakes. Drive-throughs almost seem engineered to make tempers flare, especially at restaurants where hangry drivers are likely to act out at the slightest delay. This is probably doubly so when drivers are stuck behind a driverless car, completely eliminating even the minimal decency that would likely be extended to a human driver who got themselves in a pickle. If people are willing to honk at and curse out the proverbial little old lady from Pasadena, they’re very unlikely to cooperate with a robotaxi and give it the room it needs to maneuver out of a tight spot. Perhaps that argues for a change in programming that accounts for real-world driving experiences as well as the letter of the law.

The big news from space this week was the private Fram2 mission, which took an all-civilian crew on the world’s first crewed polar flight. The four-person crew took off from Florida in a SpaceX Crew Dragon and rather than heading east towards Africa, took off due north and entered a retrograde orbit at 90° inclination, beating the previous record of 65° inclination by Valentina Tereshkova aboard Vostok 6 back in 1963. The Fram2 team managed a couple of other firsts, from the first medical X-rays taken in space to the first amateur radio contacts made from the Dragon.

It’s been a while, but Bill “The Engineer Guy” Hammack is back with a new video extolling the wonders of plastic soda bottles. If you think that’s a subject too mundane to hold your interest, then you’ve never seen Bill at work. The amount of engineering that goes into creating a container that can stand up to its pressurized content while being able to be handled both by automation machines at the bottling plant and by thirsty consumers is a lesson in design brilliance. Bill explains the whole blow-molding process, amazingly using what looks like an actual Coca-Cola production mold. We would have thought such IP would be fiercely protected, but such is Bill’s clout, we guess. The video is also a little trip down memory lane for some of us, as Bill shows off both the two-piece 2-liter bottles that used to grace store shelves and the ponderous glass versions that predated those. Also interesting is the look at the differences between hot-fill bottles and soda bottles, which we never appreciated before.

And finally, if you’ve ever been confused by which logical fallacy is clouding your thinking, why not turn to the most famous fictional logician of all time to clarify things? “Star Trek Logical Reasoning” is a YouTube series by CHDanhauser that uses clips from the Star Trek animated series to illustrate nearly 70 logical fallacies. Each video is quite short, with most featuring Commander Spock eavesdropping on the conversations of his less-logical shipmates and pointing out the flaws in their logic. Luckily, the 23rd century seems to have no equivalent of human(oid) resources, because Spock’s logical interventions are somewhat toxic by today’s standards, but that’s a small price to pay for getting your logical ducks in a row.

3D Printed Milling Machine is Solid as a Rock

13 Abril 2025 at 20:00
An attractive orange CNC mill sitting ona bench.

There are no shortage of CNC machines in the DIY space these days, but sometimes you just need to do things your own way. That’s what [Chris Borges] decided when he put together this rock-solid, concrete-filled CNC milling machine.

The concrete body of this machine is housed inside a 3D printed shell, which makes for an attractive skin as well as a handy mold. Within the concrete is a steel skeleton, with the ‘rebar’ being made of threaded rods and a length of square tubing to hold the main column. You can see the concrete being poured in around the rebar in the image, or watch it happen in the build video embedded below.

An image of the main column of [Chris]'s CNC mill as the concrete is added. The steel reinforcement is clearly visible.
In goes the concrete, up goes the rigidity.
All three axes slide on linear rails, and are attached to lead screws driven by the omnipresent NEMA 17 steppers. The air-cooled spindle, apparently the weak-point of the design, is attached to a pivoting counterweight, but make no mistake: it is on rails. All-in-all, it looks like a very rigid, and very capable design — [Chris] shows it cutting through aluminum quite nicely.

Given that [Chris] has apparently never used a true mill before, this design came out remarkably well. Between the Bill of Materials and 45 page step-by-step assembly instructions, he’s also done a fantastic job documenting the build for anyone who wants to put one together for themselves.

This isn’t the first concrete-filled project we’ve highlighted from [Chris], you may remember seeing his lathe on these pages. It certainly isn’t the first CNC mill we’ve covered, either.

AnteayerHackaday

Satisfy Your High-Voltage Urges with This Printable Flyback Transformer

13 Abril 2025 at 14:00

Sick of raiding old TVs and CRT monitors for flyback transformers to feed your high-voltage addiction? Never fear; if you’re careful, a 3D-printed flyback might be just the thing you’re looking for.

To be fair, it’s pretty easy to come by new flyback transformers, so building your own isn’t strictly necessary. But [SciTubeHD] was in the market for a particularly large flyback, in a good-natured effort to displace [Jay Bowles] from his lofty perch atop the flyback heap. And it’s also true that this project isn’t entirely 3D-printed, as the split core of the transformer was sourced commercially. The secondary coil, though, was where most of the effort went, with a secondary form made from multiple snap-together discs epoxied together for good measure. The secondary has about a kilometer of 30-gauge magnet wire while the primary holds just ten turns of 8-gauge wire covered with silicone high-voltage insulation.

To decrease the likelihood of arcing, the transformer was placed in a plastic container filled with enough mineral oil liquid dielectric to cover the secondary. After degassing in a vacuum chamber for a day, [SciTubeHD] hooked the primary to a couple of different but equally formidable-looking full-bridge inverters for testing. The coil was capable of some pretty spicy arcs — [SciTubeHD] measured 20 amps draw at 35 volts AC input, so this thing isn’t to be trifled with. STL files for the core parts are coming up soon; we trust schematics for the power supply will be available, too.

Software Project Pieces Broken Bits Back Together

13 Abril 2025 at 11:28

With all the attention on LLMs (Large Language Models) and image generators lately, it’s nice to see some of the more niche and unusual applications of machine learning. GARF (Generalizeable 3D reAssembly for Real-world Fractures) is one such project.

GARF may play fast and loose with acronym formation, but it certainly knows how to be picky when it counts. Its whole job is to look at the pieces of a broken object and accurately figure out how to fit the pieces back together, even if there are some missing bits or the edges aren’t clean.

Re-assembling an object from imperfect fragments is a nontrivial undertaking.

Efficiently and accurately figuring out how to re-assemble different pieces into a whole is not a trivial task. One may think it can in theory be brute-forced, but the complexity of such a job rapidly becomes immense. That’s where machine learning methods come in, as researchers created a system that can do exactly that. It addresses the challenge of generalizing from a synthetic data set (in which computer-generated objects are broken and analyzed for training) and successfully applying it to the kinds of highly complex breakage patterns that are seen in real-world objects like bones, recovered archaeological artifacts, and more.

The system is essentially a highly adept 3D puzzle solver, but an entirely different beast from something like this jigsaw puzzle solving pick-and-place robot. Instead of working on flat pieces with clean, predictable edges it handles 3D scanned fragments with complex break patterns even if the edges are imperfect, or there are missing pieces.

GARF is exactly the kind of software framework that is worth keeping in the back of one’s mind just in case it comes in handy some day. The GitHub repository contains the code (although at this moment the custom dataset is not yet uploaded) but there is also a demo available for the curious.

Learning Linux Kernel Modules Using COM Binary Support

Por: Maya Posch
13 Abril 2025 at 08:00
Illustration of author surveying the fruits of his labor by Bomberanian

Have you ever felt the urge to make your own private binary format for use in Linux? Perhaps you have looked at creating the smallest possible binary when compiling a project, and felt disgusted with how bloated the ELF format is? If you are like [Brian Raiter], then this has led you down many rabbit holes, with the conclusion being that flat binary formats are the way to go if you want sleek, streamlined binaries. These are formats like COM, which many know from MS-DOS, but which was already around in the CP/M days. Here ‘flat’ means that the entire binary is loaded into RAM without any fuss or foreplay.

Although Linux does not (yet) support this binary format, the good news is that you can learn how to write kernel modules by implementing COM support for the Linux kernel. In the article [Brian] takes us down this COM rabbit hole, which involves setting up a kernel module development environment and exploring how to implement a binary file format. This leads us past familiar paths for those who have looked at e.g. how the Linux kernel handles the shebang (#!) and ‘misc’ formats.

On Windows, the kernel identifies the COM file by its extension, after which it gives it 640 kB & an interrupt table to play with. The kernel module does pretty much the same, which still involves a lot of code.

Of course, this particular rabbit hole wasn’t deep enough yet, so the COM format was extended into the .♚ (Unicode U+265A) format, because this is 2025 and we have to use all those Unicode glyphs for something. This format extension allows for amazing things like automatically exiting after finishing execution (like crashing).

At the end of all these efforts we have not only learned how to write kernel modules and add new binary file formats to Linux, we have also learned to embrace the freedom of accepting the richness of the Unicode glyph space, rather than remain confined by ASCII. All of which is perfectly fine.

Top image: Illustration of [Brian Raiter] surveying the fruits of his labor by [Bomberanian]

A 17th Century Music Computer

13 Abril 2025 at 05:00

We don’t think of computers as something you’d find in the 17th century. But [Levi McClain] found plans for one in a book — books, actually — by [Athanasius Kirker] about music. The arca musarithmica, a machine to allow people with no experience to compose church music, might not fit our usual definition of a computer, but as [Levi] points out in the video below, there are a number of similarities to mechanical computers like slide rules.

Apparently, there are a few of these left in the world, but as you’d expect, they are quite rare. So [Levi] decided to take the plans from the book along with some information available publicly and build his own.

The computer is a box of wooden cards — tablets — with instructions written on them. Honestly, we don’t know enough about music theory to quite get the algorithm. [Kirker] himself had this to say in his book about the device:

Mechanical music-making is nothing more than a particular system invented by us whereby anyone, even the ἀμουσος [unmusical] may, through various applications of compositional instruments compose melodies according to a desired style. We shall briefly relate how this mechanical music-making is done and, lest we waste time with prefatory remarks, we shall begin with the construction of the Musarithmic Ark.

If you want to try it yourself, you won’t need to break out the woodworking tools. You can find a replica on the web, of course. Let us know if you set any Hackaday posts to music.

We know not everyone thinks something mechanical can be a computer, but we disagree. True, some are more obvious than others.

The Incomplete JSON Pretty Printer (Brought To You By Vibes)

13 Abril 2025 at 02:00

Incomplete JSON (such as from a log that terminates unexpectedly) doesn’t parse cleanly, which means anything that usually prints JSON nicely, won’t. Frustration with this is what led [Simon Willison] to make The Incomplete JSON pretty printer, a single-purpose web tool that pretty-prints JSON regardless of whether it’s complete or not.

Making a tool to solve a particular issue is a fantastic application of software, but in this case it also is a good lead-in to some thoughts [Simon] has to share about vibe coding. The incomplete JSON printer is a perfect example of vibe coding, being the product of [Simon] directing an LLM to iteratively create a tool and not looking at the actual code once.

Sometimes, however the machine decides to code something is fine.

[Simon] shares that the term “vibe coding” was first used in a social media post by [Andrej Karpathy], who we’ve seen shared a “hello world” of GPT-based LLMs as well as how to train one in pure C, both of which are the product of a deep understanding of the subject (and fantastically educational) so he certainly knows how things work.

Anyway, [Andrej] had a very specific idea he was describing with vibe coding: that of engaging with the tool in almost a state of flow for something like a weekend project, just focused on iterating one’s way to what they want without fussing the details. Why? Because doing so is new, engaging, and fun.

Since then, vibe coding as a term seems to get used to refer to any and all AI-assisted coding, a subject on which folks have quite a few thoughts (many of which were eagerly shared on a recent Ask Hackaday on the subject).

Of course human oversight is critical to a solid and reliable development workflow. But not all software is the same. In the case of the Incomplete JSON Pretty Printer, [Simon] really doesn’t care what the code actually looks like. He got it made in a short amount of time, the tool does exactly what he wants, and it’s hard to imagine the stakes being any lower. To [Simon], however the LMM decided to do things is fine, and there’s a place for that.

❌
❌