With immunotherapy increasingly making it out of the lab and into hospitals as a viable way to treat serious conditions like cancer, there’s a lot of pressure to optimize these therapies. This is especially true for therapies involving chimeric antigen receptor (CAR) T cells, which so far required a cumbersome process of extracting the patient’s T cells, modifying them ex vivo and returning the now CAR T cells to the patient’s body. After a recently published study, it seems that we may see in vivo CAR T cell therapy become reality, with all the ease of getting a vaccine shot.
We covered CAR T cells previously in the context of a way to prevent T cell exhaustion and making them more effective against certain tumors. This new study (paywalled) by [Theresa L. Hunter] et al. as published in Science demonstrates performing the CAR manipulation in vivo using CD8+ T cell targeting lipid nanoparticles containing mRNA to reprogram these T cells directly.
In rodent and non-human primate studies a clear effect on tumor control was demonstrated, with for auto-immune diseases the related B cells becoming effectively depleted. Although it’s still a long way off from human trials and market approval, this research builds upon the knowledge gained from existing mRNA vaccines, raising hopes that one day auto-immune or cancer therapy could be as simple as getting a cheap, standardized shot.
Some Mondays are worse than others, but April 28 2025 was particularly bad for millions of people in Spain and Portugal. Starting just after noon, a number of significant grid oscillations occurred which would worsen over the course of minutes until both countries were plunged into a blackout. After a first substation tripped, in the span of only a few tens of seconds the effects cascaded across the Iberian peninsula as generators, substations, and transmission lines tripped and went offline. Only after the HVDC and AC transmission lines at the Spain-France border tripped did the cascade stop, but it had left practically the entirety of the peninsula without a functioning power grid. The event is estimated to have been the biggest blackout in Europe ever.
Following the blackout, grid operators in the affected regions scrambled to restore power, while the populace tried to make the best of being plummeted suddenly into a pre-electricity era. Yet even as power gradually came back online over the course of about ten hours, the question of what could cause such a complete grid collapse and whether it might happen again remained.
With recently a number of official investigation reports having been published, we have now finally some insight in how a big chunk of the European electrical grid suddenly tipped over.
Oscillations
Electrical grids are a rather marvelous system, with many generators cooperating across thousands of kilometers of transmission lines to feed potentially millions of consumers, generating just enough energy to meet the amount demanded without generating any more. Because physical generators turn more slowly when they are under heavier load, the frequency of the AC waveform has been the primary coordination mechanism across power plants. When a plant sees a lower grid frequency, it is fueled up to produce more power, and vice-versa. When the system works well, the frequency slowly corrects as more production comes online.
The greatest enemy of such an interconnected grid is an unstable frequency. When the frequency changes too quickly, plants can’t respond in time, and when it oscillates wildly, the maximum and minumum values can exceed thresholds that shut down or disconnect parts of the power grid.
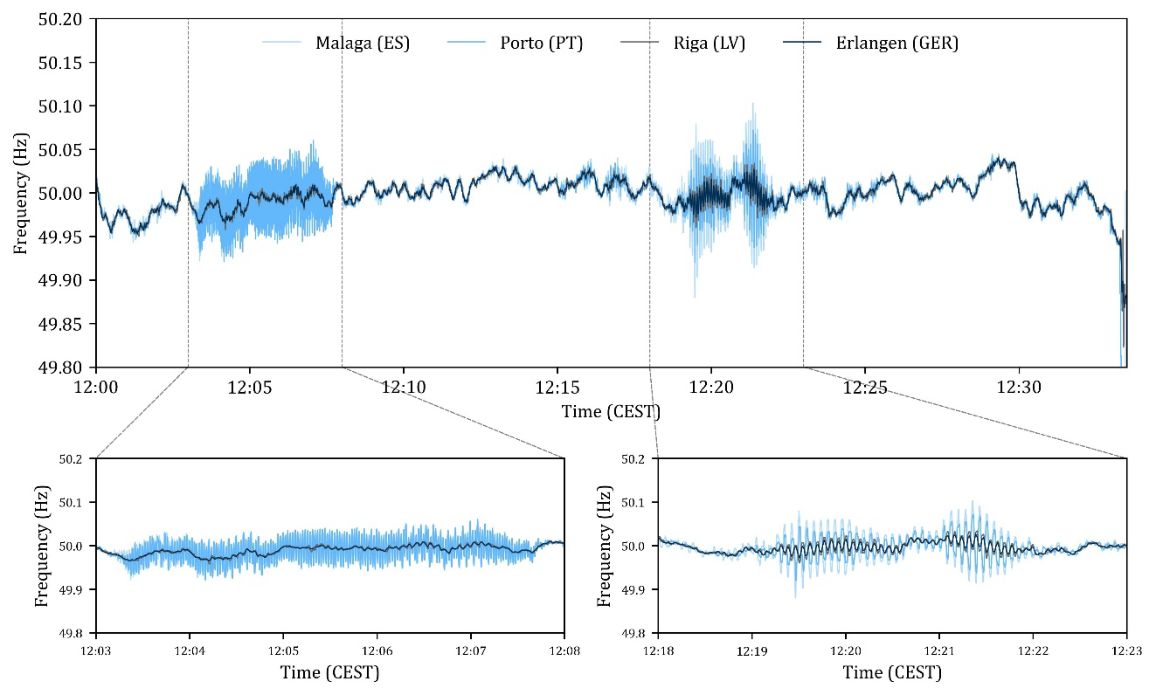
In the case of the Iberian blackout, a number of very significant oscillations were observed in the Spanish and Portuguese grids that managed to also be observable across the entire European grid, as noted in an early analysis (PDF) by researchers at Germany’s Friedrich-Alexander-Universität (FAU).
European-wide grid oscillations prior to the Iberian peninsula blackout. (Credit: Linnert et al., FAU, 2025)
This is further detailed in the June 18th report (direct PDF link) by Spain’s Transmission System Operator (TSO) Red Eléctrica (REE). Much of that morning the grid was plagued by frequency oscillations, with voltage increases occurring in the process of damping said oscillations. None of this was out of the ordinary until a series of notable events, with the first occurring after 12:02 with an 0.6 Hz oscillation repeatedly forced by a photovoltaic (PV) solar plant in the province of Badajoz which was feeding in 250 MW at the time. After stabilizing this PV plant the oscillation ceased, but this was followed by the second event with an 0.2 Hz oscillation.
After this new oscillation was addressed through a couple of measures, the grid was suffering from low-voltage conditions caused by the oscillations, making it quite vulnerable. It was at this time that the third major event occurred just after 12:32, when a substation in Granada tripped. The speculation by REE being that its transformer tap settings had been incorrectly set, possibly due to the rapidly changing grid conditions outpacing its ability to adjust.
Subsequently more substations, solar- and wind farms began to go offline, mostly due to a loss of reactive power absorption causing power flow issues, as the cascade failure outpaced any isolation attempts and conventional generators also threw in the towel.
Reactive Power
Grid oscillations are a common manifestation in any power grid, but they are normally damped either with no or only minimal interaction required. As also noted in the earlier referenced REE report, a big issue with the addition of solar generators on the grid is that these use grid-following inverters. Unlike spinning generators that have intrinsic physical inertia, solar inverters can rapidly follow the grid voltage and thus do not dampen grid oscillations or absorb reactive power. Because they can turn on and off essentially instantaneously, these inverters can amplify oscillations and power fluctuations across the grid by boosting or injecting oscillations if the plants over-correct.
In alternating current (AC) power systems, there are a number of distinct ways to describe power flow, including real power (Watt), complex power (VA) and reactive power (var). To keep a grid stable, all of these have to be taken into account, with the reactive power management being essential for overall stability. With the majority of power at the time of the blackout being generated by PV solar farms without reactive power management, the grid fluctuations spun out of control.
Generally, capacitors are considered to create reactive power, while inductors absorb it. This is why transformer-like shunt reactors – a parallel switchyard reactor – are an integral part of any modern power grid, as are the alternators at conventional power plants which also absorb reactive power through their inertia. With insufficient reactive power absorption capacity, damping grid oscillations becomes much harder and increases the chance of a blackout.
Ultimately the cascade failure took the form of an increasing number of generators tripping, which raised the system voltage and dropped the frequency, consequently causing further generators and transmission capacity to trip, ad nauseam. Ultimately REE puts much of the blame at the lack of reactive power which could have prevented the destabilization of the grid, along with failures in voltage control. On this Monday PV solar in particular generated the brunt of grid power in Spain at nearly 60%.
Generating mix in Spain around the time of the blackout. (Credit: ENTSO-E)
Not The First Time
Despite the impression one might get, this wasn’t the first time that grid oscillations have resulted in a blackout. Both of the 1996 Western North America blackouts involved grid oscillations and a lack of reactive power absorption, and the need to dampen grid oscillations remains one of the highest priorities. This is also where much of the criticism directed towards the current Spanish grid comes from, as the amount of reactive power absorption in the system has been steadily dropping with the introduction of more variable renewable energy (VRE) generators that lack such grid-stabilizing features.
To compensate for this, wind and solar farms would have to switch to grid-forming inverters (GFCs) – as recommended by the ENTSO-E in a 2020 report – which would come with the negative effect of making VREs significantly less economically viable. Part of this is due to GFCs still being fairly new, while there is likely a strong need for grid-level storage to be added to any GFC in order to make especially Class 3 fully autonomous GFCs work.
It is telling that five years after the publication of this ENTSO-E report not much has changed, and GFCs have not yet made inroads as a necessity for stable grid operation. Although the ENTSO-E’s own investigation is still in progress with a final report not expected for a few more months at least, in light of the available information and expert reports, it would seem that we have a good idea of what caused the recent blackout.
The pertinent question is thus more likely to be what will be done about it. As Spain and Portugal move toward a power mix that relies more and more heavily on solar generation, it’s clear that these generators will need to pick up the slack in grid forming. The engineering solution is known, but it is expensive to retrofit inverters, and it’s possible that this problem will keep getting kicked down the road. Even if all of the reports are unanimous in their conclusion as to the cause, there are unfortunately strong existing incentives to push the responsibility of avoiding another blackout onto the transmission system operators, and rollout of modern grid-forming inverters in the solar industry will simply take time.
In other words, better get used to more blackouts and surviving a day or longer without power.
People have been talking about switching from Windows to Linux since the 1990s, but in the world of open-source operating systems, there is much more variety than just the hundreds of flavors of Linux-based operating systems today. Take FreeBSD, for example. In a recent [GNULectures] video, we get to see a user’s attempt to switch from desktop Linux to desktop FreeBSD.
The interesting thing here is that both are similar and yet very different, mainly owing to their very different histories, with FreeBSD being a direct derivative of the original UNIX and its BSD derivative. One of the most significant differences is probably that Linux is just a kernel, with (usually) the GNU/Hurd userland glued on top of it to create GNU/Linux. GNU and BSD userland are similar, and yet different, with varying levels of POSIX support. This effectively means that FreeBSD is a singular OS with rather nice documentation (the FreeBSD handbook).
The basic summary here is that FreeBSD is rather impressive and easy to set up for a desktop, especially if you use a customized version like GhostBSD. Despite Libreboot, laptop power management, OSB NVENC, printer, and WiFi issues, it was noted that none of these are uncommon with GNU/Linux either. Having a single package manager (pkg) for all of FreeBSD (and derivatives) simplifies things a lot. The bhyve hypervisor makes running VMs a snap. A robust ZFS filesystem is also a big plus.
What counts against desktop FreeBSD in the end is a less refined experience in some areas, despite FreeBSD being able to run Linux applications courtesy of binary compatibility. With some developer love and care, FreeBSD might make for a nice desktop alternative to GNU/Linux before long, one that could be tempting even for the die-hard Windows holdouts among us.
The Stronghero 3D hybrid PLA PETG filament, with visible PETG core. (Credit: My Tech Fun, YouTube)
Sometimes you see an FDM filament pop up that makes you do a triple-take because it doesn’t seem to make a lot of sense. This is the case with a hybrid PLA/PETG filament by Stronghero 3D that features a PETG core. This filament also intrigued [Dr. Igor Gaspar] who imported a spool from the US to have a poke at it to see why you’d want to combine these two filament materials.
According to the manufacturer, the PLA outside makes up 60% of the filament, with the rest being the PETG core. The PLA is supposed to shield the PETG from moisture, while adding more strength and weather resistance to the PLA after printing. Another interesting aspect is the multi-color look that this creates, and which [Igor]’s prints totally show. Finding the right temperatures for the bed and extruder was a challenge and took multiple tries with the Bambu Lab P1P including bed adhesion troubles.
As for the actual properties of this filament, the layer adhesion test showed it to be significantly worse than plain PLA or PETG when printed at extruder temperatures from 225 °C to 245 °C. When the shear stress is put on the material instead of the layer adhesion, the results are much better, while torque resistance is better than plain PETG. This is a pattern that repeats across impact and other tests, with PETG more brittle. Thermal deformation temperature is, unsurprisingly, between both materials, making this filament mostly a curiosity unless its properties work much better for your use case than a non-hybrid filament.
The solenoid and punch side of the machine. {Credit: Simon Boak)
Although [Simon Boak] had no use for an automatic paper tape punch, this was one of those intrusive project thoughts that had to be put to rest. With not a lot of DIY projects to look at, the first step was to prototype a punch mechanism that would work reliably. This involved the machining of a block of aluminium with holes at the right locations for the punch (HSS rods) to push through and create holes into the paper without distortions. Next was to automate this process.
To drive the punches, 12V solenoids were selected, but using leverage to not require the solenoids to provide all the force directly. On the electronics side this then left designing a PCB with the solenoid drivers and an Arduino Nano-style board as the brains, all of which including the Arduino source can be found on GitHub. Much like with commercial tape punch machines, this unit receives the data stream via the serial port (and optional parallel port), with the pattern punched into the 1″ paper tape.
One issue was finding blank paper tape, for which [Simon] cut up rolls of thermal paper using a 3D-printed rig with appropriately installed sharp blades. This paper tape seems to work quite well so far, albeit with the compromise that due to the current drawn by each solenoid (~1.7A) only one solenoid gets activated at any time. This makes it slower than commercial punch machines.
Time series of O2 (blue) and VGADM (red). (Credit: Weijia Kuang, Science Advances, 2025)
In an Earth-sized take on the age-old ‘correlation or causality’ question, researchers have come across a fascinating match between Earth’s magnetic field and its oxygen levels since the Cambrian explosion, about 500 million years ago. The full results by [Weijia Kuang] et al. were published in Science Advances, where the authors speculate that this high correlation between the geomagnetic dipole and oxygen levels as recorded in the Earth’s geological mineral record may be indicative of the Earth’s geological processes affecting the evolution of lifeforms in its biosphere.
As with any such correlation, one has to entertain the notion that said correlation might be spurious or indirectly related before assuming a strong causal link. Here it is for example known already that the solar winds affect the Earth’s atmosphere and with it the geomagnetic field, as more intense solar winds increase the loss of oxygen into space, but this does not affect the strength of the geomagnetic field, just its shape. The question is thus whether there is a mechanism that would affect this field strength and consequently cause the loss of oxygen to the solar winds to spike.
Here the authors suggest that the Earth’s core dynamics – critical to the geomagnetic field – may play a major role, with conceivably the core-mantle interactions over the course of millions of years affecting it. As supercontinents like Pangea formed, broke up and partially reformed again, the impact of this material solidifying and melting could have been the underlying cause of these fluctuations in oxygen and magnetic field strength levels.
Although hard to say at this point in time, it may very well be that this correlation is causal, albeit as symptoms of activity of the Earth’s core and liquid mantle.
Currently the typical way that crude oil is processed involves a fractional distillation column, in which heated crude oil is separated into the various hydrocarbon compounds using distinct boiling points. This requires the addition of significant thermal energy and is thus fairly energy intensive. A possible alternative has been proposed by [Tae Hoon Lee] et al. with a research article in Science. They adapted membranes used with reverse-osmosis filtration to instead filter crude oil into its constituents, which could enable skipping the heating step and thus save a lot of energy.
The main change that had to be made was to replace the typical polyamide films with polyimine ones, as the former have the tendency to swell up – and thus becomes less effective – when exposed to organic solvents, which includes hydrocarbons. During testing, including with a mixture of naphtha, kerosene and diesel, the polyimine membrane was able to separate these by their molecular size.
It should be noted of course that this is still just small scale lab-testing and the real proof will be in whether it can scale up to the flow rates and endurance required from a replacement for a distillation column. Since this research is funded in part by the fossil fuel industry, one can at least expect that some trial installations will be set up before long, with hopefully positive results.
Starting June 20th, any cordless phone, smartphone, or feature phone, as well as tablets (7 – 17.4″ screens) have to meet Ecodesign requirements. In addition there is now mandatory registration with the European Product Registry for Energy Labelling (EPREL). The only exception are phones and tablets with a flexible (rollable) main display, and tablets that do not use a mobile OS, i.e. not Android, iPadOS, etc. These requirements include resistance to drops, scratches and water, as well as batteries that last at least 800 cycles.
What is perhaps most exciting are the requirements that operating system updates must be made available for at least five years from when the product is last on the market, along with spare parts being made available within 5-10 working days for seven years after the product stops being sold. The only big niggle here is that this access only applies to ‘professional repairers’, but at least this should provide independent repair shops with full access to parts and any software tools required.
On the ENERGY label that is generated with the registration, customers can see the rating for each category, including energy efficiency, battery endurance, repairability and IP (water/dust ingress) rating, making comparing devices much easier than before. All of this comes before smartphones and many other devices sold in the EU will have to feature easily removable batteries by 2027, something which may make manufacturers unhappy, but should be a boon to us consumers and tinkerers.
PVA filament is an interesting filament type, for the reason that while it can be printed with any FDM printer, it supposedly readily dissolves in water, which is also the reason why PVA glue sticks are so popular when doing crafts and arts with young children. This property would make PVA filament ideal for printing supports if your printer can handle two different materials at the same time. So surely you can just pick any old PVA filament spool and get to printing, right? As [Lost in Tech] found out, this is not quite the case.
As an aside, watching PVA supports dissolve in water set to classical music (Bach’s Air from Orchestral Suite No. 3) is quite a pleasant vibe. After thus watching the various PVA prints dissolve for a while, we are left to analyze the results. The first interesting finding was that not every PVA filament dissolved the same way, or even fully.
The first gotcha is that PVA can stand for polyvinyl acetate (the glue stick) or polyvinyl alcohol (a thickener and stabilizer) , with the ‘PVA’ filament datasheets for each respective filament showing various combinations of both types of PVA. This results in wildly different properties per filament, both in terms of Shore hardness, their printability, as well as their ability to dissolve in water. Some of the filament types (Yousu, Reprapper) also have an outer layer and inner core for some reason.
Ultimately the message appears to be that ‘PVA’ filament requires a fair bit of research to have any chance of having a relatively trouble-free printing experience.
AND gate implemented as diode-resistor logic. (Credit: Anthony Francis-Jones)
The fun part about logic gates is that there are so many ways to make them, with each approach having its own advantages and disadvantages. Although these days transistor-transistor logic (TTL) is the most common, diode-transistor logic (DTL) once was a regular sight, as well as diode-resistor logic (DRL). These logic gates are the topic of a recent video by [Anthony Francis-Jones], covering a range of logic gates implemented using mostly diodes and resistors.
Of note is that there’s another class of logic gates: this uses resistors and transistors (RTL) and preceded DTL. While DRL can be used to implement AND and OR logic gates, some types of logic gates (e.g. NOT) require an active (transistor) element, which is where DTL comes into play.
In addition to the construction of a rather nifty demonstration system and explanation of individual logic gates, [Anthony] also shows off a range of DTL cards used in the Bendix G-15 and various DEC systems. Over time TTL would come to dominate as this didn’t have the diode voltage drop and other issues that prevented significant scaling. Although the rise of VLSI has rendered DRL and DTL firmly obsolete, they still make for a fascinating teaching moment and remind us of the effort over the decades to make the computing device on which you’re reading this possible.
Creating strong permanent magnets without using so-called rare earth elements is an ongoing topic of research. An interesting contestant here are iron nitride magnets (α”-Fe16N2), which have the potential to create permanents magnets on-par with with neodymium (Nd2Fe14B) magnets. The challenging aspect with Fe-N magnets is their manufacturing, with recently [Ben Krasnow] giving it a shot over at the [Applied Science] YouTube channel following the method in a 2016 scientific paper by [Yanfeng Jiang] et al. in Advanced Engineering Materials.
This approach uses a ball mill (like [Ben]’s planetary version) with ammonium nitrate (NH4NO3) as the nitrogen source along with iron. After many hours of milling a significant part of the material is expected to have taken on the α”-Fe16N2 phase, after which shock compaction is applied to create a bulk magnet. After the ball mill grinding, [Ben] used a kiln at 200°C for a day to fix the desired phase. Instead of shock compaction, casting in epoxy was used as alternative.
We have covered Fe-N magnets before, along with the promises they hold. As one can see in [Ben]’s video, oxidation is a big problem, with the typical sintering as with other magnet types not possible either. Ultimately this led to the resulting magnet being fairly weak, with a DIY magnetometer used to determine the strength of the created magnet.
Interestingly, there’s a much newer paper by [Tetsuji Saito] et al. from 2024 in Metals that does use sintering, specifically spark plasma sintering with dynamic compression (SPS-DC). SPS-DC can be done at fairly low temperatures (373 – 573 K, or 99.85 – 299.85 °C), producing much stronger magnets than [Ben] accomplished.
Although Fe-N magnets hold a lot of promise, they have lower coercivity. This means that they demagnetize easier, which is another aspect that weighs against them. For now it would seem that we aren’t quite ready to say farewell to Nd-Fe-B magnets.
Theoretically when you write a GUI-based application for Linux there are standards to follow, with these all neatly documented over at the Freedesktop website. However, in reality, Freedesktop is more of a loose collection of specifications, some of which are third-party specifications that have somehow become the de facto standard. One example of this is the StatusNotifierItem spec that provides a way for applications to create and manage a ‘system tray’ icon.
This feature is incredibly useful for providing a consistent way to users for quickly accessing functionality and to see application status. Unfortunately, as [Brodie Robertson] notes in a recent video, not everyone agrees with this notion. Despite that Windows since 95 as well as MacOS/OS X and others provide similar functionality, Gnome and other Linux desktop environments oppose such system tray icons (despite a popular extension), with an inevitable discussion on Reddit as a result.
Although the StatusNotifierItem specification is listed on the Freedesktop website, it’s under ‘Draft specifications’ along with another, apparently internal-but-unfinished System tray proposal. Meanwhile DEs like KDE have integrated first-party support (KStatusNotifierItem) for the specification. There’s currently an active Freedesktop Gitlab discussion on the topic, whether StatusNotifierItem should even be in the list, or become an approved specification.
With the specification mired in bureaucracy and multiple camps pushing their own idea of what ‘the Linux desktop’ should look like, it feels like a real shame that the Linux Standard Base effort died a decade ago. Users and developers just want their desktop environment to come with zero surprises, after all.
Considered by many to be just a dull output for sequential text, the command-line terminal is a veritable canvas to the creative software developer. With the cursor as the brush, entire graphical user interfaces can be constructed, or even a basic text-based dashboard on which values can be updated without redrawing the entire screen over and over, or opting for a much heavier solution like a GUI.
Ncurses is one of the most well-known and rather portable Terminal User Interface (TUI) libraries using that such cursor control, and more, can be achieved in a fairly painless manner. That said, for anyone coming from a graphical user interface framework, the concepts and terminology with ncurses and similar can be confusingly different yet overlapping, so that getting started can be somewhat harrowing.
In this article we’ll take a look at ncurses’ history, how to set it up and how to use it with C and C++, and many more languages supported via bindings.
Tools And Curses
The acronym TUI is actually a so-called retronym, as TUIs were simply the way of life before the advent of bitmapped, videocard-accelerated graphics. In order to enable more than just basic, sequential character output, the terminal had to support commands that would move the cursor around the screen, along with commands that affect the way text is displayed. This basic sequence of moving the cursor and updating active attributes is what underlies TUIs, with the system’s supported character sets determining the scope of displayed characters.
Ncurses, short for “new curses“, is an evolution of the curses library by Ken Arnold as originally released in 1978 for BSD UNIX, where it saw use with a number of games like Rogue. Originally it was a freely distributable clone of System V Release 4.0 (SVr4) curses by the time of its release in 1993, based on the existing pcurses package. Later, ncurses adopted a range of new features over the course of its subsequent development by multiple authors that distinguished it from curses, and would result in it becoming the new de-facto default across a wide range of platforms.
The current version is maintained by Thomas Dickey, and the ncurses library and development files are readily available from your local package manager, or downloadable from the ncurses website. Compiling and running ncurses-based application is straightforward on Linux, BSD, and MacOS courtesy of the libncurses and related files being readily available and often already installed. On Windows you can use the MinGW port, with MSYS2 providing an appropriate terminal emulator, as well as the pacman package manager and access to the same ncurses functionality as on the other platforms.
Hello Curses
The core ncurses functionality can be accessed after including the ncurses.h header. There are two standard extensions in the panel.h and menu.h headers for panel stack management and menus, respectively. Panels are effectively wrappers around an ncurses window that automate a lot of the tedious juggling of multiple potentially overlapping windows. The menu extension is basically what it says on the tin, and makes creating and using menus easier.
For a ‘hello world’ ncurses application we’d write the following:
This application initializes ncurses before writing the Hello World! string to both the top left, at (2, 2) and the center of the terminal window, with the terminal window size being determined dynamically with getmaxyx(). The mvprintw() and mvwprintw() work like printf(), with both taking the coordinates to move the cursor to the indicated position in row (y), column (x) order. The extra ‘w’ after ‘mv’ in the function name indicates that it targets a specific window, which here is stdscr, but could be a custom window. Do note that nurses works with y/x instead of the customary x/y order.
Next, we use attributes in this example to add some color. We initialize a pair, on index 1, using predefined colors and enable this attribute with attron() and the COLOR_PAIR macro before printing the text. Attributes can also be used to render text as bold, italic, blinking, dimmed, reversed and many more styles.
Finally, we turn the color attribute back off and wait for a keypress with getch() before cleaning up with endwin(). This code is also available along with a Makefile to build it in this GitHub repository as hello_ncurses.cpp. Note that on Windows (MSYS2) the include path for the ncurses header is different, and you have to compile with the -DNCURSES_STATIC define to be able to link.
Here the background, known as the standard screen (stdscr) is used to write to, but we can also segment this surface into windows, which are effectively overlays on top of this background.
Multi-Window Application
The Usagi Electric 1 (UE1) emulator with ncurses front-end.
There’s more to an ncurses application than just showing pretty text on the screen. There is also handling keyboard input and continuously updating on-screen values. These features are demonstrated in e.g. the emulator which I wrote recently for David Lovett’s Usagi Electric 1 (UE1) vacuum tube-based 1-bit computer. This was my first ever ncurses project, and rather educational as a result.
Using David’s QuickBasic-based version as the basis, I wrote a C++ port that differs from the QB version in that there’s no single large loop, but rather a separate CPU (processor.cpp) thread that processes the instructions, while the front-end (ue1_emu.cpp) contains the user input processing loop as well as the ncurses-specific functionality. This helps to keep the processor core’s code as generic as possible. Handling command line flags and arguments is taken care of by another project of mine: Sarge.
This UE1 front-end creates two ncurses windows with a specific size, draws a box using the default characters and refreshes the windows to make them appear. The default text is drawn with a slight offset into the window area, except for the ‘title’ on the border, which is simply text printed with leading and trailing spaces with a column offset but on row zero.
Handling user input with getch() wouldn’t work here, as that function is specific to stdscr and would foreground that ‘window’. Ergo we need to use the following: int key = wgetch(desc). This keeps the ‘desc’ window in focus and obtains the key input from there.
During each CPU cycle the update_display() function is called, in which successive mvwprintw() calls are made to update on-screen values, making sure to blank out previous data to prevent ghosting, with clrtoeol() and kin as the nuclear option. The only use of attributes is with color and bold around the processor state, indicating a running state in bold green and halted with bold red.
Finally, an interesting and crucial part of ncurses is the beep() function, which does what it says on the tin. For UE1 it’s used to indicate success by ringing the bell of the system (inspired by the Bendix G-15), which here provides a more subtle beep but can be used to e.g. indicate a successful test run. There’s also the flash() function that unsurprisingly flashes the terminal to get the operator’s attention.
A Much Deeper Rabbit Hole
By the time that you find yourself writing an ncurses-based application on the level of, say, Vim, you will need a bit more help just keeping track of all the separate windows that you will be creating. This is where the Panel library comes into play, which are basically wrappers for windows that automate a lot of the tedious stuff such as refreshing windows and keeping track of the window stack.
Applications also love to have menus, which can either be painstakingly created and managed using core ncurses features, or simplified with the Menu library. For everyone’s favorite data-entry widget, there is the Forms library, which provides not only the widgets, but also provides field validation features. If none of this is enough for your purposes, then there’s the Curses Development Kit (CDK). For less intensive purposes, such as just popping up a dialog from a shell script, there is the dialog utility that comes standard on Linux and many other platforms and provides easy access to ncurses functionality with very little fuss.
All of which serves to state that the ground covered in this article merely scratches the surface, even if it should be enough to get one at least part-way down the ncurses rabbit hole and hopefully appreciative of the usefulness of TUIs even in today’s bitmapped GUI world.
On the desktop, most people use the official HTML and JavaScript-based client for Discord in either a browser or a still-smells-like-a-browser Electron package. Yet what if there was a way to use a third-party client and even run it on Windows XP, Windows 95, and NT 3.1? This is exactly what [iDontProgramInCpp] did with their Discord Messenger project.
Fortunately, as a web ‘app’ the Discord API is readily accessible and they don’t seem to be in a rush to ban third-party clients. But it did require a bit of work to add newer versions of TLS encryption to Windows XP and older. Fortunately OpenSSL still supports these older platforms, so this was not a major hurdle and Windows XP happily ran this new Discord client. That left porting to older Windows versions.
Most of the challenge lies in writing shims for API calls that do not exist on these older platforms when backporting software from Windows XP to older Windows versions, and GCC (MinGW) had to be used instead of MSVC, but this also was a relatively minor detail. Finally, Windows NT 3.1 was picked as the last challenge for Discord Messenger, which ran into MSVCRT runtime issues and required backporting features to the NT 3.1 version that was still part of the OS back then.
[MattKC] covers the project in a recent video, as well as the AeroChat client which targets Windows Live Messenger fans. Hopefully the API that allows these projects to operate doesn’t get locked down, as third-party clients like these bring their own unique advantages to the Discord ecosystem.
As useful as corrugated cardboard is, we generally don’t consider it to be a very sturdy material. The moment it’s exposed to moisture, it begins to fall apart, and it’s easily damaged even when kept dry. That said, there are ways to make corrugated cardboard a lot more durable, as demonstrated by the [NightHawkInLight]. Gluing multiple panels together so that the corrugation alternates by 90 degrees every other panel makes them more sturdy, with wheat paste (1:5 mixture of flour and water) recommended as adhesive.
Other tricks are folding over edges help to protect against damage, and integrating wood supports. Normal woodworking tools like saws can cut these glued-together panels. Adding the wheat paste to external surfaces can also protect against damage. By applying kindergarten papier-mâché skills, a custom outside layer can be made that can be sanded and painted for making furniture, etc.
Beyond these and other tips, there remains the issue of protection against water intrusion. The (biodegradable) solution here is shellac. Unfortunately, pure (canned) shellac isn’t good enough for long-term exposure to moisture, so the recipe recommended here is: 0.5 L of (~91%) IPA, 125 g of shellac flakes, and 15 g of beeswax. After heating and stirring, a paste wax is created that can be brushed on the cardboard to provide water resistance, without turning said cardboard into chemical waste.
As an alternative waterproof coating (but not biodegradable) there’s another recipe: 100 g hot glue sticks, 25 g paraffine wax or beeswax, and 20 mL of mineral oil (which lowers the melting temperature).
Although these methods, including the also discussed UV protection coatings – require some time and materials investment. Since cardboard is effectively free, there’s something to be said for this approach, if only as a fun chemistry or physics project. For [NightHawkInLight] it’s being used as the roof on his DIY camper, for which it seems like a nice lightweight, waterproof option.
After having been involved in an accident, [Kurt Kohlstedt] suffered peripheral neuropathy due to severe damage to his right brachial plexus — the network of nerves that ultimately control the shoulder, arm, and hand. This resulted in numbness and paralysis in his right shoulder and arm, with the prognosis being a partial recovery at best. As a writer, this meant facing the most visceral fear possible of writing long-form content no longer being possible. While searching for solutions, [Kurt] looked at various options, including speech-to-text (STT), before focusing on single-handed keyboard options.
More after the break…
The reason why STT didn’t really work was simple: beyond simple emails and short messages, the voice-driven process just becomes too involved and tedious with editing, rearranging, and deleting of text fragments. [Kurt] couldn’t see himself doing a single-pass narration of an article text or dealing with hours of dictating cursor movements.
One of the first single-hand typing methods he tried is as simple as it’s brilliant: by moving the functional hand a few keys over (e.g. left hand’s index finger on J instead of F), you can access all keys with a single hand. This causes a lot more stress on the good hand, though. Thus, for a long-term solution, something else would be needed.
Thanks to his state loan program (MNStar), [Kurt] was able to try out Maltron’s ‘Key Bowl’, the TIPY ‘Big Fan’, and the Matias Half-QWERTY keyboard, which describes pretty much what they look like. Of these, the Maltron was functional but very clunky, the TIPY required learning a whole new keyboard layout, something which [Kurt] struggled with. Despite its mere 22 keys, the Matias half-QWERTY offered the most straightforward transition from using a full keyboard.
It was the Matias keyboard that worked the best for [Kurt], as it allowed him to use both his left hand normally, along with adapting the muscle memory of his right hand to the left one. Although [Kurt] didn’t select the Matias in the end, it did inspire him to choose the fourth option: using a custom keymap on his full-sized QWERTY keyboard. In the remaining two parts in this series, Kurt] takes us through the design of this keymap along with how others can set it up and use it.
The Switch 2 Pro controller’s battery is technically removable, if you can get to it. (Credit: VK’s Channel, YouTube)
For those of us who have worked on SNES and GameCube controllers, we know that these are pretty simple to get into and maintain. However, in the trend of making modern game controllers more complex and less maintainable, Nintendo’s new Switch 2 Pro controller is giving modern Xbox and PlayStation controllers a run for their money in terms of repair complexity. As shown in a teardown by [VK] on YouTube (starting at nine minutes in), the first step is a disappointing removal of the glued-on front plate. After that you are dealing with thin plastic, the typical flimsy ribbon cables and a lot of screws.
The main controller IC on the primary PCB is an ARM-based MediaTek MT3689BCA Bluetooth SoC, which is also used in the Switch 2’s Joy-Cons. The 3.87V, 1070 mAh Li-ion battery is connected to the PCB with a connector, but getting to it during a battery replacement might be a bit of a chore.
More after the break…
The analog sticks are Alps-branded and do not seem to match any other sticks currently on the market. These are (disappointingly) also still resistive potentiometer sticks, meaning they might have to be replaced before long due to stick drift. Reassembly has a few tricky parts, especially with the two sticks being not identical, yet easy to swap by accident. Which would require a second disassembly round.
There’s also a soft-touch coating on these controllers, which have been known to get… gunky after a few years, so time will tell what the lifespan is here. As is typical, these controllers also only work with the Switch and not with a PC or other consoles. Overall, it seems like a nice, silent controller, but the repairability seems low at best.
The city of London is no stranger to tall constructions today, but long before the first skyscrapers would loom above its streets, Watkin’s Tower was supposed to be the tallest structure in not only London but also the entirety of the UK. Inspired by France’s recently opened Eiffel tower, railway entrepreneur and Member of Parliament [Sir Edward Watkin] wanted to erect a structure that would rival the Eiffel tower, as part of a new attraction park to be constructed near the Middlesex hamlet of Wembley. In a retrospective, [Rob’s London] channel takes a look at what came to be known as Watkin’s Folly among other flattering names.
The first stage of Watkin’s Tower at Wembley Park. The only to be ever completed. (Source: Wikimedia)
After [Gustave Eiffel], the architect of the Eiffel tower recused himself, a design competition was held for a tower design, with the Illustrated Catalogue of the 68 designs submitted available for our perusal. The winner turned out to be #37, an eight-legged, 366 meter tall tower, much taller than the 312.2 meter tall Eiffel tower, along with multiple observation decks and various luxuries to be enjoyed by visitors to Wembley Park.
Naturally, [Watkin] commissioned a redesign to make it cheaper, which halved the number of legs, causing subsidence of the soil and other grievances later on. Before construction could finish, the responsible company went bankrupt and the one constructed section was demolished by 1907. Despite this, Wembley Park was a success and remains so to this day with Wembley Stadium built where Watkin’s Folly once stood.
How hard could it be to make a chicken coop door that can be configured to open and close automatically using a straightforward interface? That’s the question that [Jeff Sandberg] set out with, after three years of using a more basic off-the-shelf unit that offered no remote access nor a convenient user interface. The use case for [Jeff] was rather straightforward: the door would be open during the day and closed at night to keep the hens safely inside the coop.
The commercial solution offered an RTC-backed programmable interface as well as a light sensor, but the latter wasn’t always reliable in inclement weather and making simple changes to the programming when e.g. the hens had to stay inside a day due to work on the yard, was much more complicated than needed, plus had to be done on the spot. The new system would solve all these ills.
That said, the existing door mechanism was doing a fine job and could be kept. This just left making a new box with electronics to control it, starting with an ESP32C3 with the ESPHome firmware that is hooked into the local Home Assistant system, along with a motor to lift and lower the door and with magnetic contact sensors.
So far so easy. The hard part came with the installation, which involved trenching to the hen house for mains power, repairing the damage from this, and troubleshooting a power issue that turned out to be due to a dodgy power adapter. The payoff is that now the chicken coop is also part of the smart home and their owner never has to trudge through a soggy garden again to adjust the programming on a dim LC display with far too few buttons.