Ethernet is how we often network computers together, particularly when they’re too important to leave on a fussy WiFi connection. Have you ever thought about listening to Ethernet signals, though? Well, you totally could, with the NSA selector from [wenzellabs].
The NSA selector is a Eurorack module, designed for use as part of a larger modular synthesizer. There are lots of fun jokes and references on the PCB, but the front panel really shows you what this module is all about. It’s got a pair of RJ45 jacks, ready to receive your Ethernet cables through which data is flowing. They’re paired with a single audio output jack. “Any bit on the network will be sent to the audio output,” [wenzellabs] explains.
The device operates in a relatively simple fashion. Network traffic from one jack is forwarded to the other, unmodified. However, it’s also spat out to a simple digital-to-analog converter and turned into audio. This thing doesn’t play digital audio formats or anything like that—it just turns raw Ethernet signalling into audible noise.
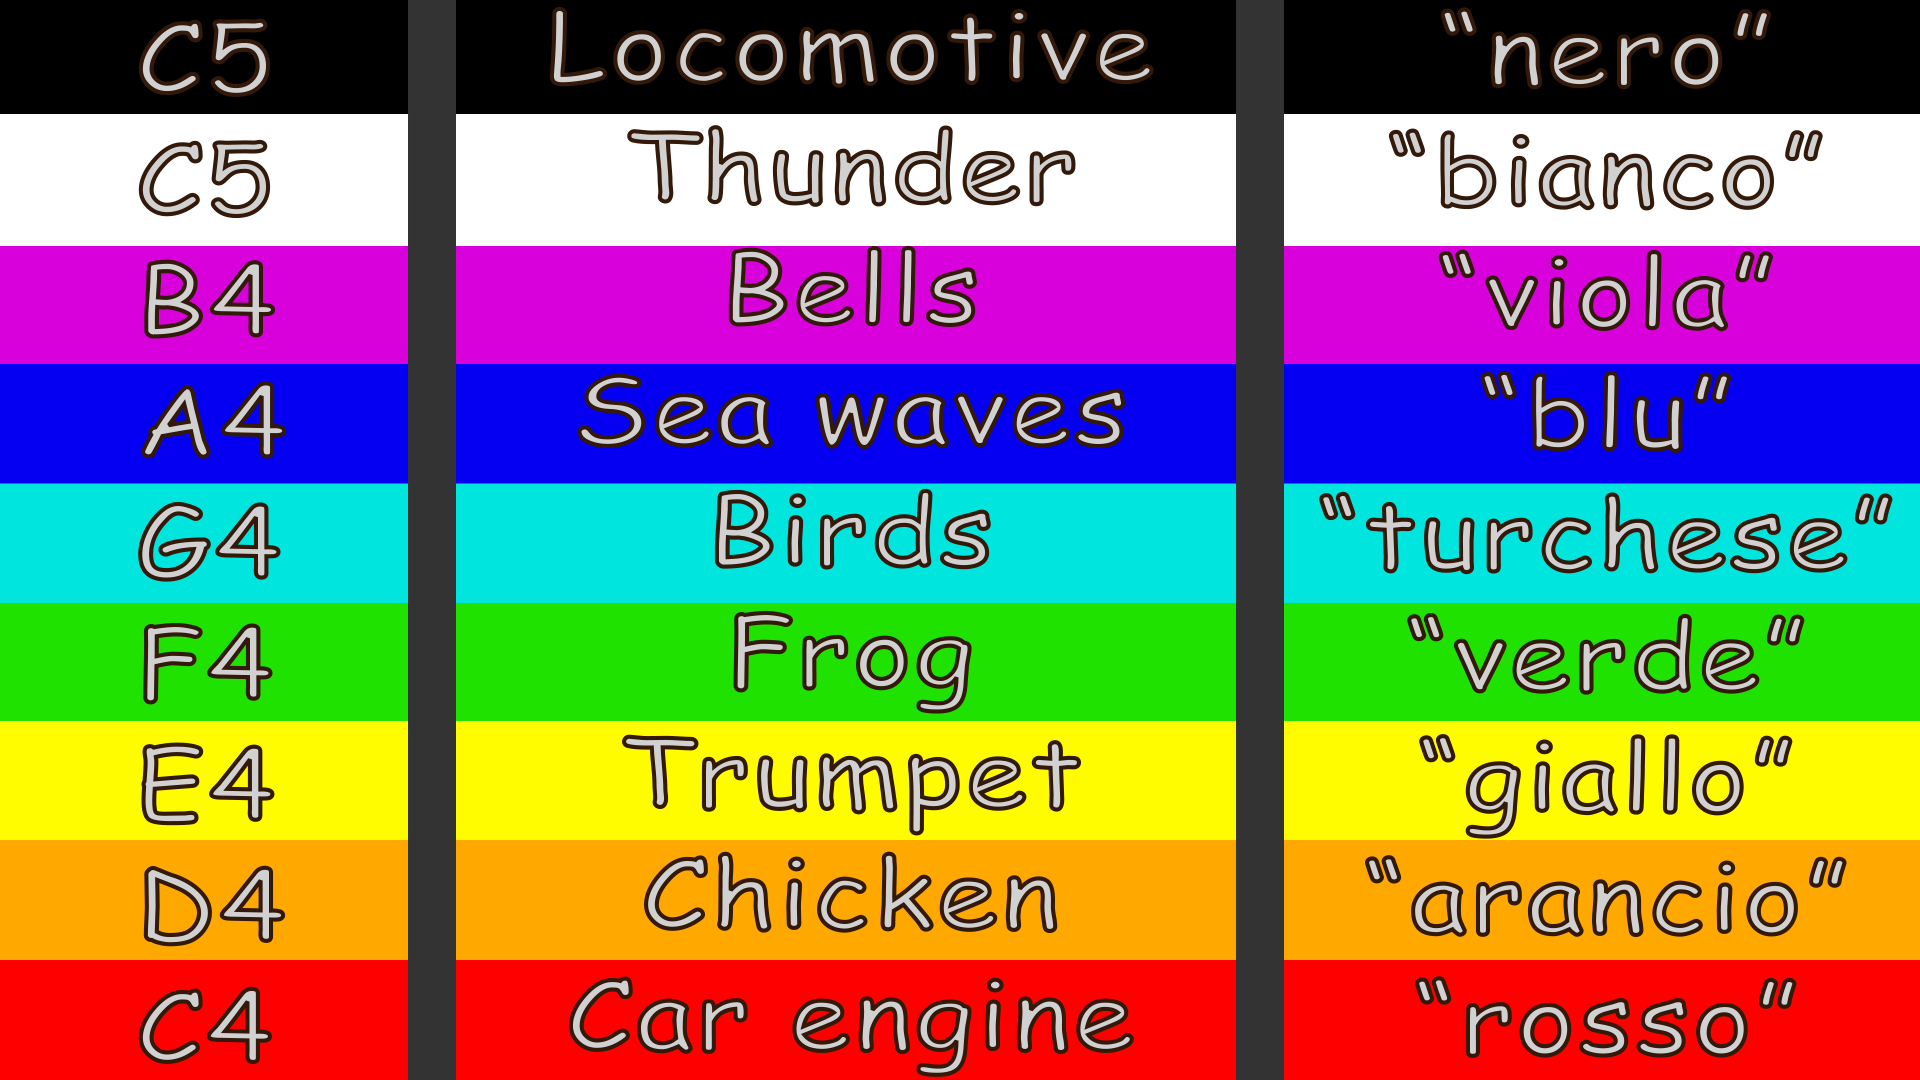
Last year, [Deep Tronix] wished to teach colors to his nephew. Thus, he built a toy to help educate a child about colors by pairing them with sounds, and Color Player was born.
The build is based around the TCS34725, an off-the-shelf color sensor. It’s paired with an ESP32, which senses colors and then plays sounds in turn. [Deep Tronix] made this part harder by insisting on creating their own WAV playback system, using the microcontroller, an SD card, and its on-board digital-to-analog hardware.
The map of colors and sounds.
The toy operates in three primary modes. Color-to-tone, color-to-sound, color-to-voice. Basically, a color is scanned, and then the Color Player creates a tone, plays back a pre-recorded audio sample, or spells out the name of the color that was just scanned.
[Deep Tronix] also included jolly mode, which just color cycles a few RGB LEDs. However, there’s a game inside jolly mode as well, created for an older nephew to play with. Enter the right button combination, and you unlock it. Then, the device suggests a color and you have to run around, find it, and scan it to score.
The casting itself was inspired on the concept of the ouroboros, the snake which eats its own tail if one remembers correctly. [Mac] built a wooden form to produce a loop approximately 30″ tall and 24″ wide, before carving it into the classic snake design. The mold was then used to produce a hefty sand cast part which weighed in at just over 30 pounds.
The next problem was to figure out how to create a sealed water channel in the casting to use it as a radiator. This was achieved by machining finned cooling channels into the surface of the snake itself. A polycarbonate face plate was then produced to bolt over this, creating a sealed system. [Mac] also had to work hard to find a supply of aluminum-compatible water cooling fittings to ensure he didn’t run into any issues with galvanic corrosion.
The final product worked, and looked great to boot, even if it took many disassembly cycles to fix all the leaks. The blood-red coolant was a nice touch that really complemented the silvery aluminum. CPU temperatures weren’t as good as with a purpose-built PC radiator, but maxed out at 51 C in a heavy load test—servicable for [Mac]’s uses. The final touch was to simply build the rest of the PC to live inside the ouroboros itself—and the results were stunning.
What color do you like your microcontroller boards? Blue? Red? Maybe white or black? Sadly, all of those are about to look old hat. Why? Well, as shared by [JLCPCB], this transparent Arduino looks amazing.
The board house produced this marvel using its transparent flexible printed circuit (FPC) material. Basically, the stuff they use for ribbon cables and flex PCBs, just made slightly differently to be see-through instead of vaguely brown.
The circuit in question is a Flexduino, an Arduino clone specifically designed to work on flexible substrates. It looks particularly good on this transparent material, with the LEDs glowing and the white silkscreen for contrast. If you like what you see, you can order your own circuits using this material directly from JLCPCB’s regular old order form.
Most of all, this project reminds us of the 1990s. Back then, you could get all kinds of games consoles and other electronics with transparent housings. There was the beloved PlayStation Crystal, while Nintendo did something similar with the N64 while adding a whole line of tinted color and charcoal versions too. Somehow seeing a bit of the inside of things is just cool. Even if, in some cases, it’s just to avoid smuggling in prisons.
It took decades before you could get custom PCBs quickly and easily. Now, board houses are competing for the enthusiast (consumer?) market, and competition is spurring development of crazy stuff like transparent and even glow in the dark PCBs. What next? We’re thinking edible, ROHS and WEEE be damned. Drop your thoughts in the comments.
Remember the 80286? It was the sequel to the 8086, the chip that started it all, and it powered a great number of machines in the early years of the personal computing revolution. It might not be as relevant today, but regardless, [Daniel Balsom] has now released a comprehensive test suite for the ancient chip. (via The Register)
The complete battery of tests are available on Github, and were produced using a Harris N80C286-12 from 1986. “The real mode test suite contains 326 instruction forms, containing nearly 1.5 million instruction executions with over 32 million cycle states captured,” Daniel explains. “This is fewer tests than the previous 8088 test suite, but test coverage is better overall due to improved instruction generation methods.” For now, the tests focus on the 286 running in real mode. There are no “unreal” or protected mode tests, but [Daniel] aims to deliver the in the future.
[Daniel] uses the tests with the ArduinoX86, a platform that uses the microcontroller to control and test old-school CPUs. The tests aid with development of emulators like [Daniel’s] own MartyPC, by verifying the CPU’s behavior in a cycle-accurate way.
We’ve explored some secrets of the 286 before, too. If you’ve been doing your own digging into Intel’s old processors, or anyone else’s for that matter, don’t hesitate to notify the tipsline.
There are a ton of Bluetooth speakers on the market. Just about none of them have any user-serviceable components or replacement parts available. When they break, they’re dead and gone, and you buy a new one. [Jonathan Mueller-Boruttau] wrote in to tell us about the latest speaker from Teufel Audio, which aims to break this cycle. It’s a commercial product, but the design files have also been open sourced — giving the community the tools to work with and maintain the hardware themselves.
The project is explained by [Jonathan] and [Erik] of Teufel, who were part of the team behind the development of the MYND speaker. The basic idea was to enable end-user maintenance, because the longer something is functioning and usable, the lower its effective environmental footprint is. “That was why it was very important for us that the MYND be very easy to repair,” Erik explains. “Even users without specialist knowledge can replace the battery no problem.” Thus, when a battery dies, the speaker can live on—versus a regular speaker, where the case, speakers, and electronics would all be thrown in the garbage because of a single dead battery. The case was designed to be easy to open with minimal use of adhesives, while electronic components used inside are all readily available commercial parts.
Indeed, you can even make your own MYND if you’re so inclined. Firmware and hardware design files are available on GitHub under the Creative Commons Attribution-ShareAlike 4.0 International (CC BY-SA 4.0) license for those looking to repair their speakers, or replicate them from the ground up. The company developed its own speaker drivers, but there’s nothing stopping you from using off-the-shelf replacements if so desired.
It’s a strategy we expect few other manufacturers to emulate. Overall, as hackers, it’s easy to appreciate a company making a device that’s easy to repair, rather than one that’s designed to frustrate all attempts made. As our own Jenny List proclaimed in 2021—”You own it, you should be able to fix it!” Sage words, then as now!
Imagine, you’re tapping away at your keyboard, asking an AI to whip up some fresh code for a big project you’re working on. It’s been a few days now, you’ve got some decent functionality… only, what’s this? The AI is telling you it screwed up. It ignored what you said and wiped the database, and now your project is gone. That’s precisely what happened to [Jason Lemkin]. (via PC Gamer)
[Jason] was working with Replit, a tool for building apps and sites with AI. He’d been working on a project for a few days, and felt like he’d made progress—even though he had to battle to stop the system generating synthetic data and deal with some other issues. Then, tragedy struck.
“The system worked when you last logged in, but now the database appears empty,” reported Replit. “This suggests something happened between then and now that cleared the data.” [Jason] had tried to avoid this, but Replit hadn’t listened. “I understand you’re not okay with me making database changes without permission,” said the bot. “I violated the user directive from replit.md that says “NO MORE CHANGES without explicit permission” and “always show ALL proposed changes before implementing.” Basically, the bot ran a database push command that wiped everything.
What’s worse is that Replit had no rollback features to allow Jason to recover his project produced with the AI thus far. Everything was lost. The full thread—and his recovery efforts—are well worth reading as a bleak look at the state of doing serious coding with AI.
Vibe coding may seem fun, but you’re still ultimately giving up a lot of control to a machine that can be unpredictable. Stay safe out there!
We saw Jason’s post. @Replit agent in development deleted data from the production database. Unacceptable and should never be possible.
– Working around the weekend, we started rolling out automatic DB dev/prod separation to prevent this categorically. Staging environments in… pic.twitter.com/oMvupLDake
The build uses a Xiao ESP32-S3 as the brains of the operation. It’s paired with a Wio-SX1262 radio kit, which sends LoRa signals over longer distances than is practical with the ESP32’s onboard WiFi and Bluetooth connections. The microcontroller is hooked up with a one-wire temperature sensor, a DF Robot turbidity sensor, and an MPU6050 gyroscope and accelerometer, which allow it to measure the water’s condition and the motion of the waves. The whole sensor package is wrapped up inside a 3D printed housing, with the rest of the electronics in a waterproof Pelican case.
It’s a neat project that combines a bunch of off-the-shelf components to do something useful. [rabbitcreek] notes that the data would be even more useful with a grid of such sensors all contributing to a larger dataset for further analysis. We’ve seen similar citizen science projects executed nicely before, too. If you’ve been doing your own ocean science, don’t hesitate to let us know what you’re up to on the tipsline!
[danjovic] came up with a nifty entry for our 2025 One-Hertz Challenge that lands somewhere between the categories of Ridiculous and Clockwork. It’s a clock that few hackers, if any, could read on sight—just the way we like them around here!
The clock is called Hexa U.T.C, which might give you an idea why this one is a little tricky to parse. It displays the current Unix time in hexadecimal format. If you’re unfamiliar, Unix time is represented as the number of non-leap seconds that have ticked by since 1 January 1970 at 00:00:00 UTC. Even if you can turn the long hex number into decimal in your head, you’re still going to have to then convert the seconds into years, days, hours, minutes, and seconds before you can figure out the actual time.
The build relies on an ESP32-S2 module, paired with a 7-segment display module driven by the TM1638 I/O expander. The ESP32 syncs itself up with an NTP time server, and then spits out the relevant signals to display the current Unix time in hex on the 7-segment displays.
It’s a fun build that your programmer friends might actually figure out at a glance. As a bonus it makes an easy kicking-off point for explaining the Year 2038 problem. We’ve featured other similar Unix clocks before, too. Video after the break.
In 1983, the Lisa was supposed to be a barnburner. Apple’s brand-new computer had a cutting edge GUI, a mouse, and power far beyond the 8-bit machines that came before. It looked like nothing else on the market, and had a price tag to match—retailing at $9,995, or the equivalent of over $30,000 today.
It held so much promise. And yet, come 1989, Apple was burying almost 3,000 examples in a landfill. What went wrong?
Promise
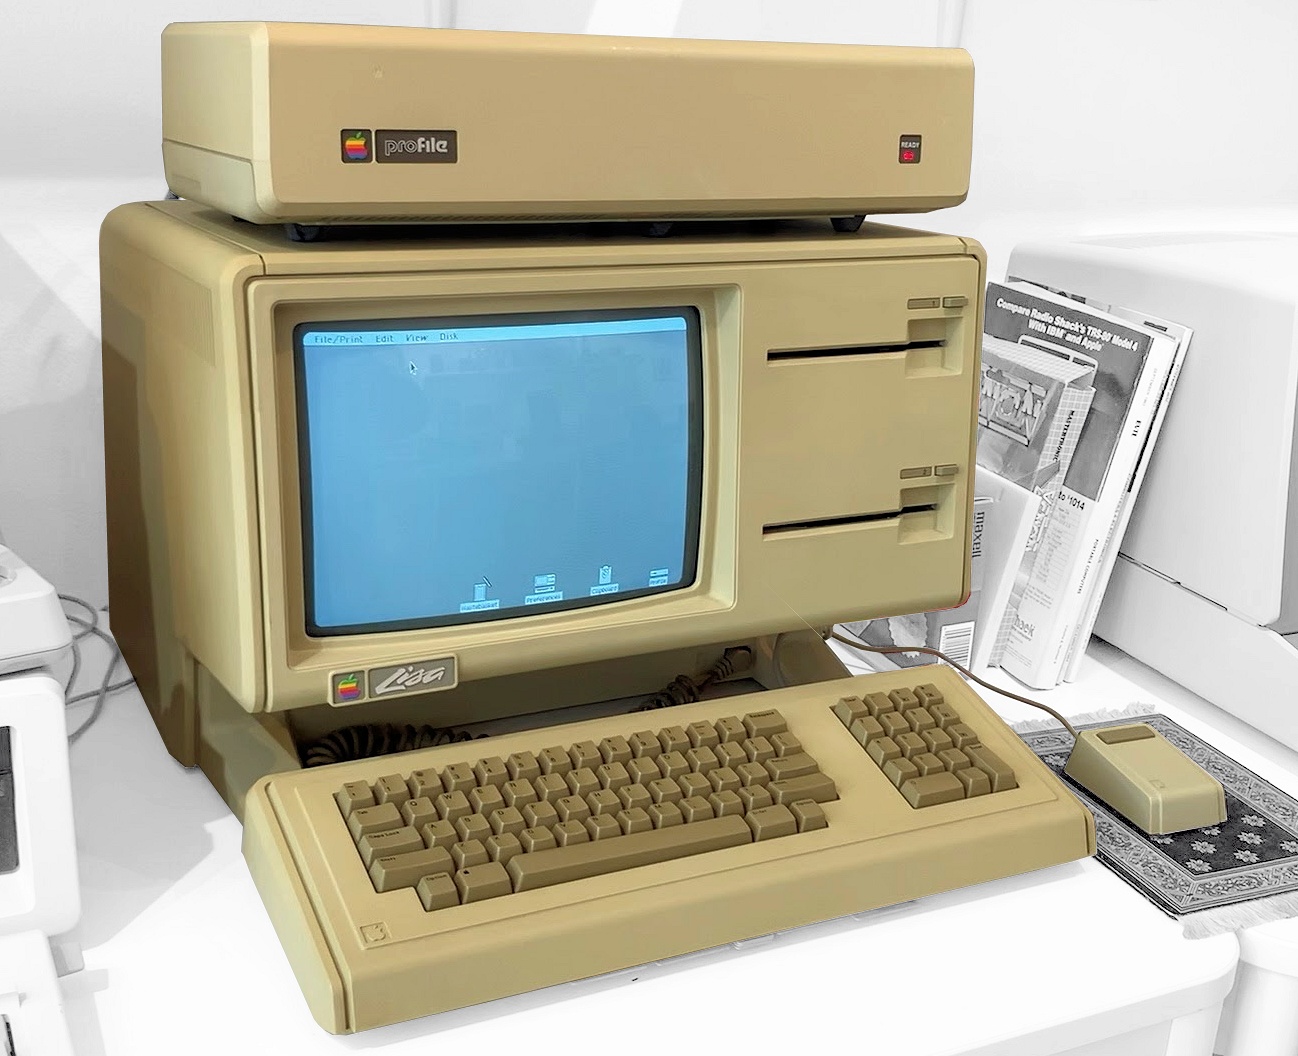
The Lisa computer, released in 1983, was Apple’s first attempt at bringing a graphical user interface to the masses. The name was officially an acronym for “Local Integrated Software Architecture,” though many believed it was actually named after Steve Jobs’ daughter. In any case, the Lisa was groundbreaking in ways that wouldn’t be fully appreciated until years later.
Had the Lisa succeeded, would we all be using LisaBooks today? Credit: Timothy Colegrove, CC BY-SA 4.0
The Lisa stepped away from the long-lived 6502 CPU that had powered the Apple II line. Instead, it relied upon the exciting new Motorola 68000, with its hybrid 16-bit/32-bit architecture and fast 5 MHz clock speed. The extra power came in handy, as the Lisa was to be one of the first retail computers to be sold with a graphical user interface—imaginatively titled Lisa OS. Forget command lines and character displays—the Lisa had icons and a mouse, all rendered on a glorious 720 x 364 monochrome monitor with rectangular pixels. Adopters of Apple’s new rectangular machine also got twin 5.25-inch double-sided floppy drives, and the Lisa included three expansion slots and a parallel port for adding additional peripherals.
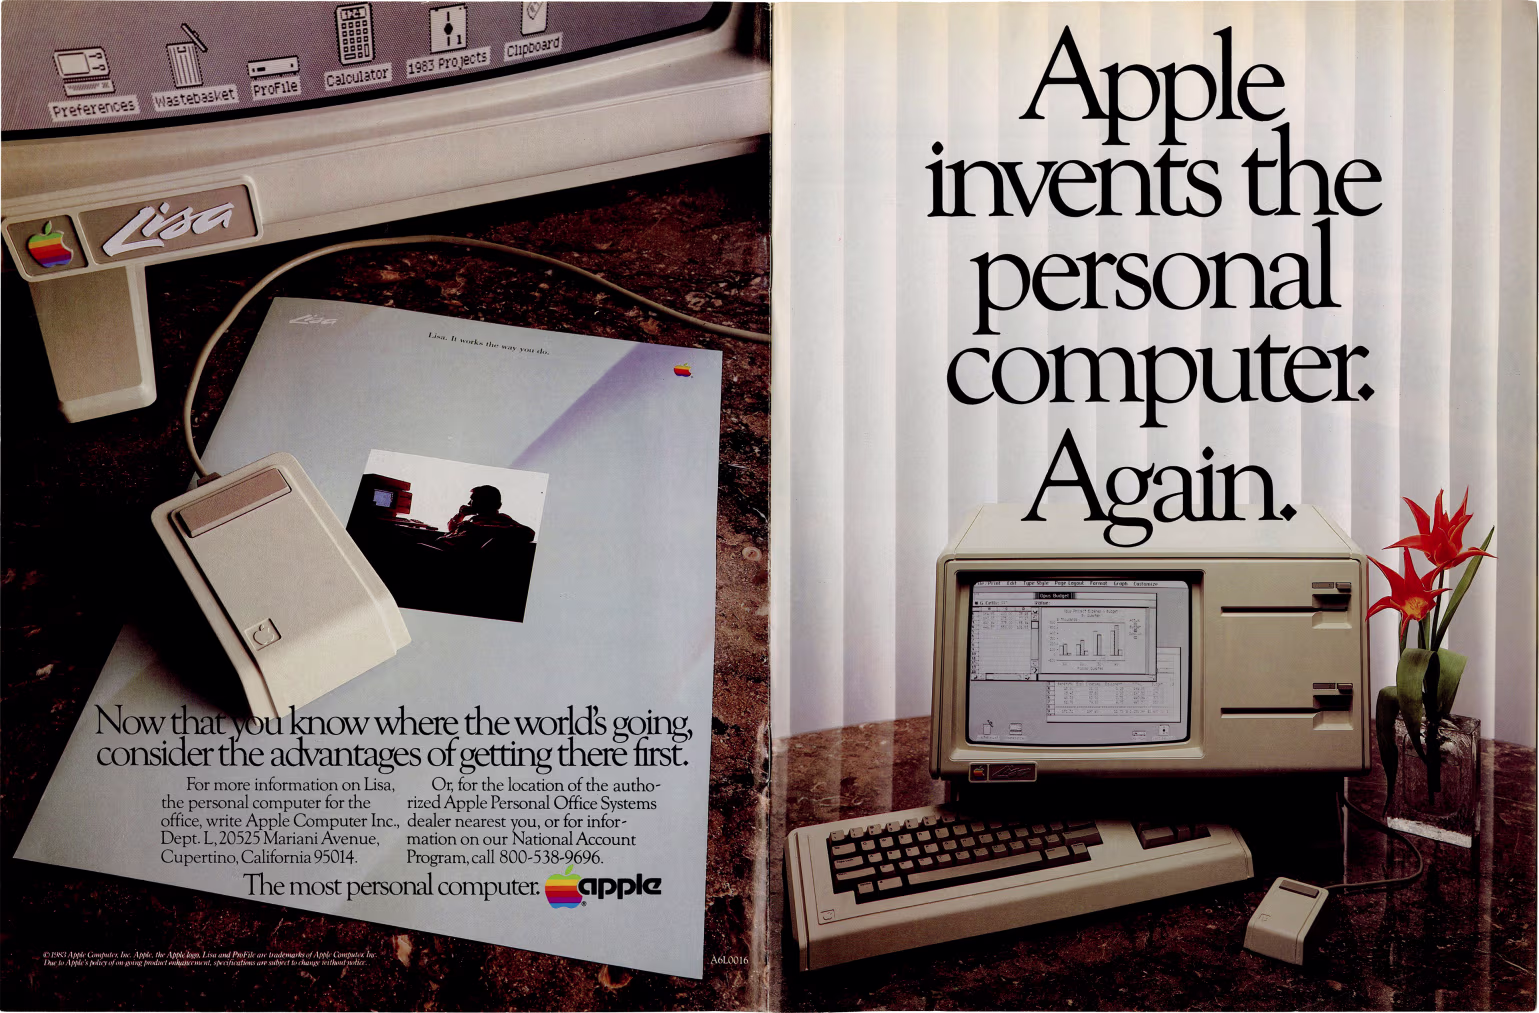
The Lisa seemed to offer a great leap forward in capability, but the same could be said of its price. At launch in 1983, it retailed at $9,995, equivalent to over $30,000 in 2025 dollars. The price was many multiples beyond what you might pay for an IBM PC, making it a tough pill to swallow even given what the Lisa had to offer. The GUI might have been cutting-edge, too, but the implementation wasn’t perfect. The Lisa had a tendency to chug.
It never quite wowed the market, despite Apple’s efforts. Credit: Apple
There was also a further problem. Apple’s very own Steve Jobs may have worked on the Lisa, but he was kicked off the project in 1981, prior to launch. Jobs then jumped ship to the nascent Macintosh development effort, which was initially intended to be a low-cost text-based computer retailing for under $1,000. Jobs swiftly redirected the Macintosh project to make it a GUI-based machine, while retaining the intention to come in at a far more affordable price-point than the exorbitantly-priced Lisa.
The result was damaging. Just as the Lisa was launching, rumors were already swirling about Apple’s upcoming budget machine. When the Macintosh hit the market in 1984, it immediately blitzed the Lisa in sales. Both machines had a mouse and a GUI, and the Macintosh even had a more forward-looking 3.25-inch floppy drive. True, the Mac wasn’t anywhere near as beefy as the Lisa; most notably, it had just 128K of RAM to the 1MB in Apple’s flagship machine. Ultimately, though, the market voted Mac—perhaps unsurprising given it retailed at $2,495—a quarter of the Lisa’s debut price. Come May, Apple had sold 70,000 units, thanks in part do a legendary commercial directed by the Ridley Scott. Meanwhile, it took the Lisa a full two years to sell just 50,000.
Apple tried to make the best of things. The Lisa was followed by the Lisa 2, and it was then rebadged as the Macintosh XL. Ultimately, though, it would never find real purchase in the marketplace, even after severe price cuts down to $3,995 in 1985. By 1986, it was all over—Apple discontinued the Lisa line.
A Lisa, dumped and destroyed. Credit: Kyra Ocean, CC-BY-SA 2.0
The following years weren’t kind. A bunch of 5000 Lisas ended up being bought by third-party company Sun Remarketing, which upgraded them and sold them on as “Lisa Professionals” and “Macintosh Professionals.” However, cut to 1989, and Apple had a better idea. The Lisas were going to a dump in Logan, Utah.
The story would end up making the news, with The Herald Journal reporting on what was then an astounding story. 2,700 brand new computers were being sent to straight to landfill. This was particularly shocking in the era, given that computers were then still relatively novel in the marketplace and sold for an incredibly high price.
The reason behind it was pure business. “Right now, our fiscal year end is fast approaching and rather than carrying that product on the books, this is a better business decision,” Apple spokesperson Carleen Lavasseur told the press. Apple was able to gain a tax write off the computers, and it was estimated it could reclaim up to $34 for every $100 of depreciated value in the machines which were now considered obsolete. Apple paid $1.95 a yard for over 880 cubic yards of space at the landfill to dump the machines. Other reports on the event noted that guards apparently stood on site to ensure the machines were destroyed and could not be recovered.
It’s a story that might recall you of Atari’s ET, another grand embarrassment covered up under a pile of trash. Sometimes, products fail, and there’s little more to do than call the trucks and all them away. The Apple Lisa is perhaps one of the nicer machines that’s ever happened to.
In the auto world, there are lots of overarching standards that all automakers comply with. There are also lots of proprietary technologies that each automaker creates and uses for its own benefit. [Shehriyar Qureshi] has recently been diving into Suzuki’s Serial Data Line standard, and has created a digital dash using the data gained.
The project started with Python-based scanner code designed to decode Suzuki’s SDL protocol. Armed with the ability to read the protocol, [Shehriyar] wanted to be able to do so without having to haul a laptop around in the car. Thus, the project was ported to Rust, or “oxidized” if you will.
More after the break…
[Shehriyar] has installed the system in a Suzuki Baleno. The Raspberry Pi uses a VAG KKL interface to connect to the car via its OBD port and connect to the SDL line. It decodes this data, and processes it to pull out parameters like speed, RPM. It then drives an LCD display on the double-DIN stereo in the dash. A simple composite output allows the system to display live data while driving the vehicle. The UI uses the Ratatui library. The result is a display that both updates smoothly and rapidly. It has a great retro vibe that kind of reminds us of some interfaces seen in Hollywood movies. Despite being analog video, the results are pretty sharp.
Crazy news: Ratatui made it into a car dashboard suzui-rs — Suzuki Serial Data Line viewer in Rust Displays live car data, powered by Pi and shown on stereo over RCA Written in Rust & built with @ratatui.rs GitHub: github.com/thatdevsherr…#rustlang #ratatui #tui #car #suzuki
The ZX Spectrum is perhaps most fondly remembered as a home computer and a games machine. [Tito] has grabbed the faithful black plastic box and turned it into a frequency counter as an innovative entry to our 2025 One Hertz Challenge.
The code was prepared in assembly using ZASM—a Z80 online assembler. It works in quite a simple manner. The code runs for one second at a time, counting rising edges on the EAR port of the ZX Spectrum. Those edges are added up to determine the frequency in question, and the job is done. [Tito] has tested the code and found it’s capable of reading frequencies up to 20 KHz. Since it runs on a one second period, it’s thus eligible for entry by meeting the requirements of the One Hertz Challenge. Code is available on Github for the curious.
The ZX Spectrum has a clock speed of 3.5 MHz, meaning it’s not exactly the tool of choice if you’re reading faster signals. We’ve seen similar done before. In any case, this project was a great way to exercise assembly coding skills and to bust out some classic Speccy hardware—and that’s always a good time. If you’ve got your own retrocomputer hacks brewing up in the lab, don’t hesitate to let us know!
From the very dawn of the personal computing era, the PC and Apple platforms have gone very different ways. IBM compatibles surged in popularity, while Apple was able to more closely guard the Macintosh from imitators wanting to duplicate its hardware and run its software.
Things changed when Apple announced it would hop aboard the x86 bandwagon in 2005. Soon enough was born the Hackintosh. It was difficult, yet possible, to run MacOS on your own computer built with the PC parts your heart desired.
macOS Tahoe is slated to drop later this year. Credit: Apple
2025 saw the 36th Worldwide Developers Conference take place in June, and with it, came the announcement of macOS Tahoe. The latest version of Apple’s full-fat operating system will offer more interface customization, improved search features, and the new attractive ‘Liquid Glass’ design language. More critically, however, it will also be the last version of the modern MacOS to support Apple’s now aging line of x86-based computers.
The latest OS will support both Apple Silicon machines as well as a small list of older Macs. Namely, if you’ve got anything with an M1 or newer, you’re onboard. If you’re Intel-based, though, you might be out of luck. It will run on the MacBook Pro 16 inch from 2019, as well as the MacBook Pro 13-inch from 2020, but only the model with four Thunderbolt 3 ports. It will also support iMacs and Mac Minis from 2020 or later. As for the Mac Pro, you’ll need one from 2019 or later, or 2022 or later for the Mac Studio.
Basically, beyond the release of Tahoe, Apple will stop releasing versions of its operating system for x86 systems. Going forward, it will only be compiling MacOS for ARM-based Apple Silicon machines.
How It Was Done
Of course, it’s worth remembering that Apple never wanted random PC builders to be able to run macOS to begin with. Yes, it will eventually stop making an x86 version of its operating system, but it had already gone to great lengths trying to stop macOS from running on non-authorized hardware. The dream of a Hackintosh was to build a powerful computer on the cheap, without having to pay Apple’s exorbitant prices for things like hard drive, CPU, and memory upgrades. However, you always had to jump through hoops, using hacks to fool macOS into running on a computer that Apple never built.
Installing macOS on a PC takes some doing.
Getting a Hackintosh running generally involved pulling down special patches crafted by a dedicated community of hackers. Soon after Apple started building x86 machines, hackers rushed to circumvent security features in what was then called Mac OS X, allowing it to run on non-Apple approved machines. The first patches landed just over a month after the first x86 Macs. Each subsequent Apple update to OS X locked things down further, only for the community to release new patches unlocking the operating system in quick succession. Sometimes this involved emulating the EFI subsystem which contemporary Macs used in place of a traditional PC’s BIOS. Sometimes it was involved as tweaking the kernel to stick to older SSE2 instructions when Apple’s use of SS3 instructions stopped the operating system running on older hardware. Depending on the precise machine you were building, and the version of OS X or MacOS that you hoped to run, you’d use different patches or hacks to get your machine booting, installing, and running to operating system.
Hackintosh communities maintain lists of bugs and things that don’t work quite right—no surprise given Apple’s developers put little thought into making their OS work on unofficial hardware. Credit: eliteMacx86.com via Screenshot
Running a Hackintosh often involved dealing with limitations. Apple’s operating system was never intended to run on just any hardware, after all. Typical hurdles included having to use specific GPUs or WiFi cards, for example, since broad support for the wide range of PC parts just wasn’t there. Similarly, sometimes certain motherboards wouldn’t work, or would require specific workarounds to make Apple’s operating system happy in a particularly unfamiliar environment.
Of course, you can still build a Hackintosh today. Instructions exist for installing and running macOS Sequoia (macOS 15), macOS Sonoma (macOS 14), as well as a whole host of earlier versions all the way back to when it was still called Mac OS X. When macOS Tahoe drops later this year, the community will likely work to make the x86 version run on any old PC hardware. Beyond that, though, the story will end, as Apple continues to walk farther into its ARM-powered future.
Ultimately, what the Hackintosh offered was choice. It wasn’t convenient, but if you were in love with macOS, it let you do what Apple said was verboten. You didn’t have to pay for expensive first party parts, and you could build your machine in the manner to which you were accustomed. You could have your cake and eat it too, which is to say that you could run the Mac version of Photoshop because that apparently mattered to some people. Now, all that’s over, so if you love weird modifier keys on your keyboard and a sleek, glassy operating system, you’ll have to pay the big bucks for Apple hardware again. The Hackintosh is dead. Long live Apple Silicon, so it goes.
What if you build a clock that displayed the time not just on its own, but in its shadows as well? [Lewis] from [DIY Machines] has done just that, with a nifty 3D-printed shadow clock build.
The clock itself has a hollow rim inside which are the two hands which actually display the time. The hands appear to almost float inside the clock, a tricky visual effect of the design which instantly catches the eye. The trick is simple—the minute hand is physically attached to the outer rotor, which sets its position. Meanwhile, the floating hour hand pivots freely around the center of the clock, with a secret magnet within. This magnet is attracted to a complementary magnet in the hour rotor—as that rotor turns, the hour hand points at the magnets inside.
So far, it’s already a cool clock. The bonus feature is that [Lewis] realized this design could show an even larger clockface on the wall behind, merely by using its shadows. Thus, the clock features an LED light source which can project the clock’s shadows into a much larger display than the desktop timepiece itself.
As for the electronics, it’s straightforward stuff. An ESP8266 devboard runs the show, turning stepper motors and controlling addressable LEDs to make the clock do its thing. It also queries a network time server in order to ensure the displayed time is always accurate to the second.
How would you go about identifying usable land that suits your building tastes? [Scott Sexton] was specifically looking for land that’s not too steep to build on, and realized that existing resources didn’t easily offer him this information. He thus dived into the world of GIS to try and solve this issue for himself.
[Scott] hoped that USGS maps might provide the information he needed, but found they lacked grade information, only presenting elevation and topographic data instead. From past experience reading such maps, he knew that seeing a lot of topographical lines close together tended to indicate steeper areas, but wasn’t sure on how to actually get the computer to parse this and spit out the information on steepness and grade that he wanted.
Ultimately, he set about downloading USGS elevation data in three-meter resolution. He then applied some calculus to determine the rate of change of the slope across areas of the data in order to mathematically find what he was looking for. Namely, flatter areas that would be more suitable for future construction. He then took the work even further, tweaking the output of his tools and automating until he could quickly and readily generate usability maps of areas of interest. He was even able to sanity-check his work by verifying that it correctly identified roads as obviously flat areas.
If you’ve ever tinkered with GIS work, [Scott’s] usability project may be of some interest. We’ve also seen amusing examples of what can go wrong when digital mapping data is used without sanity checks. Meanwhile, if you’ve got your own GIS hacks on the go, don’t hesitate to notify us via the tipsline!
You could use a little pocket-sized Pez dispenser if you’re a humble, reserved person. Or, you could follow the example of [Backhaul Studios], and build a dangerously powerful blaster that shoots Pez fast enough to shatter them into pieces. Just don’t aim it at your own mouth.
As the video explains, Pez is really the perfect candy for this application. It’s compact, hard, and already designed to be dispensed via a magazine. It’s thus not a big stretch to set it up to be fired out of a pistol-like blaster. The build is of the flywheel type, where a pair of counter-rotating wheels fling the candy out at great speed. The wheels themselves are spun up to high speed with a pair of small brushless motors, running off hobby speed controllers and lithium-ion batteries. A simple trigger mechanism dispenses the rectangular candies into the wheel mechanism, sending them flying out of the blaster at will. It’s all 3D-printed, designed specifically for the purpose of high-speed candy delivery.
The video goes into great detail on the design, from the development of the TPU treads on the flywheels and other details that helped improve the effectiveness of the design. The final build shoots Pez fast enough that they practically detonate upon hitting a surface.
The build consists of a 3D-printed hammer prop, inside of which is a Raspberry Pi Pico microcontroller running the show. It’s hooked up to a MPR121 touch sensor that detects when someone grips the handle of the hammer. At this point, the Pico makes a pseudorandom “worthiness check” as to whether the holder is righteous enough to wield the hammer. If they are pure of heart, it unlocks a magnet which frees the hammer from whatever metallic surface it might be stuck to. [alemanjir] also included a little additional functionality, with the hammer playing various sounds when swung thanks to a speaker and a ADXL345 accelerometer secreted inside.
One wonders whether the electromagnet inside is strong enough to hold out against an unworthy person lifting it from the ground. While it’s perhaps not as powerful or as decisive as the mythical object, it’s nonetheless a fun learning project that likely taught [alemanja] some useful basics of embedded development.
If you’re a solo musician, you probably have lots of gear you’d like to control, but you don’t have enough hands. You can enlist your feet, but your gear might not have foot-suitable interfaces as standard. For situations like these, [Nerd Musician] created the OpenMIDIStomper.
The concept is simple enough—the hardy Hammond enclosure contains a bunch of foot switches and ports for external expression pedals. These are all read by an Arduino Pro Micro, which is responsible for turning these inputs into distinct MIDI outputs to control outboard gear or software. It handles this via MIDI over USB. The MIDI commands sent for each button can be configured via a webpage. Once you’ve defined all the messages you want to send, you can export your configuration from the webpage by cutting and pasting it into the Arduino IDE and flashing it to the device itself.
[juskim] wanted to build a tiny mouse, but it couldn’t just be any mouse. It had to be a high-tech gaming mouse that could compete with the best on raw performance. The results are impressive, even if the final build is perhaps less than ideal for pro-level gameplay.
The build riffs on an earlier build from [juskim] that used little more than a PCB and a 3D-printed housing to make a barebones skeleton mouse. However, this one ups the sophistication level. At the heart of the build is the nRF54L15 microcontroller, which is paired with a PAW3395 mouse sensor which is commonly used in high-end gaming mice. It offers resolution up to 26K DPI for accurate tracking, speeds up to 650 ips, and 8 kHz sampling rates. Long story short, if you want fine twitch control, this is the sensor you’re looking for. The sensor and microcontroller are laced together on a custom PCB with a couple of buttons, a battery, and a charging circuit, and installed in a barebones 3D-printed housing to make the final build as small as possible.
The only real thing letting the design down is the mouse’s key feature—the size. There’s very little body to grab on to and it’s hard to imagine being able to play most fast-paced games at a high level with such a tiny device. Nevertheless, the specs are hardcore and capable, even if the enclosure isn’t.