Vista Normal

Hay nuevos artículos disponibles. Pincha para refrescar la página.
Ayer — 17 Abril 2025Hackaday

Supercon 2024: Exploring the Ocean with Open Source Hardware

Por: Tom Nardi
17 Abril 2025 at 14:00

If you had to guess, what do you think it would take to build an ocean-going buoy that could not only survive on its own without human intervention for more than two years, but return useful data the whole time? You’d probably assume such a feat would require beefy hardware, riding inside an expensive and relatively large watertight vessel of some type — and for good reason, the ocean is an unforgiving environment, and has sent far more robust hardware to the briny depths.

But as Wayne Pavalko found back in 2016, a little planning can go a long way. That’s when he launched the first of what he now calls Maker Buoys: a series of solar-powered drifting buoys that combine a collection of off-the-shelf sensor boards with an Arduino microcontroller and an Iridium Short-Burst Data (SBD) modem in a relatively simple watertight box.

He guessed that first buoy might last a few weeks to a month, but when he finally lost contact with it after 771 days, he realized there was real potential for reducing the cost and complexity of ocean research.

Wayne recalled the origin of his project and updated the audience on where it’s gone from there during his 2024 Supercon talk, Adventures in Ocean Tech: The Maker Buoy Journey. Even if you’re not interested in charting ocean currents with homebrew hardware, his story is an inspirational reminder that sometimes a fresh approach can help solve problems that might at first glance seem insurmountable.

DIY All the Way

As Dan Maloney commented when he wrote-up that first buoy’s journey in 2017, the Bill of Materials for a Maker Buoy is tailored for the hobbyist. Despite being capable of journeys lasting for several thousand kilometers in the open ocean, there’s no marine-grade unobtainium parts onboard. Indeed, nearly all of the electronic components can be sourced from Adafruit, with the most expensive line item being the RockBLOCK 9603 Iridium satellite modem at $299.

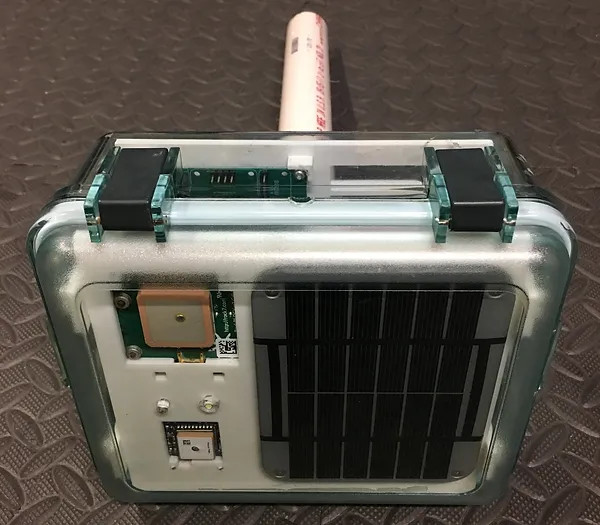
Even the watertight container that holds all the electronics is relatively pedestrian. It’s the sort of plastic latching box you might put your phone or camera in on a boat trip to make sure it stays dry and floats if it falls overboard. Wayne points out that the box being clear is a huge advantage, as you can mount the solar panel internally. Later versions of the Maker Buoy even included a camera that could peer downward through the bottom of the box.

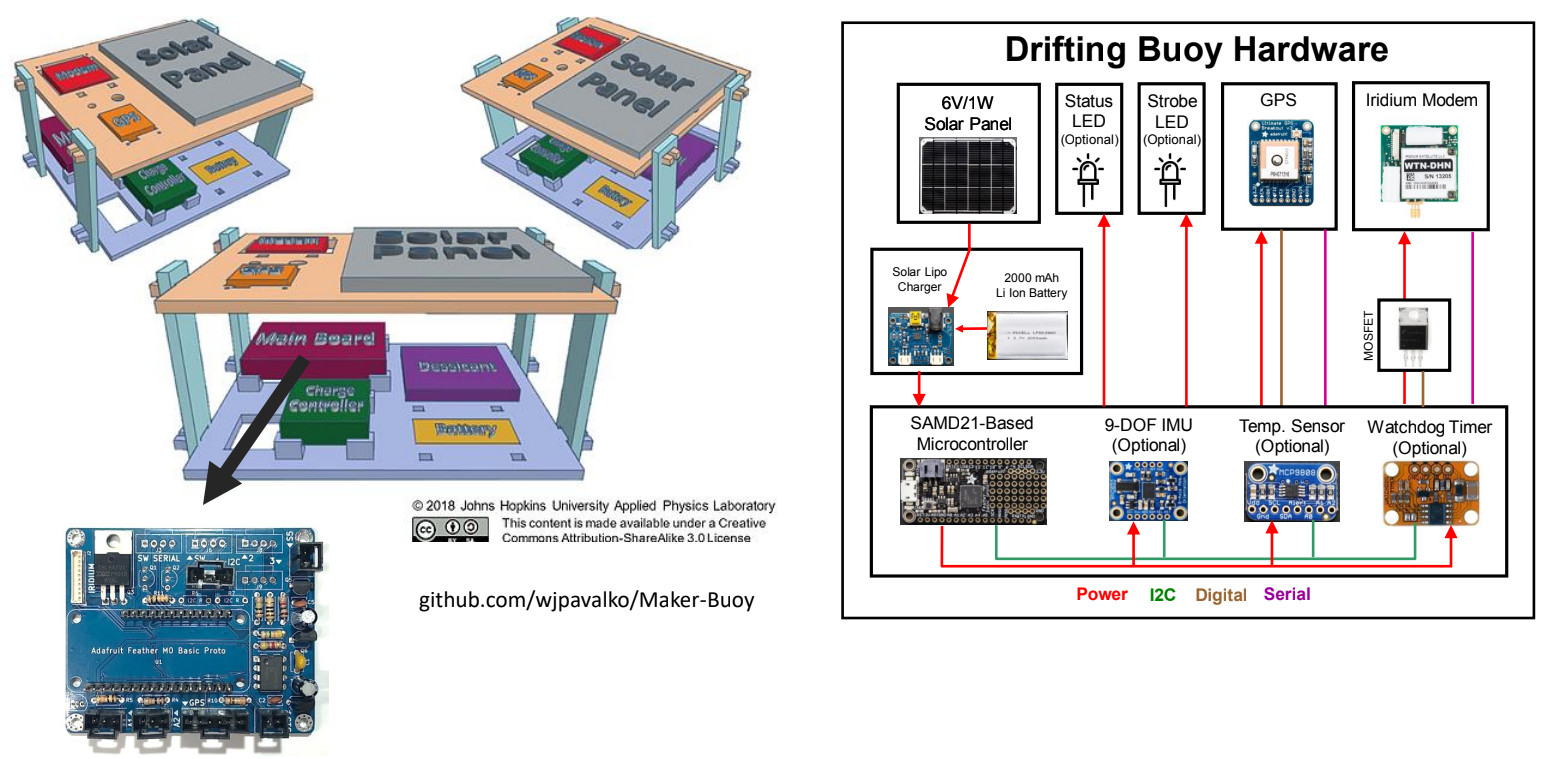
Wayne says that first buoy was arguably over-built, with each internal component housed in its own waterproof compartment. Current versions instead hold all of the hardware in place with a 3D printed internal frame. The bi-level framework puts the solar panel, GPS, and satellite modem up at the top so they’ve got a clear view of the sky, and mounts the primary PCB, battery, and desiccant container down on the bottom.

The only external addition necessary is to attach a 16 inch (40 centimeter) long piece of PVC pipe to the bottom of the box, which acts as a passive stabilizer. Holes drilled in the pipe allow it to fill with water once submerged, lowering the buoy’s center of gravity and making it harder to flip over. At the same time, should the buoy find itself inverted due to wave action, the pipe will make it top-heavy and flip it back over.

It’s simple, cheap, and incredibly effective. Wayne mentions that data returned from onboard Inertial Measurement Units (IMUs) have shown that Maker Buoys do occasionally find themselves going end-over-end during storms, but they always right themselves.

Like Space…But Wetter

The V1 Maker Buoy was designed to be as reliable as possible.

Early on in his presentation, Wayne makes an interesting comparison when talking about the difficulties in developing the Maker Buoy. He likens it to operating a spacecraft in that your hardware is never coming back, nobody will be able to service it, and the only connection you’ll have to the craft during its lifetime is a relatively low-bandwidth link.

But one could argue that the nature of Iridium communications makes the mission of the Maker Buoy even more challenging than your average spacecraft. As the network is really only designed for short messages — at one point Wayne mentions that even sending low-resolution images of only a few KB in size was something of an engineering challenge — remotely updating the software on the buoy isn’t an option. So even though the nearly fifty year old Voyager 1 can still receive the occasional software patch from billions of miles away, once you drop a Maker Buoy into the ocean, there’s no way to fix any bugs in the code.

Because of this, Wayne decided to take the extra step of adding a hardware watchdog timer that can monitor the buoy’s systems and reboot the hardware if necessary. It’s a bit like unplugging your router when the Internet goes out…if your Internet was coming from a satellite low-Earth orbit and your living room happened to be in the middle of the ocean.

From One to Many

After publishing information about his first successful Maker Buoy online, Wayne says it wasn’t long before folks started contacting him about potential applications for the hardware. In 2018, a Dutch non-profit expressed interest in buying 50 buoys from him to study the movement of floating plastic waste in the Pacific. The hardware was more than up to the task, but there was just one problem: up to this point, Wayne had only built a grand total of four buoys.

Opportunities like this, plus the desire to offer the Maker Buoy in kit and ready to deploy variants for commercial and educational purposes, meant Wayne had to streamline his production. When it’s just a personal project, it doesn’t really matter how long it takes to assemble or if everything goes together correctly the first time. But that approach just won’t work if you need to deliver functional units in quantities that you can’t count on your fingers.

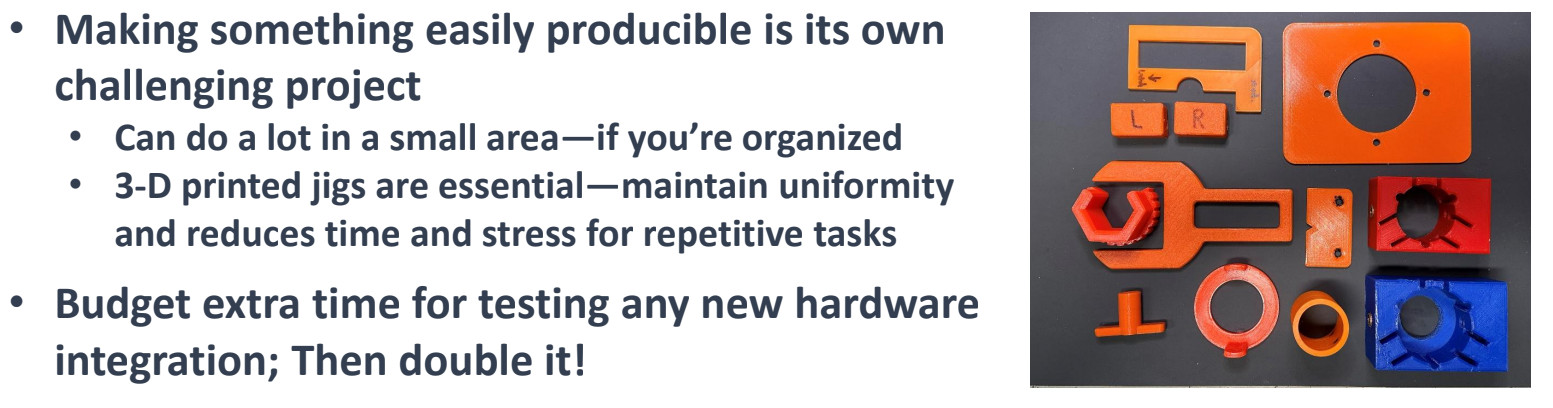
As Wayne puts it, making something and making something that’s easily producible are really two very different things. The production becomes a project in its own right. He explains that investing the time and effort to make repetitive tasks more efficient and reliable, such as developing jigs to hold pieces together while you’re working on them, more than pays off for itself in the end. Even though he’s still building them himself in his basement, he uses an assembly line approach that allows for the consistent results expected by paying customers.

A Tale Well Told

While the technical details of how Wayne designed and built the different versions of the Maker Buoy are certainly interesting, it’s hearing the story of the project from inception to the present day that really makes watching this talk worthwhile. What started as a simple “What If” experiment has spiraled into a side-business that has helped deploy buoys all over the planet.

Admittedly, not every project has that same potential for growth. But hearing Wayne tell the Maker Buoy story is the sort of thing that makes you want to go dust off that project that’s been kicking around in the back of your head and finally give it a shot. You might be surprised by the kind of adventure taking a chance on a wild idea can lead to.

Budget Schlieren Imaging Setup Uses 3D Printing to Reveal the Unseen

17 Abril 2025 at 11:00

We’re suckers here for projects that let you see the unseeable, and [Ayden Wardell Aerospace] provides that on a budget with their $30 Schlieren Imaging Setup. The unseeable in question is differences in air density– or, more precisely, differences in the refractive index of the fluid the imaging set up makes use of, in this case air. Think of how you can see waves of “heat” on a warm day– that’s lower-density hot air refracting light as it rises. Schlieren photography weaponizes this, allowing to analyze fluid flows– for example, the mach cones in a DIY rocket nozzle, which is what got [Ayden Wardell Aerospace] interested in the technique.

Shock diamonds from a homemade rocket nozzle imaged by this setup.
Examining exhaust makes this a useful tool for [Aerospace].
This is a ‘classic’ mirror-and-lamp Schlieren set up.  You put the system you wish to film near the focal plane of a spherical mirror, and camera and light source out at twice the focal distance. Rays deflected by changes in refractive index miss the camera– usually one places a razor blade precisely to block them, but [Ayden] found that when using a smart phone that was unnecessary, which shocked this author.

While it is possible that [Ayden Wardell Aerospace] has technically constructed a shadowgraph, they claim that carefully positioning the smartphone allows the sharp edge of the case to replace the razor blade. A shadowgraph, which shows the second derivative of density, is a perfectly valid technique for flow visualization, and is superior to Schlieren photography in some circumstances– when looking at shock waves, for example.

Regardless, the great thing about this project is that [Ayden Wardell Aerospace] provides us with STLs for the mirror and smartphone mounting, as well as providing a BOM and a clear instructional video. Rather than arguing in the comments if this is “truly” Schlieren imaging, grab a mirror, extrude some filament, and test it for yourself!

There are many ways to do Schlieren images. We’ve highighted background-oriented techniques, and seen how to do it with a moiré pattern, or even a selfie stick. Still, this is the first time 3D printing has gotten involved and the build video below is quick and worth watching for those sweet, sweet Schlieren images.

Modernizing an Enigma Machine

17 Abril 2025 at 08:00
Enigma buttons

This project by [Miro] is awesome, not only did he build a replica Enigma machine using modern technologies, but after completing it, he went back and revised several components to make it more usable. We’ve featured Enigma machines here before; they are complex combinations of mechanical and electrical components that form one of the most recognizable encryption methods in history.

His first Enigma machine was designed closely after the original. He used custom PCBs for the plugboard and lightboard, which significantly cleaned up the internal wiring. For the lightboard, he cleverly used a laser printer on semi-transparent paper to create crisp letters, illuminated from behind. For the keyboard, he again designed a custom PCB to connect all the switches. However, he encountered an unexpected setback due to error stack-up. We love that he took the time to document this issue and explain that the project didn’t come together perfectly on the first try and how some adjustments were needed along the way.

Custom rotary wheelThe real heart of this build is the thought and effort put into the design of the encryption rotors. These are the components that rotate with each keystroke, changing the signal path as the system is used. In a clever hack, he used a combination of PCBs, pogo pins, and 3D printed parts to replicate the function of the original wheels.

Enigma machine connoisseurs will notice that the wheels rotate differently than in the original design, which leads us to the second half of this project. After using the machine for a while, it became clear that the pogo pins were wearing down the PCB surfaces on the wheels. To solve this, he undertook an extensive redesign that resulted in a much more robust and reliable machine.

In the redesign, instead of using pogo pins to make contact with pads, he explored several alternative methods to detect the wheel position—including IR light with phototransistors, rotary encoders, magnetic encoders, Hall-effect sensors, and more. The final solution reduced the wiring and addressed long-term reliability concerns by eliminating the mechanical wear present in the original design.

Not only did he document the build on his site, but he also created a video that not only shows what he built but also gives a great explanation of the logic and function of the machine. Be sure to also check out some of the other cool enigma machines we’ve featured over the years.

Using a MIG Welder, Acetylene Torch, and Air Hammer to Remove a Broken Bolt

17 Abril 2025 at 05:00
A broken bolt is removed by welding on a hut and then using a wrench to unscrew.

If your shop comes complete with a MIG welder, an acetylene torch, and an air hammer, then you have more options than most when it comes to removing broken bolts.

In this short video [Jim’s Automotive Machine Shop, Inc] takes us through the process of removing a broken manifold bolt: use a MIG welder to attach a washer, then attach a suitably sized nut and weld that onto the washer, heat the assembly with the acetylene torch, loosen up any corrosion on the threads by tapping with a hammer, then simply unscrew with your wrench! Everything is easy when you know how!

Of course if your shop doesn’t come complete with a MIG welder and acetylene torch you will have to get by with the old Easy Out screw extractor like the rest of us. And if you are faced with a nasty bolt situation keep in mind that lubrication can help.

An Absolute Zero of a Project

17 Abril 2025 at 02:00

How would you go about determining absolute zero? Intuitively, it seems like you’d need some complicated physics setup with lasers and maybe some liquid helium. But as it turns out, all you need is some simple lab glassware and a heat gun. And a laser, of course.

To be clear, the method that [Markus Bindhammer] describes in the video below is only an estimation of absolute zero via Charles’s Law, which describes how gases expand when heated. To gather the needed data, [Marb] used a 50-ml glass syringe mounted horizontally on a stand and fitted with a thermocouple. Across from the plunger of the syringe he placed a VL6180 laser time-of-flight sensor, to measure the displacement of the plunger as the air within it expands.

Data from the TOF sensor and the thermocouple were recorded by a microcontroller as the air inside the syringe was gently heated. Plotting the volume of the gas versus the temperature results shows a nicely linear relationship, and the linear regression can be used to calculate the temperature at which the volume of the gas would be zero. The result: -268.82°C, or only about four degrees off from the accepted value of -273.15°. Not too shabby.

[Marb] has been on a tear lately with science projects like these; check out his open-source blood glucose measurement method or his all-in-one electrochemistry lab.

GK STM32 MCU-Based Handheld Game System

Por: Maya Posch
16 Abril 2025 at 23:00

These days even a lowly microcontroller can easily trade blows with – or surpass – desktop systems of yesteryear, so it is little wonder that DIY handheld gaming systems based around an MCU are more capable than ever. A case in point is the GK handheld gaming system by [John Cronin], which uses an MCU from relatively new and very capable STM32H7S7 series, specifically the 225-pin STM32H7S7L8 in TFBGA package with a single Cortex-M7 clocked at 600 MHz and a 2D NeoChrom GPU.

Coupled with this MCU are 128 MB of XSPI (hexa-SPI) SDRAM, a 640×480 color touch screen, gyrometer, WiFi network support and the custom gkOS in the firmware for loading games off an internal SD card. A USB-C port is provided to both access said SD card’s contents and for recharging the internal Li-ion battery.

As can be seen in the demonstration video, it runs a wide variety of games, ranging from DOOM (of course), Quake, as well as Command and Conquer: Red Alert and emulators for many consoles, with the Mednafen project used to emulate Game Boy, Super Nintendo and other systems at 20+ FPS. Although there aren’t a lot of details on how optimized the current firmware is, it seems to be pretty capable already.

Making a Variable Speed Disc Sander from an Old Hard Drive

16 Abril 2025 at 20:00
Our hacker converts an old hard disk drive into a disc sander.

This short video from [ProShorts 101] shows us how to build a variable speed disc sander from not much more than an old hard drive.

We feel that as far as hacks go this one ticks all the boxes. It is clever, useful, and minimal yet comprehensive; it even has a speed control! Certainly this hack uses something in a way other than it was intended to be used.

Take this ingenuity and add an old hard drive from your junkbox, sandpaper, some glue, some wire, a battery pack, a motor driver, a power socket and a potentiometer, drill a few holes, glue a few pieces, and voilà! A disc sander! Of course the coat of paint was simply icing on the cake.

The little brother of this hack was done by the same hacker on a smaller hard drive and without the speed control, so check that out too.

One thing that took our interest while watching these videos is what tool the hacker used to cut sandpaper. Here we witnessed the use of both wire cutters and a craft knife. Perhaps when you’re cutting sandpaper you just have to accept that the process will wear out the sharp edge on your tool, regardless of which tool you use. If you have a hot tip for the best tool for the job when it comes to cutting sandpaper please let us know in the comments! (Also, did anyone catch what type of glue was used?)

If you’re interested in a sander but need something with a smaller form factor check out how to make a sander from a toothbrush!

AnteayerHackaday

Porting COBOL Code and the Trouble With Ditching Domain Specific Languages

Por: Maya Posch
16 Abril 2025 at 14:00

Whenever the topic is raised in popular media about porting a codebase written in an ‘antiquated’ programming language like Fortran or COBOL, very few people tend to object to this notion. After all, what could be better than ditching decades of crusty old code in a language that only your grandparents can remember as being relevant? Surely a clean and fresh rewrite in a modern language like Java, Rust, Python, Zig, or NodeJS will fix all ailments and make future maintenance a snap?

For anyone who has ever had to actually port large codebases or dealt with ‘legacy’ systems, their reflexive response to such announcements most likely ranges from a shaking of one’s head to mad cackling as traumatic memories come flooding back. The old idiom of “if it ain’t broke, don’t fix it”, purportedly coined in 1977 by Bert Lance, is a feeling that has been shared by countless individuals over millennia. Even worse, how can you ‘fix’ something if you do not even fully understand the problem?

In the case of languages like COBOL this is doubly true, as it is a domain specific language (DSL). This is a very different category from general purpose system programming languages like the aforementioned ‘replacements’. The suggestion of porting the DSL codebase is thus to effectively reimplement all of COBOL’s functionality, which should seem like a very poorly thought out idea to any rational mind.

Sticking To A Domain

The term ‘domain specific language’ is pretty much what it says it is, and there are many of such DSLs around, ranging from PostScript and SQL to the shader language GLSL. Although it is definitely possible to push DSLs into doing things which they were never designed for, the primary point of a DSL is to explicitly limit its functionality to that one specific domain. GLSL, for example, is based on C and could be considered to be a very restricted version of that language, which raises the question of why one should not just write shaders in C?

Similarly, Fortran (Formula translating system) was designed as a DSL targeting scientific and high-performance computation. First used in 1957, it still ranks in the top 10 of the TIOBE index, and just about any code that has to do with high-performance computation (HPC) in science and engineering will be written in Fortran or strongly relies on libraries written in Fortran. The reason for this is simple: from the beginning Fortran was designed to make such computations as easy as possible, with subsequent updates to the language standard adding updates where needed.

Fortran’s latest standard update was published in November 2023, joining the COBOL 2023 standard as two DSLs which are both still very much alive and very current today.

The strength of a DSL is often underestimated, as the whole point of a DSL is that you can teach this simpler, focused language to someone who can then become fluent in it, without requiring them to become fluent in a generic programming language and all the libraries and other luggage that entails. For those of us who already speak C, C++, or Java, it may seem appealing to write everything in that language, but not to those who have no interest in learning a whole generic language.

There are effectively two major reasons why a DSL is the better choice for said domain:

  • Easy to learn and teach, because it’s a much smaller language
  • Far fewer edge cases and simpler tooling

In the case of COBOL and Fortran this means only a fraction of the keywords (‘verbs’ for COBOL) to learn, and a language that’s streamlined for a specific task, whether it’s to allow a physicist to do some fluid-dynamic modelling, or a staff member at a bank or the social security offices to write a data processing application that churns through database data in order to create a nicely formatted report. Surely one could force both of these people to learn C++, Java, Rust or NodeJS, but this may backfire in many ways, the resulting code quality being one of them.

Tangentially, this is also one of the amazing things in the hardware design language (HDL) domain, where rather than using (System)Verilog or VHDL, there’s an amazing growth of alternative HDLs, many of them implemented in generic scripting and programming languages. That this prohibits any kind of skill and code sharing, and repeatedly, and often poorly, reinvents the wheel seems to be of little concern to many.

Non-Broken Code

A very nice aspect of these existing COBOL codebases is that they generally have been around for decades, during which time they have been carefully pruned, trimmed and debugged, requiring only minimal maintenance and updates while they happily keep purring along on mainframes as they process banking and government data.

One argument that has been made in favor of porting from COBOL to a generic programming language is ‘ease of maintenance’, pointing out that COBOL is supposedly very hard to read and write and thus maintaining it would be far too cumbersome.

Since it’s easy to philosophize about such matters from a position of ignorance and/or conviction, I recently decided to take up some COBOL programming from the position of both a COBOL newbie as well as an experienced C++ (and other language) developer. Cue the ‘Hello Business’ playground project.

For the tooling I used the GnuCOBOL transpiler, which converts the COBOL code to C before compiling it to a binary, but in a few weeks the GCC 15.1 release will bring a brand new COBOL frontend (gcobol) that I’m dying to try out. As language reference I used a combination of the Wikipedia entry for COBOL, the IBM ILE COBOL language reference (PDF) and the IBM COBOL Report Writer Programmer’s Manual (PDF).

My goal for this ‘Hello Business’ project was to create something that did actual practical work. I took the FileHandling.cob example from the COBOL tutorial by Armin Afazeli as starting point, which I modified and extended to read in records from a file, employees.dat, before using the standard Report Writer feature to create a report file in which the employees with their salaries are listed, with page numbering and totaling the total salary value in a report footing entry.

My impression was that although it takes a moment to learn the various divisions that the variables, files, I/O, and procedures are put into, it’s all extremely orderly and predictable. The compiler also will helpfully tell you if you did anything out of order or forgot something. While data level numbering to indicate data associations is somewhat quaint, after a while I didn’t mind at all, especially since this provides a whole range of meta information that other languages do not have.

The lack of semi-colons everywhere is nice, with only a single period indicating the end of a scope, even if it concerns an entire loop (perform). I used the modern free style form of COBOL, which removes the need to use specific columns for parts of the code, which no doubt made things a lot easier. In total it only took me a few hours to create a semi-useful COBOL application.

Would I opt to write a more extensive business application in C++ if I got put on a tight deadline? I don’t think so. If I had to do COBOL-like things in C++, I would be hunting for various libraries, get stuck up to my gills in complex configurations and be scrambling to find replacements for things like Report Writer, or be forced to write my own. Meanwhile in COBOL everything is there already, because it’s what that DSL is designed for. Replacing C++ with Java or the like wouldn’t help either, as you end up doing so much boilerplate work and dependencies wrangling.

A Modern DSL

Perhaps the funniest thing about COBOL is that since version 2002 it got a whole range of features that push it closer to generic languages like Java. Features that include object-oriented programming, bit and boolean types, heap-based memory allocation, method overloading and asynchronous messaging. Meanwhile the simple English, case-insensitive, syntax – with allowance for various spellings and acronyms – means that you can rapidly type code without adding symbol soup, and reading it is obvious even as a beginner, as the code literally does what it says it does.

True, the syntax and naming feels a bit quaint at first, but that is easily explained by the fact that when COBOL appeared on the scene, ALGOL was still highly relevant and the C programming language wasn’t even a glimmer in Dennis Ritchie’s eyes yet. If anything, COBOL has proven itself – much like Fortran and others – to be a time-tested DSL that is truly a testament to Grace Hopper and everyone else involved in its creation.

Homemade VNA Delivers High-Frequency Performance on a Budget

16 Abril 2025 at 11:00

With vector network analyzers, the commercial offerings seem to come in two flavors: relatively inexpensive but limited capabilities, and full-featured but scary expensive. There doesn’t seem to be much middle ground, especially if you want something that performs well in the microwave bands.

Unless, of course, you build your own vector network analyzer (VNA). That’s what [Henrik Forsten] did, and we’ve got to say we’re even more impressed by the results than we were with his earlier effort. That version was not without its problems, and fixing them was very much on the list of goals for this build. Keeping the build affordable was also key, which resulted in some design compromises while still meeting [Henrik]’s measurement requirements.

The Bill of Materials includes dual-channel broadband RF mixer chips, high-speed 12-bit ADCs, and a fast FPGA to handle the torrent of data and run the digital signal processing functions. The custom six-layer PCB is on the large side and includes large cutouts for the directional couplers, which use short lengths of stripped coaxial cable lined with ferrite rings. To properly isolate signals between stages, [Henrik] sandwiched the PCB between a two-piece aluminum enclosure. Wisely, he printed a prototype enclosure and lined it with aluminum foil to test for fit and function before committing to milling the final version. He did note some leakage around the SMA connectors, but a few RF gaskets made from scraps of foil and solder braid did the trick.

This is a pretty slick build, especially considering he managed to keep the price tag at a very reasonable $300. It’s more expensive than the popular NanoVNA or its clones, but it seems like quite a bargain considering its capabilities.

Binner Makes Workshop Parts Organization Easy

16 Abril 2025 at 08:00

We’ve all had times where we knew we had some part but we had to go searching for it all over as it wasn’t where we thought we put it. Organizing the numerous components, parts, and supplies that go into your projects can be a daunting task, especially if you use the same type of part at different times for different projects. It helps to have a framework to keep track of all the small details. Binner is an open source project that aims to allow you to easily maintain a database that can be customized to your use.

dashboard of binner UIIn a recent video for DigiKey, [Byte Sized Engineer] used Binner to track the locations of his components and parts in his freshly organized workshop. Binner already has the ability to read the labels used by well-known electronics suppliers via a barcode scanner, and uses that information to populate your inventory. It even grabs quantities and links in a datasheet for your newly added part. The barcode scanner can also be used to retrieve the contents of a location, so with a single scan Binner can bring up everything residing at that location.

Binner can be run locally so there isn’t the concern of putting in all the effort to build up your database just to have an internet outage make it inaccessible. Another cool feature is that it allows you to print labels, you can customize the fields to display the values you care about.

The project already has future plans to tie into a “smart bin” system to light up the location of your component — a clever feature we’ve seen implemented in previous setups.

Something is Very Wrong With the AY-3-8913 Sound Generator

Por: Maya Posch
16 Abril 2025 at 05:00
Revision D PCB of Mockingboard with GI AY-3-8913 PSGs.

The General Instruments AY-3-8910 was a quite popular Programmable Sound Generator (PSG) that saw itself used in a wide variety of systems, including Apple II soundcards such as the Mockingboard and various arcade systems. In addition to the Yamaha variants (e.g. YM2149), two cut-down were created by GI: these being the AY-3-8912 and the AY-3-8913, which should have been differentiated only by the number of GPIO banks broken out in the IC package (one or zero, respectively). However, research by [fenarinarsa] and others have shown that the AY-3-8913 variant has some actual hardware issues as a PSG.

With only 24 pins, the AY-3-8913 is significantly easier to integrate than the 40-pin AY-3-8910, at the cost of the (rarely used) GPIO functionality, but as it turns out with a few gotchas in terms of timing and register access. Although the Mockingboard originally used the AY-3-8910, latter revisions would use two AY-3-8913 instead, including the MS revision that was the Mac version of the Mindscape Music Board for IBM PCs.

The first hint that something was off with the AY-3-8913 came when [fenarinarsa] was experimenting with effect composition on an Apple II and noticed very poor sound quality, as demonstrated in an example comparison video (also embedded below). The issue was very pronounced in bass envelopes, with an oscilloscope capture showing a very distorted output compared to a YM2149. As for why this was not noticed decades ago can likely be explained by that the current chiptune scene is pushing the hardware in very different ways than back then.

As for potential solutions, the [French Touch] project has created an adapter to allow an AY-3-8910 (or YM2149) to be used in place of an AY-3-8913.

Top image: Revision D PCB of Mockingboard with GI AY-3-8913 PSGs.

Replica of 1880 Wireless Telephone is All Mirrors, No Smoke

16 Abril 2025 at 02:00
Engraving of Alexander Graham Bell's photophone, showing the receiver and its optics

If we asked you to name Alexander Graham Bell’s greatest invention, you would doubtless say “the telephone”; it’s probably the only one of his many, many inventions most people could bring to mind. If you asked Bell himself, though, he would tell you his greatest invention was the photophone, and if the prolific [Nick Bild] doesn’t agree he’s at least intrigued enough to produce a replica of this 1880-vintage wireless telephone. Yes, 1880. As in, only four years after the telephone was patented.

It obviously did not catch on, and is not the sort of thing that comes to mind when we think “wireless telephone”. In contrast to the RF of the 20th century version, as you might guess from the name the photophone used light– sunlight, to be specific. In the original design, the transmitter was totally passive– a tube with a mirror on one end, mounted to vibrate when someone spoke into the open end of the tube. That was it, aside from the necessary optics to focus sunlight onto said mirror. [Nick Bild] skips this and uses a laser as a handily coherent light source, which was obviously not an option in 1880. As [Nick] points out, if it was, Bell certainly would have made use of it.

Bell's selenium-based photophone receiver.
The photophone receiver, 1880 edition. Speaker not pictured.

The receiver is only slightly more complex, in that it does have electronic components– a selenium cell in the original, and in [Nick’s] case a modern photoresistor in series with a 10,000 ohm resistor. There’s also an optical difference, with [Nick] opting for a lens to focus the laser light on his photoresistor instead of the parabolic mirror of the original. In both cases vibration of the mirror at the transmitter disrupts line-of-sight with the receiver, creating an AM signal that is easily converted back into sound with an electromagnetic speaker.

The photophone never caught on, for obvious reasons — traditional copper-wire telephones worked beyond line of sight and on cloudy days–but we’re greatful to [Nick] for dredging up the history and for letting us know about it via the tip line. See his video about this project below.

The name [Nick Bild] might look familiar to regular readers. We’ve highlighted a few of his projects on Hackaday before.

DIY AI Butler Is Simpler and More Useful Than Siri

15 Abril 2025 at 23:00

[Geoffrey Litt] shows that getting an effective digital assistant that’s tailored to one’s own needs just needs a little DIY, and thanks to the kinds of tools that are available today, it doesn’t even have to be particularly complex. Meet Stevens, the AI assistant who provides the family with useful daily briefs. The back end? Little more than one SQLite table and a few cron jobs.

A sample of Stevens’ notebook entries, both events and things to simply remember.

Every day, Stevens sends a daily brief via Telegram that includes calendar events, appointments, weather notes, reminders, and even a fun fact for the day. Stevens isn’t just send-only, either. Users can add new entries or ask questions about items through Telegram.

It’s rudimentary, but [Geoffrey] already finds it far more useful than Siri. This is unsurprising, as it has been astutely observed that big tech’s digital assistants are designed to serve their makers rather than their users. Besides, it’s also fun to have the freedom to give an assistant its own personality, something existing offerings sorely lack.

Architecture-wise, the assistant has a notebook (the single SQLite table) that gets populated with entries. These entries come from things like reading family members’ Google calendars, pulling data from a public weather API, processing delivery notices from the post office, and Telegram conversations. With a notebook of such entries (along with a date the entry is expected to be relevant), generating a daily brief is simple. After all, LLMs (Large Language Models) are amazingly good at handling and formatting natural language. That’s something even a locally-installed LLM can do with ease.

[Geoffrey] says that even this simple architecture is super useful, and it’s not even a particularly complex system. He encourages anyone who’s interested to check out his project, and see for themselves how useful even a minimally-informed assistant can be when it’s designed with ones’ own needs in mind.

Making Parts Feeders Work Where They Weren’t Supposed To

Por: Lewin Day
15 Abril 2025 at 20:00

[Chris Cecil] had a problem. He had a Manncorp/Autotronik MC384V2 pick and place, and needed more feeders. The company was reluctant to support an older machine and wanted over $32,000 to supply [Chris] with more feeders. He contemplated the expenditure… but then came across another project which gave him pause. Could he make Siemens feeders work with his machine?

It’s one of those “standing on the shoulders of giants” stories, with [Chris] building on the work from [Bilsef] and the OpenPNP project. He came across SchultzController, which could be used to work with Siemens Siplace feeders for pick-and-place machines. They were never supposed to work with his Manncorp machine, but it seemed possible to knit them together in some kind of unholy production-focused marriage. [Chris] explains how he hooked up the Manncorp hardware to a Smoothieboard and then Bilsef’s controller boards to get everything working, along with all the nitty gritty details on the software hacks required to get everything playing nice.

For an investment of just $2,500, [Chris] has been able to massively expand the number of feeders on his machine. Now, he’s got his pick and place building more Smoothieboards faster than ever, with less manual work on his part.

We feature a lot of one-off projects and home production methods, but it’s nice to also get a look at methods of more serious production in bigger numbers, too. It’s a topic we follow with interest. Video after the break.

[Editor’s note: Siemens is the parent company of Supplyframe, which is Hackaday’s parent company. This has nothing to do with this story.]

Keebin’ with Kristina: the One with John Lennon’s Typewriter

15 Abril 2025 at 14:00
Illustrated Kristina with an IBM Model M keyboard floating between her hands.

The Clawtype, a one-handed number with a handy strap and a good-sized display.
Image by [akavel] via GitHub
Reader [akavel] was kind enough to notify me about Clawtype, which is a custom wearable chorded keyboard/mouse combo based on the Chordite by [John W. McKown].

First of all, I love the brass rails — they give it that lovely circuit sculpture vibe. This bad boy was written in Rust and currently runs on a SparkFun ProMicro RP2040 board. For the mouse portion of the program, there’s an MPU6050 gyro/accelerometer.

[akavel]’s intent was to pair it with XR glasses, which sounds like a great combination to me. While typing is still a bit slow, [akavel] is improving at a noticeable pace and does some vim coding during hobby time.

In the future, [akavel] plans to try a BLE version, maybe even running off a single AA Ni-MH cell, and probably using an nRF52840. As for the 3D-printed shape, that was designed and printed by [akavel]’s dear friend [Cunfusu], who has made the files available over at Printables. Be sure to check it out in the brief demo video after the break.

Wooden You Like To Use the Typewriter?

The Typewriter, a wooden affair with a built-in copy holder and a nice fold-up case.
Image by [bilbonbigos] via reddit
I feel a bit late to the party on this one, but that’s okay, I made an nice entrance. The Typewriter is [bilbonbigos]’ lovely distraction-free writing instrument that happens to be primarily constructed of wood. In fact, [bilbonbigos] didn’t use any screws or nails — the whole thing is glued together.

The Typewriter uses a Raspberry Pi 3B+, and [bilbonbigos] is FocusWriter to get real work done on it. it runs off of a 10,000 mAh power bank and uses a 7.9″ Waveshare display.

The 60% mechanical keyboard was supposed to be Bluetooth but turned out not to be when it arrived, so that’s why you might notice a cable sticking out.

The whole thing all closed up is about the size of a ream of A4, and [bilbonbigos] intends to add a shoulder strap in order to make it more portable.

That cool notebook shelf doubles as a mousing surface, which is pretty swell and rounds out the build nicely. Still, there are some things [bilbonbigos] would change — a new Raspi, or a lighter different physical support for the screen, and a cooling system.

The Centerfold: A Keyboard For Your House In Palm Springs

A lovely mid-century-inspired keyboard.
Image by [the_real_jamied] via reddit
Can’t you feel the space age Palm Springs breezes just looking at this thing? No? Well, at least admit that it looks quite atomic-age with that font and those life-preserver modifier keycaps. This baby would look great on one of those giant Steelcase office desks. Just don’t spill your La Croix on it, or whatever they drink in Palm Springs.

Do you rock a sweet set of peripherals on a screamin’ desk pad? Send me a picture along with your handle and all the gory details, and you could be featured here!

Historical Clackers: the Odell Typewriter

First of all, the machine pictured here is not the true Odell number 1 model, which has a pair of seals’ feet at each end of the base and is referred to as the “Seal-Foot Odell“. Ye olde Seal-Foot was only produced briefly in 1889.

The Odell, an index typewriter with stunning detail.
Image via The Antikey Chop

But then inventor Levi Judson Odell completely redesigned the thing into what you see here — model 1b, for which he was awarded a patent in 1890. I particularly like the markings on the base. The nickel-plated, rimless model you see here was not typical; most had gold bases.

These babies cost 1/5th of a standard typewriter, and were quite easy to use to boot. With everything laid out in a line, it was far easier to use a slide mechanism than your ten fingers to select each character. On top of everything else, these machines were small enough to take with you.

No matter their appearance, or whether they typed upper case only or both, Odells were all linear index typewriters. The print element is called a type-rail. There is a fabric roller under the type-rail that applies ink to the characters as they pass. Pinch levers on the sides of the carriage did double duty as the carriage advance mechanism and the escapement.

Round-based Odells went by the wayside in 1906 and were replaced by square-based New American No. 5 models. They functioned the same, but looked quite different.

Finally, John Lennon’s Typewriter Is For Sale

John Lennon's SCM Electra 120, sitting in its open case.
Image via Just Collecting

Got an extra ten grand lying around? You could own an interesting piece of history.

This image comes courtesy of Paul Fraser Collectibles, who are selling this typewriter once owned and used by the legendary Beatle himself. While Lennon composed poems and songs on the machine, it’s unclear whether he secretly wanted to be a paperback writer.

This machine, an SCM (Smith-Corona Marchant) Electra 120, is an interesting one; it’s electric, but the carriage return is still manual. I myself have an SCM Secretarial 300, which looks very much the same, but has a frightening ‘Power Return’ that sends the carriage back toward the right with enough power to shake the floor, depending upon the fortitude of your table.

Apparently Lennon would use the machine when traveling, but gave it to a close friend in the music industry when he upgraded or otherwise no longer needed it. A booking agent named Irwin Pate worked with this friend and obtained the typewriter from him, and Irwin and his wife Clarine held on to it until they sold it to Paul Fraser Collectibles. I find it interesting that this didn’t go to auction at Christie’s — I think it would ultimately go for more, but I’m a writer, not an auction-ologist.


Got a hot tip that has like, anything to do with keyboards? Help me out by sending in a link or two. Don’t want all the Hackaday scribes to see it? Feel free to email me directly.

Shine On You Crazy Diamond Quantum Magnetic Sensor

15 Abril 2025 at 11:00

We’re probably all familiar with the Hall Effect, at least to the extent that it can be used to make solid-state sensors for magnetic fields. It’s a cool bit of applied physics, but there are other ways to sense magnetic fields, including leveraging the weird world of quantum physics with this diamond, laser, and microwave open-source sensor.

Having never heard of quantum sensors before, we took the plunge and read up on the topic using some of the material provided by [Mark C] and his colleagues at Quantum Village. The gist of it seems to be that certain lab-grown diamonds can be manufactured with impurities such as nitrogen, which disrupt the normally very orderly lattice of carbon atoms and create a “nitrogen vacancy,” small pockets within the diamond with extra electrons. Shining a green laser on N-V diamonds can stimulate those electrons to jump up to higher energy states, releasing red light when they return to the ground state. Turning this into a sensor involves sweeping the N-V diamond with microwave energy in the presence of a magnetic field, which modifies which spin states of the electrons and hence how much red light is emitted.

Building a practical version of this quantum sensor isn’t as difficult as it sounds. The trickiest part seems to be building the diamond assembly, which has the N-V diamond — about the size of a grain of sand and actually not that expensive — potted in clear epoxy along with a loop of copper wire for the microwave antenna, a photodiode, and a small fleck of red filter material. The electronics primarily consist of an ADF4531 phase-locked loop RF signal generator and a 40-dB RF amplifier to generate the microwave signals, a green laser diode module, and an ESP32 dev board.

All the design files and firmware have been open-sourced, and everything about the build seems quite approachable. The write-up emphasizes Quantum Village’s desire to make this quantum technology’s “Apple II moment,” which we heartily endorse. We’ve seen N-V sensors detailed before, but this project might make it easier to play with quantum physics at home.

This Potato Virtual Assistant is Fully Baked

15 Abril 2025 at 08:00
GLaDOS Potato Assistant

There are a number of reasons you might want to build your own smart speaker virtual assistant. Usually, getting your weather forecast from a snarky, malicious AI potato isn’t one of them, unless you’re a huge Portal fan like [Binh Pham].

[Binh Pham] built the potato incarnation of GLaDOS from the Portal 2 video game with the help of a ReSpeaker Light kit, an ESP32-based board designed for speech recognition and voice control, and as an interface for home assistant running on a Raspberry Pi.

He resisted the temptation to use a real potato as an enclosure and wisely opted instead to print one from a 3D file he found on Thingiverse of the original GLaDOS potato. Providing the assistant with the iconic synthetic voice of GLaDOS was a matter of repackaging an existing voice model for use with Home Assistant.

Of course all of this attention to detail would be for not if you had to refer to the assistant as “Google” or “Alexa” to get its attention. A bit of custom modelling and on-device wake word detection, and the cyborg tuber was ready to switch lights on and off with it’s signature sinister wit.

We’ve seen a number of projects that brought Portal objects to life for fans of the franchise to enjoy, even an assistant based on another version of the GLaDOS the character. This one adds a dimension of absurdity to the collection.

Building A DIY Tornado Tower

Por: Lewin Day
15 Abril 2025 at 05:00

A tornado can be an awe-inspiring sight, but it can also flip your car, trash your house, and otherwise injure you with flying debris. If you’d like to look at swirling air currents in a safer context, you might appreciate this tornado tower build from [Gary Boyd].

[Gary]’s build was inspired by museum demonstrations and the tornado machine designs of [Harald Edens]. His build generates a vortex that spans 1 meter tall in a semi-open cylindrical chamber. A fan in the top of the device sucks in air from the chamber, and exhausts it through a vertical column of holes in the wall of the cylinder. This creates a vortex in the air, though it’s not something you can see on its own. To visualize the flow, the cylindrical chamber is also fitted with an ultrasonic mist generator in the base. The vortex in the chamber is able to pick up this mist, and it can be seen swirling upwards as it is sucked towards the fan at the top.

It’s a nice educational build, and one that’s as nice to look at as it is to study. It produces a thick white vortex that we’re sure someone could turn into an admirable lamp or clock or something, this being Hackaday, after all. In any case, vortexes are well worth your study. If you’re cooking up neat projects with this physical principle, you should absolutely let us know!

Plasmonic Modulators Directly Convert Terahertz Waves to Optical Signals

Por: Maya Posch
15 Abril 2025 at 02:00

A major bottleneck with high-frequency wireless communications is the conversion from radio frequencies to optical signals and vice versa. This is performed by an electro-optic modulator (EOM), which generally are limited to GHz-level signals. To reach THz speeds, a new approach was needed, which researchers at ETH Zurich in Switzerland claim to have found in the form of a plasmonic phase modulator.

Although sounding like something from a Star Trek episode, plasmonics is a very real field, which involves the interaction between optical frequencies along metal-dielectric interfaces. The original 2015 paper by [Yannick Salamin] et al. as published in Nano Letters provides the foundations of the achievement, with the recent paper in Optica by [Yannik Horst] et al. covering the THz plasmonic EOM demonstration.

The demonstrated prototype can achieve 1.14 THz, though signal degradation begins to occur around 1 THz. This is achieved by using plasmons (quanta of electron oscillators) generated on the gold surface, who affect the optical beam as it passes small slots in the gold surface that contain a nonlinear organic electro optic material that ‘writes’ the original wireless signal onto the optical beam.

❌
❌