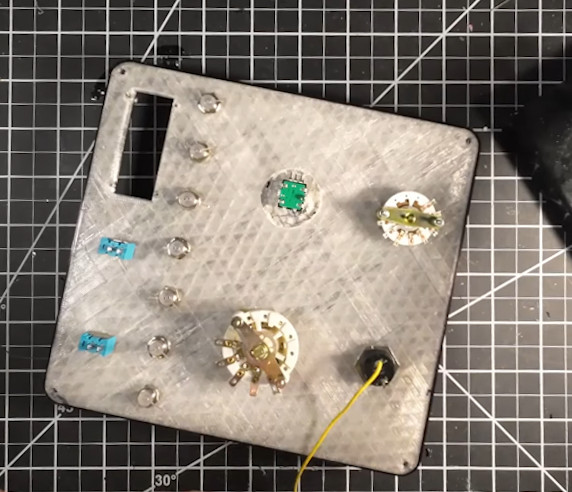
YouTuber [MechPanda] has recreated a DIY STM hack we covered about ten years ago, updating it to be primarily 3D-printed, using modern electronics, making it much more accessible to many folks. This simple STM setup utilises a piezoelectric actuator constructed by deliberately cutting a piezo speaker into four quadrants. With individual drive wires attached to the four quadrants. They (re)discovered that piezoelectric ceramic materials are not big fans of soldering heat. Still, in the absence of ultrasonic welding equipment, they did manage to get some wires to take to the surface using low-temperature solder paste.
As you can tell, you can only image conductive samples
They glued a makeshift probe holder on the rear side of the speaker actuator, which was intended to take a super sharp needle-like piece of tungsten wire. Putting the wire in tension and cutting at a sharp angle makes it possible with many attempts to get some usable points. Usable, in this instance, means sharp down the atomic level. The sample platform, actuator mount and all the connecting parts are 3D-printed with PA-CF. This is necessary to achieve enough mechanical stability with normal room temperature fluctuations. Three precision screws are used to level the two platforms in a typical kinematic mount structure, which looks like the only hard-to-source component. A geared stepper motor attached to the probe platform is set up to allow the probe to be carefully advanced towards the sample surface.
Graphite is not orange. This is a false-colour image!
The next issue concerns vibration damping of the whole assembly. This was achieved with a simple hanging sprung platform, damped using an aluminium plate and magnets mounted underneath—a simple and effective eddy-current damper setup. For the electronics, a Teensy 4.1 runs the show, driving the four quadrants via a brace of AD5761 serial DACs and a few summing amplifiers. Three DACs generate the X, Y and Z signals, which are sent to the quadrants as Z+/-X and Z+/-Y, and the fourth DAC generates a sample bias signal. The tunnelling current picked up by the probe tip is first sent to a preamplifier constructed using a very high gain transconductance (current-to-voltage) amplifier. However, the part used was not identified. The whole assembly is electrically shielded with metallic tape, including the cable running down the main analog board, which hosts an LTC2326 ADC that can handle the bipolar differential signal being fed to it. The software was programmed using the Arduino stack for ease of use. The reason for the high-speed micro is the need to control the scanning signals based on the measured tunnelling current to form a control loop. We didn’t dig into precisely how that works! As can be seen from the video, they managed to get some quite decent images of the surface of a freshly peeled HOPG (graphite) lab specimen, so the setup works, and the noise sources are under control.
In an educational project with ethically questionable applications, [ChromaLock] has converted the ubiquitous TI-84 calculator into the ultimate cheating device.
The foundation of this hack lies in the TI-84’s link protocol, which has been a mainstay in calculator mods for years. [ChromaLock] uses this interface to connect to a tiny WiFi-enabled XIAO ESP32-C3 module hidden in the calculator. It’s mounted on a custom PCB with a simple MOSFET-based level shifting circuit, and slots neatly into a space on the calculator rear cover. The connecting wires are soldered directly to the pads of the 2.5 mm jack, and to the battery connections for power.
But what does this mod do? It connects your calculator to the internet and gives you a launcher with several applets. These allow you to view images badly pixelated images on the TI-84’s screen, text-chat with an accomplice, install more apps or notes, or hit up ChatGPT for some potentially hallucinated answers. Inputting long sections of text on the calculator’s keypad is a time-consuming process, so [ChromaLock] teased a camera integration, which will probably make use of newer LLMs image input capabilities. The ESP32 doesn’t handle all the heavy lifting, and needs to connect to an external server for more complex interfaces.
To prevent pre-installed programs from being used for cheating on TI-84s, examiners will often wipe the memory or put it into test mode. This mod can circumvent both. Pre-installed programs are not required on the calculator to interface with the hardware module, and installing the launcher is done by sending two variables containing a password and download command to the ESP32 module. The response from the module will also automatically break the calculator out of test mode.
We cannot help but admire [ChromaLock]’s ingenuity and polished implementation, and hopefully our readers are more interested in technical details than academic self-sabotage. For those who need even more capability in their calculator, we’d suggest checking out the NumWorks.
[Project 326] wanted to know exactly what gas was in some glass tubes. The answer, of course, is to use a spectrometer, but that’s an expensive piece of gear, right? Not really. Sure, these cheap devices aren’t perfect, but they are serviceable and, as the video below shows, there are ways to work around some of the limitations.
The two units in question are “The Little Garden” spectrometer and a TLM-2. Neither are especially sensitive, but both are well under $100, so you can’t expect much. Because the spectrometers were not very sensitive, a 3D printed jig and lens were used to collect more light and block ambient light interference. The jigs also allowed the inclusion of special filters, which enhanced performance quite a bit. The neon bulbs give off the greatest glow when exposed to high voltage. Other bulbs contain things like helium, xenon, and carbon dioxide. There were also tubes with mercury vapor and even deuterium.
We’ll admit it. Not everyone needs a spectrometer, but if you do, there’s a lot of really interesting info on how to get the most out of these cheap devices. Apparently, [Project 326] was frustrated that he couldn’t buy an X-ray spectrometer and has vowed to create one, so we’ll be interested to see how that goes.
It’s not news that Leonardo DaVinci was somewhat ahead of his time, and over the centuries many of the creations in his sketchbooks have been created and proved quite functional. The guys from the YouTube channel How To Make Everything have been looking at one such sketch, a screw thread-cutting machine. At first glance, it seems a little flawed. Threads are hard to make by hand, and you can see that this thread-cutting machine needs two identical threads operating as a reference to make it work. However, as the guys demonstrate, you can create threads by hand using simple methods.
Starting with an offset blade mounted on a block with a hole through it, a dowel can be scribed with a starter thread. This can then be worked by hand to cut enough of a groove for the application. They demonstrated that the machine was viable using nothing but wood for construction. A metal blade was mounted, and some preload force was applied to it with a spring. The dowel to be cut was loaded, and the machine ran back and forth enough times to create a very nice-looking screw thread. And once you’ve made two identical threaded dowels, you can use them to upgrade the machine or even build a second. Once you have a repeatable way to make such threads, all kinds of applications become more accessible. Need a bench vice? No problem now!
Whilst the demonstration doesn’t precisely follow the plans laid out by the master inventor, they aren’t all that clear on the cutting tool after all, it’s nice to see people still wanting to build his ideas, and we’ll certainly be following along.
Developing your own film is an unabashedly analog process, which is one of the reasons people still gravitate towards it. After spending all day pushing buttons and looking at digital displays, spending some quiet time in the dark with pieces of paper and chemicals can be a way to decompress. But that doesn’t mean there isn’t room for a bit of modern digital convenience.
Specifically, [John Jones] wanted a timer that offered more features than his old school analog model, so he decided to build one himself. He took the long away around to make sure the end result would be a tool he could rely on, which meant getting a custom PCB made, 3D printing a case to fit in with his existing workspace, and designing a control panel that he could operate in the dark.
The PCB plays host to an ESP32 development board and an I/O expander that connects up to the array of LEDs, switches, and buttons on the front panel. The bottom-half of of the 3D printed enclosure is pretty simple, but the control panel is quite a piece of work.
Borrowing a trick from the flight sim community, [John] switched over to a clear filament after laying down the first few layers of the panel. This essentially created an integrated light diffuser, and with the addition of a few red LEDs, he had very slick backlit labels on his panel with relatively minimal effort.
Opening up the device reveals a Tuya BT17L Bluetooth module, the hackable nature of which due to other projects prompted a port of a previous Find My project which provided open source access to the network. The result is as he describes, the world’s chunkiest key finder, and also we’re guessing the one with one of the longest battery lives too.
The European budget supermarkets are well known for their budget bargain aisles, and Lidl’s Parkside range has some surprisingly robust tools among it. They might not quite be up to replacing IKEA in the hacker source stakes, but those of us who live in countries served by them know to keep an eye out in the hope of fresh gems alongside those awesome AlpenFest apple crumble cakes. This one certainly isn’t the first Parkside hack we’ve seen.
Most of us have some form of an on-the-go toolkit, but how much thought have we put into its contents? \there’s a community of people who put a lot of thought into this, and EMF Camp have put up one of their talks from earlier in the summer in which [Drew Batchelor] sets out their manifesto and introduces tinytoolk.it, a fascinating resource.
The talk is well worth a watch, as rather than setting the tools you should be carrying, it instead examines the motivations for your kit in the firs place, and how to cull those which don’t make the grade. If an items seems to see little use, put a piece of tape with the date on it every time it comes out, to put a number on it. As an example he ended up culling a multi-tool from his kit, not because it’s not an extremely useful tool, but because he found everything it did was better done by other items in the kit.
It’s probable we’ll all look at our carry-around kit with new eyes after watching this, it’s certain that ours could use a few tweaks. What’s in your kit, and how could you improve it? Let us know in the comments.
Although less popular these days, wire-wrap is still a very relevant, easily reversible solder-free way to assemble (prototype) systems using wire-wrap wire and a wire-wrap tool. This latter tool can be either a hand or powered tool, but all it has to do is retain the stripped wire, fit around the wire-wrapping post and create a snug, oxidation-proof metal-metal contact fit. For the very common 30 AWG (0.25 mm) wire-wrap wire, the Jonard Tools (OK Industries) WSU-30M wire-strip-unwrap tool is pretty much the popular standard. It allows you to strip off insulation, wrap and unwrap connections all with one tool, but the question is whether you can just 3D print a wrap-unwrap tool that’s about as good?
First a note about cost, as although the genuine WSU-30M has risen in cost over the years, it can still be obtained for around $50 from retails like Mouser, while clones of varying quality can be obtained for around $15 from your favorite e-tailer website. From experience, these clones have quite sloppy tolerance, and provide a baseline of where a wrapping tool becomes unusable, as they require some modding to be reliable.
Wire-wrap tool model by [KidSwidden] on Thingiverse.Taking a quick look at the wire-wrap tools available on Thingiverrse, we can see basically two categories: one which goes for minimally viable, with just a cylinder that has a hole poked on the side for the stripped wire to fit through, as these versions by [JLSA_Portfolio], [paulgeneres], [orionids] and [cmellano]. The WSU-30M and similar tools have a channel on the side that the stripped wire is fed into, to prevent it from getting tangled up and snagging. On the clone units this channel often has to be taped off to prevent the wire from escaping and demonstrating why retaining the wire prior to wrapping is a good idea.
This leads us to three examples of a 3D printed wire-wrap tool with such a wire channel: by [KidSwidden] (based on a Radio Shack unit, apparently), another by [DieKatzchen] and an interesting variation by [4sStylZ]. Naturally, the problem with such fine features is that tolerance matter a lot, with an 0.2 mm nozzle (for FDM printers) recommended, and the use of an SLA printer probably a good idea. It’s also hard to say what kind of wire-wrap connection you are going to get, as there are actually two variants: regular and modified.
The starting guide to wire-wrapping by Sparkfun uses the WSU-30M, which as the name suggests uses modified wire-wrap, which means that part of the wire insulation is wrapped around the bottom of the post, for extra mechanical stability, effectively like strain-relief. A lot of such essential details are covered in this [Nuts and Volts] article which provides an invaluable starting guide to wire-wrapping, including detecting bad wraps.
Naturally, the 3D printed tools will not include a stripper for the wire insulation, so you will have to provide this yourself (PSA: using your teeth is not recommended), and none of these 3D models include an unwrap tool, which may or may not be an issue for you, as careful unwrapping allows you to reuse the wire, which can be useful while debugging or reworking a board.
Top image: completed wire-wrap on a post. (Credit: Sparkfun)
While many of us now have laser cutters — either a K40-style machine or one of the newer high-output diodes — you probably don’t have one that cuts metal. True, some hobby lasers now offer IR laser heads with modest power to engrave metal. The xTool S1, for example, accepts a 2 W IR laser as an option, but we doubt it would cut through anything thicker than foil. However, there are a growing number of fiber and carbon dioxide lasers that can cut metal at semi-reasonable prices, and [All3DP] has a primer on the technology that is worth a read.
According to the post, CO2 lasers are less expensive but require gas assist, can’t work with shiny metals well, and are finicky because of the mirrors and glass tube inside. Fiber lasers cost more, but don’t need gas, work on more materials, and have fewer parts that need maintenance or may be prone to damage. There are other kinds of lasers, but the post focuses on these, the most common ones.
Machines that can cut metal aren’t cheap. They start at about $10,000. However, prices are dropping and we remember when $10,000 would buy you what would today be a terrible oscilloscope, so maybe there’s hope for an impulse-buy metal-cutting laser one day.
It isn’t that diode lasers can’t cut metal at all, but the results are not terribly useful. What would you rather have? A metal cutter or a metal 3D printer?
These days, PCB fab houses are just about everywhere, and you can’t go buy a taco without walking past eight of them. Still, some out there still like to etch their PCBs at home. If that sounds like you, you might see some value in [Chris Borge]’s PCB agitator.
The design mostly relies on 3D printed parts, including the main body. It has a heavy base which is filled with concrete to keep it nicely weighed down on the table. A table for holding a PCB and fluid tank is then installed on top, via a bearing which allows it to pivot in one axis. An Arduino Nano commands the agitation of the table top, and hence the PCB etching tank, with a servo used to actually shift the table back and forth.
It’s a simple design — far simpler than some of the advanced coffee-making hardware we’ve seen recently. Regardless, it gets the job done, and done well! In testing, it accelerated [Chris]’s etching jobs significantly, we’re talking hours here. Meanwhile, if you don’t have a 3D printer on hand, you could always try building one out of junk instead!
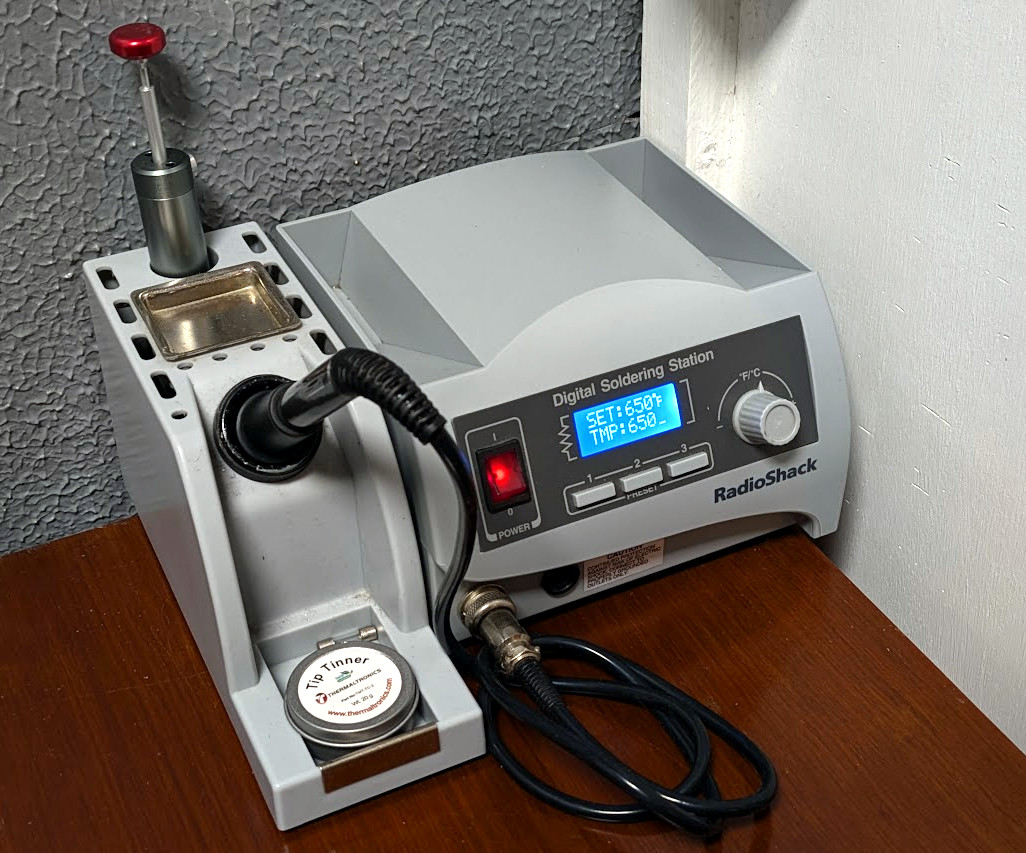
Like many people who solder regularly, I decided years ago to upgrade from a basic iron and invest in a soldering station. My RadioShack digital station has served me well for the better part of 20 years. It heats up fast, tips are readily available, and it’s a breeze to dial in whatever temperature I need. It’s older than both of my children, has moved with me to three different homes, and has outlived two cars and one marriage (so far, anyway).
When I got this, Hackaday still used B&W pictures.
As such, when the new breed of “smart” USB-C soldering irons started hitting the scene, I didn’t find them terribly compelling. Oh sure, I bought a Pinecil. But that’s because I’m an unrepentant open source zealot and love the idea that there’s a soldering iron running a community developed firmware. In practice though, I only used the thing a few times, and even then it was because I needed something portable. Using it at home on the workbench? It just never felt up to the task of daily use.
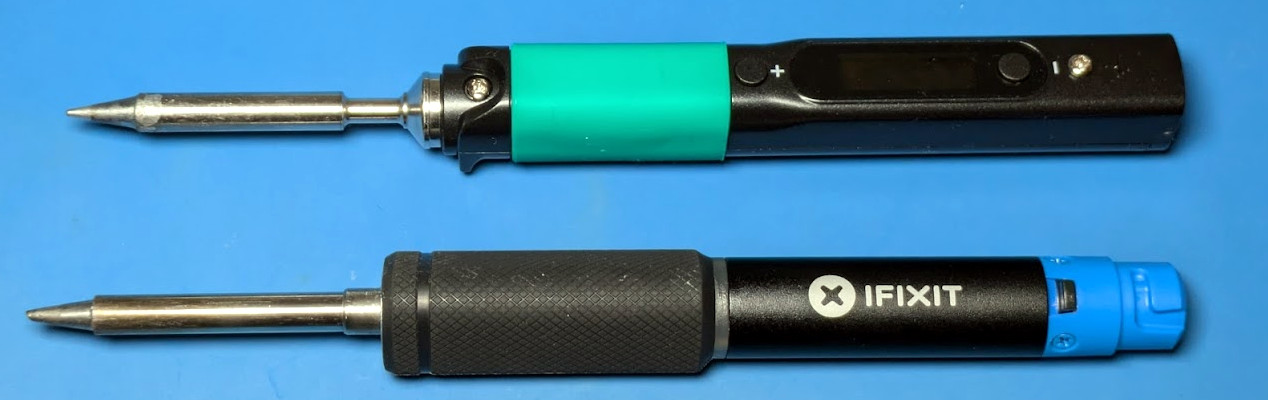
So when iFixit got in contact a couple weeks back and said they had a prototype USB-C soldering iron they wanted me to take a look at, I was skeptical to say the least. But then I started reading over the documentation they sent over, and couldn’t deny that they had some interesting ideas. For one, it was something of a hybrid iron. It was portable when you needed it to be, yet offered the flexibility and power of a station when you were at the bench.
Even better, they were planning on putting their money where their mouth is. The hardware was designed with repairability in mind at every step. Not only was it modular and easy to open up, but the company would be providing full schematics, teardown guides, and spare parts.
Alright, fine. Now you’ve got my attention.
Best of Both Worlds
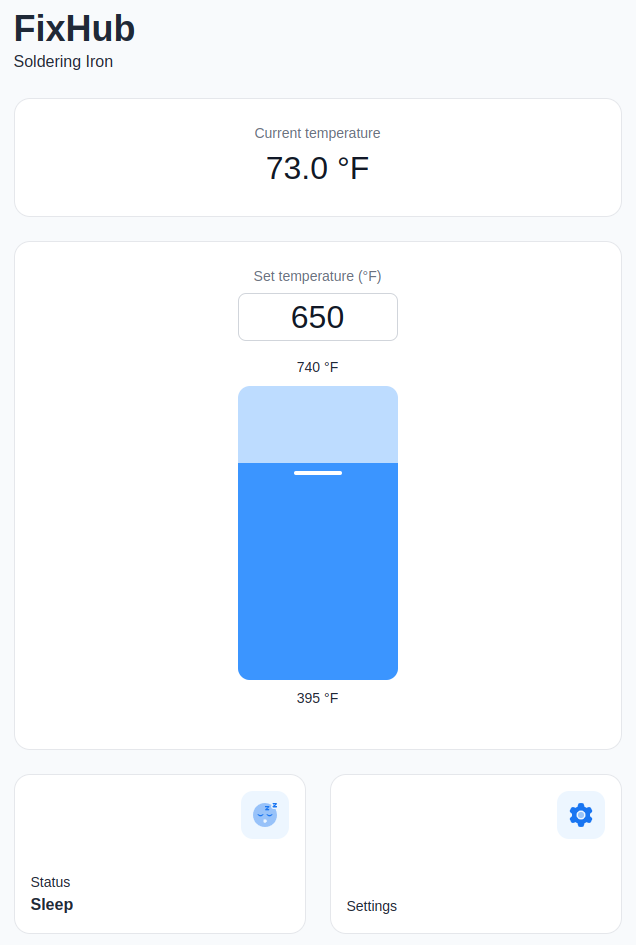
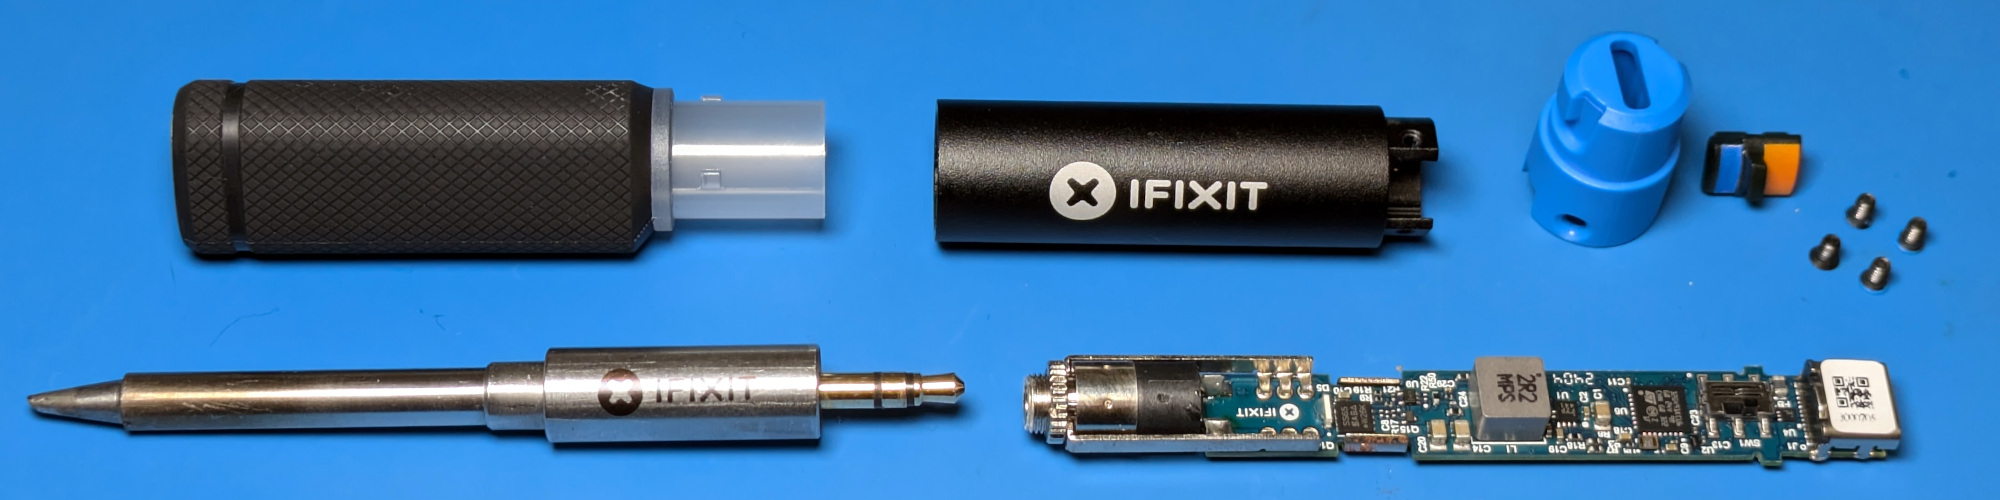
Before we get too much farther, I should clarify that the FixHub is technically two separate devices. Officially iFixit calls the combo a “Portable Soldering System” in their documentation, which is made up of the Smart Soldering Iron and the Portable Power Station. While they are designed to work best when combined, both are fully capable of working independently of each other.
Smart Soldering Iron
The star of the show is, of course, the Smart Soldering Iron. It’s a 100 watt iron that comes up to operating temperature in under five seconds and can work with any suitably beefy USB-C Power Delivery source. The size and general proportions of the iron are very close to the Pinecil V2, though the grip is larger and considerably more comfortable to hold. The biggest difference between the two however is the absence of a display or configuration buttons. According to iFixit, most users don’t change their settings enough to justify putting the interface on the iron itself. That doesn’t mean you can’t tweak the iron’s settings when used in this stand-alone configuration, but we’ll get back to that in a minute.
The only control on the iron is a slide switch on the tail end that cuts power to the heating element. I like this arrangement a lot more than the software solution used on irons like the Pinecil. The click of the switch just feels more reliable than having to hold down a button and hoping the iron’s firmware understands that I want to turn the thing off and not adjust some setting. Of course, this is still a “smart” iron, so naturally there’s also support for accelerometer based idle and sleep modes that you can enable.
While there’s no display, the illuminated ring behind the grip does provide a visual indicator of what the iron is doing: solid blue means it has power but the heating element is off, a pulsing blue indicates the iron is heating, and orange means it has reached the desired temperature. If you flick the heater switch off, the ring pulses purple until it cools back off and returns to blue. It’s a simple and effective system, but the visual distinction between the blue and purple isn’t great. Would love to see the ability to customize these colors in a future firmware update.
The iron has a couple of clever portability features for those who often find themselves hacking on the go. The magnetic cap can be placed over the tip even when it’s hot, which means you don’t need to wait for the iron to cool down before you pack it away in your bag. The included USB-C cable also comes with a locking collar that mates with the groves in the tail of the iron — this keeps the cable from pulling out if you’ve got yourself contorted into some weird angle, but doesn’t prevent you from using your own cable should you want.
As for the tip, it can be easily removed without tools and uses a 3.5 mm TRS plug like the Miniware TS80, although I don’t have a TS80 handy to test if the tips are actually compatible. For their part, iFixit says they plan on offering an array of styles and sizes of tips in addition to the 1.5 mm bevel that the Smart Soldering Iron ships with.
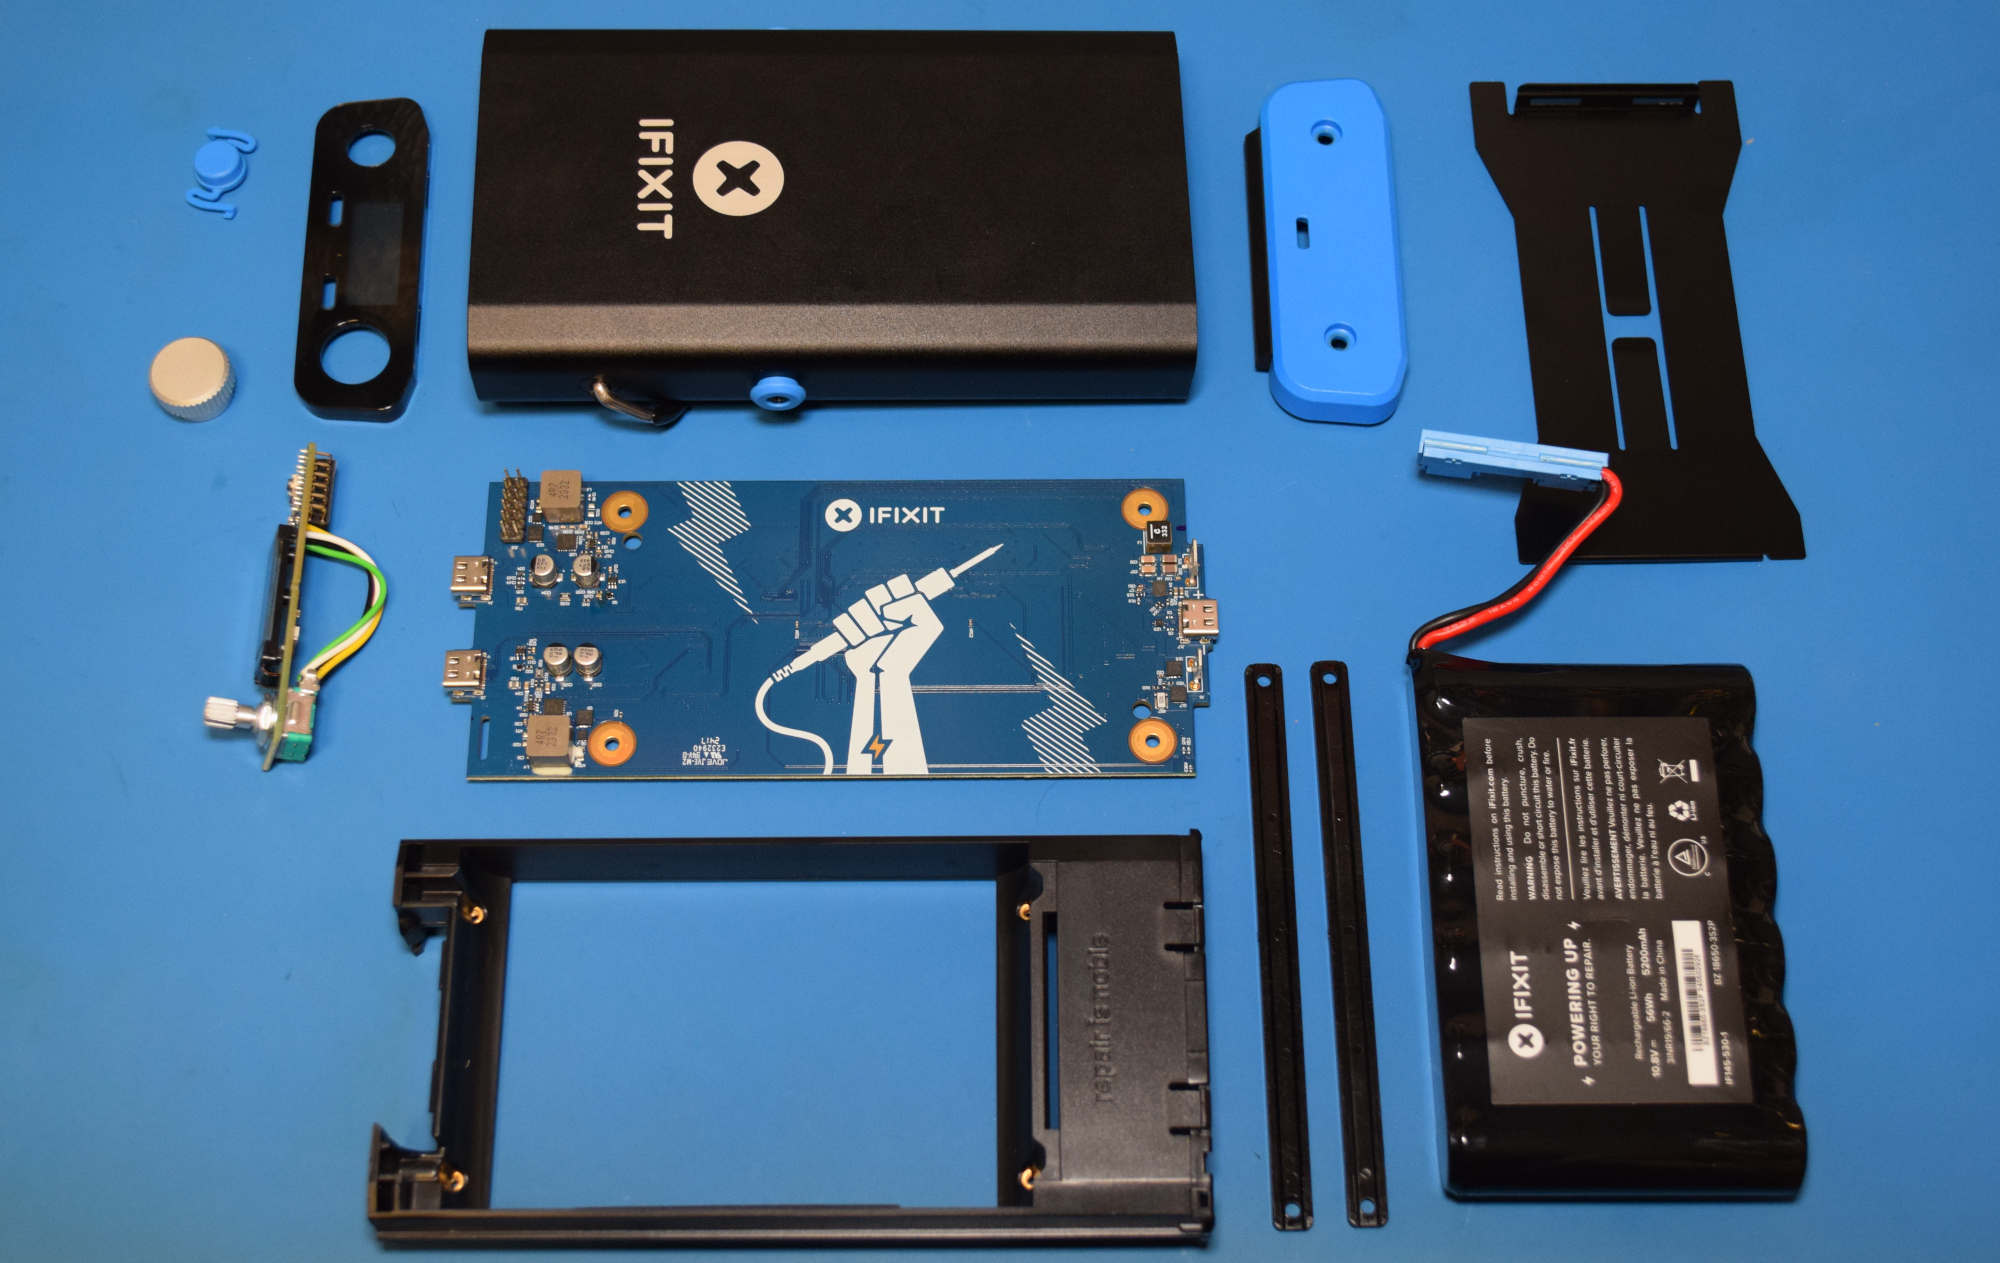
Portable Power Station
While it’s not required to use the Smart Soldering Iron, for the best experience, you’ll want to spring for the Portable Power Station. It’s essentially a 5,200 mAh battery bank capable of powering devices at 100 W, with a single USB-C port on the back for charging and two on the front for whatever devices you want to plug into it.
The trick is, once the Station detects you’ve plugged a Smart Soldering Iron into it, you’re given the ability to configure it via the OLED screen and rotary encoder on the front of the device. There’s even support for connecting a pair of Smart Soldering Irons to the Station, each with its own independent configuration. Though in that case, both would have to share the total 100 W output.
Assuming a single Smart Soldering Iron, iFixit says you should expect to get up to eight hours of runtime from the Portable Power Station. Of course there are a lot of variables involved, so your mileage may vary. If you’re spending most of your time at the bench, you can keep the rear USB-C port connected to a Power Delivery charger and use it more or less like a traditional station.
The Internet of Irons
Plugging the Smart Soldering Iron into the Power Station is the most obvious way of tweaking its various settings, but as I mentioned earlier, it’s not the only way.
Maybe you don’t want to buy the Station, or you left it at home. In either event, you can simply plug the iron into your computer and configure it via WebSerial.
You’ll need a browser based on Chrome to pull this trick off, as Mozilla has decided (at least, for now) to not include the capability in Firefox. In testing, it worked perfectly on both my Linux desktop and Chromebook.
Unfortunately, plugging the iron into your phone won’t work, as the mobile version of Chrome does not currently support WebSerial. But given the vertical layout of the interface and the big touch-friendly buttons, I can only assume that iFixit is either banking on this changing soon or has a workaround in mind. Being able to plug the iron into your phone for a quick settings tweak would be incredibly handy, so hopefully it will happen one way or another.
The WebSerial interface not only gives you access to all the same settings as plugging the iron into the Power Station does, but it also serves as the mechanism for updating the firmware on the iron.
Incidentally, the Power Station has it’s own nearly identical WebSerial interface. Primarily this would be used for upgrading the firmware, but it’s not hard to imagine that some users would prefer being able to change their settings on the big screen rather than having to squint at an OLED not much larger than their thumbnail.
Solder At Your Command
But wait! I hear those gears turning in your head. If the Smart Soldering Iron into the Power Station both feature WebSerial interfaces that let you play around with their settings, does that mean they might also offer a traditional serial interface for you to poke around in?
Hell yeah they do!
There was no mention of this terminal interface in any of the documentation I received from iFixit, but thanks to the built-in help function and tab completion, I was able to make my way around the various tools and functions. I never knew how badly I yearned to adjust the temperature on my soldering station from the command line before this moment. There’s clearly a lot of potential here, and I’m really looking forward to seeing what the community can come up given this level of control.
A Look Under the Hood
iFixit offered to give me a peek at the in-development repair guides for the Smart Soldering Iron and the Power Station, but I passed. For one thing, there’s no doubt in my mind that the finished product is going to be phenomenally detailed. Just look at any of their in-house guides, and you’ll know what to expect. But more to the point, I wanted to see how hard it would be to take the two devices apart without any guidance.
I’m happy to report that the iron and its base station are some of the most easily dissembled devices I’ve ever come across. No glue, weird tape, or hidden fasteners. No little plastic tabs that break if you look at them the wrong way. Just two pieces of hardware that were designed and assembled in a logical enough way that you only need to look at them to understand how it all goes together.
Of course, this should come as no surprise. Imagine the mud that would have been slung had iFixit had dropped the ball here. You can’t very well campaign for repairability if you don’t hold your own products to the same standards you do for everyone else. Presumably they designed the Smart Soldering Iron and the Power Station to hit a perfect ten by their published standards, and from what I’ve seen, they nailed it.
I also got a look at the schematics, exploded diagrams, and parts list for both products. Like the repair guides, these won’t be made public until the hardware ships in October. But don’t worry, this isn’t some crowdsource bait-and-switch. They’ve got the goods, and it’s all very impressive.
Now to be clear, we’re not talking open source hardware here. Don’t expect to pull Gerbers from a GitHub repo so you can crank out your own Power Station. But the documentation they’re providing is remarkable for a consumer device. The schematics especially — they’re filled with all sorts of notes in the margins from the engineers which were fascinating to go through.
Investing in the Future
If I’ve not made it abundantly clear so far, iFixit really blew me away with the Portable Soldering System. I knew they would put a solid effort into the product from their reputation alone, but even still, I wasn’t expecting the hardware and software to be this polished. iFixit didn’t just raise the bar, they sent it into orbit.
But all this comes at a price. Literally. The Smart Soldering Iron alone will set you back $79.95, and if you want to get the Power Station along with it, the combo comes in at $249.95. You could get a nice soldering station from Weller or Hakko for half the price. Then again, it’s hard to compare what iFixit is offering here to anything else on the market.
In the end, this is one of those times when you’ve got to decide what’s really important to you. If you just want a quality soldering station, there are cheaper options that will meet all of your needs and then some. But if you want to support a company that’s working to change the status quo, sometimes you’ve got to reach a little deeper into those pockets.
Your shiny new personal electronic device is likely to be designed solely as an app platform to run the products of faceless corporations, so the story goes, and therefore has an ever smaller hacking potential. Perhaps that view is needlessly pessimistic, because here’s [JP3141] with an example that goes against the grain. It’s an Apple Watch, being used as an ammeter. How it does that comes as the result of a delicious piece of lateral thinking.
Like many mobile devices, the device comes with a magnetometer. This serves as an electronic compass, but it’s also as its name might suggest, an instrument for sensing magnetic fields in three axes. With a 3D printed bobbin that slides over the watch, and a few turns of wire, it can sense the magnetic field created by the current, and a measurement can be derived from it. The software on the watch is only a simple proof of concept as yet, but it applies some fairly understandable high-school physics to provide a useful if unexpected measure of current.
We’re surprised to see just how many times the Apple Watch has appeared on these pages, but scanning past projects it was a cosmetic one which caught our eye. Who wouldn’t want a tiny Mac Classic!
Kitting out a full workshop can be expensive, but if you’re only working on small things, it can also be overkill. Indeed, if your machining tends towards the miniature, consider building yourself a series of tiny machines like [KendinYap] did. In the video below, you can see the miniature electric sander, table saw, drill press, and cut-off saw put through their paces.
Just because the machines are small, doesn’t mean they’re not useful. In fact, they’re kind of great for doing smaller jobs without destroying what you’re working on. The tiny belt sander in particular appeals in this case, but the same applies to the drill press as well. [KendinYap] also shows off a tiny table and circular saw. The machines are straightforward in their design, relying largely on 3D printed components. They’re all powered by basic DC brushed motors which are enough to get the job done on the small scale.
Magnets are pretty nice little tools. [EmGi] has used them in many a cool 3D printed build with great success. But getting them where you want can be really tricky. More often than not, you end up with glue all over your fingers, or the magnets fly out of place, or they stick together when you don’t want them to.
Well, [EmGi] created a mighty fine magnet insertion tool that you can print for yourself. It’s finger-operated and uses a single embedded magnet to place magnets wherever they’re needed.
This thing went through several designs before [EmGi] ever printed it out. Originally, there were two magnets, but there was an issue where if the tool wasn’t lifted off perfectly, it would send the magnet flying.
But now it works great, and [EmGi] even deposited an array of 64 magnets without using glue to test it out before printing a second one to handle the other polarity. Check out the build/demo video after the break.
Frustrated by his Aldi multimeter’s backlight turning off after just 15 seconds, [Steg Steg] took matters into his own hands. His solution? He added a manual toggle switch to control the backlight, allowing it to stay on as long as needed. He began by disassembling the multimeter—removing the outer bumper and a few screws—to access the backlight, labeled “BL.” He identified the voltage regulator outputting 2.8V, desoldered the red wire, and extended it to install the switch.
On his first try, he successfully drilled a spot for the SPST switch. To fit the switch into the multimeter’s rubber bumper, he used a circular punch, although his second hole wasn’t as clean as the first. Despite this minor setback, the modification worked perfectly, giving him complete control over his multimeter’s backlight without the original 15-second timeout.
We’ve all got our favorite hand tools, and while the selection criteria are usually pretty subjective, it usually boils down to a combination of looks and feel. In our opinion, the king of both these categories when it comes to screwdrivers is those clear, hard acetate plastic handles, which are a joy to use — at least until the plastic starts to degrade and exude a characteristically funky aroma.
But perhaps we can change that if these experiments on screwdriver “mange” hold up. That’s [357magdad]’s unappealing but accurate description of the chemical changes that eventually occur in the strong, hard, crystal-clear handles of your favorite screwdrivers. The polymer used for these handles is cellulose acetate butyrate, or CAB, which is mostly the same cellulose acetate that replaced the more explode-y cellulose nitrate in things like pool balls and movie film, except with some of the acetate groups replaced with a little butyric acid. The polymer is fine at first, but add a little UV light and over time the outer layer of CAB decomposes into a white flaky cellulose residue while the butyric acid volatilizes, creating the characteristic odor of vomitus. Lovely.
In the video below, [357magdad] takes a look at different concoctions that all allegedly cure the mange. TL, DW; it was a dunk in household ammonia that performed the best, well ahead of other common agents like vinegar and bleach. The ammonia — or more precisely, ammonium hydroxide — works very quickly on the cellulose residue, dissolving it readily and leaving the handle mange-free and looking nearly new after some light scrubbing. None of the other agents came close, although acetone did manage to clear up the mange a bit, at the cost of softening the underlying CAB in a process that’s probably similar to acetone smoothing ABS prints.
As for the funky smell, well, the results were less encouraging. Nothing really got rid of the pukey smell, even a roll in baking soda. We suspect there won’t be much for that, since humans can detect it down to 10 parts per million. Consider it the price to pay for a nice-looking screwdriver that feels so good in your hand.
We live in a time where there’s virtually no excuse not to have some kind of oscilloscope. As [IMSAI Guy] shows in a recent video, for what you might expect to pay for a decent meter, you can now get one that includes a scope. There are several options out there but it is hard to know how much to spend to get the best possible product. The Zoyi ZT-702S that he looks at costs under $80. But is it worth it?
Scopes that connect to your PC are often very inexpensive. You can also find little toy scopes that use a microcontroller and a little LCD screen. Even though the specs on these are usually appalling, they will still let you visualize what’s happening in a circuit. Sure, you want an expensive bench scope with lots of channels sometimes, but often, you just need to see a signal in broad strokes. Having a scope and a meter together is very handy.
The little meter claims 10 MHz bandwidth and 48 megasamples per second in scope mode. The meter claims true RMS and 9999 counts. The internal battery charges from USB-C. As you might expect, the meter portion works well enough for a basic meter. The scope reacts well up to 5 MHz. It isn’t necessarily the best scope in the world, but for $80 it seemed quite adequate. The probe compensation wasn’t able to quite make a square wave square, but you still got the idea.
As commenters on the video pointed out, there is a newer model that has two channels (at a slightly higher price tag). They also point out that there are dozens of similar devices at different price points, and everyone has their favorite.
If you have hobby-level cash, we’d suggest a higher-end scope meter like an OWON or Hantek since the professional brands are still very expensive. We wonder what the designer of 1983’s Pocket-O-Scope would think of these modern devices.