Not only will this spin nicely, the spinning action will use magnets to energize PCB coils and light up LEDs for some persistence of vision action. Designing the PCB was easier than you might imagine thanks to KiMotor, a KiCad plugin to automate the design of parametric PCB motors.
Mechanical testing went pretty well with the bearings and magnets that [mulcmu] had on hand, along with a scrap PCB as the sacrifice. Although a bit difficult to hold, it spins okay with just the bearing and the shaft. Once the boards arrived, it was time to test the electrical side. So far, things are not looking good — [mulcmu] is only getting a few tens of mV out of the rectifier — but they aren’t giving up hope yet. We can’t wait to see this one in action!
Hurry! This is the last weekend to enter the 2024 Business Card Challenge! Technically you have until Tuesday, July 2nd, but you know what we mean. Show us what you’ve got!
There is perhaps no more important time to have a business card than when you’re in college, especially near the end when you’re applying for internships and such. And it’s vital that you stand out from the crowd somehow. To that end, Electrical & Computer Engineer [Ryan Chan] designed a tidy card that plays tic-tac-toe.
Instead of X and O, the players are indicated by blue and red LEDs. Rather than having a button at every position, there is one big control button that gets pressed repeatedly until your LED is in the desired position, and then you press and hold to set it and switch control to the other player. In addition to two-player mode, the recipient of your card can also play alone against the ATMega.
The brains of this operation is an ATMega328P-AU with the Arduino UNO bootloader for ease of programming. Schematic and code are available if you want to make your own, but we suggest implementing some type of changes to make it your own. Speaking of, [Ryan] has several next steps in mind, including charlieplexing the LEDs, using either USB-C or a coin cell for power, upgrading the AI, and replacing the control button with a capacitive pad or two. Be sure to check it out in action in the two videos after the break.
Summer has settled upon the northern hemisphere, which means that it’s time for sweet, sweet strawberries to be cheap and plentiful. But would you believe they taste even better in freeze-dried format? I wouldn’t have ever known until I happened to get on a health kick and was looking for new things to eat. I’m not sure I could have picked a more expensive snack, but that’s why we’re here — I wanted to start freeze-drying my own strawberries.
While I could have just dropped a couple grand and bought some kind of freeze-drying contraption, I just don’t have that kind of money. And besides, no good Hackaday article would have come out of that. So I started looking for alternative ways of getting the job done.
Early on in my web crawling on the topic, I came across this Valley Food Storage blog entry that seems to have just about all the information I could possibly want about the various methods of freeze-drying food. The one that caught my eye was the dry ice method, mostly because it’s only supposed to take 24 hours.
Here’s what you do, in a nutshell: wash, hull, and slice the strawberries, then put them in a resealable bag. Leave the bag open so the moisture can evaporate. Put these bags in the bottom of a large Styrofoam cooler, and lay the dry ice on top. Loosely affix the lid and wait 24 hours for the magic to happen.
I still had some questions. Does all the moisture simply evaporate? Or will there be a puddle at the bottom of the cooler that could threaten my tangy, crispy strawberries? One important question: should I break up the dry ice? My local grocer sells it in five-pound blocks, according to their site. The freeze-drying blog suggests doing a pound-for-pound match-up of fruit and dry ice, so I guess I’m freeze-drying five entire pounds of strawberries. Hopefully, this works out and I have tasty treats for a couple of weeks or months.
Preparation
In order to make this go as smoothly as possible, I bought both a strawberry huller and a combination fruit and egg slicer. Five pounds of strawberries is kind of a lot, eh? I’m thinking maybe I will break up the ice and try doing fewer strawberries in case it’s a complete failure.
I must have gotten rid of all our Styrofoam coolers, so I called the grocery store to make sure they have them. Unfortunately, my regular store doesn’t also have dry ice, but that’s okay — I kind of want to be ready with my cooler when I get the dry ice and not have to negotiate buying both while also handling the ice.
So my plan is to go out and get the cooler and the strawberries, then come back and wash the berries. Then I’ll go back out and get the dry ice and then hull and slice all the berries. In the meantime, I bought some food-safe desiccant packets that absorb moisture and change color. If this experiment works, I don’t want my crispy strawberries ruined by Midwestern humidity.
Actually Doing the Thing
So I went and bought the cooler and the strawberries. They were $2.99 for a 2 lb. box, so I bought two boxes, thinking that a little more poundage in dry ice than berries would be a good thing. I went back out to the other grocery store for the dry ice, and the person in the meat department told me they sell it in pellets now, in 3- and 6-lb. bags. So I asked for the latter. All that worrying about breaking it up for nothing!
Then it was go time. I got out my cutting board and resigned myself to hulling and slicing around 75 strawberries. But you know, it really didn’t take that long, especially once I got a rhythm going. I had no idea what the volume would be like, so I started throwing the slices into a gallon-sized bag. But then it seemed like too much mass, so I ended up with them spread across five quart-sized bags. I laid them in the bottom of the cooler in layers, and poured the dry ice pellets on top. Then I took the cooler down to the basement and made note of the time.
Since I ended up with six pounds of dry ice and only four pounds of strawberries, my intent is to check on things after 18 hours, even though it’s supposed to take 24. My concern is that the strawberries will get done drying out earlier than the 24-hour mark, and then start absorbing moisture from the air.
Fruits of Labor
I decided to check the strawberries a little early. There was no way the ice was going to last 24 hours, and I think it’s because I purposely put the lid on upside down to make it extra loose. The strawberries are almost frozen and are quite tasty, but they are nowhere near depleted of moisture. So I decided to get more ice and keep going with the experiment.
I went out and got another 6 lb. of pellets. This time, I layered everything, starting with ice in the bottom and ending with ice on top. This time, I put the lid on the right way, just loosely.
Totally Not Dry, But Tasty
Well, I checked them a few hours before the 24-hour mark, and the result looks much the same as the previous morning. Very cold berries that appear to have lost no moisture at all. They taste great, though, so I put them in the freezer to use in smoothies.
All in all, I would say that this was a good experiment. Considering I didn’t have anything I needed when I started out, I would say it was fairly cost-effective as well. Here’s how the pricing breaks down:
28-quart Styrofoam cooler: $4.99
4 lbs. of strawberries: $5.99
12 lbs. of dry ice at $1.99/lb.: $24
a couple of resealable bags: $1
Total: $36, which is a little more than I paid for a big canister of freeze-dried strawberries on Amazon that lasted maybe a week. If this had worked, it would have been pretty cost-effective compared with buying them.
So, can you freeze-dry strawberries without a machine? Signs still point to yes, but I’m going to go ahead and blame the Midwestern humidity on this one. You can bet I’ll be trying this again in the winter, probably with fewer berries and smaller cooler. By the way, there was a small puddle underneath the cooler when it was all said and done.
Have you ever tried freeze-drying anything with dry ice? If so, how did it go? Do you have any tips? Let us know in the comments.
We love that the frame has a built-in stand; that’s a great touch that really turns this card into something that someone might keep on their desk long-term. The brains of this operation is an ESP32 TTGO E-paper board, which checks the battery voltage first before connecting to Wi-Fi and getting data from the OpenWeatherMap API. It displays the information and then goes to sleep for 15 minutes.
For power, [BLANCHARD Jordan] is using a 5 V solar panel and a small battery from an old vape pen. We love to see projects that keep those things out of the landfills, so don’t sleep on using them.
You have just a few weeks left to enter the 2024 Business Card Challenge, so fire up those soldering irons and get hackin’!
What was the worst thing about the 70s? Some might say the oil crisis, inflation, or even disco. Others might tell you it was 8-track tapes, no matter what was on them. I’ve heard that the side of the road was littered with dead 8-tracks. But for a while, they were the only practical way to have music in the car that didn’t come from the AM/FM radio.
If you know me at all, you know that I can’t live without music. I’m always trying to expand my collection by any means necessary, and that includes any format I can play at home. Until recently, that list included vinyl, cassettes, mini-discs, and CDs. I had an 8-track player about 20 years ago — a portable Toyo that stopped working or something. Since then, I’ve wanted another one so I can collect tapes again. Only this time around, I’m trying to do it right by cleaning and restoring them instead of just shoving them in the player willy-nilly.
Update: I Found a Player
I have since cleaned it.
A couple of weeks ago, I was at an estate sale and I found a little stereo component player and speakers. There was no receiver in sight. I tested the player with the speakers and bought them for $15 total because it was 75% off day and they were overpriced originally. While I was still at the sale, I hooked it up to the little speakers and made sure it played and changed programs.
Well, I got it home and it no longer made sound or changed programs. I thought about the play head inside and how dirty it must be, based on the smoker residue on the front plate of the player. Sure enough, I blackened a few Q-tips and it started playing sweet tunes again. This is when I figured out it wouldn’t change programs anymore.
I found I couldn’t get very far into the player, but I was able to squirt some contact cleaner into the program selector switch. After many more desperate button presses, it finally started changing programs again. Hooray!
This is what’s going on, inside and out. Image via 8-Track Heaven, a site which has itself gone to 8-Track Heaven.
So now, the problem is the tapes themselves. I think there are two main reasons why people think that 8-tracks suck. The first one is the inherent limitations of the tape. Although there were 90- and 120-minute tapes, most of them were more like 40-60 minutes, divided up into four programs. One track for the left channel, one for the right, and you have your eight tracks and stereo sound.
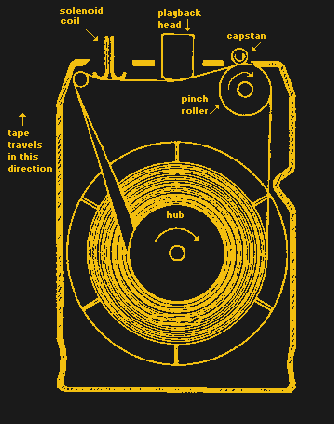
The tape is in a continuous loop around a single hub. Open one up and you’ll see that the tape comes off the center toward the left and loops back onto the outside from the right. 8-tracks can’t be rewound, only fast-forwarded, and it doesn’t seem like too many players even had this option. If you want to listen to the first song on program one, for instance, you’d better at least tolerate the end of program four.
The tape is divided into four programs, which are separated by a foil splice. A sensor in the machine raises or lowers the playback head depending on the program to access the appropriate tracks (1 and 5, 2 and 6, and so on.)
Because of the 10-12 minute limitation of each program, albums were often rearranged to fit better within the loud solenoidal ka-chunk of each program change.
For a lot of people, this was outright heresy. Then you have to consider that not every album could fit neatly within four programs, so some tracks faded out for the program change, and then faded back in, usually in the middle of the guitar solo.
Other albums fit into the scheme with some rearrangement, but they did so at the expense of silence on one or more of the programs. Check out the gallery below to see all of these conditions, plus one that divided up perfectly without any continuations or silence.
The second reason people dislike 8-tracks is that they just don’t sound that good, especially since cassette tapes were already on the market. They didn’t sound super great when they were new, and years of sitting around in cars and dusty basements and such didn’t help. In my experience, at this point, some sound better than others. I suppose after the tape dropout, it’s all subjective.
What I Look For When Buying Tapes
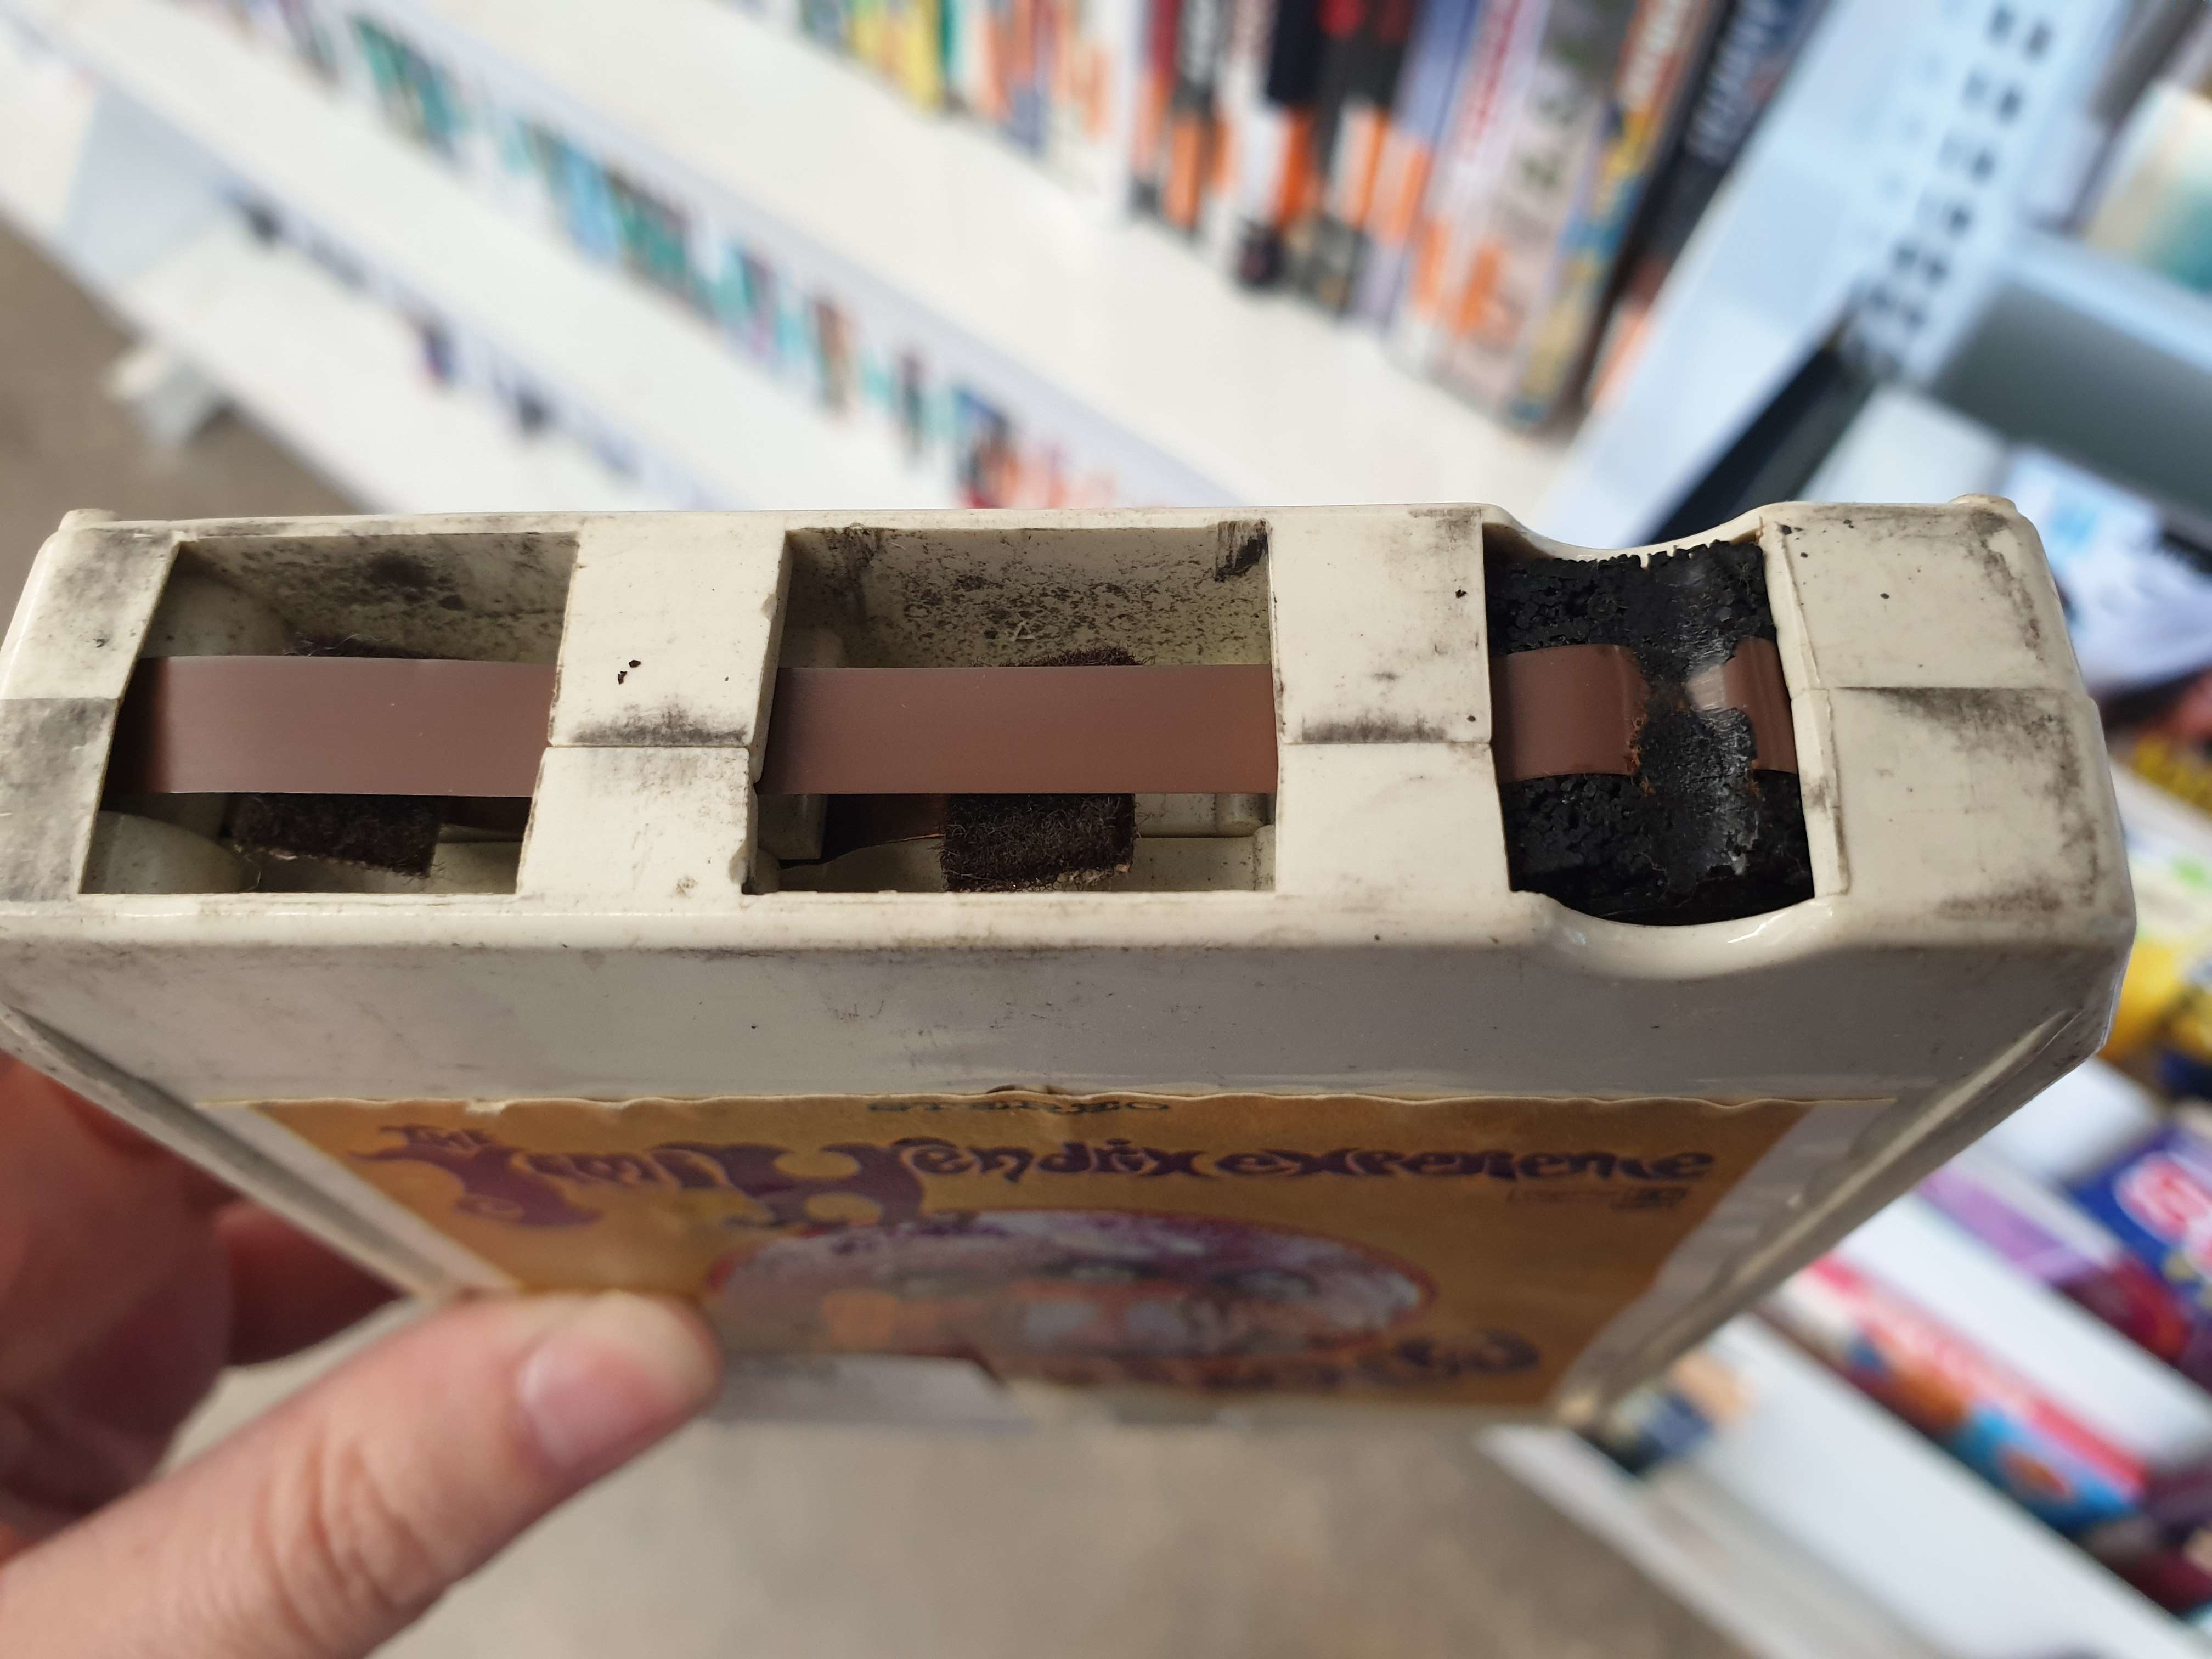
The three most important things to consider are the pressure pads, the foil splices, and the pinch roller. All of these can be replaced, although some jobs are easier than others.
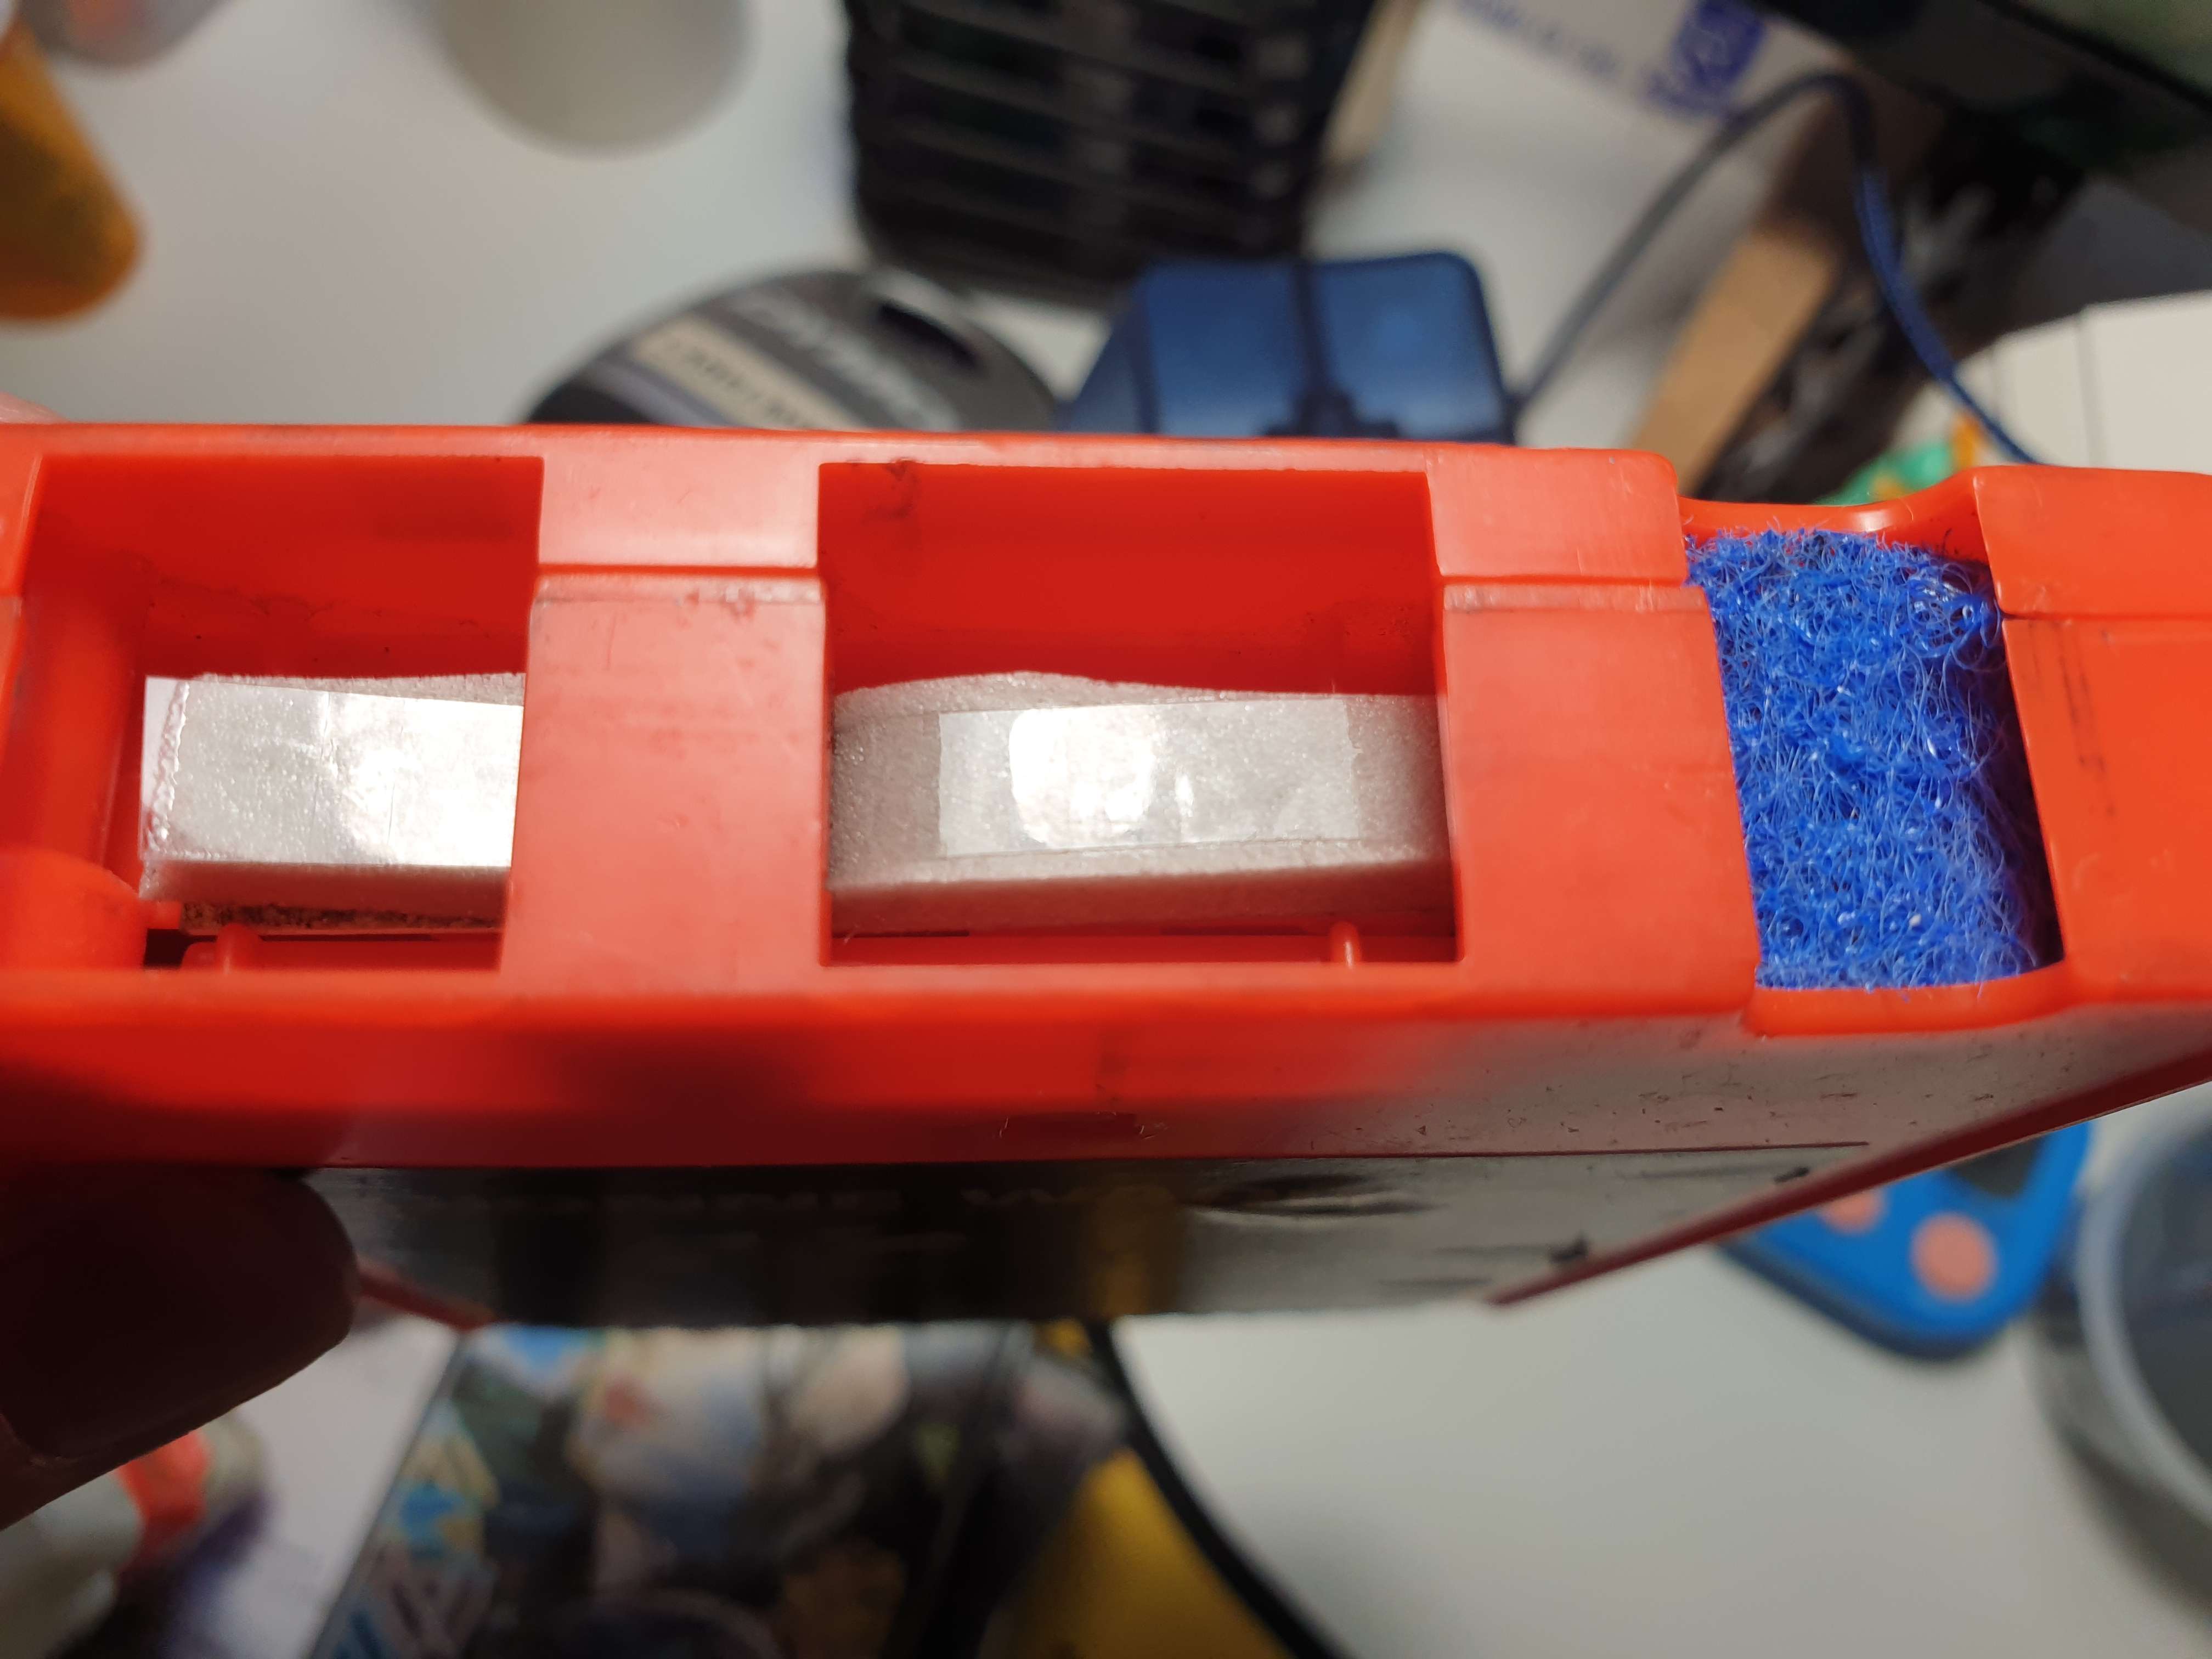
Start by looking at the pressure pads. These are either made of foam that’s covered with a slick surface so the tape can slide along easily, or they are felt pads on a sproingy metal thing like a cassette tape. You want to see felt pads when you’re out shopping, but you’ll usually see foam. That’s okay. You can get replacement foam on ebay or via 8-track avenue directly, or you can do what I do.
After removing the old foam and scraping the plastic backing with my tweezers, I cut a piece of packing tape about 3/8″ wide — just enough to cover the width of some adhesive foam window seal. The weatherstripping’s response is about the same as the original foam, and the packing tape provides a nice, slick surface. I put a tiny strip of super glue on the adhesive side and stick one end down into the tape, curling it a little to rock it into position, then I press it down and re-tension the tape. The cool part is that you can do all this without opening up the tape by just pulling some out. Even if the original foam seems good, you should go ahead and replace it. Once you’ve seen the sticky, black powder it can turn to with time, you’ll understand why.
An example of what not to buy. This one is pretty much hopeless unless you’re experienced.
Another thing you can address without necessarily opening up the tape are the foil splices that separate the programs. As long as the pressure pads are good, shove that thing in the player and let it go until the ka-chunk, and then pull it out quickly to catch the splice. Once you’ve got the old foil off of it, use the sticky part of a Post-It note to realign the tape ends and keep them in place while you apply new foil.
Again, you can get sensing foil on ebay, either in a roll, or in pre-cut strips that have that nice 60° angle to them. Don’t try to use copper tape like I did. I’ll never know if it worked or not, because I accidentally let too much tape un-spool from the hub while I was splicing it, but it seemed a little too heavy. Real-deal aluminium foil sensing tape is even lighter-weight than copper tape.
One thing you can’t do without at least opening the tape part way is to replace the pinch roller. Fortunately, these are usually in pretty good shape, but you can usually tell right away if they are gooey without having to press your fingernail into it. Even so, I have salvaged the pinch rollers out of tapes I have tried to save and couldn’t, just to have some extras around.
If you’re going to open the tape up, you might as well take some isopropyl alcohol and clean the graphite off of the pinch roller. This will take a while, but is worth it.
Other Problems That Come Up
Sometimes, you shove one of these bad boys in the player and nothing happens. This usually means that the tape is seized up and isn’t moving. Much like blowing into an N64 cartridge, I have heard that whacking the tape on your thigh a few times will fix a seized tape, but so far, that has not worked for me. I have so far been unable to fix a seized tape, but there are guides out there. Basically, you cut the tape somewhere, preferably at a foil splice, fix the tension, and splice it back together.
Another thing that can happen is called a wedding cake. Basically, you open up the cartridge and find that the inner loops of tape have raised up around the hub, creating a two-layer effect that resembles a wedding cake. I have not so far successfully fixed such a situation, but I’ve only run across one so far. Basically, you pull the loops off of the center, re-tension the tape from the other side, and spin those loops back into the center. This person makes it look insanely easy.
Preventive Maintenance On the Player
As with cassette players, the general sentiment is that one should never actually use a head-cleaning tape as they are rough. As I said earlier, I cleaned the playback head thoroughly with 91% isopropyl alcohol and Q-tips that I wished were longer.
An early set of my homemade pressure pads. Not the greatest.
Another thing I did to jazz up my discount estate sale player was to make a capstan-cleaning tape per these instructions on 8-Track Avenue. Basically, I took my poor Dionne Warwick tape that I couldn’t fix, threw away the tape, kept the pinch roller for a rainy day, and left the pressure pads intact.
To clean the capstan, I took a strip of reusable dishrag material and stuffed it in the place where the pinch roller goes. Then I put a few drops of alcohol on the dishrag material and inserted the tape for a few seconds. I repeated this with new material until it came back clean.
In order to better grab the tape and tension it against the pinch roller, the capstan should be roughed up a bit. I ripped the scrubby side off of an old sponge and cut a strip of that, then tucked it into the pinch roller pocket and let the player run for about ten seconds. If you listen to a lot of tapes, you should do this often.
Final Thoughts
I still have a lot to learn about fixing problematic 8-tracks, but I think I have the basics of refurbishment down. There are people out there who have no qualms about ironing tapes that have gotten accordioned, or re-spooling entire tapes using a drill and a homemade hub-grabbing attachment. If this isn’t the hacker’s medium, I don’t know what is. Long live 8-tracks!
Are you tired of the same old music, but can’t afford any new tunes, even if they’re on dead formats? Boy, do we know that feeling. Here’s what you do: build yourself a GlobeTune music player, and you’ll never want for new music again.
The idea is simple, really. Just turn what we assume is a nice, clicky knob, and after a bit of static (which is a great touch!), you get a new, random radio station from somewhere around the globe. [Alexis D.] originally built this as a way to listen to and discover new music while disconnecting from the digital world, and we think it’s a great idea.
[Alexis D.] has production in mind, so after a Raspberry Pi Zero W prototype, they set about redesigning it around the ESP32. The current status seems to be hardware complete, software forthcoming. [Alexis D.] says that a crowdfunding campaign is in the works, but that the project will be open-sourced once in an acceptable state. So stay tuned!
If you want to make a good first impression on someone, it seems like the longer you can keep them talking, the better. After all, if they want to keep talking, that’s a pretty good sign that even if you don’t become business partners, you might end up friends. What better way to make an acquaintance than over a friendly game of tic-tac-toe?
This one will probably take them by surprise, being a 4×4 matrix rather than the usual 3×3, but that just makes it more interesting. The front of the card has all the usual details, and the back is a field of LEDs and micro switches. Instead of using X and O, [Edison Science Corner] is using colors — green for player one, and red for player two. Since playing requires the taking of turns, the microcontroller lights up green and red with alternating single-button presses.
Speaking of, the brains of this operation is an ATMega328P-AU programmed with Arduino. If you’d like to make your own tic-tac-toe business card, the schematic, BOM, and code are all available. Be sure to check out the build and demo video after the break.
This one is a remix of some other linear RGB clocks, but the result is distinctly [andrei.erdei]’s style. There’s nothing crazy going on under the hood here — it’s essentially a Wemos D1 mini running a strip of RGBs, and the microcontroller connects to a Wi-Fi router to get the time from a server. The magic is in the programming and the way the clock is read.
The brief but thorough demo video after the break does a much better job of explaining the display by showing various times of the day, but we’ll give it a shot. For one thing, it uses 24-hour time exclusively. There are four groups of triangles; yellow, red, green, and blue which correspond to tens and units of hours, and tens and units of minutes.
The triangles light up in groups of three in the order depicted in the animation. At midnight, none of the triangles are lit up. Again, it’s best explained in the video, looking at various times of day. Plus you can see the neat-o startup animation.
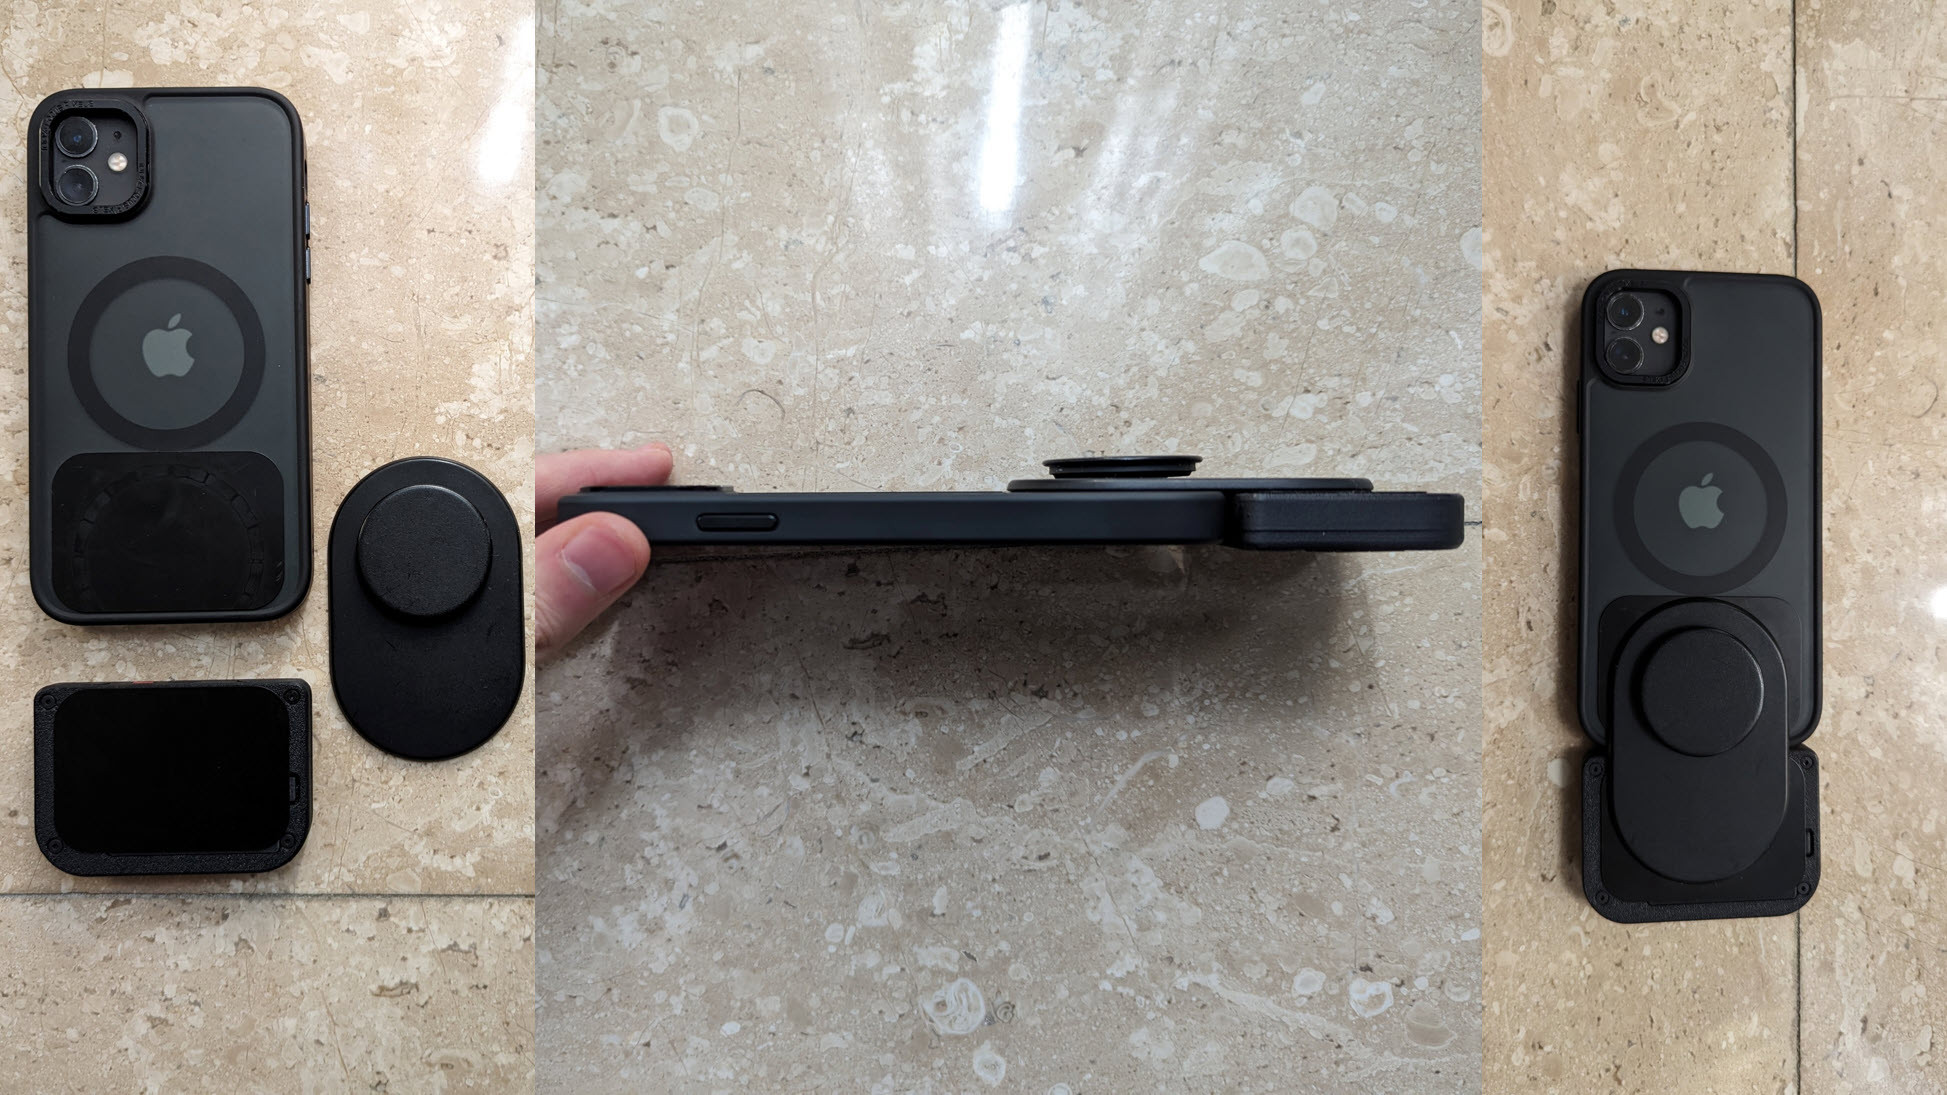
If you’re anything like us, you really, really miss having a physical keyboard on your phone. Well, cry no more, because [Joe LiTrenta] has made it possible for any modern smartphone whatsoever to have a detachable, physical keyboard and mouse at the ready. [Joe] calls this creation the BlueBerry.
The keyboard/mouse combo in question is a little BlackBerry Bluetooth number from ZitaoTech which is available on Tindie, ready to go in a 3D printed case. What [Joe] has done is to create a custom ZMK-based firmware that allows the keyboard be device-agnostic.
In order to easily mount the keyboard to the phone and make it detachable, [Joe] used adhesive-backed metal mounting plates on both the phone and the keyboard, and a mag-safe pop socket to connect the two. The firmware makes use of layers so everything is easily accessible.
Check out the demo video after the break, which shows the board connected to a Google Pixel 7. It makes the phone comically long, but having a physical keyboard again is serious business, so who’s laughing now? We’d love to see a keyboard that attaches to the broad side of the phone, so someone get on that. Please?
This is an interesting development because Finland consumes the most coffee in the world, according to the International Coffee Organization. Coffee roasting is a highly-valued traditional artisan profession there, so it stands to reason that they might turn to technology for help.
Just like with scotch whisky, there’s nothing wrong with coffee blends outright. Bean blends are good for consistency, when you want every cup to taste pretty much exactly the same. Single-origin beans, though, are traceable to one location, and as a result, they usually have a distinct flavor based on the climate they’re grown in.
If you’re new to coffee, blends are a nice, safe way to start out. And, interestingly, the AI chose to make the blend out of four different types of beans instead of the usual two or three, despite being tasked with creating a blend that would suit the palates of coffee enthusiasts. But the coffee experts agreed that the AI blend was “perfect” and needed no human intervention. We probably won’t be getting to Finland anytime soon, so if you try it, let us know how it tastes!
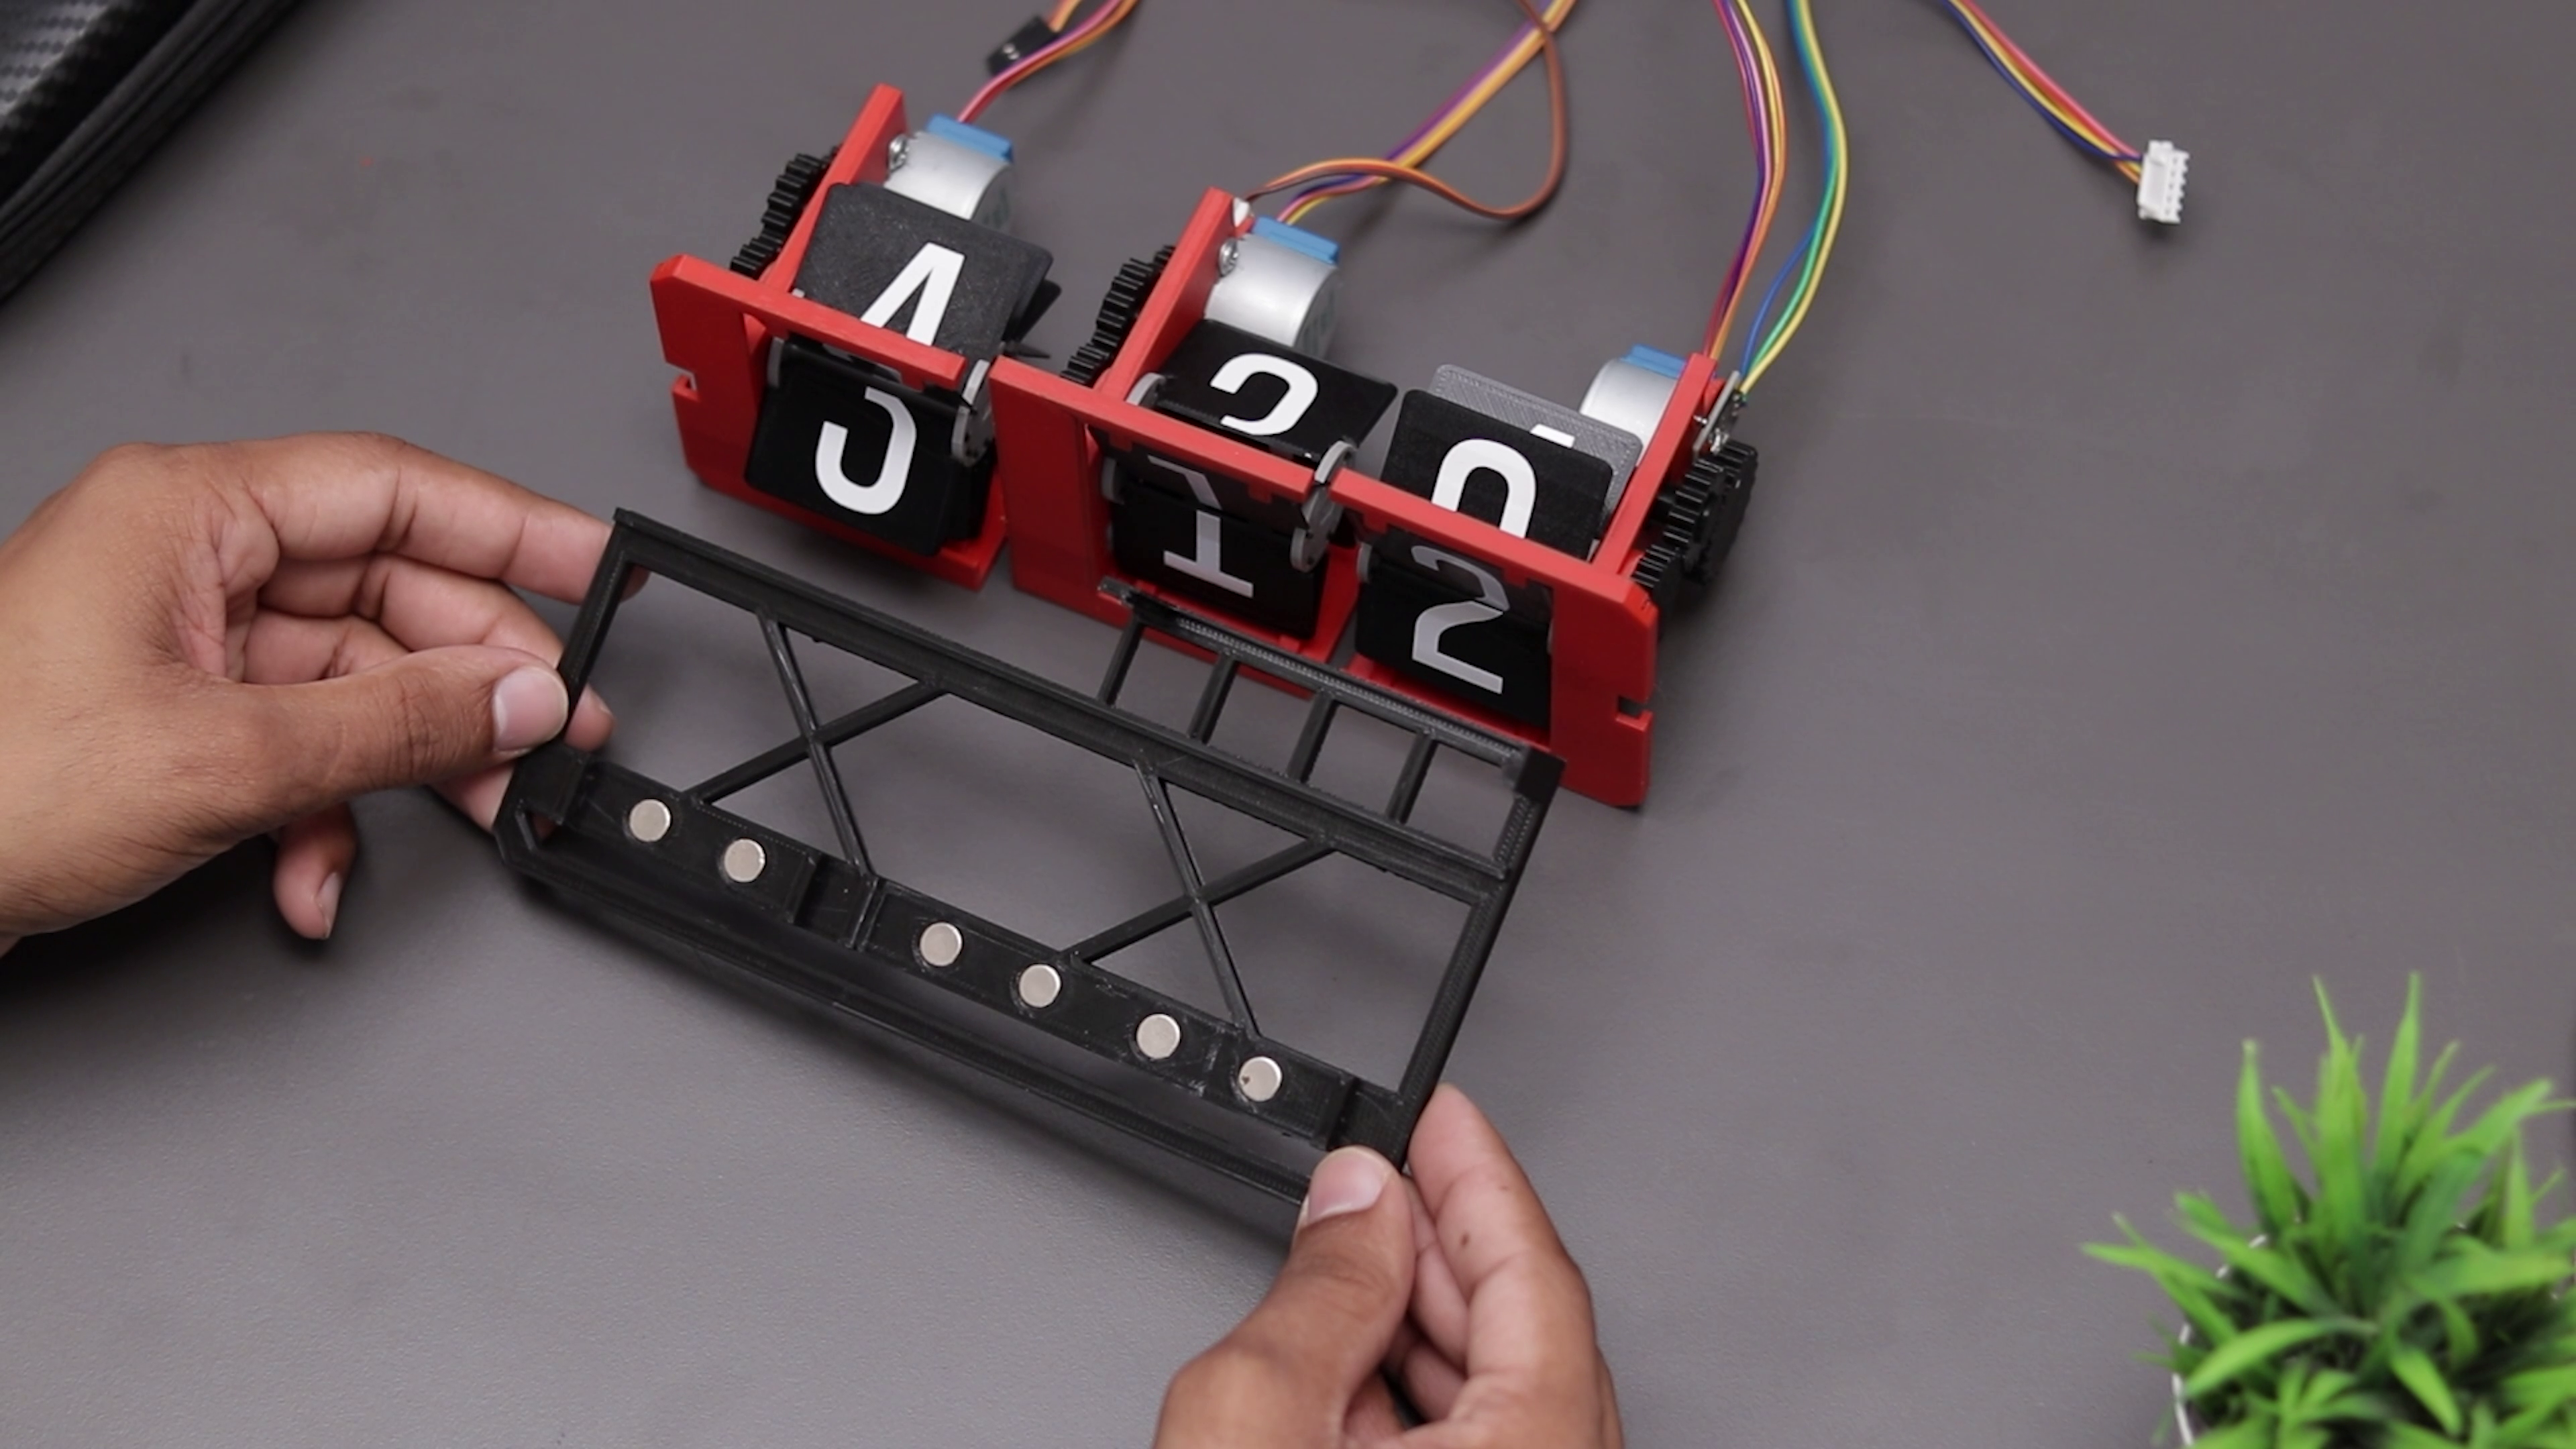
While split-flap alarm clocks once adorned heavy wood nightstands in strong numbers, today the displays are most commonly found in train stations and airports. Hey, at least they’re still around, right? Like many of us, [The Wrench] has always wanted to make one for themselves, but they actually got around to doing it.
This doesn’t seem like a beginner-friendly project, but [The Wrench] says they were a novice in 3D design and so used Tinkercad to design all the parts. After so many failures, they settled on a design for each unit that uses a spool to attach the flaps, which is turned by a stepper motor.
A small neodymium magnet embedded in the primary gear and a Hall effect sensor determine where the stepper motor is, and in turn, which number is displayed. Everything is handled by an Arduino Nano on a custom PCB.
Aside from the sleek, minimalist look, our favorite part is that [The Wrench] used even more magnets to connect each display segment to the base. You may have noticed that there are only three segments, because the hours are handled by a single display that has flaps for 10, 11, and 12. This makes things simpler and gives the clock an interesting look. Be sure to check out the build video after the break.
Here’s a story that may be familiar: [der-b] is a Linux developer who is forced two carry two laptops — one for work with unavoidable work stuff on it, and one for software development. Unfortunately this leads to keyboard confusion between the two when one is connected to an external display.
In an attempt to overcome this, [der-b] designed a keyboard that can be connected to more than one device at a time, despite ultimately thinking that this will lead to another layer of confusion. The point was to try to make something as lightweight as possible, since carrying two laptops is already a struggle. As a bonus, this project was a learning experience for soldering SMD parts.
The keyboard itself is based on the Planck and uses an ATMega32u4 running QMK firmware, so that means it’s a 40% ortholinear with 48 keys total. [der-b] used low-profile Cherry MX switches to keep things sleek.
In order to switch between different host devices, [der-b] uses shortcuts as you’ll see in the short video after the break. This is accomplished with a FSUSB36 IC on the USB connections between the ATMega and the host.
[der-b] encountered a spate of issues while building this keyboard, which you can read all about in the blog post. We love to see transparency when it comes to your write-ups, especially when the projects become learning experiences. (Aren’t they all?) But if 48 keys aren’t nearly enough for you, check out this learning-experience keyboard build.
You’ve probably used one for everything from opening packages to stripping wires in a pinch (because you know better than to use your teeth). We’re talking about the blade of the iconic Swiss Army knife. And while there are many different models out there, they all feature at least one knife among their utensils. Until now.
In an interview with The Guardian, Elsner spoke of creating more specialized tools, such as one for cyclists, who don’t necessarily need a blade. He also mentioned that Victorinox have a tool specifically for golfers, but we’d like to point out that it features, among other things, a knife.
It’s going to be a long time before people stop assuming that the skinny red thing in your pocket contains a knife, especially at the airport. What TSA agent is going to take the time to check out your tool? They’re going to chuck it in the bucket with the rest of them. Would you consider buying a blade-less multi-tool? Let us know in the comments.
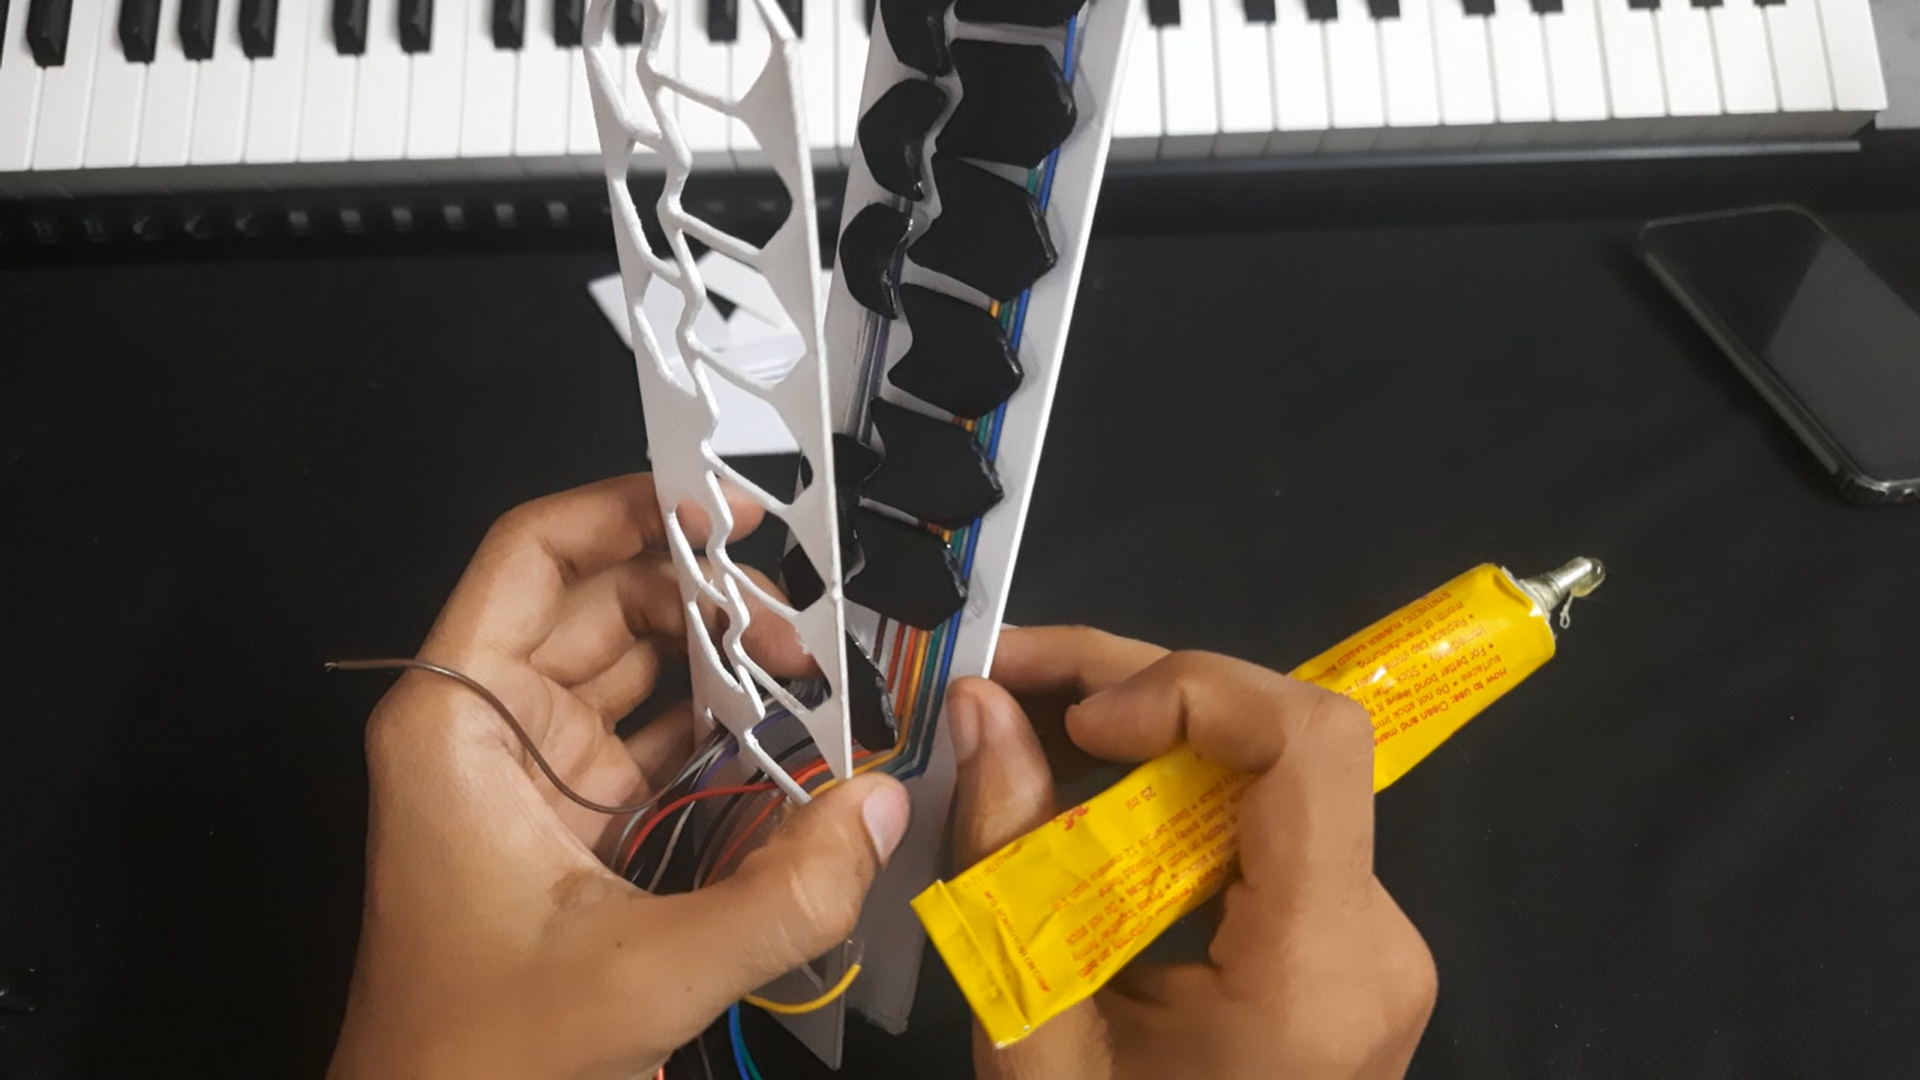
Have you ever wanted to take a break from reading or studying to just rock out for a few blissful minutes? If you’re anything like us, you like to rock out most of the time and take the occasional break to do your reading. Either way, you really can’t go wrong with this MIDI bookmark from [Misfit Maker].
This slick little bookmark may look 3D printed, but it’s all carefully-cut foam board in two thicknesses. Even the keys are made foam board — they’re just wrapped in carbon fiber so they look extra cool.
Underneath that carbon fiber is a layer of aluminium tape to make them capacitive. [Misfit Maker] recommends using copper tape instead because it allows for wires to be soldered directly to the keys.
The brains of this beauty is in the form of an ESP32 which is controlling an MPR-121 capacitive touch sensor. If you’d like to make one of these for yourself, there are plenty of helpful GIFs embedded in the thorough write-up. Be sure to check out the brief demo after the break.
If you want to easily MIDI-fy something and use touch inputs, you can’t really go wrong with the Raspberry Pi Pico, which does capacitive touch natively. Check out this MIDI kalmiba to learn more.
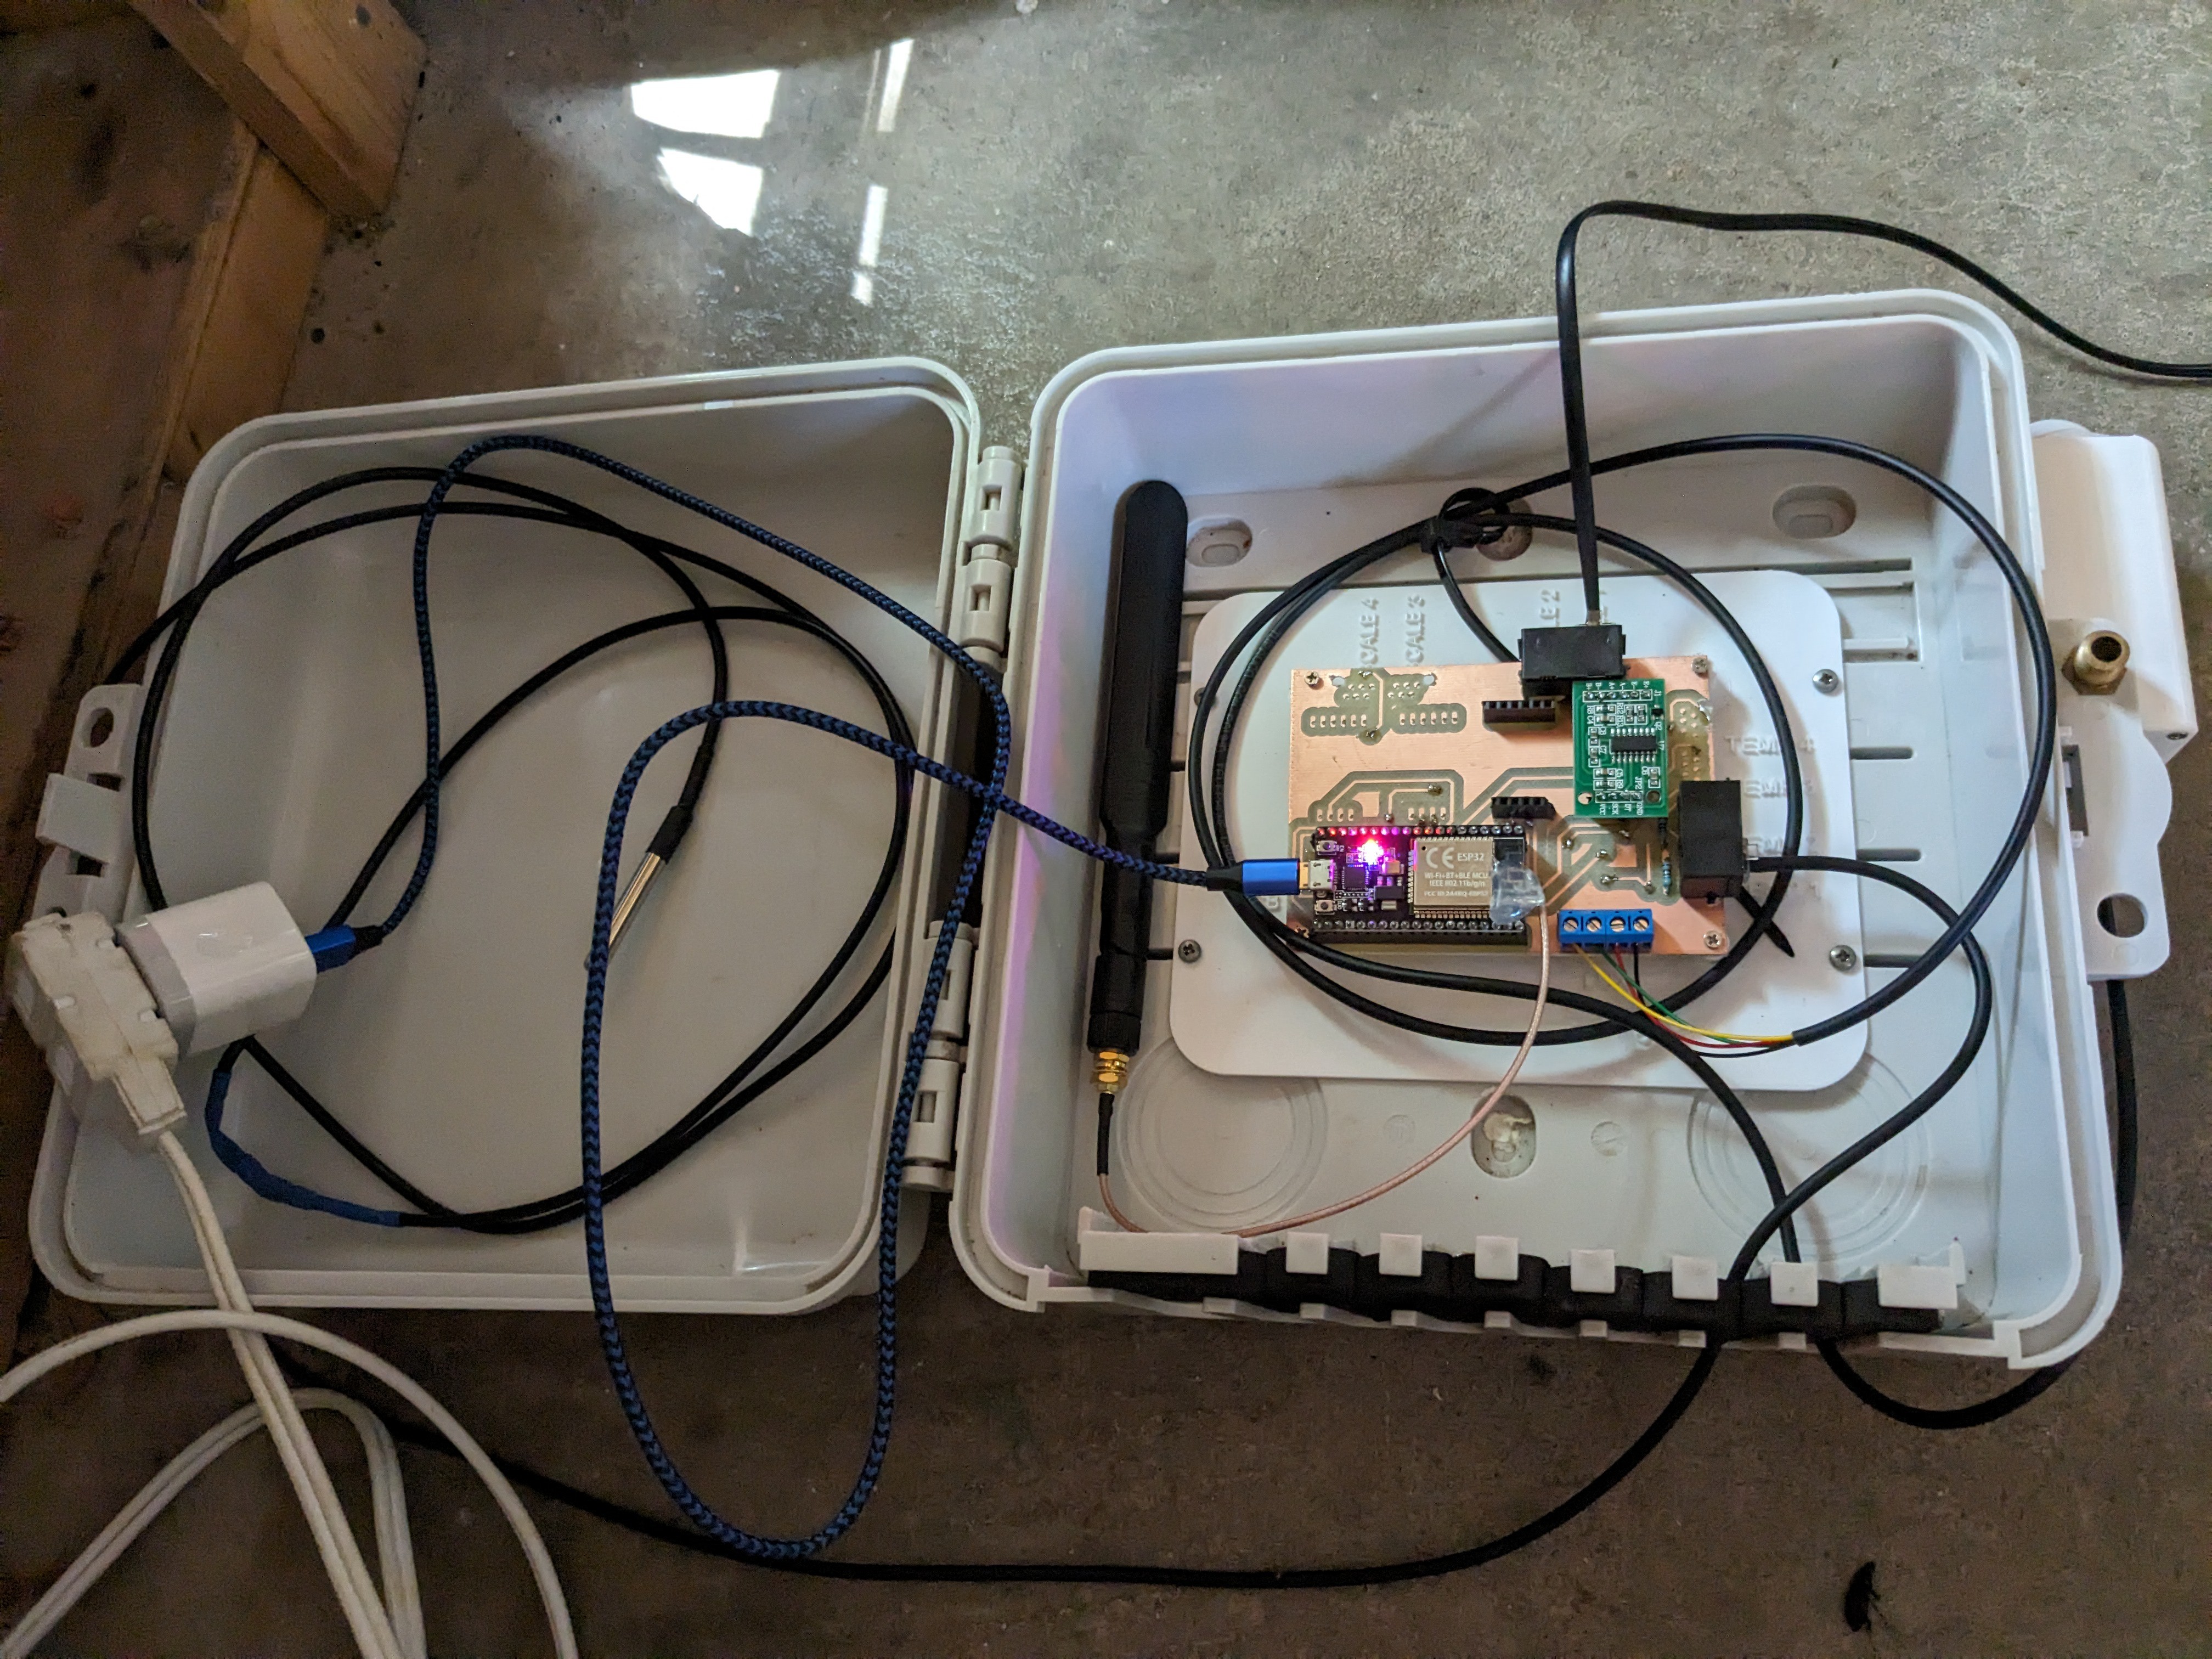
This hive tracker features a light sensor, a temperature sensor, and three strain gauges to measure the weight. There would be four, but a mouse decided to take a bite of the wires in the most nightmarish place to repair.
Everything runs off of an ESP32, and there’s an external antenna involved because the hive is nearly out of Wi-Fi range. The strain gauges are the affordable bathroom-scale type, and [Ben] has extras for if and when the number of hives goes up.
We like the combination of hard work and simplicity going on here — [Ben] milled and drilled the PCB himself, and used phone plugs to connect the temperature and weight sensors. Unfortunately, the plugs make the strain gauges a little finicky, so [Ben] says he would probably use screw terminals next time, or might be soldering the wires sooner rather than later. Consider this one a work in progress, and keep watching for updates as [Ben] works out the kinks.
If you’ve never considered roasting your own coffee at home, you may be surprised to learn that it can be done in a few minutes with a regular popcorn popper and not much else. After all, you only really need two things to roast coffee: heat, and constant agitation to distribute that heat evenly. While the popcorn popper provides both, it’s easy to end up with semi-uneven roasts, probably because the beans are mostly just spinning around and not being tossed as well as they could be. Eventually, one might want a more advanced machine, and that’s where something like [Larry Cotton]’s latest wobble disk roaster can step in.
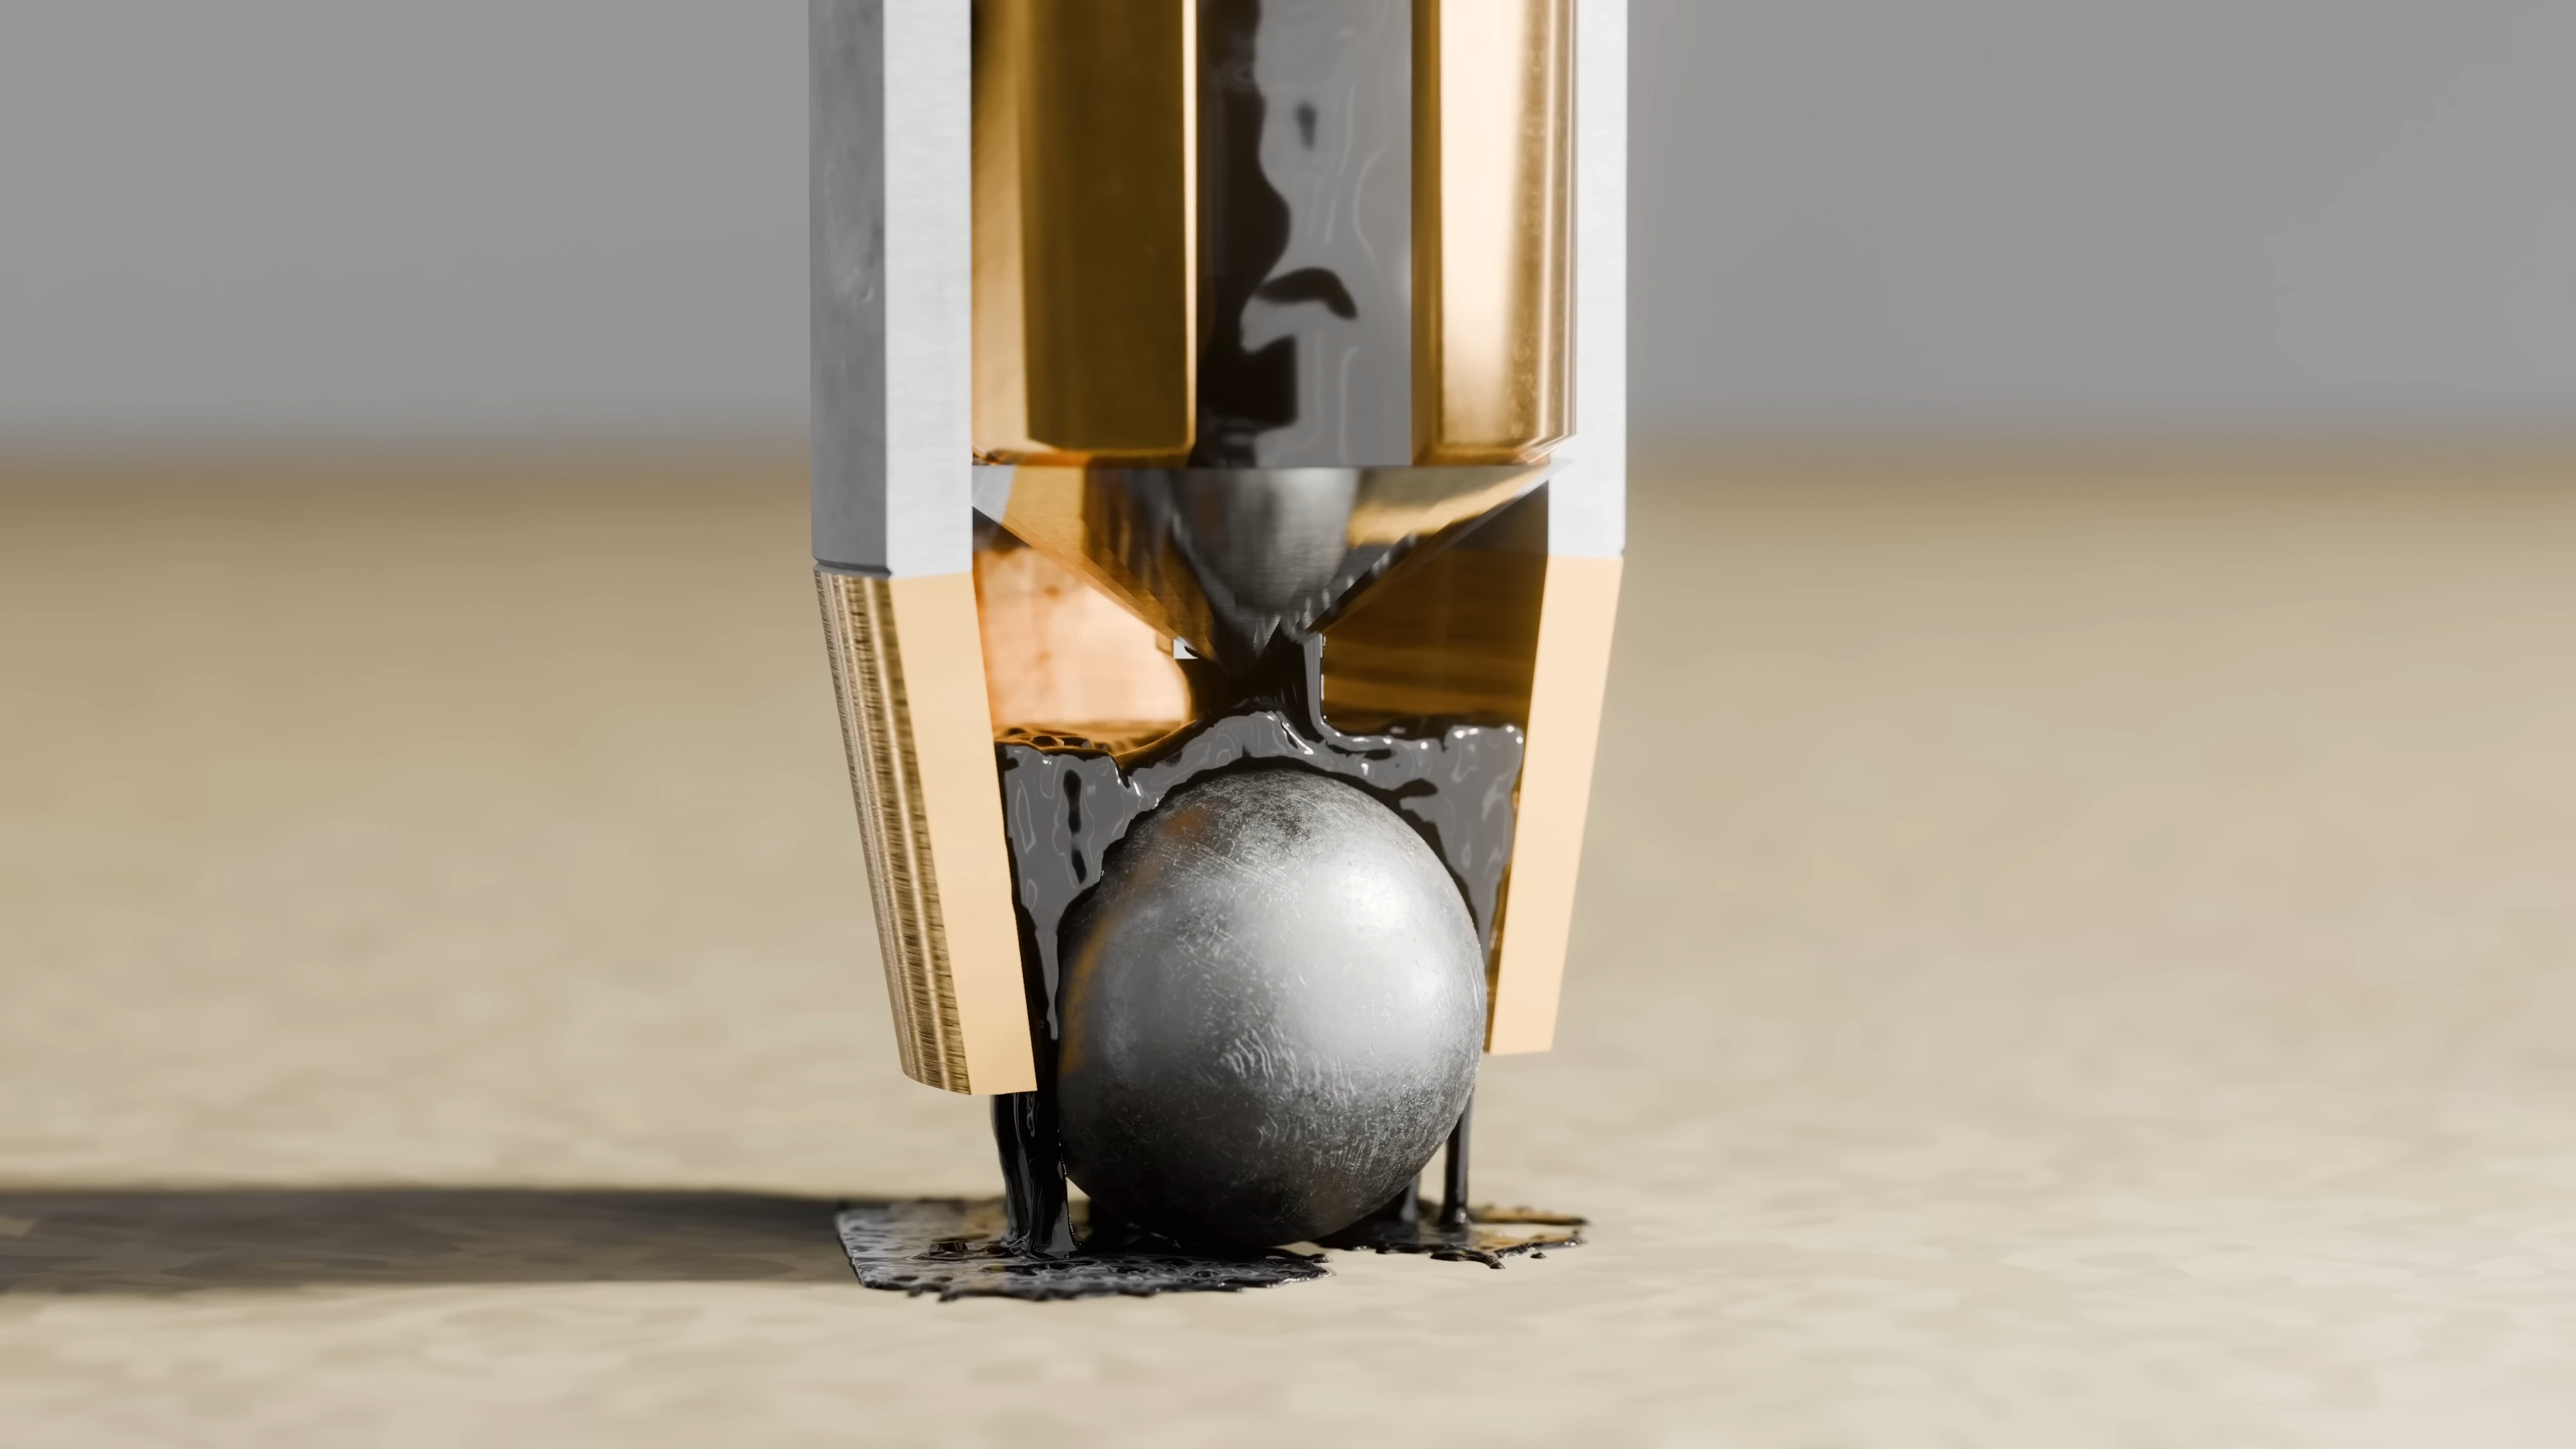
For starters, this machine roasts more beans than the average popcorn popper in a single throw — the maximum is 350g, or just over three-quarters of a full pound, which is way more than the average popcorn machine will hold. It essentially consists of a heat gun pointed upwards at a sieve full of green coffee beans that are being constantly pushed around by a motorized wobbling disk. As the heat blows, the large metal disk does figure eights through the beans, keeping the heat nice and even. So where does the red ball come in? It’s at the bottom, keeping the flying bean skins (chaff) from entering the heat gun’s fan motor.
Toward the end of the short video after the break, you’ll see a diagram showing all the parts of this roaster. If that’s not enough for you, here’s a build guide for a previous wobble disk roaster (PDF) that should be quite helpful in building either version.
If you want to see some of Larry’s previous machines, we’ve got ’em. And then you can let Hackaday Editor-in-Chief [Elliot Williams] tell you all about roasting at home.
One of the greatest things about the hacker ecosystem is that whole standing-on-the-shoulders-of-giants thing. Somebody makes something and shares it, and then someone else takes that thing and remixes it, sometimes making it objectively better. For their T3rminal cyberdeck, [calebholloway08] was inspired by a number of projects and came up with something that looks simply fantastic.
Whether you want to call this beauty a cyberdeck or a mobile PC, the guts are what you might expect — a Raspberry Pi 4, an affordable mini keyboard, and a touch screen. But this one took some doing, as in [calebholloway08] had to do a little bit of surgery on the Pi 4, the PiSugar S plus power supply platform, and the display. But you shouldn’t let that stop you from standing on the shoulders of giants, as [calebholloway08] provides (or guides you towards) clear instructions for all three mods.
One thing [calebhollway08] would have done differently was to use something other than a 18650 battery for power, like a 21700. The question is, what will you do differently?
We love LEGO, we love keyboards, and when the two join forces, we’re usually looking at a versatile peripheral that’s practically indestructible. Such seems to be the case with [joshmarinacci]’s LEGO-compatible 3D-printed plate for a three-key macro pad. For a first foray into scratch-built keyboard construction, we think this is pretty great.
The idea here is threefold: the plate holds the switches in place, negates the need for a PCB, and makes it possible to build the case completely out of LEGO. In fact, [joshmarinacci]’s plan for the keycaps even includes LEGO — they are going to 3D print little adapters that fit the key switch’s stem on one side, and the underside of a 2×2 plate on the other.
Although [joshmarinacci]’s plan is to design a PCB for the next version, there is plenty to be said for combining the plate and the PCB by printing guides for the wires, which we’ve seen before. We’ve also seen LEGO used to create a keyboard stand that fits just right.
Look around you. Chances are, there’s a BiC Cristal ballpoint pen among your odds and ends. Since 1950, it has far outsold the Rubik’s Cube and even the iPhone, and yet, it’s one of the most unsung and overlooked pieces of technology ever invented. And weirdly, it hasn’t had the honor of trademark erosion like Xerox or Kleenex. When you ‘flick a Bic’, you’re using a lighter.
It’s probably hard to imagine writing with a feather and a bottle of ink, but that’s what writing was limited to for hundreds of years. When fountain pens first came along, they were revolutionary, albeit expensive and leaky. In 1900, the world literacy rate stood around 20%, and exorbitantly-priced, unreliable utensils weren’t helping.
In 1888, American inventor John Loud created the first ballpoint pen. It worked well on leather and wood and the like, but absolutely shredded paper, making it almost useless.
One problem was that while the ball worked better than a nib, it had to be an absolutely perfect fit, or ink would either get stuck or leak out everywhere. Then along came László Bíró, who turned instead to the ink to solve the problems of the ballpoint.
Bíró’s ink was oil-based, and sat on top of the paper rather than seeping through the fibers. While gravity and pen angle had been a problem in previous designs, his ink induced capillary action in the pen, allowing it to write reliably from most angles. You’d think this is where the story ends, but no. Bíró charged quite a bit for his pens, which didn’t help the whole world literacy thing.
French businessman Marcel Bich became interested in Bíró’s creation and bought the patent rights for $2 million ($26M in 2024). This is where things get interesting, and when the ballpoint pen becomes incredibly cheap and ubiquitous. In addition to thicker ink, the secret is in precision-machined steel balls, which Marcel Bich was able to manufacture using Swiss watchmaking machinery. When released in 1950, the Bic Cristal cost just $2. Since this vital instrument has continued to be so affordable, world literacy is at 90% today.
When we wrote about the Cristal, we did our best to capture the essence of what about the pen makes continuous, dependable ink transmission possible, but the video below goes much further, with extremely detailed 3D models.
Thanks to both [George Graves] and [Stephen Walters] for the tip!