Vista Normal

Hay nuevos artículos disponibles. Pincha para refrescar la página.
AnteayerHackaday

I2C For Hackers: The Basics

7 Agosto 2024 at 14:00

You only really need two data wires to transfer a ton of data. Standards like UART, USB2, I2C, SPI, PS/2, CAN, RS232, SWD (an interface to program MCUs), RS485, DMX, and many others, all are a testament to that. In particular, I2C is such a powerful standard, it’s nigh omnipresent – if you were to somehow develop an allergy to I2C, you would die.

Chances are, whatever device you’re using right now, there’s multiple I2C buses actively involved in you reading this article. Your phone’s touchscreen is likely to use I2C, so is your laptop touchpad, most display standards use I2C, and power management chips are connected over I2C more often than not, so you’re covered even if you’re reading this on a Raspberry Pi! Basically everything “smart” has an I2C port, and if it doesn’t, you can likely imitate it with just two GPIOs.

If you’re building a cool board with a MCU, you should likely plan for having an I2C interface exposed. With it, you can add an LCD screen with a respectable resolution or a LED matrix, or a GPS module, a full-sized keyboard or a touchpad, a gesture sensor, or a 9 degree of freedom IMU – Inertial Measurement Unit, like a accelerometer+compass+gyroscope combination. A small I2C chip can help you get more GPIOs for your MCU or CPU, or a multi-channel motor driver, or a thermal camera, or a heap of flash memory; if you’re adding some sort of cool chip onto your board, it likely has an I2C interface to let you fine-tune its fancy bits.

As usual, you might have heard of I2C, and we sure keep talking about it on Hackaday! There’s a good few long-form articles about it too, both general summaries and cool tech highlights; this article is here to fill into some gaps and make implicit knowledge explicit, making sure you’re not missing out on everything that I2C offers and requires you to know!

Basics And Addressing

A common I2C EEPROM – you likely have a good few such chips within a dozen meter radius. By [Raimond Spekking], CC BY-SA 4.0
I2C is a two-wire interface, and you can put multiple devices on these two wires – thanks to an addressing system and strictly defined hierarchy. One party on the bus is the one always initiating all conversations (old: master, new: controller), and this role is basically always static; usually, it’s your MCU. Your devices can’t send data to your MCU on your own – your MCU has to read data from your devices. As such, you usually can’t make bidirectional effortless communications UART style, unless you dig deep enough to make “multi-master” communications work – which is a cool feature but is often poorly supported.

Instead, if your device is the kind you expect to return important data at random points, there’s often an INT pin – the INT pin is not included in the standard and usually is not required to use any I2C device, but if your IC or breakout exposes the INT pin, you should consider using it, since it will save you a fair bit of CPU time spent polling your device for data.

I2C is wonderful in that you can put a large number of devices on your bus – as long as your communications can physically stay stable. How does it work? Addresses. Devices are pre-programmed with an address you can use to talk to them, and you can query a bus to get a list of addresses that the connected devices respond on. Some devices can only have a single address so you can only add one of them to a – unless you hack it in one of the ways I’ll describe below. Many devices that – for instance, SSD1306 displays have a single pin you can tie high or low, so you can put two of these devices on the same bus, and GPIO expanders tend to have three pins that result in eight possible addresses. Rarely, there are devices that let you reprogram their address with a command, too.

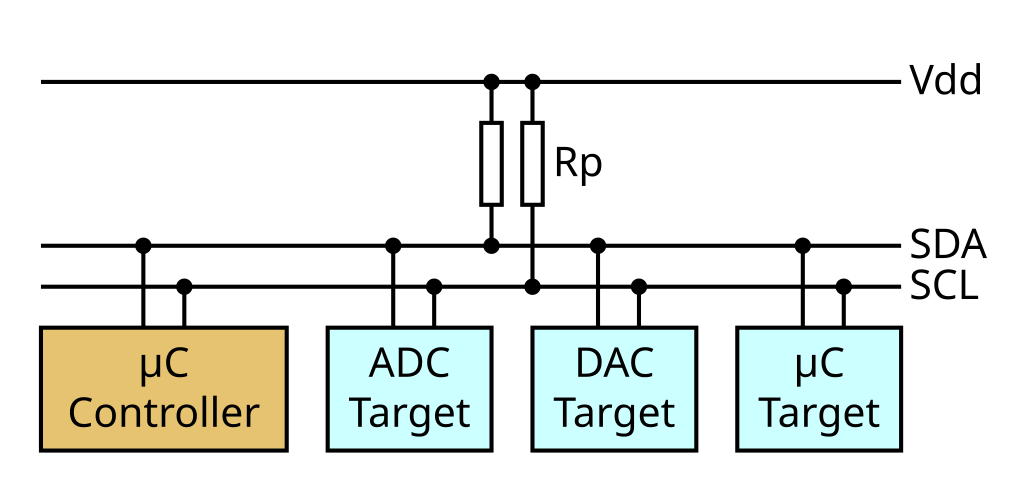
An I2C device’s address is specified in the datasheet. Beware – addresses are 7-bit, and during transfer, the address is shifted and the least significant bit signifies whether a write or read operation is happening; some datasheets will show the address in its proper 7-bit form and some show it already shifted. The way you can notice the latter if you see separate read and write addresses specified – that’s a non-shifted address. A surefire way is to connect your device to any I2C controller and scan for devices, of course. I2C addresses aren’t unique like MAC addresses, so, there’s way more kinds of I2C devices than there are addresses. Here’s a database you can check for fun, but it’s definitely incomplete. 10-bit addresses exist and they do widen the address space comfortably, but they’re still not that popular. Remember – an I2C bus can be scanned, and it’s a pretty wonderful feature – it gives you a sanity check showing that a device is connected, a check that you don’t really get with interfaces like SPI and UART!

An I2C device with a twist. ADDR here is set by connecting it to SCL/SDA/GND/VCC (4 bits with one pin), and, INT pin here is called ALERT. By [Pradeep717], CC BY-SA 4.0
How do you avoid address conflicts, in case you’re planning to use multiple devices? Plan ahead, use address changing pins where possible, and use tricks. There are chips that help you put more devices on an I2C bus, for instance, acting like a “gateway” – it’s a saturated market, with Linear Technology taking up a lot of its space with their famously pricy but seriously worthwhile ICs, and they even have Linux drivers! There’s also a large number of tricks – some hackers suggest using SCL lines as chip selects, some suggest swapping SCL and SDA, and some talk about powering devices down selectively; if you’re experiencing address conflicts, you won’t be able to solve this purely in software, but it’s certain you won’t run out of hardware options.

Clocks And Pullups

There’s three standard I2C clock speeds – 100kHz, 400kHz and 1MHz, some hosts and devices can go even higher but it’s not especially prominent. Technically, you can go higher or lower, software I2C implementations often do, but some devices might not like it. Hosts often run at 100kHz, but it’s common that you can up the frequency and switch it into 400kHz; however, there’s hosts that are hardwired to 100kHz operation, like VGA/DVI/HDMI port and desktop/laptop-internal I2C controllers.

This affects, and sometimes, if you have choice between I2C and some other interface, speed might be a deciding factor. For example, take SSD1306 or SH1106 OLED screens – they can be connected through either I2C or SPI, so if you’re using a breakout, it just depends on the way it’s wired. You won’t be able to send data to an I2C screen as quickly over SPI, because of the inherent data cap – they supports SPI links at multiple MHz clock rate, whereas an I2C link will be limited to 400KHz. Want faster screen refresh? You’ll want to wire the screen into SPI mode. Fine with possibly lower FPS? I2C is a valid choice, then.

You need pullups – and you cannot use GPIO-internal pullups like you can do with buttons, they are too high of a value as a rule. A typical range for a pullup is from 1K to 10K – going too high will distort the signal on the bus, and going too low will make the bus impossible to drive. Raspberry Pi boards use 1.8K pullups on the dedicated I2C bus, 4.7K is another popular value, and I’ve had 10K pullups result in unstable communications at higher speeds, so I typically go lower a fair bit, using 1.8K, 4.7K or 5.1K pullups. Mind you, if both your device, so if an I2C sensor breakout is failing to respond when connected to a Raspberry Pi but it really should work, check whether you maybe should desolder or disconnect the pullups on the sensor board itself.

I2C is pretty cool indeed – all those devices I mentioned in the intro, they’re a breakout board and a cable away, often, you don’t even have to solder. Looking to use I2C on your board as an expansion interface, but don’t know what kind of connector to use? It’s pretty simple, I’ve talked about it in my article on I2C ecosystems. One five-pin header and one four-pin JST-SH is all you need, and you can even get vertical JST-SH connectors if space is a concern!

Next time, let’s talk more about I2C devices, the kinds of I2C interfaces you will encounter and all the places they are usually hidden in, types of I2C transfers you can do, and notable implementation nuances, – leaving no stone unturned as usual.

Hack On Self: Sense Of Time

6 Agosto 2024 at 14:00

Every now and then, a commercial product aims to help you in your life journey, in a novel way, making your life better through its presence. Over the years, I’ve been disappointed by such products far more often than I have been reassured, seeing each one of them rendered unimaginative and purposeless sometimes even despite the creator’s best intentions. The pressures of a commercial market will choke you out without remorse, metal fingers firmly placed on your neck, tightening with every move that doesn’t promise profit, and letting money cloud your project’s vision. I believe that real answers can only come from within hacker communities, and as we explore, you might come to see it the same way.

This is the tip of the iceberg of a decade-long project that I hope to demonstrate in a year or two. I’d like to start talking about that project now, since it’s pretty extensive; the overall goal is about using computers to help with human condition, on a personal level. There’s a lot of talk about computers integrating into our lives – even more if you dare consult old sci-fi, much of my inspiration.

Tackling a gigantic problem often means cutting it down into smaller chunks, though, so here’s a small sub-problem I’ve been working on, for years now, on and off: Can you use computers to modify your sense of time?

The Time Question

Ever start your day thinking you will hack on a project, and in the evening, realize you’ve instead done something else entirely? Sometimes you find something cool while distracted, and sometimes, getting distracted comes to haunt you.

maybe one day I will assemble these

This has been a staple of my days as long as I remember my conscious life, and at some point, I started wondering just how much this could be modified. Do you remember one particular project we’ve seen a couple people build, a vibration-based compass build that gives you a sense of where north is? Ironically, I have made PCBs for building my own version of this project – they were designed in 2022, I finally ordered them last year in 2023, and I haven’t gotten to assemble them still.

So, you can give yourself a sense of “where’s north” – something that humans are missing, generally. Technically, humans are also missing a source of time, which is why we always supplemented it with wrist-worn watches and pocket clocks. Having compared my day plans to what actually happens on that day for two decades, I can see that I need something more than that. It’s traditionally been common for me to mis-estimate when exactly I could get something done – I would give an estimate that felt correct, then start doing part of the task and forget about the flow of time, minutes passing by me.

So, there are two problems here. One of them is that, despite having been alive for a fair bit of time, my database of “how much it takes for me to do X” is inaccurate. This makes sense: keeping such references is a conscious effort that might not extend to, and day-to-day situations are highly variable. Still, if someone is relying on me, it would be nice to be aware enough to at least notify that person, and to learn to plan ahead. Another is that it’s easy for me to get and forget about the flow of time. It sure helps me concentrate on articles, but it doesn’t help when someone is waiting on me.

At some point, this started to screw with my sense of self. Really, just how much can you rely on some aspects of your mind if it continuously fails you and people you care about, in a manner that you are expected to “just figure out already”? You have to learn to distrust certain basic aspects of your cognitive processes; again and again, something as “simple” as time planning is weighted down by all the instance of letting people down with zero intention to do so. This is a pretty uncomfortable position to be in, if being honest with yourself is a priority of yours. Unsurprisingly, it also made things pretty difficult when talking about employment or real-life obligations. Something had to be done.

Well, could you give yourself a sense of time, say, with vibromotors? Apparently, you can, but there’s nuance to it. Let me tell you about two projects I’ve built to attempt this, and some basic concepts I learned about human-computer integration.

The Not-A-Bomb Wearable

My first project in this vein grew out of a purpose-less experiment, funnily enough: a project literally called I Made This And I Don’t Know Why – a simple board I built to make use of seven-segment displays our hackerspace had a dozen of. ESP8266, dynamic indication with a shift register, and MicroPython – writing firmware for this board was a nice challenge in writing non-blocking code and finding portions of code to optimize. Soon, the board found a good few purposes – among them, a time tracker.

I decided to solve a simple problem – building a mental database on the amount of time does it take me to get from “start” to “finish” for an arbitrary task. Tracking that was tricky – say, I want to check the length of a bicycle ride from my house to a certain point. I’d need to check my phone at the exact time when I left the house, keep that time in mind, and then, once I’ve arrived to my destination, check again. Both of these require some time to execute and some memory, so, I decided to make an automatic countdown timer. Glancing at my wrist felt significantly easier, so, after some cutting, sewing, and hotglue work, I made one of the IMTAIDKW boards into an oversized watch, and used one of my universal power source designs to power it from a 18650.

There were some setbacks during – notably, this countdown timer required me to patch MicroPython’s ESP8266 port, due to an obscure bug making the time.time() function seriously imprecise; an inaccurate countdown timer wasn’t in my plan. Still, it was a nice experiment – relying on something that you build yourself is always fun, and I’ve added features like adjusting the start time. It was also automatic enough to be useful, with digits large enough and bright enough to be noticeable, still, making for an unobtrusive device, and pretty cool to wear.

The main problem was that I forgot to put it on and start the countdown. It was a purpose-built device, and I only needed it a couple times a day at its very most, so most of the time it stayed off my wrist, and I would even lose track of it sometimes. Another problem was remembering to check the time of arrival, unsurprisingly – looking at my wrist was easy enough, so most of the time I could notice the time difference and go “oh interesting”, but even then, it was easy to forget. The last, main problem, was actually keeping a mental database – turns out that when you need to remember pretty similar datapoints, it’s easy to confuse them. Does it normally take me 15 minutes to get to the city center, or was it the electronics store? This turned out to be pretty easy to mix up.

The lessons from this iteration: decreasing resistance to use is good, collecting data is good, and, you should automate the data collection process if at all possible. I wouldn’t stop here, of course – some time later, I found an even nicer wristband to hack on.

Unconventional Battery Upgrades

The TTGO (or was it Lilygo?) T-Wristband is a fun product – with an ESP32 at its heart, a good few sensors, a 160 x 80 IPS LCD, and a single capacitive button. It’s an old device by now, but when I bought it in the beginning of 2020, it was fun to hack on, and hack it I did, making it run MicroPython. I didn’t know what exactly to do with it, but soon I remembered about the “sense of time” project. At the time, I wanted to tap into my life minute-by-minute and see if I could build a device able to help me notice when I’m distracted. The minimum viable prototype idea was very simple – adding a vibromotor to the watch, then having it vibrate exactly every minute, having it be an “am I currently spending my time correctly” reminder.

The problem was, by the time I came up with that, a good few months passed where the wristband was sitting in a drawer with the battery fully discharged – hurting its capacity a bit, which, at 80 mAh, was already not great. Also, I wanted to be able to keep adding features to the code without carefully balancing sleep modes or having to charge my watch multiple times throughout the day; I just wanted to run code and charge the battery every night at most. So, it got a battery upgrade – a Samsung phone battery glued to, ahem, yet another wristband, and a devboard with vibromotor driver taped on top. After the hardware tweaks, the code itself was seriously easy to write.

despite the added bulk, it was surprisingly fun to wear. at some points, I even added features like remote PC control and a gesture interface!

Whenever I’d notice it vibrating, I’d ask myself – “am I doing the right thing right now?” And, to my surprise, it did catch some distraction moments every now and then, for sure!  Oftentimes, I wasn’t doing the right thing, in one way or another, and a reminder about being supposed to do something else was quite welcome. Other times, when I was focused on something, the “am I doing the right thing” question would get a “yes” in my mind, and, it felt good to think that.

It wasn’t as comfortable in times when I wasn’t expecting me to be on top of things – while I’d be resting, the every-minute feedback of the watch would feel annoying and needlessly distracting; soon, I implemented a vibration toggle with the capacitive button, and a few other things. My guess is that the annoyance factor and generally getting used to the vibrations has made me less sensitive to the vibromotor’s signal, which in turn made the wearable less effective at its goal. Apart from that, the battery wire kept breaking every so often, taking the watch out of commission, which made it hard to start properly relying on it.

On the upside – it turned out that this idea has been floating in collective unconscious for a while now, to the point that it was the point of a watch worn by one of the characters in Mr. Robot, and a relatable one at that. It’s pretty good to get external independent confirmation that an idea of yours has merit! In particular, the video above reminds me a lot of my experiences – I spent less time on my phone and generally less time doing things I didn’t want to do, I was getting up and walking around more often, and, I had add a small feature that mutes the watch when I go to sleep.

It All Worked Out Despite The Plan

Lessons here? If you can hook your device’s signals into producing a thought in your brain, that helps massively – checking for “am I doing the right thing” every minute came to me naturally, and a lot quicker than I expected it to. Context sensitivity is a must for self-help devices- the wearable would’ve had been way more effective if I had some ways to detect that I’m likely to be distracted, as opposed to having it vibrate indiscriminately every minute. In general, make sure your device is not annoying to you in any bad way – it’s supposed to be helping you, so any reason you’re annoyed by it, is a problem for the device’s primary usefulness.

On the hardware side, make your device reliable – building habits takes an ongoing effort, and you want it to be consistent. At the same time, consider building your device as a playground for developing your idea further; this could require a bigger battery, or more space inside the case, or an expansion socket. Reality is to plans what pure oxygen is to paper, and getting things done is typically way more important than getting them right the first time. Last but by no means least, wires suck – I’ve been saying this, and I will repeat that as much as needed.

In the end, I have mostly solved my original problem by tweaking my personal approach to time over the years, learning to over-estimate estimates, and ultimately putting myself in less situation where I am under time pressure – it turned out that was the bigger problem. It would’ve been nice if I could’ve noticed that sooner, but, the devices I’ve built certainly have helped. Today, I still have some sense-of-time solutions I rely on, but they are new, designed with these lessons in mind, and they’re a part of a multi-faceted system that I can only tell you about in the next articles – stay tuned!

Bringing The UMPCs Back With A Pi Zero

4 Agosto 2024 at 05:00
The UMPC powered up, case-less showing the black PCB, with the display standing upwards and showing a blue colour scheme desktop with a CLI terminal open. To the right of it is one of the UMPCs that served as an inspiration for this project.

Miss PDAs and UMPCs? You wouldn’t be the only one, and it’s a joy to see someone take the future into their own hands. [Icepat]’s dream is reviving UMPCs as a concept, and he’s bringing forth a pretty convincing hardware-backed argument in form of the Pocket Z project. For the hardware design, he’s hired two engineers, [Adam Nowak] and [Marcin Turek], and the 7-inch Pocket Z7 version is coming up quite nicely!

The Hackaday.io project shows an impressive gallery of inspiration devices front and center, and with these in mind, the first version of the 7-inch UMPC sets the bar high. With a 1024×600 parallel RGB (DPI) touchscreen display, an ATMega32U4-controlled keyboard, battery-ready power circuitry, and a socketed Pi Zero for brains, this device shows a promising future for the project, and we can’t wait to see how it progresses.

While it’s not a finished project just yet, this effort brings enough inspiration all around, from past device highlights to technical choices, and it’s worth visiting it just for the sentiment alone. Looking at our own posts, UMPCs are indeed resurfacing, after a decade-long hiatus – here’s a Sidekick-like UMPC with a Raspberry Pi, that even got an impressive upgrade a year later! As for PDAs, the Sharp memory LCD and Blackberry keyboard combination has birthed a good few projects recently, and, who can forget about the last decade’s introductions to the scene.

Need A USB Sniffer? Use Your Pico!

3 Agosto 2024 at 23:00
D+ and D- wires from a USB cable connected to GPIO pins on the Pi Pico, using a female header plugged onto the jumper wires

Ever wanted to sniff USB device communications? The usual path was buying an expensive metal box with USB connectors, using logic analyzers, or wiring devboards together and hacking some software to make them forward USB data.

Now, thanks to [ataradov]’s work, you can simply use a Pi Pico – you only need to tap the D+ and D- pins, wire them to RP2040’s GPIOs, and you can sniff communication between your computer and any low-speed (1.1 Mbps) or full-speed (12 Mbps) devices. On the RP2040 side, plug the Pico into your computer, open the virtual serial port created, and witness the USB packets streaming in – for the price of a Pico, you get an elegant USB sniffer, only a little soldering required.

[ataradov] also offers us a complete board design with a RP2040 and a USB hub on it, equipped with USB sockets that completely free us from the soldering requirement; it’s an open-source KiCad design, so you can simply order some  sniffers made from your favourite fab! This project is a great learning tool, it’s as cheap and easy to make as humanly possible, and it has big potential for things like reverse-engineering old and new systems alike. Just couple this hack with another Pico doing USB device or host duty, maybe get up to date with USB reverse-engineering fundamentals, and you could make a Facedancer-like tool with ease.

Need to reach 480 Mbit/s? [ataradov] has a wonderful board for you as well, that we have covered last year – it’s well worth it if a device of yours can only do the highest speed USB2 can offer, and, it offers WireShark support. Want WireShark support and to use a Pico? Here’s a GitHub project by another hacker, [tana]. By now, merely having a Pi Pico gives you so many tools, it’s not even funny.

We thank [Julianna] for sharing this with us!

Steam Deck, Or Single Board Computer?

3 Agosto 2024 at 20:00
Steamdeck motherboard standing upright propped onto a USB-C dock it's wired up to, showing just how little you need to make the steamdeck board work.

With a number of repair-friendly companies entering the scene, we have gained motivation to dig deeper into devices they build, repurpose them in ways yet unseen, and uncover their secrets. One such secret was recently discovered by [Ayeitsyaboii] on Reddit – turns out, you can use the Steam Deck mainboard as a standalone CPU board for your device, no other parts required aside from cooling.

All you need is a USB-C dock with charging input and USB/video outputs, and you’re set – it doesn’t even need a battery plugged in. In essence, a Steam Deck motherboard is a small computer module with a Ryzen CPU and a hefty GPU! Add a battery if you want it to work in UPS mode, put an SSD or even an external GPU into the M.2 port, attach WiFi antennas for wireless connectivity – there’s a wide range of projects you can build.

Each such finding brings us closer to the future of purple neon lights, where hackers spend their evenings rearranging off-the-shelf devices into gadgets yet unseen. Of course, there’s companies that explicitly want us to hack their devices in such a manner – it’s a bet that Framework made to gain a strong foothold in the hacker community, for instance. This degree of openness is becoming a welcome trend, and it feels like we’re only starting to explore everything we can build – for now, if your Framework’s or SteamDeck’s screen breaks, you always have the option to build something cool with it.

[Via Dexerto]

Embedded Python: MicroPython Is Amazing

11 Julio 2024 at 14:00

In case you haven’t heard, about a month ago MicroPython has celebrated its 11th birthday. I was lucky that I was able to start hacking with it soon after pyboards have shipped – the first tech talk I remember giving was about MicroPython, and that talk was how I got into the hackerspace I subsequently spent years in. Since then, MicroPython been a staple in my projects, workshops, and hacking forays.

If you’re friends with Python or you’re willing to learn, you might just enjoy it a lot too. What’s more, MicroPython is an invaluable addition to a hacker’s toolkit, and I’d like to show you why.

Hacking At Keypress Speed

Got a MicroPython-capable chip? Chances are, MicroPython will serve you well in a number of ways that you wouldn’t expect. Here’s a shining example of what you can do. Flash MicroPython onto your board – I’ll use a RP2040 board like a Pi Pico. For a Pico, connect an I2C device to your board with SDA on pin 0 and SCL on pin 1, open a serial terminal of your choice and type this in:

>>> from machine import I2C, Pin
>>> i2c = I2C(0, sda=Pin(0), scl=Pin(1))
>>> i2c.scan()

This interactivity is known as REPL – Read, Evaluate, Print, Loop. The REPL alone makes MicroPython amazing for board bringup, building devices quickly, reverse-engineering, debugging device library problems and code, prototyping code snippets, writing test code and a good few other things. You can explore your MCU and its peripherals at lightning speed, from inside the MCU.

When I get a new I2C device to play with, the first thing I tend to do is wiring it up to a MicroPython-powered board, and poking at its registers. It’s as simple as this:

>>> for i in range(16):
>>>     # read out registers 0-15
>>>     # print "address value" for each
>>>     print(hex(i), i2c.readfrom_mem(0x22, i))
>>> # write something to a second (0x01) register
>>> i2c.writeto_mem(0x22, 0x01, bytes([0x01]) )

That i2c.scan() line alone replaces an I2C scanner program you’d otherwise have to upload into your MCU of choice, and you can run it within three to five seconds. Got Micropython running? Use serial terminal, Ctrl+C, and that will drop you into a REPL, just type i2c.scan() and press Enter. What’s more, you can inspect your code’s variables from the REPL, and if you structure your code well, even restart your code from where it left off! This is simply amazing for debugging code crashes, rare problems, and bugs like “it stops running after 20 days of uptime”. In many important ways, this removes the need for a debugger – you can now use your MCU to debug your code from the inside.

Oh, again, that i2c.scan()? You can quickly modify it if you need to add features on the fly. Want addresses printed in hex? (hex(addr) for addr in i2c.scan()). Want to scan your bus while you’re poking your cabling looking for a faulty wire? Put the scan into a while True: and Ctrl+C when you’re done. When using a typical compiled language, this sort of tinkering requires an edit-compile-flash-connect-repeat cycle, taking about a dozen seconds each time you make a tiny change. MicroPython lets you hack at the speed of your keyboard typing. Confused the pins? Press the `up` button, edit the line and run the i2c = line anew.

To be clear, all of code is running on your microcontroller, you just type it into your chip’s RAM and it is executed by your MCU. Here’s how you check GPIOs on your Pi Pico, in case you’re worried that some of them have burnt out:

>>> from machine import Pin
>>> from time import sleep
>>> pin_nums = range(30) # 0 to 29
>>> # all pins by default - remove the ones connected to something else if needed
>>> pins = [Pin(num, Pin.OUT) for num in pin_nums]
>>> 
>>> while True:
>>>   # turn all pins on
>>>   for i in range(len(pins)):
>>>     pins[i].value(True)
>>>   sleep(1)
>>>   # turn all pins off
>>>   for i in range(len(pins)):
>>>     pins[i].value(False)
>>>   sleep(1)
>>>   # probe each pin with your multimeter and check that each pin changes its state

There’s many things that make MicroPython a killer interpreter for your MCU. It’s not just the hardware abstraction layer (HAL), but it’s also the HAL because moving your code from board to board is generally as simple as changing pin definitions. But it’s all the other libraries that you get for free that make Python awesome on a microcontroller.

Batteries Included

It really is about the batteries – all the libraries that the stock interpreter brings you, and many more that you can download. Only an import away are time, socket, json, requests, select, re and many more, and overwhelmingly, they work the same as CPython. You can do the same r = requests.get("https://retro.hackaday.com"); print(r.text)[:1024] as you would do on desktop Python, as long as you got a network connection going on. There will be a few changes – for instance, time.time() is an integer, not a float, so if you need to keep track of time very granularly, there are different functions you can use.

Say, you want to parse JSON from a web endpoint. If you’re doing that in an Arduino environment, chances are, you will be limited in what you can do, and you will get triangle bracket errors if you mis-use the JSON library constructs because somehow the library uses templates; runtime error messages are up to you to implement. If you parse JSON on MicroPython and you expect a dict but get a list in runtime, it prints a readable error message. If you run out of memory, you get a very readable MemoryError printed out, you can expect it and protect yourself from it, even fix things from REPL and re-run the code if needed.

The user-supplied code is pretty good, too. If you want PIO or USB-HID on the RP2040, or ESP-CPU-specific functions on the ESP family, they are exposed in handy libraries. If you want a library to drive a display, it likely already has been implemented by someone and put on GitHub. And, if that doesn’t exist, you port one from Arduino and publish it; chances are, it will be shorter and easier to read. Of course, MicroPython has problems. In fact, I’ve encountered a good few problems myself, and I would be amiss not mentioning them.

Mind The Scope

In my experience, the single biggest problem with MicroPython is that writing out `MicroPython` requires more of my attention span than I can afford. I personally shorten it to uPy or just upy, informally. Another problem is that the new, modernized MicroPython logo has no sources or high-res images available, so I can’t print my own stickers of it, and MicroPython didn’t visit FOSDEM this year, so I couldn’t replenish my sticker stock.

On a more serious note, MicroPython as a language has a wide scope of where you can use it; sometimes, it won’t work for you. An ATMega328P can’t handle it – but an ESP8266 or ESP32 will easily, without a worry in the world, and you get WiFi for free. If you want to exactly control what your hardware does, counting clock cycles or hitting performance issues, MicroPython might not work for you – unless you write some Viper code.

If you want to have an extremely-low-power MCU that runs off something like energy harvesting, MicroPython might not work – probably. If you need your code run instantly once your MCU gets power, mind the interpreter takes a small bit of time to initialize – about one second, in my experience. If you want to do HDMI output on a RP2040, perhaps stick to C – though you can still do PIO code, there are some nice libraries for it.

Some amount of clock cycles will be spent on niceties that Python brings. Need more performance? There are things you can do. For instance, if you have a color display connected over SPI and you want to reduce frame rendering time, you might want to drop down to C, but you don’t have to ditch MicroPython – just put more of your intensive code into C-written device drivers or modules you compile, and, prototype it in MicroPython before you write it.

As Seen On Hackaday

If you’ve followed the USB-C PD talking series, you must’ve seen that the code was written in MicroPython, and I’ve added features like PD sniffing, DisplayPort handling and PSU mode as if effortlessly; it was just that easy to add them and more. I started with the REPL, a FUSB302 connected to a RP2040, poking at registers and reading the datasheet, and while I needed outside help, the REPL work was so so much fun!

There’s something immensely satisfying about poking at a piece of technology interactively and trying to squeeze features out of it, much more if it ends up working, which it didn’t, but it did many other times! I’ve been hacking on that PD stack, and now I’m slowly reformatting it from a bundle of functions into object-based code – Python makes that a breeze.

Remember the Sony Vaio board? Its EC (embedded controller) is a RP2040, always powered on as long as batteries are inserted, and it’s going to be running MicroPython. The EC tasks include power management, being a HID over I2C peripheral, button and LED control, and possibly forwarding keyboard and trackpoint events to save a USB port from the second RP2040, which will run QMK and server as a keyboard controller. MicroPython allows me to make the firmware quickly, adorn it with a dozen features while I do it, and keep the codebase expandable on a whim. The firmware implementation will be a fun journey, and I hope I can tell about it at some point.

Have you used MicroPython in your projects? What did it bring to your party?

PCB Design Review: HAB Tracker With ATMega328P

10 Julio 2024 at 14:20

Welcome to the Design Review Central! [VE3SVF] sends us their board, and it’s a HAB (High Altitude Balloon) tracker board. It’s got the venerable ATMega28P on it, a LoRa modem and a GPS module, and it can be powered from a LiIon battery. Stick this board with its battery onto a high-altitude balloon, have it wake up and transmit your coordinates every once in a while, and eventually you’ll find it in a field – if you’re lucky. Oherwise, it will get stuck hanging on a tree branch, and you will have to use a quadcopter to try and get it down, and then, in all likelihood, a second quadcopter so that you can free the first one. Or go get a long ladder.

The ATMega328P is tried and true, and while it’s been rising in price, it’s still available – with even an updated version that sports a few more peripherals; most importantly, you’re sure to find a 328P in your drawer, if not multiple. Apart from that, the board uses two modules from a Chinese manufacturer, G-Nice, for both GPS and Lora. Both of these modules are cheap, making this tracker all that more accessible; I could easily see this project being sold as a “build your own beacon” kit!

Let’s make it maybe a little nicer, maybe a little cheaper, and maybe decrease the power consumption a tad along the way. We’ll use some of the old tricks, a few new ones, and talk about project-specific aspects that might be easy to miss.

The Low Hanging Fruit

Way better than the 0.5mm/0.25mm defaults, so make sure to replace them! Can even go down to 0.17mm if called for.

This board has four layers, which is nice because you get more ground and more routing space for a tiny price increase these days. This board doesn’t add fills on inner layers, but that is an easy fix – just select one of the GND power planes and tick the In1/In2.Cu boxes in their settings. Another thing to tweak in zone settings is zone clearance and minimum thickness – default KiCad clearances are way too conservative, setting them to something like 0.2 mm / 0.2 mm is a good idea. That improves ground connectivity, and also lets us get rid of ground tracks that would otherwise be necessary to bring ground to different connectors.

The inner layers have ground, and ground on all layers can reach further, too. That said, the inner layers benefit from being completely free – that’s when you get the best return current flow. Remember, each track, whether signal or power, needs its ground return path, and if you don’t provide a direct clean one, electricity will find a way. That, in turn, results in noise, both received and emitted, as well as possible instabilities.

In particular, the ISP flashing header had a lot of low-hanging fruit; tracks that were pulled on inner layers but could as well go on top/bottom layers. Many tracks could be snaked between GPS and LoRa module pads, too – the gaps are wide enough, that even a 0.2 mm track feels comfortable in there, and you could probably pull two if you dropped down to 0.15 mm, which is still safe with most fabs.

And, after a dozen minutes of work, the inner layers are free. A surprising amount of space could be found – for instance, the three DIO tracks nicely went along the right edge of the board. More importantly, capacitors were moved closer to where they work best. In particular, the AREF capacitor is two vias and one long inner track apart, which won’t make for good analog decoupling. That did require moving the ATMega a bit upwards, but a judicious application of Del and Shift+Del on tracks, as well as some track dragging, made that move go quickly.

I could talk about component size choices, but they’re not meaningfully interfering with routing on the board – even the opposite, having one of the diodes be 1206 helps me avoid some vias. On the other hand, rotating the battery divider resistors and power regulators 180 degrees resulted in some good routing space freed up. And, looking at the board, the ATMega328P routing could perhaps use being rotated one turn clockwise, too. That’d make SPI routing cleaner, power tracks and analog pins shorter, and let us put capacitors at the sides, at the low low cost of having GPIO pins snake around a bit. However, here, the benefits aren’t necessarily as clear-cut as in previous articles; instead, it’s a time vs niceness tradeoff.

The Chip Gets Rotated, But Not Necessarily

Here, a conundrum. We could spend maybe a dozen more minutes and rotate the chip, or leave it be? Is the board going to be slightly nicer? Yes. Is this necessary? No. If you want to just order the board and go, it’s completely fair for you to press order and leave improvements of this grade for rev2. On the other hand, if the itch to improve your board is bad enough that the time investment doesn’t scare you out of it, give in and see yourself become better at PCB design. Worked for me.

There are hidden problems for such small redesigns, though. Remember, a redesign might have you reinstate a problem that you’ve successfully avoided with the original iteration, or, it can quickly become infeasible. I’ve had it happen, where a redesign that intended to add features and reduce complexity has become counter-productive midway through, so, I’ve had to stop myself from continuing and just order the board already. You’ll learn to keep track of these, but it does take keeping it in mind. Keep your Ctrl+Z’s ready, keep a copy of the files, or a Git commit, if you are doing something fundamental, and be ready to get a lesson in letting go.

I ended up rotating the chip, and the board did indeed become a bit nicer, but in ways that don’t solve any pressing problems. By the way, have you noticed something this board has done really well from the start? That’s component placement. The ways the LoRa module, GPS module, ATMega328P and the headers are positioned, I wouldn’t change anything about them. Maybe move the pin headers onto a 2.5 4mm grid so that you could expand this board with a perfboard if needed, but that one isn’t a must – this is a low weight board, after all, the headers are more for debugging than anything else.

Last Thoughts: Inner Layers And Antenna Choice

If you have internal layers, use them for ground or power fills, so that power and return currents can flow unrestricted. This is going to reduce both radiated and received emissions, as well as make power rails smoother, which feels mighty helpful considering this design has two radios on it and the GPS radio has a passive antenna.

Also, some fabs don’t want empty inner layers. Last year, JLCPCB started refusing boards with inner or outer layers more than 30% full, in what’s presumably an attempt to decrease the etching process costs, causing some people to redesign perfectly working PCBs with little notice. Combine this with a recent documentation overhaul that just so happened to turn some previously free options into paid ones, and if I were to guess, they are no longer able to keep running at a loss as much as they did, so, the age of golden offers at JLCPCB might soon to be over.

Our improvements ended up providing more than enough copper on top and bottom layers, that you could possibly switch this board to two-layer; again, cheaper ordering, possibly quicker manufacturing time, possibly cheaper PCBA. Isn’t a requirement, but it is nice when you can do it. If you are to keep the two extra layers, remember that on-board antennas need keepouts at least for a wide patch under them, if not for a good amount of space around them, and the keepout has to be on all layers. No tracks, no fills, no copper, do not pass go, do not collect 200.

Thicker tracks for power paths are good whenever you can afford them – and this board has plenty of space! I personally usually add them in last, and it’s not a problem here, but it’s most certainly a smarter decision to draw them thick first so that you don’t have to do a re-layout later.

It also does feel like you could consider an active antenna here. For a high-altitude balloon, sure, you’re way way more likely to get a fix and you’ve got a whole lot more time to do it, but I would guess improving your chances is worthwhile. Plus, I don’t know much about G-Nice’s modules, still yet to try out the one I purchased last year – it might be that this module is perfectly okay, but it concerns me these are meant to be footprint-compatible drop-in replacements for well-established company modules, with this specific module borrowing an U-Blox footprint, and as such, I don’t know how much to expect. An active antenna adds a fair of weight and size footprint, and it might be that everyone’s flying with passive antennas no worries, so I might be completely out of my zone here. Whichever is the case, I would appreciate input!

As usual, if you would like a design review for your board, submit a tip to us with [design review] in the title, linking to your board files. KiCad design files strongly preferred, both repository-stored files (GitHub/GitLab/etc) and shady Google Drive/Dropbox/etc .zip links are accepted.

The ErgO Ring Makes Computer Interactions Comfortable

3 Julio 2024 at 11:00
The ring shown on someone's index finger

[Sophia Dai] brings us a project you will definitely like if you’re tired of traditional peripherals like a typical keyboard and mouse combo. This is ErgO, a smart ring you can build out of a few commonly available breakouts, and it keeps a large number of features within a finger’s reach. The project has got an IMU, a Pimoroni trackball, and a good few buttons to perform actions or switch modes, and it’s powered by a tiny Bluetooth-enabled devboard so it can seamlessly perform HID device duty.

While the hardware itself appears to be in a relatively early state, there’s no shortage of features, and the whole experience looks quite polished. Want to lay back in your chair yet keep scrolling the web, clicking through links as you go? This ring lets you do that, no need to hold your mouse anymore, and you can even use it while exercising. Want to do some quick text editing on the fly? That’s also available; the ErgO is designed to be used for day to day tasks, and the UX is thought out well. Want to use it with more than just your computer? There is a device switching feature. The build instructions are quite respectable, too – you can absolutely build one like this yourself, just get a few breakouts, a small battery, some 3D printed parts, and find an evening to solder them all together. All code is on GitHub, just like you would expect from a hack well done.

Looking for a different sort of ring? We’ve recently featured a hackable cheap smart ring usable for fitness tracking – this one is a product that’s still being reverse-engineered, but it’s alright if you’re okay with only having an accelerometer and a few optical sensors.

Split A USB-C PD Port Into Three Port-ions

1 Julio 2024 at 20:00
The splitter with a 3D-printed case and three yellow cables coming out of it, powering two phones and one powerbank at the same time

There’s no shortage of USB-C chargers in all sorts of configurations, but sometimes, you simply need a few more charging ports on the go, and you got a single one. Well then, check out [bluepylons]’s USB-C splitter, which takes a single USB-C 5V/3A port and splits it into three 5V/1A plugs, wonderful for charging a good few devices on the go!

This adapter does things right – it actually checks that 3A is provided, with just a comparator, and uses that to switch power to the three outputs, correctly signalling to the consumer devices that they may consume about 1A from the plugs. This hack’s documentation is super considerate – you get detailed instructions on how to reproduce it, every nuance you might want to keep in mind, and even different case options depending on whether you want to pot the case or instead use a thermal pad for a specific component which might have to dissipate some heat during operation!

This hack has been documented with notable care for whoever might want to walk the journey of building one for themselves, so if you ever need a splitter, this one is a wonderful weekend project you are sure to complete. Wonder what kind of project would be a polar opposite, but in all the best ways? Why, this 2kW USB-PD PSU, most certainly.

An Open XBOX Modchip Enters The Scene

30 Junio 2024 at 20:00
Showing the modchip installed into a powered up Xbox, most of the board space taken up by a small Pi Pico board. A wire taps into the motherboard, and a blue LED on the modchip is lit up.

If you’ve ever bought a modchip that adds features to your game console, you might have noticed sanded-off IC markings, epoxy blobs, or just obscure chips with unknown source code. It’s ironic – these modchips are a shining example of hacking, and yet they don’t represent hacking culture one bit. Usually, they are more of a black box than the console they’re tapping into. This problem has plagued the original XBOX hacking community, having them rely on inconsistent suppliers of obscure boards that would regularly fall off the radar as each crucial part went to end of life. Now, a group of hackers have come up with a solution, and [Macho Nacho Productions] on YouTube tells us its story – it’s an open-source modchip with an open firmware, ModXO.

Like many modern modchips and adapters, ModXO is based on an RP2040, and it’s got a lot of potential – it already works for feeding a BIOS to your console, it’s quite easy to install, and it’s only going to get better. [Macho Nacho Productions] shows us the modchip install process in the video, tells us about the hackers involved, and gives us a sneak peek at the upcoming features, including, possibly, support for the Prometheos project that equips your Xbox with an entire service menu. Plus, with open-source firmware and hardware, you can add tons more flashy and useful stuff, like small LCD/OLED screens for status display and LED strips of all sorts!

If you’re looking to add a modchip to your OG XBOX, it looks like the proprietary options aren’t much worth considering anymore. XBOX hacking has a strong community behind it for historical reasons and has spawned entire projects like XBMC that outgrew the community. There’s even an amazing book about how its security got hacked. If you would like to read it, it’s free and worth your time. As for open-source modchips, they rule, and it’s not the first one we see [Macho Nacho Productions] tell us about – here’s an open GameCube modchip that shook the scene, also with a RP2040!

Root Your Sleep Number Smart Bed, Discover It Phoning Home

30 Junio 2024 at 14:00
A graphic representing the features of a Sleep Number smart bed, showing individually controlled heated zones

Did you know you can get a “smart bed” that tracks your sleep, breathing, heart rate, and even regulates the temperature of the mattress? No? Well, you can get root access to one, too, as [Dillan] shows, and if you’re lucky, find a phone-home backdoor-like connection. The backstory to this hack is pretty interesting, too!

You see, a Sleep Number bed requires a network connection for its smart features, with no local option offered. Not to worry — [Dillan] wrote a Homebridge plugin that’d talk the cloud API, so you could at least meaningfully work with the bed data. However, the plugin got popular, Sleep Number didn’t expect the API to be that popular. When they discovered the plugin, they asked that it be shut down. Tech-inclined customers are not to be discouraged, of course.

Taking a closer look at the hardware, [Dillan] found a UART connection and dumped the flash, then wrote an extensive tutorial on how to tap into your bed’s controller, which runs Linux, and add a service you can use locally to query bed data and control the bed – just like it should have been from the beginning. Aside from that, he’s found a way to connect this hub to a network without using Sleep Number’s tools, enabling fully featured third-party use – something that the company doesn’t seem to like. Another thing he’s found is a reverse SSH tunnel back into the Sleep Number network.

Now, it can be reasonable to have a phone-home tunnel, but that doesn’t mean you want it in your personal network, and it does expose a threat surface that might be exploited in the future, which is why you might want to know about it. Perhaps you’d like to use Bluetooth instead of WiFi. Having this local option is good for several reasons. For example, having your smart devices rely on the manufacturer’s server is a practice that regularly results in perma-bricked smart devices, though we’ve been seeing some examples of dedicated hackers bringing devices back to life. Thanks to this hack, once Sleep Number shutters, is bought out, or just wants to move on, their customers won’t be left with a suddenly dumbed-down bed they can no longer control.

[Header image courtesy of Sleep Number]

Try Out MCUs With This Jumperable TSSOP20 Adapter

30 Junio 2024 at 05:00
Two of these boards next to each other, one showing the front, assembled, side with the MCU and supporting components soldered on, and the other showing the back, patch panel, side, with wires connecting the MCU pads to testpoints leading to the supporting components

There are so many new cool MCUs coming out, and you want to play with all of them, but, initially, they tend to be accessible as bare chips. Devboards might be hard to get, not expose everything, or carry a premium price. [Willmore] has faced this problem with an assortment of new WCH-made MCUs, and brings us all a solution – a universal board for TSSOP20-packaged MCUs, breadboard-friendly and adaptable to any pinout with only a few jumpers on the underside.

The board brings you everything you might want from a typical MCU breakout – an onboard 3.3V regulator, USB series resistors, a 1.5K pullup, decoupling capacitors, and a USB-C port. All GPIOs are broken out, and there’s a separate header you can wire up for all your SWD/UART/USB/whatever needs – just use the “patch panel” on the bottom of the board and pick the test points you want to join. [Willmore] has used these boards for the CH32Vxxx family, and they could, no doubt, be used for more – solder your MCU on, go through the pin table in the datasheet, do a little point-to-point wiring, and you get a pretty functional development board.

Everything is open-source – order a few of these boards from your fab of choice, and you won’t ever worry about a breakout for a TSSOP20 MCU or anything that would fit the same footprint. It could even be used in a pinch for something like an I2C GPIO expander. This is also a technique worth keeping in mind – a step above the generic footprint breakouts. Looking for more universal breakouts to keep? Here’s one for generic LCD/OLED panel breakouts.

❌
❌