Vista Normal

Hay nuevos artículos disponibles. Pincha para refrescar la página.
Ayer — 20 Febrero 2025Salida Principal

Add a Little WOPR to Your Server Rack

Por: Tom Nardi
20 Febrero 2025 at 06:00

Like so many of us, [aforsberg] found themselves fascinated with the WOPR computer from WarGames — something about all those blinking LEDs must speak to nerds on some subconscious level. But rather than admire the light show from afar, they decided to recreate it at a scale suitable for a 1U server rack.

So what goes into this WOPR display? In this case, the recipe simply calls for three MAX7219 dot matrix LED modules and a Raspberry Pi Pico, although you could swap that out for your favorite microcontroller if you wish. You should probably stick with something that at least runs MicroPython though, or else you won’t be able to use the included Python code to mimic the light patterns seen in the film.

What we like most about this project is how simple and inexpensive it is to recreate. There’s no custom PCB, and all the parts are mass produced enough that the economies of scale have made them comically cheap. Even at Amazon prices, you’re looking at around $50 USD in parts, and quite a bit less if you’ve got the patience to order everything through AliExpress.

Critics will note that, in its current state, this display just shows gibberish (admittedly stylish gibberish, but still). But as we’ve seen with similar projects, that’s simply a matter of software.


AnteayerSalida Principal

Give Your Animal Crossing Villagers the Gift of Linux

Por: Tom Nardi
18 Febrero 2025 at 12:00

If you’ve played any of the versions of Nintendo’s Animal Crossing over the years, you’ll know that eventually you get to the point where you’ve maxed out your virtual house and filled it with all the furniture you could possibly want — which is arguably as close to “winning” the game as you can get.

But now thanks to the work of [decrazyo] there’s a piece of furniture that you can add to your Animal Crossing house that will never get old: an x86 emulator that boots Linux. As explained in the video below, this trick leverages the fact that Nintendo had already built a highly accurate Nintendo Entertainment System (NES) emulator into Animal Crossing on the GameCube, which could be used to run a handful of classic games from within the player’s virtual living room. But it turns out that you can get that emulator to load a user-provided ROM from the GameCube’s memory card, which opens the doors to all sorts of mischief.

In this case, all [decrazyo] had to do was prepare an NES ROM that booted into Linux. That might seem like a tall order, but considering he had already worked on a port of Unix to the classic console, it’s not like he was going in blind. He identified the minimal Embeddable Linux Kernel Subset (ELKS) as his target operating system, but wanted to avoid the hassle of re-writing the whole thing for the 8-bit CPU in the NES. That meant adding another emulator to the mix.

If porting Linux to the NES sounded tough, running an x86 emulator on the console must be pure madness. But in reality, it’s not far off from several projects we’ve seen in the past. If you can boot Linux on an ATmega328 via an emulated RISC-V processor, why not x86 on the NES? In both cases, the only problem is performance: the emulated system ends up running at only a tiny fraction of real-speed, meaning booting a full OS could take hours.

As if things couldn’t get complicated enough, when [decrazyo] tried to boot the x86 emulator ROM, Animal Crossing choked. It turned out (perhaps unsurprisingly) that his ROM was using some features the emulator didn’t support, and was using twice as much RAM as normal. Some re-writes to the emulator sorted out the unsupported features, but there was no getting around the RAM limitation. Ultimately, [decrazyo] had to create a patch for Animal Crossing that doubled the memory of the in-game emulator.

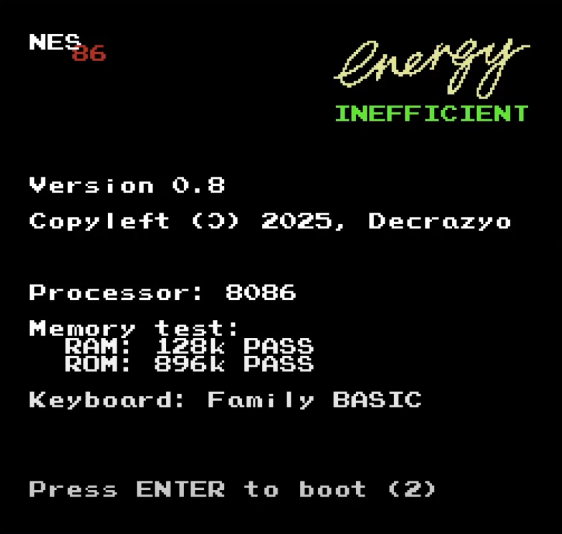
Still with us? So the final setup is a patched Animal Crossing, which is running an in-game NES emulator, which is running a ROM that contains an x86 emulator, which is finally booting a minimal Linux environment at something like 1/64th normal speed. Are we having fun yet?

Despite its age and cutesy appearance, the original Animal Crossing has turned out to be a surprisingly fertile playground for hackers.

Space Monitor Points Out Celestial Objects

Por: Tom Nardi
18 Febrero 2025 at 09:00

Logically we understand that the other planets in the solar system, as well as humanity’s contributions to the cosmos such as the Hubble Space Telescope and the International Space Station, are zipping around us somewhere — but it can be difficult to conceptualize. Is Jupiter directly above your desk? Is the ISS currently underneath you?

If you’ve ever found yourself wondering such things, you might want to look into making something like Space Monitor. Designed by [Kevin Assen], this little gadget is able to literally point out the locations of objects in space. Currently it’s limited to the ISS and Mars, but adding new objects to track is just a matter of loading in the appropriate orbital data.

In addition to slewing around its 3D printed indicator, the Space Monitor also features a round LCD that displays the object currently being tracked, as well as the weather. Reading through the list of features and capabilities of the ESP32-powered device, we get the impression that [Kevin] is using it as a sort of development platform for various concepts. Features like remote firmware updates and the ability to point smartphones to the device’s configuration page via on-screen QR aren’t necessarily needed on a personal-use device, but its great practice for when you do eventually send one of your creations out into the scary world beyond your workbench.

If you’re interested in something a bit more elaborate, check out this impressive multi-level satellite tracker we covered back in 2018.

Adding USB-C (Kinda) to a PowerMac G4

Por: Tom Nardi
15 Febrero 2025 at 12:00

For those who’ve never bitten the Apple, the PowerMac G4 was a blue-tinted desktop Macintosh offered from 1999 to 2004. At the time, the machines were plenty fast — being advertised as the first “personal supercomputer” when they hit the market. But Father Time is particularly harsh on silicon, so they’re properly archaic by modern standards.

As such, the rear panel of one of these machines is hardly where you’d expect to run into a functional USB-C port. But thanks to the efforts of [Dandu], old has officially met new. Critics will note that it’s not real USB-C, and instead uses USB 2.0 with the more modern connector. That’s true, but considering how many commercial devices we run into that are still using the same trick, we’ll give it a pass.

So in theory, all it should take to make this possible is a USB 2.0 PCI card and some clever wiring going into the back of a bulkhead USB-C connector. Which if you zoom out far enough, is exactly what [Dandu] did. But when your dealing with a 20+ year old computer, everything is easier said than done.

For one thing, it look awhile to find a PCI USB card that would actually work under the two operating systems the computer runs (OS X Tiger and Mac OS 9). For those taking notes, a card using the Ali M5273 chip ended up being the solution, although it can only hit USB 1.1 speeds under OS 9. He also needed to find card that had an internal header connector to wire the USB-C port to, which wasn’t always a given.

[Dandu] provides some screen shots and benchmarks to show how the new port works in both versions of Mac OS, but the  most important feature is that he can casually plug his phone into the back of the machine.

Laser Cut Acrylic Provides Movie-Style Authentication

Por: Tom Nardi
12 Febrero 2025 at 12:00

Here at Hackaday, we pride ourselves on bringing you the latest and greatest projects for your viewing pleasure. But sometimes we come across a creation so interesting that we find ourselves compelled to write about it, even if it’s already been hanging around the Internet for years. This may or may not be due to the fact that we just re-watched Crimson Tide, and found ourselves on a self-imposed dive into a very particular rabbit hole…

If you’ve seen Crimson Tide, or the first few minutes of WarGames, you might already know what this post is about. Both films prominently make use of a one-time authentication device which the user snaps in half to reveal a card that has some secret code printed on it — and as it turns out, there are at least two different projects that aim to replicate the props used in the movies.

The props were inspired by the real-world “Sealed Authenticators” used by the United States to verify commands regarding the launch of nuclear weapons. As shown in the films, once a launch order, known as an Emergency Action Message, is received, its validity could be confirmed by breaking open one of the Authenticators and comparing the code sequence printed on it to what was sent along with the message. Supposedly the real ones are more like foil envelopes that would be torn open, but presumably that wasn’t cool enough for Hollywood.

So how do you make your own film-quality Authenticator? The two projects take slightly different approaches, but the basic idea is to create a three layer acrylic stack. The top and bottom pieces are identical, and scored in the middle so they’ll break along a clean line. The center piece is cut in half and largely hollowed out to create the compartment for your printed message. It’s perhaps best described as two “C” shapes that have slight gap where they meet, which provides some room for the top and bottom layers to flex. With the acrylic pieces aligned and the message inside, everything is solvent welded together.

Of course, the question now is what to do with them. We can think of all sorts of games and challenges that could make use of this kind of thing, but if you’re looking for something a little more practical, these would be an awesome way to store your two-factor authentication recovery codes. With the proper software, you could even use these for secure file storage via QR code.

A Programming Language for Building NES Games

Por: Tom Nardi
8 Febrero 2025 at 12:00

Generally speaking, writing your own games for retro consoles starts with C code. You’ll need to feed that through a console-specific tool-chain, and there’s certainly going to be some hoops to jump through, but if everything goes as expected, you should end up with a ROM file that can be run in an emulator or played on real hardware if you’ve got the necessary gadgetry to load it.

But NESFab takes things in a slightly different direction. While the code might look like C, it’s actually a language specifically tailored for developing games on the Nintendo Entertainment System (NES). The documentation claims that this targeted language not only compiles into considerably faster 6502 assembly than plain C on GCC or LLVM, but is designed to work around the strengths (and weaknesses) of the NES hardware.

Looking deeper into the example programs and documentation, NESFab offers quite a few quality of life features that should make developing NES games easier. For one thing, there’s integrated asset loading which automatically converts your image files into something the console can understand. One just needs to drop the image file into the source directory, open it in the code with the file function, and the build system will take care of converting it on the fly as the ROM is built. The nuances of bank switching — the organization of code and assets so they fit onto the physical ROM chips on the NES cartridge — are similarly abstracted away.

The obvious downside of NESFab is that, as with something like GB Studio, you’re going to end up putting effort into learning a programming environment that works for just one system. So before you get started, you really need to decide what your goals are. If you’re a diehard NES fan that has no interest in working on other systems, learning a language and build environment specifically geared to that console might make a certain degree of sense. But if you’d like to see your masterpiece running on more than just one system, working in straight C is still going to be your best bet.

Breaking: USPS Halts Inbound Packages From China and Hong Kong

Por: Tom Nardi
5 Febrero 2025 at 12:00

Some troubling news hit overnight as the United States Post Office announced via a terse “Service Alert” that they would suspend acceptance of inbound parcels from China and Hong Kong Posts, effective immediately.

The Alert calls it a temporary suspension, but gives no timeline on when service will be restored. While details are still coming together, it seems likely that this suspension is part of the Trump administration’s Chinese tariff package, which went into effect at midnight.

Specifically, the administration looks to close the “de minimis” exemption — a loophole which allowed packages valued under $800 USD to pass through customs without having to pay any duties or fees. Those packages will now not only be subject to the overall 10% tax imposed by the new tariff package, but will now have to be formally processed through customs, potentially tacking on even more taxes and fees.

The end result is that not only will your next order of parts from AliExpress be more expensive, but it’s likely to take even longer to arrive at your door. Of course, this should come as no surprise. At the end of the day, this is precisely what the administration aims to accomplish with the new tariffs — if purchasing goods from overseas is suddenly a less attractive option than it was previously, it will be a boon to domestic suppliers. That said, some components will be imported from China regardless of who you order them from, so those prices are still going to increase.

Other carriers such as FedEx and UPS will also have to follow these new rules, but at the time of this writing, neither service had released a statement about how they intend to comply.

How 3D Printing Helps Bring USS Cod Memorial to Life

Por: Tom Nardi
5 Febrero 2025 at 09:00

The USS Cod is a Gato-class submarine that saw combat in the Second World War and today operates as a museum ship in Cleveland, Ohio. While many other surviving WWII-era subs were cut into pieces or otherwise modified for public display, Cod is notable for being intact and still in her wartime configuration. It’s considered to be one of the finest submarine restorations in the world, and in a recent video from their official YouTube page, we get a look at how 3D printing is used to keep the 82 year old submarine looking battle-ready.

In the video below, President of the USS Cod Submarine Memorial [Paul Farace] is joined by one of the volunteers who’s been designing and printing parts aboard the submarine. While the Cod is in remarkable condition overall, there’s no shortage of odd bits and pieces that have gone missing over the sub’s decades of service.

3D printing is being used to recreate replica batteries for Cod

Many of these parts are all but unobtainable today, so being able to recreate a look-alike based on drawings and images of the original components is an incredible asset to the team as they work towards accurately recreating what it was like to live and work aboard a Gato-class submarine.

A prime example from the video has to deal with the Mark 27 torpedo that’s on display aboard Cod. The team knew from contemporary images and diagrams that there was supposed to be a small “spinner” propeller at the nose of the torpedo, but it was missing on theirs. So after measuring the opening, a printed facsimile was created which could slide into the nose of the torpedo without requiring any glue or other modifications to the original artifact. The video also references a larger project to create replica batteries for Cod — while the recreated cells are primarily made of painted wood, the terminals and other details on the top are 3D printed.

As we saw underneath the battleship USS New Jersey, solving the unique challenges presented by the preservation of these floating museums often takes some out of the box thinking. Makes us wonder how often those in the hacking and making community get a chance to lend their skills towards projects like these. If you’ve ever found yourself hacking around in a museum, floating or otherwise, we’d love to hear about it.

Taylorator Makes Mischief on the Airwaves

Por: Tom Nardi
29 Enero 2025 at 21:00

[Stephen] recently wrote in to share his experiments with using the LimeSDR mini to conduct a bit of piracy on the airwaves, and though we can’t immediately think of a legitimate application for spamming the full FM broadcast band simultaneously, we can’t help but be fascinated by the technique. Called the Taylorator, as it was originally intended to carpet bomb the dial with the collected works of Taylor Swift on every channel, the code makes for some interesting reading if you’re interested in the transmission-side of software defined radio (SDR).

The write-up talks about the logistics of FM modulation, and how quickly the computational demands stack up when you’re trying to push out 100 different audio streams at once. It takes a desktop-class CPU to pull it off in real-time, and eats up nearly 4 GB of RAM.

You could use this project to play a different episode of the Hackaday Podcast on every FM channel at once, but we wouldn’t recommend it. As [Stephen] touches on at the end of the post, this is almost certainly illegal no matter where you happen to live. That said, if you keep the power low enough so as not to broadcast anything beyond your home lab, it’s unlikely anyone will ever find out.

Setting the Stage for Open Source Sonar Development

Por: Tom Nardi
24 Enero 2025 at 12:00

At Hackaday, we see community-driven open source development as the great equalizer. Whether it’s hardware or software —  if there’s some megacorp out there trying to sell you something, you should have the option to go with a comparable open source version. Even if the commercial offering is objectively superior, it’s important that open source alternatives always exist, or else its the users themselves that end up becoming the product before too long.

So we were particularly excited when [Neumi] wrote in to share his Open Echo project, as it contains some very impressive work towards democratizing the use of sonar. Over the years we’ve seen a handful of underwater projects utilize sonar in some form or another, but they have always simply read the data from a commercial, and generally expensive, unit. But Open Echo promises to delete the middle-man, allowing for cheaper and more flexible access to bathymetric data.

The TUSS4470 Shield lets you experiment with driving transducers.

The project started with the reverse engineering of a cheap commercial fish finder, which gave [Neumi] first-hand experience with driving ultrasonic transducers and interpreting the signal they return. Further research lead him to the Texas Instruments TUSS4470, a ultrasonic sensor IC that can do much of the heavy lifting. He spun up an Arduino shield using this chip, and wrote the necessary code to interface directly with a commercial transducer.

This is already a huge milestone for DIY sonar, but [Neumi] isn’t stopping there. The newest iteration of the hardware is designed not just to work with commercial transducers, but can be used with home-built ones as well. While the project isn’t complete, he’s made some very rapid progress as demonstrated in the video below.

We’ve covered a number of projects over the years that involved reading the depth of body of water, and this project would have been able to make each one of them cheaper and easier accomplish. While admittedly not every hacker is keen to map the bottom of their local waterway, we know there is a niche group out there that have been waiting a long time for a project like this to come around.

Brick Layer Post-Processor, Promising Stronger 3D Prints, Now Available

Por: Tom Nardi
23 Enero 2025 at 12:00

Back in November we first brought you word of a slicing technique by which the final strength of 3D printed parts could be considerably improved by adjusting the first layer height of each wall so that subsequent layers would interlock like bricks. It was relatively easy to implement, didn’t require anything special on the printer to accomplish, and testing showed it was effective enough to pursue further. Unfortunately, there was some patent concerns, and it seemed like nobody wanted to be the first to step up and actually implement the feature.

Well, as of today, [Roman Tenger] has decided to answer the call. As explained in the announcement video below, the company that currently holds the US patent for this tech hasn’t filed a European counterpart, so he feels he’s in a fairly safe spot compared to other creators in the community. We salute his bravery, and wish him nothing but the best of luck should any lawyer come knocking.

So how does it work? Right now the script supports PrusaSlicer and OrcaSlicer, and the installation is the same in both cases — just download the Python file, and go into your slicer’s settings under “Post-Processing Scripts” and enter in its path. As of right now you’ll have to provide the target layer height as an option to the script, but we’re willing to bet that’s going to be one of the first things that gets improved as the community starts sending in pull requests for the GPL v3 licensed script.

There was a lot of interest in this technique when we covered it last, and we’re very excited to see an open source implementation break cover. Now that it’s out in the wild, we’d love to hear about it in the comments if you try it out.

Thanks to [greg_bear] in the Hackaday Discord for the tip.

Putting Cheap Motorcycle Tachometers to Work

Por: Tom Nardi
18 Enero 2025 at 18:00

With so much data being thrown at our eyeballs these days, it’s worryingly easy for the actually important stuff to slip by occasionally. So when [Liam Jackson] wanted a way to visualize the number of test failures popping up in the continuous integration system at work, he went with a novel but effective solution — universal motorcycle tachometers.

It turns out these little gauges can be had for under $10 a piece from the usual overseas retailers, and are very easy to drive with a microcontroller. As [Liam] explains, all you need to do other than providing them with 12 volts, is feed them a PWM signal. Even though the gauges are designed for a 12 V system, they apparently don’t have any problem responding to the 5 V logic level from the Arduino’s pins.

As for the frequency he says that 1,000 RPM corresponds to 16.66 Hz, so you can just multiply up from there to show whatever number you wish. That said, [Liam] warns that the gauges draw several hundred milliamps once the needle gets into the two digit range, so keep that in mind. Conveniently, those number happen to be in red anyway…

For his particular application, [Liam] put three of the gauges together to create a very handsome dashboard. If you want to recreate his setup exactly he’s made the STLs available for the gauge cluster housing. Note the small OLED at the center, this offers a way to show a bit more context than the three analog gauges alone can express, especially if you’ve got an application where you might be switching between multiple data sources.

Over the years we’ve seen several projects that repurposed analog gauges of various types, often for showing computer performance, but they generally involved having to drive the galvanometers directly. That these tachometers can simply be fed a simple digital signal should make implementing them into your project much easier.

JTAG & SWD Debugging on the Pi Pico

Por: Tom Nardi
18 Enero 2025 at 12:00

[Surya Chilukuri] writes in to share JTAGprobe — a fork of the official Raspberry Pi debugprobe firmware that lets you use the low-cost microcontroller development board for JTAG and SWD debugging just by flashing the provided firmware image.

We’ve seen similar projects in the past, but they’ve required some additional code running on the computer to bridge the gap between the Pico and your debugging software of choice. But [Surya] says this project works out of the box with common tools such as OpenOCD and pyOCD.

As we’ve cautioned previously, remember that the Pi Pico is only a 3.3 V device. JTAG and SWD don’t have set voltages, so in the wild you could run into logic levels from 1.2 V all the way to 5.5 V. While being able to use a bare Pico as a debugger is a neat trick, adding in a level shifter would be a wise precaution.

Looking to get even more use out of those Pi Picos you’ve got in the parts bin? How about using it to sniff USB?

Fighting to Keep Bluetooth Thermometers Hackable

Por: Tom Nardi
16 Enero 2025 at 12:00

Back in 2020, we first brought you word of the Xiaomi LYWSD03MMC — a Bluetooth Low Energy (BLE) temperature and humidity sensor that could be had from the usual sources for just a few dollars each. Capable of being powered by a single CR2032 battery for up to a year, the devices looked extremely promising for DIY smart home projects. There was only one problem, you needed to use Xiaomi’s app to read the data off of the things.

Enter [Aaron Christophel], who created an open source firmware for these units that could easily be flashed using a web-based tool from a smartphone in BLE range and opened up all sorts of advanced features. The firmware started getting popular, and a community developed around it. Everyone was happy. So naturally, years later, Xiaomi wants to put a stop to it.

The good news is, [Aaron] and [pvvx] (who has worked on expanding the original custom firmware and bringing it to more devices) have found a workaround that opens the devices back up. But the writing is on the wall, and there’s no telling how long it will be until Xiaomi makes another attempt to squash this project.

We can’t imagine why the company is upset about an extremely popular replacement firmware for their hardware. Unquestionably, Xiaomi has sold more of these sensors thanks to the work of [Aaron] and [pvvx]. This author happens to have over a dozen of them all over the house, spitting out data in a refreshingly simple to parse format. Then again, the fact that you could use the devices without going through their software ecosystem probably means they loose out on the chance to sell your data to the highest bidder…so there’s that.

The duo aren’t releasing any information on how their new exploit works, which will hopefully buy them some time before Xiaomi figures out how to patch it. In the short video below, [Aaron] shows the modified installation process that works on the newer official firmware. Unfortunately you now have to connect each unit up to the Xiaomi app before you can wipe it and install the open firmware, but it’s still better than the alternative.

Using the ESP8266 for Low-Cost Fault Injection

Por: Tom Nardi
15 Enero 2025 at 12:00

As a general concept, fault injection is a technique that studies how a system reacts to unusual or unexpected external forces. The idea is that, if you can trigger a glitch at the precise moment, you might be able to use that to your advantage in disabling security features or otherwise gaining further access to the device in question. In the hardware world, this could be achieved by fiddling with the power going into the device, or subjecting it to extreme temperatures.

We’ve covered voltage glitching attacks on these pages in the past, but most of the tools used are fairly expensive if you’re not doing this kind of thing professionally. Luckily for us, [Aditya Patil] has developed a fault injection tool that can run on a standard ESP8266 development board. Obviously it’s not as capable as a bespoke device costing hundreds of dollars, but if you just want to experiment with the concept, it’s a fantastic way to wrap your head around it all.

Now to be clear, the ESP8266 alone isn’t able to generate the sort of high-voltage spikes that are often used to glitch out a chip. The idea with this project is that the ESP would serve as the programmable timer used to trigger a high voltage generator or other nefarious piece of kit. That said, if you’ve got something low power enough that could get confused by rapidly having ~3 V applied to its power rails, in theory you could use the dev board without any additional hardware — though we’d strongly recommend at least throwing a MOSFET between the ESP and whatever you’re harassing.

With the firmware flashed to the ESP8266, plugging the board into your computer will provide you with a serial interface through which the software can be configured and attacks can be launched. While this interactive menu system is nice, and reminds us a bit of the Bus Pirate, [Aditya] also provides an example Python script that will let you fire commands at the system far faster than you could type them out.

If you’re looking for more capability, something like the PicoGlitcher would probably be the next step up, but if you want to really dive into the deep-end, the ChipWhisperer line of devices from [Colin O’Flynn] are really where it’s at. Check out the fascinating talk he gave about voltage glitching during the 2021 Remoticon if you’d like to learn more about the technique.

Clever PCBs Straighten Out the Supercon SAO Badge

Por: Tom Nardi
13 Enero 2025 at 19:30

When we decided that Simple Add-Ons (SAOs) would be the focus of Supercon 2024, it was clear the badge would need to feature more than just one or two of the requisite connectors. We finally settled on six ports, but figuring out the geometry of getting all those ports on the badge in such a way that the SAOs wouldn’t hit each other was a bit tricky. In early concept drawings the badge was just a big rectangle with the ports along the top, but it was too ugly.

In the end we went with a somewhat organic design — an electronic “flower” with the radially arranged SAOs forming the petals, but this meant that that none of the SAOs were in the traditional vertical orientation. Luckily, [Adrian Studer] designed a couple of PCBs that not only resolve this issue, but add a seventh SAO port for good measure.

In the project repository you’ll find two PCB designs. The first, “SAO Up” is essentially a little arm that turns the SAO port 90 degrees. This doesn’t exactly get them vertical, in fact, whether or not the new orientation is actually an improvement for the top two SAOs is perhaps debatable. But it definitely helps on the lower SAOs, which are essentially upside down in their original configuration.

The real star of the show is “SAO Bridge”, a wavy board that connects across the two midline SAO ports on the Supercon badge and turns it into a set of three (nearly) horizontal connectors across the front. The center port is particularly helpful in that it gives you a place to put unusually wide SAOs.

As a reminder the Supercon SAO badge, and the winners of the 2024 SAO Contest, will be making the trip across the pond for Hackaday Europe in just a few months. That means you’ve still got plenty of time to have a few of these CERN-OHL-P licensed boards made up.

iFixit Releases Command Line Docs for FixHub Iron

Por: Tom Nardi
12 Enero 2025 at 00:00

When we reviewed the iFixit FixHub back in September, one of the most interesting features of the portable soldering station was the command line interface that both the iron and the base station offered up once you connected to them via USB. While this feature wasn’t documented anywhere, it made a degree of a sense, as the devices used WebSerial to communicate with the browser. What was less clear at the time was whether or not the user was supposed to be fiddling with this interface, or if iFixit intended to lock it up in a future firmware update.

Thanks to a recent info dump on GitHub, it seems like we have our answer. In the repo, iFixit has provided documentation for each individual command on both the iron and base, including some background information and application notes for a few of the more esoteric functions. A handful of the commands are apparently disabled in the production version of the firmware, but there’s still plenty to poke around with.

A note at the top of the repo invites users to explore the hardware and to have fun, but notes that any hardware damage caused by “inventive tinkering” won’t be covered under the warranty. While it doesn’t look to us like there’s much in here that could cause damage, there’s one or two we probably wouldn’t play with. The command that writes data to the non-volatile storage of the MAX17205 “Fuel Gauge” IC is likely better left alone, for example.

Some of the notes provide a bit of insight into the hardware design of the FixHub, as well. The fact that there are two different commands for reading the temperature from the thermocouple and thermistor might seem redundant, but it’s explained that the value from the thermistor is being used for cold junction compensation to get a more accurate reading from the thermocouple in the iron’s tip. On the other hand, one can only wonder about the practical applications of the tip_installed_uptime command.

The potential for modifying and repairing the FixHub was one of the things we were most excited about in our review, so we’re glad to see iFixit releasing more documentation for the device post-release. That said, the big question still remains: will we eventually get access to the firmware source code?

Remotely Controlled Vehicles Over Starlink

Por: Tom Nardi
8 Enero 2025 at 12:00

Modern remote control (RC) radios are capable of incredible range, but they’re still only made for line-of-sight use. What if you want to control a vehicle that’s 100s of kilometers away, or even on the other side of the planet? Cellular is an option, but is obviously limited by available infrastructure — good luck getting a cell signal in the middle of the ocean.

But what if you could beam your commands down from space? That’s what [Thingify] was looking to test when they put together an experimental RC boat using a Starlink Mini for communications. Physically, there was no question it would work on the boat. After all, it was small, light, and power-efficient enough. But would the network connection be up to the task of controlling the vehicle in real-time?

During early ground testing, the Mini version of the Starlink receiver worked very well. Despite being roughly 1/4 the size of its predecessor, the smaller unit met or exceeded its performance during benchmarks on bandwidth, latency, and signal strength. As expected, it also drew far less power: the Mini’s power consumption peaked at around 33 watts, compared to the monstrous 180 W for the larger receiver.

On the water, there was even more good news. The bandwidth was more than enough to run a high-resolution video feedback to the command center. At the same time, the boat moved autonomously between waypoints, and when [Thingify] switched over to manual control, the latency was low enough not to be a problem. We wouldn’t recommend manually piloting a high-speed aircraft over Starlink, but for a boat that’s cruising along at 4 km/h, the lag didn’t even come into play.

The downside? Starlink is a fairly expensive proposition; you’d need to have a pretty specific mission in mind to justify the cost. The Mini receiver currently costs $599 USD (though it occasionally goes on sale), and you’ll need at least a $50 per month plan to go with it. While this puts it out of the price range for recreational RC, [Thingify] notes that it’s not a bad deal if you’re looking to explore uncharted territory.

Logging Baby’s Day in Linux

Por: Tom Nardi
7 Enero 2025 at 09:00

There’s plenty of surprises to be had when you become a parent, and one of the first is that it’s suddenly your job to record  the frequency of your infant’s various bodily functions in exacting detail. How many times did the little tyke eat, how long did they sleep, and perhaps most critically, how many times did they poop. The pediatrician will expect you to know these things, so you better start keeping notes.

Or, if you’re [Triceratops Labs], you build a physical button panel that will keep tabs on the info for you. At the press of each button, a log entry is made on the connected Raspberry Pi Zero W, which eventually makes its way to a web interface that you can view to see all of Junior’s statistics.

In terms of hardware, this one is quite simple — it’s really just an array of arcade-style push buttons wired directly into the Pi’s GPIO header. Where it shines is in the software. This project could have been just a Python script and a text file, but instead it uses a MariaDB database on the back-end, with Apache and PHP serving up the web page, and a custom Systemd service to tie it all together. In other words, it’s what happens when you let a Linux admin play with a soldering iron.

It probably won’t come as much surprise to find that hackers often come up with elaborate monitoring systems for their newborn children, after all, it’s a great excuse for a new project. This machine learning crib camera comes to mind.

❌
❌