When we first spotted the article about a one-transistor amateur radio transceiver, we were sure it was a misprint. We’ve seen a lot of simple low-power receivers using a single transistor, and a fair number of one-transistor transmitters. But both in one package with only a single active component? Curiosity piqued.
It turns out that [Ciprian Popica (YO6DXE)]’s design is exactly what it says on the label, and it’s pretty cool to boot. The design is an improvement on a one-transistor transceiver called “El Pititico” and is very petite indeed. The BOM has only about fifteen parts including a 2N2222 used as a crystal-controlled oscillator for both the transmitter and the direct-conversion receiver, along with a handful of passives and a coupe of hand-wound toroidal inductors. There’s no on-board audio section, so you’ll have to provide an external amplifier to hear the signals; some might say this is cheating a bit from the “one transistor” thing, but we’ll allow it. Oh, and there’s a catch — you have to learn Morse code, since this is a CW-only transmitter.
As for construction, [Ciprian] provides a nice PCB layout, but the video below seems to show a more traditional “ugly style” build, which we always appreciate. The board lives in a wooden box small enough to get lost in a pocket. The transceiver draws about 1.5 mA while receiving and puts out a fairly powerful 500 mW signal, which is fairly high in the QRP world. [Ciprian] reports having milked a full watt out of it with some modifications, but that kind of pushes the transistor into Magic Smoke territory. The signal is a bit chirpy, too, but not too bad.
We love minimalist builds like these; they always have us sizing up our junk bin and wishing we were better stocked on crystals and toroids. It might be good to actually buckle down and learn Morse too.
The host of problems to deal with when you’re feeling the need for FDM speed are many and varied, but high on the list is figuring out how to melt filament fast enough to accommodate high flow rates. Plus, the filament must be melted completely; a melty outside and a crunchy inside might be good for snacks, but not for 3D printing. Luckily, budget-minded hobbyists can build a drop-in booster to increase volumetric flow using only basic tools and materials.
[aamott]’s booster, which started life as a copper screw, is designed to replace the standard spacer in an extruder, with a bore that narrows as the filament gets closer to the nozzle to ensure that the core of the filament melts completely. Rather than a lathe, [aamott]’s main tool is a drill press, which he used to drill a 0.7 mm bore through the screw using a PCB drill bit. The hole was reamed out with a 10° CNC engraving bit, generating the required taper. After cutting off the head of the screw and cleaning up the faces, he cut radial slots into the body of the booster by threading the blade of a jeweler’s saw into the bore. The result was a bore wide enough to accept the filament on one end, narrowing to a (roughly) cross-shaped profile at the other.
Stacked up with a couple of knock-off Bondtech CHT nozzles, the effect of the booster was impressive — a 50% increase in flow rate. It’s not bad for a prototype made with simple tools, and it looks a little easier to build than [Stefan]’s take on the same idea.
Here at Hackaday, we take pride in presenting the freshest hacks and the best of what’s going on today in the world of hardware hacking. But sometimes, we stumble upon a hack from the past so compelling that we’ve got to bring it to you, so we can all marvel at what was possible in the Before Times.
This one, a completely homebrewed automatic photometric telescope, was designed and built by the father-son team of [Jack Ells] and [Peter Ells]. From the elder [Ells]’ field notes, the telescope saw its first light in 1988, giving us some idea of the scale of problems that had to be overcome to get this wonderful machine working. The optics are straightforward, as least as telescopes go — it’s an f-4.0 Newtonian reflector with an 8.5″ (221 mm) primary mirror on an equatorial mount. The telescope is very rugged-looking indeed, and even stands on brick piers for stability. The telescope’s mount is controlled by a BBC Micro running custom BASIC software.
For the photometric parts, the [Ells] boys installed a photo-multiplier tube at the focus of the telescope. More precisely, they used a liquid light guide to connect the eyepiece to a rack full of equipment, which included the PM tube, its high-voltage power supply, and a series of signal conditioners and counter circuits. The idea was to view a single star through a pinhole mask over the objective of the telescope and count the rate of photons received over time. Doing so would reveal periodic changes in the star’s brightness. Today we’d use similar data to search for exoplanet transits; while we don’t think that was a thing back in 1988, it looks like this telescope could easily have handled the job.
Sadly, [Jack Ells] died only two years after finishing the telescope. But he left it with his son, who eventually moved it to a location with better seeing conditions, where it gathered data for another eight years. The quality of the work is amazing, and as father-son projects go, this one is tough to beat.
Model rocketry has always taken cues from what’s happening in the world of full-scale rockets, with amateur rocketeers doing their best to incorporate the technologies and methods into their creations. That’s not always an easy proposition, though, as this three-year effort to nail a SpaceX-style vertical landing aptly shows.
First of all, hats off to high schooler [Aryan Kapoor] from JRD Propulsion for his tenacity with this project. He started in 2021 with none of the basic skills needed to pull off something like this, but it seems like he quickly learned the ropes. His development program was comprehensive, with static test vehicles, a low-altitude hopper, and extensive testing of the key technology: thrust-vector control. His rocket uses two solid-propellant motors stacked on top of each other, one for ascent and one for descent and landing. They both live in a 3D printed gimbal mount with two servos that give the stack plus and minus seven degrees of thrust vectoring in two dimensions, which is controlled by a custom flight computer with a barometric altimeter and an inertial measurement unit. The landing gear is also clever, using rubber bands to absorb landing forces and syringes as dampers.
The video below shows the first successful test flight and landing. Being a low-altitude flight, everything happens very quickly, which probably made programming a challenge. It looked like the landing engine wasn’t going to fire as the rocket came down significantly off-plumb, but when it finally did light up the rocket straightened and nailed the landing. [Aryan] explains the major bump after the first touchdown as caused by the ascent engine failing to eject; the landing gear and the flight controller handled the extra landing mass with aplomb.
All in all, very nice work from [Aryan], and we’re keen to see this one progress.
Ever since the beginning of the Space Age, the inner planets and the Earth-Moon system have received the lion’s share of attention. That makes sense; it’s a whole lot easier to get to the Moon, or even to Mars, than it is to get to Saturn or Neptune. And so our probes have mostly plied the relatively cozy confines inside the asteroid belt, visiting every world within them and sometimes landing on the surface and making a few holes or even leaving some footprints.
But there’s still one place within this warm and familiar neighborhood that remains mysterious and relatively unvisited: the Sun. That seems strange, since our star is the source of all energy for our world and the system in general, and its constant emissions across the electromagnetic spectrum and its occasional physical outbursts are literally a matter of life and death for us. When the Sun sneezes, we can get sick, and it has the potential to be far worse than just a cold.
While we’ve had a succession of satellites over the last decades that have specialized in watching the Sun, it’s not the easiest celestial body to observe. Most spacecraft go to great lengths to avoid the Sun’s abuse, and building anything to withstand the lashing our star can dish out is a tough task. But there’s one satellite that takes everything that the Sun dishes out and turns it into a near-constant stream of high-quality data, and it’s been doing it for almost 15 years now. The Solar Dynamics Observatory, or SDO, has also provided stunning images of the Sun, like this CGI-like sequence of a failed solar eruption. Images like that have captured imaginations during this surprisingly active solar cycle, and emphasized the importance of SDO in our solar early warning system.
Living With a Star
In a lot of ways, SDO has its roots in the earlier Solar and Heliospheric Observer, or SOHO, the wildly successful ESA solar mission. Launched in 1995, SOHO is stationed in a halo orbit at Lagrange point L1 and provides near real-time images and data on the sun using a suite of twelve science instruments. Originally slated for a two-year science program, SOHO continues operating to this day, watching the sun and acting as an early warning for coronal mass ejections (CME) and other solar phenomena.
Although L1, the point between the Earth and the Sun where the gravitation of the two bodies balances, provides an unobstructed view of our star, it has disadvantages. Chief among these is distance; at 1.5 million kilometers, simply getting to L1 is a much more expensive proposition than any geocentric orbit. The distance also makes radio communications much more complicated, requiring the specialized infrastructure of the Deep Space Network (DSN). SDO was conceived in part to avoid some of these shortcomings, as well as to leverage what was learned on SOHO and to extend some of the capabilities delivered by that mission.
SDO stemmed from Living with a Star (LWS), a science program that kicked off in 2001 and was designed to explore the Earth-Sun system in detail. LWS identified the need for a satellite that could watch the Sun continuously in multiple wavelengths and provide data on its atmosphere and magnetic field at an extremely high rate. These requirements dictated the specifications of the SDO mission in terms of orbital design, spacecraft engineering, and oddly enough, a dedicated communications system.
Geosynchronous, With a Twist
Getting a good look at the Sun for space isn’t necessarily as easy as it would seem. For SDO, designing a suitable orbit was complicated by the stringent and somewhat conflicting requirements for continuous observations and constant high-bandwidth communications. Joining SOHO at L1 or setting up shop at any of the other Lagrange points was out of the question due to the distances involved, leaving a geocentric orbit as the only viable alternative. A low Earth orbit (LEO) would have left the satellite in the Earth’s shadow for half of each revolution, making continuous observation of the Sun difficult.
To avoid these problems, SDO’s orbit was pushed out to geosynchronous Earth orbit (GEO) distance (35,789 km) and inclined to 28.5 degrees relative to the equator. This orbit would give SDO continuous exposure to the Sun, with just a few brief periods during the year where either Earth or the Moon eclipses the Sun. It also allows constant line-of-sight to the ground, which greatly simplifies the communications problem.
Science of the Sun
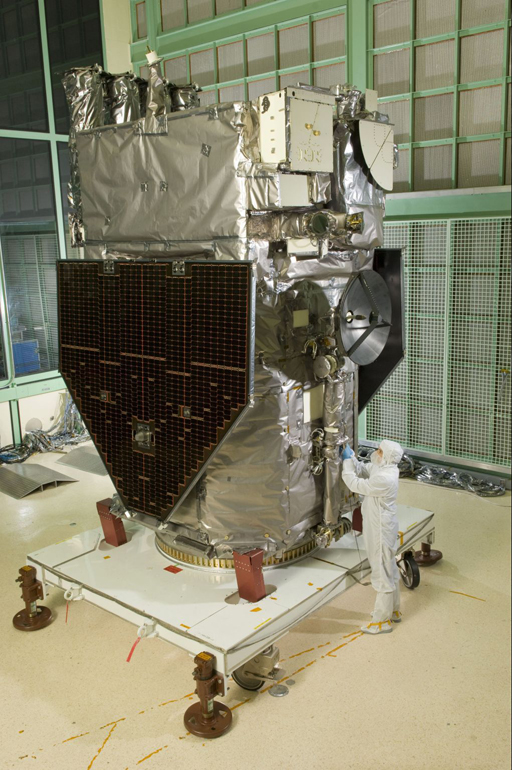
SDO packaged for the trip to geosynchronous orbit. The solar array corners are clipped to provide clearance for the high-gain dishes when the Earth is between SDO and the Sun. The four telescopes of AIA are visible on the top with EVE and HMI on the other edge above the stowed dish antenna. Source: NASA
The main body of SDO has a pair of solar panels on one end and a pair of steerable high-gain dish antennas on the other. The LWS design requirements for the SDO science program were modest and focused on monitoring the Sun’s magnetic field and atmosphere as closely as possible, so only three science instruments were included. All three instruments are mounted to the end of the spaceframe with the solar panels, to enjoy an unobstructed view of the Sun.
Of the three science packages, the Extreme UV Variability Experiment, or EVE, is the only instrument that doesn’t image the full disk of the Sun. Rather, EVE uses a pair of multiple EUV grating spectrographs, known as MEGS-A, and MEGS-B, to measure the extreme UV spectrum from 5 nm to 105 nm with 0.1 nm resolution. MEGS-A uses a series of slits and filters to shine light onto a single diffraction grating, which spreads out the Sun’s spectrum across a CCD detector to cover from 5 nm to 37 nm. The MEGS-A CCD also acts as a sensor for a simple pinhole camera known as the Solar Aspect Monitor (SAM), which directly measures individual X-ray photons in the 0.1 nm to 7 nm range. MEGS-B, on the other hand, uses a pair of diffraction gratings and a CCD to measure EUV from 35 nm to 105 nm. Both of these instruments capture a full EUV spectrum every 10 seconds.
To study the corona and chromosphere of the Sun, the Atmospheric Imaging Assembly (AIA) uses four telescopes to create full-disk images of the sun in ten different wavelengths from EUV to 450 nm. The 4,096 by 4,096 sensor gives the AIA a resolution of 0.6 arcseconds per pixel, and the optics allow imaging out to almost 1.3 solar radii, to capture fine detail in the thin solar atmosphere. AIA also visualizes the Sun’s magnetic fields as the hot plasma gathers along lines of force and highlights them. Like all the instruments on SDO, the AIA is built with throughput in mind; it can gather a full data set every 10 seconds.
For a deeper look into the Sun’s interior, the Helioseismic and Magnetic Imager (HMI) measures the motion of the Sun’s photosphere and magnetic field strength and polarity. The HMI uses a refracting telescope, an image stabilizer, a series of tunable filters that include a pair of Michelson interferometers, and a pair of 4,096 by 4,096-pixel CCD image detectors. The HMI captures full-disk images of the Sun known as Dopplergrams, which reveal the direction and velocity of movement of structures in the photosphere. The HMI is also capable of switching a polarization filter into the optical path to produce magnetograms, which use the polarization of light as a proxy for magnetic field strength and polarity.
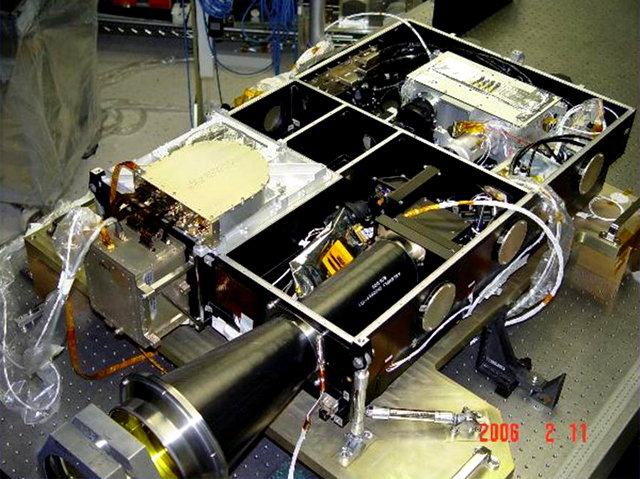
SDO’s Helioseismic and Magnetic Imager (HMI). Sunlight is gathered by the conical telescope before entering tunable filters in the optical oven at the back of the enclosure. The twin CCD cameras are in the silver enclosure to the left of the telescope and are radiantly cooled by heatsinks to lower thermal noise. Source: NASA.
Continuous Data, and Lots of It
Like all the SDO instruments, HMI is built with data throughput in mind, but with a twist. Helioseismology requires accumulating data continuously over long observation periods; the original 5-year mission plan included 22 separate HMI runs lasting for 72 consecutive days, during which 95% of the data had to be captured. So not only must HMI take images of the Sun every four seconds, it has to reliably and completely package them up for transmission to Earth.
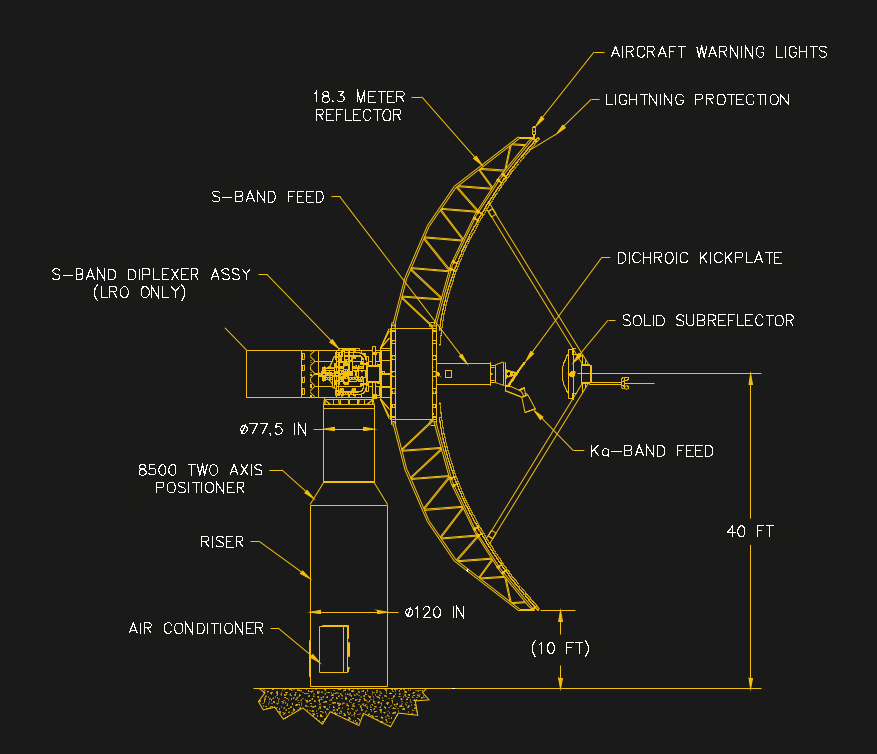
Schematic of the 18-m dish antenna used on the SDO ground station. The feedhorn is interesting; it uses a dichroic “kickplate” that’s transparent to S-band wavelengths but reflective to the Ka-band. That lets S-band telemetry pass through to the feedhorn in the center of the dish while Ka-band data gets bounced into a separate feed. Source: AIAA Space Ops 2006 Conference.
While most space programs try to leverage existing communications infrastructure, such as the Deep Space Network (DSN), the unique demands of SDO made a dedicated communications system necessary. The SDO communication system was designed to meet the throughput and reliability needs of the mission, literally from the ground up. A dedicated ground station consisting of a pair of 18-meter dish antennas was constructed in White Sands, New Mexico, a site chosen specifically to reduce the potential for rainstorms to attenuate the Ka-band downlink signal (26.5 to 50 GHz). The two antennas are located about 5 km apart within the downlink beamwidth, presumably for the same reason; storms in the New Mexico desert tend to be spotty, making it more likely that at least one site always has a solid signal, regardless of the weather.
To ensure that all the downlinked data gets captured and sent to the science teams, a complex and highly redundant Data Distribution System (DDS) was also developed. Each dish has a redundant pair of receivers and servers with RAID5 storage arrays, which feed a miniature data center of twelve servers and associated storage. A Quality Compare Processing (QCP) system continually monitors downlinked data quality from each instrument aboard SDO and stores the best available data in a temporary archive before shipping it off to the science team dedicated to each instrument in near real-time.
The numbers involved are impressive. The SDO ground stations operate 24/7 and are almost always unattended. SDO returns about 1.3 TB per day, so the ground station has received almost 7 petabytes of images and data and sent it on to the science teams over the 14 years it’s been in service, with almost all of it being available nearly the instant it’s generated.
As impressive as the numbers and the engineering behind them may be, it’s the imagery that gets all the attention, and understandably so. NASA makes all the SDO data available to the public, and almost every image is jaw-dropping. There are also plenty of “greatest hits” compilations out there, including a reel of the X-class flares that resulted in the spectacular aurorae over North America back in mid-May.
Like many NASA projects, SDO has far exceeded its planned lifespan. It was designed to catch the midpoint of Solar Cycle 24, but has managed to stay in service through the solar minimum of that cycle and into the next, and is now keeping a close watch on the peak of Solar Cycle 25.
Not according to [Wesley Pidhaychuk (VA5MUD)], a Canadian ham who tricked out his bike with a transceiver and all the accessories needed to work the HF bands while peddling along. The radio is a Yaesu FT-891, a workhorse mobile rig covering everything from the 160-meter band to 6 meters. [Wes] used some specialized brackets to mount the radio’s remote control head to the handlebars, along with an iPad for logging and a phone holder for streaming. The radio plus a LiFePO4 battery live in a bag on the parcel rack in back. The antenna is a Ham Stick mounted to a mirror bracket attached to the parcel rack; we’d have thought the relatively small bike frame would make a poor counterpoise for the antenna, but it seems to work fine — well enough for [Wes] to work some pretty long contacts while pedaling around Saskatoon, including hams in California and Iowa.
The prize contact, though, was with [WA7FLY], another mobile operator whose ride is even more unique: a 737 flying over Yuma, Arizona. We always knew commercial jets have HF rigs, but it never occurred to us that a pilot who’s also a ham might while away the autopilot hours working the bands from 30,000 feet. It makes sense, though; after all, if truckers do it, why not pilots?
Begun, the Spectrum Wars have. First, it was AM radio getting the shaft (last item) and being yanked out of cars for the supposed impossibility of peaceful coexistence with rolling broadband EMI generators EVs. That battle has gone back and forth for the last year or two here in the US, with lawmakers even getting involved at one point (first item) by threatening legislation to make terrestrial AM radio available in every car sold. We’re honestly not sure where it stands now in the US, but now the Swiss seem to be entering the fray a little up the dial by turning off all their analog FM broadcasts at the end of the year. This doesn’t seem to be related to interference — after all, no static at all — but more from the standpoint of reclaiming spectrum that’s no longer turning a profit. There are apparently very few analog FM receivers in use in Switzerland anymore, with everyone having switched to DAB+ or streaming to get their music fix, and keeping FM transmitters on the air isn’t cheap, so the numbers are just stacked against the analog stations. It’s hard to say if this is a portent of things to come in other parts of the world, but it certainly doesn’t bode well for the overall health of terrestrial broadcasting. “First they came for AM radio, and I did nothing because I’m not old enough to listen to AM radio. But then they came for analog FM radio, and when I lost my album-oriented classic rock station, I realized that I’m actually old enough for AM.”
Have you or a loved one been injured by falling space debris? You may be entitled to significant compensation. Call 1-800-SPACEJUNK for a free consultation with one of our attorney specialists. OK, maybe it hasn’t gotten to that point yet, but when SpaceX has set up a space debris hotline, you know the lawsuits are just around the corner. The move seems to be related to a piece of junk that fell on a campground in North Carolina earlier in the year which was identified as a section of a SpaceX Dragon that had brought astronauts to the ISS. The rather furry-looking piece of debris has apparently remained on the campground and is even being used to attract business, which seems a far better outcome than the Florida family whose roof caught a chunk of an ISS battery pack. No word on what happens if you call the SpaceX hotline to report something, but if black-suited goons don’t rush to the scene in a Cybertruck, we’ll be disappointed.
If you’ve been around Hackaday for a while, the name Anool Mahidharia will probably be familiar to you. Aside from writing over 300 articles for us, Anool has been a driving force behind The Maker’s Asylum hackspace in Mumbai, where among a ton of other achievements he managed to spearhead the development of an affordable open-source oxygen concentrator during the darkest days of the Covid-19 pandemic. All that was side action on his main gig running test and measurement company Lumetronics. Anool has decided to shut the business down and sell off all the contents of the shop, which contains some really cool machines and equipment. If you’re handy to Mumbai you’ll definitely want to check this out. Anool, we’re not sure what the future holds for you, and we certainly hope you’re not hanging things up for good, but if you are, “So long, and thanks for all the hacks.”
The entire point of a submarine is to be invisible, to dip beneath the waves and imitate a patch of perfectly normal seawater as convincingly as possible. So we mere mortals have very few opportunities to see submarines at all, let alone see one maneuver. But if you’re anywhere near the Heidelberg area, you just might get a chance to see U17, a Type 206 diesel-electric sub that served in the Bundesmarine until 2010, as it’s being moved to its new home at the Technik Museen Sinsheim. A lot of the journey is on barges along the Rhine and Neckar rivers, at least until it arrives in Haßmersheim, whereupon the 90-meter boat will take to the road in a circuitous route to its new home. Can’t get to Germany to watch it in person? No worries — there’s a live stream for that.
Speaking of old tube-shaped objects, we know that compressed gas cylinders are built to last, but one was recently found that’s been in continuous service for over a century. Gas cylinders are subject to periodic inspection, for obvious reasons, and get a date stamped into their neck once they pass. The stalwart cylinder, currently holding carbon dioxide gas, has date stamps going back to 1921, and may even have older stamps lying beneath labels with fancy new-fangled 2D barcodes. Quite a contrast to a date stamped into the steel with a hammer and die, and it only emphasizes how old this thing is and how much of our technological history it has witnessed — so far.
And finally, if you think your job sucks, you’re probably right. But even so, it’s not worth ending it all, as a “civil service robot” apparently did by casting itself down a stairwell. The bot, apparently despondent thanks to a zero-wage, dead-end job that entailed shuffling documents around a municipal office in Gumi, South Korea, was seen rolling about in circles on a landing before taking the fatal plunge, which witnesses seemed to think was deliberate. The robot’s remains were collected and a post-mortem examination is being conducted to see what went wrong. The suicidal robot, built by California start-up Bear Robotics, which disappointingly does not appear to build robotic bears, seemed to have been the only one of its peers with the ability to call elevators and move between floors of its own volition. So maybe it wasn’t so much a suicide but a case of workplace jealousy and murder most foul.
If something has a “smart” in its name, you know that it’s talking to someone else, and the topic of conversation is probably you. You may or may not like that, but that’s part of the deal when you buy these things. But with some smarts of your own, you might be able to make that widget talk to you rather than about you.
Such an opportunity presented itself to [Benjamen Lim] when a bunch of brand X smartwatches came his way. Without any documentation to guide him, [Benjamen] started with an inspection, which revealed a screen of debug info that included a mysterious IP address and port. Tearing one of the watches apart — a significant advantage to having multiple units to work with — revealed little other than an nRF52832 microcontroller along with WiFi and cellular chips. But the luckiest find was JTAG pins connected to pads on the watch face that mate with its charging cradle. That meant talking to the chip was only a spliced USB cable away.
Once he could connect to the watch, [Benjamen] was able to dump the firmware and fire up Ghidra. He decided to focus on the IP address the watch seemed fixated on, reasoning that it might be the address of an update server, and that patching the firmware with a different address could be handy. He couldn’t find the IP as a string in the firmware, but he did manage to find a sprintf-like format string for IP addresses, which led him to a likely memory location. Sure enough, the IP and port were right there, so he wrote a script to change the address to a server he had the keys for and flashed the watch.
So the score stands at [Benjamen] 1, smartwatch 0. It’s not clear what the goal of all this was, but we’d love to see if he comes up with something cool for these widgets. Even if there’s nothing else, it was a cool lesson in reverse engineering.
Helium-neon lasers may be little more than glorified neon signs, but there’s just something about that glowing glass tube that makes the whole process of stimulated emission easier to understand. But to make things even clearer, you might want to take a step inside the laser with something like [Les Wright]’s open-cavity He-Ne laser.
In most gas lasers, the stimulated emission action takes place within a closed optical cavity, typically formed by a glass tube whose ends are sealed with mirrors, one of which is partially silvered. The gas in the tube is stimulated, by an electrical discharge in the case of a helium-neon laser, and the stimulated photons bounce back and forth between the mirrors until some finally blast out through the partial mirror to form a coherent, monochromatic laser beam. By contrast, an open-cavity laser has a gas-discharge tube sealed with the fully silvered mirror on one end and a Brewster window on the other, which is a very flat piece of glass set at a steep angle to the long axis of the tube and transparent to p-polarized light. A second mirror is positioned opposite the Brewster window and aligned to create a resonant optical cavity external to the tube.
To switch mirrors easily, [Les] crafted a rotating turret mount for six different mirrors. The turret fits in a standard optical bench mirror mount, which lets him precisely align the mirror in two dimensions. He also built a quick alignment jig, as well as a safety enclosure to protect the delicate laser tube. The tube is connected to a high-voltage supply and after a little tweaking the open cavity starts to lase. [Les] could extend the cavity to almost half a meter, although even a waft of smoke was enough obstruction to kill the lasing at that length.
If this open-cavity laser arrangement seems familiar, it might be because [Les] previously looked at an old-school particle counter with such a laser at its heart.
It’s official: [Engineer Bo] wins the internet with a video titled “Finding NEMA 17,” wherein he builds a dynamometer to find the best stepper motor in the popular NEMA 17 frame size.
Like a lot of subjective questions, the only correct answer to which stepper is best is, “It depends,” and [Bo] certainly has that in mind while gathering the data needed to construct torque-speed curves for five samples of NEMA 17 motors using his homebrew dyno. The dyno itself is pretty cool, with a bicycle disc brake to provide drag, a load cell to measure braking force, and an optical encoder to measure the rotation of the motor under test. The selected motors represent a cross-section of what’s commonly available today, some of which appear in big-name 3D printers and other common applications.
[Bo] tested each motor with two different drivers: the TMC2209 silent driver to start with, and because he released the Magic Smoke from those, the higher current TB6600 module. The difference between the two drivers was striking, with lower torque and top speeds for the same settings on each motor using the TB6600, as well as more variability in the data. Motors did better across the board with the TBC6600 at 24 volts, showing improved torque at higher speeds, and slightly higher top speeds. He also tested the effect of microstepping on torque using the TBC6600 and found that using full steps resulted in higher torque across a greater speed range.
At the end of the day, it seems as if these tests say more about the driver than they do about any of the motors tested. Perhaps the lesson here is to match the motor to the driver in light of what the application will be. Regardless, it’s a nice piece of work, and we really appreciate the dyno design to boot — reminds us of a scaled-down version of the one [Jeremey Fielding] demonstrated a few years back.
A couple of weeks back we featured a story (third item) about a chunk of space jetsam that tried to peacefully return to Earth, only to find a Florida family’s roof rudely in the way. The 700-gram cylinder of Inconel was all that was left of a 2,360-kg battery pack that was tossed overboard from the ISS back in 2021, the rest presumably turning into air pollution just as NASA had planned. But the surviving bit was a “Golden BB” that managed to slam through the roof and do a fair amount of damage. At the time it happened, the Otero family was just looking for NASA to cover the cost of repairs, but now they’re looking for a little more consideration. A lawsuit filed by their attorney seeks $80,000 to cover the cost of repairs as well as compensation for the “stress and impact” of the event. This also seems to be about setting a precedent, since the Space Liability Convention, an agreement to which the USA is party, would require the space agency to cover damages if the debris had done damage in another country. The Oteros think the SLC should apply to US properties as well, and while we can see their point, we’d advise them not to hold their breath. We suppose something like this had to happen eventually, and somehow we’re not surprised to see “Florida Man” in the headlines.
There was a little hubbub this week around the release of a study regarding the safety of autonomous vehicles relative to their meat-piloted counterparts. The headlines for the articles covering this varied widely and hilariously, ranging from autonomous vehicles only being able to drive in straight lines to AVs being safer than human-driven cars, full-stop. As always, one has to read past the headlines to get an idea of what’s really going on, or perhaps even brave reading the primary literature. From our reading of the abstract, it seems like the story is more nuanced. According to an analysis of crashes involving 35,000 human-driven vehicles and 2,100 vehicles with some level of automation, AVs with SAE Level 4 automation suffered fewer accidents across the board than those without any automation. Importantly, the accidents that Level 4 vehicles do suffer are more likely to occur when the vehicle is turning just before the accident, or during low-visibility conditions such as dawn or dusk. The study also compares Level 4 automation to Level 2, which has driver assistance features like lane-keeping and adaptive cruise control, and found that Level 2 actually beats Level 4 in clear driving conditions, but loses in rainy conditions and pretty much every other driving situation.
There’s a strange story coming out of New York regarding a Federal Communications Commission (FCC) enforcement action that seems a little shady. It regards a General Mobile Radio Service (GMRS) repeater system used by the New York State GMRS Alliance. GMRS is sort of a “ham radio lite” system — there’s no testing required for a license, you just pay a fee — that uses the UHF band. Repeaters are allowed, but only under specific rules, and that appears to be where things have gone wrong for the club. The repeater system they used was a linked system, which connected geographically remote repeaters stretching from the far western part of the state near Buffalo all the way to Utica. It’s the linking that seems to have raised the FCC’s hackles, and understandably so because it seems to run counter to the GMRS rules in section 95. But it’s the method of notification that seems hinky here, as the repeater custodian was contacted by email. That’s not typical behavior for the FCC, who generally send enforcement notices by certified snail mail, or just dispense with the paper altogether and knock on your door. People seem to think this is all fake news, and it may well be, but then again, the email could just have been an informal heads-up preceding a formal notice. Either way, it’s bad news for the GMRS fans in upstate New York who used this system to keep in touch along Interstate 90, a long and lonely stretch of road that we know all too well.
Third time’s a charm? We’ll see when sunspot region AR3723 (née AR3697 née AR3664) makes a historic third pass around the Sun and potentially puts Earth in its crosshairs yet again. The region kicked up quite a ruckus on its first pass across the solar disk back in May with a series of X-class flares that produced stunning aurorae across almost all of North America. Pass number two saw the renamed region pass more or less quietly by, although it did launch an M-class flare on June 23 that caused radio blackouts in most of the North Atlantic basin. When AR3723 does peek out from behind the eastern limb of the Sun it’ll be a much-diminished version of its former Carrington-level glory, and will likely be given multiple designations thanks to fragmentation while it was hanging out on the backside. But it could still pack a punch, and even if this particular region doesn’t have much juice left, it sure seems like the Sun has plenty of surprises in store for the balance of Solar Cycle 25.
And finally, we’ve been doing an unexpected amount of automotive DIY repairs these days, meaning we spend a lot of time trolling around for parts. Here’s something we didn’t expect to see offered by a national retailer, but that we’d love to find a use for. If it ever comes back in stock we just might pick one up.
Dice are about the simplest machines possible, and they’ve been used since before recorded history to generate random numbers. But no machine is so simple that a little needless complexity can’t make it better, as is the case with this mechanical spinning dice. Or die. Whatever.
Inspiration for the project came from [Attoparsec]’s long history with RPG and tabletop games, which depend on different kinds of dice to generate the randomness that keeps them going — that and the fortuitous find of a seven-segment flip-dot display, plus the need for something cool to show off at OpenSauce. The flip-dot is controlled by an array of neodymium magnets with the proper polarity to flip the segments to the desired number. The magnets are attached to an aluminum disk, with each array spread out far enough to prevent interference. [Attoparsec] also added a ring of magnets to act as detents that lock the disk into a specific digit after a spin.
The finished product ended up being satisfyingly clicky and suitably random, and made a good impression at OpenSauce. The video below documents the whole design and build process, and includes some design dead-ends that [Attoparsec] went down in pursuit of a multiple-digit display. We’d love to see him revisit some of these ideas, mechanically difficult though they may be. And while he’s at it, maybe he could spice up the rolls with a little radioactivity.
There have been a couple of high-profile solar eclipses lately, but like us, you probably missed the news of the one that passed over Munich in 2019. And every day since then, in fact, unless you were sitting in a particular spot: the couch of one [Bernd Kraus], who has his very own personal eclipse generator.
We’ll attempt to explain. Living in an apartment with a gorgeous western view of Munich is not without its cons, chief among which is the unobstructed exposure to the setting sun. Where most people would opt for a window treatment of some sort to mitigate this, [Bernd] felt that blotting out the entire view was a heavy-handed solution to the problem. His solution is a window-mounted X-Y gantry that dangles a cutout of the moon in just the right place to blot out the sun. An Arduino uses the time and date to calculate the position of the sun as it traverses the expansive window and moves the stepper motors to keep the moon casting its shadow in just the right place: on his face as he sits in his favorite spot on the couch.
There are a couple of time-lapse sequences in the video below, as well as a few shots of the hardware. We know this isn’t an actual coronagraph, but the effect is pretty cool, and does resemble an eclipse, at least in spirit. And it goes without saying that we applaud the unnecessary complexity embodied by this solution.
On the face of it, harnessing wind power to heat your house seems easy. In fact some of you might be doing it already, assuming you’ve got a wind farm somewhere on your local grid and you have an electric heat pump or — shudder — resistive heaters. But what if you want to skip the middleman and draw heat directly from the wind? In that case, wind-powered induction heating might be just what you need.
Granted, [Tim] from the Way Out West Blog is a long way from heating his home with a windmill. Last we checked, he didn’t even have a windmill built yet; this project is still very much in the experimental phase. But it pays to think ahead, and with goals of simplicity and affordability in mind, [Tim] built a prototype mechanical induction heater. His design is conceptually similar to an induction cooktop, where alternating magnetic fields create eddy currents that heat metal cookware. But rather than using alternating currents through large inductors, [Tim] put 40 neodymium magnets with alternating polarity around the circumference of a large MDF disk. When driven by a drill press via some of the sketchiest pullies we’ve seen, the magnets create a rapidly flipping magnetic field. To test this setup, [Tim] used a scrap of copper pipe with a bit of water inside. Holding it over the magnets as they whiz by rapidly heats the water; when driven at 1,000 rpm, the water boiled in about 90 seconds. Check it out in the video below.
It’s a proof of concept only, of course, but this experiment shows that a spinning disc of magnets can create heat directly. Optimizing this should prove interesting. One thing we’d suggest is switching from a disc to a cylinder with magnets placed in a Halbach array to direct as much of the magnetic field into the interior as possible, with coils of copper tubing placed there.
When a ransomware attack targets something like a hospital, it quickly becomes a high-profile event that understandably results in public outrage. Hospitals are supposed to be backstops for society, a place to go when it all goes wrong, and paralyzing their operations for monetary gain by taking over their information systems is just beyond the pale. Tactically, though, it makes sense; their unique position in society seems to make it more likely that they’ll pay up.
Which is why the ongoing cyberattack against car dealerships is a little perplexing — can you think of a less sympathetic victim apart from perhaps the Internal Revenue Service? Then again, we’re not in the ransomware business, so maybe this attack makes good financial sense. And really, judging by the business model of the primary target of these attacks, a company called CDK Global, it was probably a smart move. We had no idea that there was such a thing as a “Dealer Management System” that takes care of everything from financing to service, and that shutting down one company’s system could cripple an entire industry, but there it is.
Water may seem like the enemy for anyone who gets in trouble while swimming, but it’s really time that they’re fighting. Even a strong swimmer can quickly become exhausted fighting wind and waves; add in the hypothermia that’ll eventually set in even in water as warm as a bath, and the difference between life and death can come down to seconds. Getting help to a floundering swimmer isn’t easy, though, as lifeguards can only swim so fast.
But a new remotely operated rescue boat aims to change that, by getting to someone in trouble as fast as possible. Named EMILY, for “Emergency Integrated Lifesaving Lanyard,” the unit is a compact electrically powered rescue boat that can be rapidly deployed by lifeguards, who remotely pilot it to the victim. The boat’s deck is covered with what looks like survival gear, most of which would probably be of more use to the lifeguard upon their arrival than to the swimmer, who would likely just use the boat for flotation. As such, this makes way more sense than sending a drone out there, which at best could only drop a life ring. At $12,000 a piece, these boats aren’t cheap, but for the families who lost their kids in 2022 who donated them, they probably seem like quite a bargain. Here’s hoping they pay off.
We can’t be sure, but we’ve got a vague memory of playing a game called Lunar Landing way back in the day. It would likely have been on a TRS-80 in our local Radio Shack store, and if memory serves, we never got particularly good at the text-based simulator. Happily, though, we can now at least attempt to foist our lack of skills off on a 55-year-old bug in the software. Recently discovered by the excellently named Martin C. Martin while trying to optimize the fuel burn schedule to land softly with the most fuel remaining — the key to a high score, as we recall — the bug makes it so a tiny change in burn rate gives wildly different results. The post-mortem of his search and the analysis of the code, written by high school student Jim Storer only months after the real moon landing in 1969, is very interesting. We especially appreciated the insights into how Storer wrote it, revealed via personal communications. It’s a great look at a piece of computer history, and hats off to both Storer and Martin — although we haven’t seen a CVE posted for this yet.
We know that Minitel terminals are highly collectible, but this is ridiculous. Granted, the Minitel occupies a unique place in computer history, and the boxy design of the original CRT and keyboard terminal was not without its charms. But this particular terminal seems to have had a Very Bad Day in the recent past and is now on the chopping block for a mere €430. To be fair, the eBay user in France has listed the Dalí-esque Minitel as an objet d’art; at that price, we’d like to at least get some usable parts from it to fix other terminals, but that doesn’t seem likely. Somebody will probably buy it, though — no accounting for taste.
And finally, AnimaGraffs is back, this time with a deep dive into the Bell 407 helicopter. We’ve been big fans of his work for a while and have featured a few of his videos in this space, including his look inside the SR-71 Blackbird spy plane. The new video is richly detailed and includes not only the engineering that goes into rotorcraft but also the physics that makes them work and makes them so challenging to fly. Enjoy!
Nobody doubts the utility of the Arduino Nano and its many clones, and chances are good you’ve got at least one or two of the tiny dev boards within arm’s reach right now. But as small as it is, the board still takes up a fair amount of real estate, especially on solderless breadboards during the prototyping phase of a project. Wouldn’t it be nice to shrink down the Nano just a bit and regain a couple of rows for plugging in components and jumpers?
It looks like [Albert van Dalen] thought so, and he managed to get a Nano’s functionality — and then some — onto a DIP-26 footprint. The aptly named “Nano DIP,” which at 33 mm x 10 mm — about the same size as the ATmega328 on the Arduino Uno — will tickle the miniaturization fans out there. The board is built around an ATtiny3217 and has almost all of the Nano’s features, like a USB port, reset button, built-in LEDs, 5 V regulator, and preloaded bootloader. Its big extra feature is the 350-kilosamples-per-second 8-bit DAC, while sacrificing external crystal pins and a 3.3 V regulator.
To make the board cheap enough to manufacture, [Albert] elected a minimum component size of 0402, which made squeezing all the parts onto the board challenging. The MCU barely fits between the header pin pads, and the Micro USB jack had to be a vertical-mount type. It does the business, though, so if you’re looking to free up a little breadboard space, check it out.
In a lot of ways, Etch-A-Sketch is the perfect toy; simple, easy to use, creative, endlessly engaging, and as a bonus, it’s completely mechanical. We find that last attribute to be a big part of its charm, but that’s not to say an electronic version of the classic toy can’t be pretty cool, especially when it’s done without the aid of a microcontroller.
This is one of those “because I can” projects that we always find so interesting, and more so because it wasn’t entirely clear to [BigZaphod] that he had the skills to pull it off. While his initial design centered around a bunch of 8×8 LED matrix displays and a 256×4-bit RAM chip, the rest of it was a lot of hand-waving. After a few experiments with addressing the LEDs, [Zaphod] started filling in the blanks with a refresh circuit using a 555 — naturally — and a pair of counters. Properly debounced encoders for the horizontal and vertical controls came next, along with more counters to track the cursor and a host of other circuits that ended up looking like a “one of each” selection from the 7400-series catalog.
While we do wish for a schematic on this one, it’s still a pretty enjoyable video, and the end product seems to work really well. The electronic version has a few features the original lacks, such as wrapping the cursor to the other side of the screen. We’d imagine that the buttons on the encoders could be put to work, too; perhaps a click could make it so you can move the cursor without leaving a trail behind. That might be a challenge to execute in logic, but then again, that was the point of the whole thing.
Still jonesing for that mechanical Etch-A-Sketch experience? Not a problem.
If you need to get up to speed, check out our previous coverage of the all-band hack for the UV-K5, in which [Paul (OM0ET)] installs a tiny PCB to upgrade the radio’s receiver chip to an Si4732. Along with a few jumpers and some component replacements on the main board, these hardware mods made it possible for the transceiver, normally restricted to the VHF and UHF amateur radio bands, to receive everything down to the 20-meter band, in both AM and single-sideband modulations.
The new mod featured in the video below does all that and more, all while making the installation process slightly easier. The new PCB is on a flexible substrate and is considerably slimmer, and also sports an audio amplifier chip, to make up for the low audio output on SSB signals of the first version. Installation, which occupies the first third of the video below, is as simple as removing one SMD chip from the radio’s main board and tacking the PCB down in its footprint, followed by making a couple of connections with very fine enameled wire.
You could load the new firmware and call it a day at that point, but [Paul] decided to take things a step further and install a separate jack for a dedicated HF antenna. This means sacrificing the white LED on the top panel, which isn’t much of a sacrifice for most hams, to make room for the jack. Most of us would put a small SMA jack in, but [Paul] went for a BNC, which required some deft Dremel and knife work to fit in. He also used plain hookup wire to connect the jack, which sounds like a terrible idea; we’d probably use RG-316, but his mod didn’t sound that bad at all.
With few exceptions, power transmission is a field where wobbling is a bad thing. We generally want everything running straight and true, with gears and wheels perfectly perpendicular to their shafts, with everything moving smoothly and evenly. That’s not always the case, though, as this pericyclic gearbox demonstrates.
Although most of the components in [Retsetman] model gearboxes seem familiar enough — it’s mostly just a collection of bevel gears, like you’d see inside a differential — it’s their arrangement that makes everything work. More specifically, it’s the shaft upon which the bevel gears ride, which has a section that is tilted relative to the axis of the shaft. It’s just a couple of degrees, but that small bit of inclination, called mutation, makes the ring gear riding on it wobble as the shaft rotates, allowing it to mesh with one or more ring gears that are perpendicular to the shaft. This engages a few teeth at a time, transferring torque from one gear to another. It’s easier to visualize than it is to explain, so check out the video below.
Gearboxes like these have a lot of interesting properties, with the main one being gear ratio. [Retsetman] achieved a 400:1 ratio with just 3D printed parts, which of course impose their own limitations. But he was still able to apply some pretty serious torque. The arrangement is not without its drawbacks, of course, with the wobbling bits naturally causing unwelcome vibrations. That can be mitigated to some degree using multiple rotatins elements that offset each other, but that only seems to reduce vibration, not eliminate it.