There was a time when building a telescope was a rite of passage for budding astronomers, much as building a radio was the coming age for electronics folks. These days, many things are cheaper to buy than build, even though we do enjoy building anything we can. Orion was a big name in telescopes for many years. Their parent company also owned Meade and Coronado, both well-known optical brands. A recent video from [Reflactor] brought it to our attention that Orion abruptly ceased operations on July 9th.
We always hate to hear when well-known brands that serve a big part of our community vanish. According to [Reflactor], people who have telescopes with the company for repair are likely to never see them again. [Dylan O’Donnell] also had a video about it (see below), and, as he notes, at that time, the website was still operating, but it’s gone now. To add further fuel to the fire Sky & Telescope ran an article on July 12th saying that Meade was also on the chopping block, although at the time of this writing, their site is still online.
You have to wonder what problems you might have selling telescopes today. Many people live where there is light pollution. We’d like to think there are still people who want to ponder the universe from their backyard, though.
There are still people selling telescopes, so presumably, one of them — maybe Celestron — will take up the slack. Or maybe we’ll see a resurgence in telescope homebrewing.
It is hard to imagine what a mainframe or supercomputer can do when we all have what amounts to supercomputers on our desks. But if you look at something like IBM’s mainframe Telum chip, you’ll get some ideas. The Telum II has “only” eight cores, but they run at 5.5 GHz. Unimpressed? It also has 360 MB of on-chip cache and I/O and AI accelerators. A mainframe might use 32 of these chips, by the way.
[Clamchowder] explains in the post how the cache has a unique architecture. There are actually ten 36 MB L2 caches on the chip. There are eight caches, one for each core, plus one for the I/O accelerator, and another one that is uncommitted.
A typical CPU will have a shared L3 cache, but with so much L2 cache, IBM went a different direction. As [Clamchowder] explains, the chip reuses the L2 capacity to form a virtual L3 cache. Each cache has a saturation metric and when one cache gets full, some of its data goes to a less saturated cache block.
Remember the uncommitted cache block? It always has the lowest saturation metric so, typically, unless the same data happens to be in another cache, it gets moved to the spare block.
There’s more to it than that — read the original post for more details. You’ll even read speculation about how IBM managed a virtual L4 cache, across CPUs.
[Michelle Hampson] reports in IEEE Spectrum that Chinese researchers may improve self-driving cars by mimicking how the human eye works. In some autonomous cars, two cameras use polarizing filters to help understand details about what the car sees. However, these filters can penalize the car’s vision in low light conditions.
Humans, however, have excellent vision in low-lighting conditions. The Retinex theory (based on the Land Effect discovered by [Edwin Land]) attributes this to the fact that our eyes sense both the reflectance and the illumination of light. The new approach processes polarized light from the car’s cameras in the same way.
The images pass through two algorithms. One compensates for brightness levels, while the other processes the reflective properties of the incoming light. They mounted cameras on real cars and drove them in actual dim environments to test everything out.
The result? Studies show that the approach improved driving accuracy by approximately 10%. However, the algorithms require extensive training on difficult-to-obtain data sets, so that is one challenge to adoption.
Self-driving cars certainly need improving. Oddly enough, navigation can be done with polarizing filter cameras and a clear view of the sky. Or, you can look under the road.
[MIKROWAVE1] claims he’s not a radio repair guy, but he agreed to look at a malfunctioning Hallicrafters S-120 shortwave receiver. He lets us watch as he tries to get it in shape in the video below. You’ll see that one of his subscribers had done a great job restoring the radio, but it just didn’t work well.
Everything looked great including the restored parts, so it was a mystery why things wouldn’t work. However, every voltage measured was about 20V too low. Turns out that the series fuse resistor had changed value and was dropping too much voltage.
That was an easy fix and got three of the radio’s four bands working. The fourth band had some problems. Fixing some grounding helped, but the converter tube was weak and a new replacement made it work much better.
There were some other minor issues, but in the end, the radio was back to its original glory. We have to warn you that restoring old radios can be addictive. The good news is, thanks to the Internet, you don’t have to figure it all out yourself or find a local expert who will take an apprentice. Hallicrafters was a huge name in the radio business after World War II, and, for that matter, during the war, too.
It is common these days to have a soldering iron where you can set the temperature using some sort of digital control. But how accurate is it? Probably pretty accurate, but [TheHWCave] picked up a vintage instrument on eBay that was made to read soldering iron temperature. You can see the video below, which includes an underwhelming teardown.
The device is a J thermocouple and a decidedly vintage analog meter. What’s inside? Nearly nothing. So why did the meter not read correctly? And where is the cold junction compensation?
The probe seemed okay when used with a modern meter. However, driving the meter directly showed a problem. It seemed like something was wrong with the meter’s movement.
Pulling the meter out revealed a handwritten label identifying the meter as having a full-scale deflection of just over 27 millivolts and using a 0.5 ohm external resistor. Unsurprisingly, the old meter had some issues with the thermocouple.
Pulling the meter showed that the compensation was actually inside the meter casing. The meter’s problem was due to these extra components: an NTC thermistor and a custom wire-wound resistor. Changing the resistor fixed the box. This time, he put the two components outside the meter housing in the vast space of the nearly empty case.
Today, we take measuring temperature for granted. Only the cheapest meters lack temperture measurement and you can use other techniques like IR sensors, too. But this was an interesting look at how it was done “back in the day” and an interesting repair, too.
Thermocouples are an old standby for measuring high temperatures. With modern tech, it is pretty simple to compensate them.
While version control used to be reserved for big corporate projects, it is very mainstream these days. You can attribute much of that to Git, the software that has nearly displaced other version control. Git works well, it is versatile, and it scales well. It is easy to use as an individual developer or as part of a worldwide team. But Git is also one of those things that people don’t always study, they just sort of “pick it up” as they go. That motivated [Glasskube] to create “The Guide to Git I Never Had.”
If you are ready to click away because you are not a software person, hang on. Git is actually useful for many different kinds of data, and there are a number of hardware projects that use Git in some form. That’s especially true if the project has some code associated with it, but there are projects that consist of PCBs, reverse engineering documentation, or schematics.
Simplistically, Git tracks a bunch of files and lets you rewind in time to answer the question: what did this look like a month ago? Or a year ago? However, the real power lies in producing and merging branches.
For example, you might be working on a product and decided to add feature “A.” Meanwhile, your partner decides to work on feature “B.” No problem. You can each work in your own separate branch and get everything working. You don’t even have to be connected to a server until the very end.
When either of you are ready, you can merge your branch with the main branch. Often, this can be done automatically, but Git knows when it is in over its head and will ask for help. When you are both done merging, both of your changes are “live.” If you do it right, Git can also help answer the question: why did we make that change two years ago? It is surprising how often that’s important.
When you think of Sony, you probably think of a technology company that’s been around forever. However, as [Asianometry] points out, it really formed in the tough years after World War II. The two people behind the company’s formation were an interesting pair. One of them was a visionary engineer and one was a consummate businessman.
While it is hard to imagine today, securing a license to produce transistors was difficult in the early days. What’s worse is, even with the license, it was not feasible to use the crude devices in a radio.
The devices were poor by today’s standards, and while transistors would work at audio frequencies for hearing aids, getting them to work at AM radio frequencies was a challenge. The Sony founders had to decide whether to use alloy transistors or grown crystal transistors.
Western Electric did not want to share its crystal-growing technology, so in 1954, the team created an alloy transistor. However, it failed to work well at radio frequencies, so they shifted to growing crystals, which seemed more amenable to scaling. One of the team tried using phosphorous and indium doping and created a transistor that could work at higher frequencies. But there was a problem.
Despite the transistor’s superior performance, they couldn’t make another one. Common wisdom at the time was that phosphorus doping was a dead end, but it had worked once. It just took time to find the right way to do it. By 1955, they produced usable transistors, even though the yield was at around 5%.
Texas Instruments beat them to market with a transistor radio, the Regency TR-1, in 1954, but in 1955, they produced the TR-55. Of the five transistors inside, some were alloyed transistors, and some were grown crystals. The factory had to hand-select crystal transistors to make each unit work. The radios were on sale for about 19,000 yen (the TR-1 cost about 50 bucks; recall that in 1954, that was nearly $600 in today’s money). Adjusting for inflation, in today’s money, a Japanese teenager would shell out about $850 for the TR-55.
The TR-55 wasn’t the first Sony radio to have transistors. The TR-52 was a prototype, but it had case problems and never made it into the hands of the public. The radio didn’t make it to the United States until 1957. By then, Texas Instruments, Raytheon, and GE all had radios available, too.
It is a fascinating look into the history of an iconic electronics brand and a window into another world that, honestly, wasn’t that long ago. We couldn’t help but note similarities with Apple, who also had a businessman and engineer combination. Sony would go on to innovate in a number of areas, including optical data storage.
[Peter Demchenko] wanted to use a low power TS555 in an ESR meter design. The problem is, he needed to handle significant current sink requirements for cases where the capacitor under test had a low ESR. The TS555 wasn’t up to the task.
However, [Peter] made an interesting observation. the output pin of the device can sink or source current. However, the discharge pin is exactly the same output but can only sink current.
But what if you tied them together? Using some equalizing resistors, that’s exactly what he did, and this roughly doubles the rated current sink capability. According to [Peter], you do make the circuit more sensitive to power supply variations, but that could be an acceptable trade, depending on your application.
The meter schematic confused us for a moment because the R3 and R4 designations are corrupted. Both the equalizing resistors, it appears, are 110 ohms. The schematic legend should read “R3 110” not “3 110.” The same for R4 which appears as “4 110.”
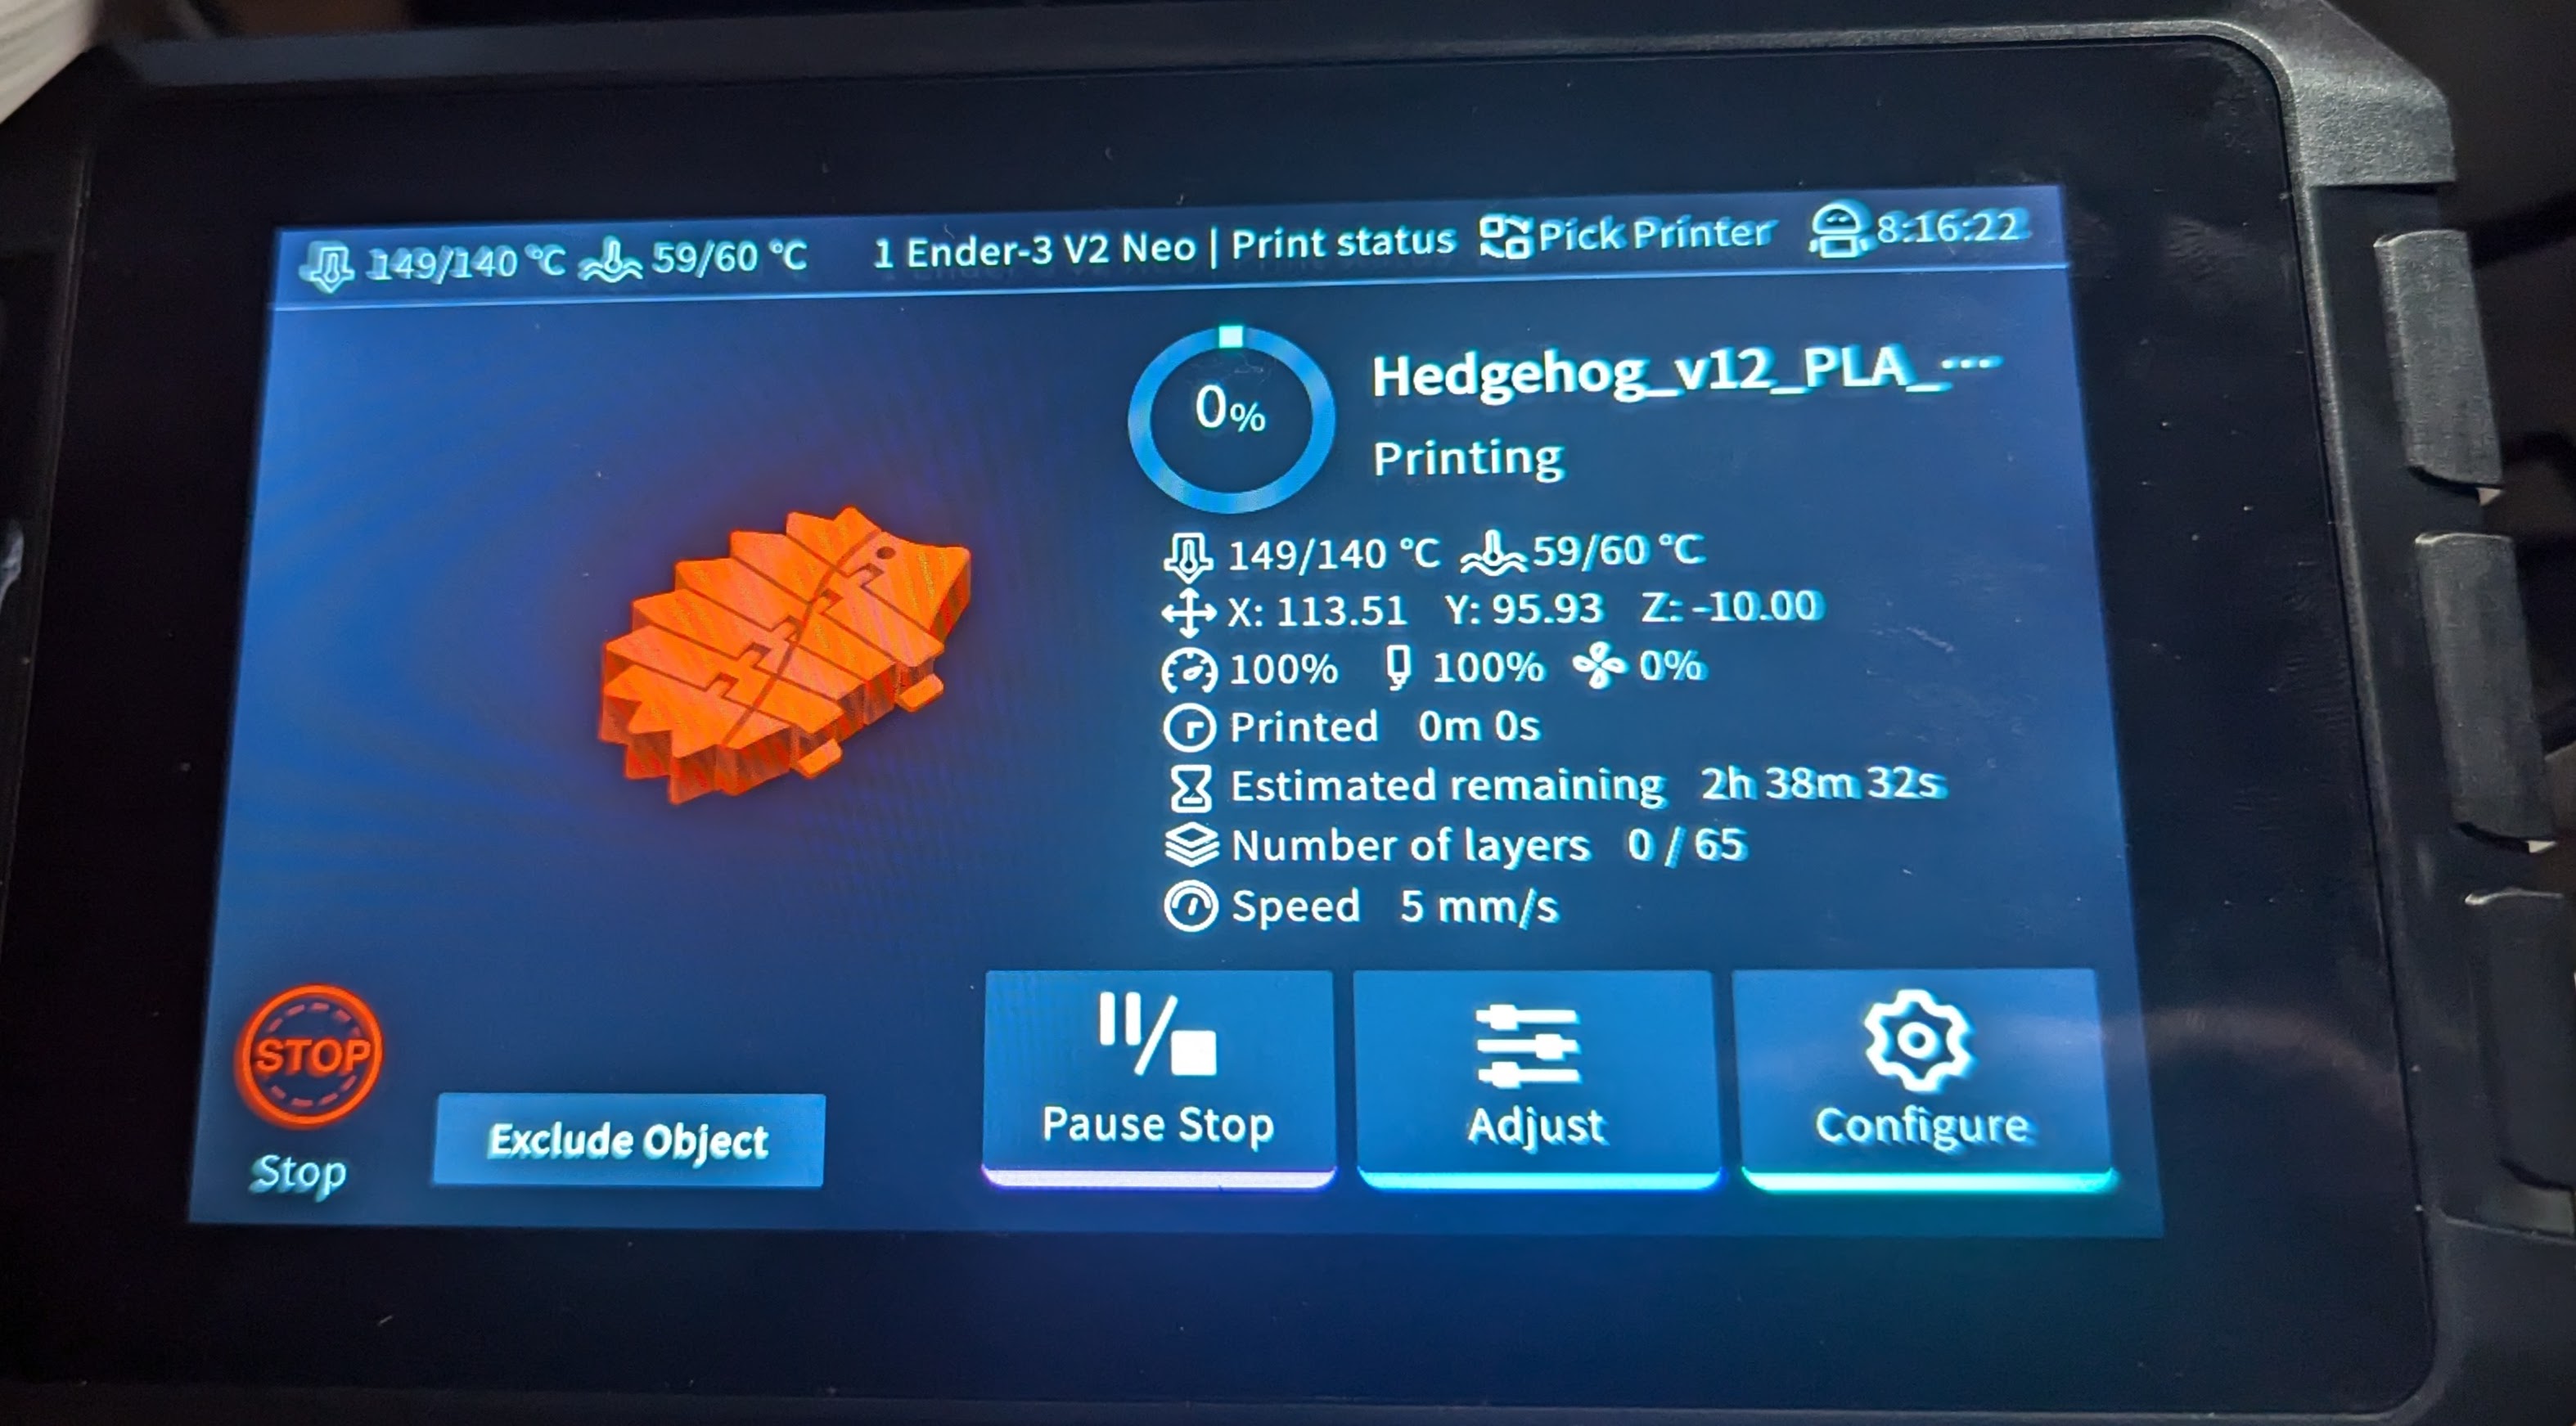
Last time I tried to convince you that, if you haven’t already, you should try running your 3D printer with Klipper. There are several ways to actually make it work.
The first thing you need is something to run the Klipper host. Most people use a Raspberry Pi and if you already have one that runs OctoPrint, for example, you might well use it. Just tuck your SD card away in case you give up and install a fresh Linux system on a new card.
The Creality Sonic Pad has issues, but it does work.
However, a Pi isn’t your only option. You should be able to make it work on nearly anything that runs Linux. We’ve even seen it running on Windows under WSL. If you have an old laptop that can run Linux, that would work, too. We’ve even heard it works on a Chromebook.
The other option is to get a “pad.” Several vendors make touchscreens with some Linux single-board computer bundled together with Klipper preinstalled. For example, there is the Creality Sonic Pad, along with similar devices from other 3D printing companies.
If you decide to go that route, you might want to make sure it is easy to install your own software easily. Some pads, like the Creality unit, are notorious for having so much customization that they don’t lend themselves to upgrades unless they come from the manufacturer. In some cases, you can wipe out the stock firmware and install a normal operating system, but at that point, you could probably just buy a Pi and a touchscreen, right?
Installation
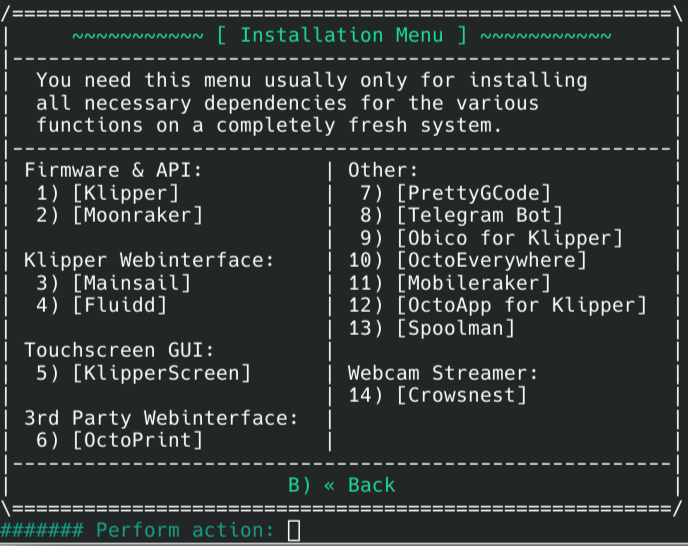
If you use something like a pad, it probably has a menu option to provide prebuilt firmware for your printer. Typically, you let it save the code to an SD card or a USB stick and then you are expected to flash it to your printer which, of course, depends on what kind of printer you have.
If you are rolling your own, you use a menu configuration program something like building a Linux kernel. If you have a pre-built configuration file, it will probably tell you in its comments what things you should pick. You need to know, for example, the type of CPU your board has, the bootloader offset, and if you are connecting via USB or serial. You can find details on the Klipper project pages.
KIAUH makes installing Klipper and supporting programs painless.
Installing the Linux side is easy because there is a nice script called KIHUH. The easiest thing to do is clone the Git repository and run it. From there, you can install Klipper, Moonraker, Fluidd, Mainsail, and some other things, too.
The real trick isn’t installing the software. The challenge is creating a proper configuration file for your printer. If you have a totally stock and popular printer, you’ll probably be in luck. But, how many of us can say that?
Start with the GitHub list to see if your printer or board is there. Even if it isn’t an exact match for your hardware, it will give you a start. For example, my custom printer is a Fysetc Spider, but the canned configuration is for a core XY machine, which means I have to make changes.
Even if you get a pad that claims to be “plug and play,” don’t count on it. For example, a Creality Sonic Pad’s instructions for installing with a Creality Ender 3 first asks you to take the printer apart to determine the type of motherboard you have. That’s not really plug and play! Any deviation from the stock machine is likely to require you to change the default profile.
Ch…Ch…Ch…Changes
In addition to just setting things up to match my exact hardware, I also needed to adjust the extruder step count. That has to be simple, right? Most firmware requires you to plug in the number of steps per millimeter of filament.
Klipper, on the other hand, wants to know how many millimeters extrude from a full rotation of the stepper. If you know how many steps (and microsteps) your printer uses, you can easily calculate either number from the other. For example, if you have 200 steps per rotation and 16 microsteps, that’s 3200 steps total. If your current steps per millimeter is 100, then your Klipper “rotation distance” is 3200/100=32.
Configuration Example
I had another major change to make. My printers have a non-standard filament sensor that detects the filament moving. That way, it can detect not only broken filaments but jammed filaments, too.
To install it, I had to add a few lines to my printer.cfg file and restart Klipper. Since I have more than one printer with the same sensor, I put all the lines in a single file and then included it in each printer. So the printer.cfg change was very simple:
This defines a few macros you can use elsewhere. Like Python, the indentation matters. You can organize your files using [include], and that’s especially useful if you have multiple printers that can share files.
Reference
So, how do you know what’s available? The Klipper reference. It will show you all the configuration sections you can use and what can possibly go in them. Don’t forget that some features — like print status notifications — will be in the Moonraker configuration which is a separate document.
Since the system is in Python, you can hack on it to your heart’s content. Just back up first. For example, you can add some custom Python scripts in the klipper/extras directory, like the one that can run arbitrary system commands from G-code.
Tinkering is what most of us like the best, and there’s plenty of opportunity to tinker with here. Klipper is also a good way to put new life in a very old printer since what runs on the printer is very simple, and all the heavy lifting is done elsewhere.
Klipper can easily do adaptive bed leveling, for example. If you can work in Python, it is also easy to experiment with things like exotic sensors.
While classroom learning isn’t for everyone, one awesome benefit of the Internet is that you have a variety of college classes available to you, even if they aren’t for credit. You can virtually audit classes from institutions around the world on just about any topic you can think of. Of course, the topic we think of is practical electronics and that happens to be the title of a class from [Dr. Bill Newhall] of the University of Colorado. You can watch the first part in the video below. So far, there are two lectures available but more are coming as the class is ongoing right now.
[Dr. Newhall] is one of us. He’s a ham radio operator and a pilot, as well as an electrical engineer. This class is aimed at others who need to understand electronics in another context. It reminded us of the genesis of one of our favorite books — also from a professor — The Art of Electronics.
The course material promises to cover topics ranging from solar and battery power sources, power conversions, IoT and RF communications, sensors, and DC motor control. Of course, there will also be sections on microcontrollers and associated hardware.
Just like a real class, the first lecture has a lot of housekeeping information, but you might want to skim it anyway. But if you want to get to the electronics, the second video won’t disappoint. While it covers a lot of ground that is probably familiar to most Hackaday readers, it is a good review and there’s more coming in the future lectures.
I have several 3D printers, and I’ve always been satisfied with using either Repetier or Marlin on all of them. There are a few other firmware versions that could run on my hardware, but those two have been all I’ve needed. Sure, it was painful for a while having to juggle features to fit the firmware image onto the smaller microcontroller boards. Now that Marlin supports big 32-bit boards however, that hasn’t been a problem. But recently, I’ve been on a program to switch everything to Klipper.
In this post, I’ll tell you why I did it and give you some data about why you might consider it, too.
The Landscape
Marlin is written in C and burned into a 3D printer’s flash memory. It does a lot. It receives G-code commands, interprets them, and translates them to meaningful actions on the hardware. Modern versions handle automatic transformations to account for lumpy beds, input shaping to reduce shaking, and linear advance to produce better prints.
It might seem simple to control a 3D printer, but there are lots of little details to take into account. For example, if you are moving the head between two XY coordinates and you expect a certain flow rate, then you have to figure out how fast to turn the steppers to get the right amount of plastic out over that time. You also may have to retract before you start a move, make sure temperatures are stable, and transform the actual coordinates based on bed leveling data. There’s a lot going on.
Klipper does the exact same job, but it does it differently. On the 3D printer board is a tiny piece of software that does very little. It’s a bit like a device driver for the printer. All by itself, it does nothing. But it can handle very basic commands that describe how to move the machine.
All the rest of the processing you expect to happen now runs on some Linux computer. That is very often a Raspberry Pi, but it could be a spare laptop, your desktop computer, or anything that will run a reasonable Linux install. Several vendors even sell single-board computers with touchscreens made specifically for running this part of Klipper.
However, even though a screen is nice, you don’t really need it. I’ll talk about that more later.
The Problem
Historically, Klipper was a way to break out of the limitations of using tiny 8-bit controller boards with limited memory. These days, you can get plenty of powerful 3D printer controller boards, so that isn’t as much of an issue as it used to be.
Instead, I have another problem. The build. One of my printers is a custom printer that doesn’t really match any other printer in the world. So, I have to build my own version of Marlin. That’s actually not very hard to do. However, there are two things that are very annoying. First, you have to flash the firmware. The printer uses DFU, and I have brought out the “bootload” switch, but it is still a pain, and I possibly will brick the printer if I make a mistake. A recoverable brick, but still.
But the real problem is keeping my version of Marlin up to date with the official version. The version I have running now is old enough to not have some of the cool features, so I would have to merge the mainline in with my fork. Can it be done? Of course. But it’s awkward, and the longer you wait, the worse it gets.
For a recent 3D printing class I sometimes teach, I picked up two cheap printers that had great support for Klipper, so they were my guinea pigs before I attempted to switch over to the custom printer.
I should note that Klipper, I think, appeals to people who like tweaking settings and editing configuration files. Since you’re reading Hackaday, there’s a good chance that describes you. But if you despise opening a Bash shell and entering text, you might think about avoiding Klipper. While the UIs do a good job of protecting you from most of this, there’s going to be times when you’ll need to get your hands dirty.
Is Klipper the Solution?
You do have to flash a small program over to your board to run Klipper, but once you do it, you very likely will never do it again. If you are dissatisfied, you can flash Marlin back and there’s no harm done. Just make sure you can get your hands on a stock firmware image for your printer before you start making any changes. In my case, I do have the ability to go back to Marlin if I ever wanted to. But at this point, the only reason I’d make the switch back was if I planned on selling the machine to a beginner.
After that one flash, all the other setups for anything you want to do are done through Linux, mostly through a simple configuration file. There are also web-based and touchscreen-based GUIs, but everything is really in a file. The code, too, is mostly in Python, so making a change or adding something is relatively simple, especially if you are comfortable with Linux. The hardware stub and a small part of the host is in C, however.
If you aren’t comfortable with Linux, the user interfaces will help. You can even use them to edit your configuration files in your browser, so it is possible to have no idea how to use Linux and still get by.
Klipper Architecture
I was going to draw a diagram of the Klipper architecture, but [Sineos] beat me to it, so I borrowed this one from the Klipper discourse group’s documentation.
[Sineos] created this diagram for the Klipper knowledge baseAt the top right is the Klipper firmware — that’s the stub that executes basic commands on the hardware. The box on the bottom right indicates that you can even treat the computer Klipper is running on as a hardware host, and — what isn’t shown — is that Klipper can manage multiple controller boards (more on that later).
The final red block is the host, and that’s where all the real processing occurs. It reads G-code and worries about bed level, temperature, and so on. One of the key features is that you control it with macros, which could look like G-code or something else.
Custom G-Code
For example, suppose you want to create a new G-code, say G12345. As far as I know, that’s not a legal G-code. But you can define a macro named G12345 and make it do whatever you want. You can also define macros for real G-codes if you want. So, defining G28 would allow you to take over how the printer homes itself.
You can also have a macro named HACKADAY_LOGO or FILAMENT_CHANGE and stick those in your G code to make Klipper do anything you want. You can even do programming language constructions like for loops and if/then/else in your macros.
Klipper is almost completely concerned with reading input codes and spitting out basic movements. A lot of system management falls to Moonraker, which talks to Klipper for you and communicates with the Web, MQTT, Home Automation, and more. A configuration file is also used to set up Moonraker. So for example, if you want a text message when your print is complete, Moonraker can do that. It also can keep your system up to date.
User Interfaces
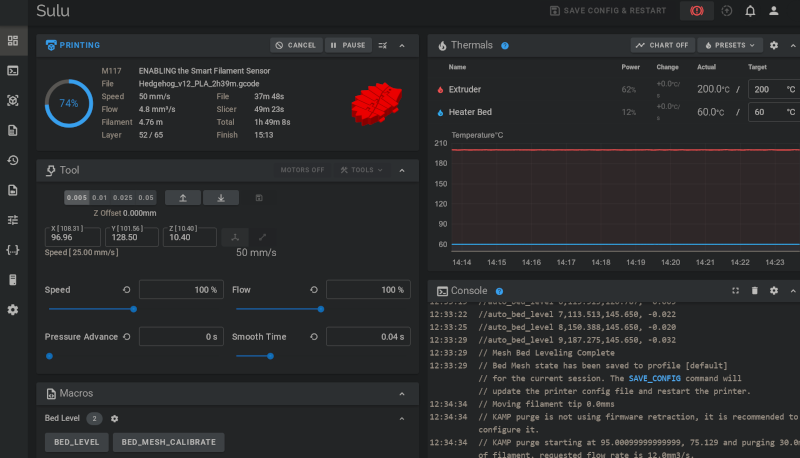
It also communicates with user interfaces. For example, if you have a touch screen, it also talks to the system via Moonraker. However, the user interface is usually a web browser viewing pages provided by Fluidd or Mainsail. In fact, you can run both on different ports and use either one you like at any time. The browser doesn’t have to be on the machine you have Klipper on, by the way. In that way, it is like OctoPrint, which you can also use if you like.
OctoPrint has many features but can be heavy to run. For whatever reason, most people seem to run Fluidd or Mainsail, even though it is possible to use OctoPrint and benefit from its many plugins and features. Moonraker can even be made to mimic OctoPrint — so slicers that know how to send jobs to Octoprint can also send jobs to Klipper.
Here’s a look at part of Fluidd’s main page (you can, of course, configure and theme it):
Part of the Fluidd main page during a print.
The Next Trick… Juggling!
I mentioned earlier that Klipper can control multiple boards. Some new bed sensors, for example, are their own computers, and Klipper can talk to them directly.
For another example. Suppose you have a board with lots of stepper drivers, and you decide to build a printer with four extruders. Later, you decide you want filament run-out sensors for each one, but your board doesn’t have enough input ports. No problem! Just get a second cheap board, flash it with the stub firmware, and tell Klipper about it. There’s no reason those sensors have to be on the same board as the other electronics. If you are running on a Raspberry Pi, there may be times when you want the Pi to not only run the main Klipper code but also host I/O devices, and that’s the function of that bottom block.
Next Steps
In the next installment, I’ll tell you more about how you can get started and a few things to look out for. If you already use Klipper, let us know your favorite tricks in the comments.
We covered Klipper way back in 2017, and it has come a long way since then. Of course, there are other ways to speed up your 3D prints.
Using a disk drive today is trivial. But back “in the day,” it was fairly complex both because the drives were simple and the CPUs were not powerful by today’s standards. [Thomas] has been working on a 68000 Mac emulator and found that low-level floppy information was scattered in different places. So he’s gathered it all for us in one place.
Low-level disk access has a lot of subtle details. For example, the Mac calibrates its speed control on boot. If your emulated drive just sets the correct speed and doesn’t respond to changes during calibration, the system will detect that as an error. Other details about spinning disks include the fact that inner tracks are shorter than outer track and may require denser recordings. Laying out sectors can also be tricky since you will lose performance if you, for example, read sector one and then miss sector two and have to wait for it to come back around. Disk sectors are often staggered for this reason.
Adding to the complexity is the controller — the IWM or Integrated Woz Machine — which has an odd scheme for memory mapping I/O. You should only access the odd bytes of the memory-mapped I/O. The details are all in the post.
In a way, we don’t miss these days, but in other ways, we do. It wasn’t that long ago that floppies were king. Now it is a race to preserve the data on them while you still can.
In the early days of 3D printers, most builds used smooth rods and bearings that rode on them. But these days, printers are shipping with either V-slot extrusions with Delrin wheels or linear rails. Which is best? Everyone seems to have an opinion, but [Spencer] decided to compare them using some well-defined experiments, and he shares his results in the video below.
Common wisdom is that linear rails create a better print quality, but [Spencer] didn’t really find that much difference. He does admit, however, that he isn’t an expert on setting up linear rails, so perhaps there’s something he could have done better. He did note that the rails were quieter but that, for both cases, the noise generated by the moving rails was only a small fraction of the total noise generated by the printer. The rails were also more stable in terms of resonance. Input shaping can help overcome that, though, so it probably isn’t that important in a modern printer.
What do you think? Are linear rail upgrades worth it? Let us know in the comments. We’ve been 3D printing long enough that we are hard-pressed to complain much about any of the prints we produce today on printers that cost a fraction of what we spent on our first ones.
Of course, you could go with string. Putting rails together with or without slots is its own art form.
You’ve probably heard that a 3D printer is capable of producing its own replacement parts. Sometimes, that even includes upgraded or improved versions of the parts it was originally built with. But sometimes, it’s hard to figure out what improved really means. Think about air ducts that cool the part after printing. In theory, it should be easy to design a new duct. But how does it perform? Empirical testing can be difficult, but [Mike] shows how you can simulate the airflow so you can test design changes and validate assumptions before you print the actual part.
Of course, this wouldn’t only apply to printer ducts. You might also get some tips if you want to model airflow for PC cooling, hot air soldering, or other air-related projects. The free version of the software has some limitations, but it was surprisingly capable.
We also enjoyed how [Mike] used fluid to visualize the actual patterns and compared it to the simulation. The trick is using a compound from a kid’s science project kit, and it seems to work very well. Of course, you could just grab your smartphone. This might be worth thinking about if you are building a laser cutter air assist, too.
In a modern car, your speedometer might look analog, but it is almost certainly digital and driven by the computer that has to monitor all sorts of things anyway. But how did they work before your car was a rolling computer complex? The electronic speedometer has been around for well over a century and, when you think about it, qualifies as a technlogical marvel.
If you already know how they work, this isn’t a fair question. But if you don’t, think about this. Your dashboard has a cable running into it. The inner part of the cable spins at some rate, which is related to either the car’s transmission or a wheel sensor. How do you make a needle deflect based on the speed?
Mechanical Solutions
Early versions of the speedometer used a governor pulling against a spring. The faster it rotates, the more the two weights of the governor pull out against the spring, and the needle moves with the weights.
As an aside, this sort of centrifugal governor is also known as a fly-ball governor, and similar devices were commonly used to regulate the maximum throttle on steam engines. The arms of the governor would be fully extended once the engine reached its top speed, which lead to the term “balls-out” becoming used to describe a machine operating at its upper limits.
Another type of mechanical speedometer had an escapement like a watch. The time mechanism would move the needle back, and the rotation of the wheels would move it forward. The net result was a needle position that would increase with speed.
The Magnetic Approach
However, most cars use a magnetic type speedometer — although it doesn’t work in the way you might imagine. There’s no reed relay or Hall effect sensing the magnetic field. Instead, there is an aluminum cup attached to the speedometer needle and, nearby, a magnet that spins on a shaft moving at some ratio of the car’s speed. There’s no direct connection between the two.
Being a non-ferrous metal, aluminum is not generally something we think of being affected by magnets. Under normal circumstances that might be true, but a moving magnetic field will induce eddy currents in aluminum. This forms a field in the aluminum, too, and the spinning magnet tends to drag the cup, thereby deflecting the pointer.
A spring similar to one you might find in a mechanical clock or watch pulls back the pointer so the needle hovers at the point where the force of the magnet pulls against the spring. The pull on the spring has to account for the gear ratios and the size of the tires to accurately reflect the vehicle’s speed.
If you want to see an entertaining teardown of an old speedometer, [Tubalcain/Mr Pete] has you covered in the video below. He also shows how the odometer part worked, too.
Modern Times
Of course, these days you are more likely to pick up a pulse using a Hall effect or some other part of the vehicle and just count the pulses in the car’s computer. In fact, the pulses might be encoded at the source and travel over something like a CAN bus to get to the computer.
It is also possible to pick up speed from other tracking information like GPS, although that might not be as accurate. But if you have, for example, a mobile phone app that shows your speed, that’s probably what it is doing. The obvious way to do that is to take position measurements periodically and then do the math. However, more sophisticated systems can actually measure Doppler shift to get a more accurate reading.
We see a lot of bicycle speedometers for some reason. Eddy currents make induction cooktops work, too. Even tiny ones.
For decades, the magnetic stripe has been ubiquitous on everything from credit cards to tickets to ID badges. But the BBC reports — unsurprisingly — that the mag stripe’s days are numbered. Between smartphones, QR codes, and RFID, there’s just less demand for the venerable technology.
IBM invented the stripe back in the early 1960s. The engineer responsible, [Forrest Parry], was also involved in developing the UPC code. While working on a secure ID for the CIA, his wife suggested using an iron to melt a strip of magnetic tape onto the card. The rest is history.
The new technology rapidly took over, and by 1969, in the United States, there was a standard that has remained largely unchanged. The BBC post notes that a card reader in 1970 could read a credit card out of your pocket today if it still had a magnetic stripe. Infamously, IBM’s CEO at the time was not a fan, reportedly because “Mom doesn’t like credit cards.”
So, while you’ll still find mag stripes on a few cards here and there, in a few years, they’ll probably vanish completely. Don’t worry! You can still make your own. Don’t have a reader? Grab a flatbed scanner.
If you’re like us, you’ve studied the mathematician [Euler], but all you really remember is that you pronounce his name like “oiler” and not much else. [Welch Labs], on the other hand, not only remembers what he learned about logarithms and imaginary numbers but also has a beautiful video with helpful 3D graphics to explain the concepts.
This post, however, isn’t about that video. If you are interested in math, definitely watch it. It’s great. But it also got us thinking. What would it be like to be a high school math student today? In our day, we were lucky to have some simple 2D graph to explain concepts. Then it hit us: it probably is exactly the same.
Changing the Subject
Well, maybe not exactly, but the problem is, we are guessing that your math teacher — no offense to him or her — wasn’t the same kind of person [Welch Labs] is. To be fair, we couldn’t have produced that video either. So, the way we see it, you have a few choices.
First, maybe you get lucky and you happen to get a teacher (about math or any other subject) who is just awesome. We are lucky enough to know a few of these people, but you have to admit world-class teachers are rare, and even rarer outside of colleges and universities.
Second, maybe you have a teacher who is greatly engaged and goes out and finds material like this to share. We suspect that goes on a lot, but maybe not as much as it could. There is a whole industry, too, set up to provide teachers with materials for profit, but it often isn’t at the same quality level as something like this. That’s unsurprising. If you are a movie studio, not every movie wins the Oscar.
Third, if a student is motivated, you have an extraordinary research library at your fingertips. Individuals create amazing articles, videos, and even courses. Major universities have their course material online for anyone to use, in many cases. You just have to find it.
A Mixed Bag
This, too, is a mixed bag. While you have access to more information, you have to critically evaluate if it is correct or not. You could presume anything you found in a traditional library was probably not patently false. Not that everything in a library is true, but, statistically, the way books used to be produced and library collections created, it was far less likely than finding false information on the Internet. On the other hand, how motivated were you as a kid to do things like that? Well, being a Hackaday reader, you probably were. Maybe a better question is how many of your classmates were in the library while you were reading about computers?
In a way, it is like tech support. Sure, AI might not be the best of all possible tech support. But it might be better than what you probably will get. Realistically, every teacher can’t be the greatest, and even if they were, they probably don’t have the time to produce huge amounts of high-quality material for their classes.
The Answer? (Or, at Least, the Question)
So what’s the answer? That’s where you come in. How could we make sure that all students get access to high quality resources from everywhere? I frequently hear of kids using Khan Academy, for example, to explain things they aren’t getting from their teachers. But that’s just one resource. Are there curated lists of resources for each subject out there somewhere? If not, why not? What other ways could we get the serious educational material produced on the Web every day into the classroom? I’m sure there are lists, but we’re thinking about something with the go-to recognition of, say Wikipedia. Not just a random blog posting. Let us know what you think and what’s already out there.
Over at EDN, [Brian Dipert] has been tearing down web cameras. A few months ago, he broke into a bargain basement camera. This time, he’s looking into a premium unit. Although we have to admit from some of what he reports, we are a little surprised at some of the corners cut. For example, it’s a 4K camera that doesn’t quite provide a 4K image. Despite a Sony CMOS sensor, [Brian] found the low-light performance to be poor. However, it does carry a much larger price tag than the previous camera examined.
The interesting part is about half way down the page when he tries to open the unit up. It seems like it is getting harder and harder to get into things and this camera was no exception. The device finally gives up. Inside is a relatively unremarkable board with a host of unknown ICs. One interesting item is a gyro chip that determines if the camera is upside down.
[Brian] managed to get the camera back together with no harm. It is interesting to compare it to the $15 camera he took apart earlier.
Here’s a hypothetical situation. You decide to build your own steam generator plant and connect it to the electric grid. No matter where you live, you’d probably have to meet a ton of requirements from whoever controls your electric power, almost surely backed by your government. Yet, according to a recent post by [Bert], a version of this is going on in Europe and, probably, in many more places: unregulated solar power inverters driving the grid.
If you have just a few solar panels hanging around, that probably isn’t a problem. But there are a sizeable number of panels feeding power — and that number seems to grow daily — having control of the inverters could potentially allow you to limit the grid’s capacity or — if the inverters allowed it — possibly take the grid down by feeding power incorrectly back into the grid.
According to [Burt], a small number of companies control most of the inverters in his country — the Netherlands — and there is virtually no regulation about how they operate. While we don’t think he’s suggesting they would act maliciously, you don’t have to search the news very much to find cases where companies have been hacked or made a mistake that caused major impacts to important systems.
Apparently, inverters in the Netherlands do have to meet certain technical standards, but the post since that’s widely unenforced. But the real point is that the companies managing the switches are not regulated or managed. [Burt] thinks that EU-wide legislation is needed to forestall some future disaster.
You might think this isn’t a realistic scenario, but you just have to think about Crowdstrike to realize it could happen. Or other major network outages. We aren’t usually fans of more regulation, but [Burt] makes some interesting points. What do you think?